The easiest way to create an AR (Augmented Reality) sticker

Reading Time: 4 minutes

I have summarised two methods of drawing or creating a pattern
Method 1: Browse your photo albums for suitable patterns.
1. If you select Near face, the sticker will hover and move with you while you are moving.
2. Click the brush in the upper right corner of the pattern to edit the pattern, you can mirror, duplicate, delete.
Click the camera icon on the right side to test it,
Click Save to publish, give your AR sticker a name,
Finally, click Post to confirm the publication,
Introduction
AR stickers (Augmented Reality Stickers) are an interactive experience that superimposes a virtual image or animation onto a real environment, and are very popular among young users and social platforms.
How can we involve people with no knowledge in AR creation?
The creation process only uses your smartphone or iPad, so let’s get started!
Step1: Download B612 from the Appstore using your mobile phone or iPad. (Less than one minute)
Screenshot from the Google Play Store
Step2: Choose a way to log in and enter the creation. (1 minute)
Screenshot from the B612
I’ll demonstrate below
Step3: Draw or create the pattern you want (10 minutes)
I have summarised two methods of drawing or creating a pattern
Choose your favourite way!
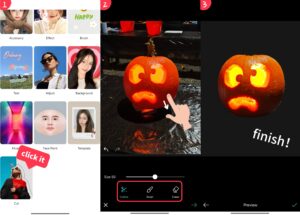
Method 1: Browse your photo albums for suitable patterns.
Choose cut → select photos → to cut
Draw an outline on the pattern you want to snap off can be recognised automatically,
for better results you can use brush and eraser to trim the edges of the pattern.
Screenshot from the B612
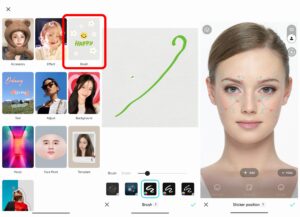
Method 2: Click Brush and draw the pattern.
Screenshot from the B612
Step4: Edit your pattern, add motion (5 minutes)
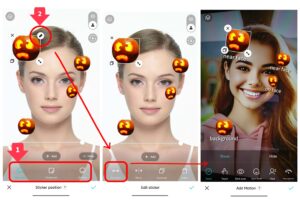
Now you can further create your AR stickers.
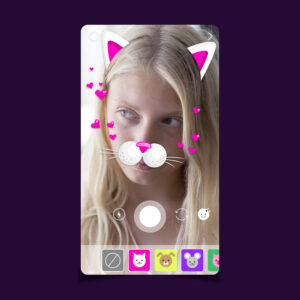
1. If you select Near face, the sticker will hover and move with you while you are moving.
If you select Background (actually “Foreground”), the sticker will be fixed in the position you place it and will not move with you.
If you select On face, the sticker will show the effect of sticking on your face.
2. Click the brush in the upper right corner of the pattern to edit the pattern, you can mirror, duplicate, delete.
One of the most interesting function is Add Motion, click Add Motion, you can add interaction to the pattern, click the screen pattern appears or hide and other interactive ways, waiting for you to try!
Screenshot from the B612
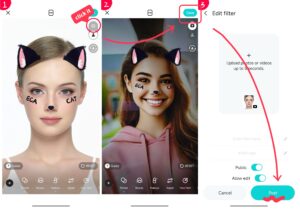
Step5: Test your AR sticker and publish it (3 minute)
Click the camera icon on the right side to test it,
if you need to adjust it,
you need to click the human icon under the camera icon
to go back to the editing page.
Click Save to publish, give your AR sticker a name,
add tags to make it easier for people to find you (if you publish it publicly),
you can choose to make it public and share it with your friends,
or just use it for yourself.
Screenshot from the B612
Finally, click Post to confirm the publication,
so you have finished making your own AR stickers,
hope this experience can bring you fun,
share it with your friends and use it!
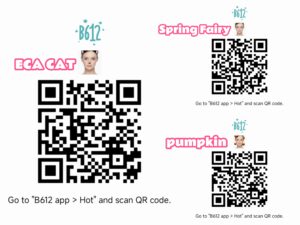
Here are the 3 AR stickers I demonstrated creating, you are welcome to use them with the B612 scanner!
Create your own AR stickers © 2024 by Mengmeng Hu is licensed under CC BY-SA 4.0 ![]()
![]()
![]()