
Recap
This is a follow on from my previous post, ‘Using Microsoft Flow to update a Teams group with SharePoint activity‘. Flow is also known as Power Automate, and it is a Microsoft method for connecting apps so that outputs from one app can become inputs to another app, and events that happen in one app can trigger procedures in another app.
In my previous post, I added Flow to a Microsoft Teams group, and set up conditional testing to post a message in one of two Teams channels, depending on the value chosen in a metadata column when a file was uploaded to a SharePoint library belonging to the Team.
The Plan
The next steps to improve on this Flow will be:
- Changing the SharePoint column name to ‘Relevance’ and the option labels, Teams channel names and Flow conditions to say ‘Urgent’ and ‘FYI’ rather than ‘Yesterday’ and ‘Never’. This morphed into the far more complicated problem of waiting for the SharePoint column value to change before continuing the Flow.
Jump to this section. - In the message that’s posted to Teams, change the text displaying the uploaded file’s URL to a working link to the file.
Jump to this section. - Post the message in Teams using the name of the person who uploaded the file to SharePoint.
Jump to this section. - Another thing I would like to do is to add the updates as cards in ‘To Do’ columns in the Teams group Trello board.
Jump to this section. - Summary: Bringing the last few things together. Jump to summary section
- Jump to links
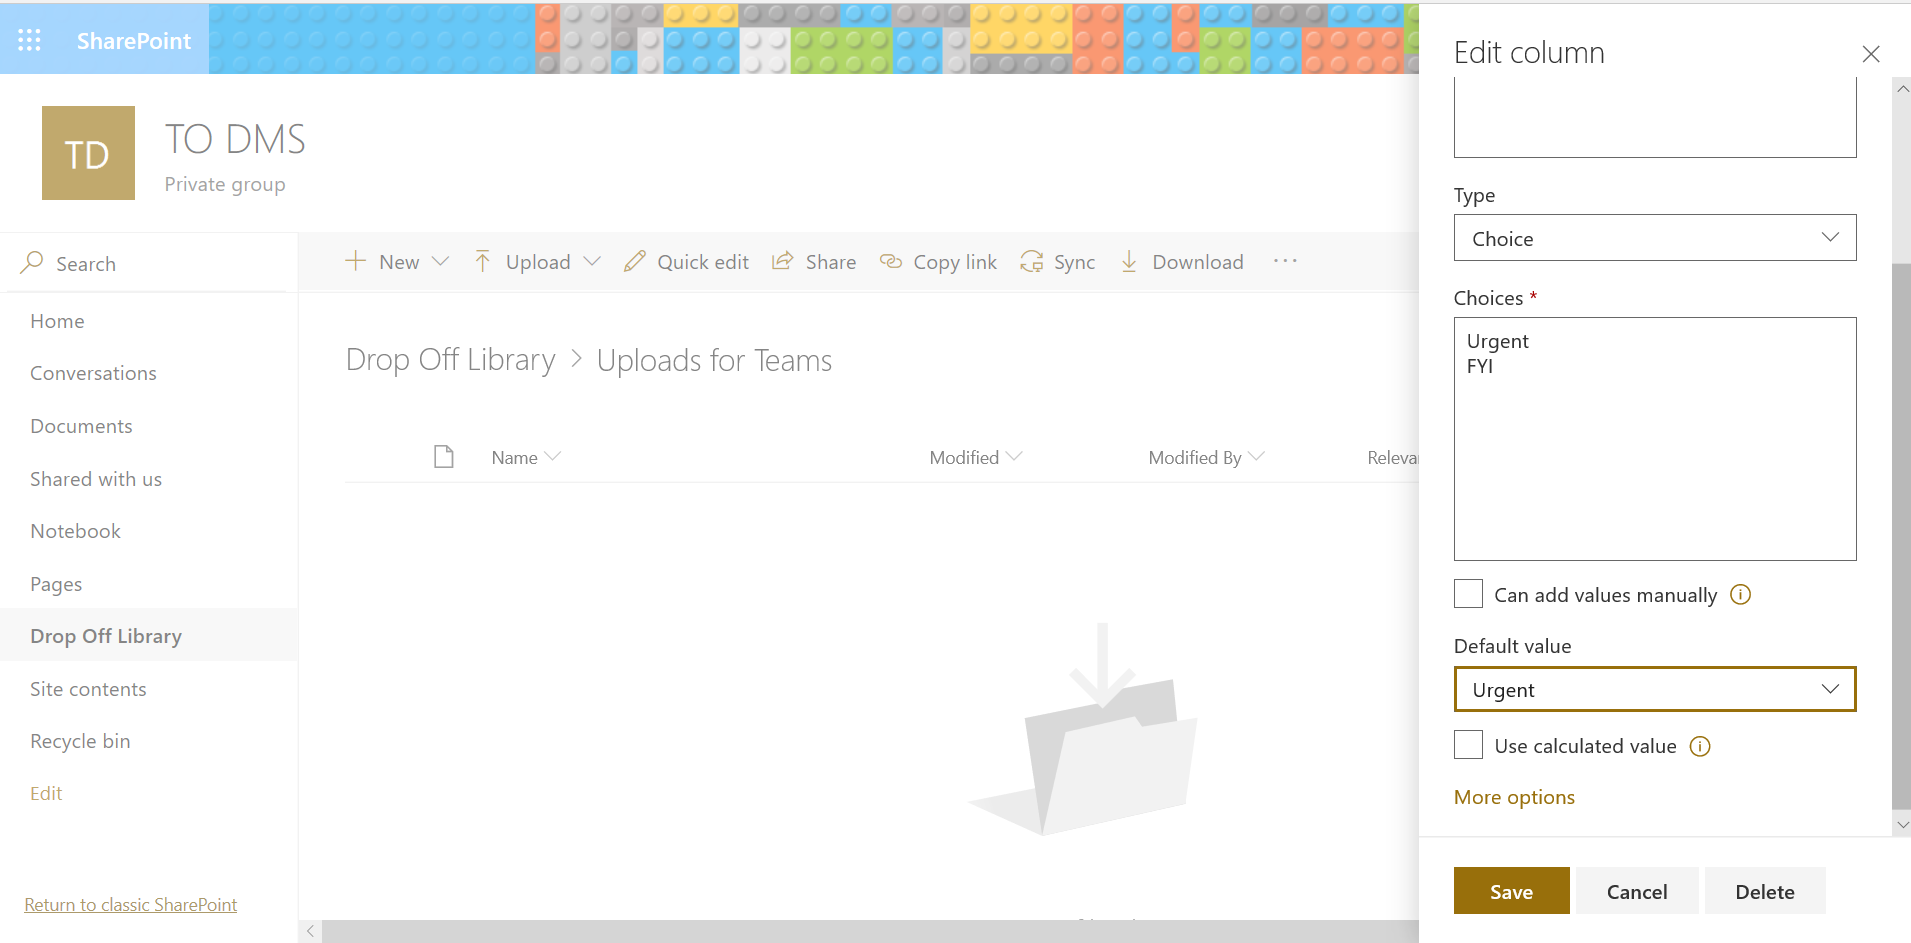
1: Renaming the labels
I renamed the SharePoint column ‘Relevance’, and then renamed the Teams channels and SharePoint option choices ‘FYI’ and ‘Urgent’. Checking the Flow, it has updated the column and channel names but not the value to be tested:
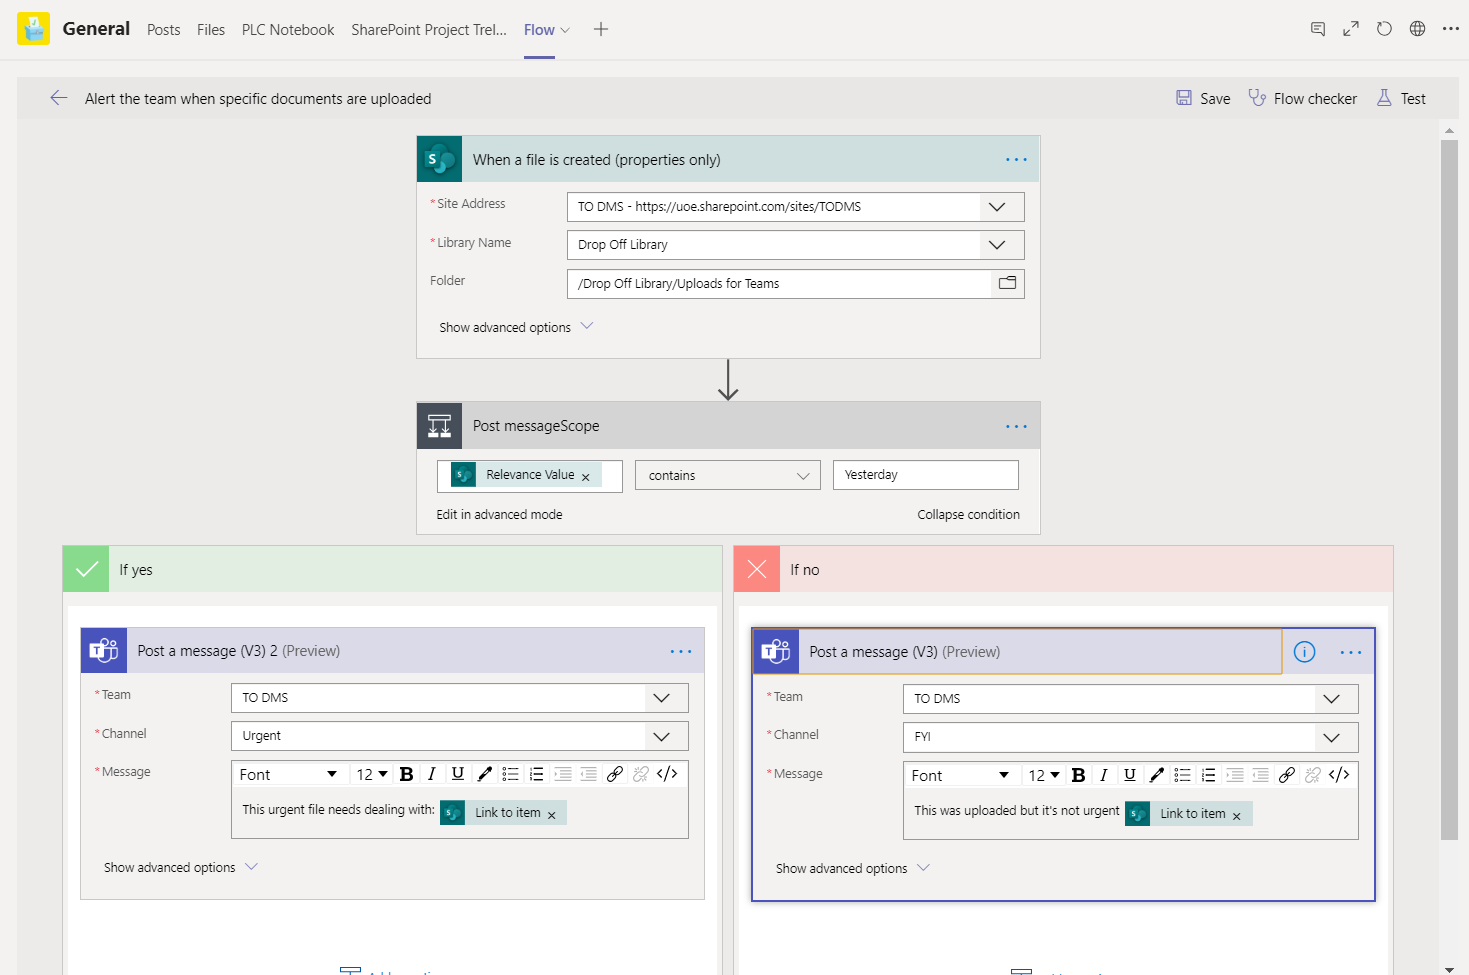
The names have changed but Yesterday stayed the same
I updated ‘Yesterday’ to ‘Urgent’ and ran the test Flow. I thought it would have worked, but it routed everything as if it was non-urgent.
I tried changing the condition test from ‘is equal to’ to ‘contains’, and then the test failed:
Failed! But why??
It even emailed me in Outlook to tell me so:

I feel judged
Looking at the error messages in the Test run, I think for some reason my Flow has stopped waiting for the required metadata to be added. Instead, it is running the conditional test on the field while it’s empty:

“The template language function ‘contains’ expects its first argument ‘collection’ to be a dictionary (object), an array or a string. The provided value is of type ‘Null’.
What kind of loser provides a value of type ‘Null'”.
Uploading a file without entering the required data confirmed that this was the case. But why did the Flow stop waiting?
Above all, why did it work before and then stop when I changed the column and value names and labels?
I tried deleting and replacing all the field names and values, in case there was some kind of data error I couldn’t see, but that didn’t fix it.
Next, I tried deleting and replacing the SharePoint column.
It was SharePoint that said it, not me
I even removed and rebuilt the condition in the Flow, but ended up with the same error.
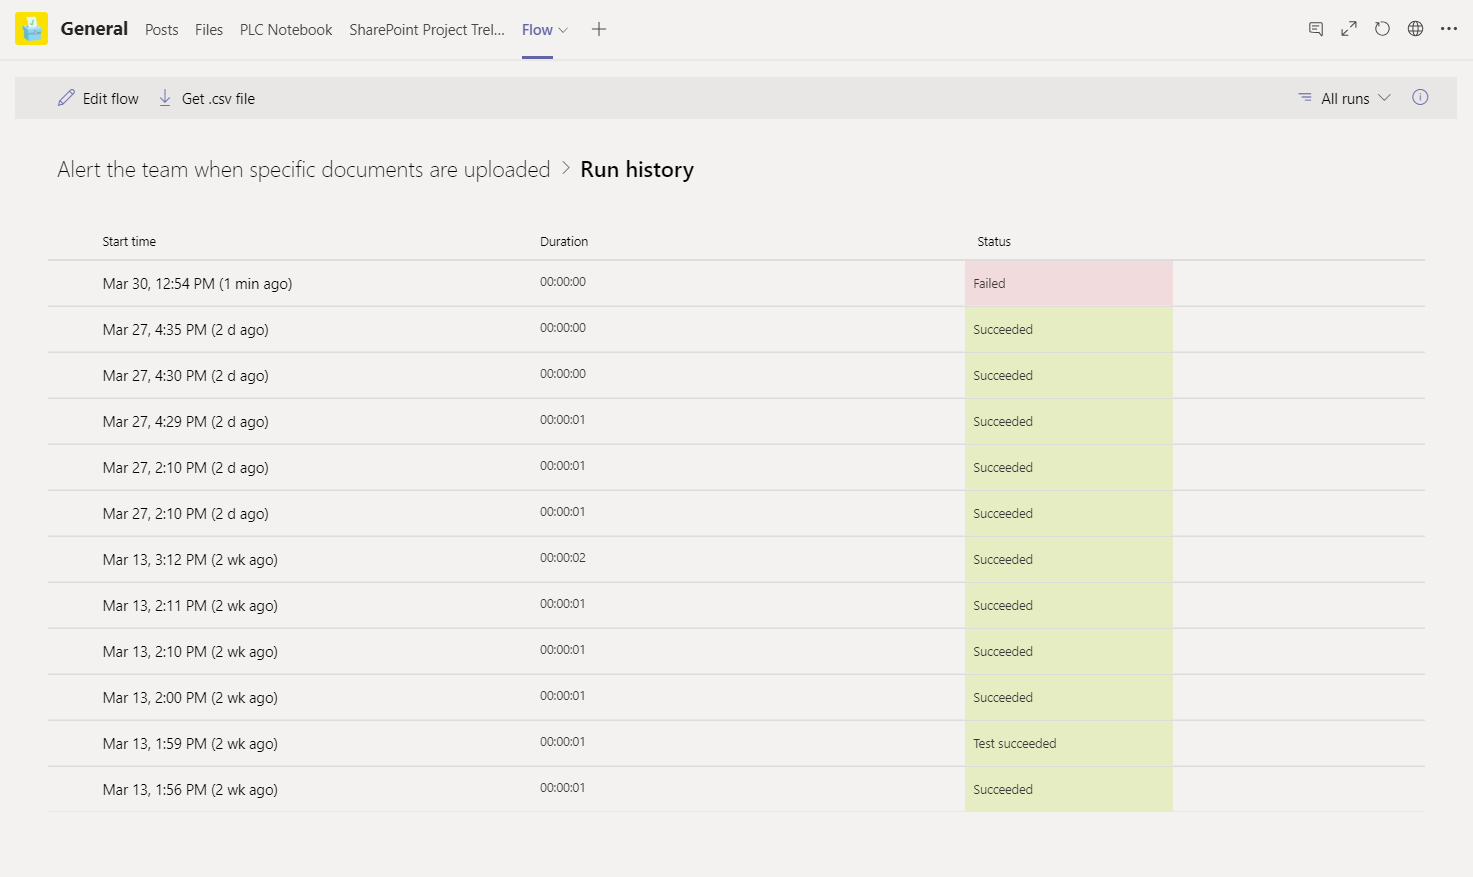
As a last ditch attempt, I uploaded a file without Test mode, and for some reason it worked again. I think it’s probably to do with the timing of when the Flow tests the condition of the metadata from SharePoint. So it mostly works for now, but the process is obviously unreliable and needs improving on.
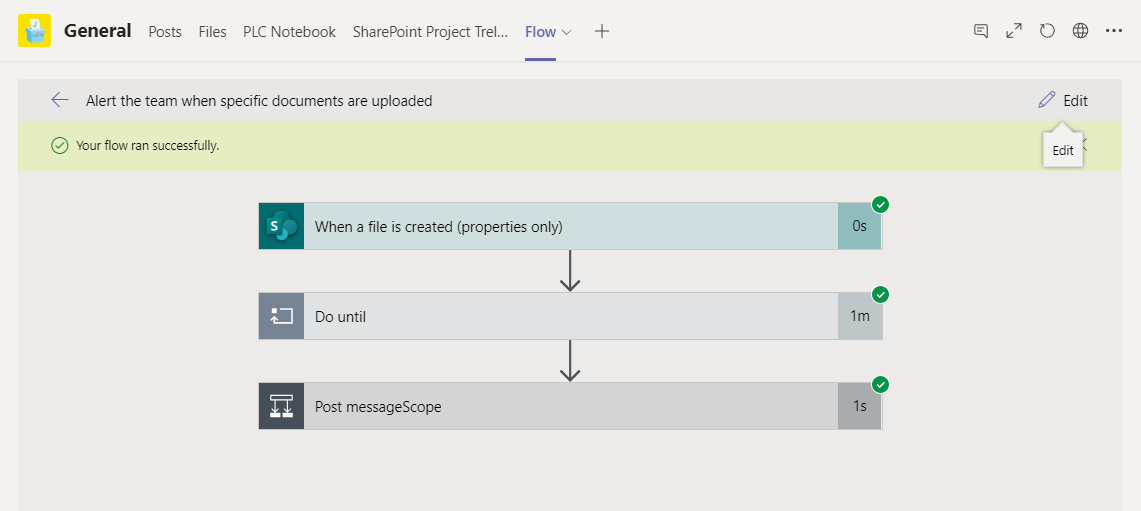
Loops
I needed some way to make sure the Flow waits for the test value to be entered before checking the condition.
The first solution I found was a do-until loop:
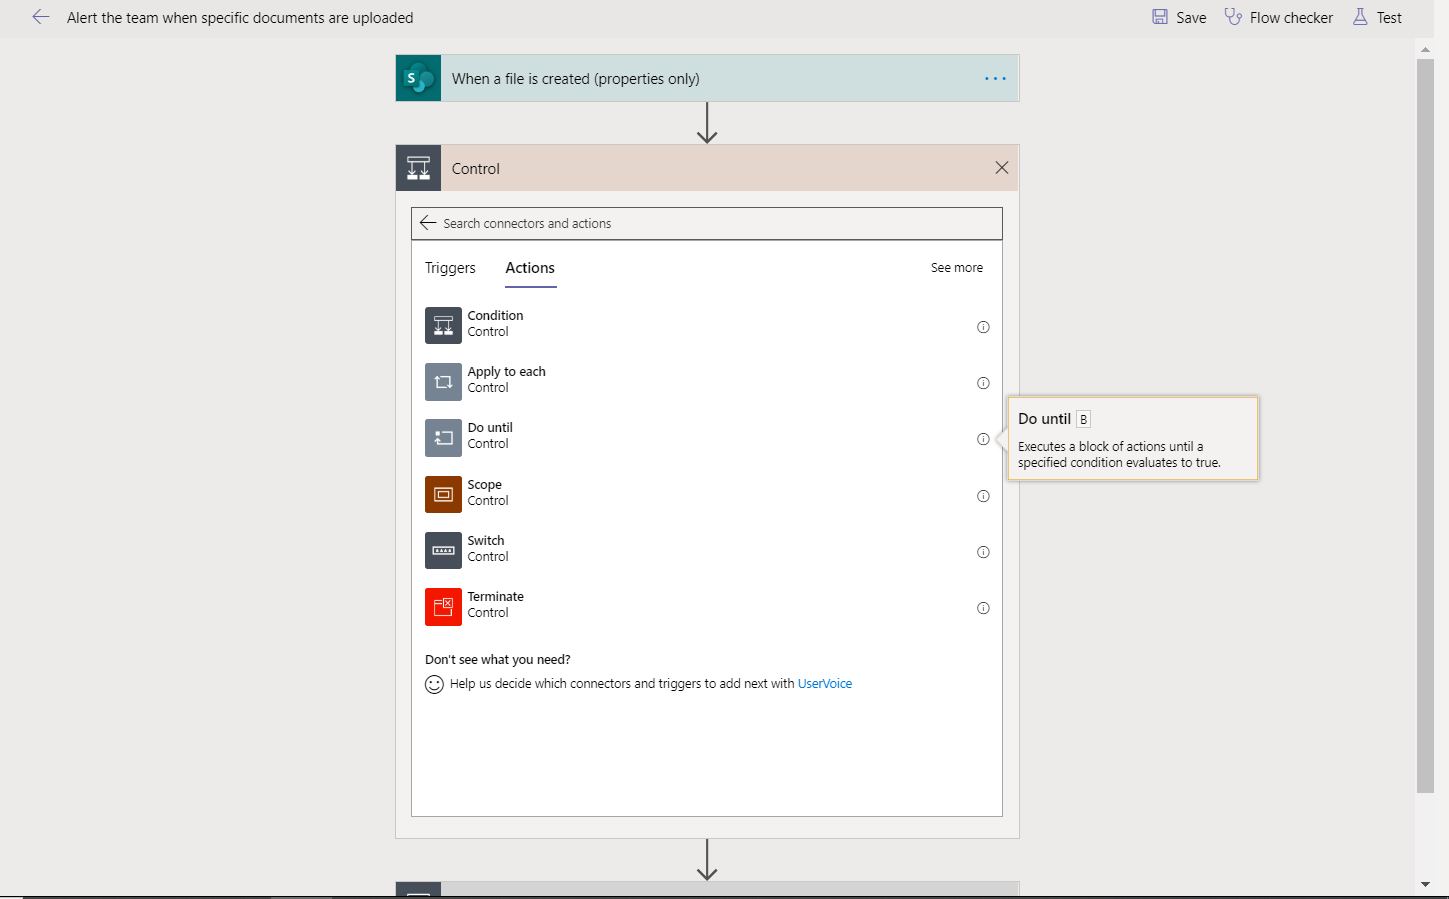
Adding a Do-Until loop. They call it a Control, but it isn’t working out that way for me.
I thought the main feature of a do-until loop should be the until condition. I tried testing for None and Null, neither of which worked after the first try, so I added a new choice of ‘Select’ to the SharePoint column as the default value, and tested for a change from that:
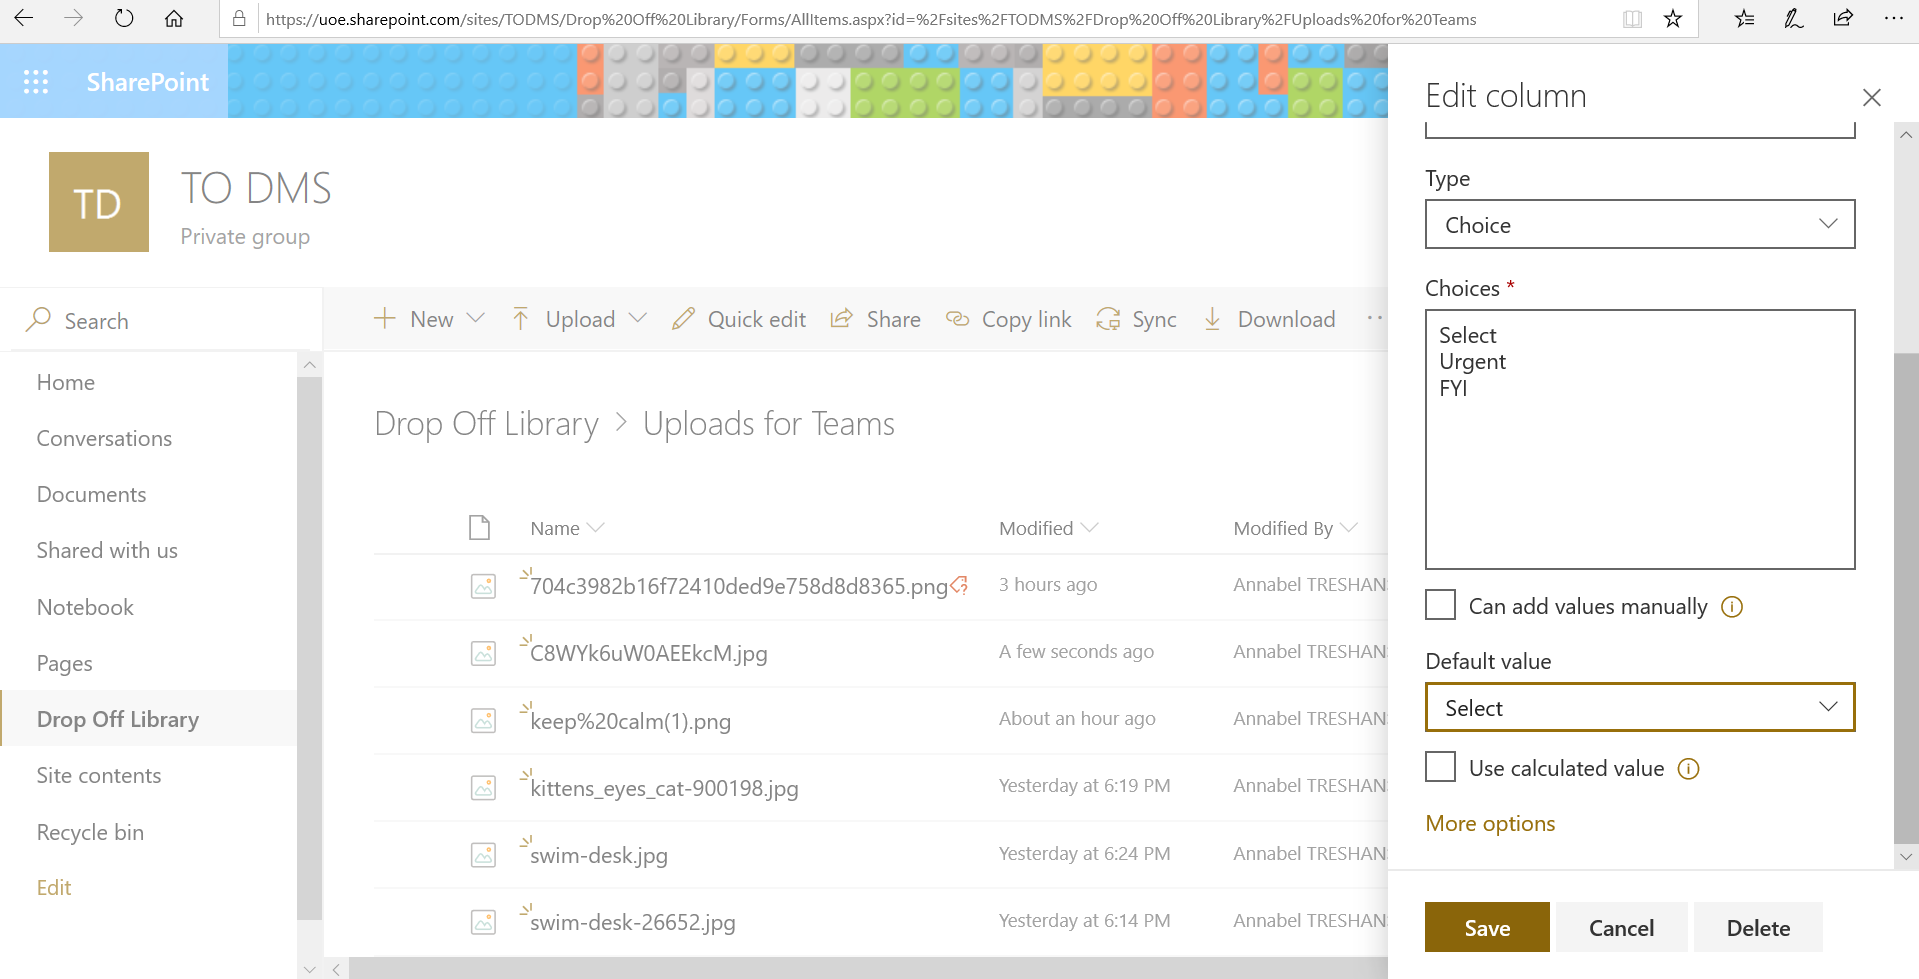
Adding the default choice of not having made a choice yet
This loop should in theory repeat until the value chosen for the uploaded file changes from ‘Select’
Unfortunately there were two major problems with this do-until loop:
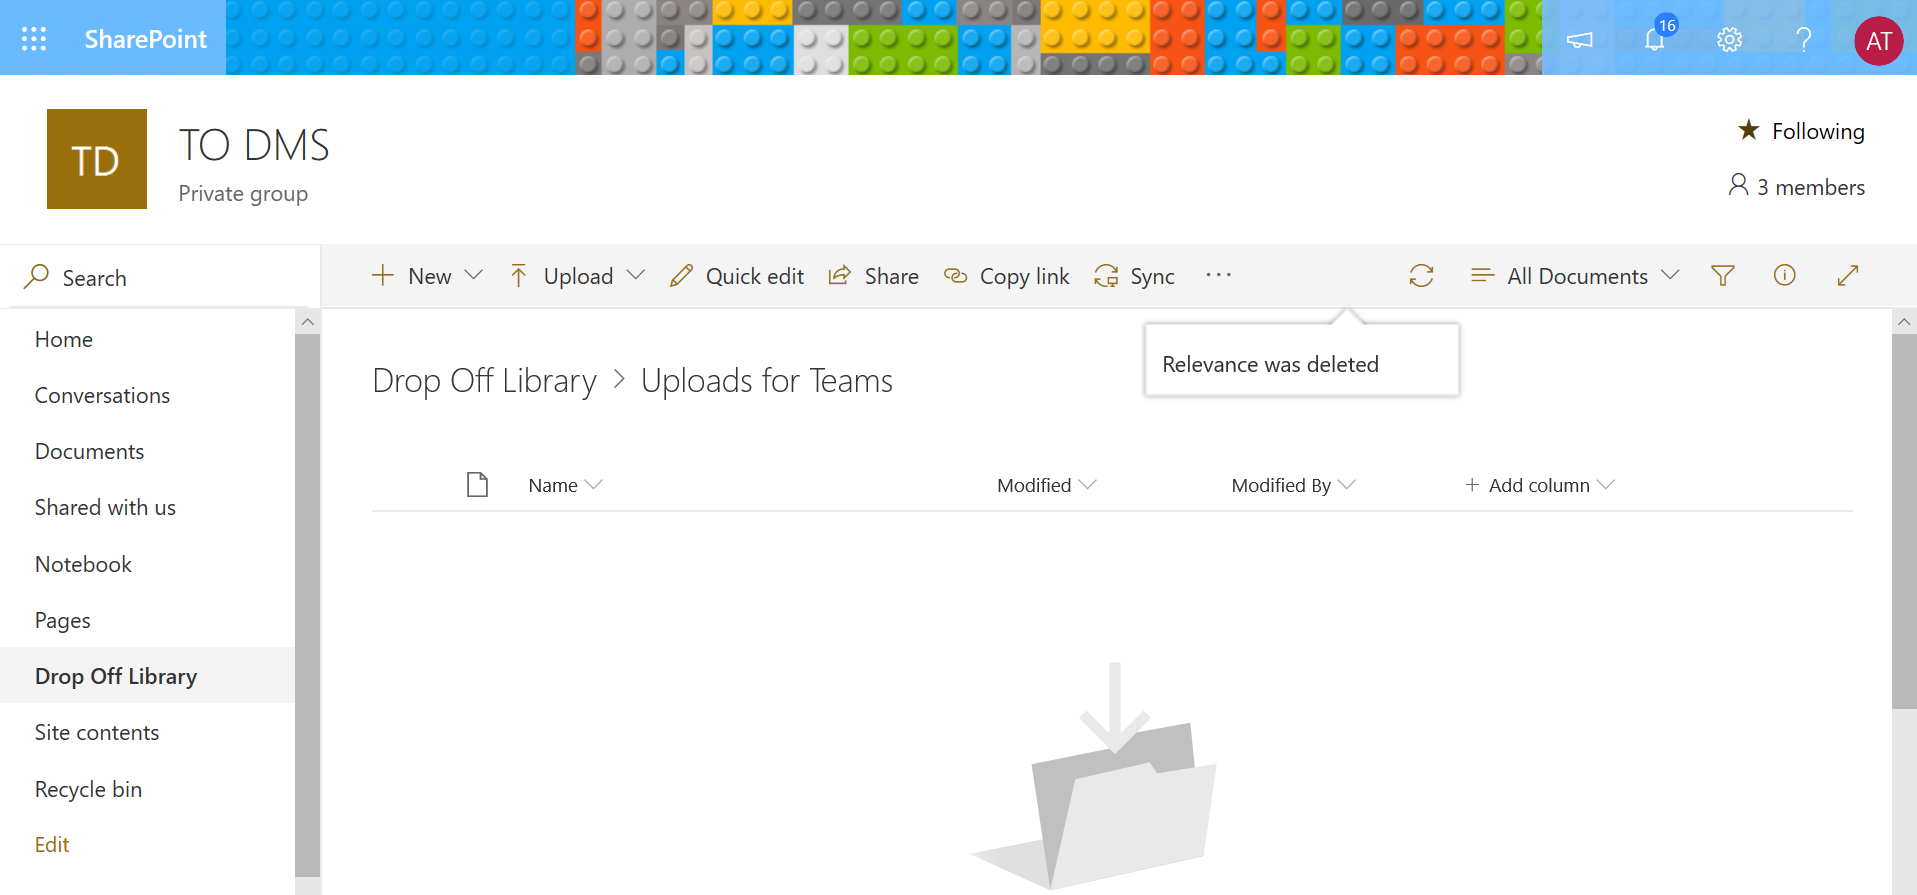
- It was horribly, unreasonably difficult to edit the value of the file’s SharePoint column after uploading:
Ugh, SharePoint.
- It didn’t work anyway
Again, files were being routed as non-urgent, and I noticed an extra set of conditions that were breaking my loop:
Sneaky sneaky timeouts
I tried setting them to really high values, but it still didn’t make any difference.
Next, I tried adding a Run-After condition to the next action, so that it would only run on successful completion of the do-until loop:
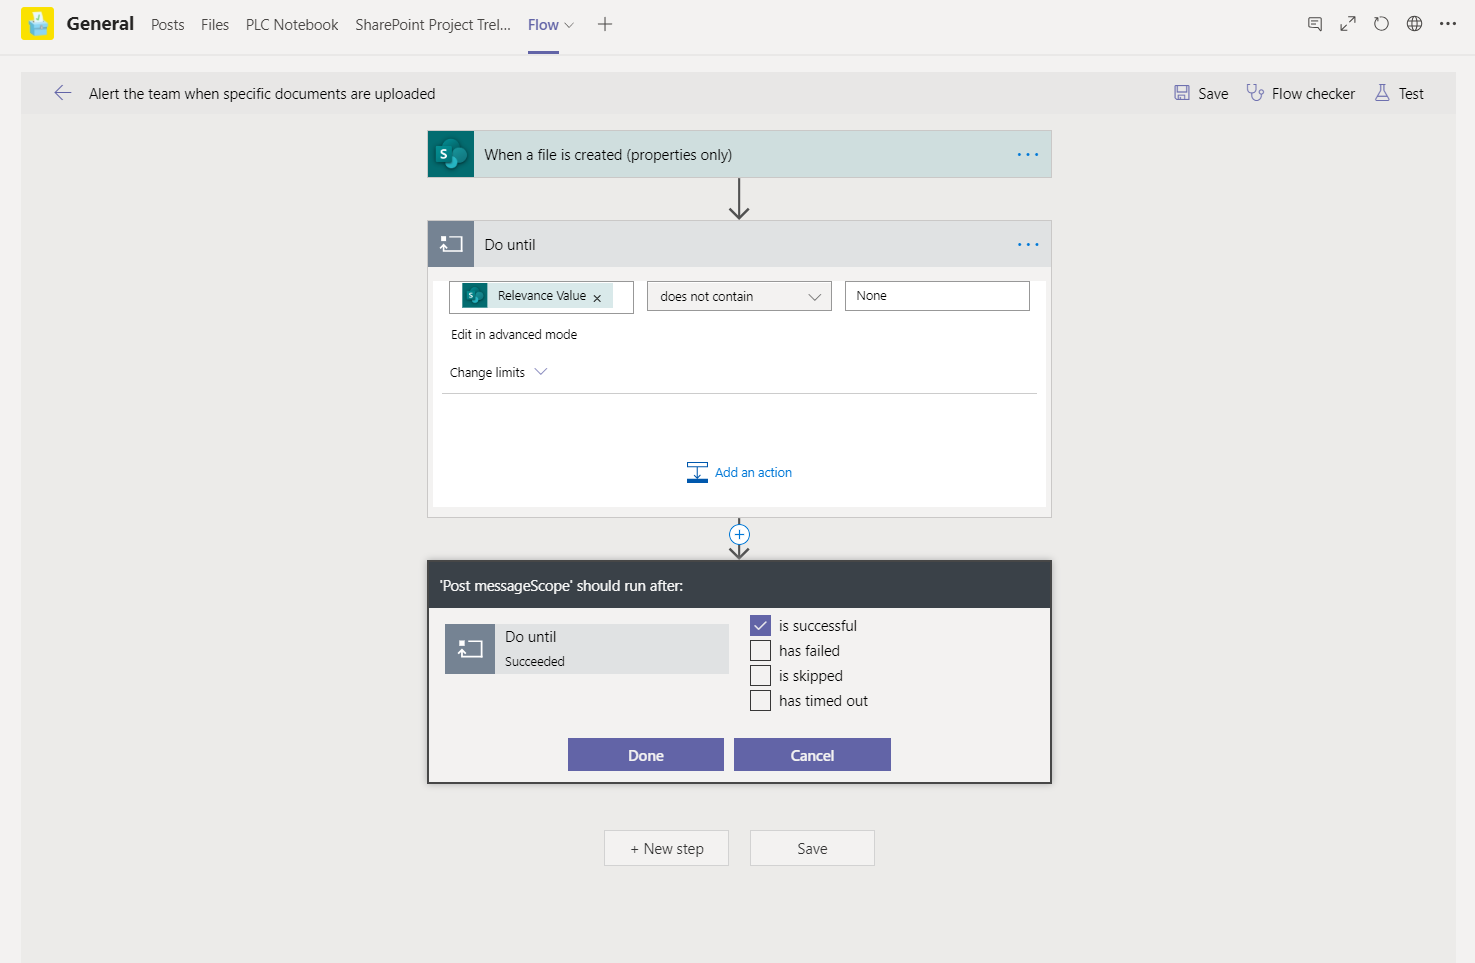
Adding a Run-After condition
Frustratingly, several of these attempts seemed to work the first time I tried them, but as soon as I tried uploading a second file, it went straight to ‘FYI’.
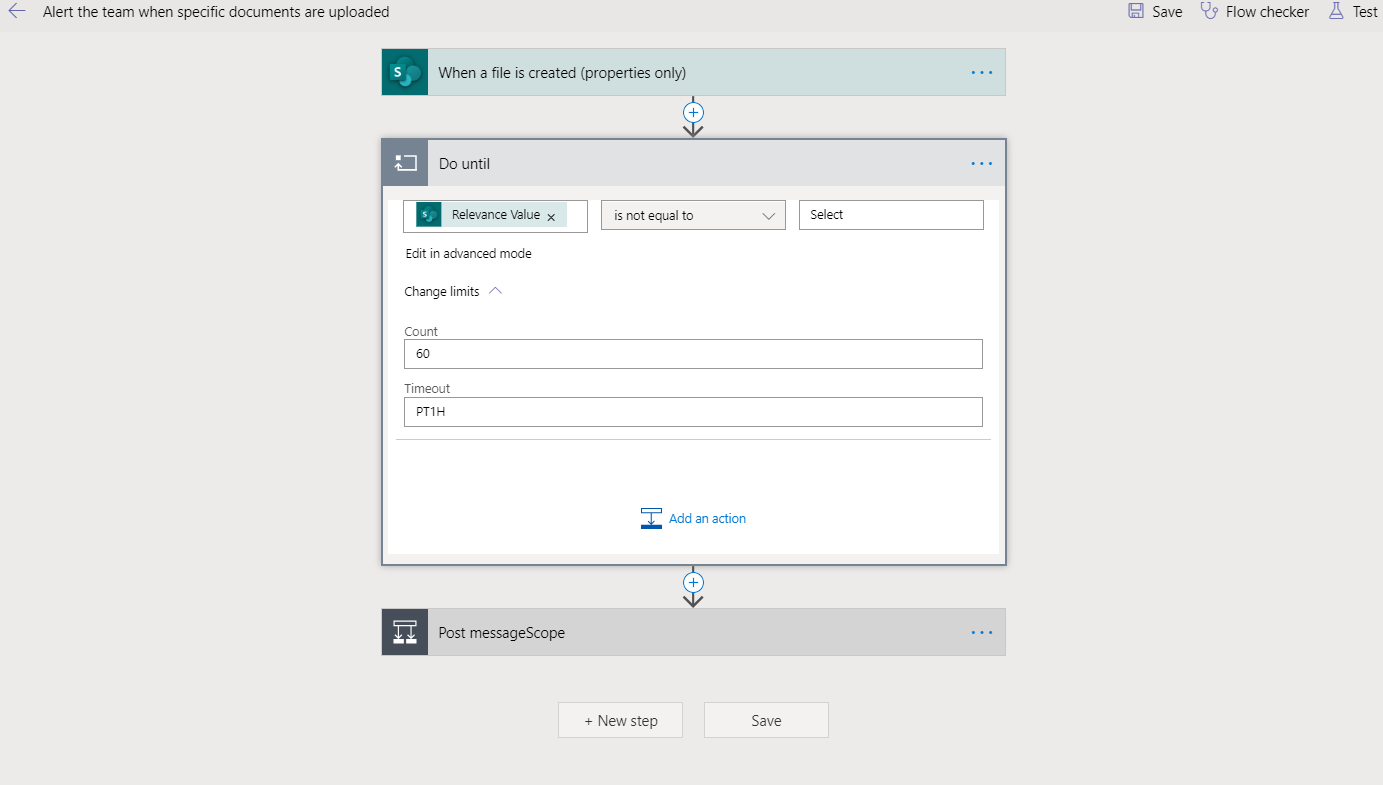
Next, I tried adding a 5 minute delay to the Do-until block of the Flow. My hope was that this delay would happen inside the loop, so that it wouldn’t increment the counter too fast and then exit.

The Delay block is in the built-in functions list
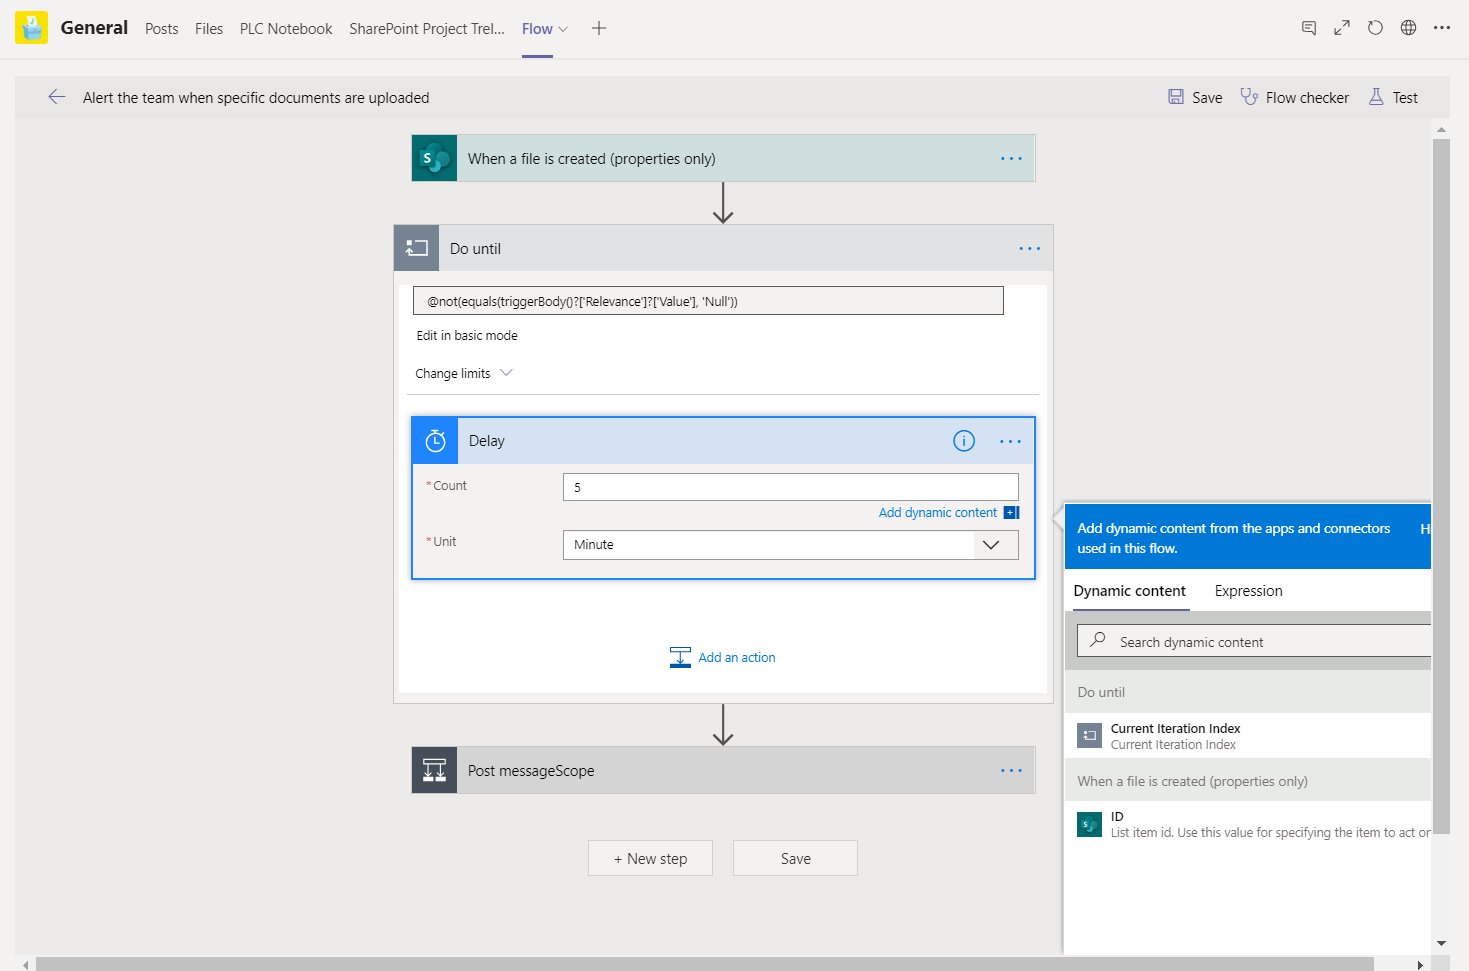
Setting the delay timer looks very straightforward. It’s when it’s going to happen that’s the tricky part.
I didn’t really think through that every time I tested this Flow it was going to take 5 minutes now…
Probably 1 minute would have done it. I mean, it’s got to be counting through that loop in milliseconds, if that’s what was happening.
It failed on the first test anyway:
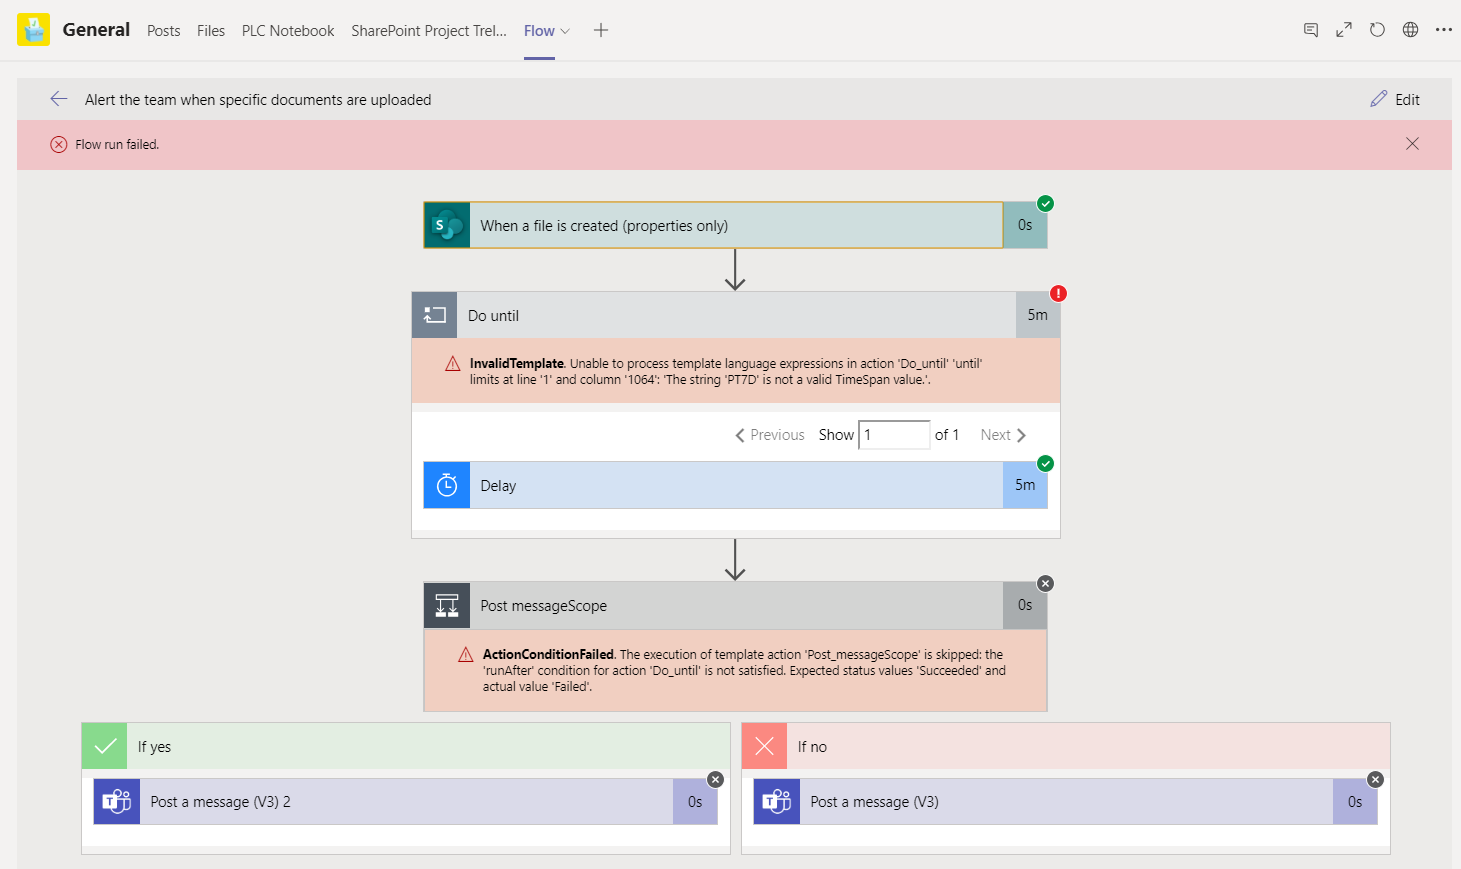
Fail. Just so wrong.
Sitting and waiting 5 minutes for Flow did get me thinking that I should prepare a set of test cases for this. So that’s what I did next.
Test cases
I picked a set file for each one of these, so I could more easily check where they were going.
Then I could mix them up and retest during regression testing.
|
Expected to pass if the Flow is at least valid: Upload a file and label it FYI |
|
Expected to pass if routing is working: Upload a file and label it Urgent |
|
Expected to pass if delays and routing are working: Upload a file, wait a time that’s significant but less than the delay added to the loop, and then label it Urgent |
|
Expected to time out and fail: Upload a file, wait longer than the delay added to the loop, then label it Urgent (after I get this part of the flow working I will need to add something to catch that error) |
|
+ some small scale regression testing: Upload 3 files, label one Urgent, one FYI, and leave the other one to time out |
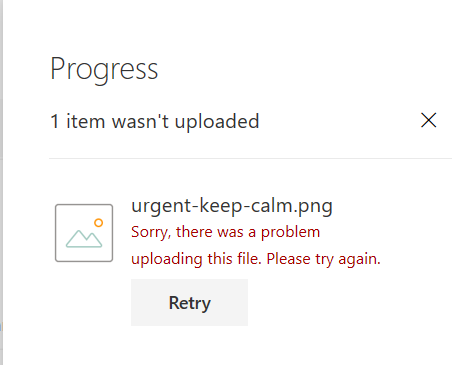
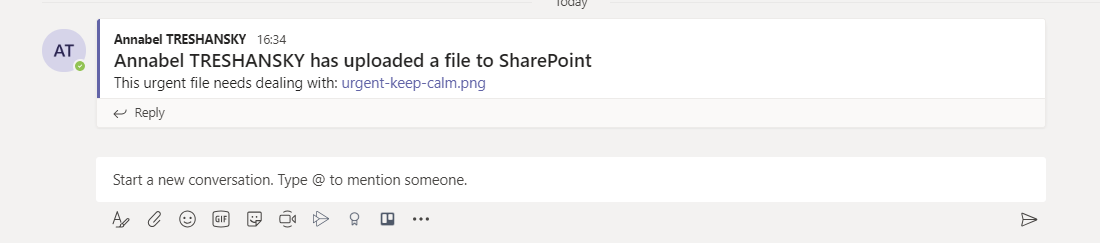
And here they are:
 Not urgent: Squirrel |
 Urgent: Keep Calm |
 Urgent but late: Think Geek’s swim desk |
 Timeout: Kittens |
Checking my error message, I discovered that ‘PT7D’ was not a valid TimeSpan value, so I changed it back to ‘PT1H’, reduced the delay time to 1 minute, and re-ran my test with a squirrel:
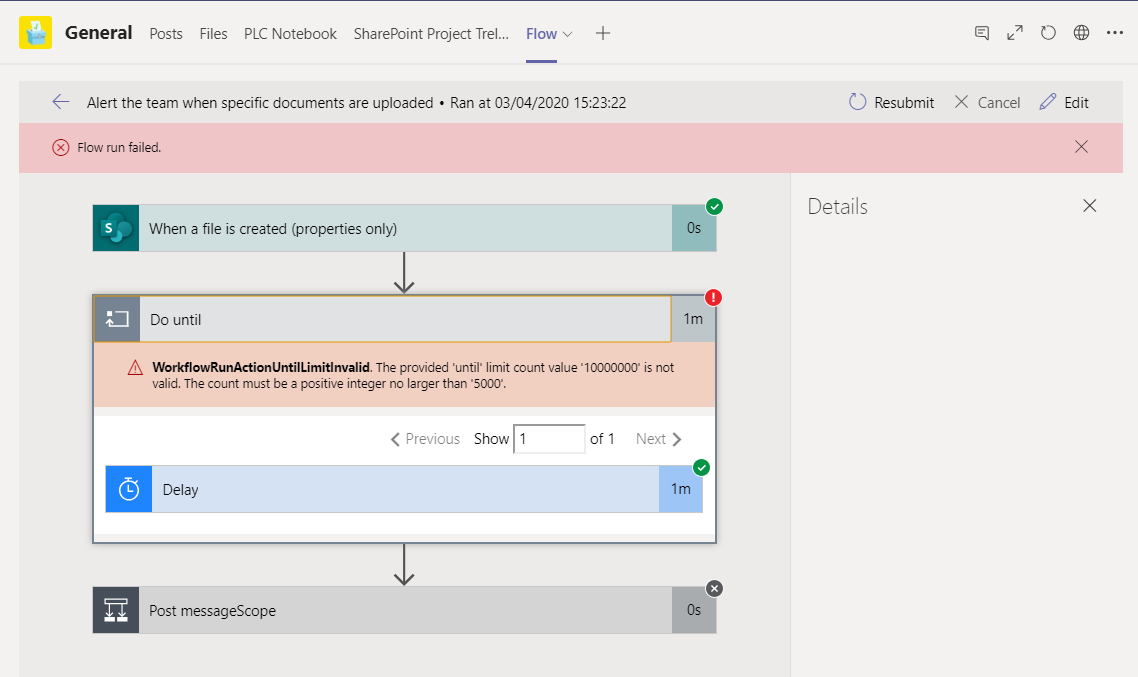
I’ll be changing that to 5000 then
This error message was so specific and informative it was actually quite helpful. I changed the count value to 5000, and ran the test again:
What??
Time to run it with the test data…
The results? EVERYTHING was routed to ‘FYI’😖
Time to RTFM some more, I thought. Unfortunately, all the Microsoft documentation says about the Do-until loops in Flow is this:
A do-until loop allows you to repeat a step until a certain condition is met. The most common reason to use this is in approval scenarios. For example, you can create a new record in a database, wait until a certain field in that record is “Approved”, and then continue the flow.
This is almost exactly what I want it to do, except it doesn’t work, and there’s nothing there to show why, or how to make it work.
According to Softlanding, a review of the Microsoft Logic Apps documentation tells us,
the Flow stops if at least one of three conditions are met – on completion, after running several iterations, or after some time. Since Timeout uses ISO 8601 notation, we can change the timeout to P1DT1M, so that the action doesn’t time out due to inactivity from the Delay action.
Thanks to this, I’ve changed my timeout to P1DT1M, but that still hasn’t fixed the problem.
Next, I tried adding an action to the Do-until loop, to re-check the relevance value of the item in SharePoint, in case it wasn’t already checking:
It’s hard to tell what is or isn’t happening already, when you can’t see the code under the hood…
Adding this action caused the loop to become infinite, and I don’t know why. But another look at this action did offer me the chance to look at ‘Code View’, which popped up a small window with some JSON in it:
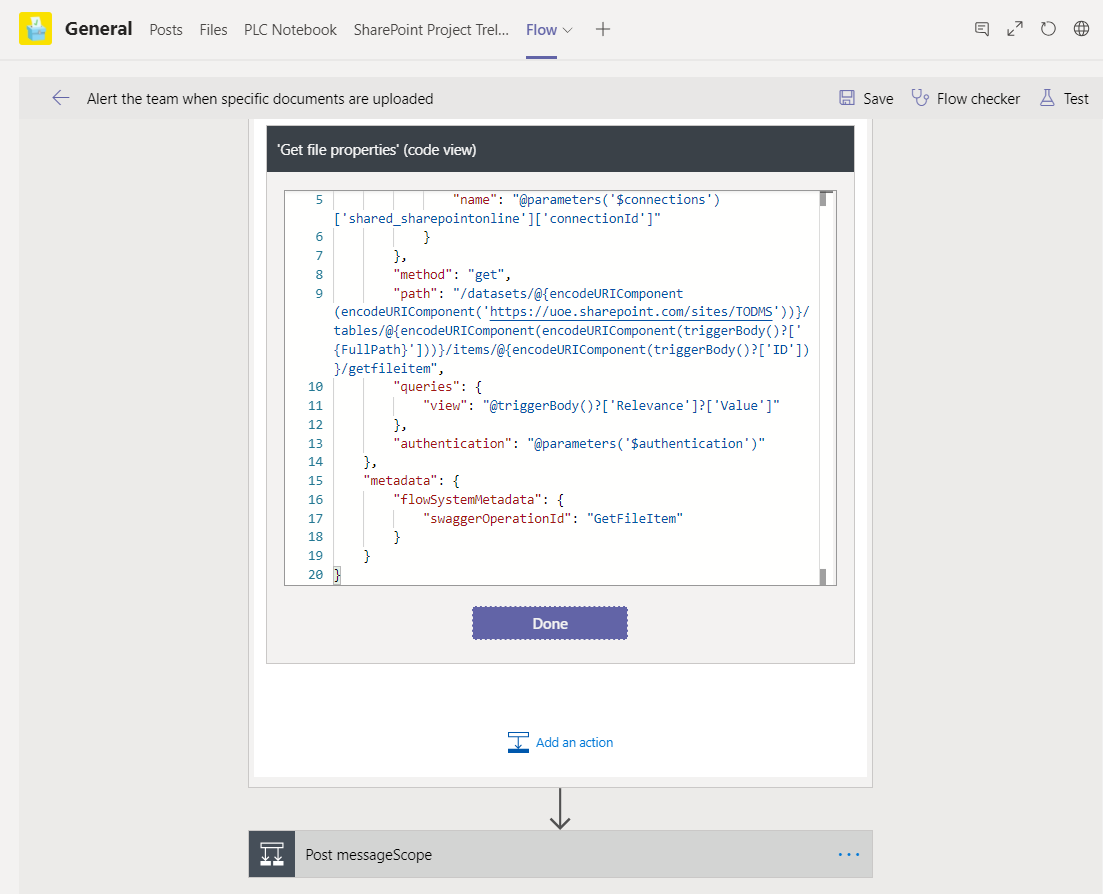
Here’s some JSON. It’s still hard to tell what’s going on.
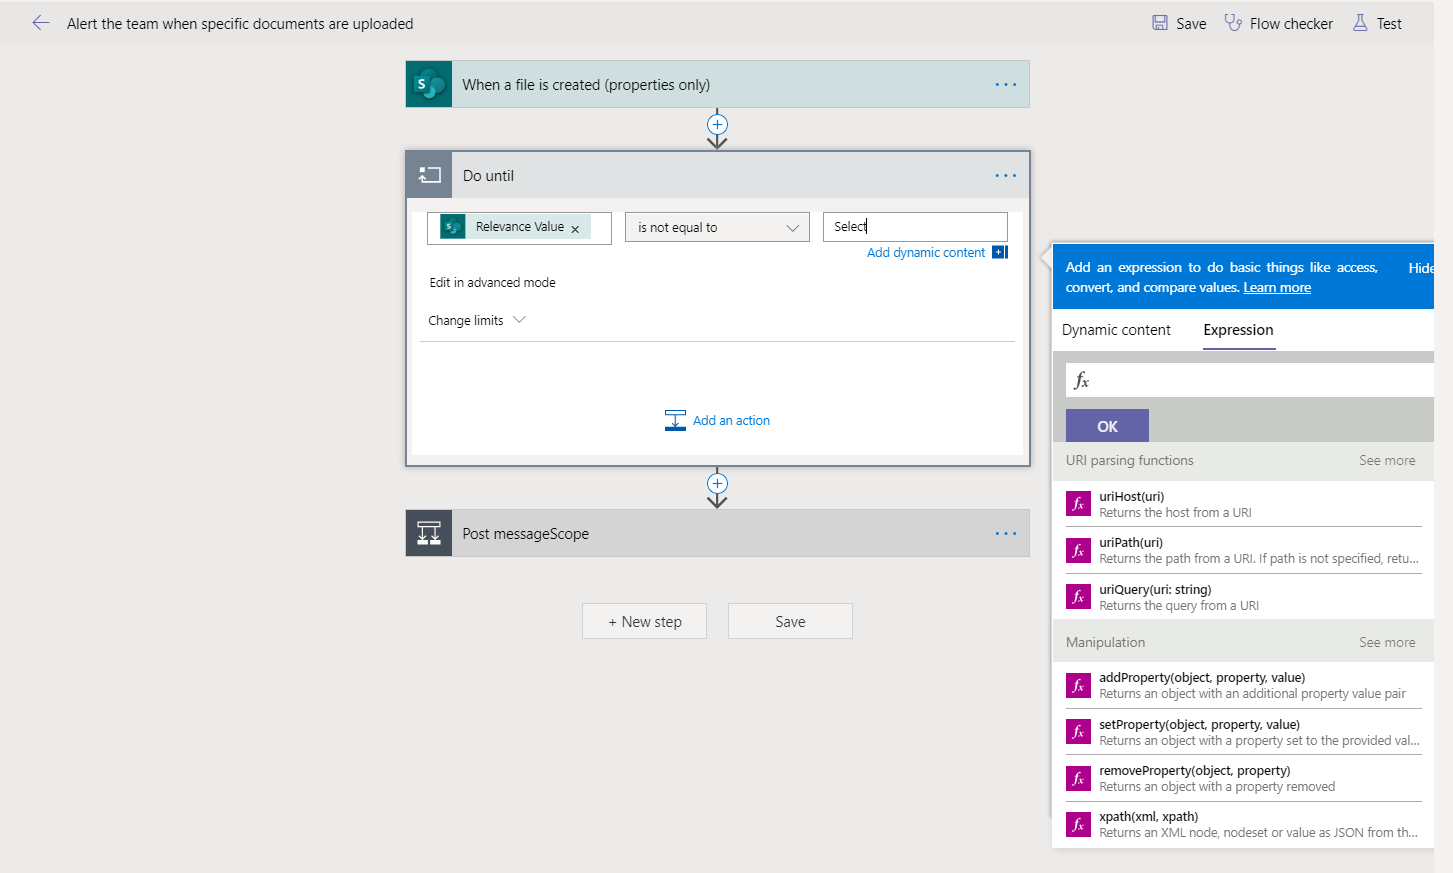
However, I have just realised that I can at least test the exit conditions of my loop by changing the default column value in SharePoint to Urgent. Yay. Something to look forward to.
I may also need to create a view in SharePoint, as those are mentioned in the Flow options.
For the purposes of this Flow, there should also be a way of creating an upload form in SharePoint to ensure the field is filled in during upload. However, in the other case I’m working on, the flow will need to detect a field being changed after upload.
Another week, another day:
Bearing in mind how I left this problem (above), I changed the default value in the SharePoint column to Urgent, so that I could test how the logic was working in the various condition tests I’ve tried.
Here are my findings:
Well this is frustrating.
One reboot later:
| Condition | Result | Comments |
|---|---|---|
| Relevance Value is equal to Urgent | Works | Test case that obviously should work |
| Relevance Value contains or(FYI,Urgent) | Works | Testing syntax for OR with contains |
| Relevance Value is equal to or(FYI,Urgent) | Works | Testing syntax for OR with is equal to |
| Relevance Value is not equal to None | Mostly Works | Looking for a way to test for empty / unchanged values. Strangely, although this one posted to Urgent, it got stuck on the way to Trello but did post it later. |
| Relevance Value is not equal to Null | Works | Looking for a way to test for empty / unchanged values. |
| Relevance Value is equal to Freddy | Works | Test case that obviously should fail. Clearly something is very wrong here and my conditional test is irrelevant to exiting the loop. |
These tests gave me part of the information I was looking for: although they didn’t help me check the syntax of my conditional tests, I now knew that my loop was exiting without even checking them.
Yet another week in…
Back to working from lockdown after a week on leave in lockdown, I tried another search of the Microsoft forums, where we are all prisoners of our own device, and I found this post by someone trying to set up a flow in almost exactly the same way: Microsoft Power Automate Community – Forums – Get Help with Power Automate – General Power Automate Discussion – Do until loop logic
Before going into the details of why the answers suggested other routes to take, I did notice the right way of testing for null in a data field:
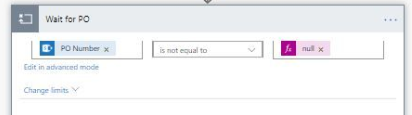
There’s the real null. But how did it get there?
Source: https://powerusers.microsoft.com/t5/General-Power-Automate/Do-until-loop-logic/td-p/282888?lightbox-message-images-282966=65429i590F3E80BD472336
Having seen how to do it though, I couldn’t find how to get that functions list to appear in my own Flow. According to this post, it should be simple: just choose the ‘Expressions’ tab in the Dynamic content popup window, which I suddenly couldn’t get to appear in any part of my Flow.
Thankfully, another search provided a quick but annoyingly user-unfriendly answer to that problem: I had resized my Teams window to a width at which the Dynamic Content popup just didn’t appear. Facepalm. 😣
It worked, anyway. Here’s my proper null, added to the condition in my do-until loop, which I suspect is about to disappear from my Flow anyway, but at least I’ve learned how to do this:
I’m so proud: it’s like nothing, but properly
I tested the flow again, with the proper null in the condition this time, but I knew in my heart it was a vain hope. Uunsurprisingly, it didn’t work: as usual the loop exited before the SharePoint value was updated.
You know, I realise I’m obviously missing something of key importance here, but I also can’t see the point of an ‘until’ loop that doesn’t wait for the ‘until’ condition to be met.
And it’s back to the Microsoft forums…
It’s possible to delay a flow or to run flows on a schedule. Would either of these options work?
Delays
I could see this option mostly working if the ‘Relevance’ field value was always going to be added immediately(ish) after upload, as long as the people doing the uploading would know that they always had to do that. However, this arrangement seems very unreliable and prone to all kinds of errors caused by interruptions, mistakes in data entry, or changes of mind by the users. I also still don’t like the requirement for an extra step in data entry that is caused by the Relevance column.
Scheduling
It would be possible to set the flow to run on a recurring schedule. It could then check the relevance value each time, until it was not null. This would also mean removing the do-until loop, as effectively the whole flow would be inside a loop instead. The next question I see arising from this is, would I then have many flows recurring at the same time, one for each uploaded file, presumably using resources? Would it be more efficient to have one recurring flow that checked all the files in the Drop Off Library, perhaps moving them somewhere else after the Relevance field was filled in?
Alternative Solutions?
I could get rid of the do-until loop and set the flow to be triggered by a change in any Relevance value, instead of the file upload. (Assuming this is possible…)
To summarise, I don’t like the first option, the do-until loop is going, and I think we need a SharePoint upload form.
So… coming back to this again with a new plan
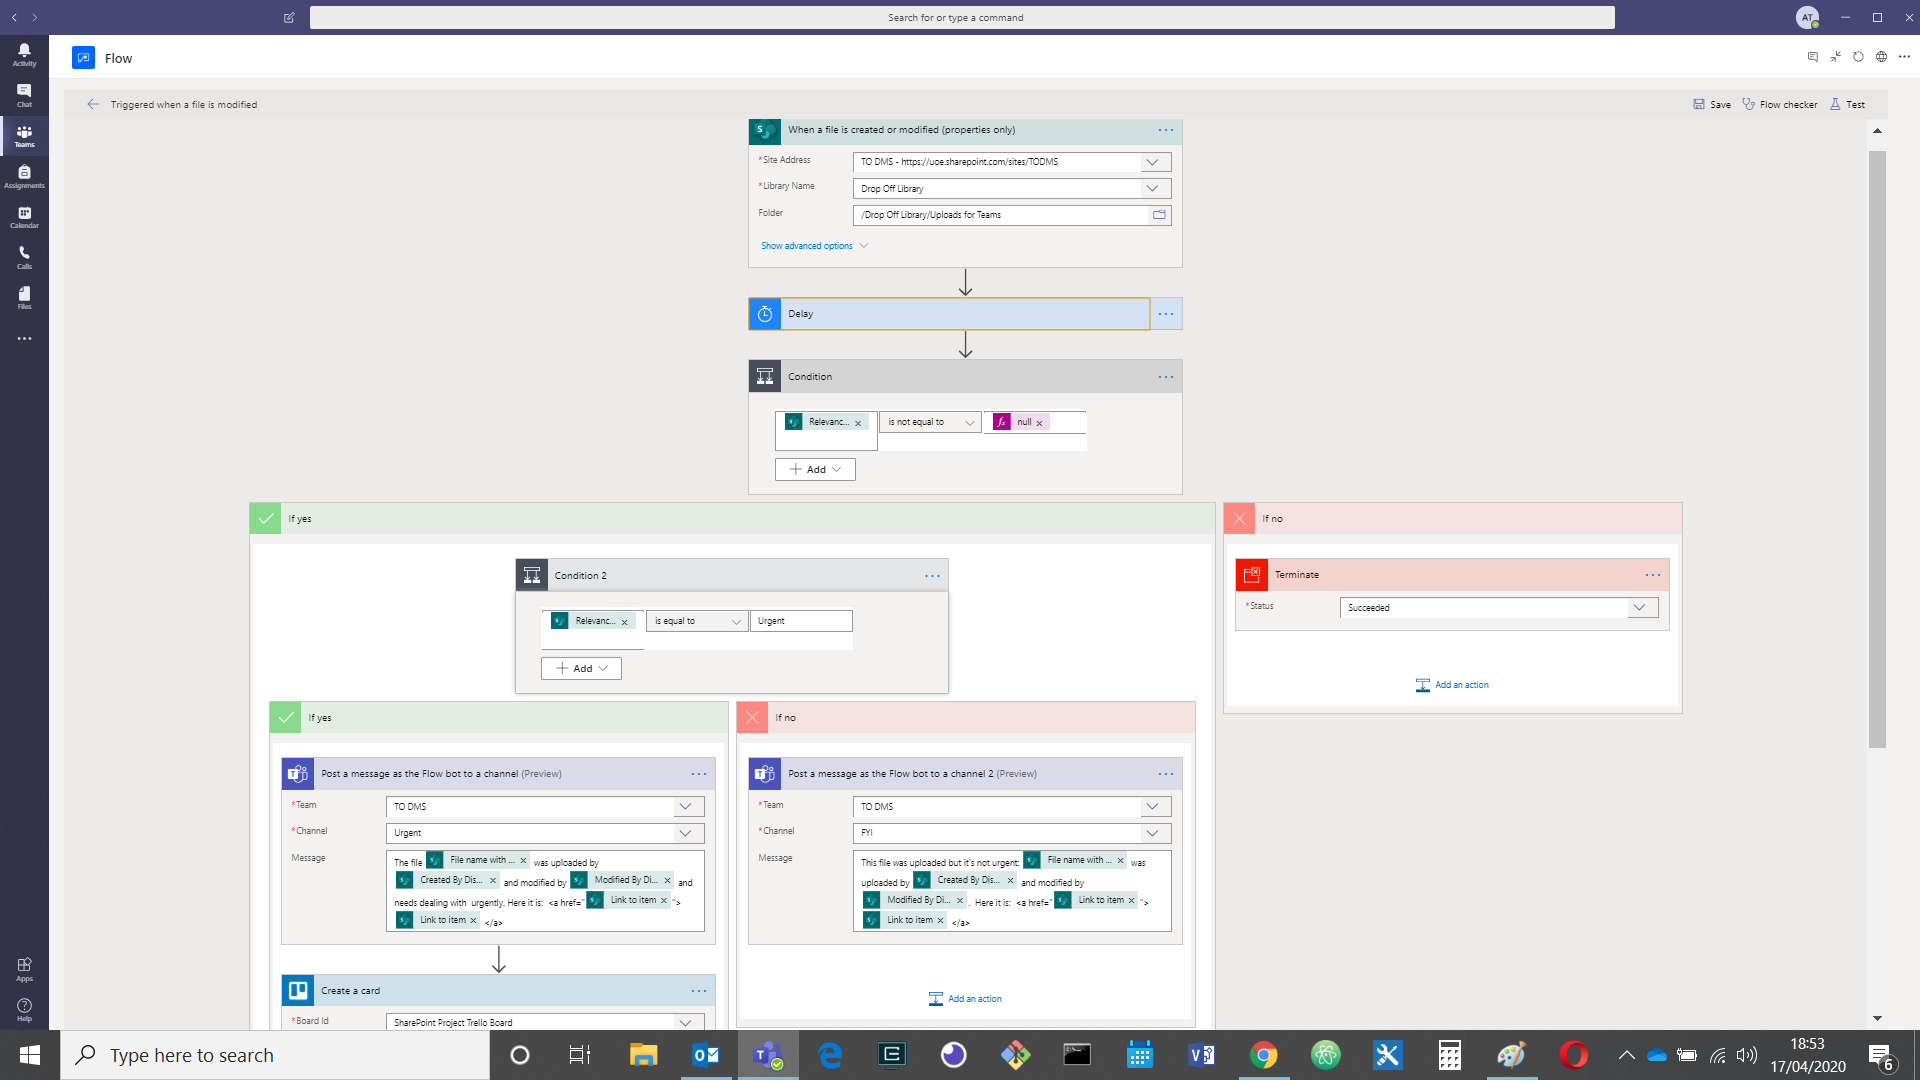
Here is Flow 2:
Flow 2: I think I’ve cracked it!
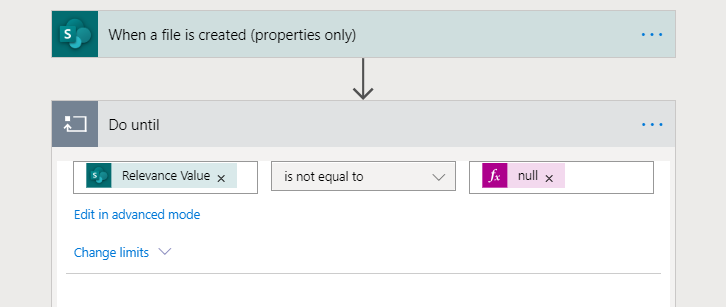
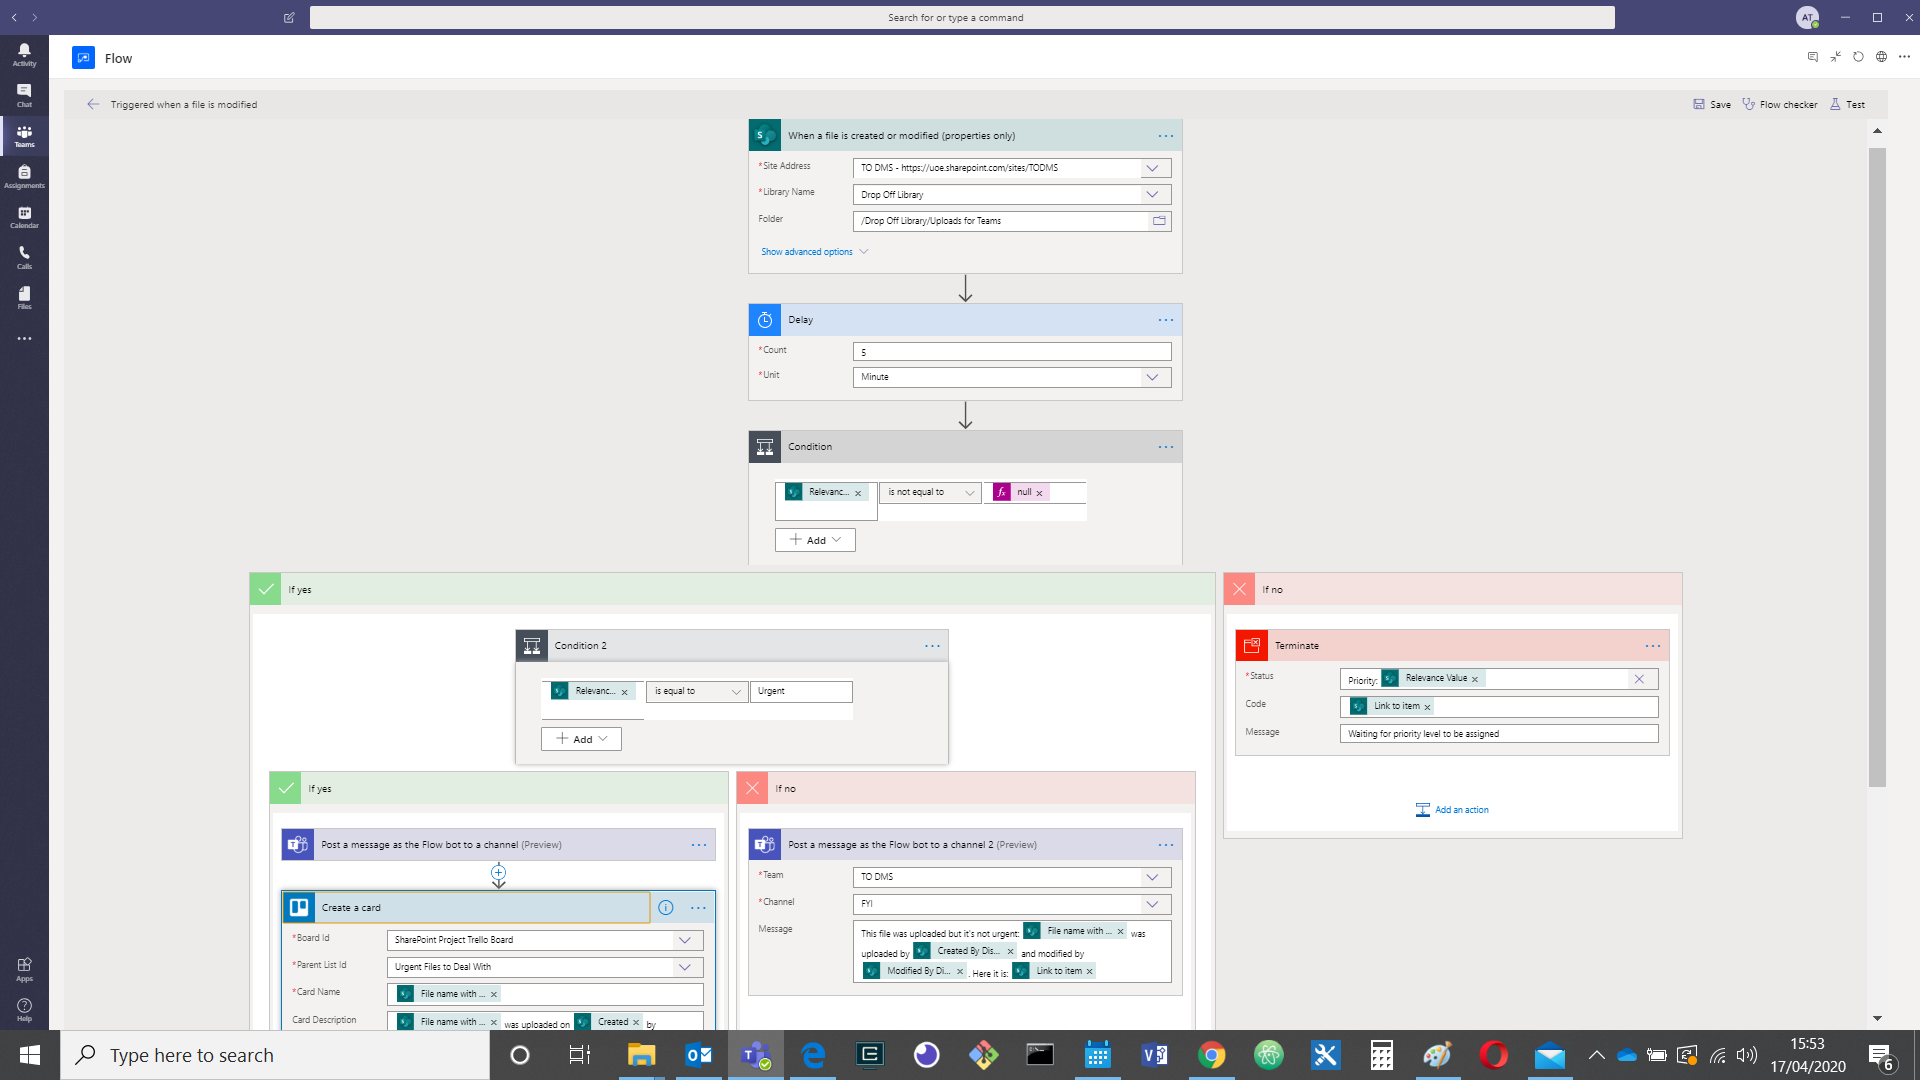
Going with my Alternative Solution idea, I found a slightly different SharePoint trigger for the Flow: instead of ‘When a file is created (properties only)’, it is now ‘When a file is created or modified (properties only)’.
Next, I removed the incomprehensibly non-working do-until loop and replaced it with two conditional tests:
- Testing for the Relevance value not being equal to null
- If a value has been entered, it moves on to the second test for whether the value entered is ‘Urgent’, and continues as with the original Flow.
- If the value hasn’t been entered yet, the Flow terminates, but as the trigger condition now includes modification of file properties, this effectively moves the ‘do-until’ loop condition to outside the flow.
Finally, I added a 5 minute delay before the first conditional test, to give the users a chance to enter the relevance value after uploading the file, and prevent the flow from doing an unnecessary failing first run every time.
Note: because I kept coming back to this part of the problem, the other parts below are mostly using the original Flow, however, these changes do not affect those solutions, which are edits to later steps in the flow. I will do some regression testing to confirm this.
2: Converting the URLs to links
As a change from the timing issues, I decided to work on one of the other updates: editing each Teams message to convert the text listing of the file path to a working link.
It took a bit of trial and error, as when I edited the messages the first time, the ‘HTML View’ editor converted my HTML formatting characters to entities for display only:
Well you can see what I was trying to do…
and in the second message you can see how it is now it’s working.
Eventually, I noticed the code symbol that would allow me to edit in Code View mode, so I could work the HTML link code around the data fields in the list:
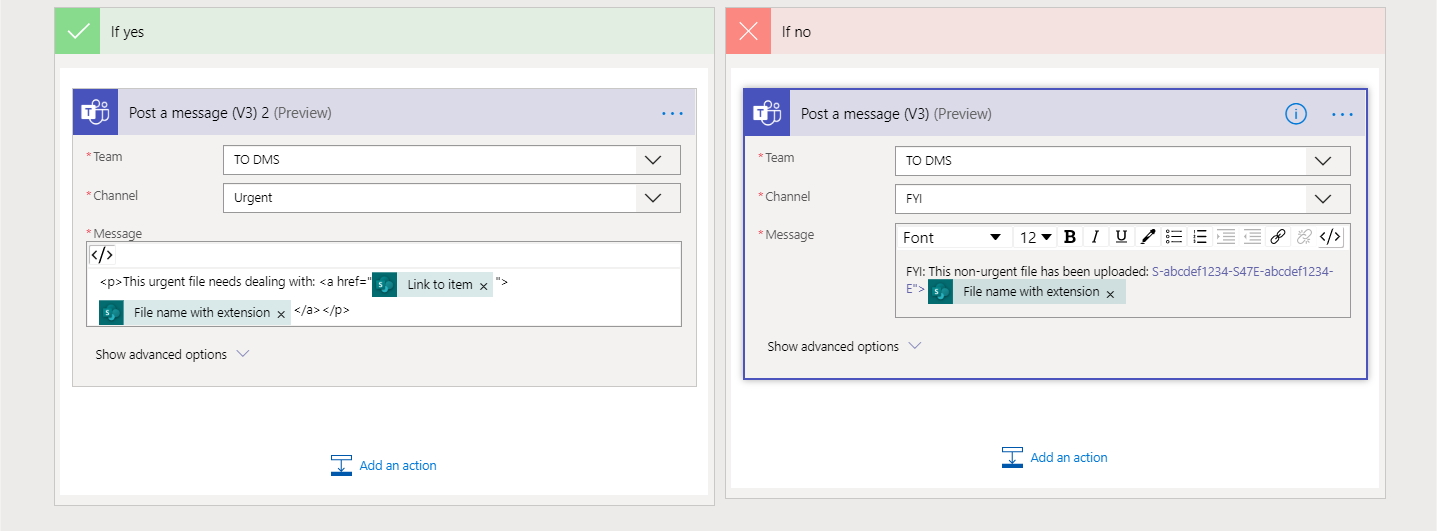
Code View lets you edit HTML, while HTML View doesn’t. What?
Strangely, when I exited Code View the HTML I had entered was replaced with an unintelligible string of text, but I was relieved to find that when I ran the Flow it did work:
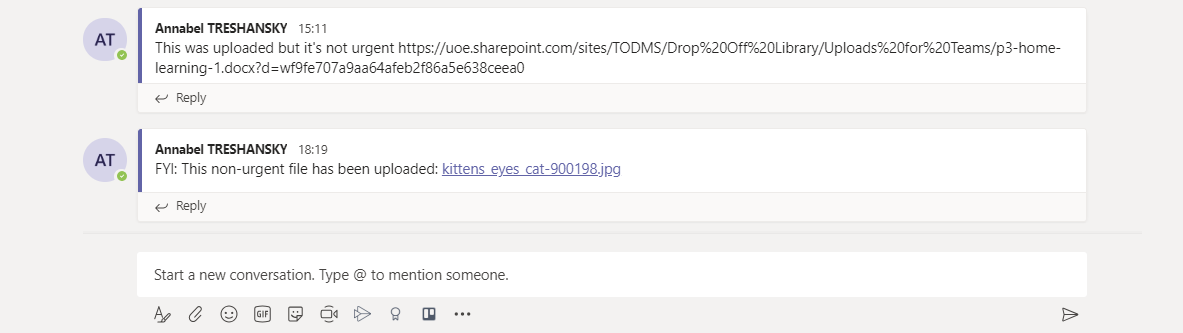
Before and after: it works!
3: Adding the file owner’s name
This immediately became two sub-problems:
- Could I get the file owner / uploader’s name into the message?
- Could I get their name to display as the poster of the message? (I thought this was likely to be much more difficult)
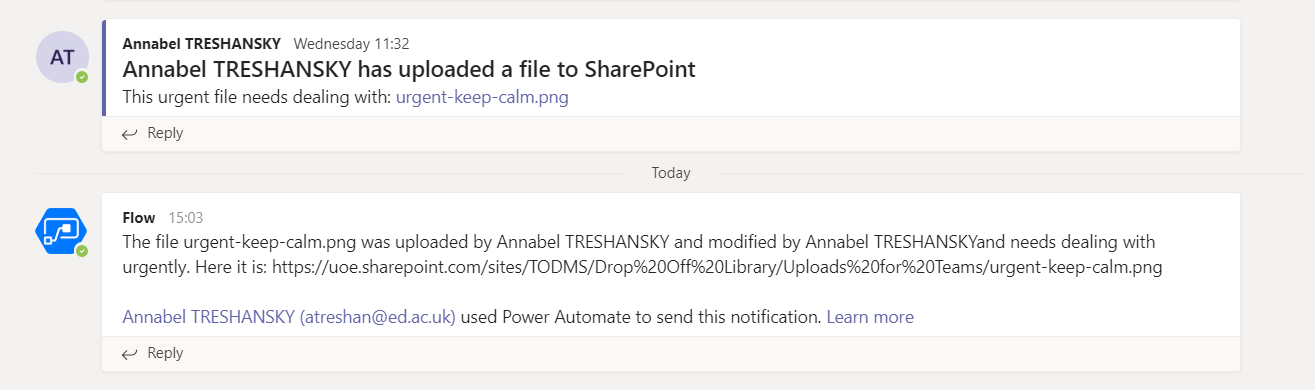
Part 1 turned out to be quite easy:
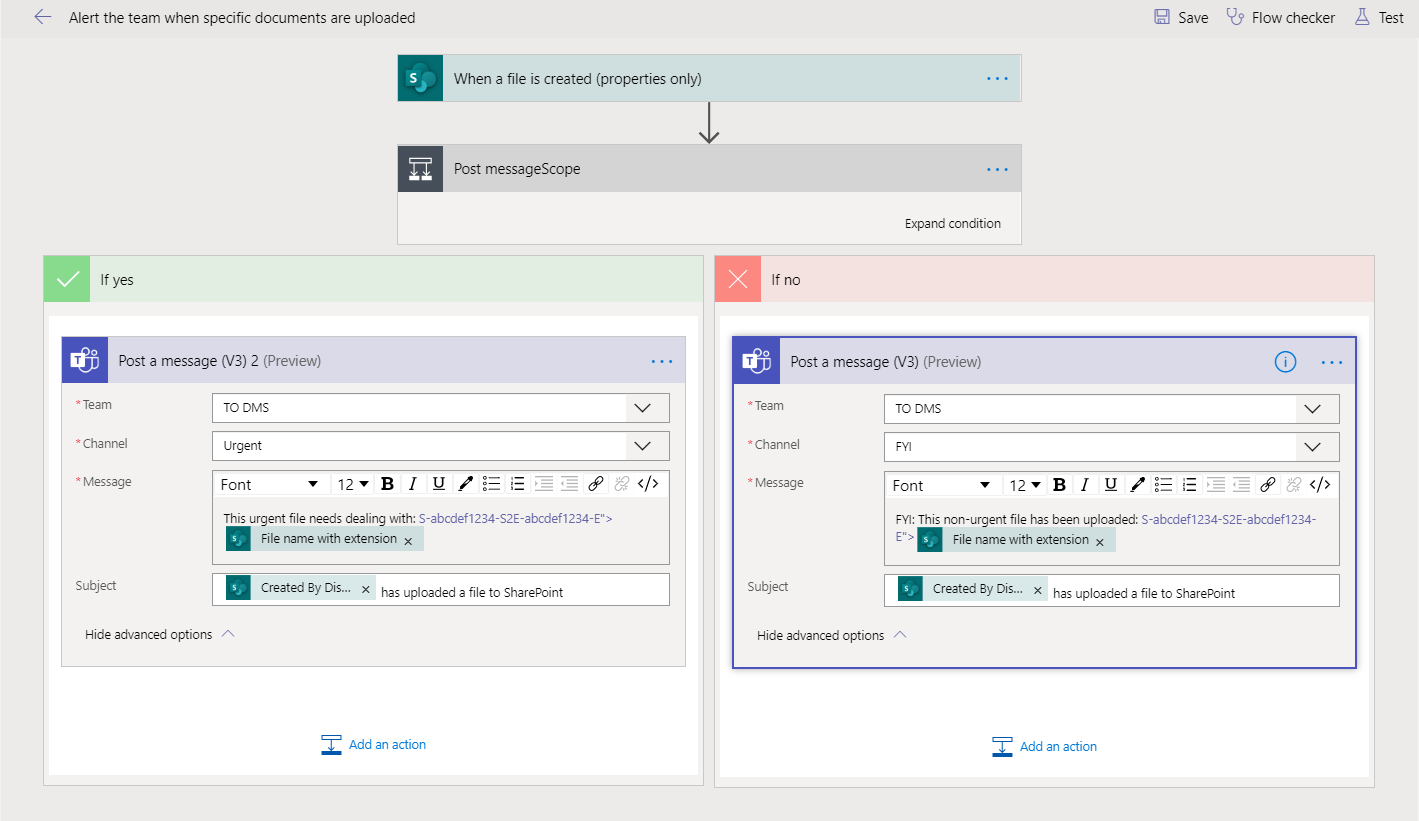
Beats me why adding a field in the subject is more ‘Advanced’ than adding one in the message body. Still, yay me.
And here it is, instantly working, just like that:
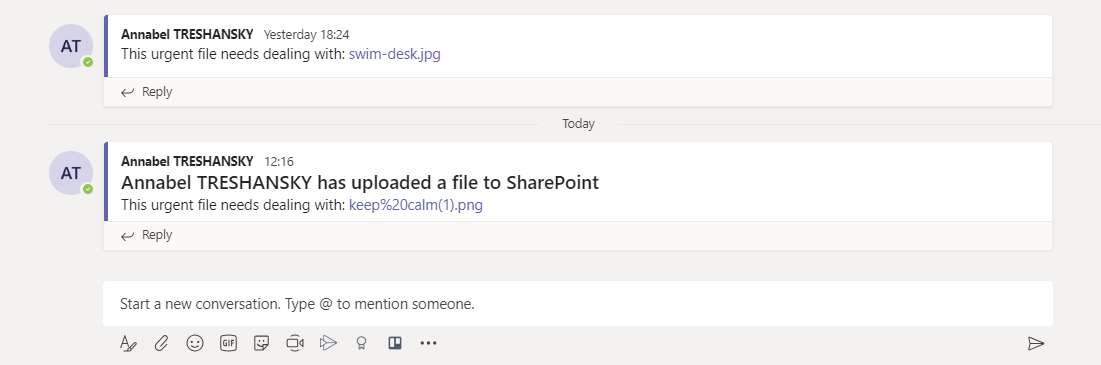
It was me that uploaded a file! Who knew.
Part 2 turned out to be more complicated, and relates to who owns the Flow and whose connections are used for the Office apps involved:
Who owns this Flow? Me and the Teams group
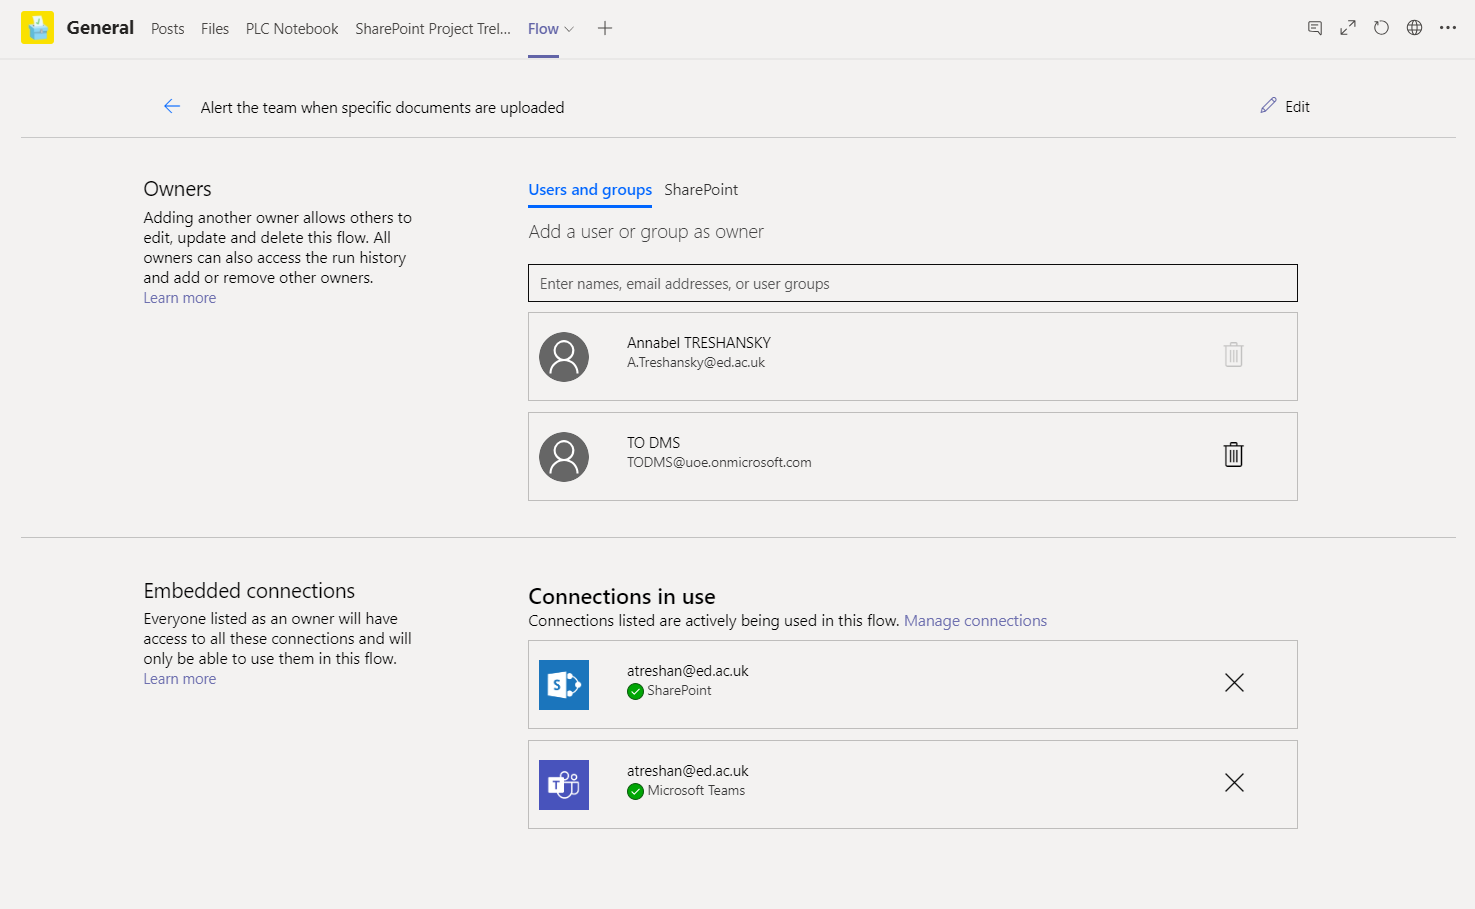
I own this. That’s not ideal.
Using my login credentials won’t allow us to make this Flow as transferable as we would like. Ideally, as the Teams group itself seems to be an owner, and has what looks like another Microsoft ID, it would be much better if I could transfer the ownership of the Flow to the Teams group.
I thought I might be able to do this by sending a copy of the Flow to the email address that the Teams group seems to have. Unfortunately, this was not only possible until I got it working, but also not possible at all, because it required me to remove my personal email address first, which is what I was trying to accomplish by doing this anyway:
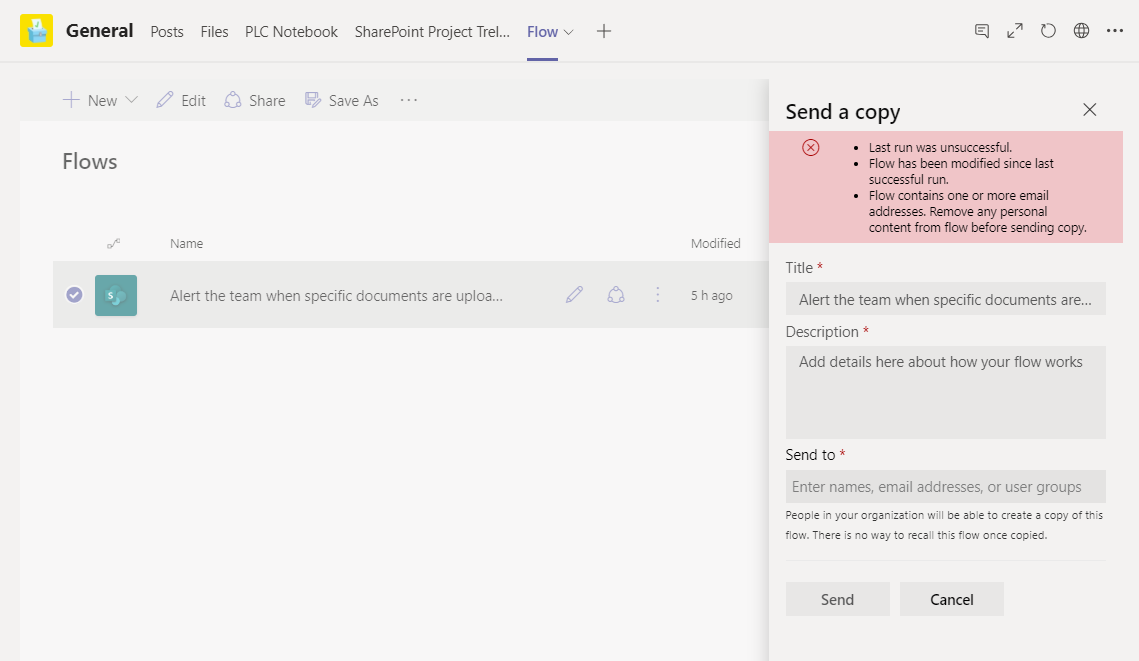
It won’t let me send it, and if it did, it wouldn’t have done what I wanted.
Reading up about this in ‘SharePoint Flows from Scratch’ by Peter Kalmström, I discovered the following:
Flows are stored in the personal account of the user who created them (and in the region that hosts the environment of that user, if multiple environments are used). This might be good for personal flows and experimenting, but it creates issues if a user who has created flows for the organisation leaves his / her position.
According to this, there are two solutions:
- Create a dedicated user account for all flows that automate business processes within the organisation. This would need a full E3 license (what?) so it can send emails and access SharePoint. Because flow-generated emails have the flow creator as sender by default, this option results in a better sender address. As it does not sound as if the sender can easily be changed, this sounds likely to be the best option for what I need to do.
- Team flows. In this situation, each flow has multiple owners. This may sound ideal, however each owner can then edit the flow and delete any of the other owners except the flow creator. If you add a SharePoint list or library as an owner of a flow then everyone who has edit access to that list or library also has edit access to the flow.
In the second case, the two ways of sharing a flow with other users are by making them owners of Team flows, or by export / import. Once a flow is shared, it moves from ‘My flows’ to ‘Team flows’.
Exporting and importing flows, allows a flow to be copied between Office 365 tenants.
Flows can be exported as .zip or .json files. The .json format saves it as a Logic App that can be imported to Microsoft Azure. The .zip option allows it to be imported and used as a template in which only a few settings need to be changed.
So my next step with this part of the problem was to speak to my manager about setting up a dedicated user account for our Flows.
Almost immediately after doing that (of course!) I discovered another possible solution: an option to post to a Teams channel as the ‘Flow Bot’.
Posting as ‘Flow Bot’
This screenshot shows the results of using that option, in comparison with the previous solution:
Flow Bot still says I did it
Looking at the two results, although the Flow Bot does fulfil the letter of the brief, I don’t think it fulfils the intention behind it, as my name is still listed at the bottom of the message. The editing and formatting options for Flow Bot also aren’t as good, so on balance I think I still prefer the dedicated account idea.
4: Listing Urgent Files in Trello
The first step was to create a new list on the Trello board:
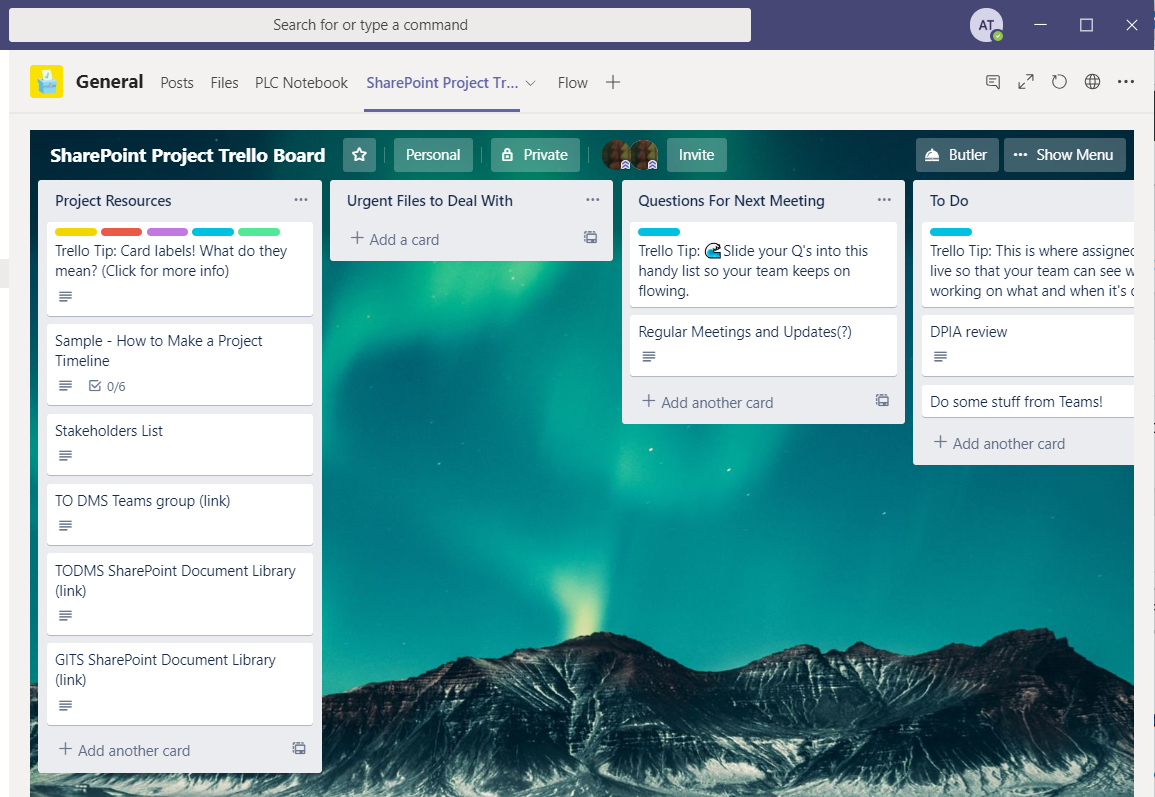
Ta-da!
Going back to the Flow, I added an action to the end of the ‘Yes’ branch, searched for ‘trello’ to bring up a list of Trello related actions, and chose ‘Create a card’:
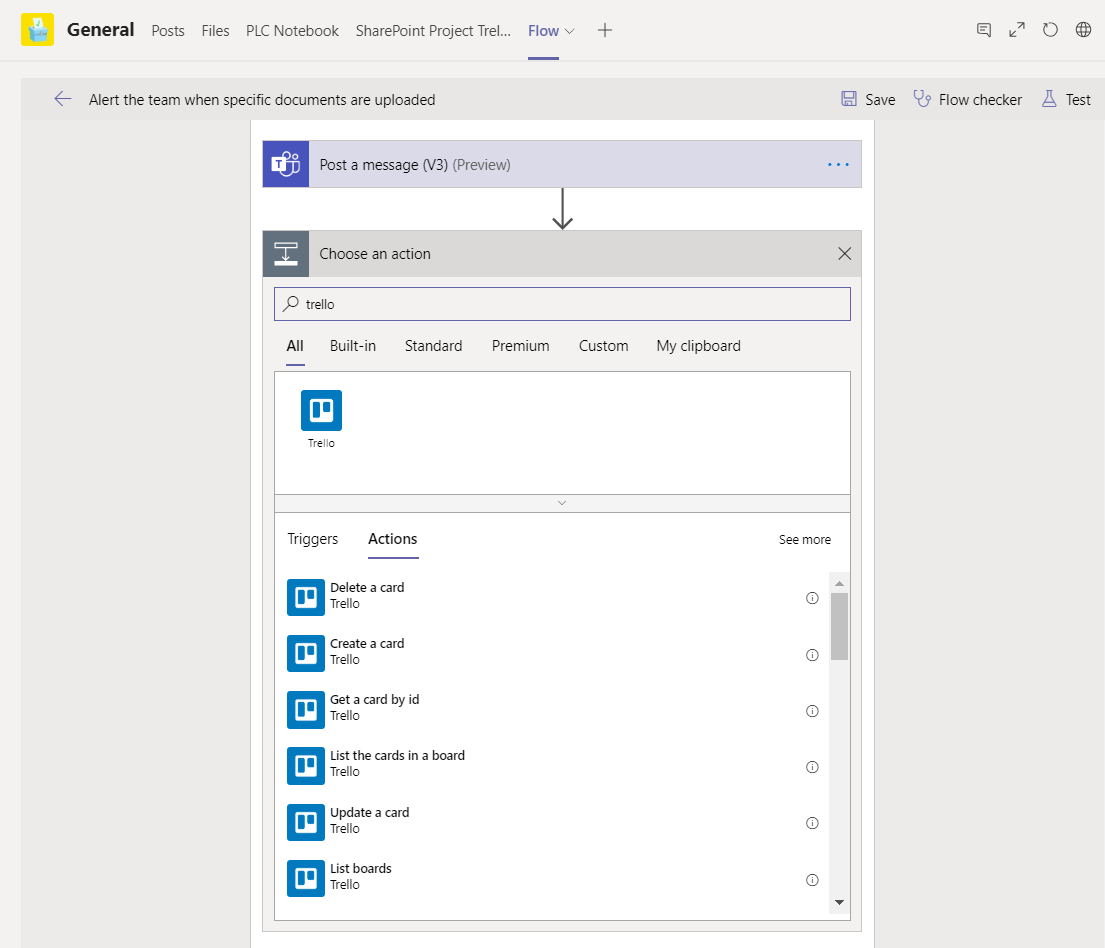
Did I mention I love Trello. That’s not even a question.
Having chosen my action, because it’s linking to another app, I have to agree to everything in this scary dialog box. Thank goodness I started a new work account for this, because I seem to have given an awful lot of rights and privacy away to Microsoft:
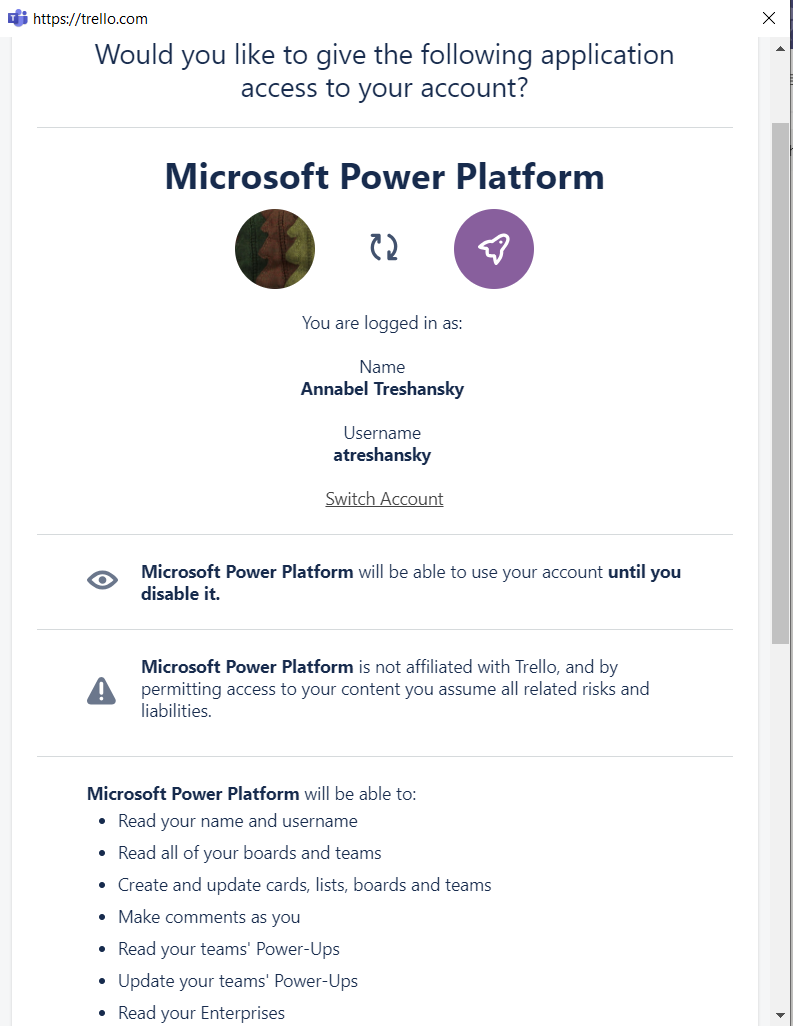
Seriously.
Next I filled in a nice straightforward set of options for filling in the Trello card with data fields from SharePoint, Teams and Flow:
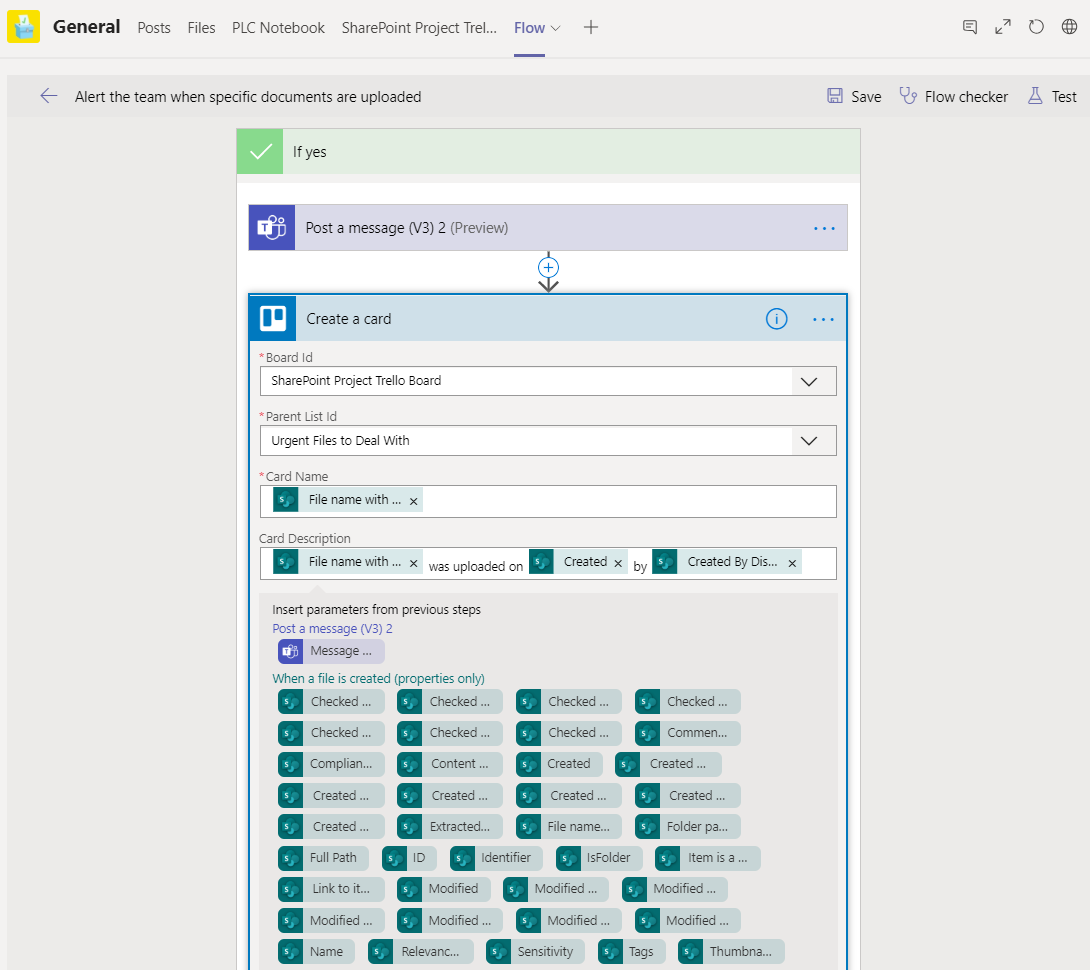
It’s all coming together now. Lovely.
I can now see the Trello action in the overview of my Flow:

Testing time now: fingers crossed!
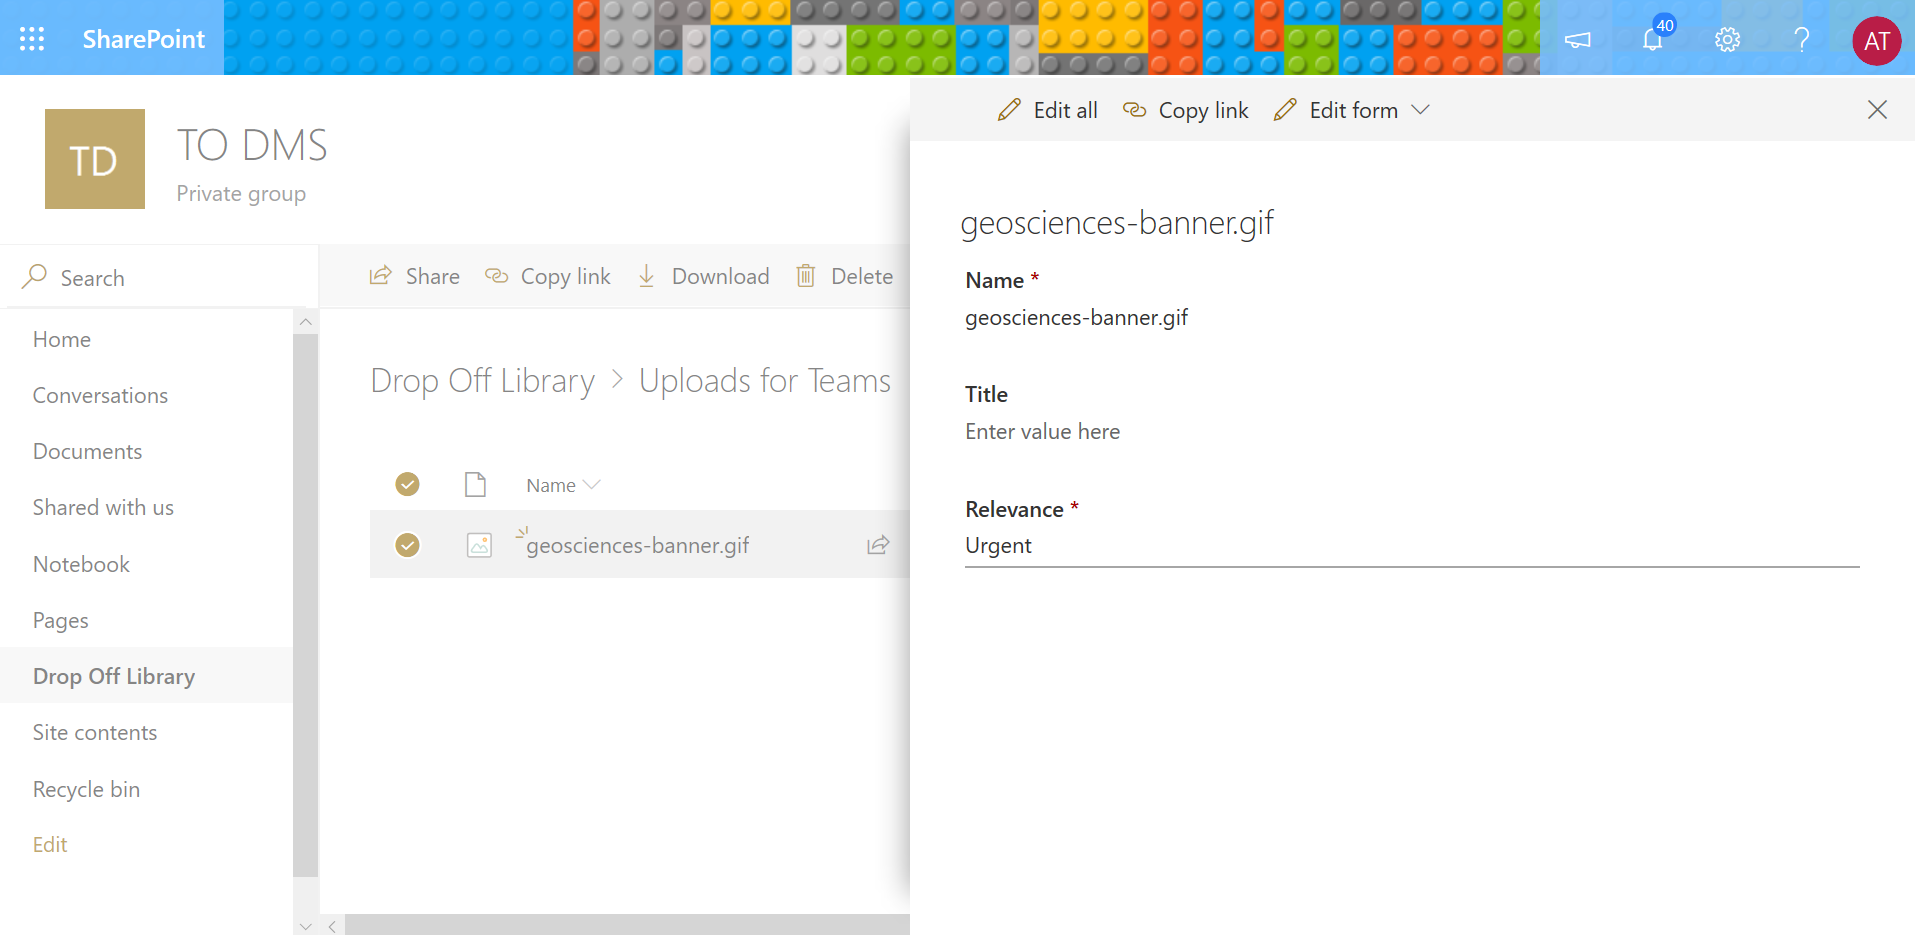
To test this, I’ll set the default value of the SharePoint column to ‘Urgent’, so I know it should be routed to the Urgent channel and then Trello:
Default is now Urgent. It’s the new normal, folks.
The results:
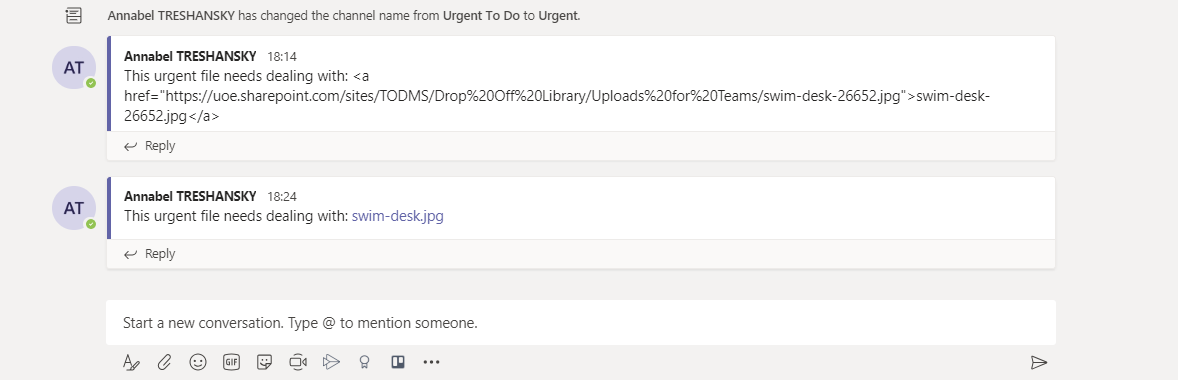
It worked in Teams:
There’s my message in the Urgent channel
It worked in Trello:
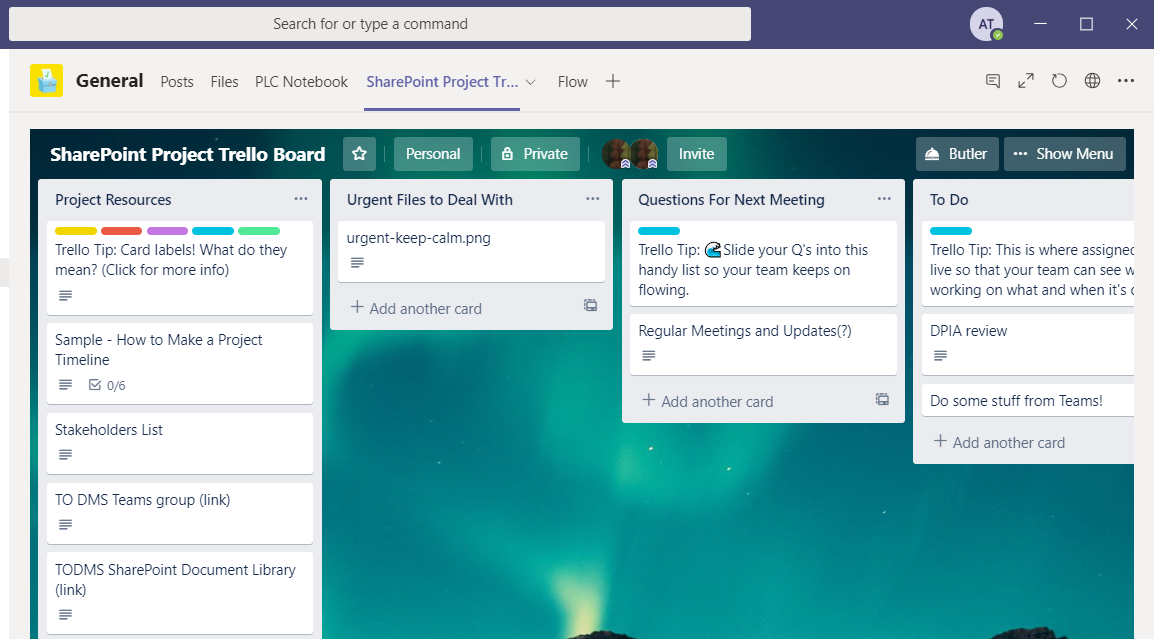
There’s my new Trello card, posted in the ‘Urgent Files to Deal With’ list
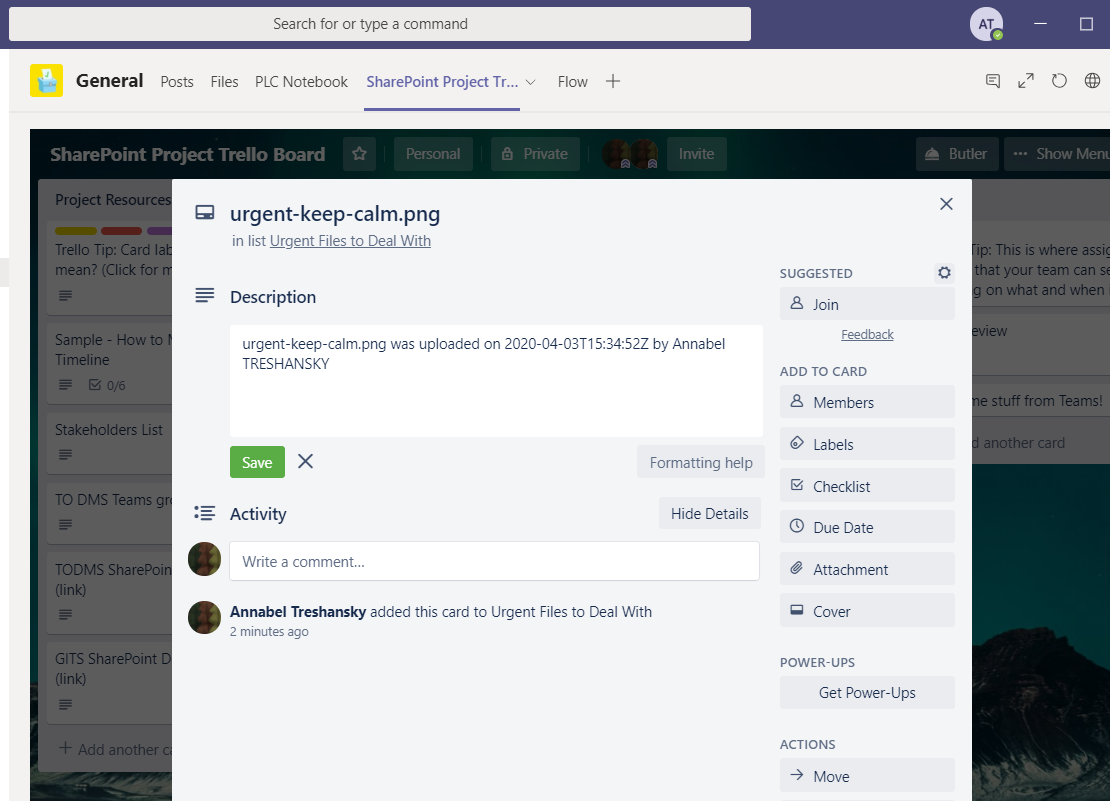
Here are the details that were posted in the Trello card. They could do with a bit of tweaking, but that will be easier now I know where things are going:
Lovely. I like Trello.
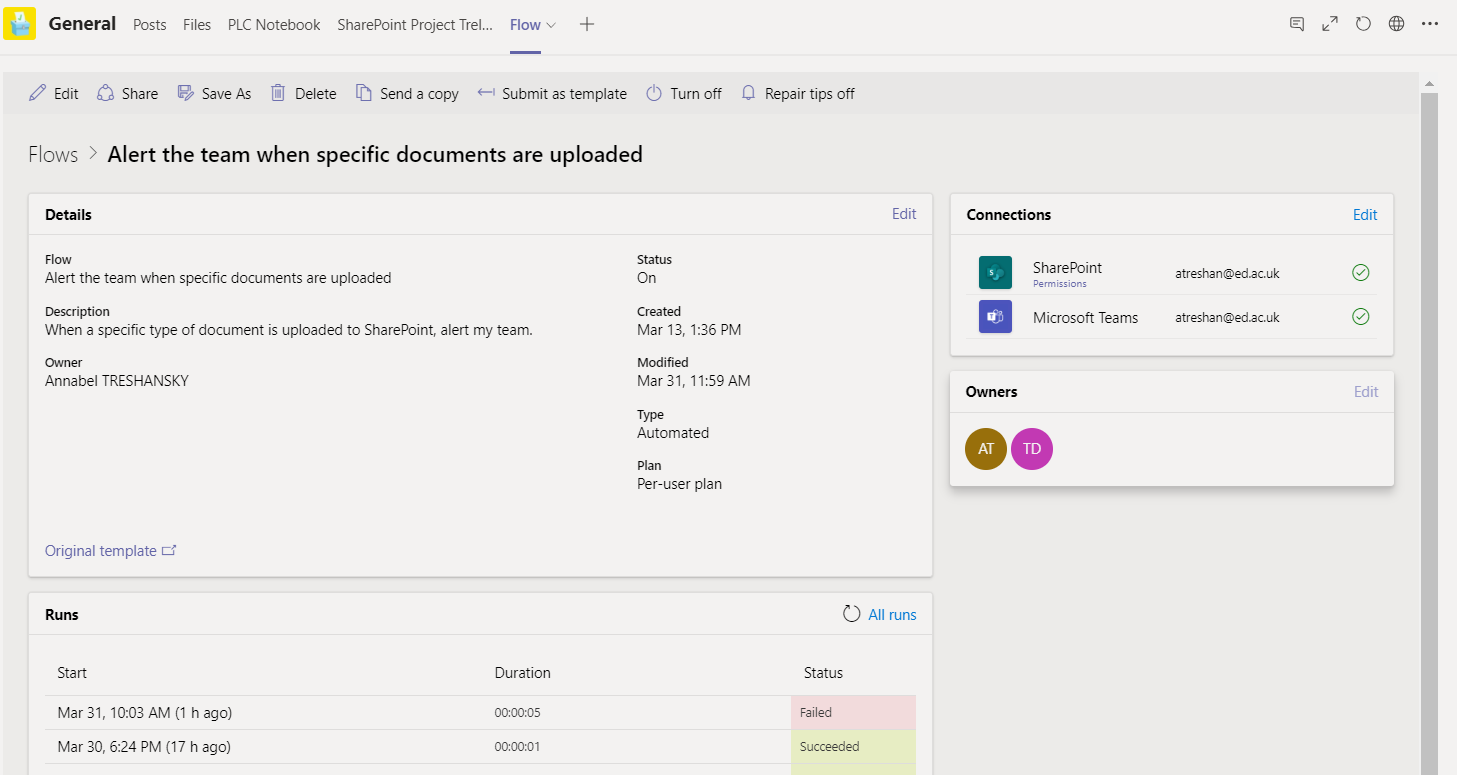
So, after a lot of trial and error, I achieved nearly everything on my list:
- Adjusting the condition testing loop to wait for a value to be entered in the Relevance column after files are uploaded to SharePoint. This is now fixed (see first section).
- Adding URL links to the messages. This looks better with the V3 style messages rather than the Flow Bot messages, but it’s working in both.
- Reassigning ownership of the Flow. I hoped it would be able to log into apps under the Teams group address, and posts messages using either the Teams group name, or ideally the name of whoever uploaded each file to SharePoint. However, it seemed that this may not be possible due to the ways that ownership operates with Flows and Flow Bot, so my next step with this part of the problem was to speak to my manager about setting up a dedicated user account for our Flows. This seems to be no problem at all, so that will probably be the solution for this part of the problem.
- Posting urgent messages as Trello cards. There’s some scope for tidying up and tweaking, but it works.
Going back to each part of the problem separately, each of these things are now either fixed or greatly improved on.
As one last tweak, I changed the ‘Terminate’ status to successful even when there wasn’t a Relevance value yet. I had tried to set up my own custom ‘Waiting’ status, but with anything except success, it was emailing me to report failures.
Best of all, in the process I think I have found the solution for a document updating problem in my Dissertation Repository project, so I can now put my new found Microsoft skills to good use😁.
Here’s the state of the flow at this (hopefully final!) point:
It works! …I think… 😅
Back to ‘The Plan’
To be continued…
Links
- Microsoft Teams (Preview): Post a Message (v3)
- Create team flows
- Microsoft Flow: SharePoint Trigger on specific fields changed via SP HTTP Request
- Microsoft Power Automate Community Forums Get Help with Power Automate Building Flows Re: Wait for field change Action
- SharePoint Designer Workflow – Wait for Field Change help
- Build more advanced flows than ever
- Microsoft Flow and the (infamous) Do Until loop
- Microsoft: Power Automate documentation
- Understanding Long Running Do Until loops with Delay actions in Microsoft Flow
- Limits and configuration in Power Automate
- Wikipedia: ISO 8601
- SharePoint Flows from Scratch – Peter Kalmström
- Microsoft Power Automate Community – Forums – Get Help with Power Automate – General Power Automate Discussion – Do until loop logic
- SharePoint Connectors: When an item is created or modified
- Microsoft Flow: Make a condition to check for empty fields or null values
- Microsoft Power Users – Power Automate: HELP: Add Dynamic Content option not available in Flows
- Run flows on a schedule
- Microsoft Power Automate Blog: Flow of the Week
- Post a message as the Flow bot to a channel
(Main Image: Flow / Qi Gong pose by Trimatiks from Pixabay)


Leave a Reply