Introduction
This post describes a Power App that fetches and displays data from the Stack Exchange REST API using OAuth2 authentication, with a custom connector created by importing a collection from Postman.
Why did this happen?
This is a step in my ongoing project to access our Blackboard Learn Virtual Learning Environment using REST APIs. I thought this might be possible using Microsoft Power Apps, which would allow the development of apps more quickly, but getting the connection itself figured out was proving complex(*here’s why).
The first step in testing out this theory was my Dad Jokes Power App, which did not require any authentication.
Once that worked, the next step was to try the same process with another REST API that used the same kind of OAuth2 authentication process as Learn. After searching through various free public API lists, I found the Stack Exchange API, which seemed to match the authentication process fairly closely, and has good instructions too.
I also thought it looked useful in its own right, both for keeping up with news from developers, and for trying out methods for searching, sorting and filtering data when I got further into the Power Apps side of app development.
Index Links
- Top
- Introduction
- Index
- The Stack Exchange API
- OAuth2 Authentication
- StackApps App Registration
- Importing the OpenAPI Definition
- Finding the API Swagger Definition
- Converting YAML to JSON
- Converting from OpenAPI 3 to OpenAPI 2
- OpenAPI to Postman
- The Postman Collection
- Creating a Custom Connector from a Postman Collection
- Custom Connector: General Information Page
- Custom Connector: OAuth2 Authentication
- Custom Connector: Definitions
- Custom Connector: Test Connection
- Bloopers
- It Works!
- Adding the Connector to a Power App
- Fixing a WADL Error
- A Power App to fetch Data
- A Few Display Details
- Permission to use the Connector
- Copyright Disclaimer
- Turning the Arrow Icon into a Working Link
- Converting Unix Time to Human Readable Time
- Displaying the Answer and View Counts
- Displaying the Author Details
- Displaying Tags
- And finally…
- Links
The Stack Exchange API
The Stack Exchange API enables developers to access, search, filter and sort questions, answers and other data posted on the (very helpful) Stack Exchange forums. Full documentation of the API can be found here: Stack Exchange API v2.3 Docs: Overview (https://api.stackexchange.com/docs). The current version of the API is v2.3.
OAuth2 Authentication
The Stack Exchange API uses the OAuth 2.0 method of authentication. They offer two versions: an explicit grant for server side applications and an implicit one for pure browser based ones. I am using the explicit OAuth 2.0 flow, which they outline step-by-step as follows:
The explicit OAuth 2.0 flow consists of the following steps:
- Send a user to
https://stackoverflow.com/oauth, with these query string parameters- client_id
- scope (details)
- redirect_uri – must be under an apps registered domain
- state – optional
- The user approves your app
- The user is redirected to redirect_uri, with these query string parameters
- code
- state – optional, only returned if provided in the first step
- POST (application/x-www-form-urlencoded) the following parameters to
https://stackoverflow.com/oauth/access_token- client_id
- client_secret
- code – from the previous step
- redirect_uri – must be the same as the provided in the first step
This request is responded to with either an error (HTTP status code 400) or an access token of the form
access_token=...&expires=1234.expireswill only be set if scope does not includeno_expiry, the use of which is strongly advised against unless your app truly needs perpetual access.In order to get
access_tokenandexpires(if applicable) wrapped in a JSON object, POST tohttps://stackoverflow.com/oauth/access_token/jsoninstead.
Full details of the Stack Exchange authentication process can be found here: Stack Exchange API: Authentication (https://api.stackexchange.com/docs/authentication)
StackApps App Registration
The first step in creating the connector was to register an app with Stack Exchange, which would provide me with the app’s client id and secret.
Clicking on the link to app registration from the Authentication instructions took me to this page, for StackApps Login and Registration: https://stackapps.com/users/login?returnurl=/apps/oauth/register:
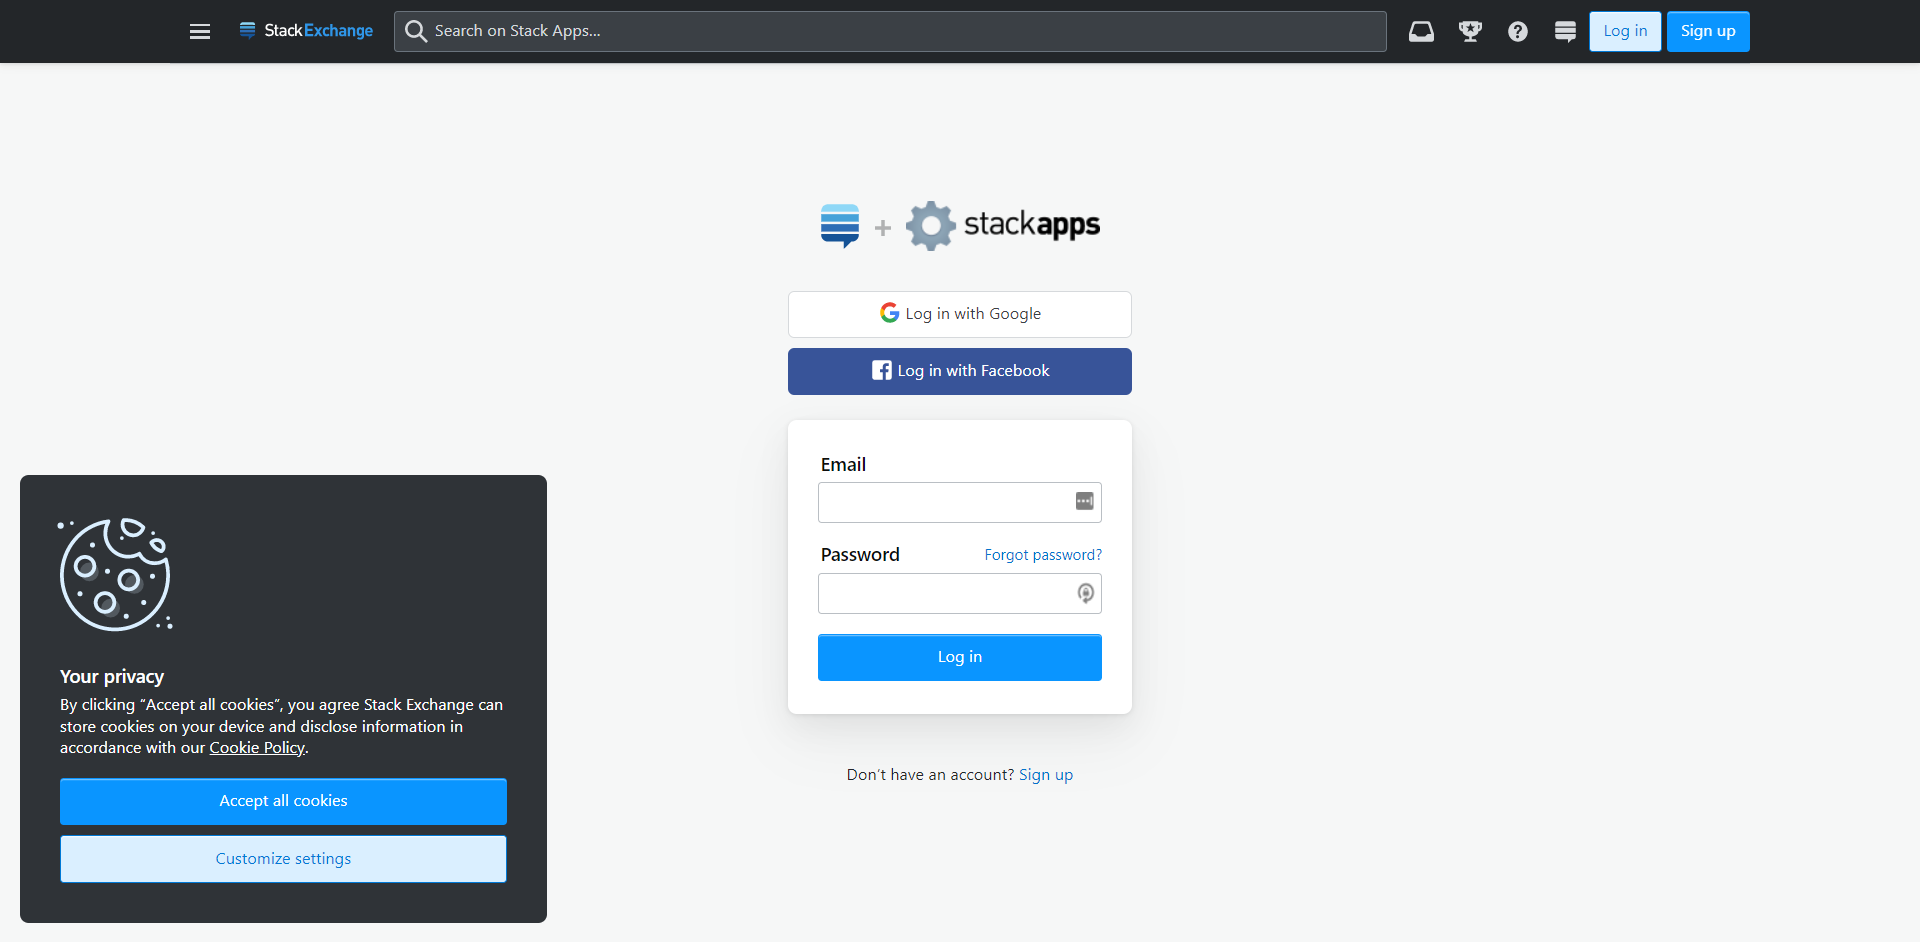
Account creation with Stack Apps: this can be done using a Google account
At this point, I thought I was just signing in or registering a user account for the website but logging in with Google skipped me past that and straight to the App registration page, which looks like this:
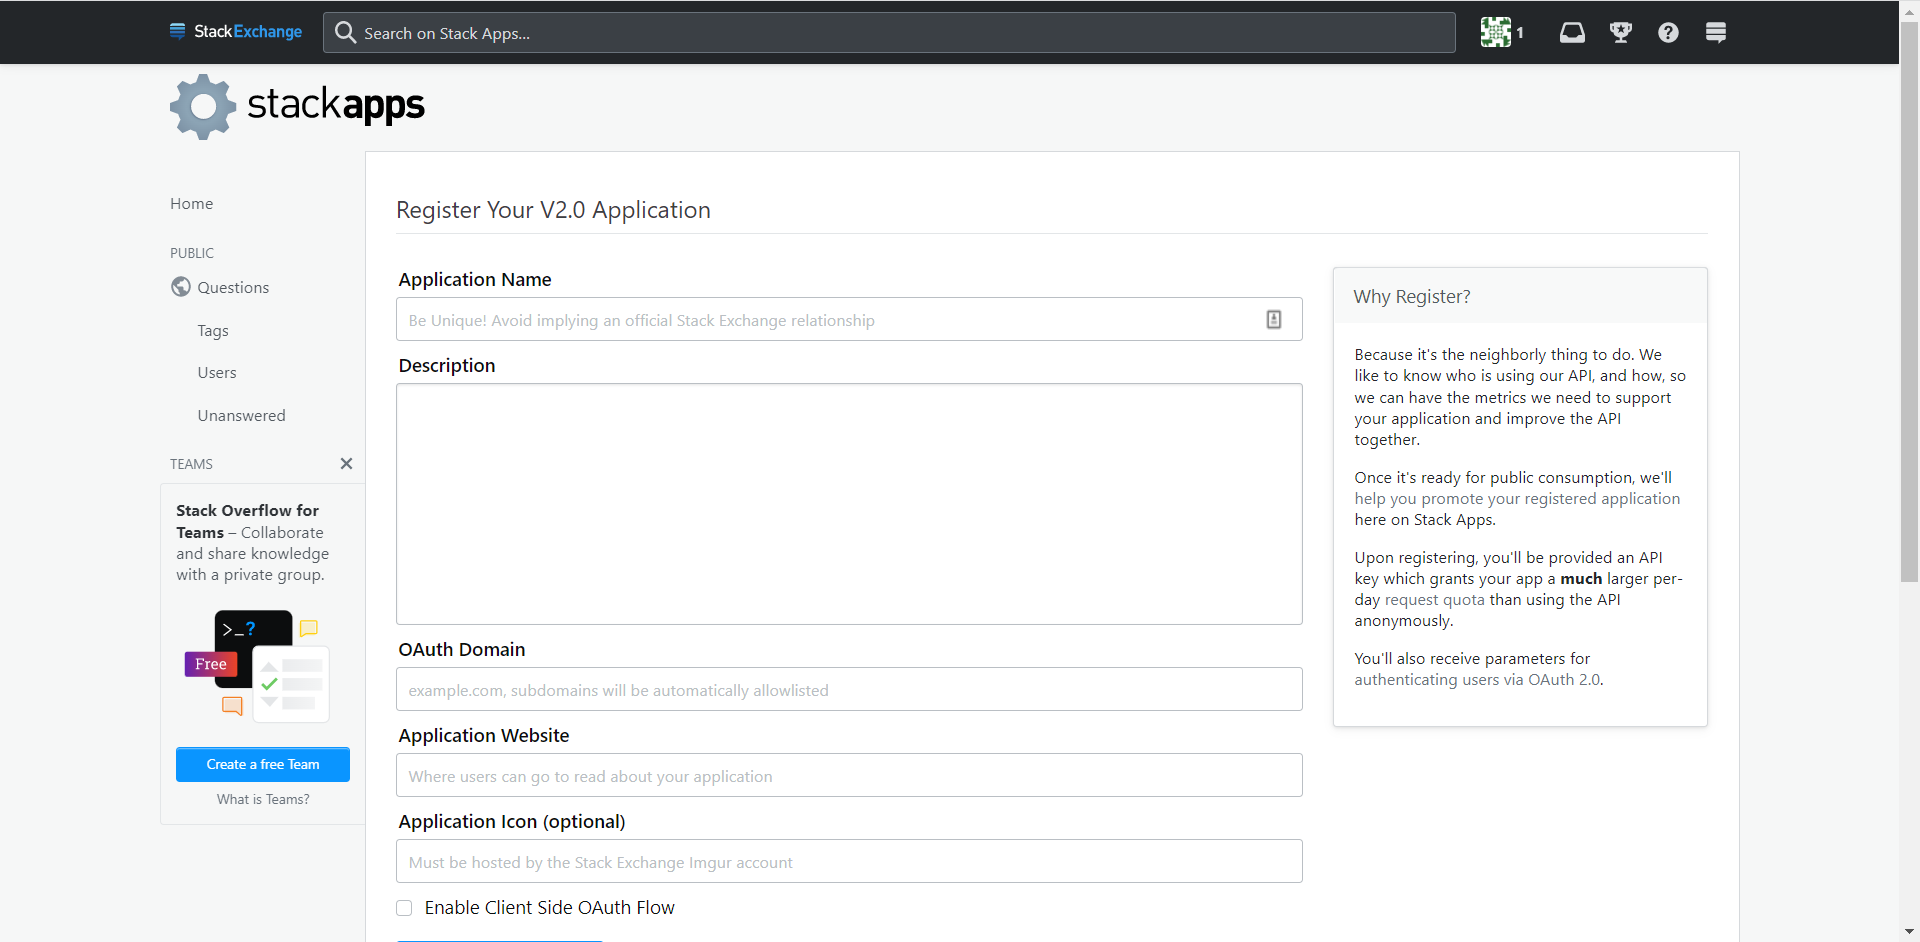
Registering my application with StackApps
The Registration Settings
App Name: Test Connector
stackapps.com/apps/oauth/view/XXXXX
Client Id
XXXXX – (they generate this)
Their explanation:
This Id identifies your application to the Stack Exchange API. Your application client id is not secret, and may be safely embedded in distributed binaries.
Pass this as client_id in our OAuth 2.0 flow.
Client Secret
XXXXXXXXXXXXXXXXXXXXXXXXXX – (they generate this)
Their explanation:
Pass this as client_secret in our OAuth 2.0 flow if your app uses the explicit path.
This must be kept secret. Do not embed it in client side code or binaries you intend to distribute. If you need client side authentication, use the implicit OAuth 2.0 flow.
Key
XXXXXXXXXXXXXXXXXXX – (they generate this)
Their explanation:
Pass this as key when making requests against the Stack Exchange API to receive a higher request quota.
This is not considered a secret, and may be safely embed in client side code or distributed binaries.
Description
Test app, trying to get an OAuth2 connection working with Power Platform.
Their explanation:
This text-only blurb will be shown to users during authentication.
OAuth Domain
consent.azure-apim.net
– Looking at the network requests created by my other custom connectors, they were all subdomains of consent.azure-apim.net, so as Stack Apps state that ‘subdomains are considered to be under their parent domain’, this seemed like a good choice for the OAuth Domain, and it worked.
Their explanation:
Whenever a redirect occurs during an authentication session (as specified by redirect_uri) it must reside under this domain.
For the purposes of redirection, subdomains are considered to be under their parent domain. Registering example.com would allow a redirect_uri of foo.example.com for example.
Application Website
https://blogs.ed.ac.uk/annabel-treshansky/
(It doesn’t really have one, but this is a required field so I thought I might as well link to my blog!)
Their explanation:
A link to this website will accompany most displays of your application on the Stack Exchange network.
Application Icon
Not Set – not required
Their explanation:
This image will accompany most displays of your application on the Stack Exchange network.
Stack Apps Post
Not Set – not required.
Their explanation:
When you’ve published your application, it should be listed on Stack Apps with the app or script tags.
(Not sure how I could do this as my Power App would only be available to logged in users of our Microsoft tenant, but I suppose in theory I could still post about it).
Client Side Flow Is Disabled
Their explanation:
An application can either be configured for client side or server side authentication flows.
Changing to one will disable the other flow.
Desktop OAuth Redirect Uri Is Disabled
Their explanation:
Applications that have the client side flow enabled can use https://stackexchange.com/oauth/login_success as their redirect_uri by default.
This is provided so non-web clients can participate in OAuth 2.0 without requiring a full fledged web server. Applications that do not need this behaviour can disable it.
Importing the OpenAPI definition
First, I needed to try what seemed like the most straightforward option: importing the OpenAPI definition into the Power Apps Custom Connector directly from the API url (https://api.stackexchange.com/):

Sadly, no
Sadly, that didn’t work, and I got this error message:
We weren’t able to download the OpenAPI file from the provided URL. Please upload the file manually using the "Import from OpenAPI file" option. Learn more
I tried again with https://api.stackexchange.com/2.3/ but got the same error. I needed to find the OpenAPI JSON.
Finding the API Swagger Definition
The next step was much trickier. I knew I would need either an OpenApi URL or a JSON Swagger file to import the API definition, perhaps via a Postman collection, but I couldn’t find anything like that on the Stack Exchange API home page.
Looking at the documentation, I thought that a sample query might be a place to start finding out how it worked, and ‘Get all articles on a site’ seemed like a relatively straightforward one.
The page for Usage of /articles GET allowed me to run queries such as:
https://api.stackexchange.com/2.3/articles?order=desc&sort=activity&site=stackoverflow
and see the output in a window below the query on the page.
Here’s a sample output from running a query:
{

     "items": [

         {

             "tags": [

                 "deep-learning",

                 "intel",

                 "openvino",

                 "encoder-decoder"

             ],

           "owner": {

                 "account_id": 3375070,

                 "reputation": 66,

                 "user_id": 2833360,

                 "user_type": "registered",

                 "profile_image": "https://www.gravatar.com/avatar/efef14887f09f4510ec9c5dc79b15ef3?s=256&d=identicon&r=PG&f=1",

                 "display_name": "Ragesh Hajela",

                 "link": "https://stackoverflow.com/users/2833360/ragesh-hajela"

           },

             "view_count": 19,

             "score": 2,

             "last_activity_date": 1648806189,

             "creation_date": 1648787751,

             "last_edit_date": 1648806189,

             "article_id": 71701870,

            "article_type": "how-to-guide",

             "link": "https://stackoverflow.com/collectives/intel/articles/71701870/how-to-use-model-downloader-for-encoder-decoder-models-using-openvino-toolkit",

             "title": "How to use Model Downloader for Encoder Decoder Models using OpenVINO™ toolkit"

         }

    ],

       "has_more": false,

       "quota_max": 10000,

       "quota_remaining": 9995

}
Did this mean the api definition was at https://api.stackexchange.com/2.3?
Yes and no. Visiting that URL in the browser brings up an error, and trying https://api.stackexchange.com/2.3/swagger/ has the same result:
{"error_id":404,"error_message":"no method found with this name","error_name":"no_method"}
So clearly something was there, but not that.
Next, I tried searching the StackApps forum for any mention of Power Platform or Power Apps, and I found at least one other person had had a go at this, and seemed to have got it working: App as Power Platform custom connector. This post, by Greg Hurlman, said,
“Trying to create a connector for Microsoft’s Power Platform in order for others to be able to create Power Apps and Power Automate workflows against Stack* data.
I need a post in order to get write scope access, so, uh, yeah. “
Ok, it wasn’t the most informative post, but it did give me some encouragement that this was possible. I also thought a bit of stalking of Greg Hurlman’s profile on Stack Apps might bring up some more useful posts about his app.
Looking at his description, ‘Solution Architect on the Parature team at Microsoft based in Washington, DC. Coder for 25 years, .Net developer since 2001’, I did feel this 25 year veteran Microsoft coder might be a bit out of my programming league. But they also said he doesn’t have any gold or silver forum badges yet, so Hah! New life goal for me 😀
Trawling a bit further through his user activity led me to his
comment on a post called ‘Is there a OpenAPI/Swagger spec for the Stack Exchange API?‘.
And this question and answer was very helpful :
The user ‘Grokify‘ asked, and answered:
“I’m interested in calling the Stack Exchange API (https://api.stackexchange.com/docs) and was wondering if there is a OpenAPI/Swagger 2.0 or 3.0 specification for it? I didn’t see it on the docs page but was wondering if one existed.”
I’ve started to create a spec here. It is far from complete but provides a project to work off of.
The spec can be used with Swagger UI here:
Feel free to use and contribute.
Visiting the Petstore Swagger.io link for the Stack Exchange API (https://petstore.swagger.io/?url=https://raw.githubusercontent.com/openapis/api-specs/master/stackexchange/stackexchange-api-v2.2_openapi-v3.0.yaml) brought up this very neatly designed and recognisable user interface for exploring the Stack Exchange API definition and usage instructions:
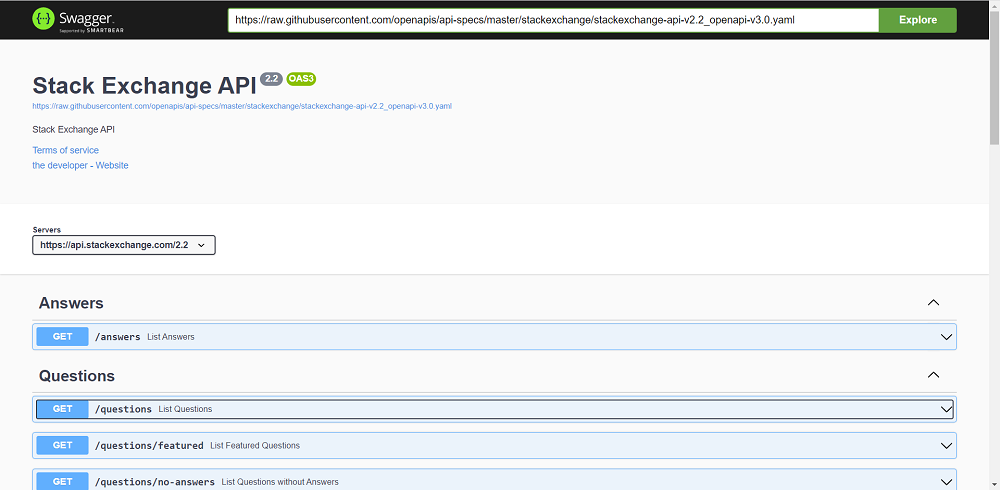
Petstore Swagger UI seems to be a useful tool for exploring APIs
Expanding the ‘Questions’ sections gave me more details on how to use these parts of the API:

Long screenshot of the Swagger user interface for the Stack Exchange API definition, showing more usage details and examples from the Questions sections
Visiting the second part of the URL, without the Petstore Swagger user interface, brings up this structured text definition, which I assume is a ‘YAML’ file (https://raw.githubusercontent.com/openapis/api-specs/master/stackexchange/stackexchange-api-v2.2_openapi-v3.0.yaml):
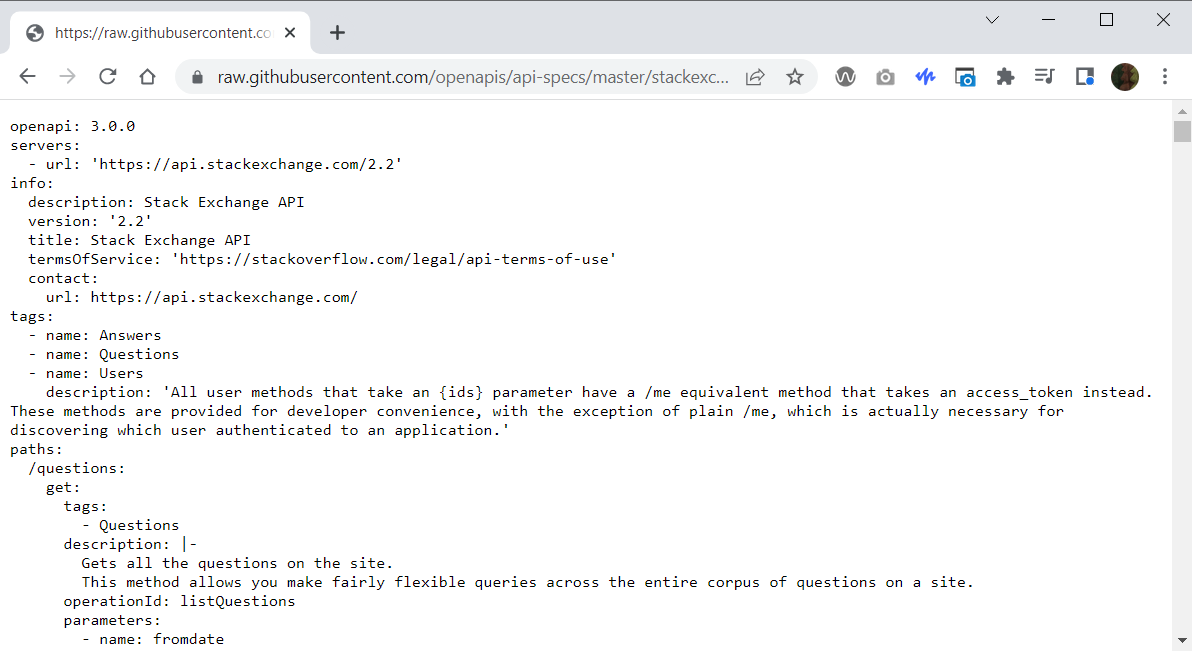
This is what the YAML text looks like in the browser
(Here’s how the YAML begins, for those who can’t make out the screenshot):
openapi: 3.0.0

servers:

    - url: 'https://api.stackexchange.com/2.2'

info:

    description: Stack Exchange API

    version: '2.2'

    title: Stack Exchange API

    termsOfService: 'https://stackoverflow.com/legal/api-terms-of-use'

    contact:

        url: https://api.stackexchange.com/

tags:

    - name: Answers

    - name: Questions

    - name: Users

        description: 'All user methods that take an {ids} parameter have a /me equivalent method that takes an access_token instead. These methods are provided for developer convenience, with the exception of plain /me, which is actually necessary for discovering which user authenticated to an application.'

paths:

    /questions:

        get:

            tags:

                - Questions

            description: |-

                Gets all the questions on the site.

                This method allows you make fairly flexible queries across the entire corpus of questions on a site.

            operationId: listQuestions

            parameters:

                - name: fromdate

                  in: query

                  required: false
…etc…
So what is YAML, I wondered, and is it better than JSON? A quick Google for ‘YAML’, brought up first this snippet from Red Hat’s article, ‘What is YAML?‘,
“YAML is a data serialization language that is often used for writing configuration files. Depending on whom you ask, YAML stands for yet another markup language or YAML ain’t markup language (a recursive acronym), which emphasizes that YAML is for data, not documents.”,
followed by this comparison from Linux Hint’s, ‘Is YAML better than JSON?‘,
“JSON is comparatively faster than YAML. However, if data configurations are small then YAML is better since its interface is much more friendly. JSON has a feature to encode six different data types like an object, array, strings, numbers, null and boolean.”
That’s that sorted out then.
At first, importing an OpenAPI into a Custom Connector from the YAML URL seemed like it might be working:
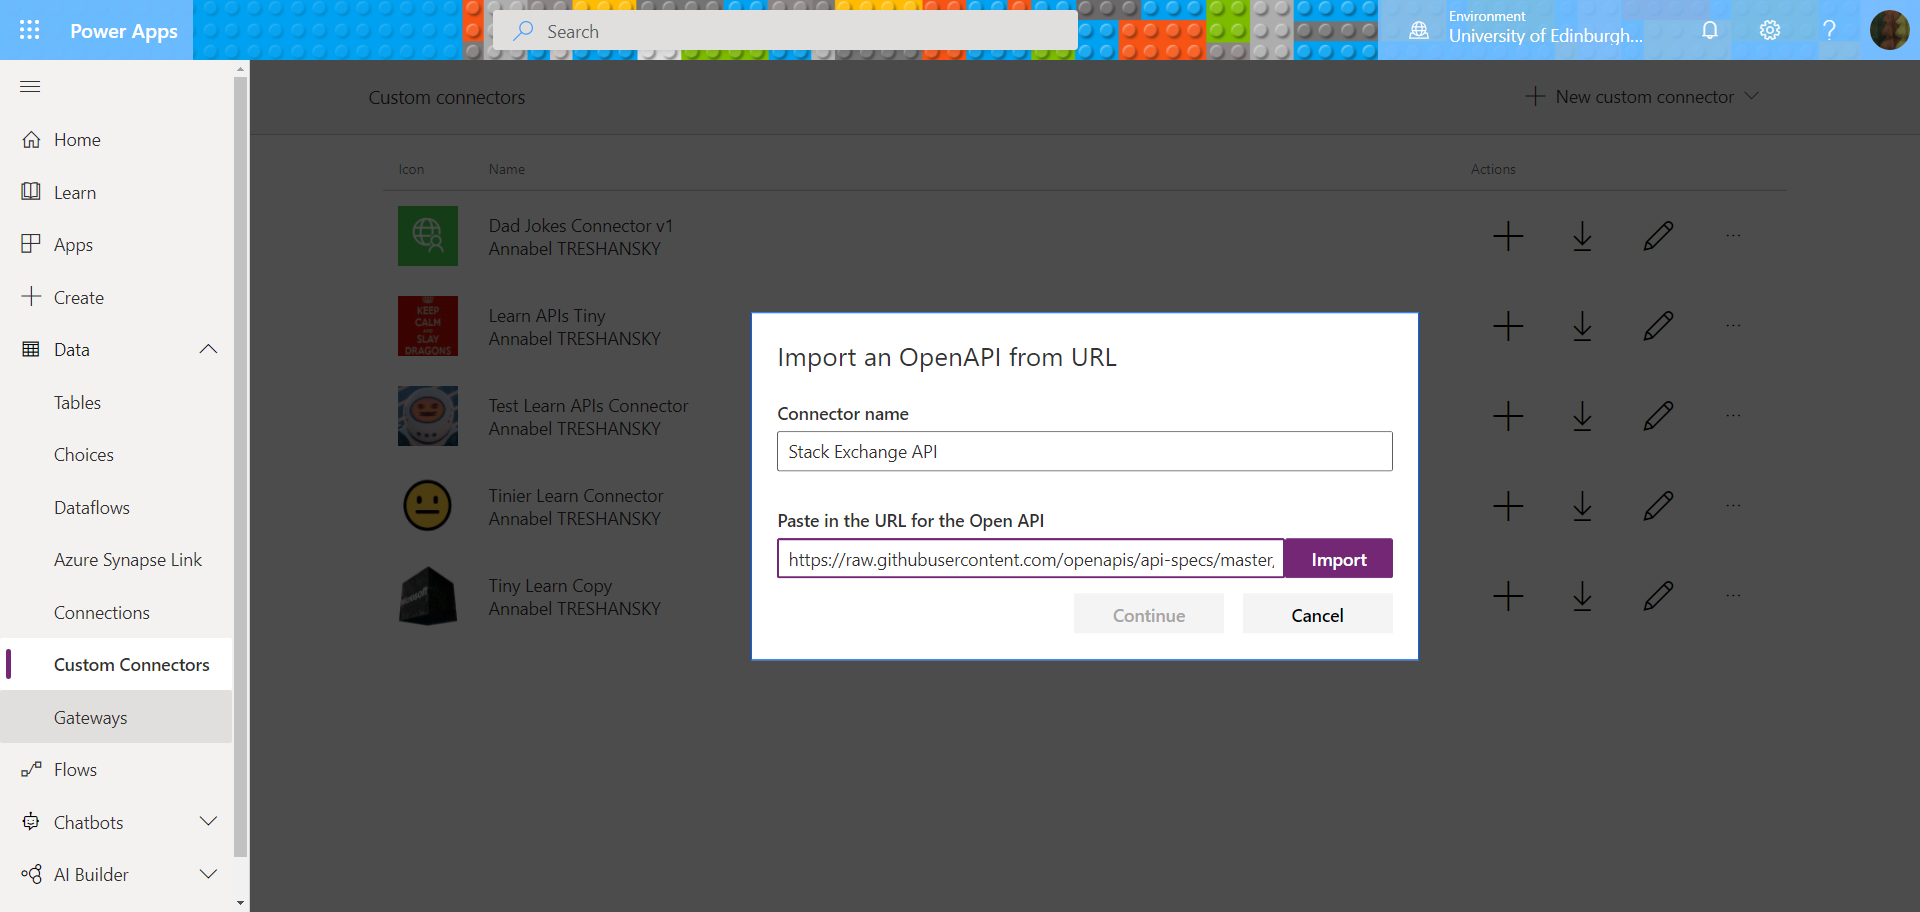
Importing from the YAML URL – what’s going to happen??
Unfortunately, when I got to the ‘Definitions’ page of the Custom Connector setup, it turned out no definitions were imported from that YAML file:
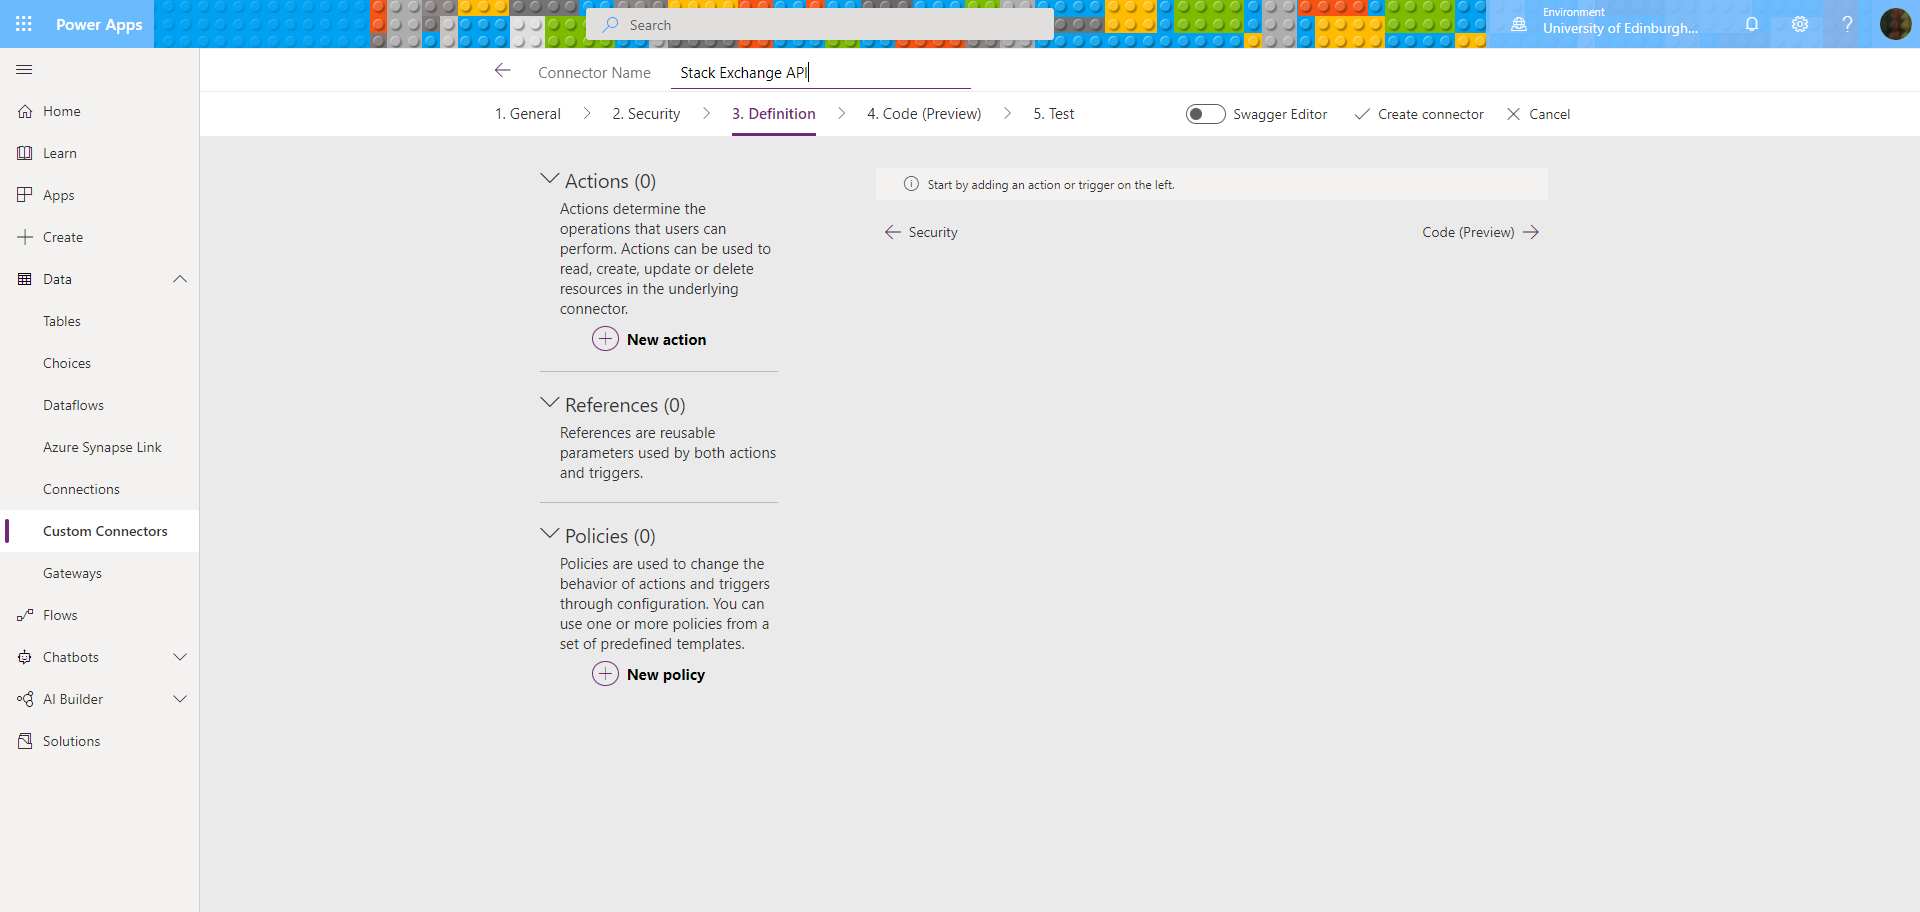
It was all looking so good… but now no actions are available
As I only needed to make the connection at the moment, would I need an endpoint there to get to the saving and testing? I tried saving the connector without any:
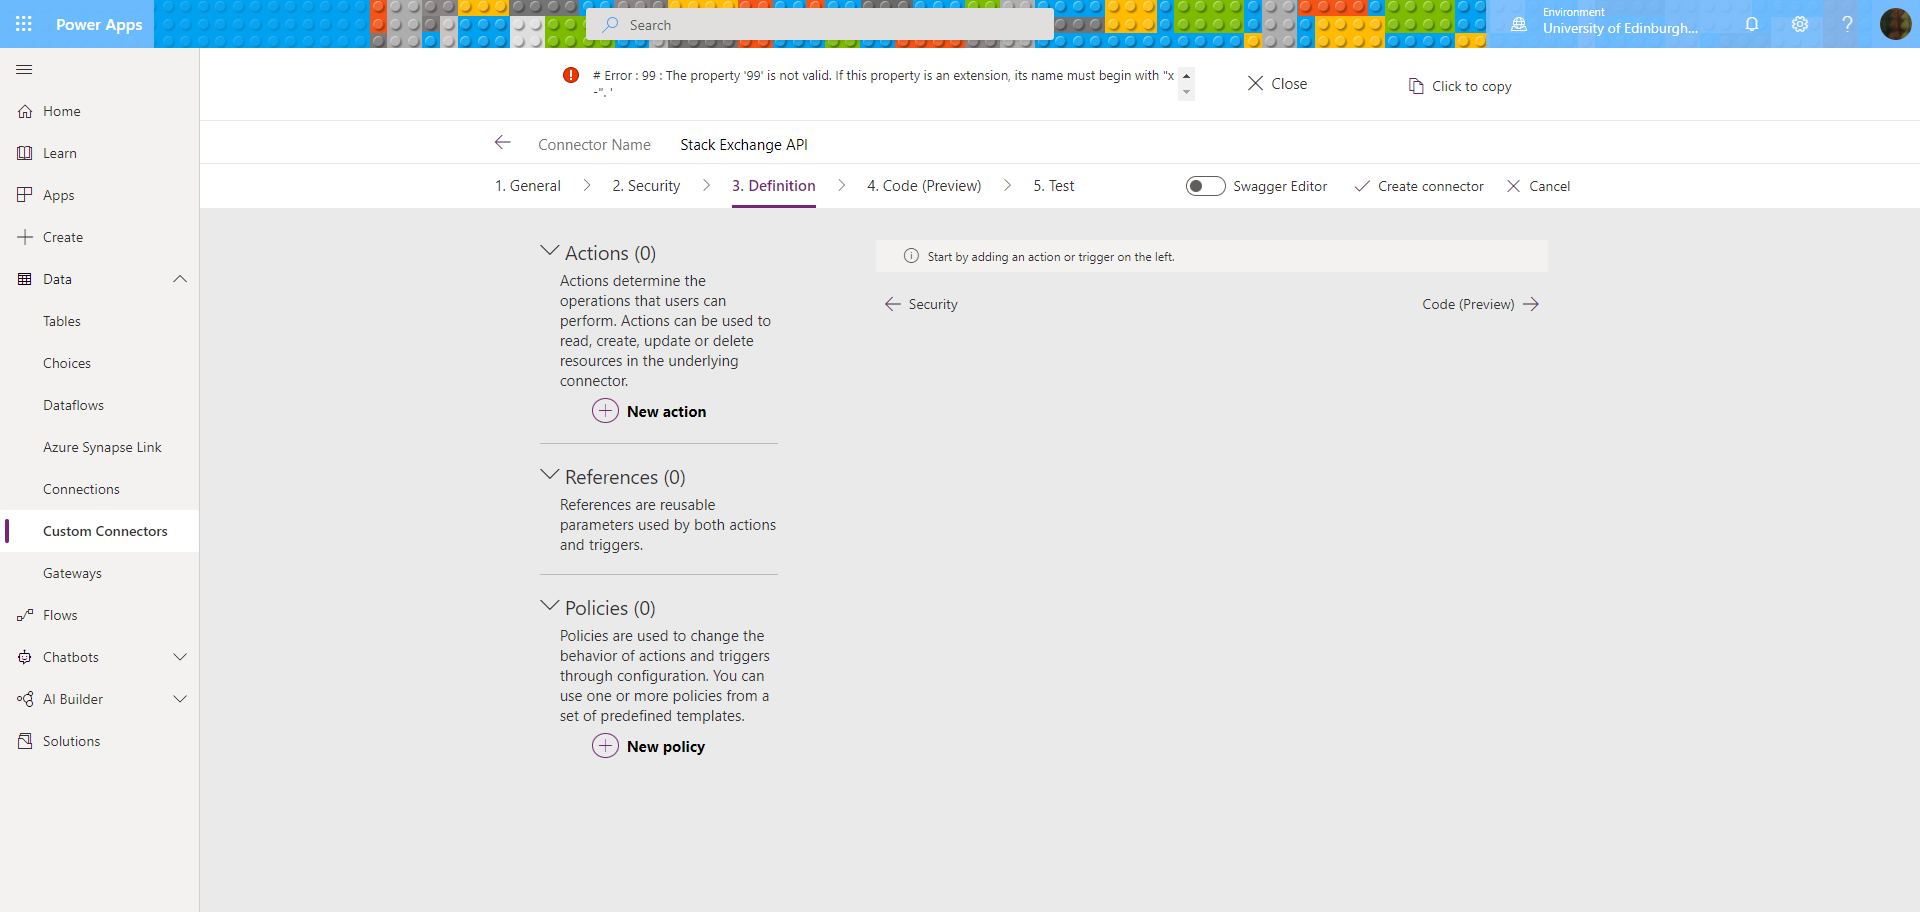
Hm, what’s that tiny red error up at the top…?
Scrolling through that tiny error message brought up a wall of text detailing 99 errors, that started like this:
Specified swagger has the following errors: 'Error : 0 : The property '0' is not valid. If this property is an extension, its name must begin with "x-". ## Error : 1 : The property '1' is not valid. If this property is an extension, its name must begin with "x-". ## Error : 2 : The property '2' is not valid. If this property is an extension, its name must begin with "x-". ## Error : 3 :
…etc
It looked pretty bad in the Swagger editor too, where the scale of the problem actually looked even worse than the first 99 errors:
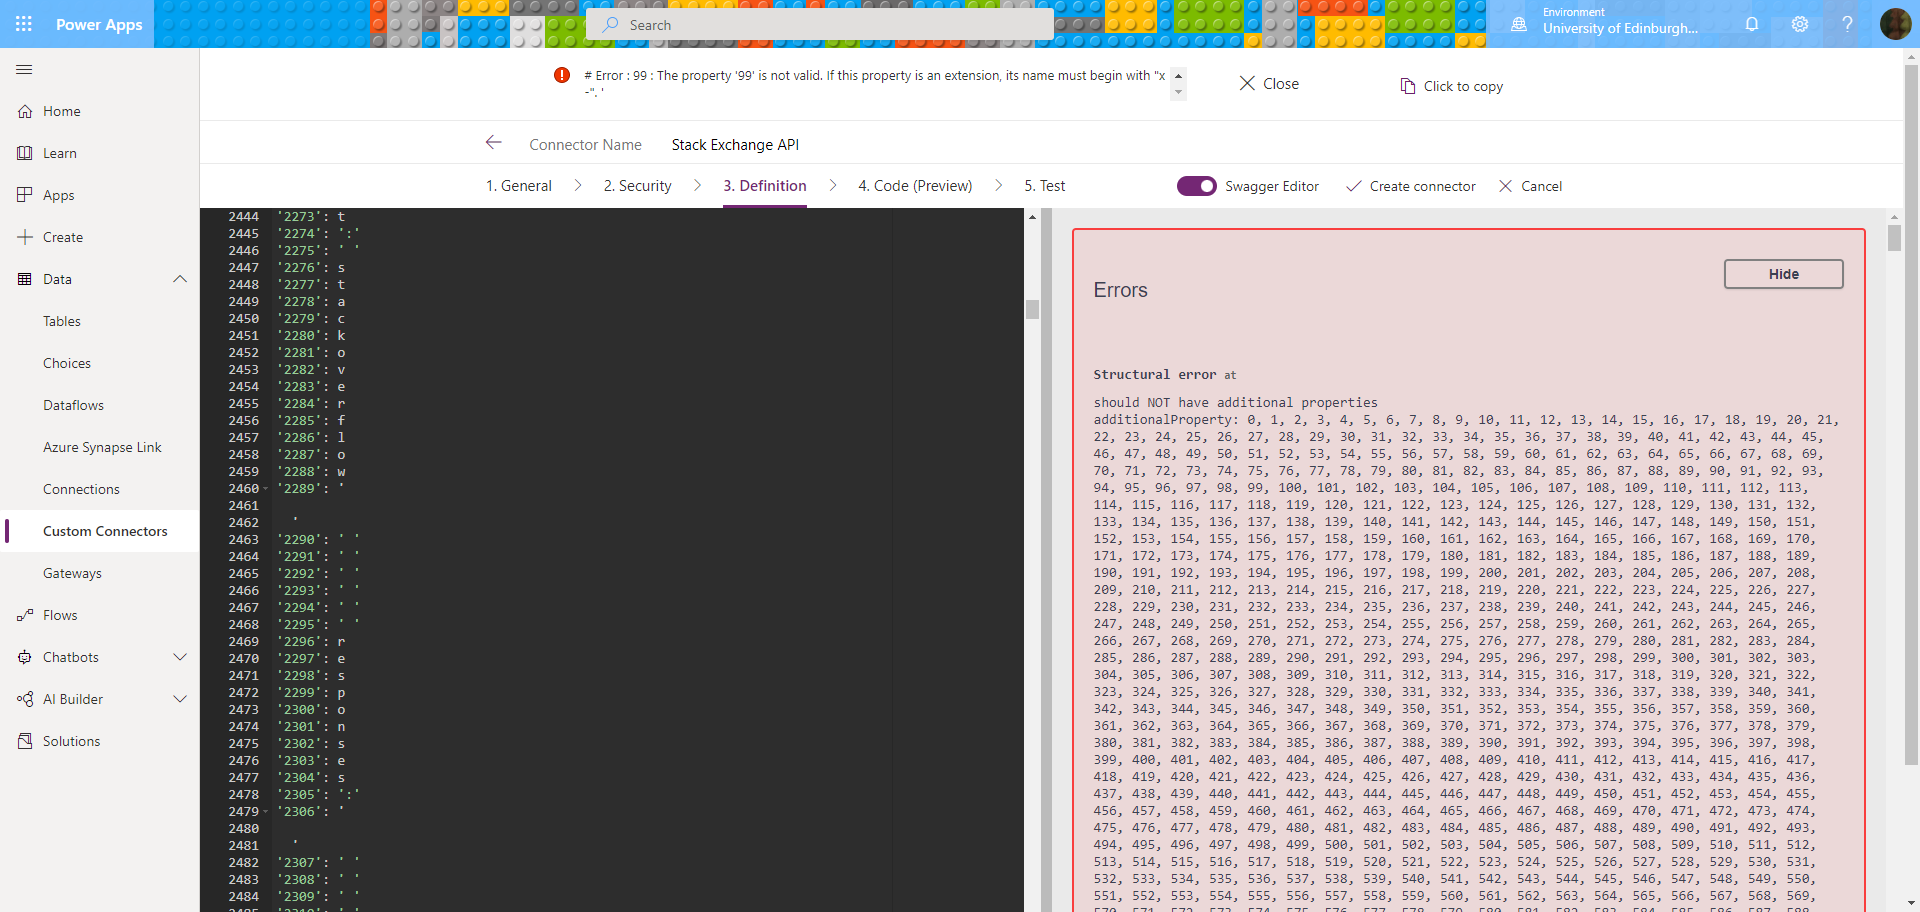
Swagger editor carnage – what is that, 2000 lines of errors?!
Clearly the YAML file had not imported as well as I had thought. I needed to find a way of converting the YAML to JSON.
Converting YAML to JSON
(Note: This step may not be necessary as the next thing I did looks as if it might have worked on the YAML file anyway without converting to JSON first).
A bit of Googling found me this very handy tool, ConvertJSON.com, where you can convert YAML to JSON:
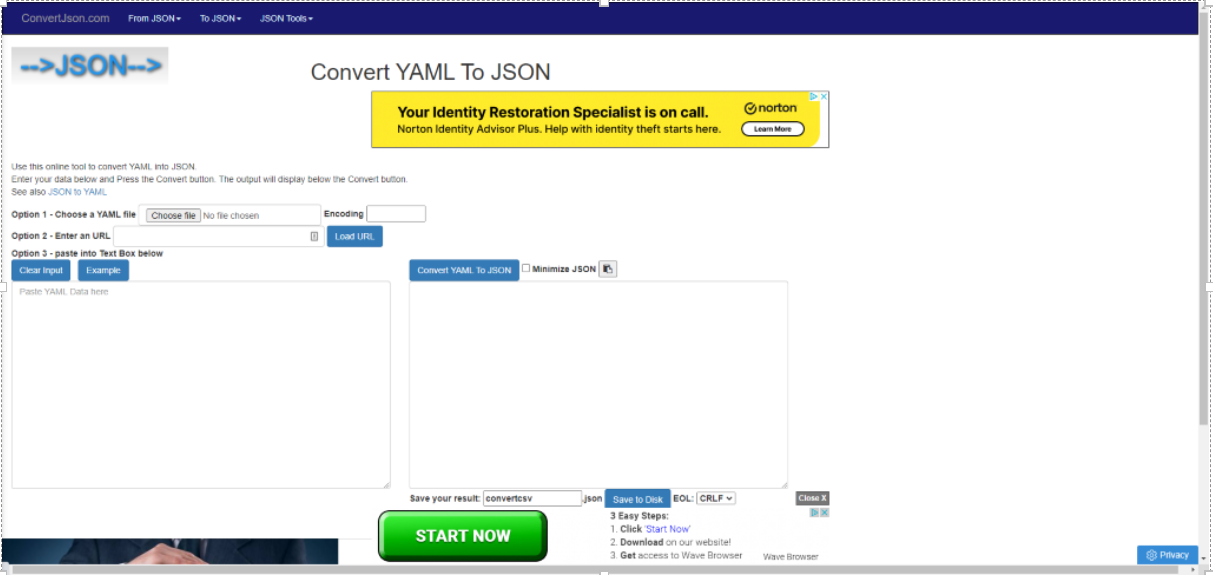
A very handy tool – looks like exactly what I need!
YAML goes in one box, JSON comes out of the other one. Brilliant stuff:
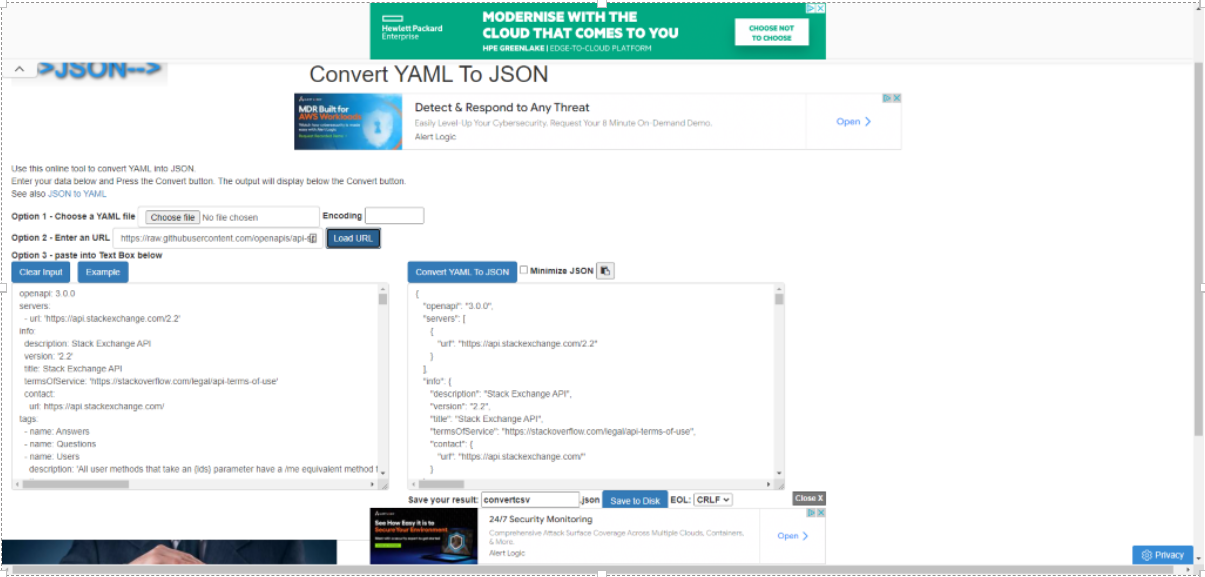
My YAML is now JSON
Now I had the JSON, I could save it into a text file and import it into the custom connector, right…?
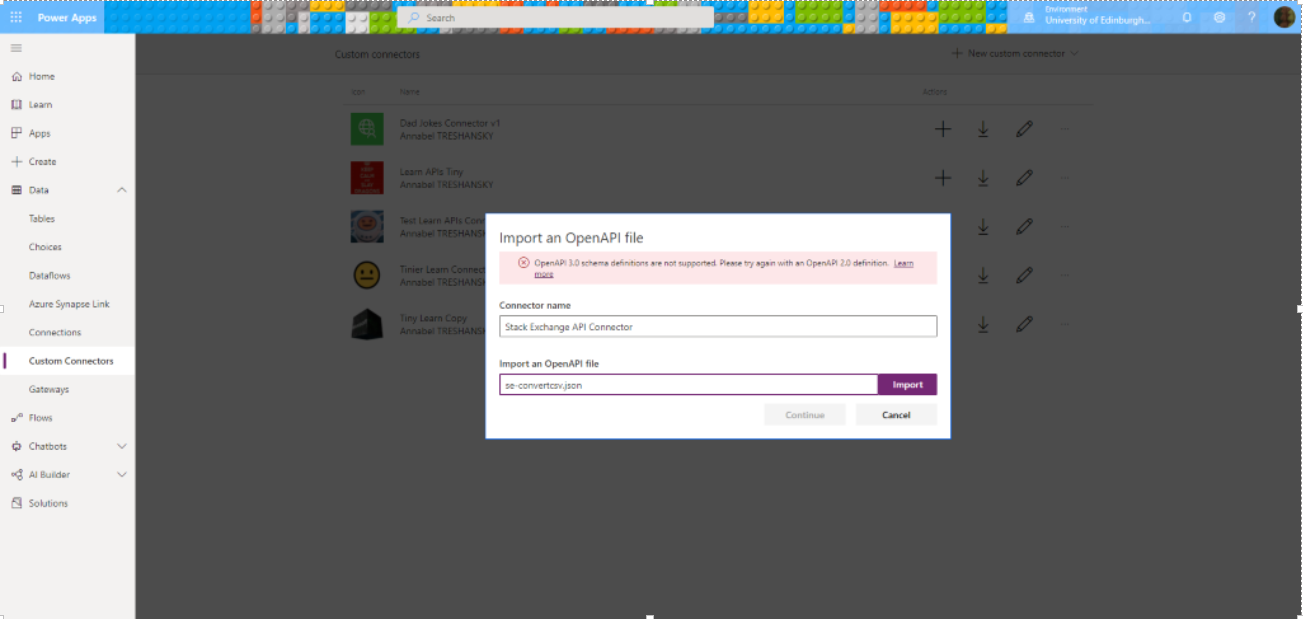
Apparently not…
The error message says this:
OpenAPI 3.0 schema definitions are not supported. Please try again with an OpenAPI 2.0 definition. Learn more
So now I had to get it from OpenAPI 3 to 2…
Converting from OpenAPI 3 to OpenAPI 2
So far, I had managed to run converters online to convert the YAML from GitHub to JSON and download a file that was OpenAPI v3 JSON. I needed to convert this to version 2 for importing into the Power Platform Custom Connector.
As seems to happen, I found one other person asking how to Convert OpenAPI 3.0 to Swagger 2.0, who also needed it for Power Automate!
The answers recommended a couple of tools: API Transformer, which turned out to be a paid service (fair enough but not something I’m willing to pay for in the circumstances!), and LucyBot api-spec-converter. LucyBot converts from URL sources, which got me thinking of finding the password for my old personal blog, turning off cross site scripting security for the uploads directory and uploading it there.
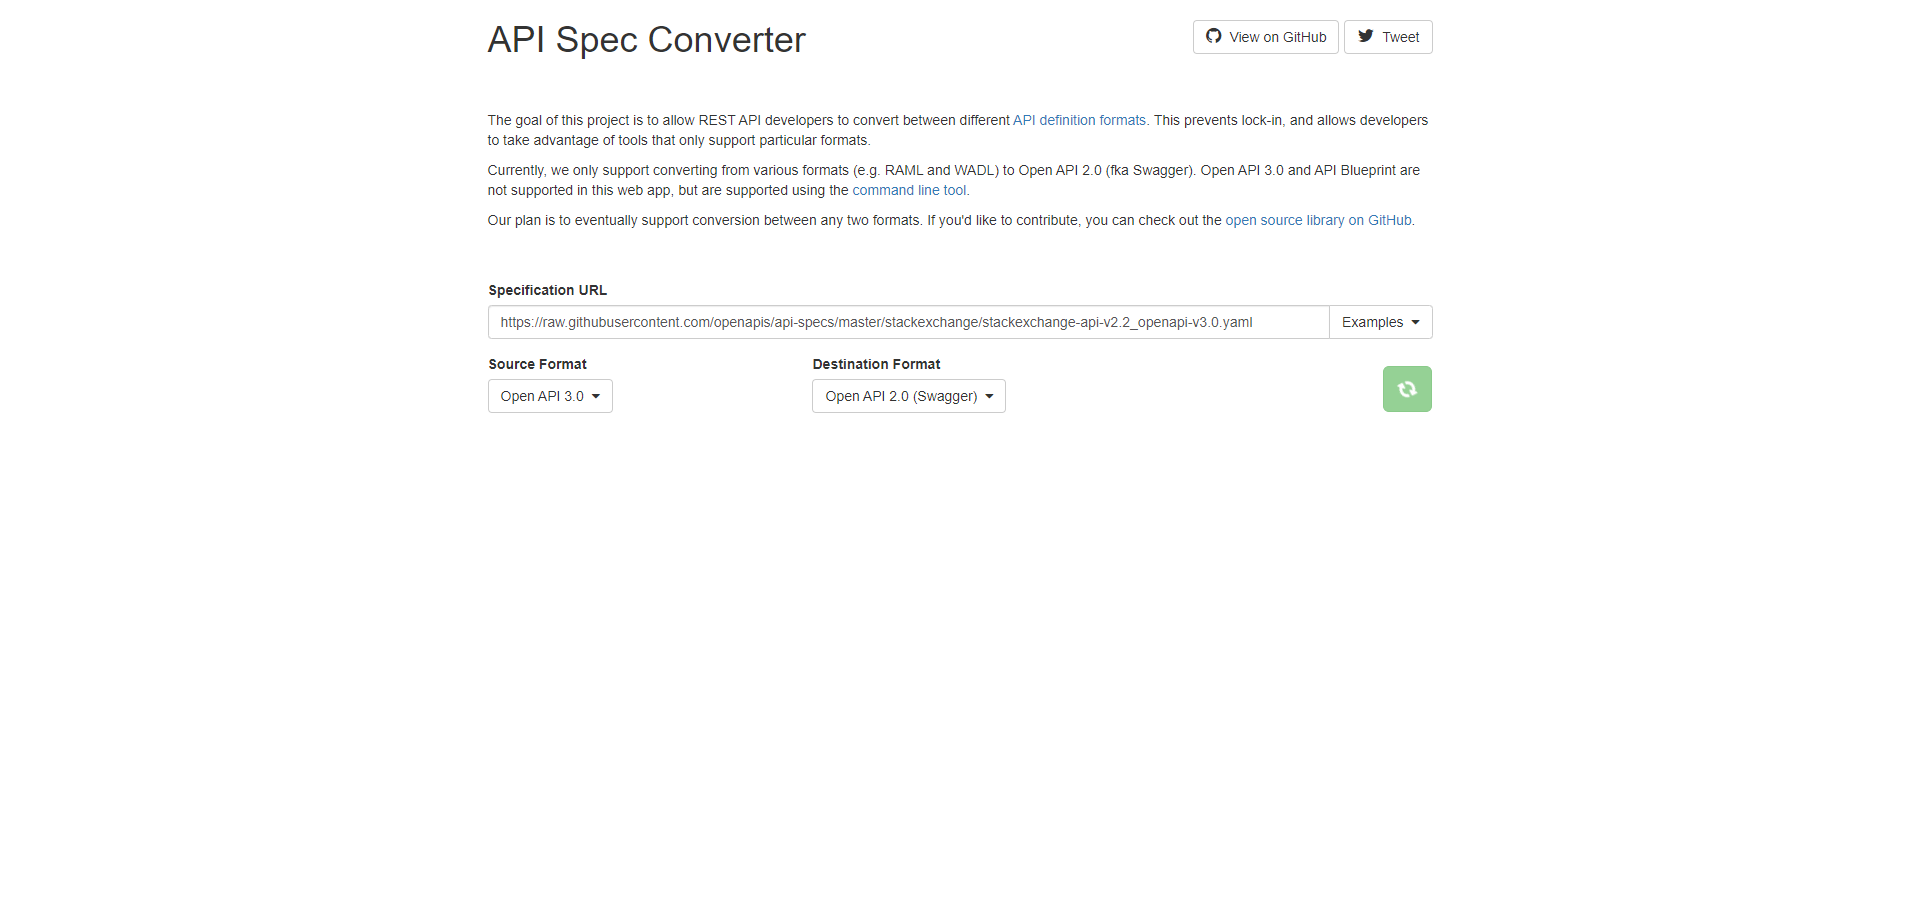
LucyBot converter: a fantastically useful looking tool, but not quite for these circumstances
To avoid diving into old blog admin, I read around the related answers instead, and I found a very useful looking list of online tools here at OpenAPI.Tools: Converters.
Thanks to this handy list, I finally had some luck with openapi-to-postman, which converts OpenAPI 3 to a version 2 Postman collection.
Converting OpenAPI 3 to a Postman collection
This was quite straightforward to run by following the instructions on GitHub. It also looks as if it might have worked on the YAML file without converting to JSON first:
- I opened a command line window and installed the API to Postman converter with
npm i -g openapi-to-postmanv2 - I had the JSON saved in a text file called se-convertcsv.json
- I ran openapi-to-postmanv2 with this command:
openapi2postmanv2 -s se-convertcsv.json -o se-postmancollectionv2.jsonIt worked, and responded with these messages:
Input file: C:\Users\atreshan\working\se-convertcsv.json
Writing to file: false C:\Users\atreshan\working\se-postmancollectionv2.json { result: true,
output: [ { type: ‘collection’, data: [Object] } ] } - The conversion was successful, and the collection was written to a Postman version 2 file called se-postmancollectionv2.json, which I would then need to convert to Postman version 1 and cut down in size for the custom connector
- To do this, I ran the postman-collection-transformer utility to convert the version 2 collection to Postman version 1, which is the version required for importing to the custom connector:
postman-collection-transformer convert -i se-postmancollectionv2.json -o se-postman_collection-v1.json -j 2.0.0 -p 1.0.0 -P - Luckily, when I ran the postman collection transformer utility, I discovered the output file was actually small enough anyway: the size was 76 KB which actually does seem very small.
After a couple of typos, I got there in the end:
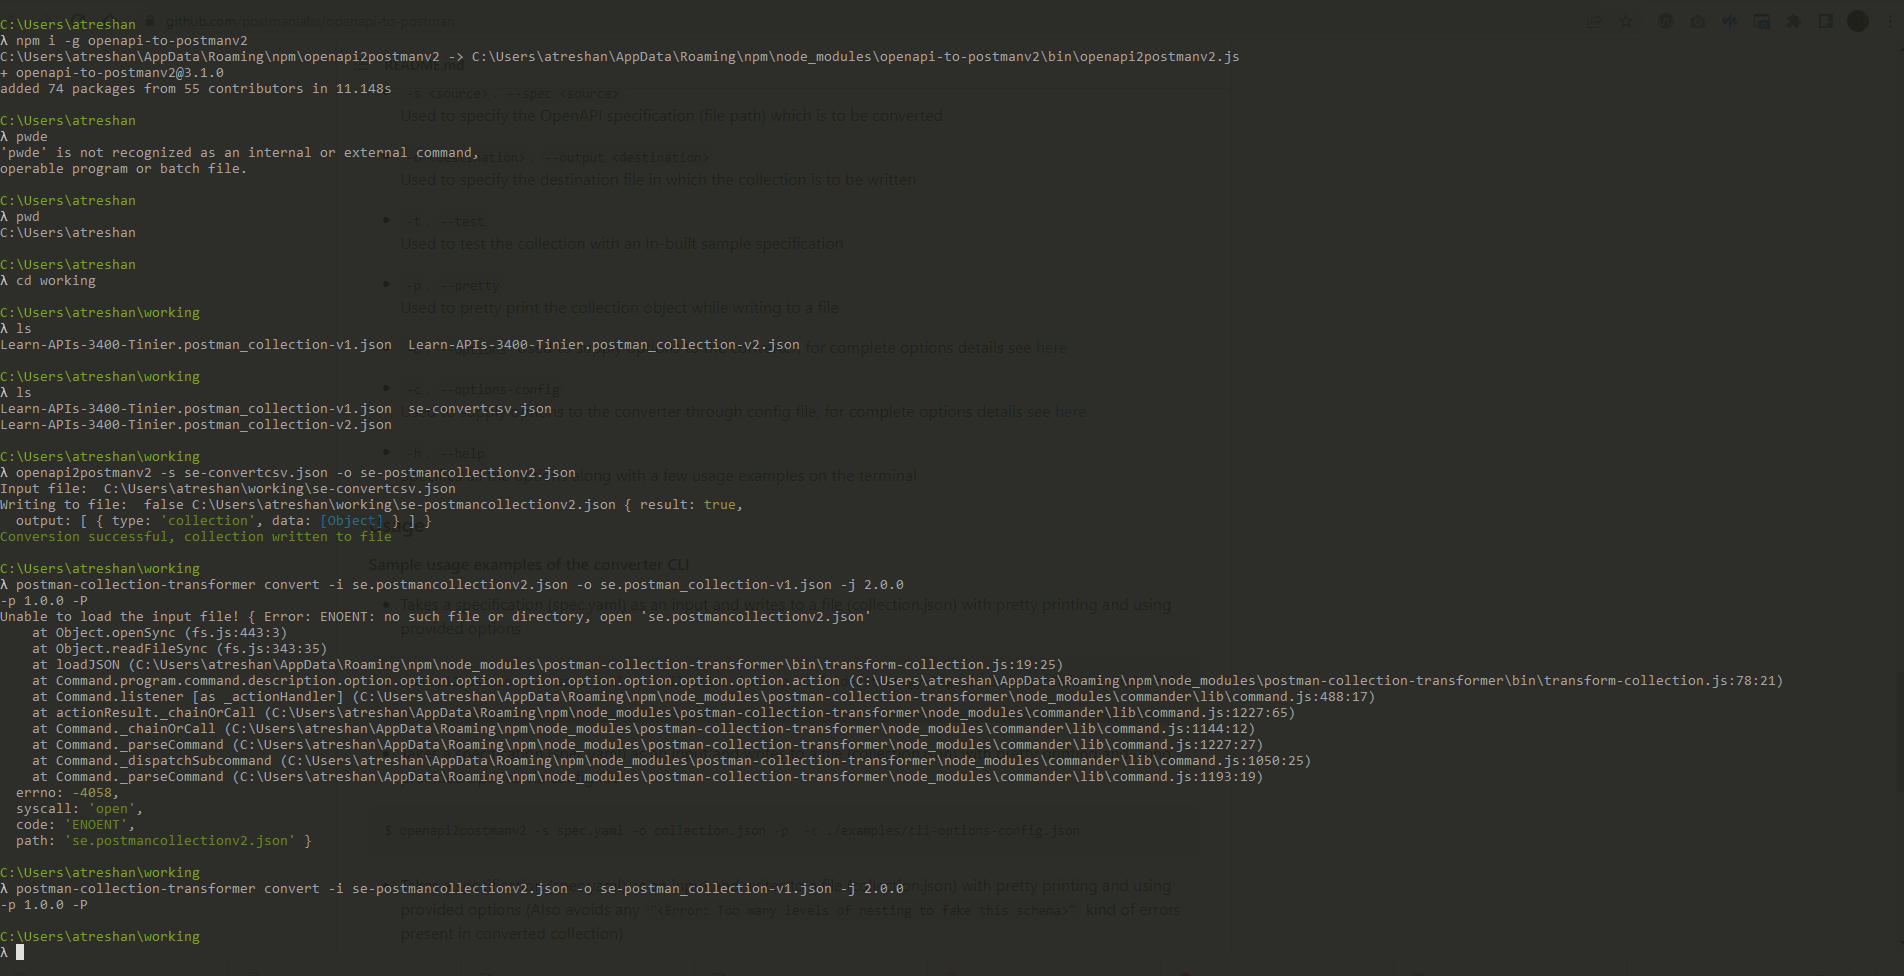
Screenshot: Using the API to Postman converter in a command line window
The Postman Collection
I thought it would be a good idea to se how the API looked in Postman. Trying to import the v1 collection into Postman didn’t work because it was v1:
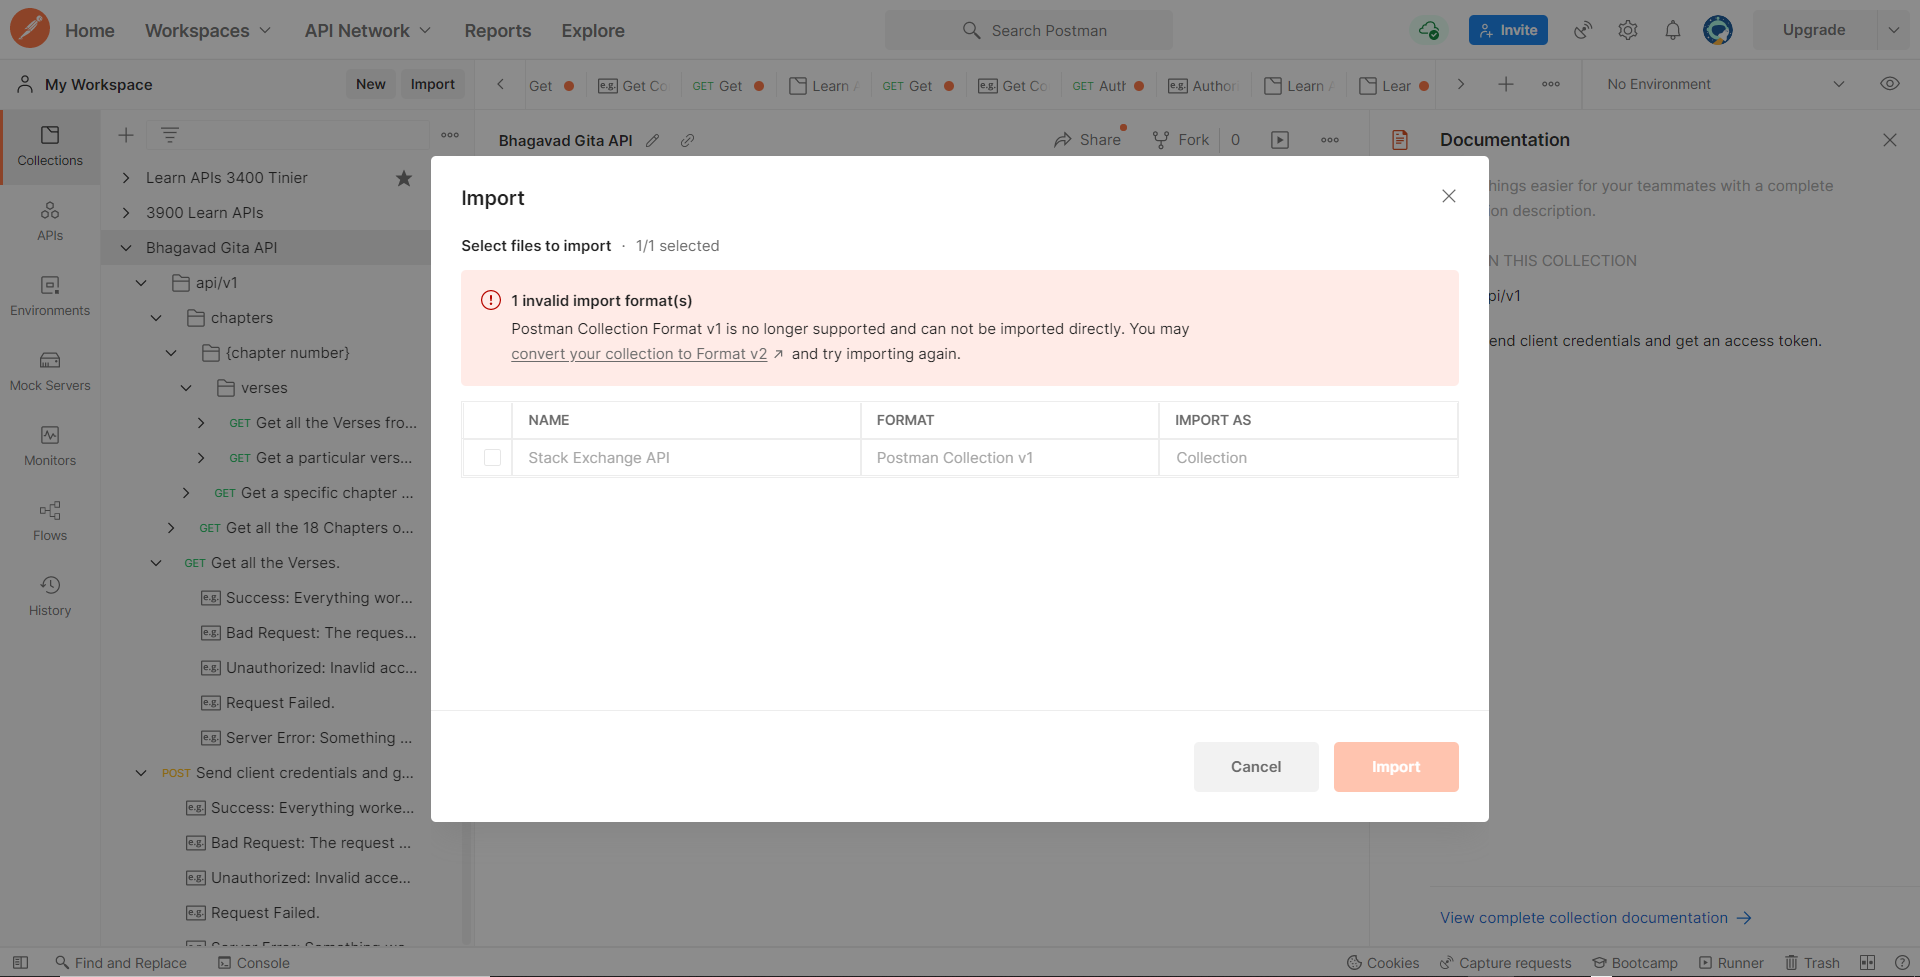
Seems ironic: the format I can import for Power Apps won’t import back into Postman!
So I tried v2 instead:
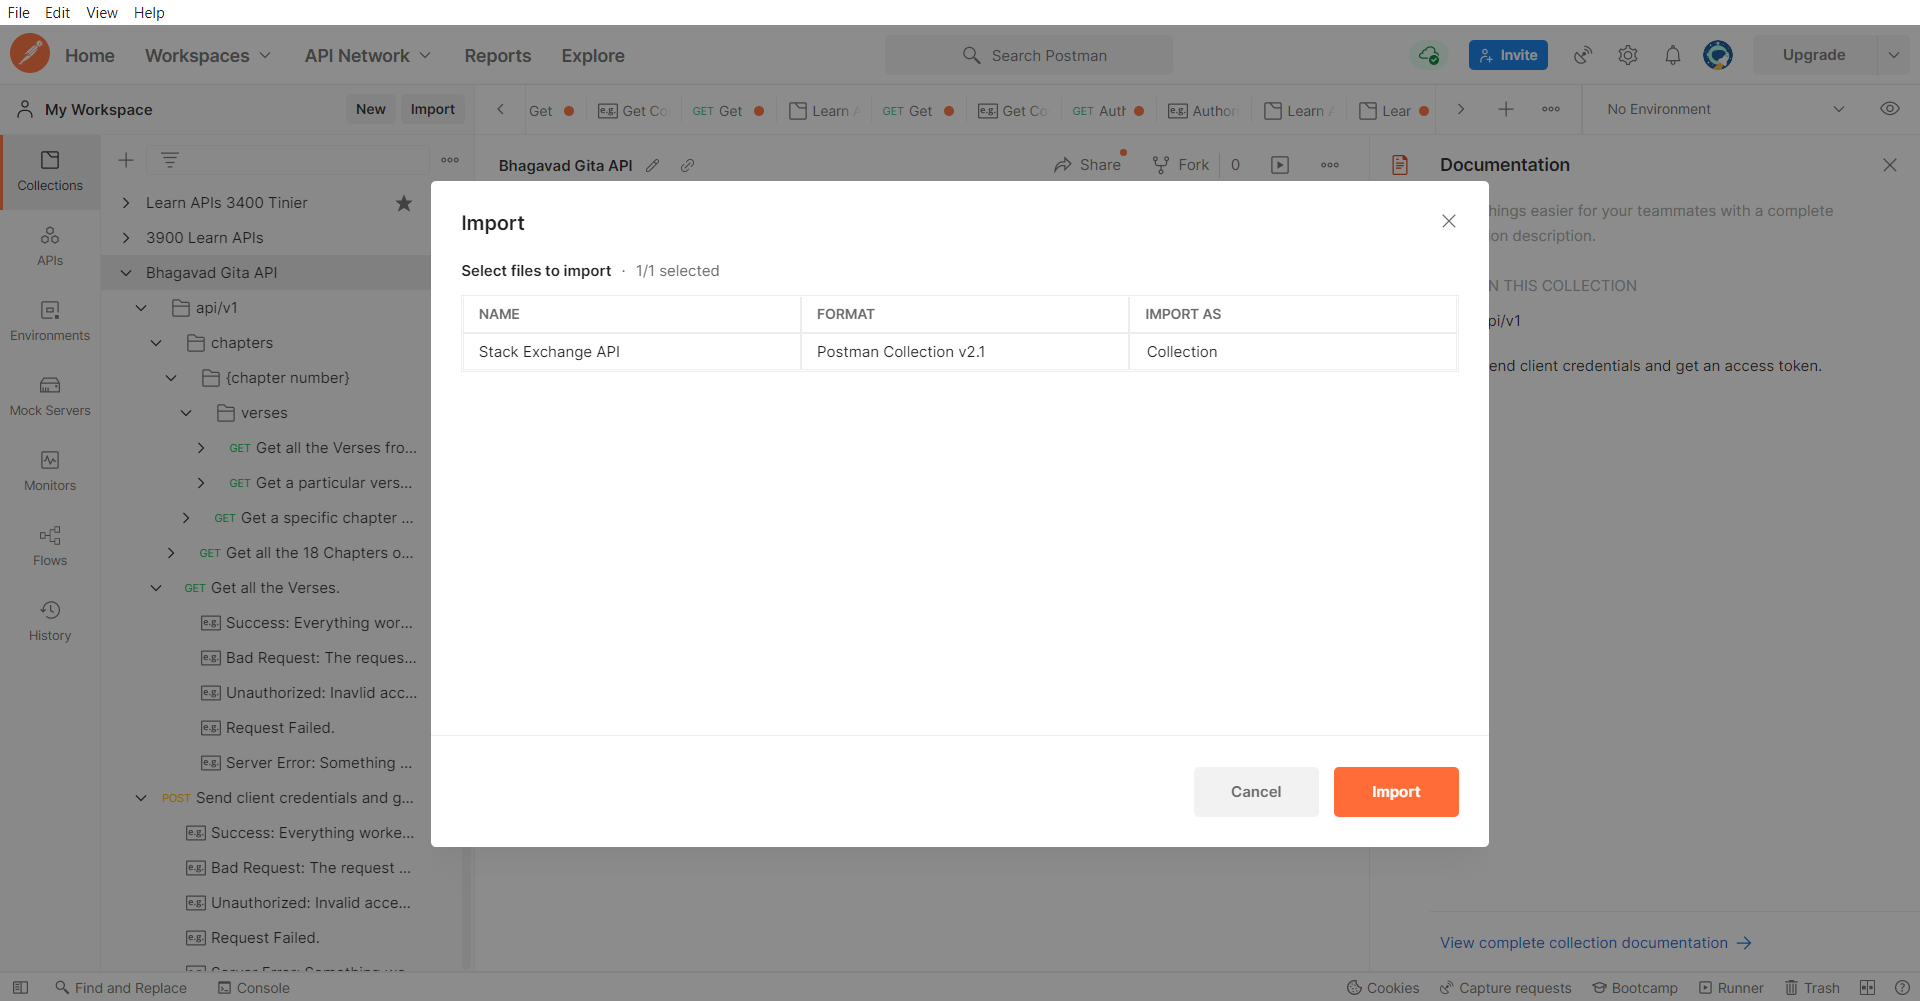
Importing a version 2 collection into Postman: thankfully this did work
Looking in Postman, the collection all seems to be there, although without any authorisation details:

There it is in Postman – finally, this feels like progress!
Creating a Custom Connector from a Postman Collection
Although the Postman collection didn’t include any authentication details, nothing except the base url ever seems to import to the custom connector anyway so I thought it was worth trying to import it as it was.
And although it was the version 2 collection I could look at in Postman, it was the version 1 collection that could be imported to create a Power Apps custom connector. Like this:
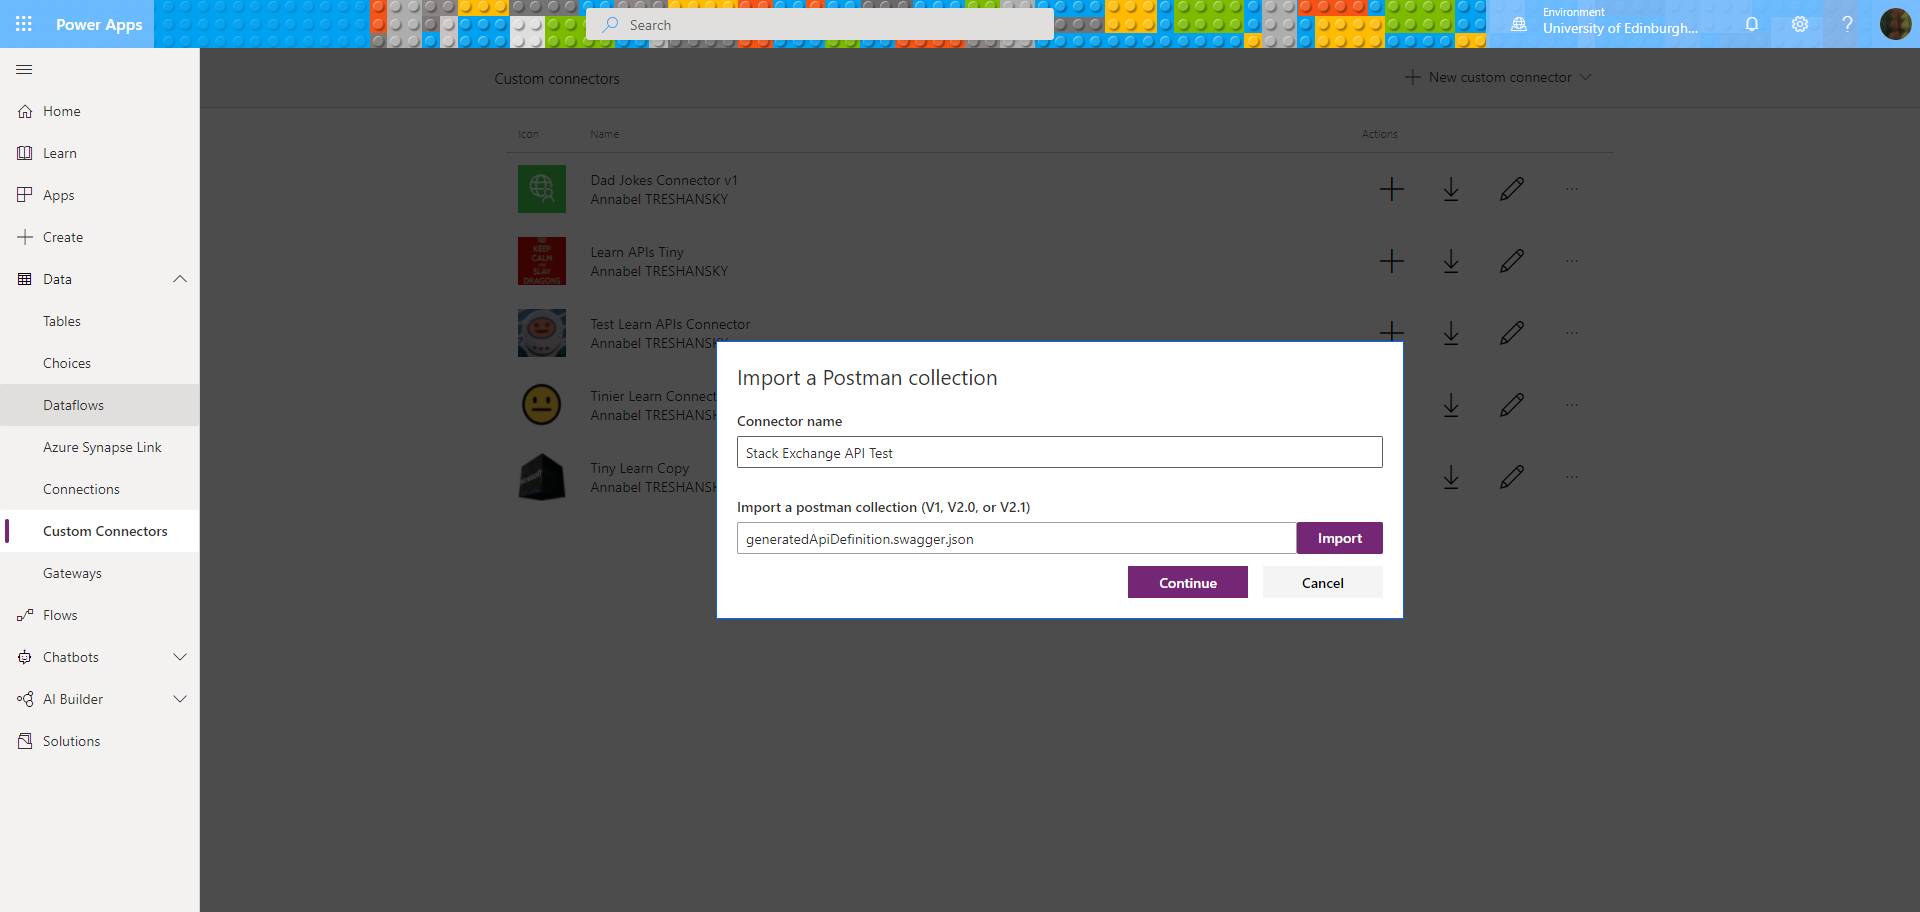
Fingers crossed: Importing the Postman collection…
Still seems to be working…
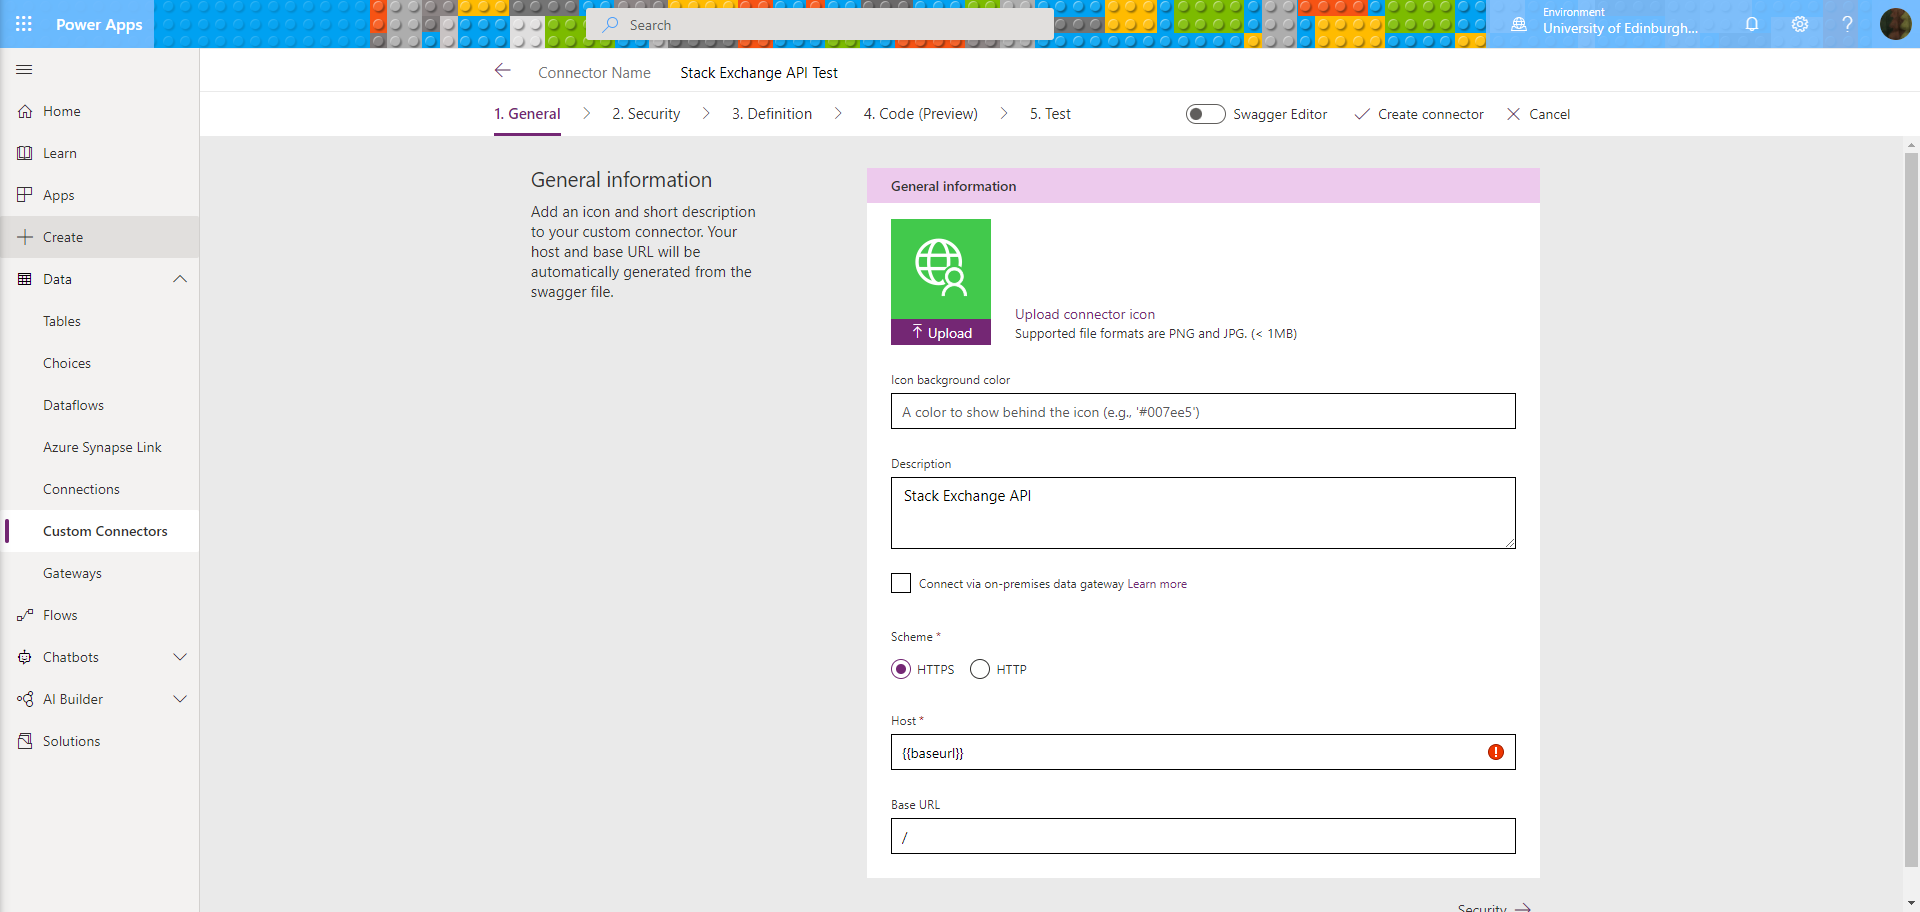
Fingers still crossed: that’s the first screen of the Power Apps Custom Connector…
How about this dramatic tension 😀
Custom Connector: General Information Page
I found a new mistake to make on this screen: Host cannot contain subpaths – but maybe the base url can?
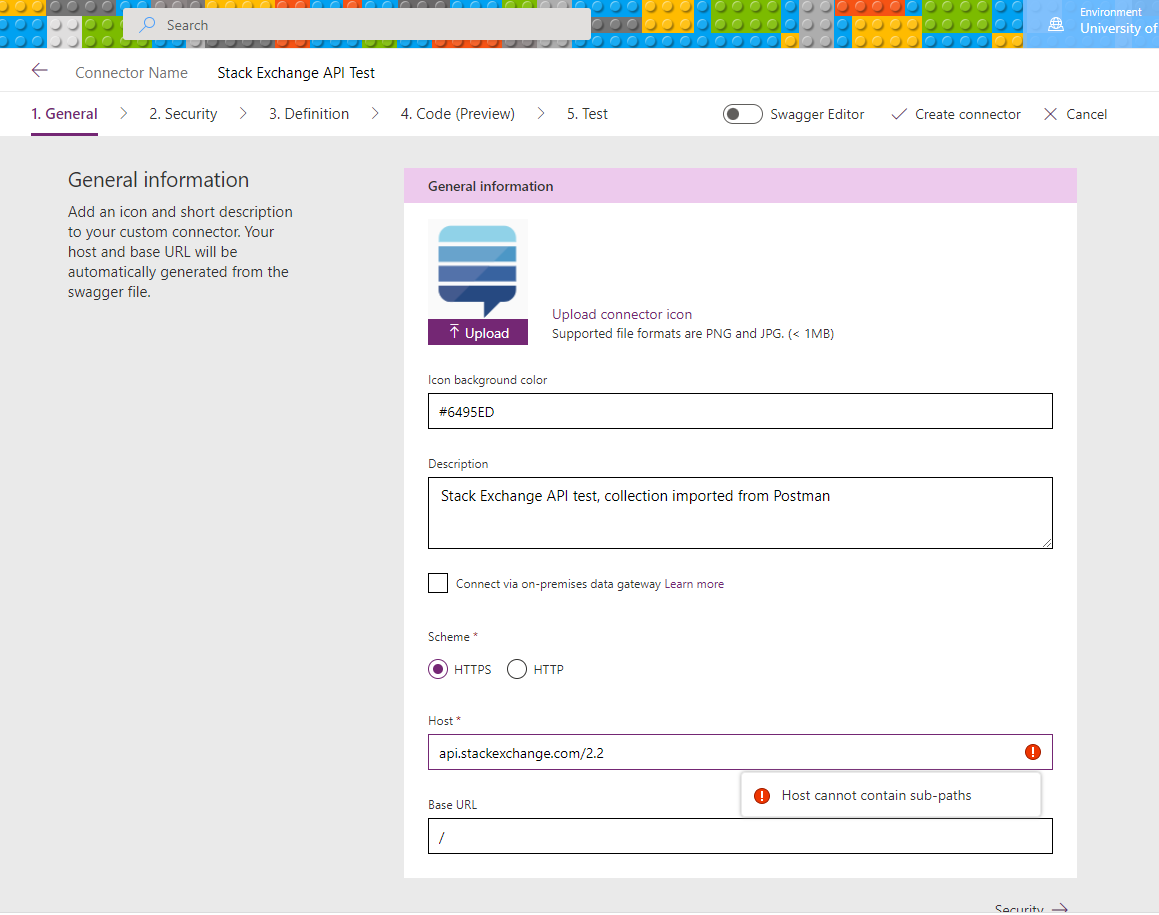
The API url may need splitting between the two boxes
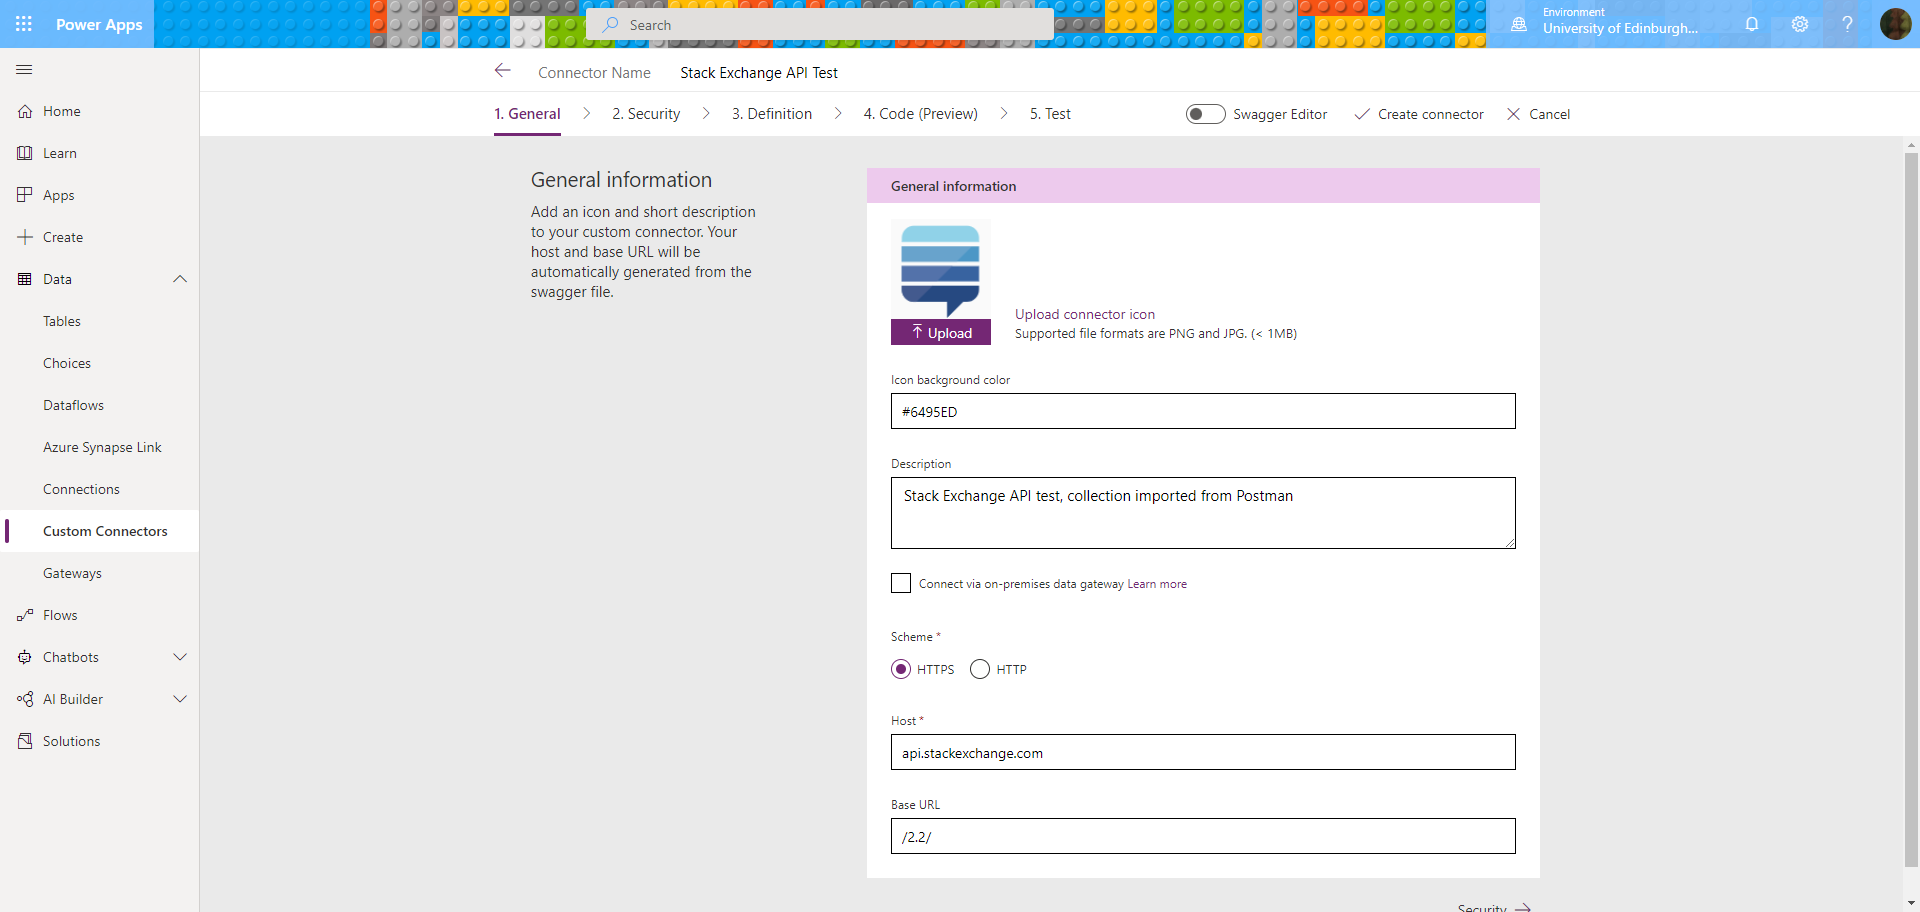
The host domain goes in the first box, and the rest of the URL for the API goes in the Base URL box
Good, no errors so far. I’ve also got their icon in there, although I won’t be doing anything copyright infringing with it, just using it to tell my own connectors apart while I’m working on this.
Next up, the OAuth 2 page…
Custom Connector: OAuth2 Authentication
This is how my Authentication page was set up for connecting to Stack Exchange with OAuth2:
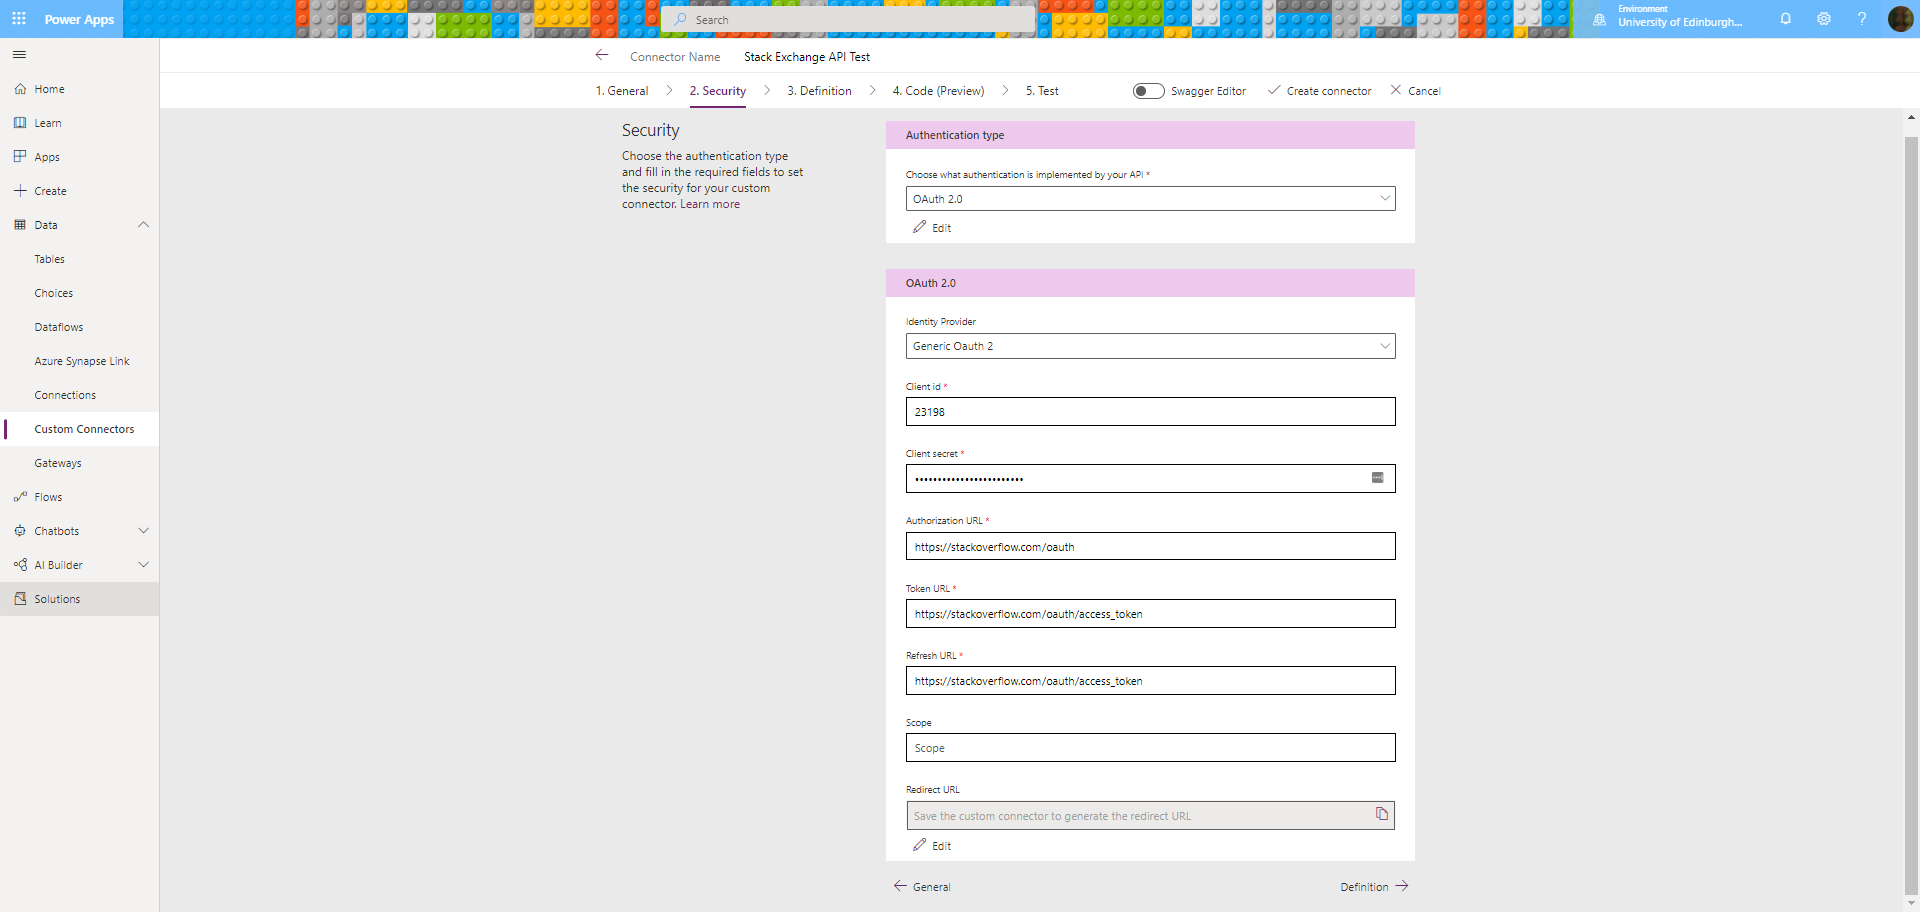
Funny, I thought this would be the hard part but it wasn’t
Here are the settings:
| Setting | Value |
|---|---|
| Authentication type | OAuth 2.0 |
| Identity Provider | Generic OAuth 2 |
| Client Id | ID from Stack Apps |
| Client secret | Secret from Stack Apps |
| Authorization URL | https://stackoverflow.com/oauth |
| Token URL | https://stackoverflow.com/oauth/access_token |
| Refresh URL | https://stackoverflow.com/oauth/access_token |
| Scope | (Leave blank) |
| Redirect URL | (Autofills when you save) |
I wasn’t sure what to put for scope, but as the documentation makes clear, leaving it blank would be fine for my purposes:
Scope
“With an empty scope, authentication will only allow an application to identify a user via the /me method. In order to access other information, different scope values must be sent. Multiple values may be sent in scope by comma or space delimitting them.”
- read_inbox – access a user’s global inbox
- no_expiry – access_token’s with this scope do not expire
- write_access – perform write operations as a user 2.1
- private_info – access full history of a user’s private actions on the site 2.1
Custom Connector: Definitions
Looking at the imported definitions, this page also looked good so far (at least compared to the blank page from before!):
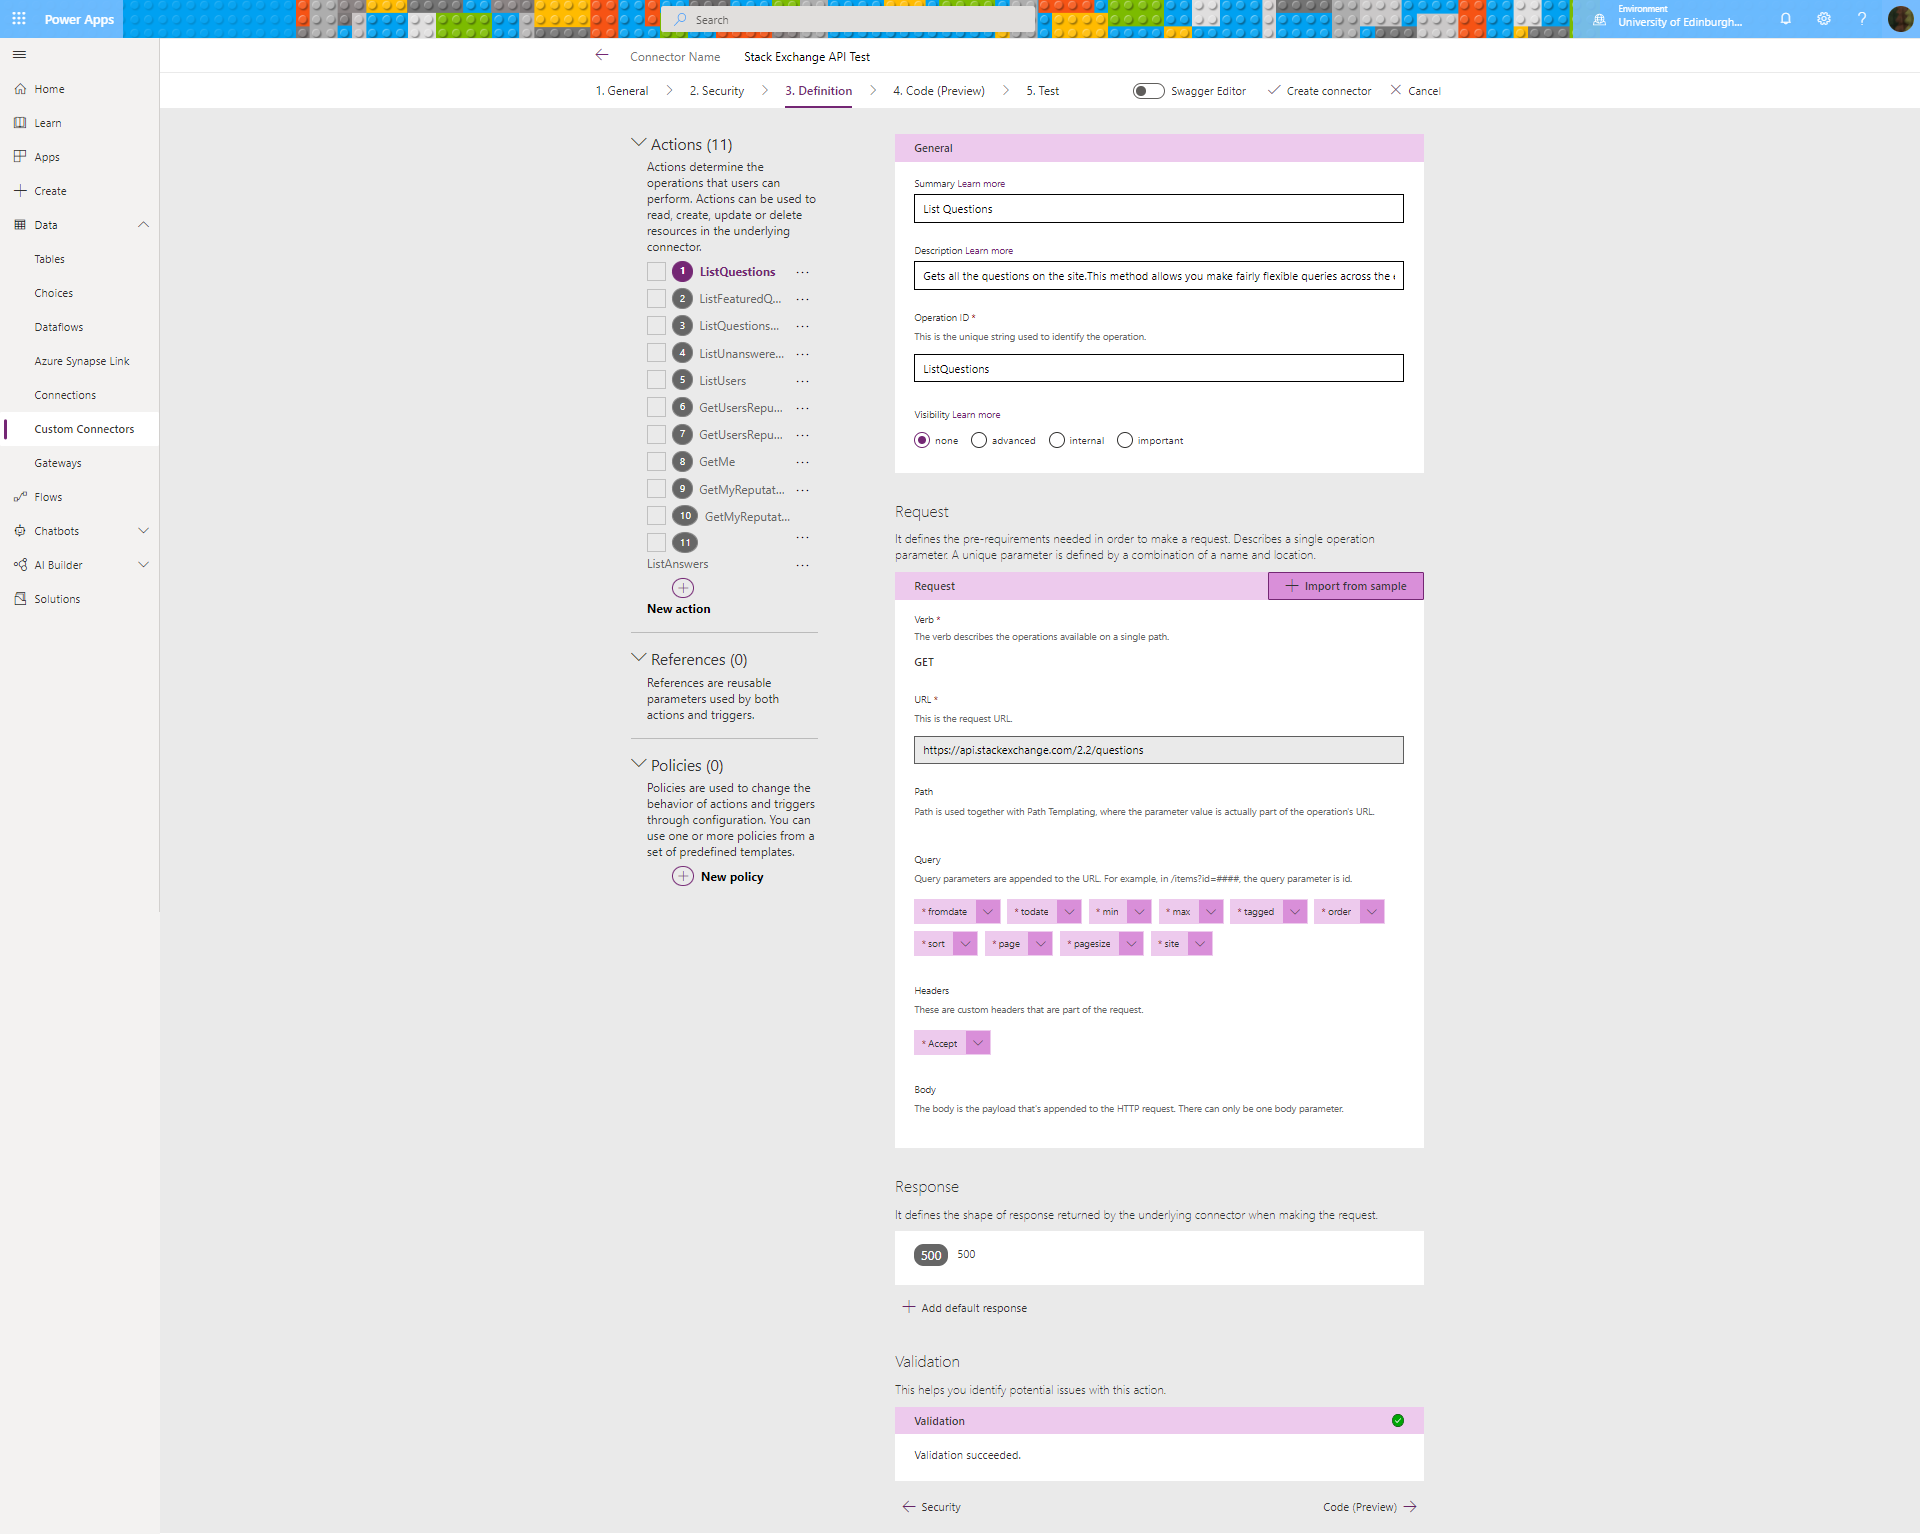
There’s a list of API endpoint definitions, including places for query string and header values:
Looking good so far!
And it says validation succeeded, whatever that actually means.
Custom Connector: Test Connection
Saving the custom connector gave me a warning message:
“Your custom connector has been successfully created, but there was an issue converting it to WADL for Power Apps: An error occured while converting OpenAPI file to WADL file. Error: ‘Operation id “ListQuestions” must specify either a default response or a 200-series response. Any other responses in the swagger is not supported by PowerApps client at JSON path paths[‘/questions’].get'”
Ok…
That looks like an issue that would come up if the connector actually connects, so let’s see if it does create a connection.
Fingers crossed…
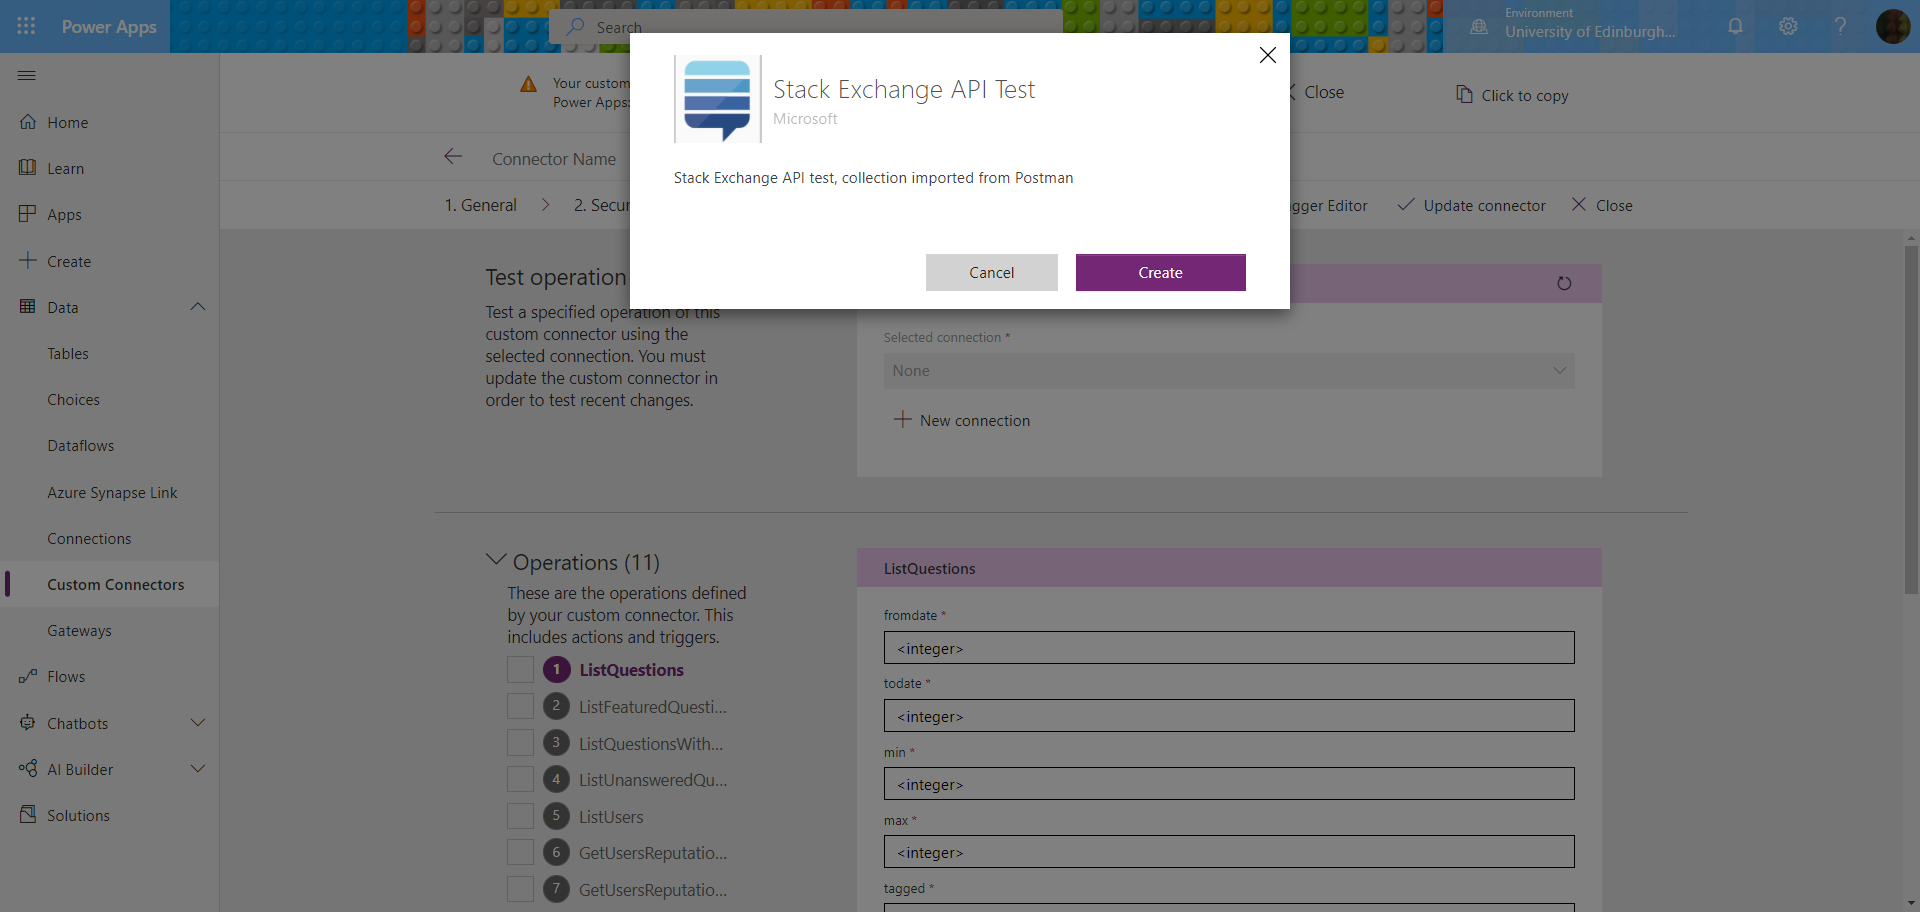
Click ‘Create’…
Hm – the new window does have the stack exchange icon, but why is it blank?
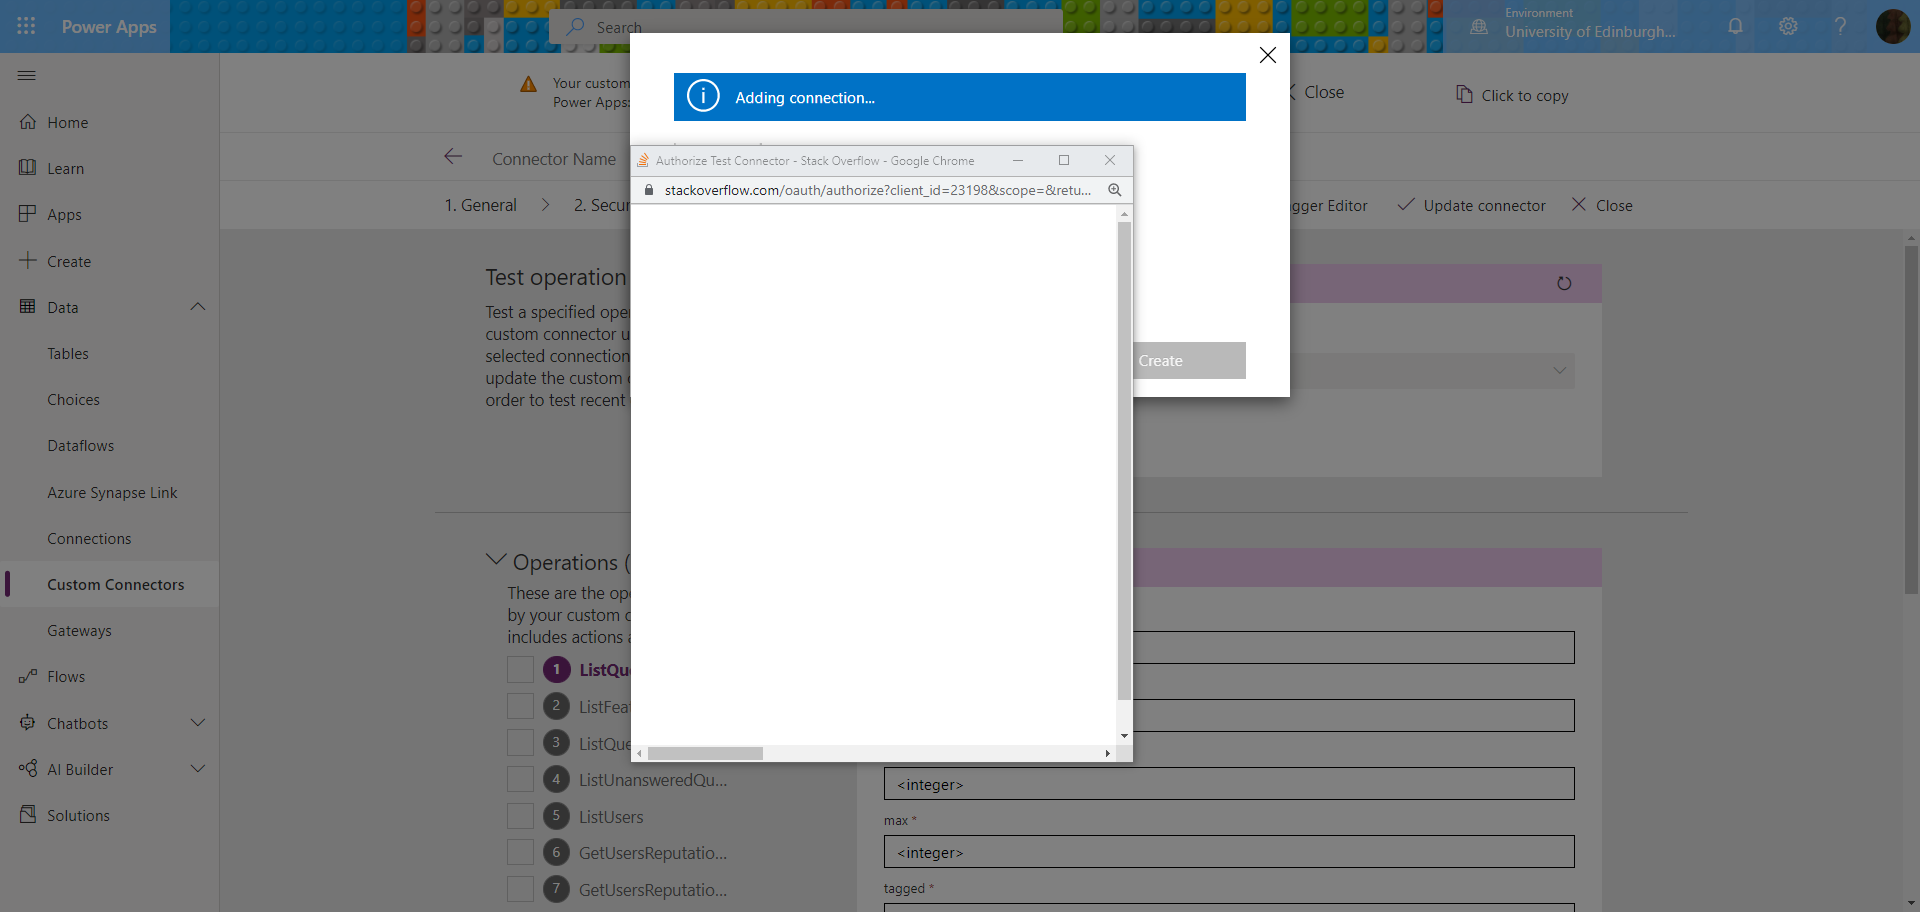
What’s this blank window then…?
Back to the Index
The Obligatory Moment of Brief Hilarity
Huh – Looking in the browser’s Inspect console, Network Tools made as much sense to me as it ever does, but the popup window was blank – why??
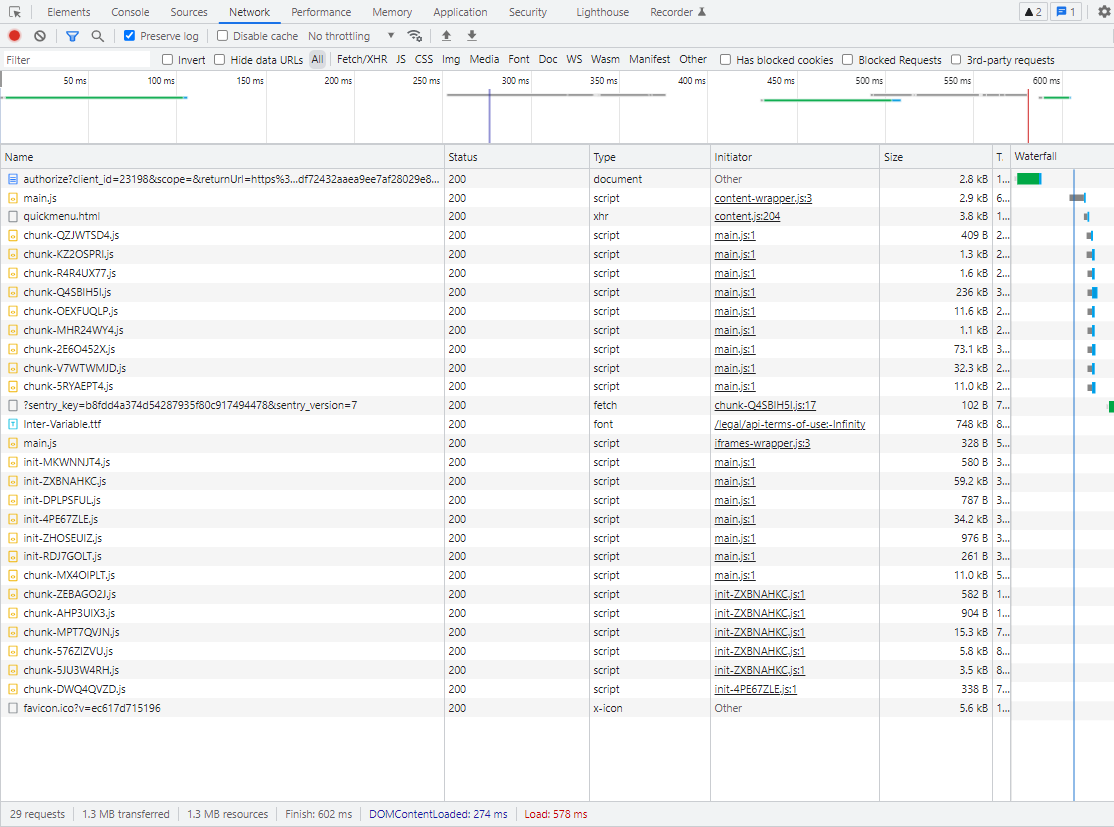
Network Tools, clear as ever
Clicking on the ‘authorize‘ URL and looking in the Preview tab showed me this permission requesting screen that it apparently opened – but where was it?
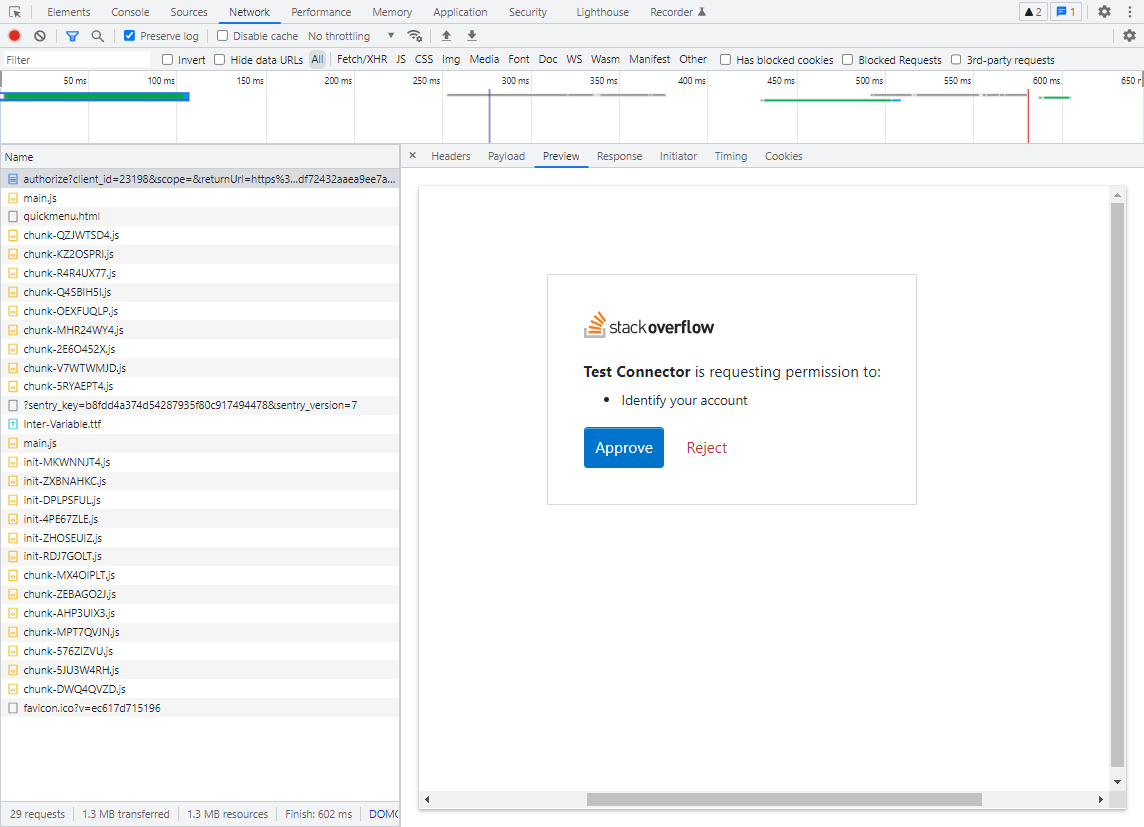
Preview: interesting, where is that window???
I’m an idiot: it was scrolled off the edge of my popup window!!!
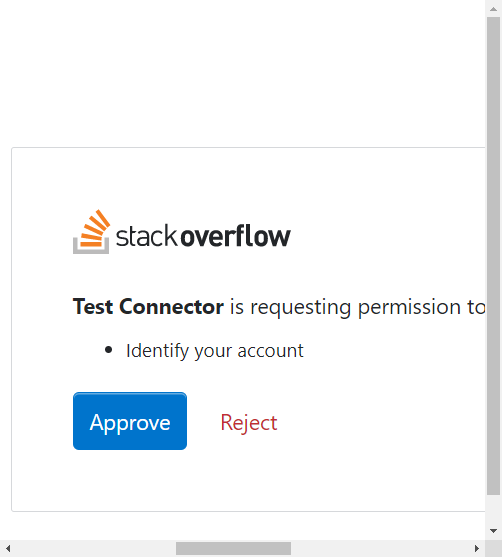
How we laughed. By which I mean me of course. No one else laughed. But I did.
It works!
It’s done it! It’s made a working connection:

See that Status? ‘Connected’! Huzzah! 😀
Adding the Connector to a Power App
The next step was to add my custom connector to a Power App, which looks like it should be straightforward, but in this case led me to what I’ve got to say is my favourite technical acronym yet.
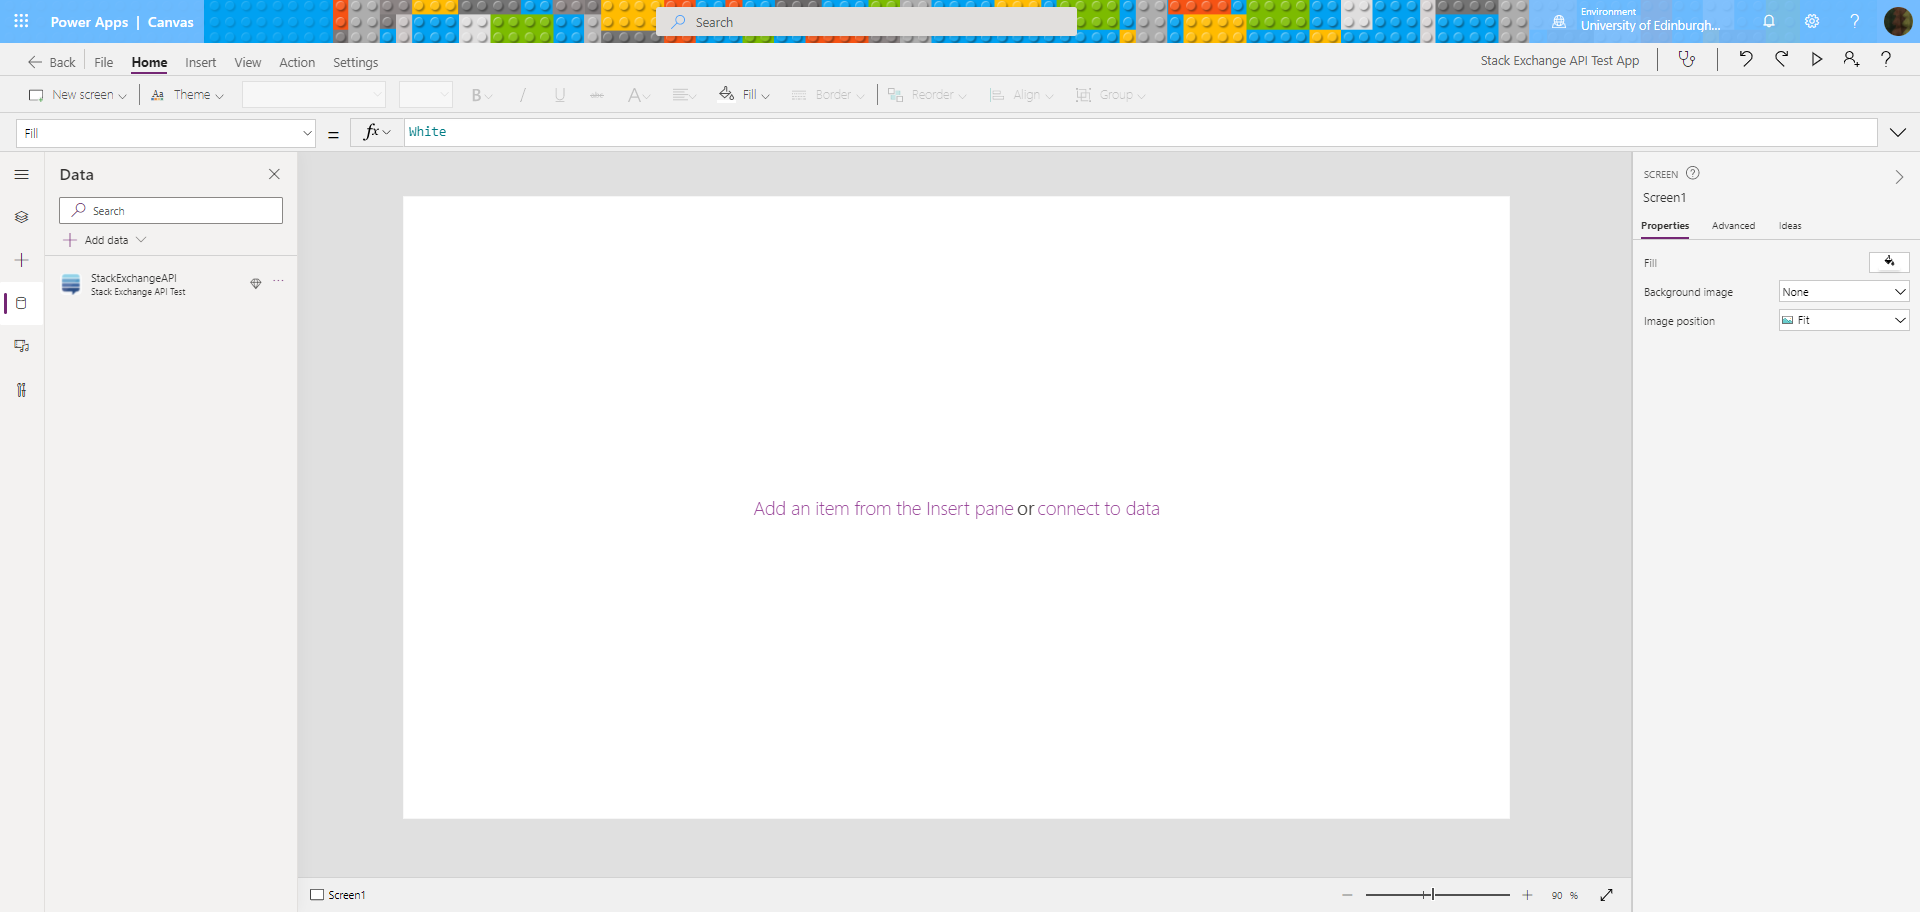
In this screenshot, you can see I’ve created a canvas app in Power Apps, gone to the panel to add data, and the connector is shown as available for adding:
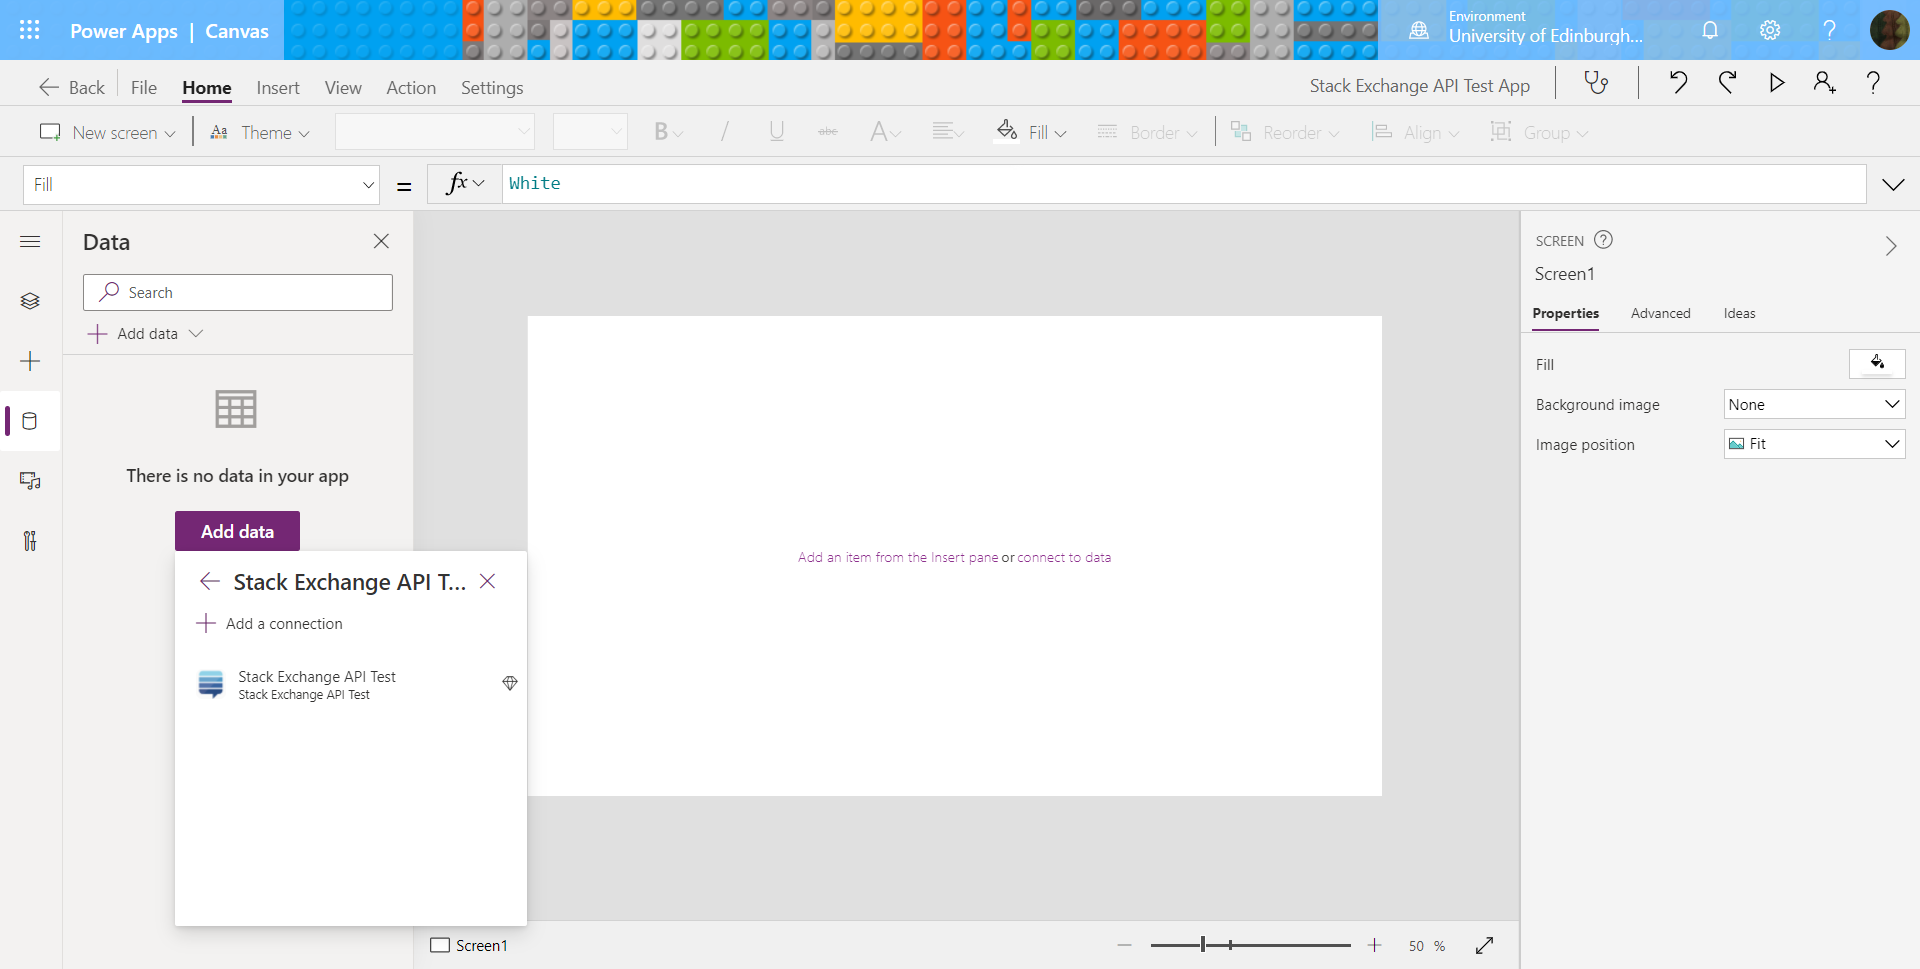
There’s the data connection made with the custom connector,
showing as available for adding to the app
But clicking on the connector to add it caused this: ‘Error: There was a problem adding your service. Please try again later. More’:
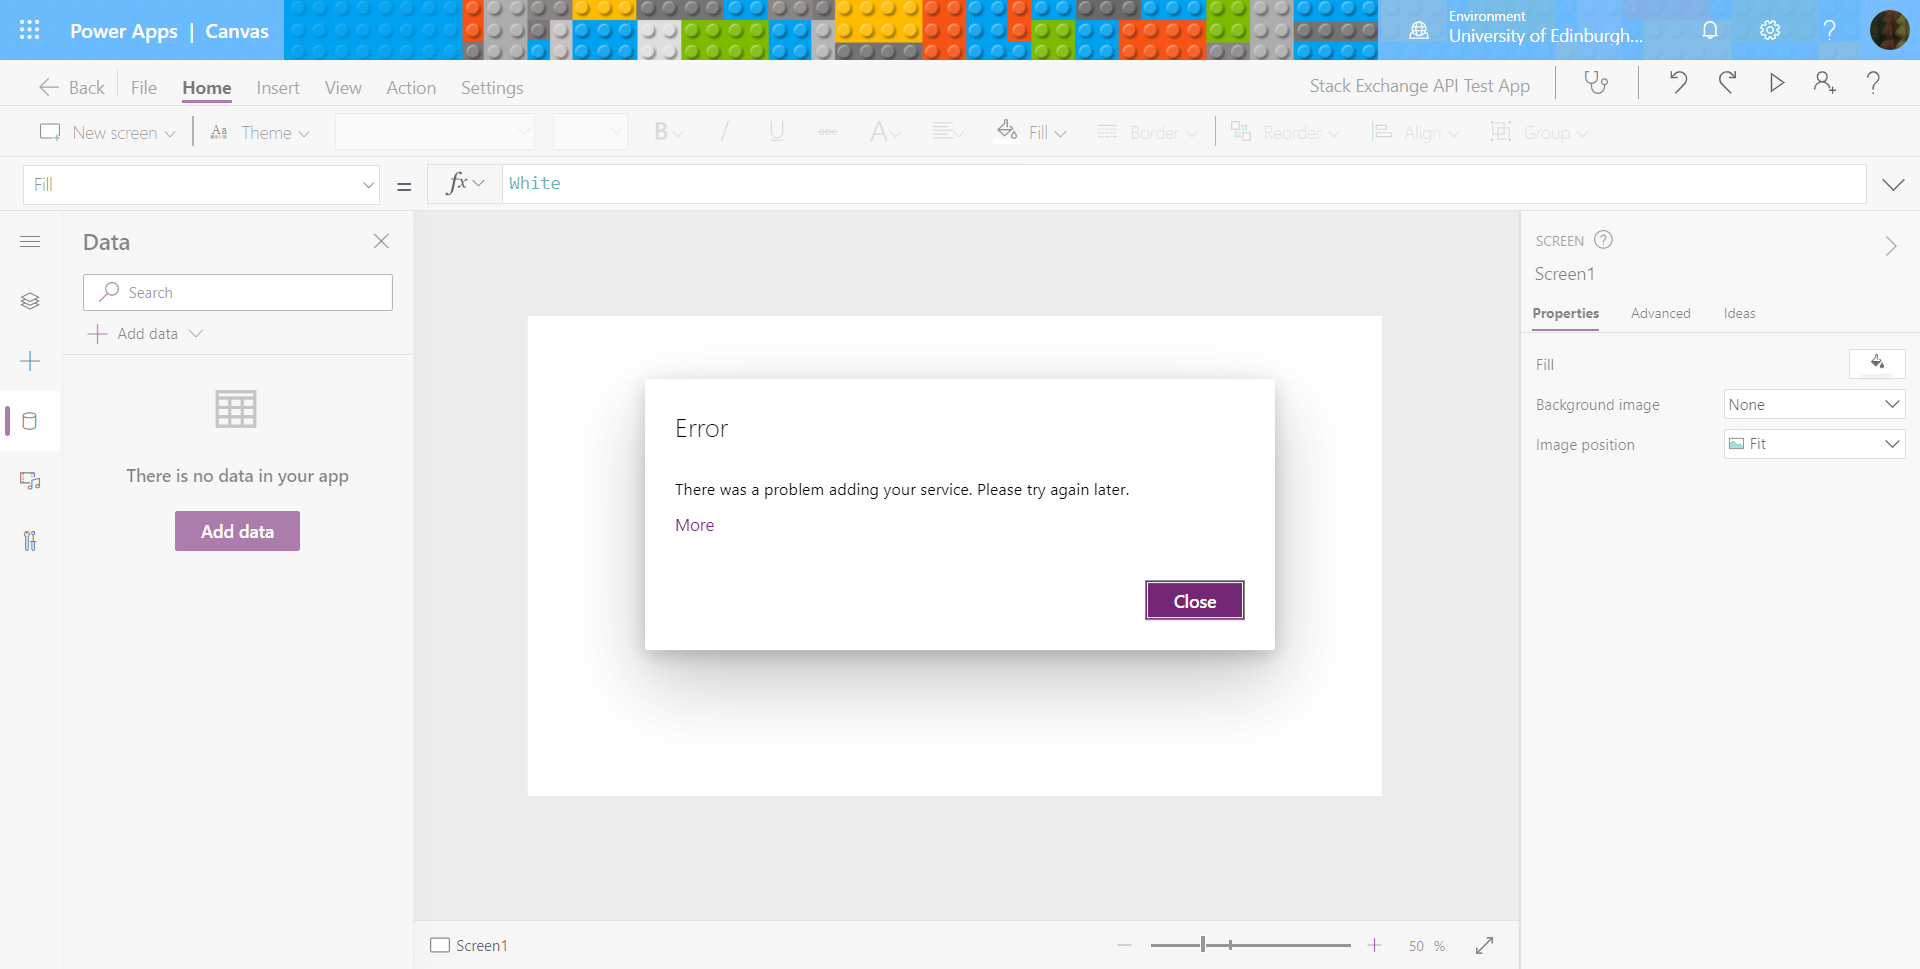
On the bright side, I like how it’s encouraging me to try more
Perhaps this was a reappearance of the problem indicated earlier?
“Your custom connector has been successfully created, but there was an issue converting it to WADL for Power Apps: An error occured while converting OpenAPI file to WADL file. Error: ‘Operation id “ListQuestions” must specify either a default response or a 200-series response. Any other responses in the swagger is not supported by PowerApps client at JSON path paths[‘/questions’].get’ “
Yes, this was the error message that appeared when I clicked ‘More’:
“No wadlUrl is specified for this Api. This usually indicates there was an error when converting the Swagger associated with this api to a WADL file.
apiId: /providers/microsoft.powerapps/apis/shared_stack-20exchange-20api-20test-5f9caa97d9644297e-0bca29717258fb9d “
So Power Apps accesses APIs using something called WADL, which Google’s handy, informative website-ripping-off snippets describe like this:
“The Web Application Description Language (WADL) is a machine-readable XML description of HTTP-based web services. WADL models the resources provided by a service and the relationships between them. WADL is intended to simplify the reuse of web services that are based on the existing HTTP architecture of the Web.”
(See more at Wikipedia)
Fixing a WADL Error
So, looking at the error messages, it appeared that Power Apps required the API endpoints to be described in the format of a WADL file. The Custom Connector was meant to create this WADL file when I saved it, or perhaps when I created the connection, but the WADL file hadn’t been created because of errors in the Custom Connector’s Definitions page.
The errors in the Definitions page appeared to be that certain standard responses associated with particular HTTP status codes weren’t defined:
“Error: ‘Operation id “ListQuestions” must specify either a default response or a 200-series response.”
Looking at the ListQuestions definition in the custom connector, I could see the problem: it was indeed missing any responses except one for a 500 server error code:
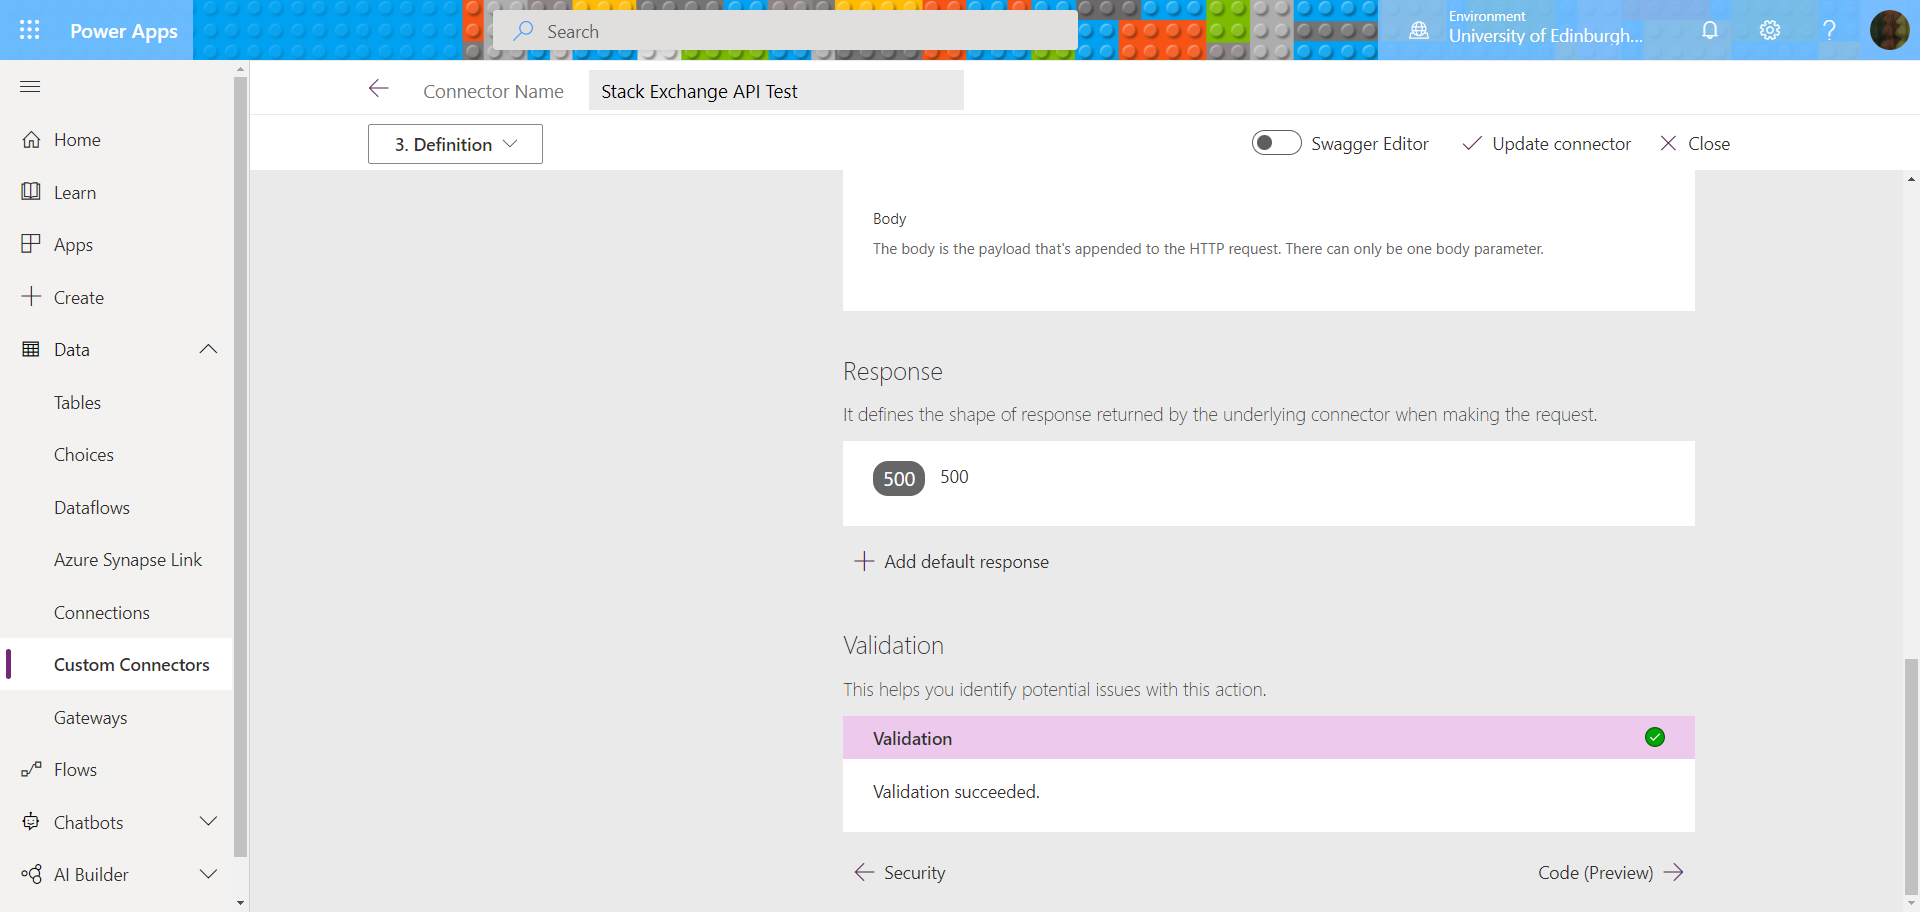
Ok, so something else is meant to be here
Looking through the rest of the endpoint definitions, some of the others didn’t have a 200 status code response either. In comparison, ListAnswers did:
This is the type of 200 response definition that should be there
The first thing I thought of trying was to save and import some sample data from Postman. I logged in to Stack Exchange via Google but authentication in Postman failed:
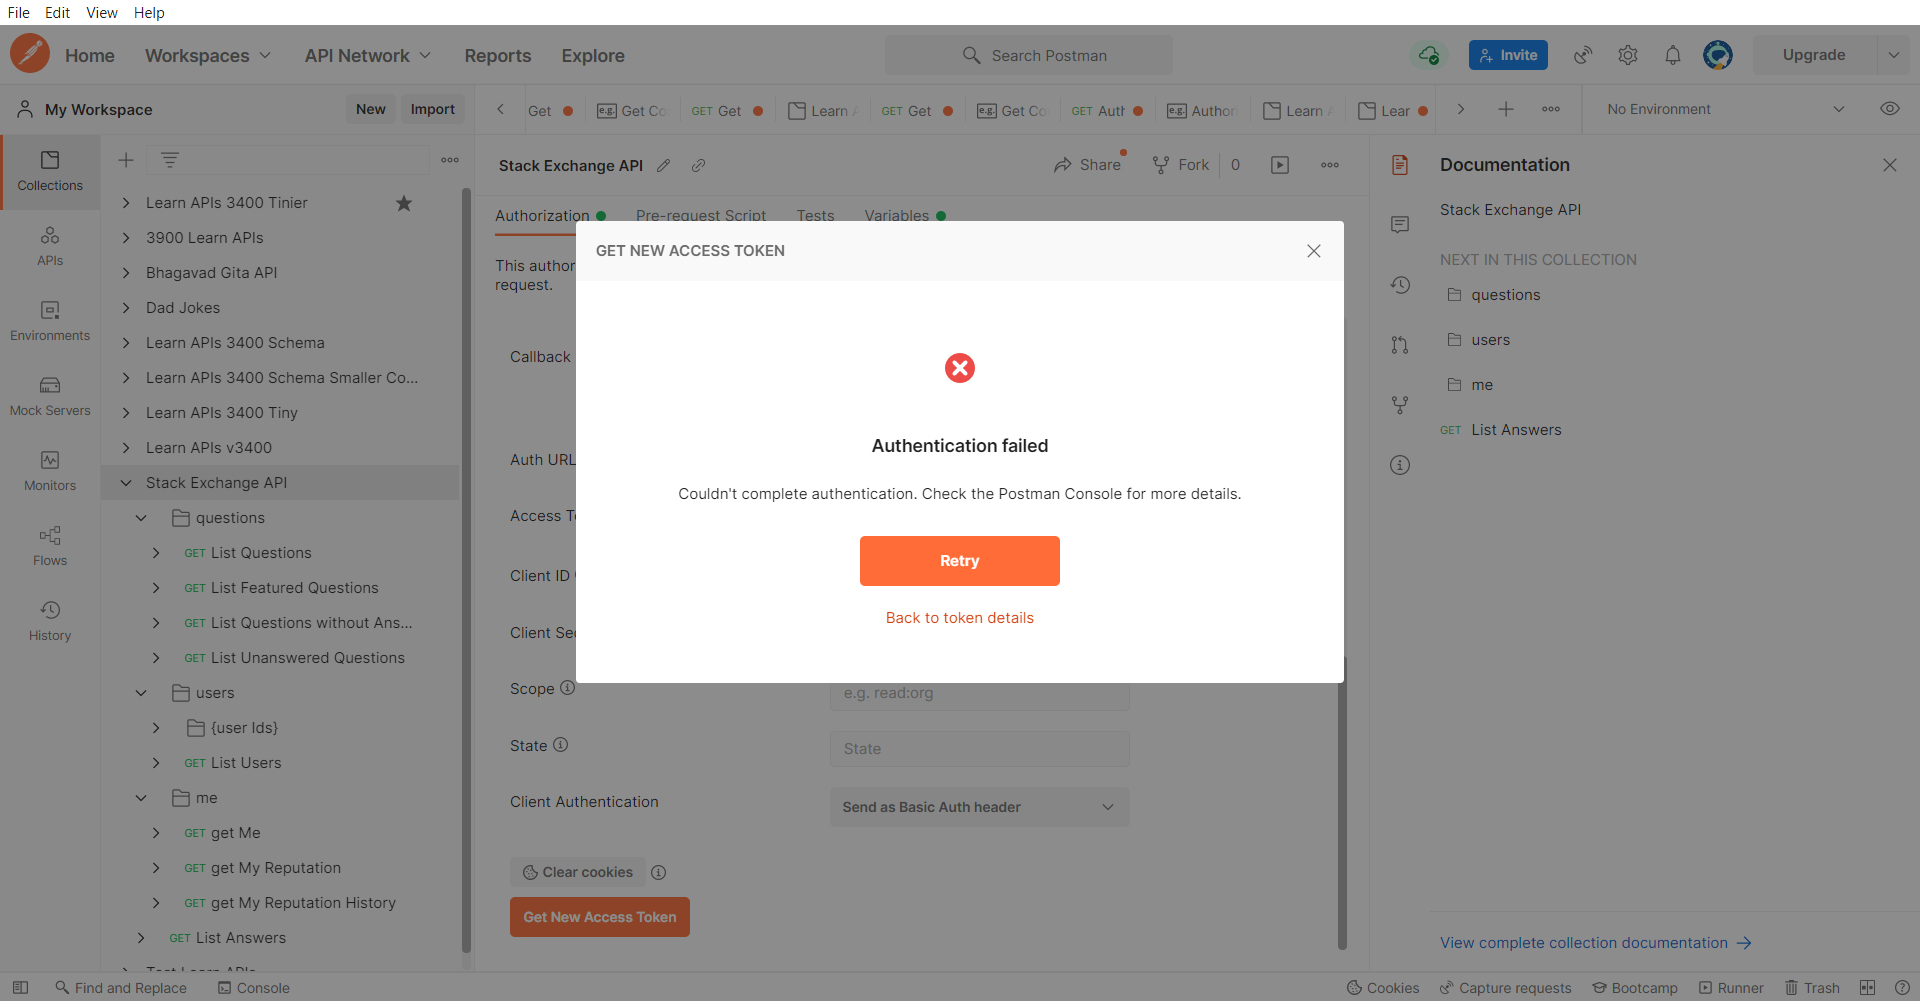
It’s actually quite a nice change to have something that authenticates in the custom connector but can’t connect in Postman
Of course: I couldn’t log in from Postman because the app’s registered domain is consent.azure-apim.net.
Thankfully, Stack Exchange’s excellent, detailed and helpfully interactive online documentation came to the rescue: I realised I could get the default response sample from the usage pages for their API endpoints. The only possible hitch was that my definitions applied to the previous version of the API (which I could no longer find on their site), but I hoped that at least the simpler queries might not have changed much.
First I tried the documentation page for ListQuestions: Usage of /questions GET (https://api.stackexchange.com/docs/questions)
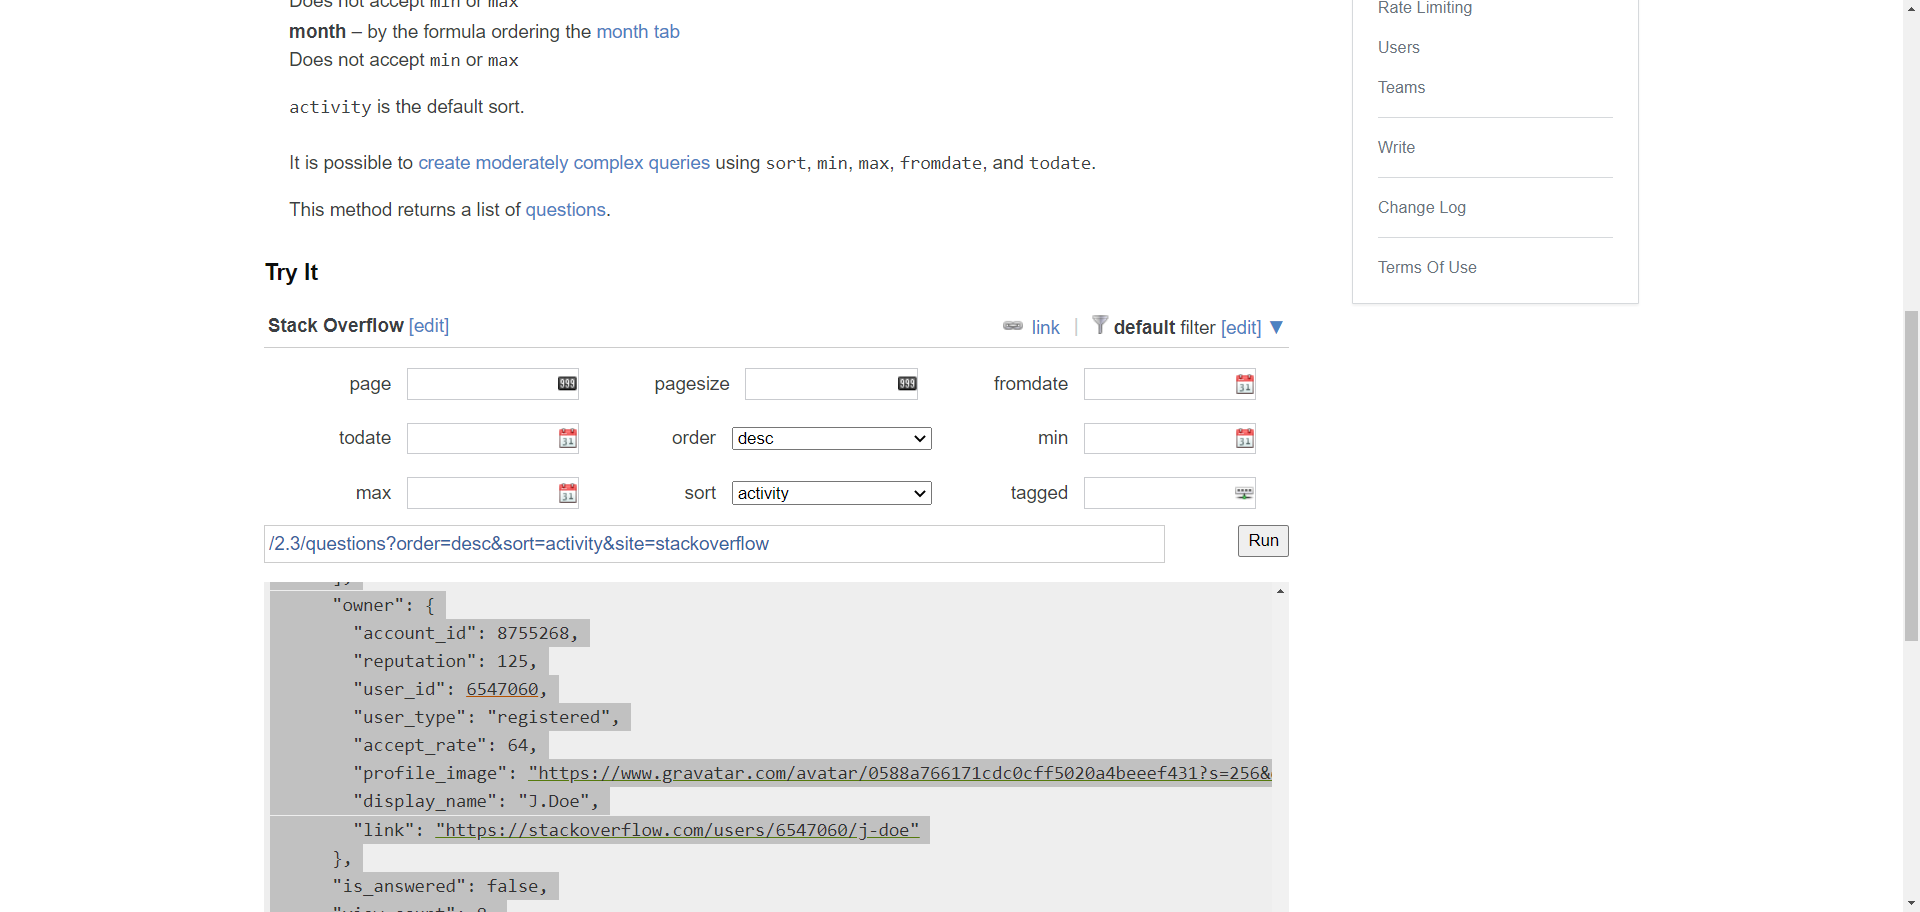
It’s actually hard to imagine how this interactive documentation page could possibly be more useful, other than also being available in older versions
I entered a value for every possible option available to ensure they would all be included in the output. When I clicked RUN, it created the querystring for the GET request url: (eg /2.3/questions?order=desc&sort=activity&site=stackoverflow ), and an output panel full of JSON for the sample response, which I copied to my clipboard.
(Try this for a sample wall of output JSON: https://api.stackexchange.com/2.3/questions?order=desc&sort=activity&site=stackoverflow)
Back in the custom connector’s Definition page, I clicked on ‘Add a default response’. A panel opened to ‘Import from sample’, and I pasted the copied JSON text into the ‘Body’ text box and clicked the ‘Import’ button.
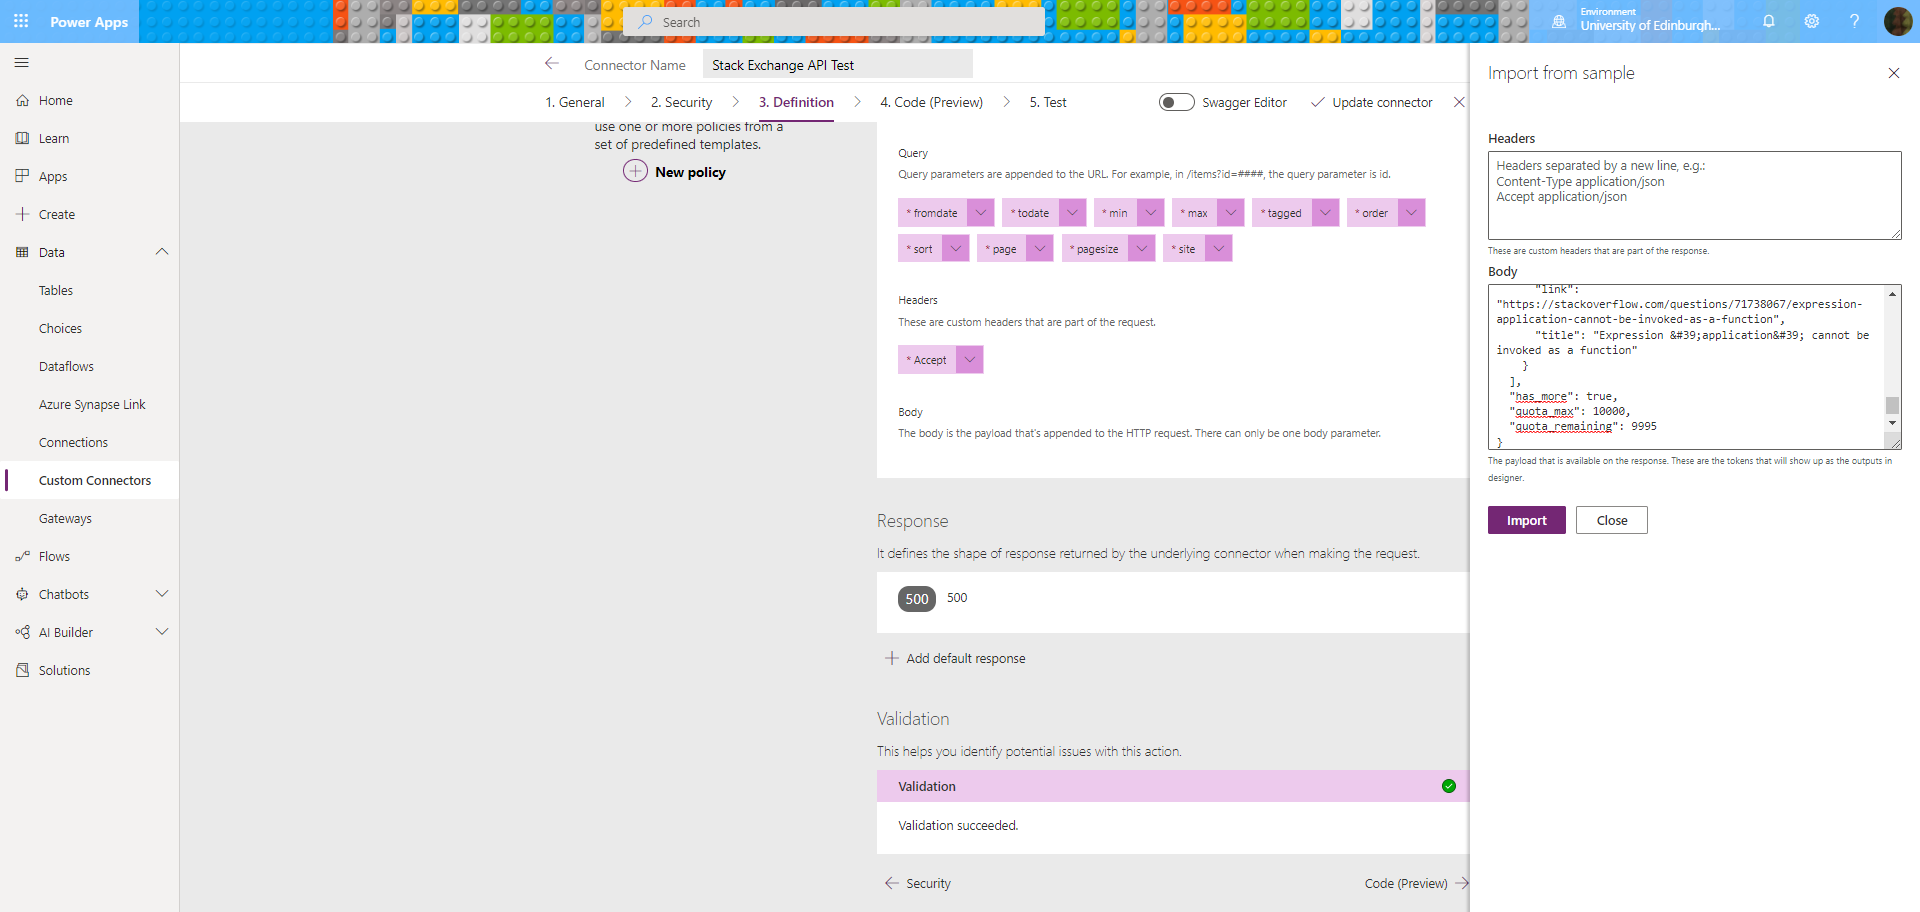
Adding a default response to the custom connector by importing a JSON response sample
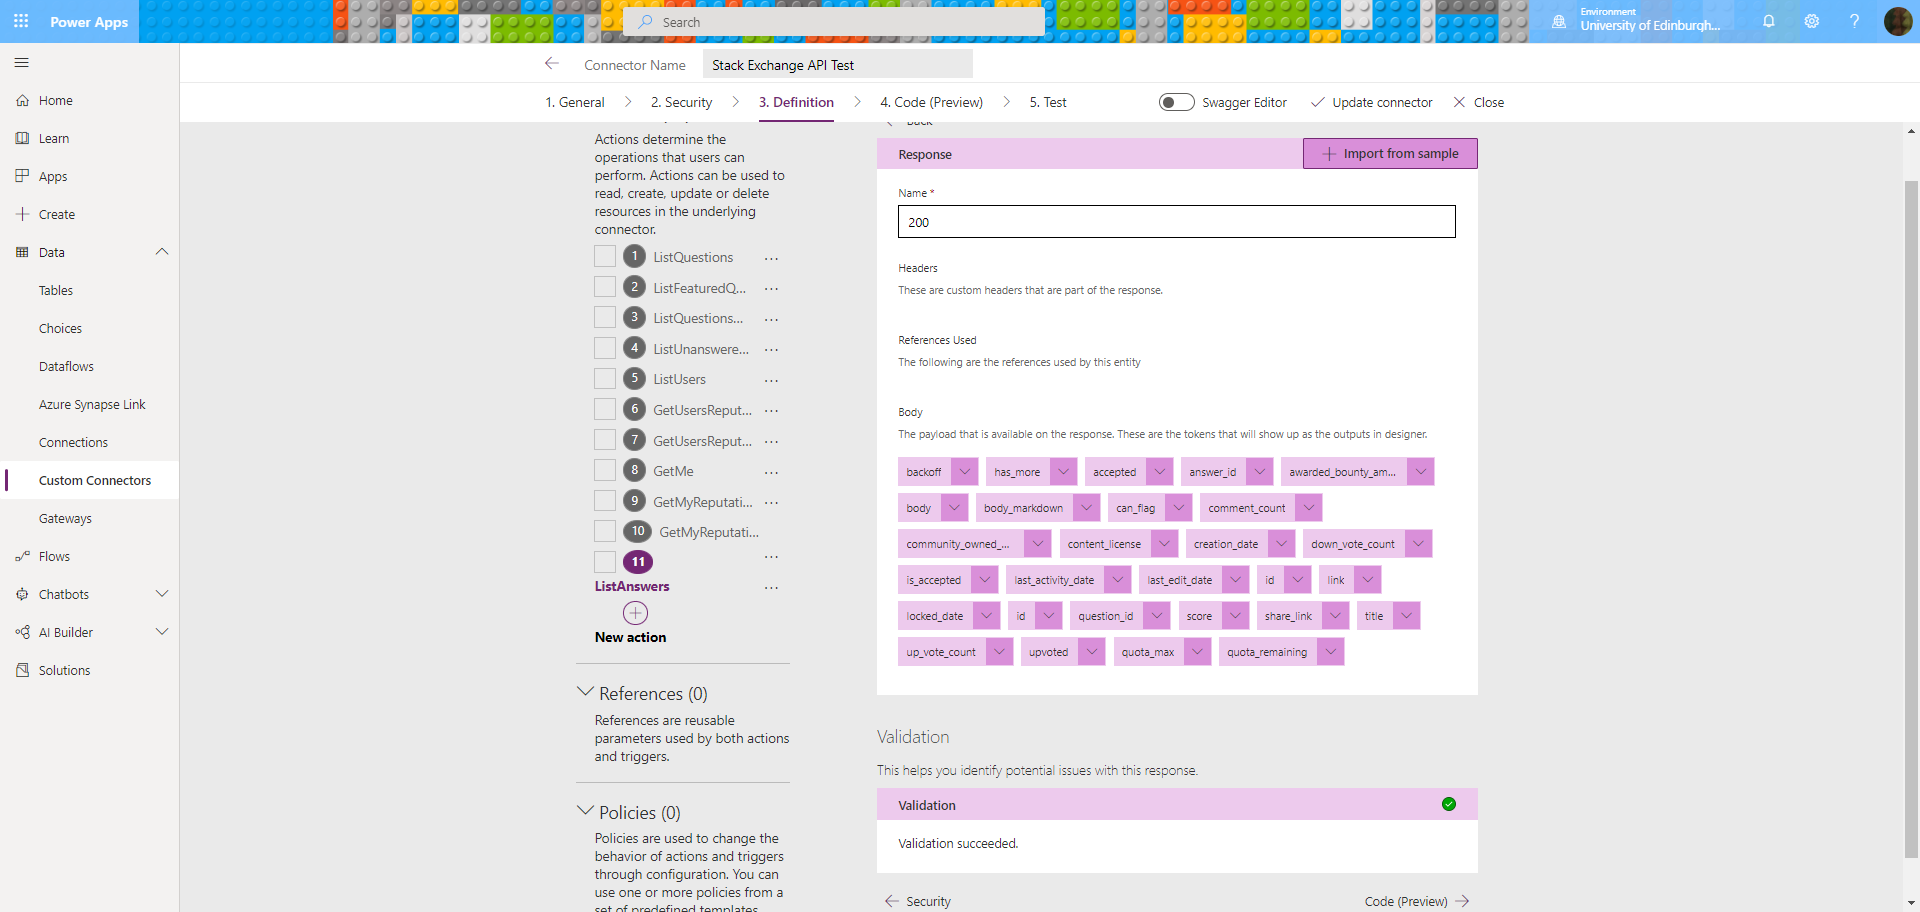
This seemed to work, as it added a response it’s calling default:
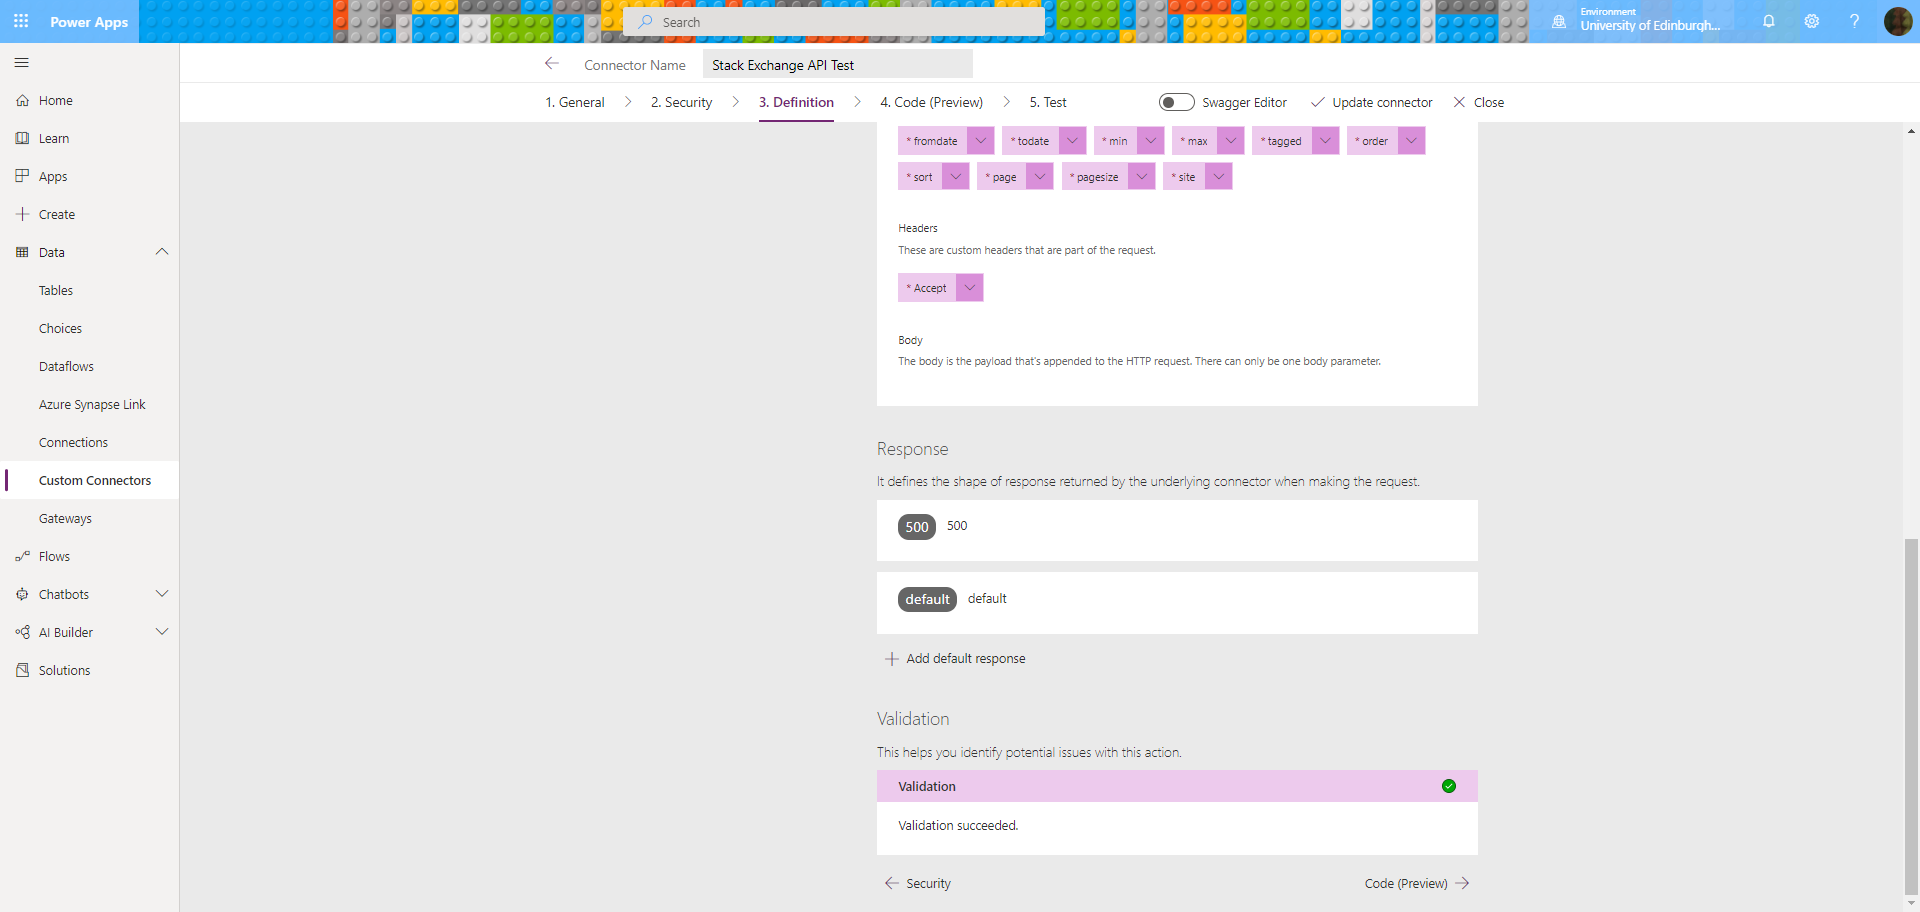
Ok – a new default response has appeared. So what is it?
Looking in the new default response, it’s extracted a lot of appropriate looking variable names from the JSON sample:
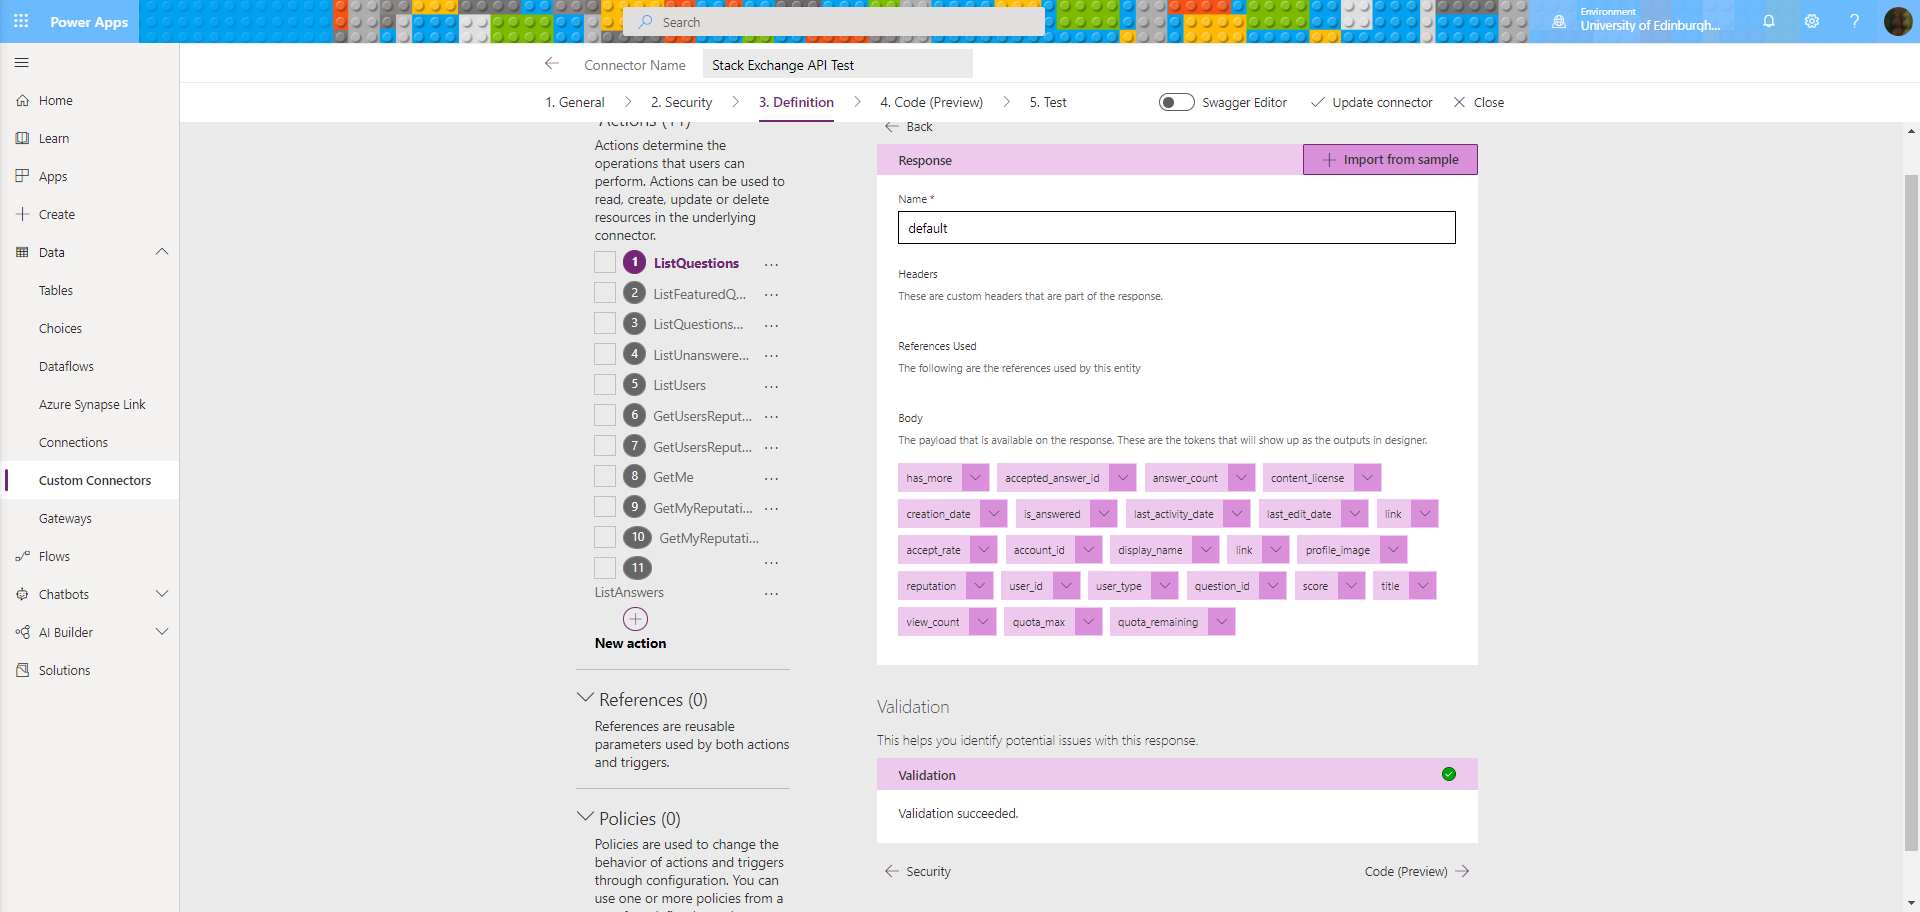
The new default response has appeared and looks probably ok…
The next step would be to save the connector and see if the error message changed to mention a different endpoint instead of ListQuestions:
“Your custom connector has been successfully updated, but there was an issue converting it to WADL for Power Apps: An error occurred while converting OpenAPI file to WADL file. Error: ‘Operation id “ListFeaturedQuestions” must specify either a default response or a 200-series response. Any other responses in the swagger is not supported by PowerApps client at JSON path paths[‘/questions/featured’].get’ “
Yes! We were onto the next operation, which means I’d fixed ListQuestions, at least from this error 😊
Now I knew this was the answer, it was time to do the same process for all the operations I could find, perhaps delete the ones I couldn’t, and then try updating again…
It worked!! It saved without any error messages, so it was back to Power Apps.
Trying again in the Power App gave me the same ‘No WADL’ error. So I tried recreating the connection, and it still didn’t work. Finally, I tried saving and restarting the Power App, which seemed to do the trick:
Hooray
A Power App to fetch Data
This seemed like a good opportunity to practise using one of Power Apps’ responsive layouts, as described in Microsoft Docs: Building responsive canvas apps:
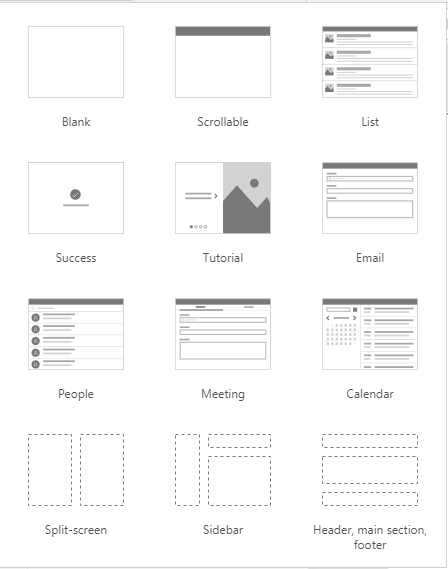
Microsoft’s responsive layout template selection for Power Apps
Adding a Vertical Gallery to my app, I saw it offered my custom connector as a data source:

A good sign, although it wasn’t enough by itself
I needed to run a GET request and build a data collection to display first. But these REST options from my custom connector had appeared in the Power Apps menus, and that looked very promising:
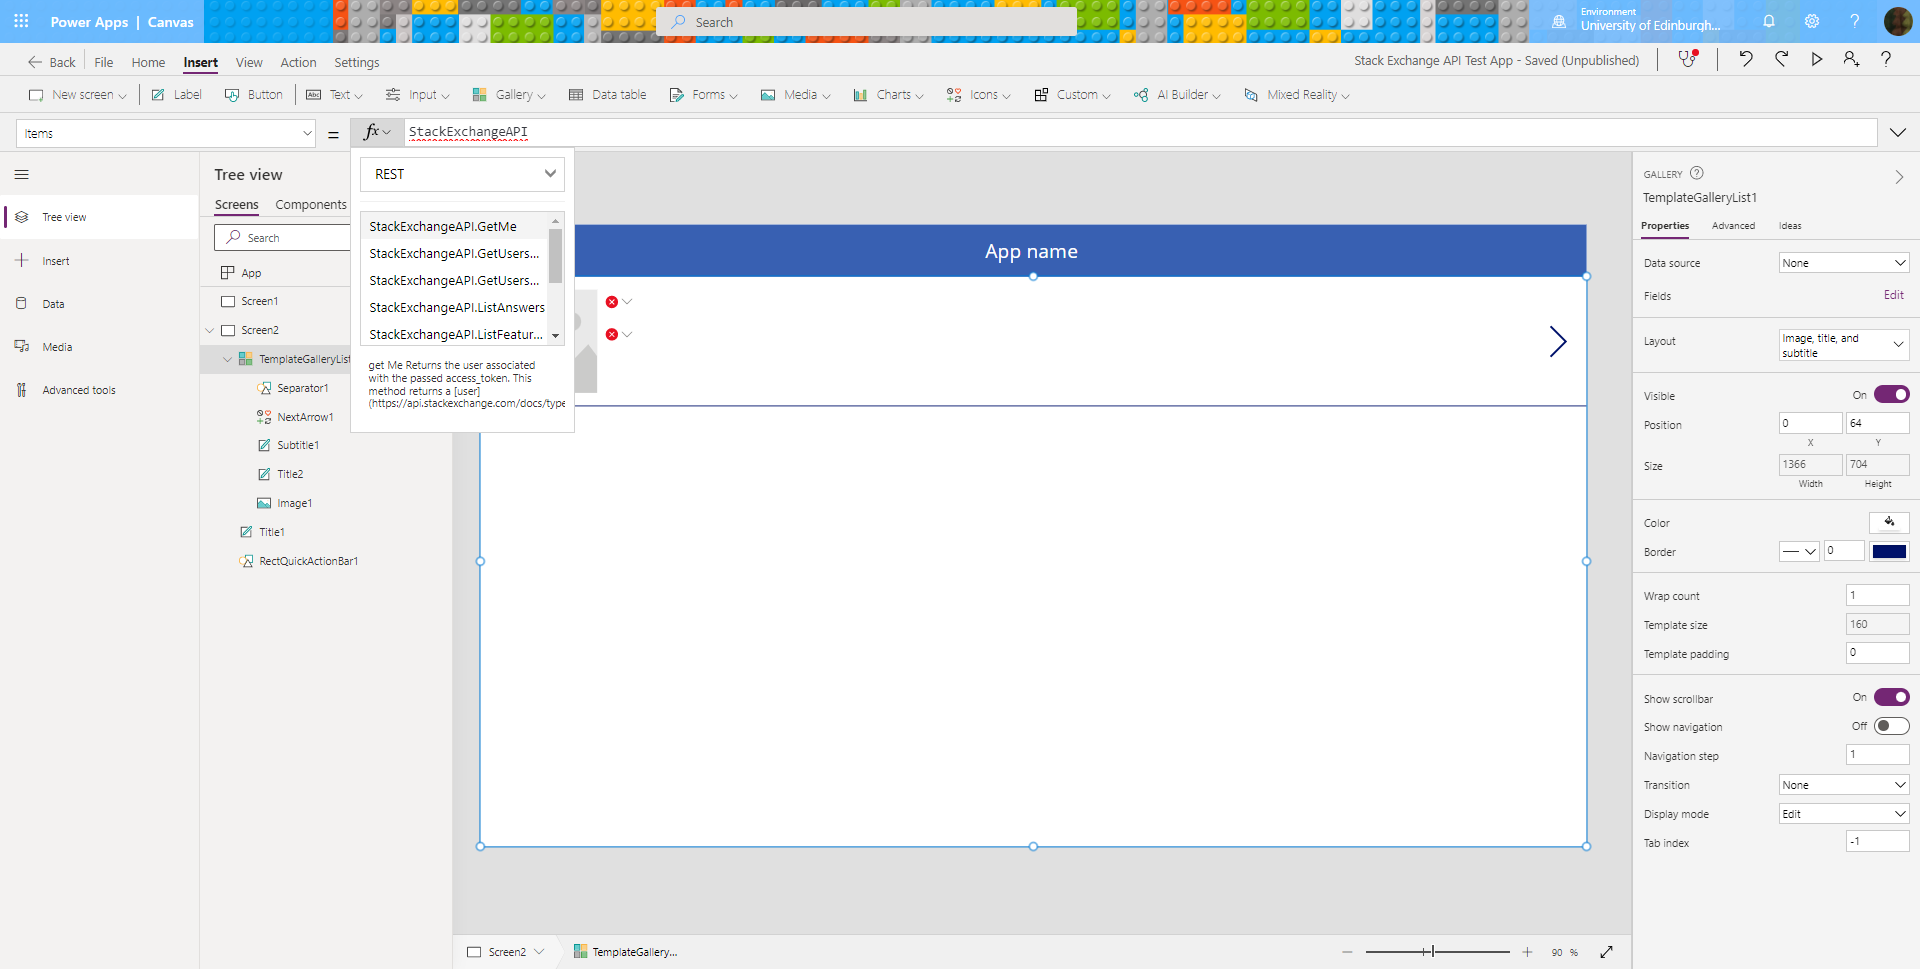
Those REST options correspond to my API endpoints!
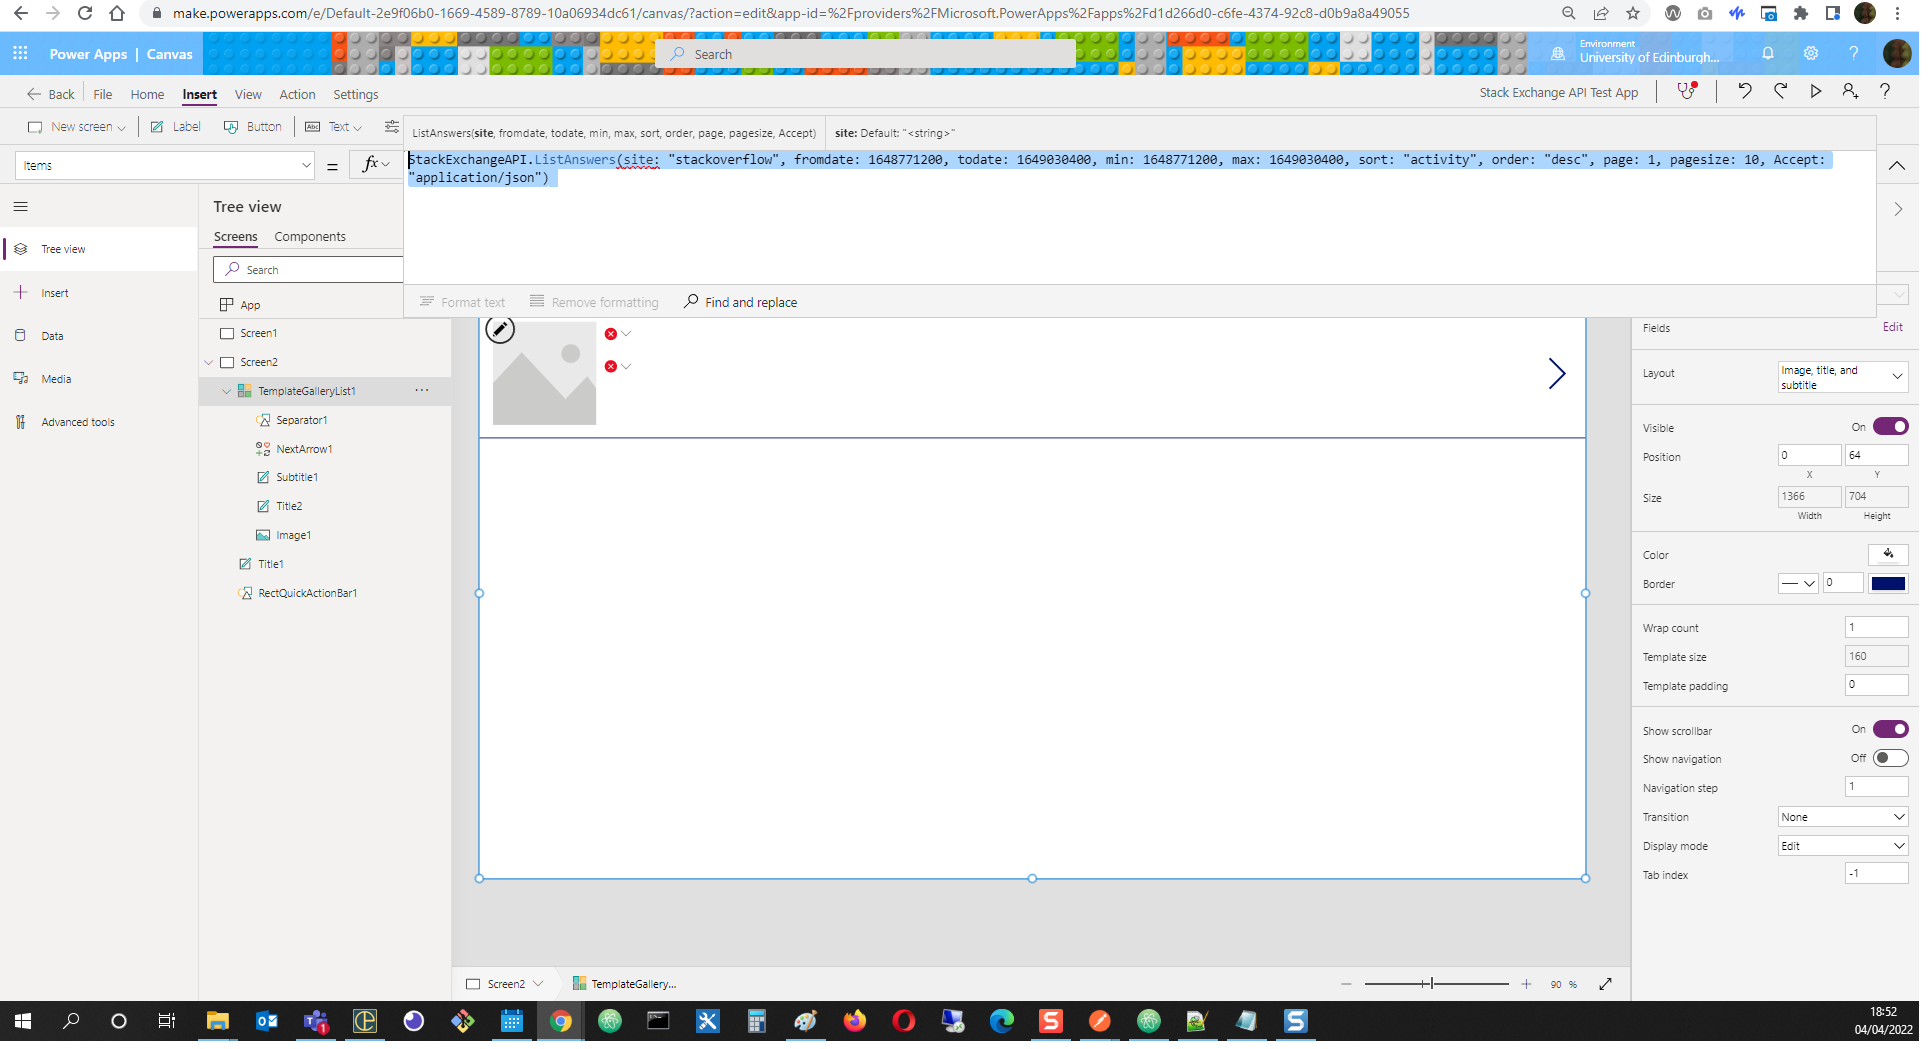
Selecting the ListAnswers endpoint (for example) added it to the Items function in the formula bar, and then I needed to add the parameter list:

Now we’re definitely getting there…
Checking the URL produced on the Stack Exchange API documentation page ‘Usage of /answers GET’ gave me a querystring with this list of variables:
/2.3/answers?page=1&pagesize=10&fromdate=1648771200&todate=1649030400&order=desc&min=1648771200&max=1649030400&sort=activity&site=stackoverflow
I thought is was worth a try to add them to the Power Apps formula like this:
StackExchangeAPI.ListAnswers(site: "stackoverflow", fromdate: 1648771200, todate: 1649030400, min: 1648771200, max: 1649030400, sort: "activity", order: "desc", page: 1, pagesize: 10, Accept: "application/json")
Sadly though, this caused an error, starting with the first one listed:
It’s listing the variables it expects, but it still doesn’t like them
I was pretty sure I needed to fetch the API results into a collection first, then get the items from parts of the collection.
So I made another screen with a Fetch button to do that:
Stop trying to make Fetch happen. It’s not going to happen.
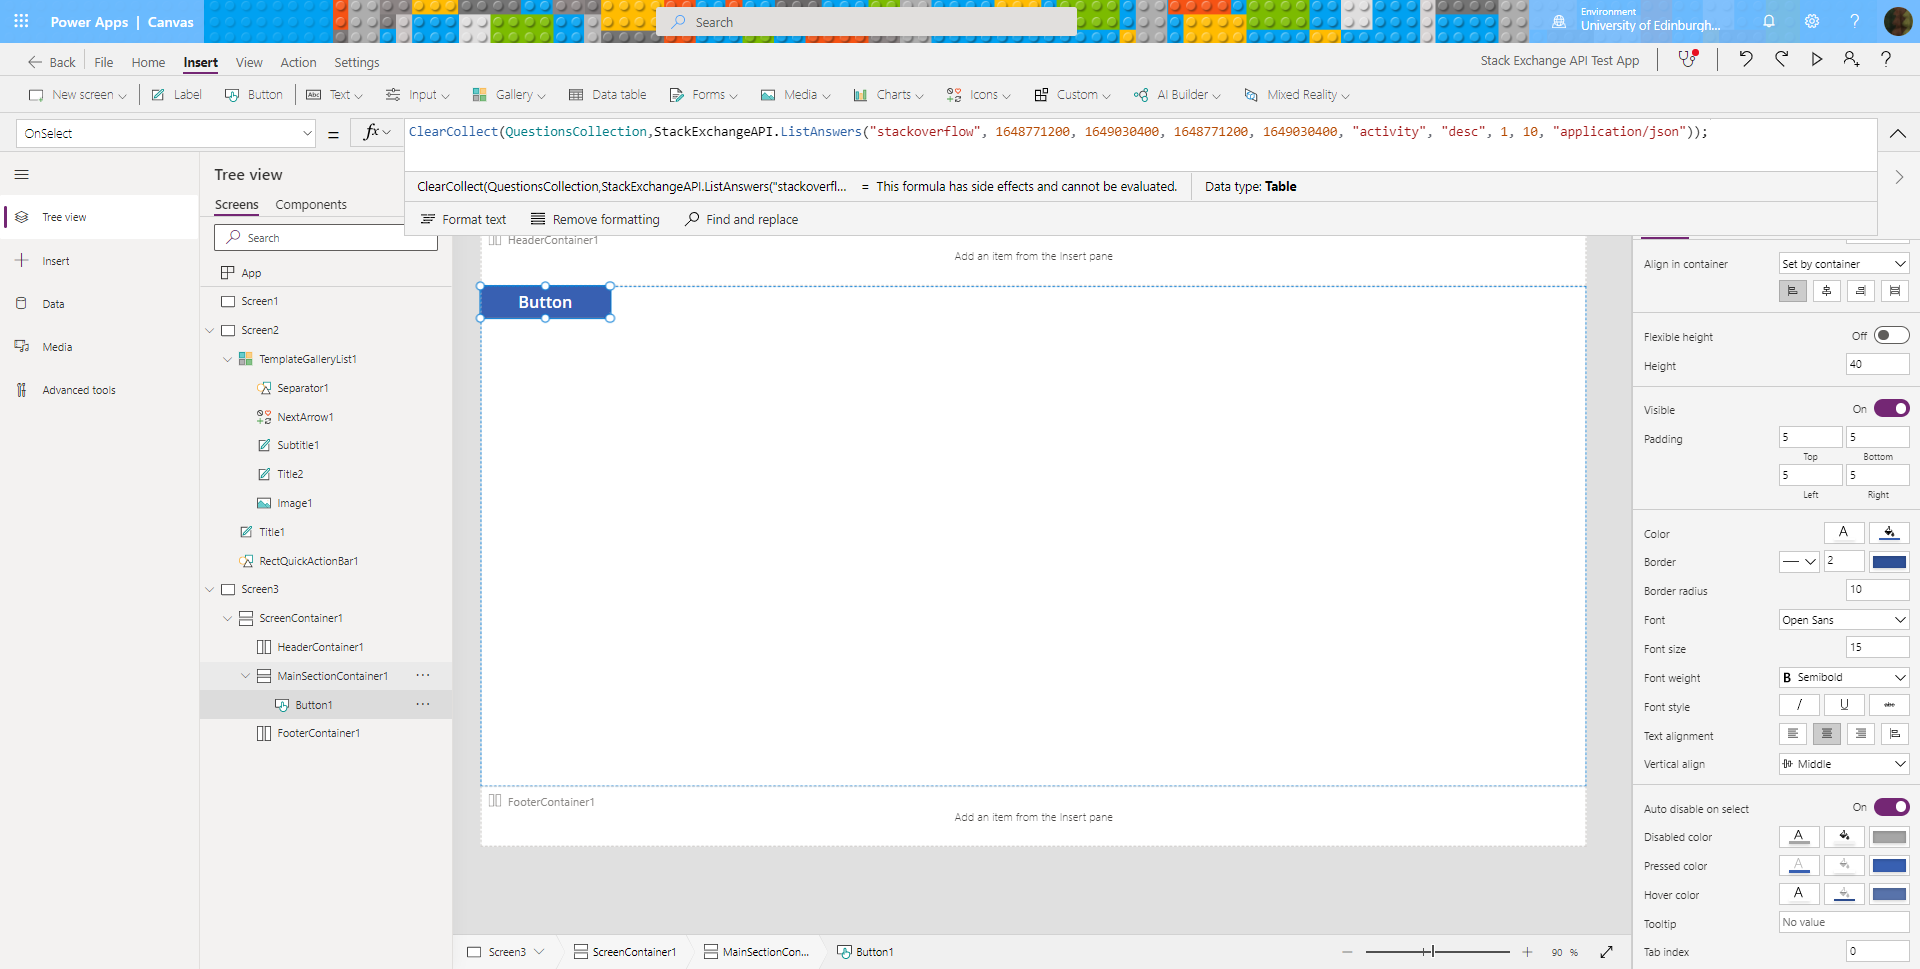
The OnSelect property of the Fetch button is set to this:
ClearCollect(QuestionsCollection,StackExchangeAPI.ListAnswers("stackoverflow", 1648771200, 1649030400, 1648771200, 1649030400, "activity", "desc", 1, 10, "application/json"));

Navigate(Screen2);
At this point, I had got too tired, and wasted hours the next day trying to fetch Answer data when I intended to be fetching Question data, Argh….
Eventually I noticed: FFS I’ve been fetching answers not questions. That explained a few things then, like why the body and title weren’t there, and the fields weren’t exactly the same as the question data type…
So I tried again with actual questions. Seeing that tags were required, I thought I might as well fetch questions tagged with ‘powerapps’ 😀
Let’s try that again, but actually fetching the questions
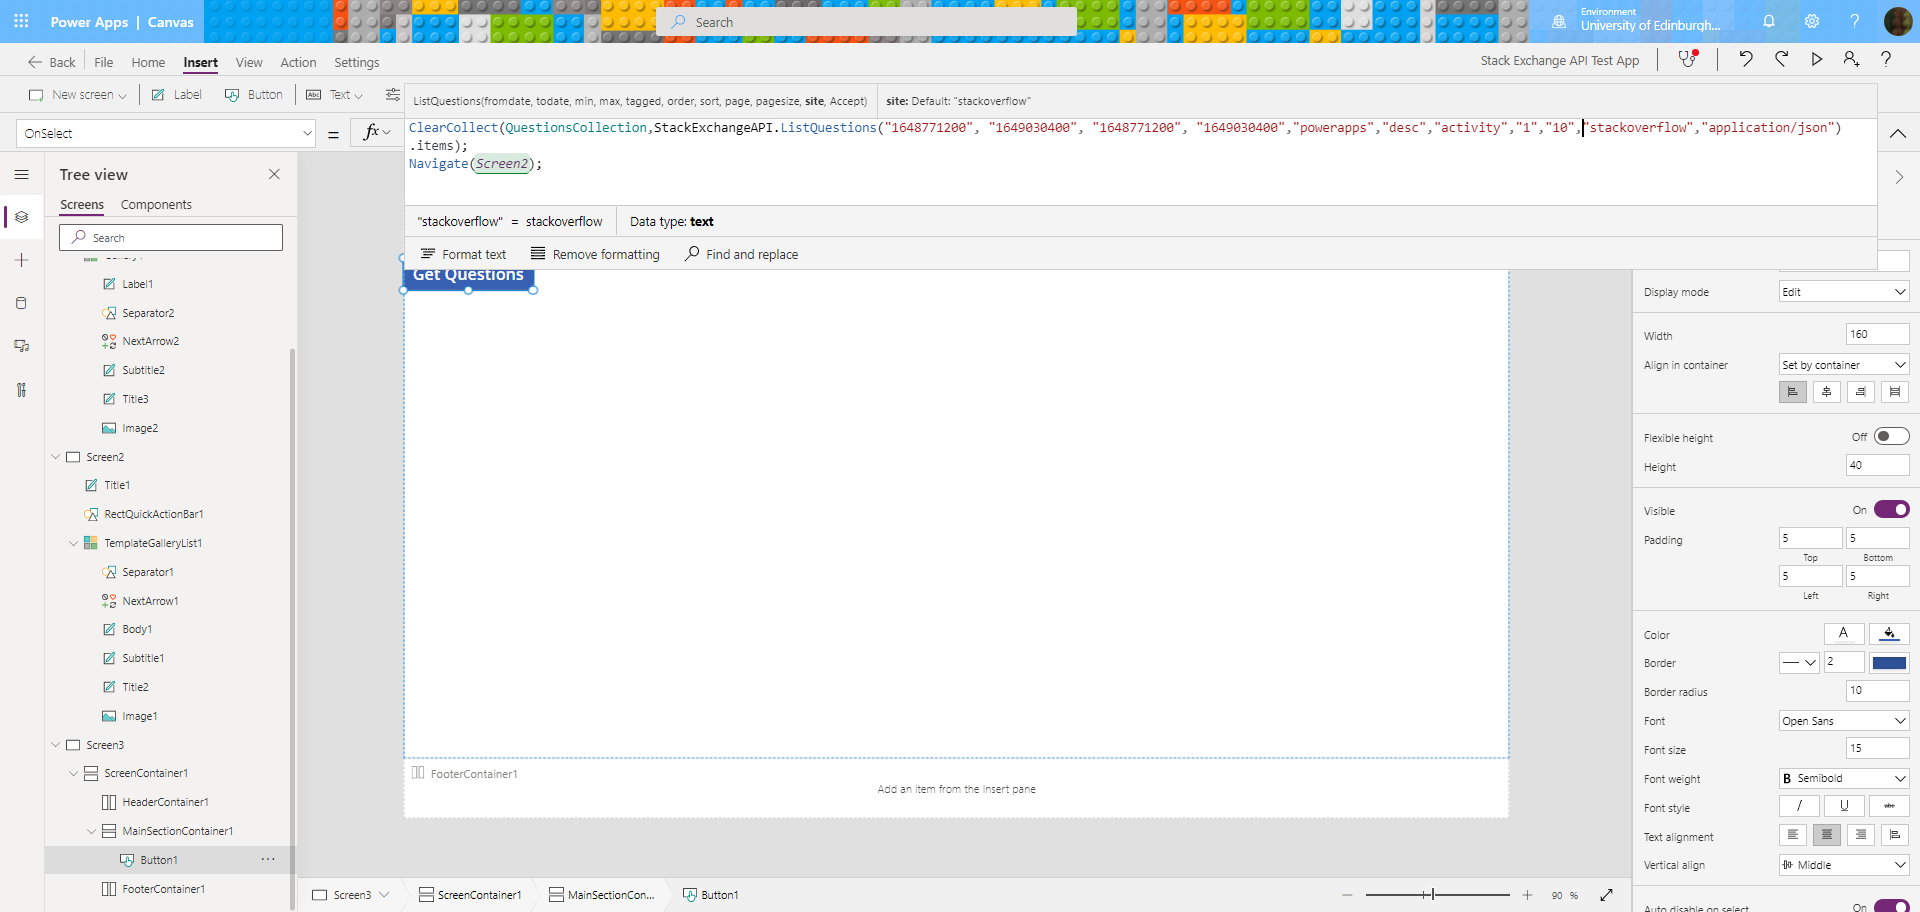
The code in the button’s OnSelect property now says this:
ClearCollect(QuestionsCollection,StackExchangeAPI.ListQuestions("1648771200", "1649030400", "1648771200", "1649030400","powerapps","desc","activity","1","10","stackoverflow","application/json").items);

Navigate(Screen2);
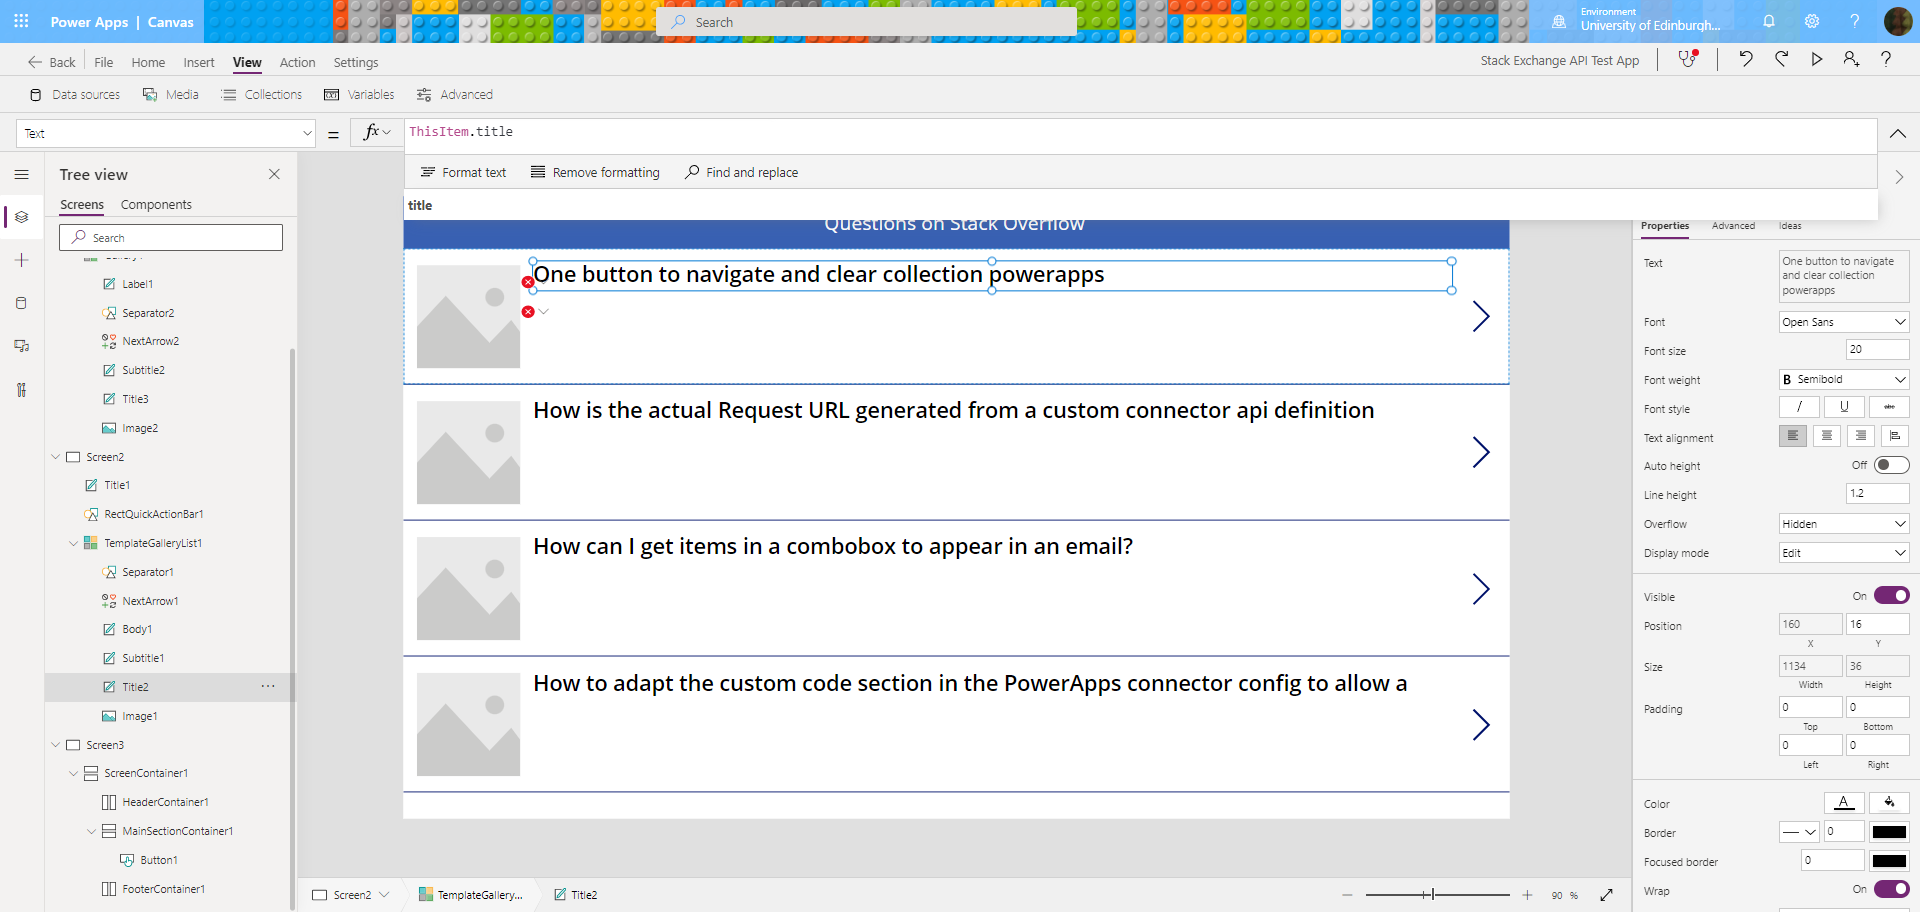
Much better, hooray!! The Questions Collection is now full of appropriate looking data, just waiting to be displayed in a gallery:
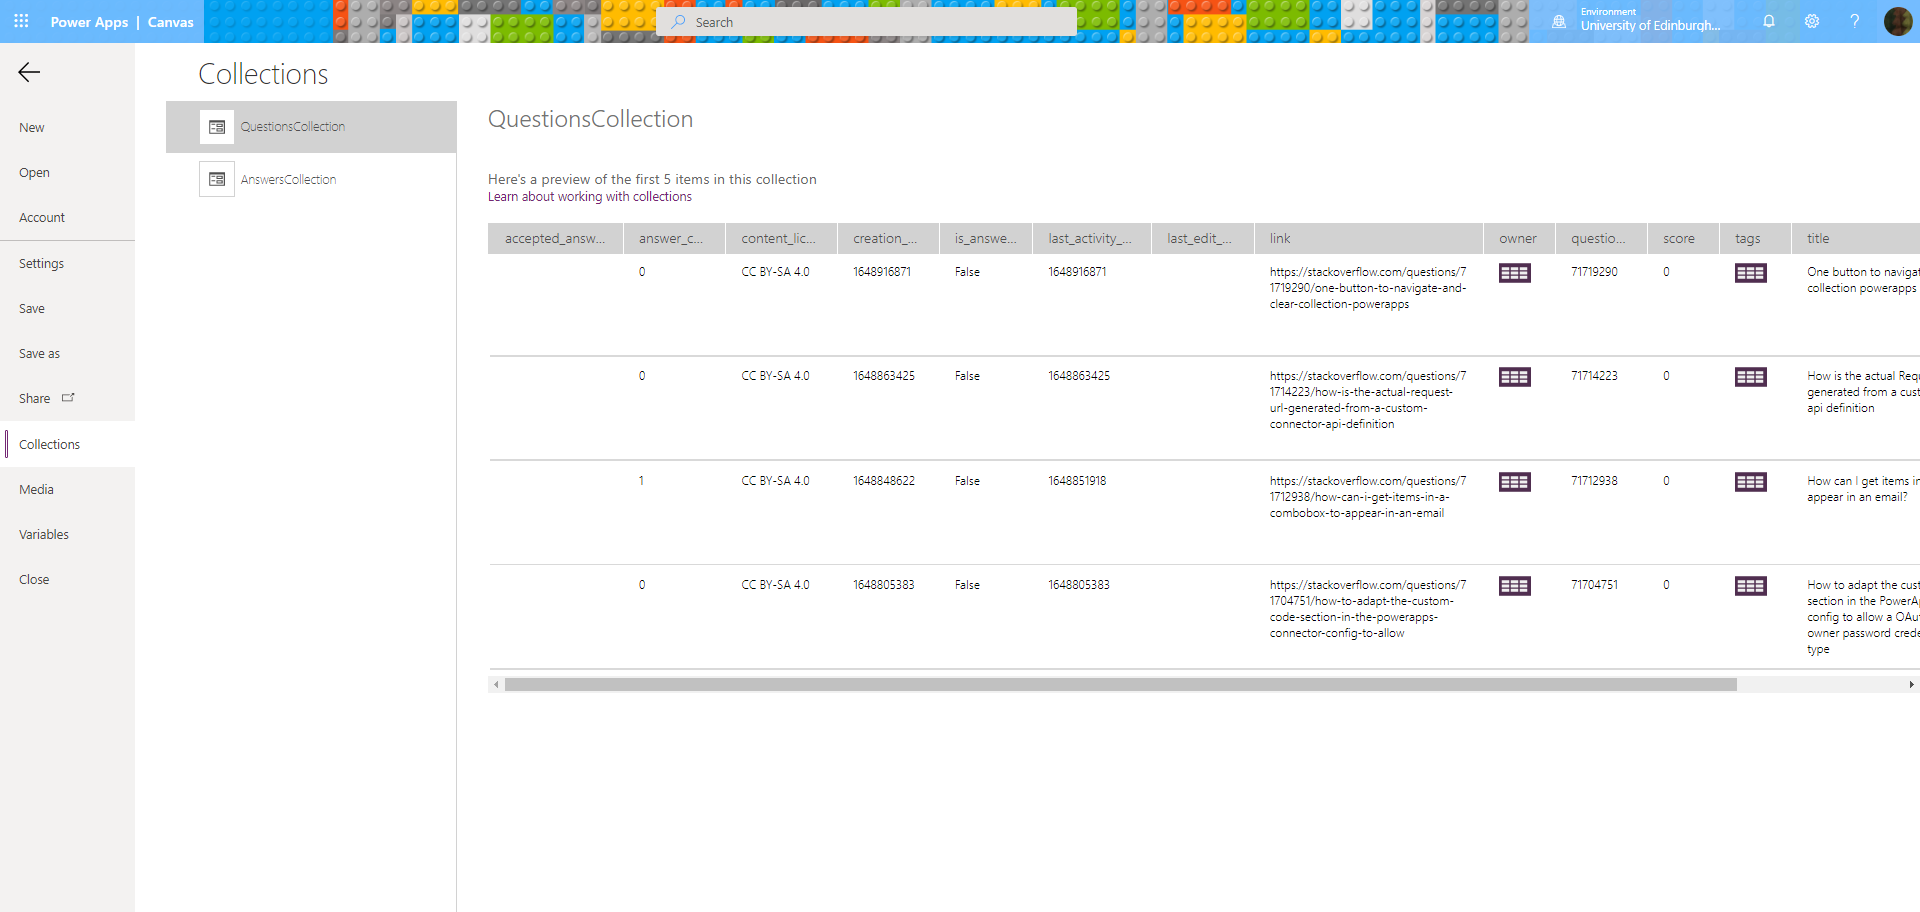
Question data, hooray
Better still, those useful looking data fields from my Questions Collection are now available in my Gallery for adding to the display fields:
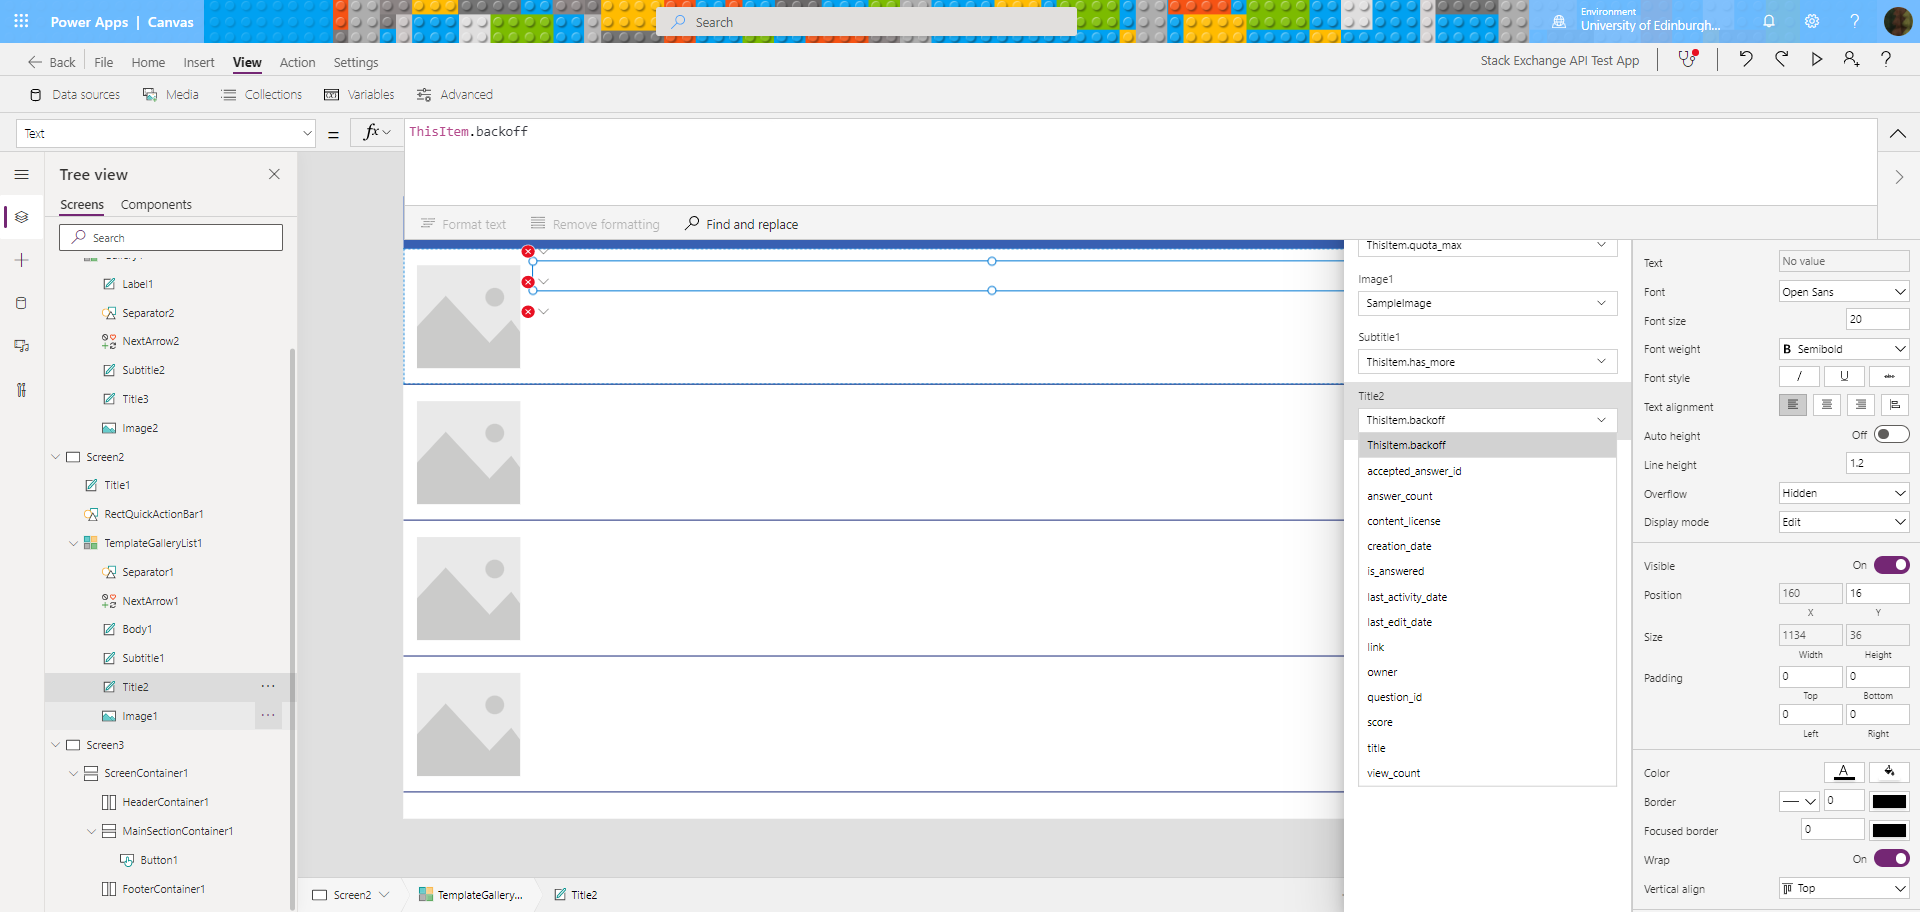
There are my data fields, available for adding to the gallery…
Bingo 😀
It’s like a garden in the springtime: the first little shoots of data fields peeking up into the display
A Few Display Details
Permission to use the Connector
The first time I went back into the Power App, it asked my permission to use the connector. I decided that was polite, so that was nice:
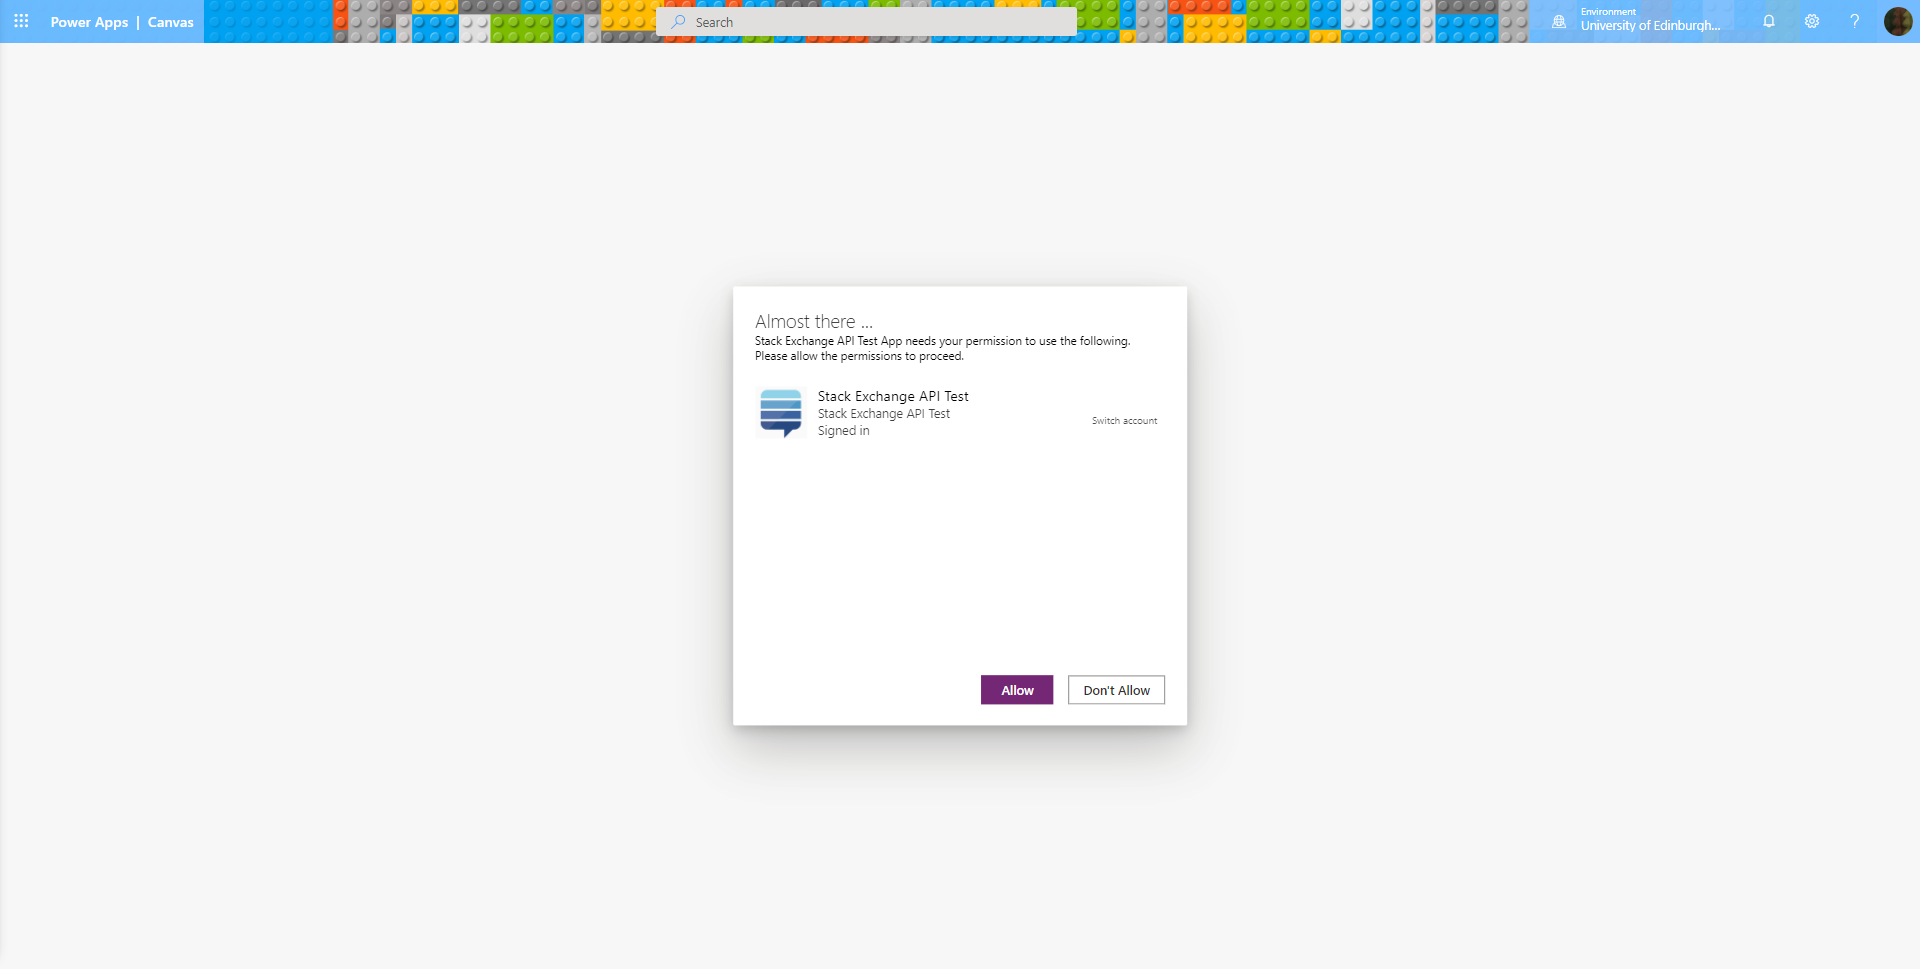
Power App asking for permission to use the custom connector
Copyright Disclaimer
The app and custom connector described in this article are not public and are not associated with Stack Exchange. Use of the Stack Exchange API logo to identify the custom connector for this project is for my own personal use only, to distinguish it from my other projects.
Turning the Arrow Icon into a Working Link
Following the helpful instructions in Power Apps Forums: Hyperlinks in Powerapps, I added Launch(ThisItem.link) to the OnSelect property of the arrow icon, which refers to the ‘link’ URL property in each data item to turn the arrow icons into working links:
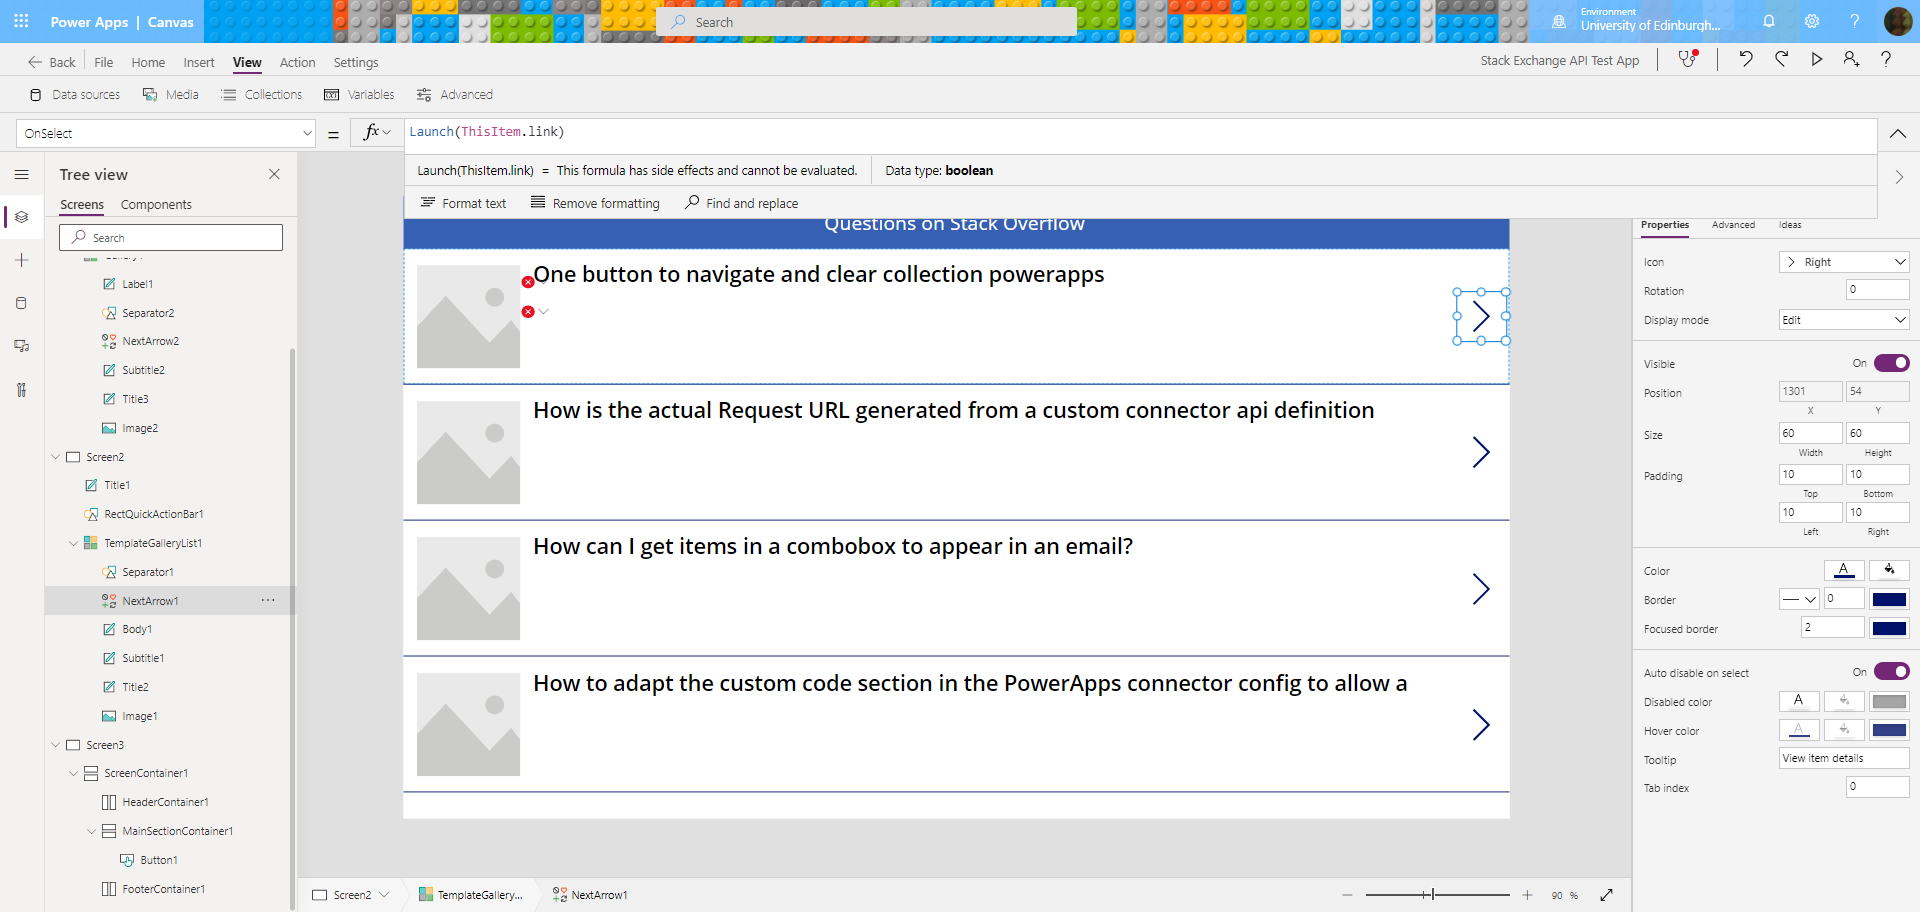
Clicking on each arrow will now launch the associated web page for the question
Converting Unix Time to Human Readable Time
According to the Stack Exchange API documentation page on Date Formats,
“All dates in the API are in unix epoch time, which is the number of seconds since midnight UTC January 1st, 1970. The API does not accept or return fractional times, everything should be rounded to the nearest whole second. “
I needed a more readable format to display the dates in my app.
I was very lucky to find this answer to a question about how to Convert Unix Time to Human Readable Time, by Power Apps forum contributor Timl:
Hi @seadude
An interesting bit of behaviour is that PowerApps is based on JavaScript, and JavaScript works usually with datetimes based on the number of milliseconds from the Unix epoch.
Because of this, we can take the Unix time, multiply by 1,000 (eg convert from seconds to milliseconds), and use the regular PowerApps formatting functions. In your example, the formula would look like this.
Text(1546096196000, "[$-en-US]ddd, dd mmm yyyy hh:mm:ss")
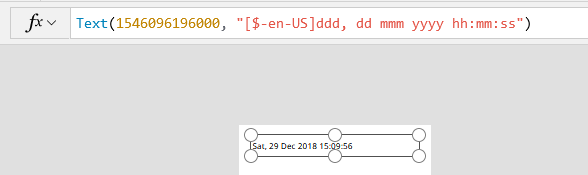
This saves us from needing to divide by 86400, and adding Date(1970,1,1).
So thanks to Timl, my Date display field now contains this formula:
Text((ThisItem.creation_date * 1000), "[$-en-GB]ddd, dd mmm yyyy hh:mm:ss")
It’s working, hooray!
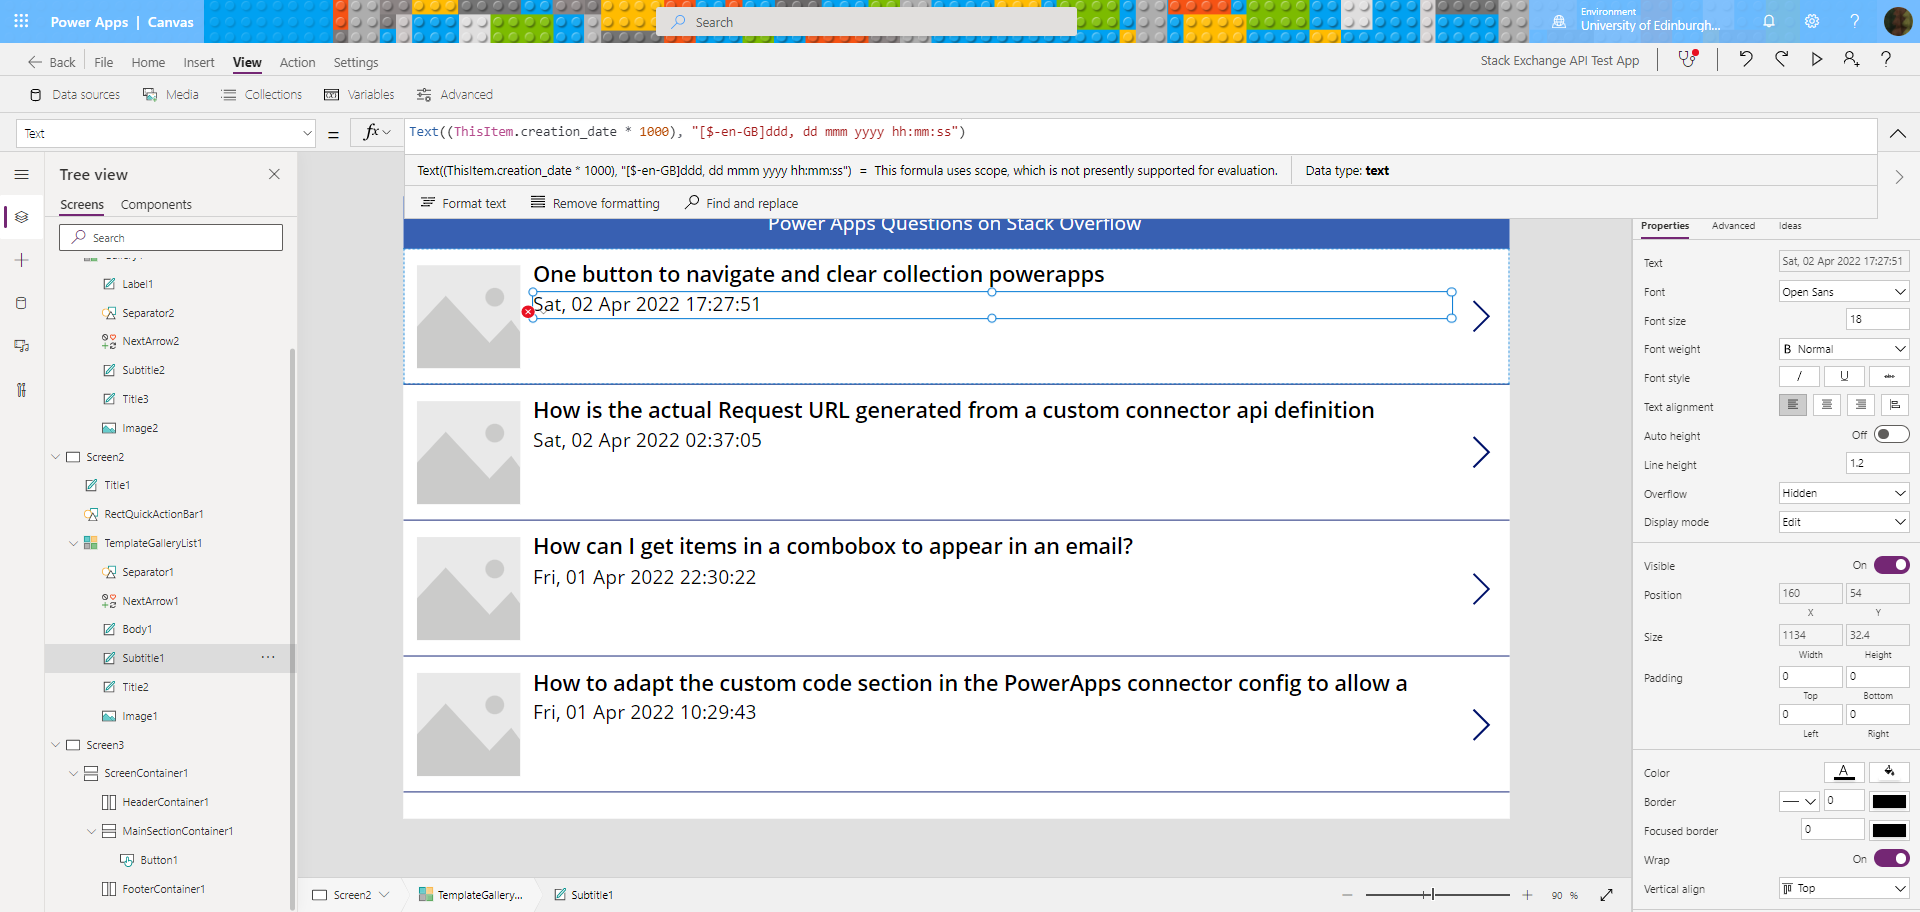
Look at those lovely readable dates
Displaying the Answer and View Counts
Next I got the answer count displaying nicely with this formula in its text field:
Concatenate(ThisItem.answer_count & " Answer(s)")
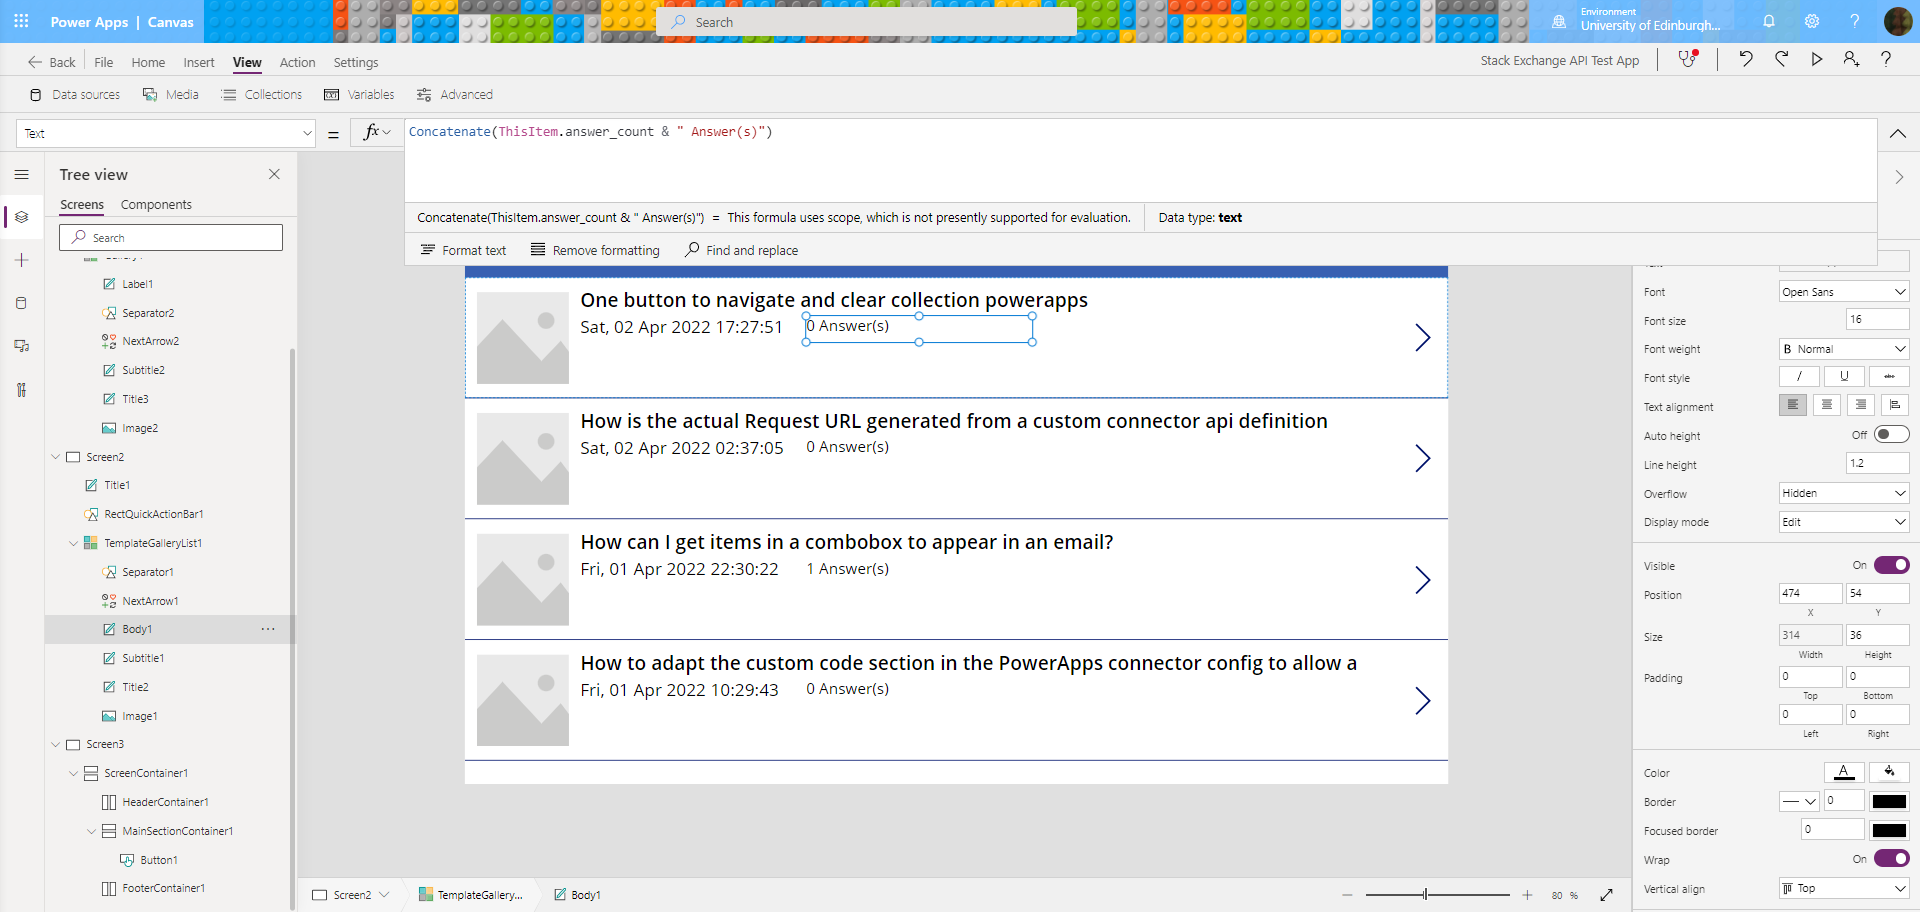
Screenshot with numbers of answers displayed
Later, I added the View Count to the same display field, like this:
Concatenate(ThisItem.view_count & " View(s), " & ThisItem.answer_count & " Answer(s)")
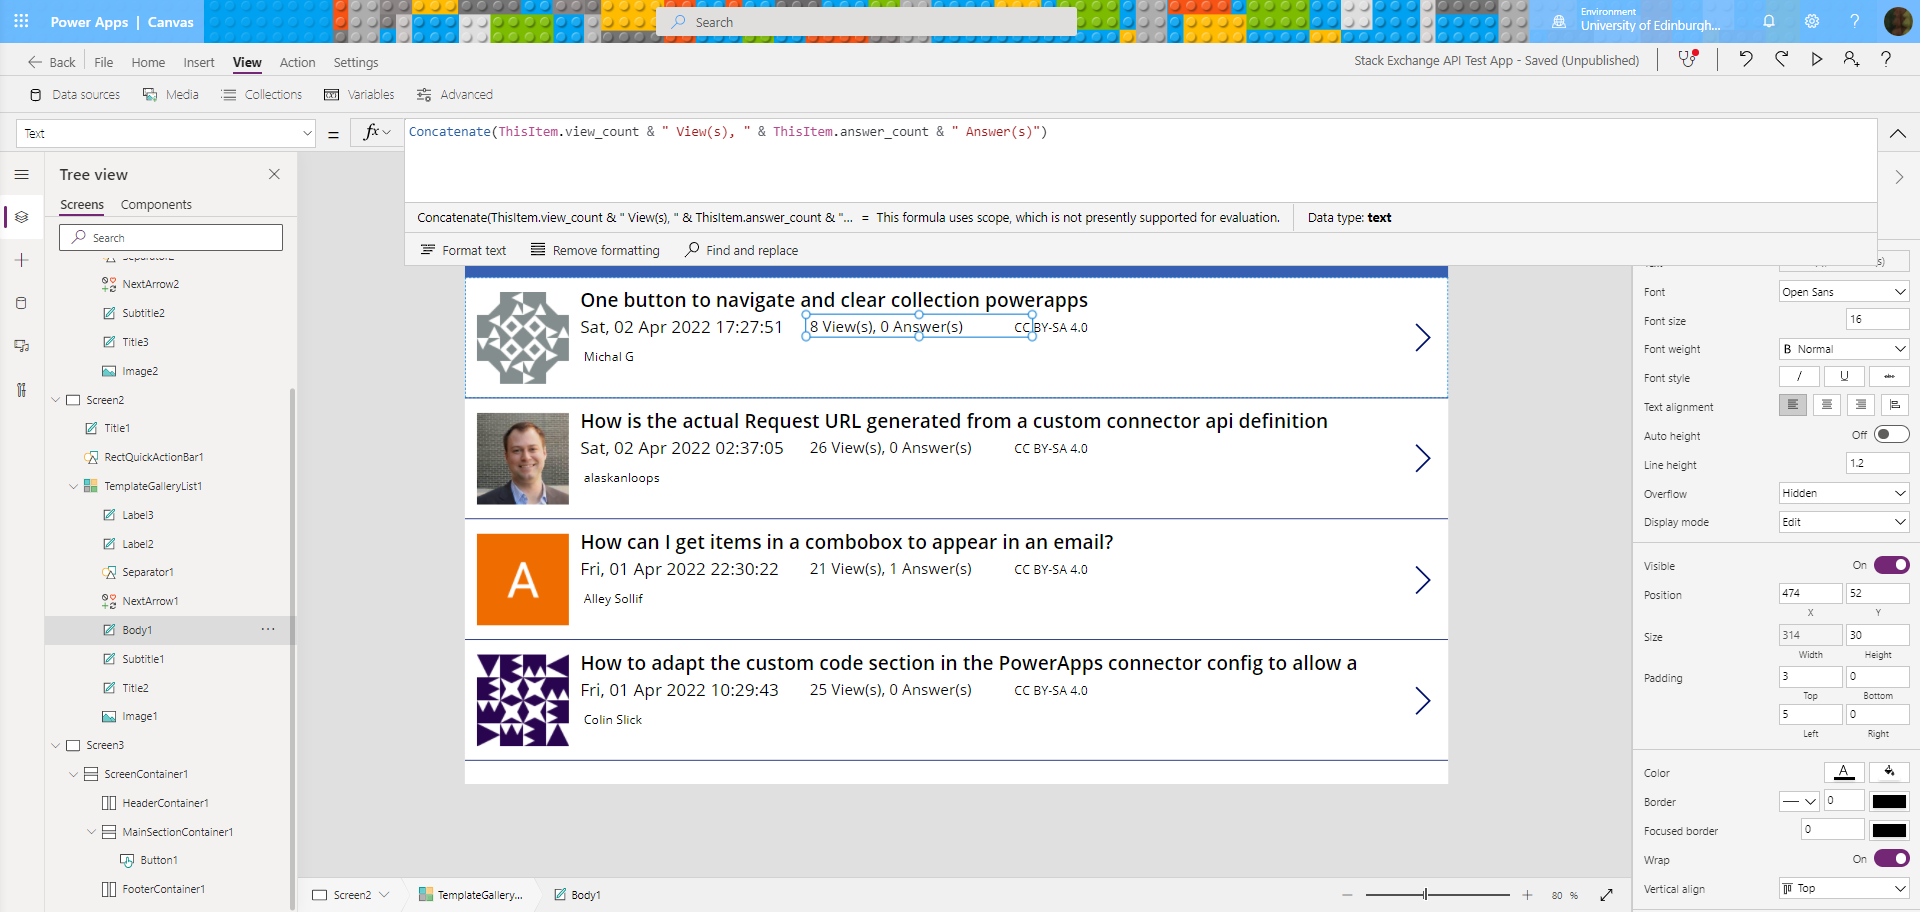
Screenshot with numbers of views displayed as well
Displaying the Author Details
Got profile images displaying with ThisItem.owner.profile_image:
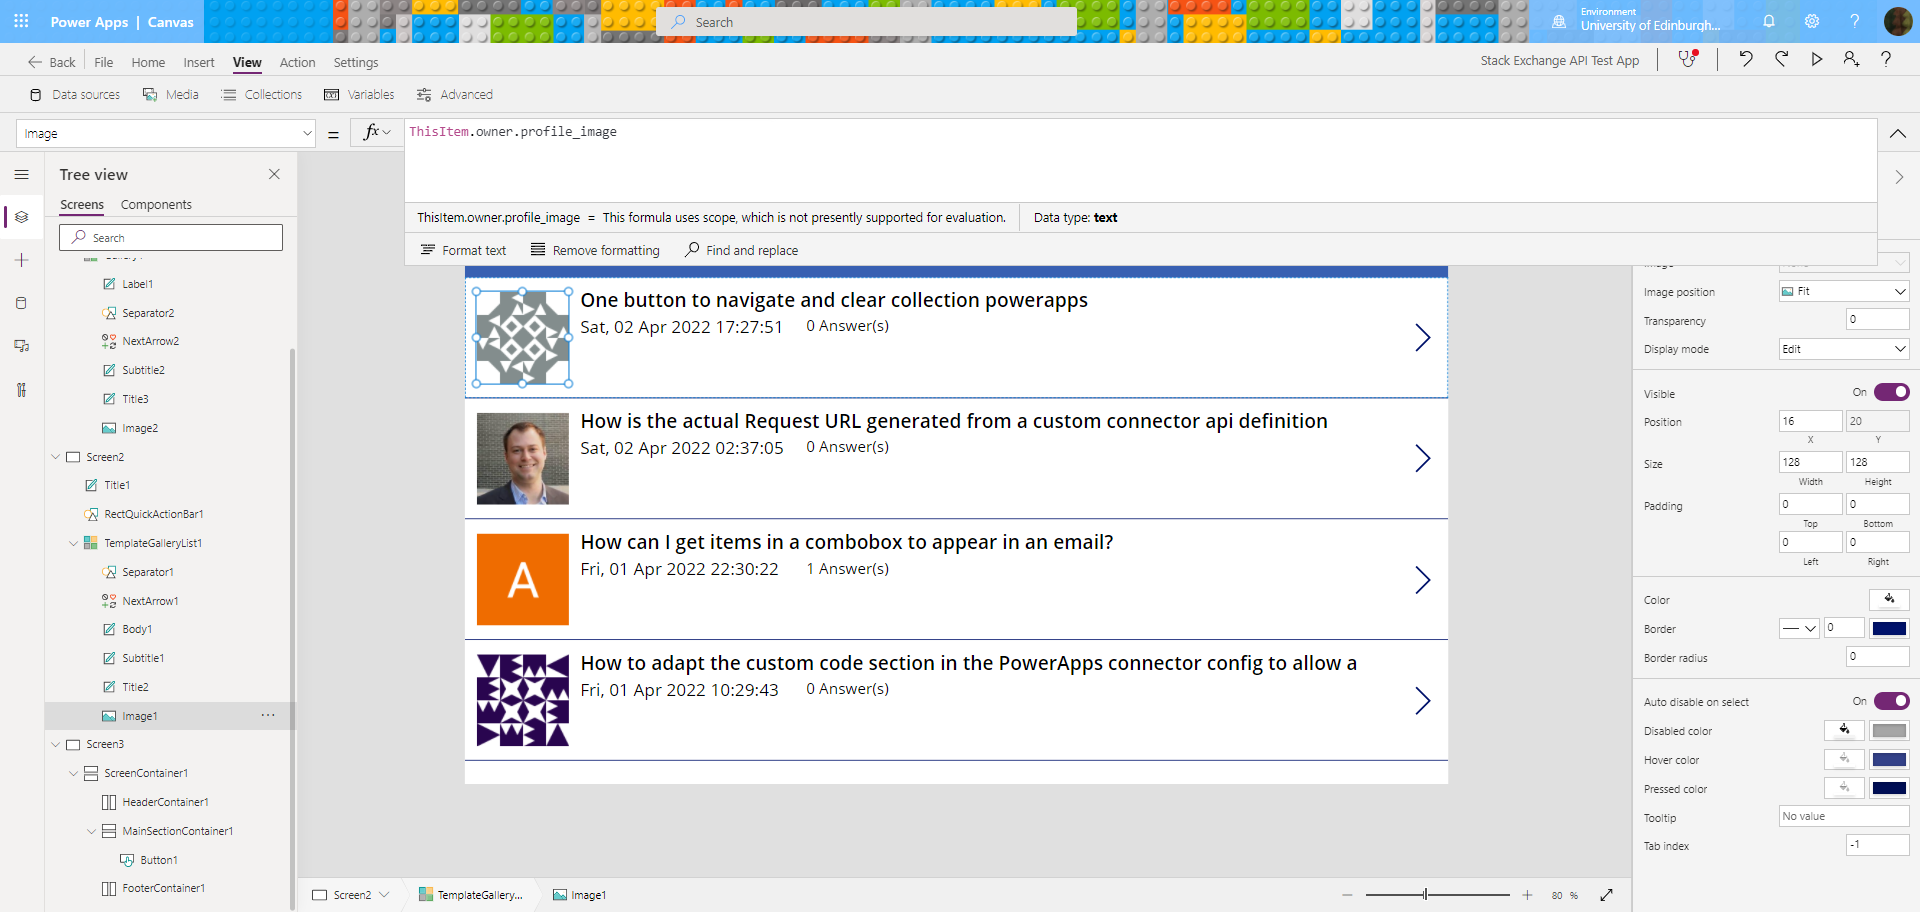
Power Apps Gallery screenshot with author profile images
Next, I displayed their names with profile links, by adding a Label with ThisItem.owner.display_name in the Text property and Launch(ThisItem.owner.link) in the OnSelect property:
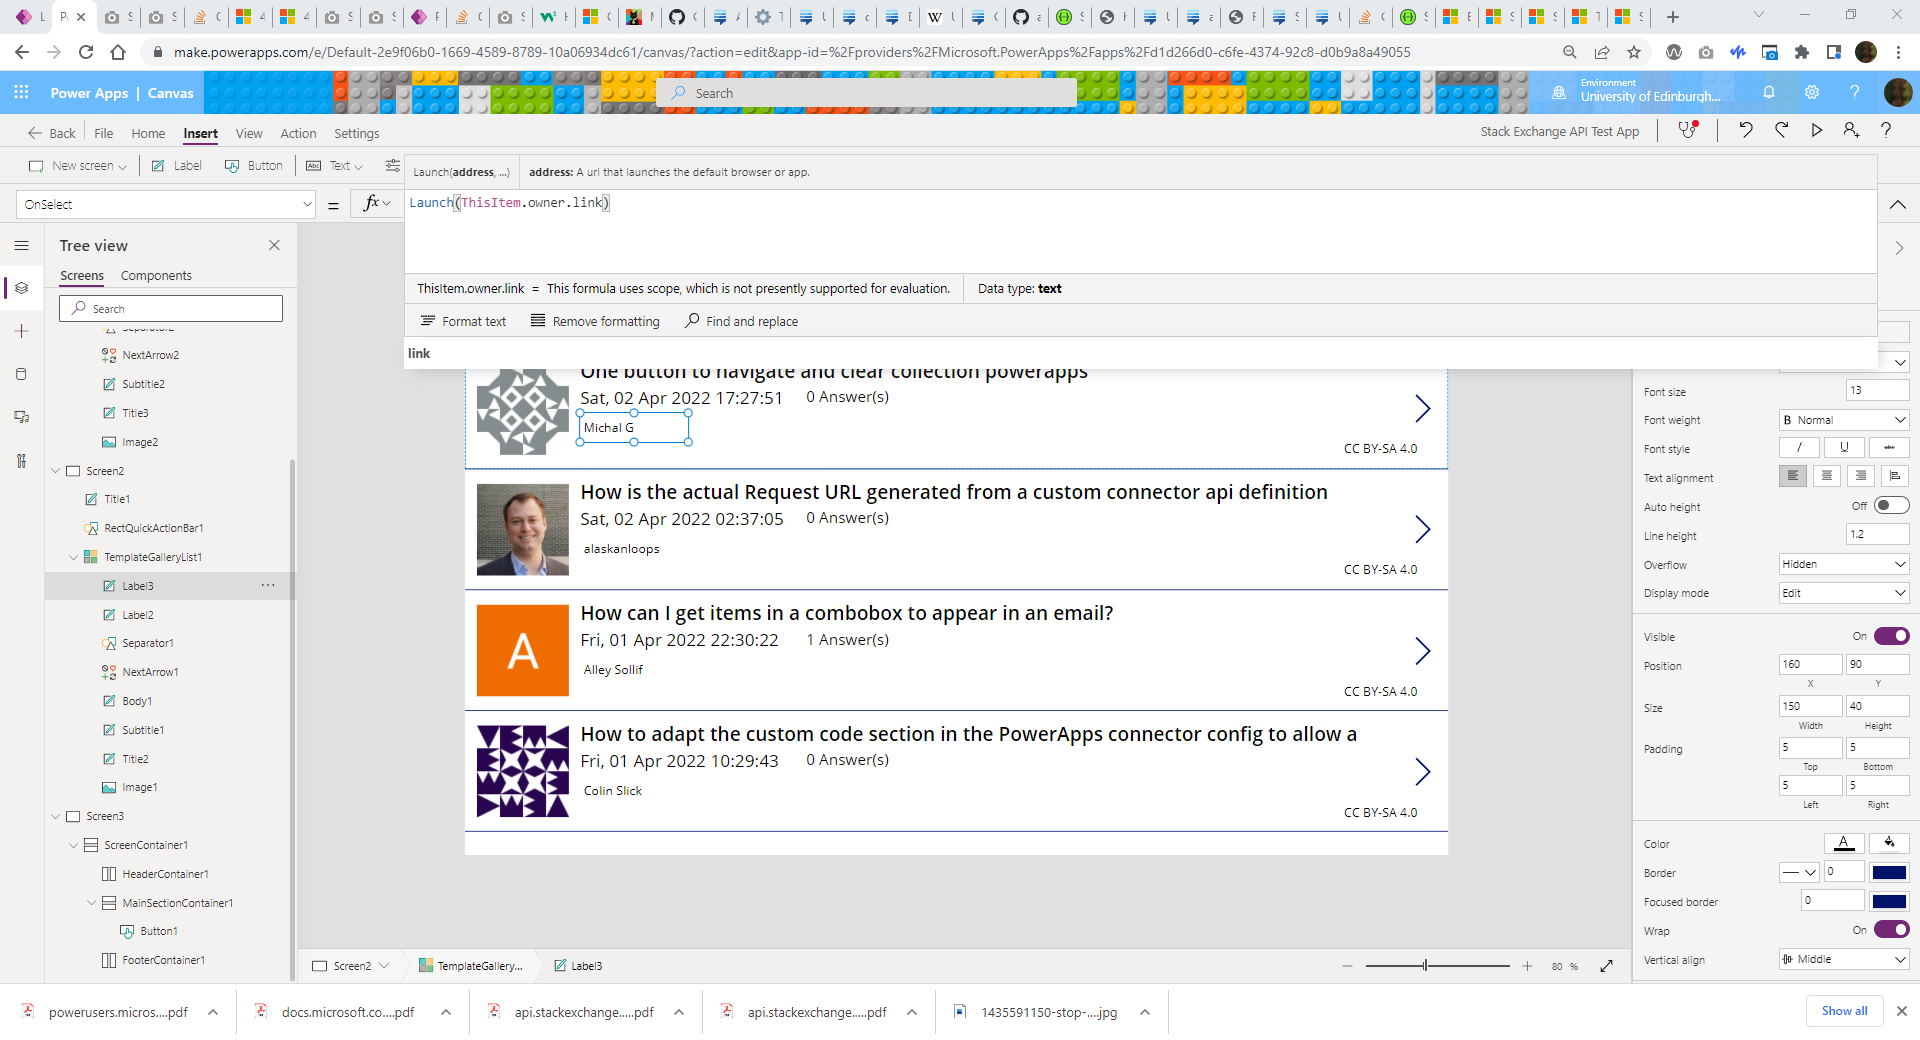
Got to credit and link to the authors! 😀
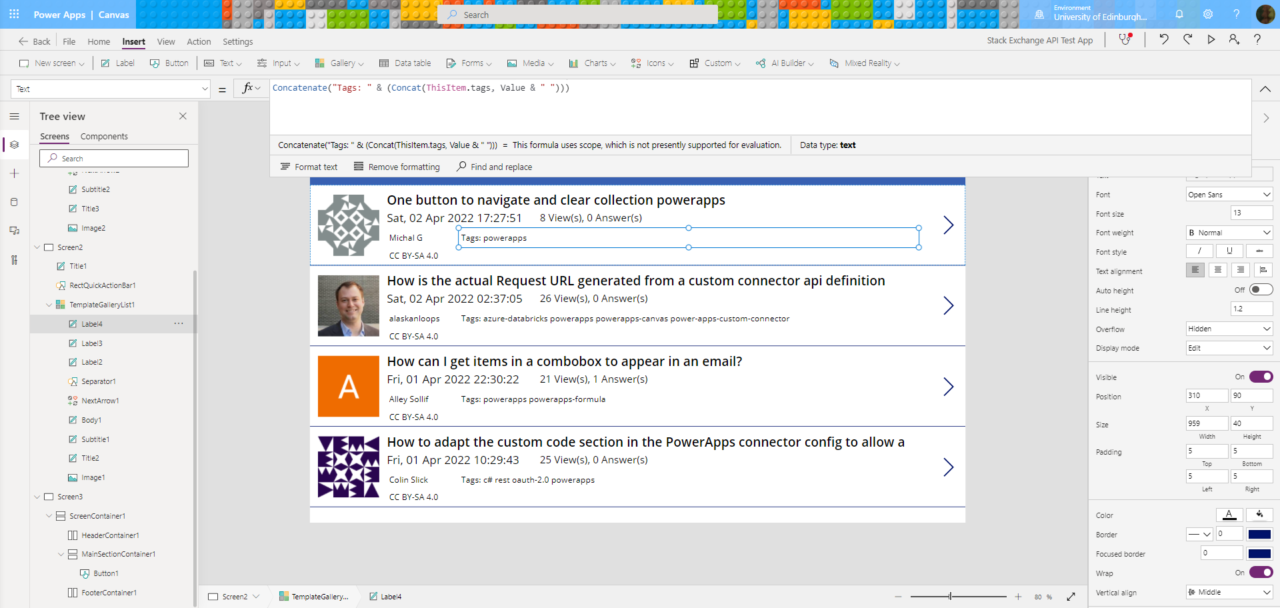
Subject Tags
Finally, I got the tags out of their nested data table for displaying with this formula in a Text label:
Concatenate("Tags: " & (Concat(ThisItem.tags, Value & " ")))
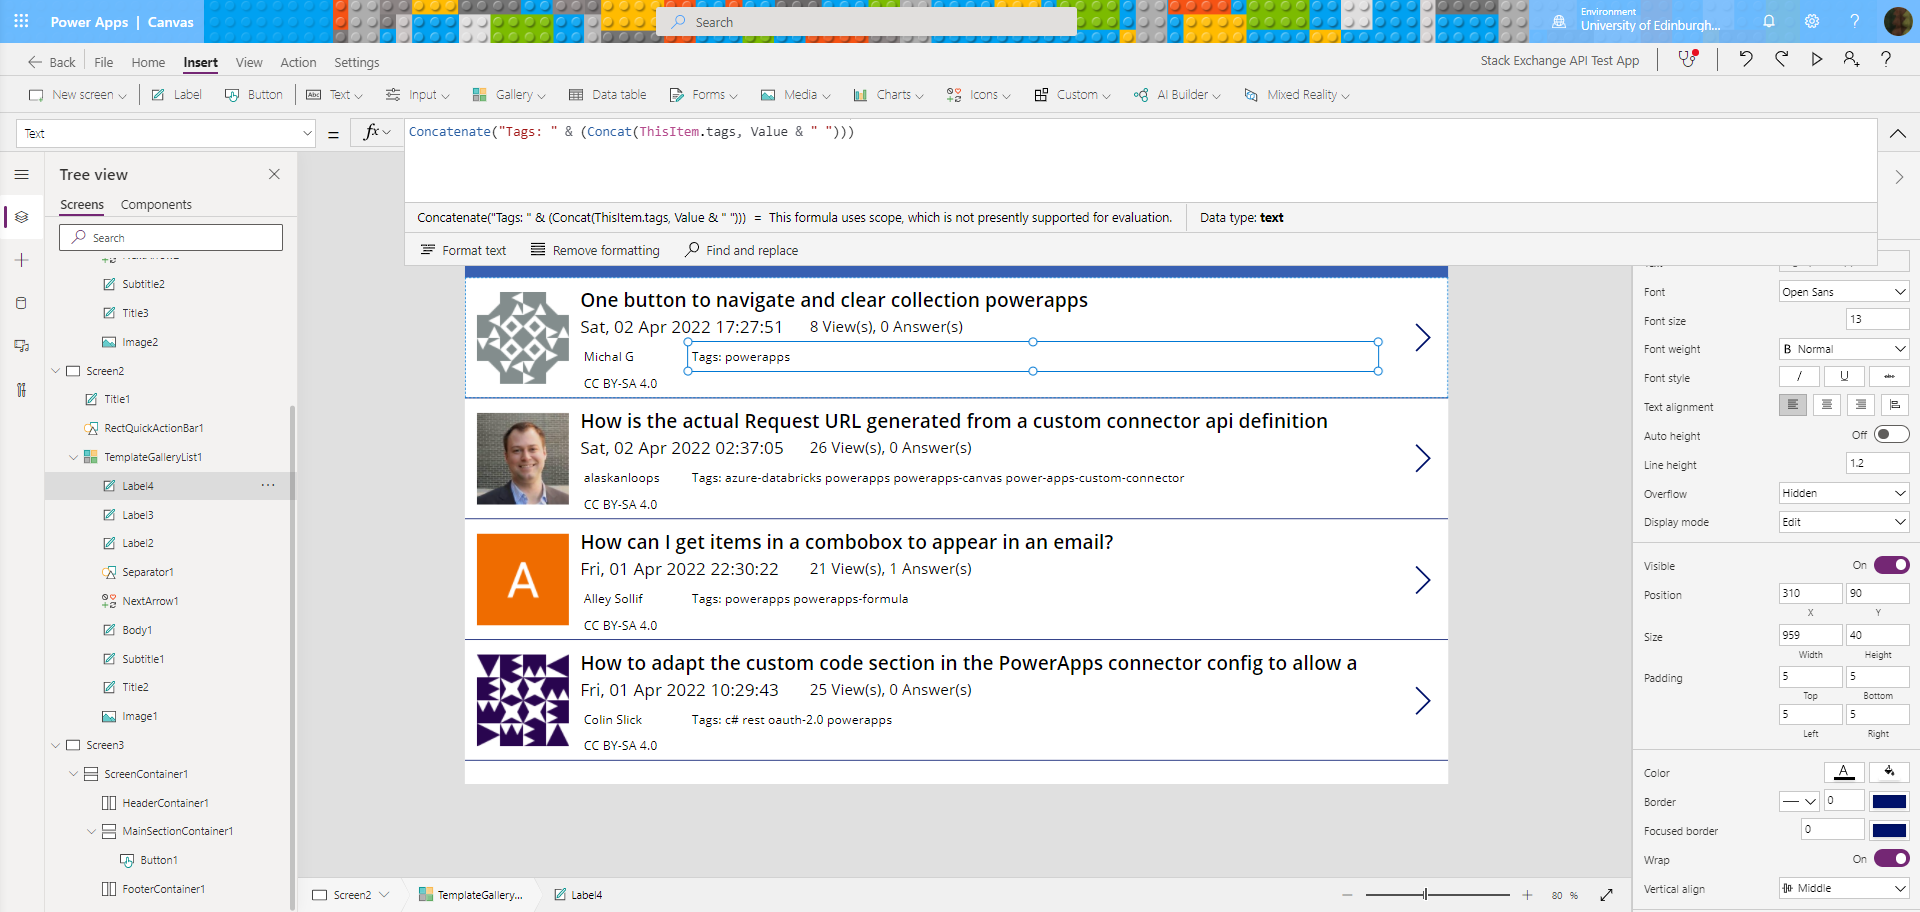
Gallery screenshot with tags displaying: I think that’s everything!
Back to the Index
And finally…
Just so much awesomeness…
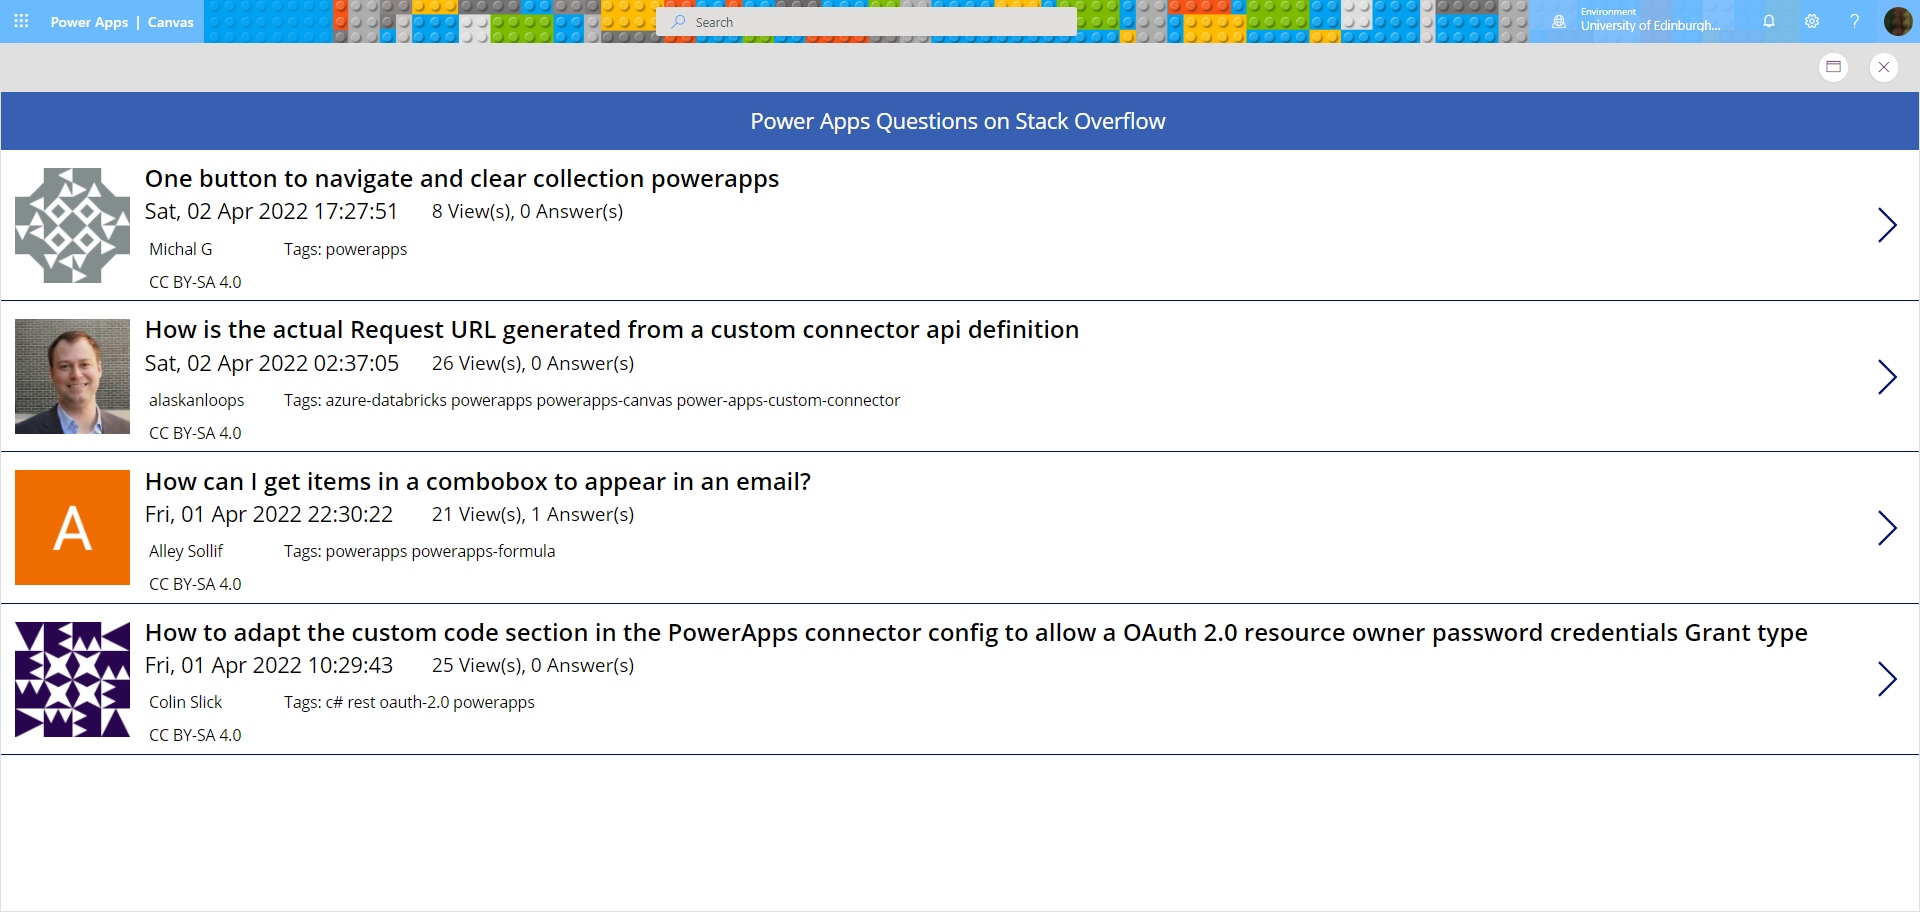
The finished (for my purposes 🙂 ) product!
I’m so glad I made it this far, and if you did too thanks for reading, and I’d love to hear from you in the comments! 😀
Links
- Making a Dad Jokes App using REST APIs and Power Apps Custom Connectors
- The OAuth 2.0 Authorization Framework
- Three-Legged OAuth – Blackboard Docs
- 900+ Free Rest and GraphQL JSON APIs
- Public APIs
- Stack Exchange API v2.3 Docs: Overview
- Stack Exchange API: Authentication
- StackApps Login and Registration: https://stackapps.com/users/login?returnurl=/apps/oauth/register
- Stack Exchange API Home Page
- Microsoft Docs: Create a custom connector from an OpenAPI definition
- Stack Exchange API: Usage of /articles GET
- StackApps forum
- Stack Apps Forum: App as Power Platform custom connector
- Greg Hurlman’s profile on Stack Apps
- Stack Apps Forum: Is there a OpenAPI/Swagger spec for the Stack Exchange API?
- OpenAPI Specification
- Swagger
- GitHub: Stack Exchange API Specification
- GitHub: Stack Exchange API 2.2 YAML file
- Petstore: Stack Exchange API 2.2 Swagger (List Questions Endpoint)
- Red Hat: What is YAML?
- Linux Hint: YAML vs JSON – Which is better?
- ConvertJSON.com
- Convert YAML to JSON
- OpenAPI.Tools
- API Transformer
- LucyBot api-spec-converter
- OpenAPI.Tools: Converters
- openapi-to-postman
- postman-collection-transformer
- Converting Postman collections from v1 to v2
- How to FIX: Postman Collection Format v1 is no longer supported
- W3C: Web Application Description Language
- Wikipedia: Web Application Description Language
- Stack Exchange API: Usage of /questions GET
- Microsoft Docs: Building responsive canvas apps
- Stack Exchange API documentation page: ‘Usage of /answers GET’
- Jonathan Bennet, AKA Aaron Samuels from “Mean Girls,” Explains Why “Fetch” is NEVER Gonna Happen. So stop trying to make it happen, okay?
- Stack Exchange API: Type question
- Power Apps Forums: Hyperlinks in Powerapps
- Always love this link: HTML Color Groups
- Microsoft Power Apps Forum: Convert Unix Time to Human Readable Time. Answer by Timl
- Show text, dates, and times in canvas apps
- Stack Exchange API: Date Formats
- Wikipedia: Unix time
(*my boss’s fault)
((Graphic from Microsoft Docs: Microsoft's responsive layout template selection for Power Apps))


Simon
Hi. You can use a free online tool to convert YAML to JSON https://freetools.site/data-converters/yaml-to-json
Annabel Treshansky
Hi Simon, that looks really useful – thanks for the link
Mariusz Michalowski
(With permission from the author)
YAML Tutorial for beginners that are looking to dig deeper into this topic.
https://spacelift.io/blog/yaml
Annabel Treshansky
Hi Mariusz, that looks really useful – thanks for posting it