
This post describes a Power App that fetches and displays data from a simple REST API using a custom connector created by importing from Postman. The app also uses a Toggle control to create a While loop in Power Apps.
The app itself can be found here: https://apps.powerapps.com/play/f1478489-b888-4e8a-9fe5-8c244e126e70?tenantId=2e9f06b0-1669-4589-8789-10a06934dc61, but is sadly only available to those with a University of Edinburgh login, as this app is a personal educational project and is not for publication or profit.
Why did this happen?
I’ve recently been working on a project to access our Blackboard Learn Virtual Learning Environment more efficiently using REST APIs. It occurred to me that this might be possible using Microsoft Power Apps, which could allow the development of apps more quickly, if we could get the connection itself figured out. The Dad Jokes app was developed as a proof (or otherwise) of the concept.
Index Links
- Power Apps Operations
- Finding the Maximum Text Length
- Making a While Loop in Power Apps
- Settings for the working WHILE loop with a Toggle
- Exporting the Power App to a different Environment
- Testing Responsive Design Settings in Power Apps
- Sharing and Publishing Power Apps
- Displaying the Power App in a Teams tab
- Links
Power Apps Custom Connectors
Looking in Power Apps, I saw that connecting to REST APIs was indeed possible using custom connectors, as long as the API uses JSON and one of over 10 authentication mechanisms:
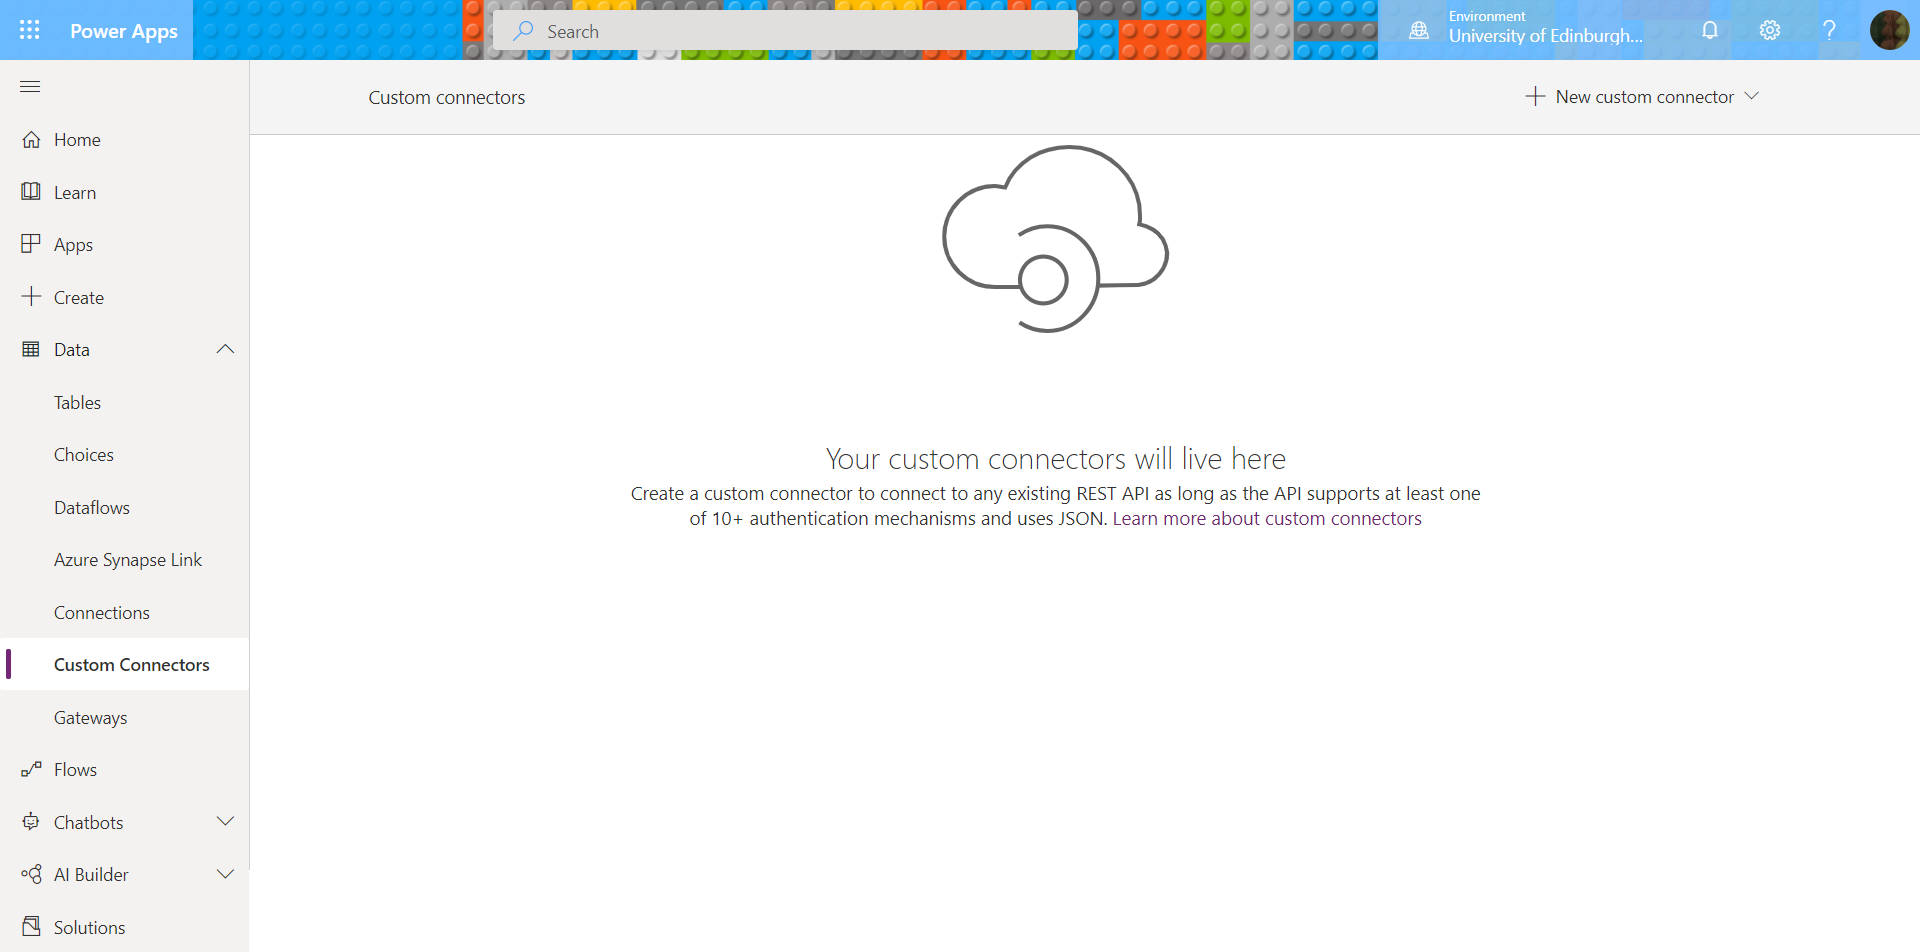
Your custom connectors will live here… I like the optimism already 🙂
Custom connectors allow Power Apps developers to extend the functionality of apps by connecting them to APIs and other services. According to Microsoft’s documentation on custom connectors, they require either a per user/app/month or a per user/month licence for all users using the app. I don’t know the exact details of our licence, but I think it does include one of these plans.
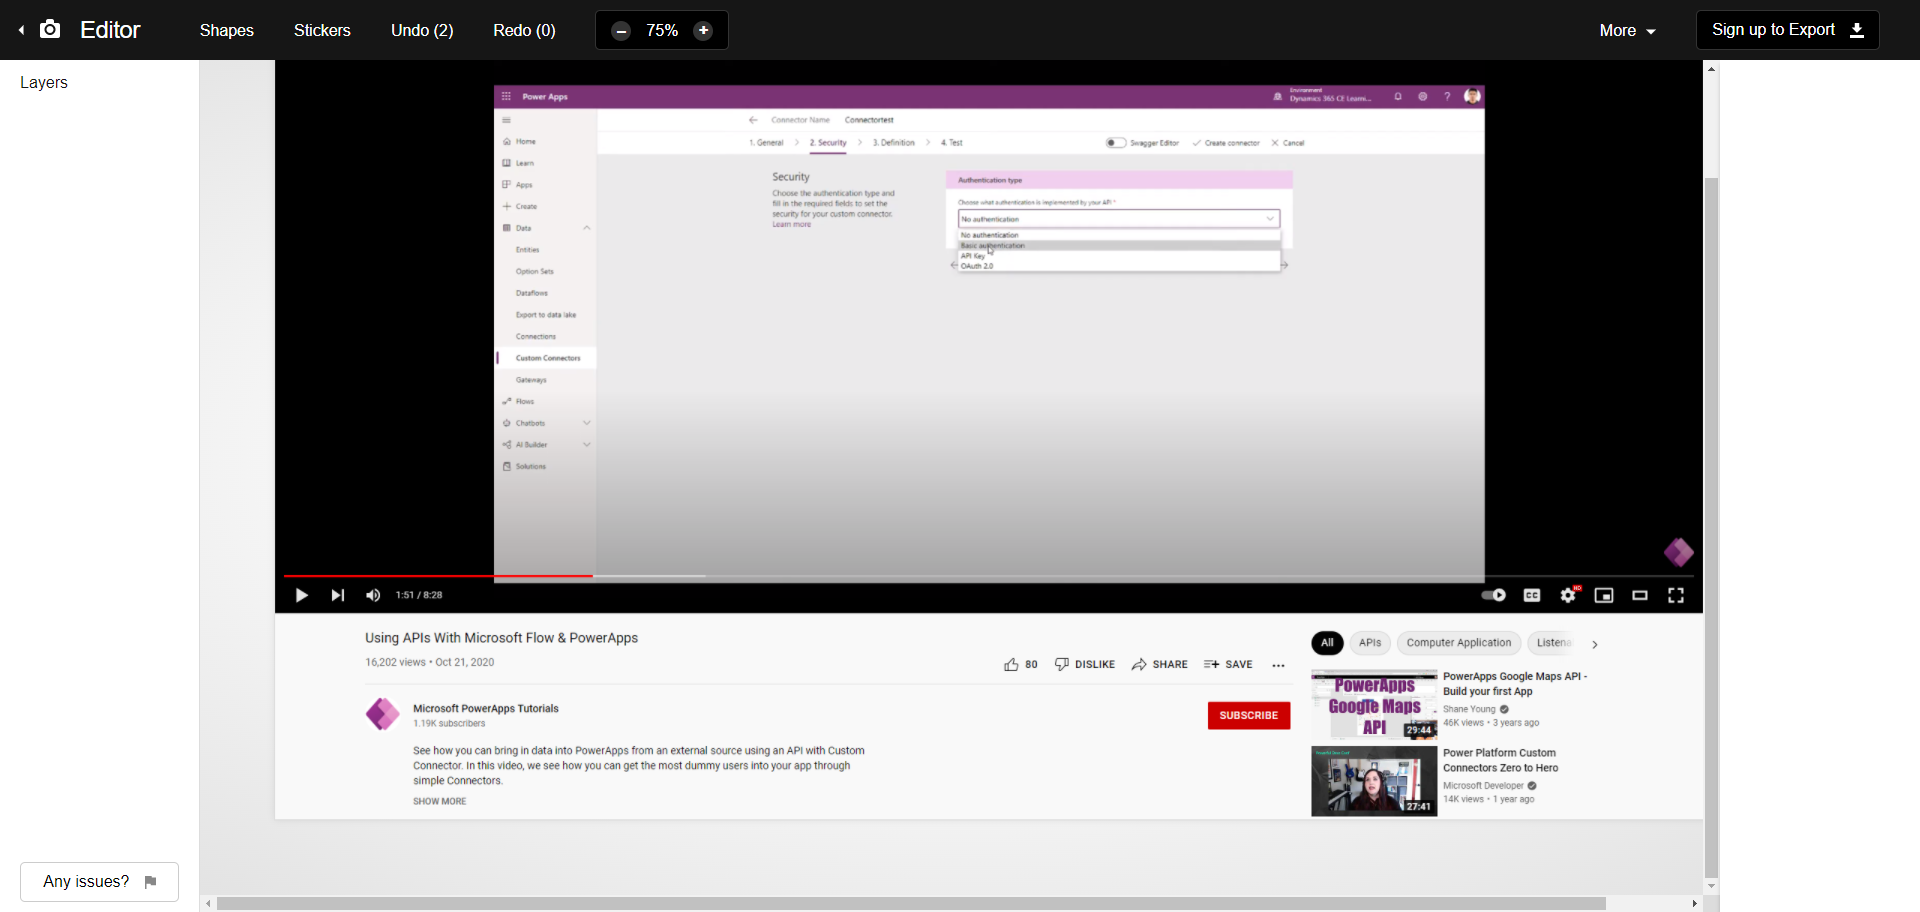
The Learn APIs are complex and require OAuth2 authentication, which I wasn’t sure would be possible in Power Apps. I found this handy video from Microsoft PowerApps Tutorials on YouTube, which showed that OAuth2 was one of the authentication mechanisms listed as available:
The Dad Jokes API
I thought it would be worth trying a simpler experiment first, as we have often got so far with Microsoft 365 development only to find we don’t have all the required permissions. In fact, the practice example in the Microsoft documentation required me to create a resource group in Azure, which I don’t have permission to do. However, I knew of a very simple Dad Jokes API that we used in my CodeClan course, and thought it would be a fun way to do a basic test of the concept.
The API serves a random Dad Joke from the address https://icanhazdadjoke.com, in either text or JSON format depending on the HTTP headers used in the GET request. Here is their description:
Endpoints
Fetch a random dad joke
GET https://icanhazdadjoke.com/ fetch a random dad joke.
Fetching a random joke as JSON:
$ curl -H "Accept: application/json" https://icanhazdadjoke.com/

{

  "id": "R7UfaahVfFd",

  "joke": "My dog used to chase people on a bike a lot. It got so bad I had to take his bike away.",

  "status": 200

}
Fetching a random joke as text:
$ curl -H "Accept: text/plain" https://icanhazdadjoke.com/

  My dog used to chase people on a bike a lot. It got so bad I had to take his bike away.
Using Postman
If there is a Swagger file available for the REST API, it is possible to create a Power Apps custom connector by importing that as OpenAPI.
Without that, it is also possible to create a custom connector by importing a collection exported from Postman. This process is described in Microsoft’s documentation at Create a custom connector from a Postman collection.
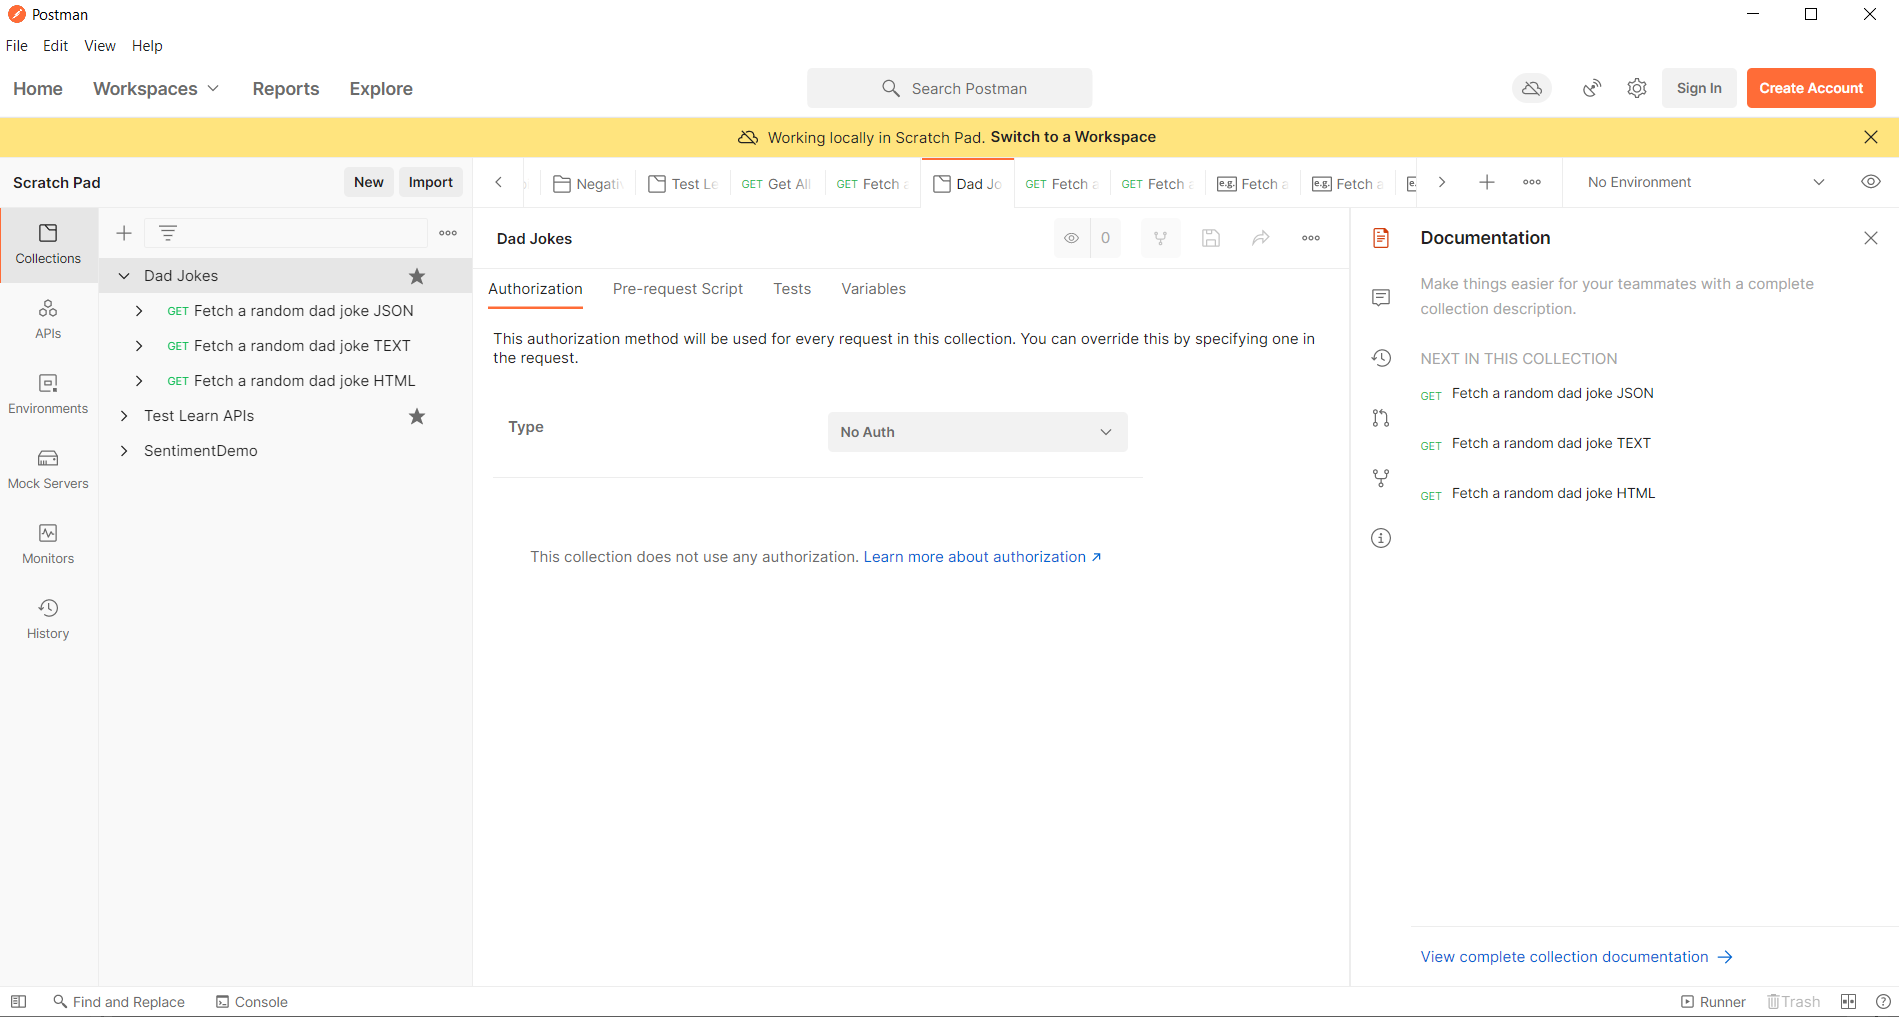
A very small Postman collection
So I created a very small ‘collection’ of three versions of the basic API GET endpoint, with headers for accepting text, JSON and HTML, and tested them in Postman. (If you’re following along, only use the JSON version, as the custom connector seemed to only take the first version and treat the others as the same request). This process is described in the Microsoft documentation at Create a Postman collection for a custom connector.
Here’s the text version:
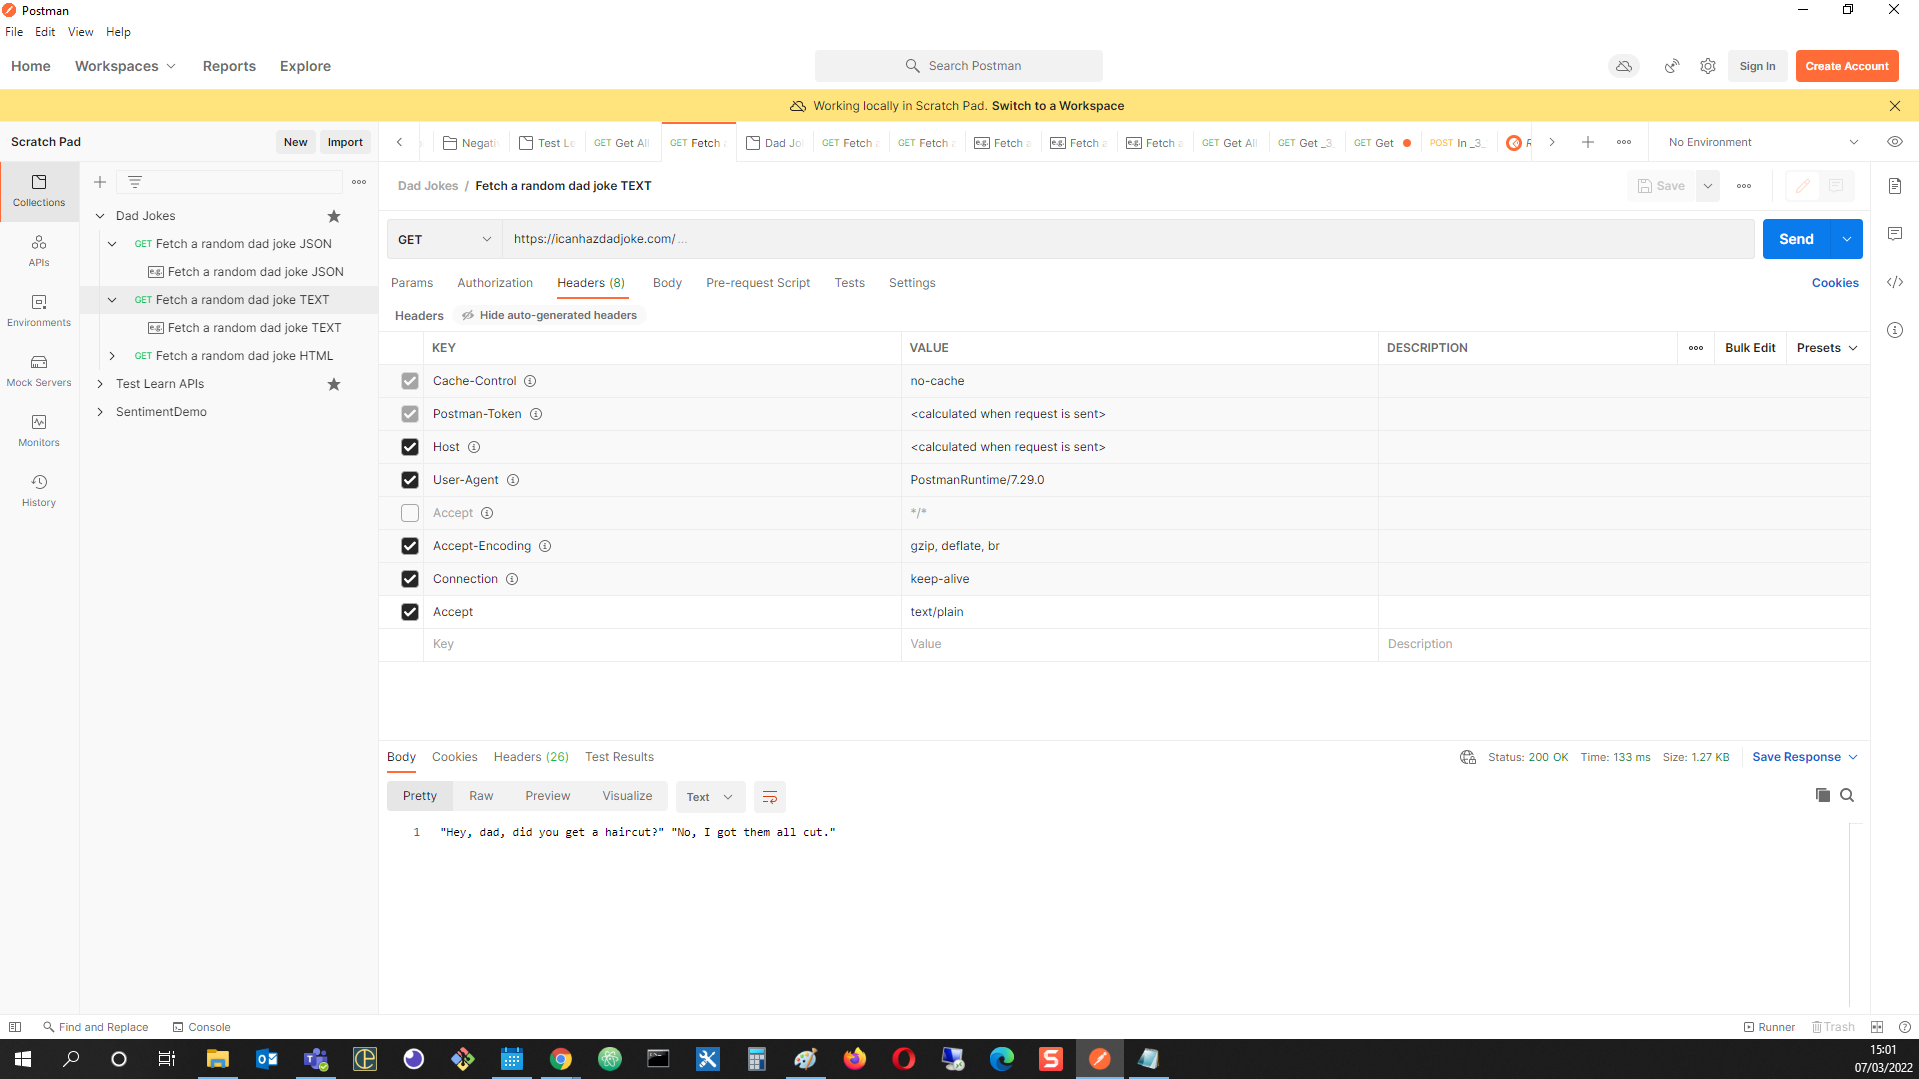
Plain text: The joke says, “Hey, dad, did you get a haircut?” “No, I got them all cut.”
My husband has been telling a version of this joke for 25 years…
Here’s the JSON version:
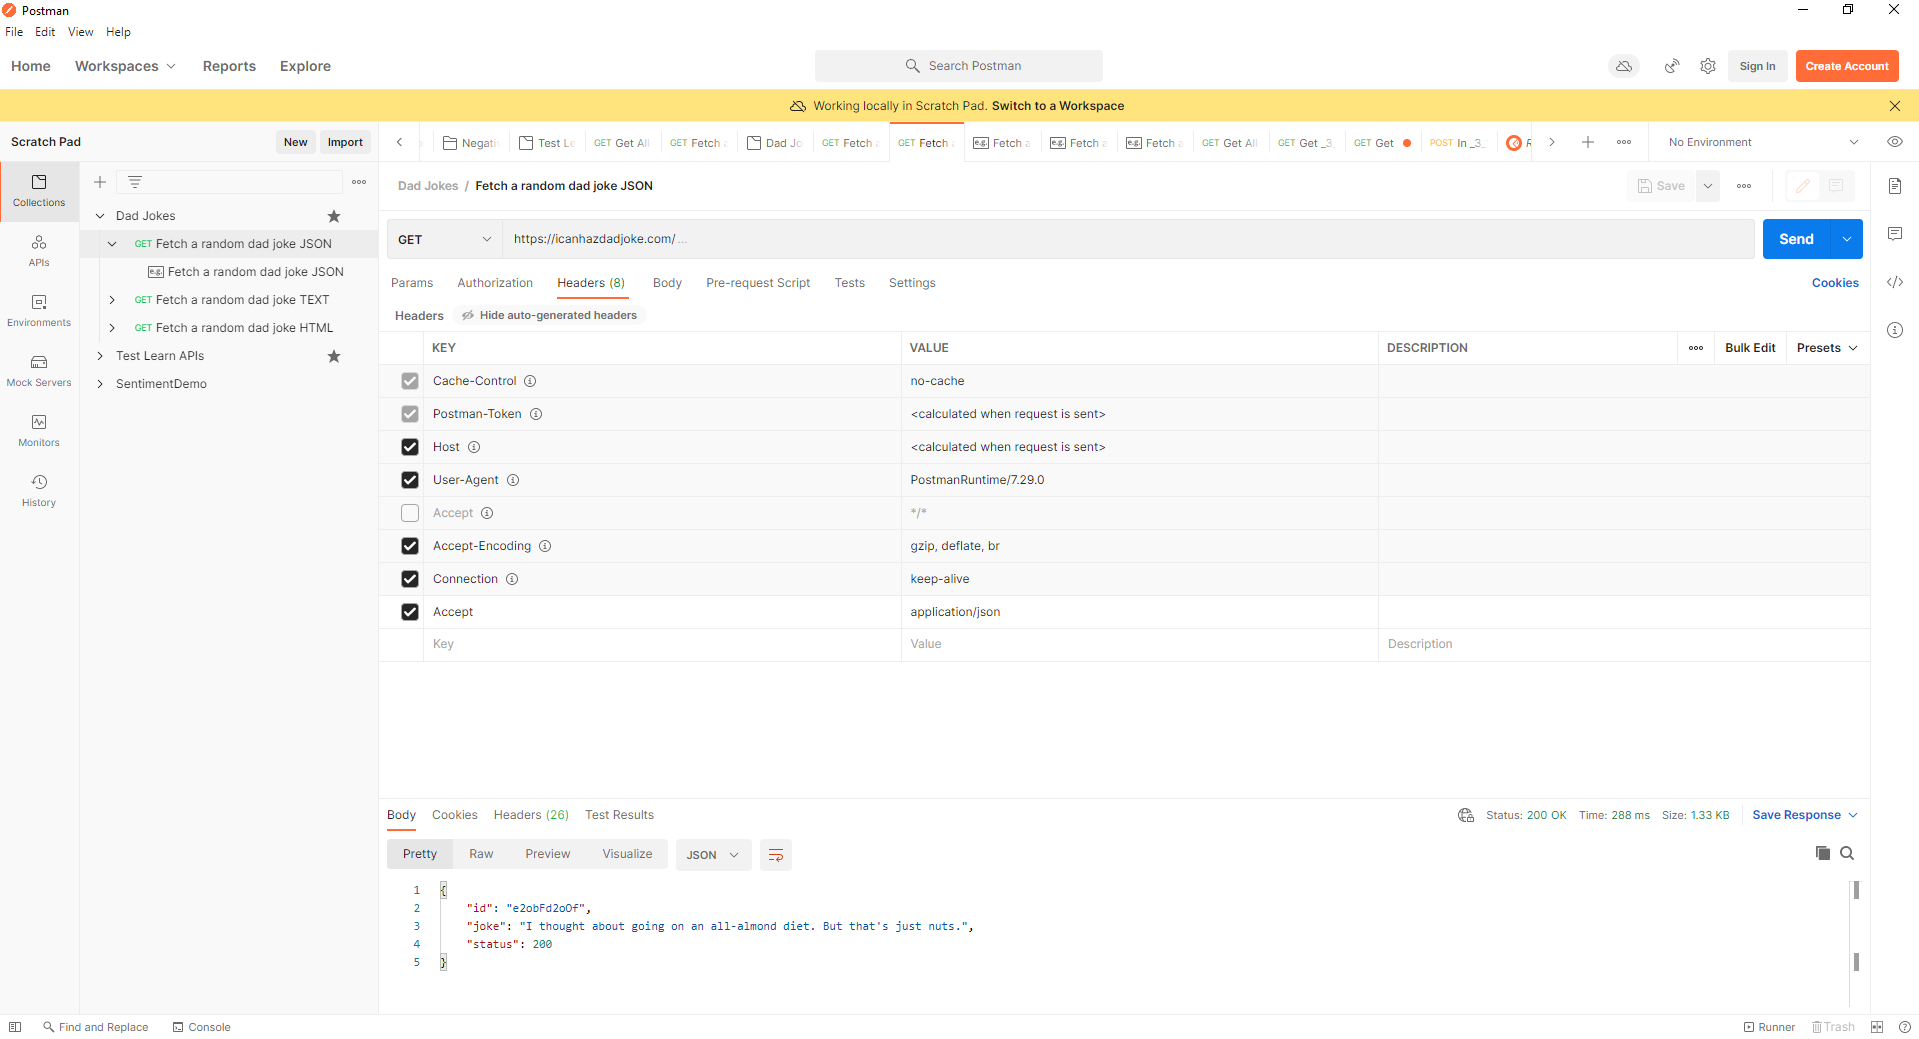
The joke says, “I thought about going on an all almond diet. But that’s just nuts.”
This is definitely more fun than OAuth2 authentication with Azure and Learn.
The export command is in a drop down menu accessed via the three dots next to the collection name:
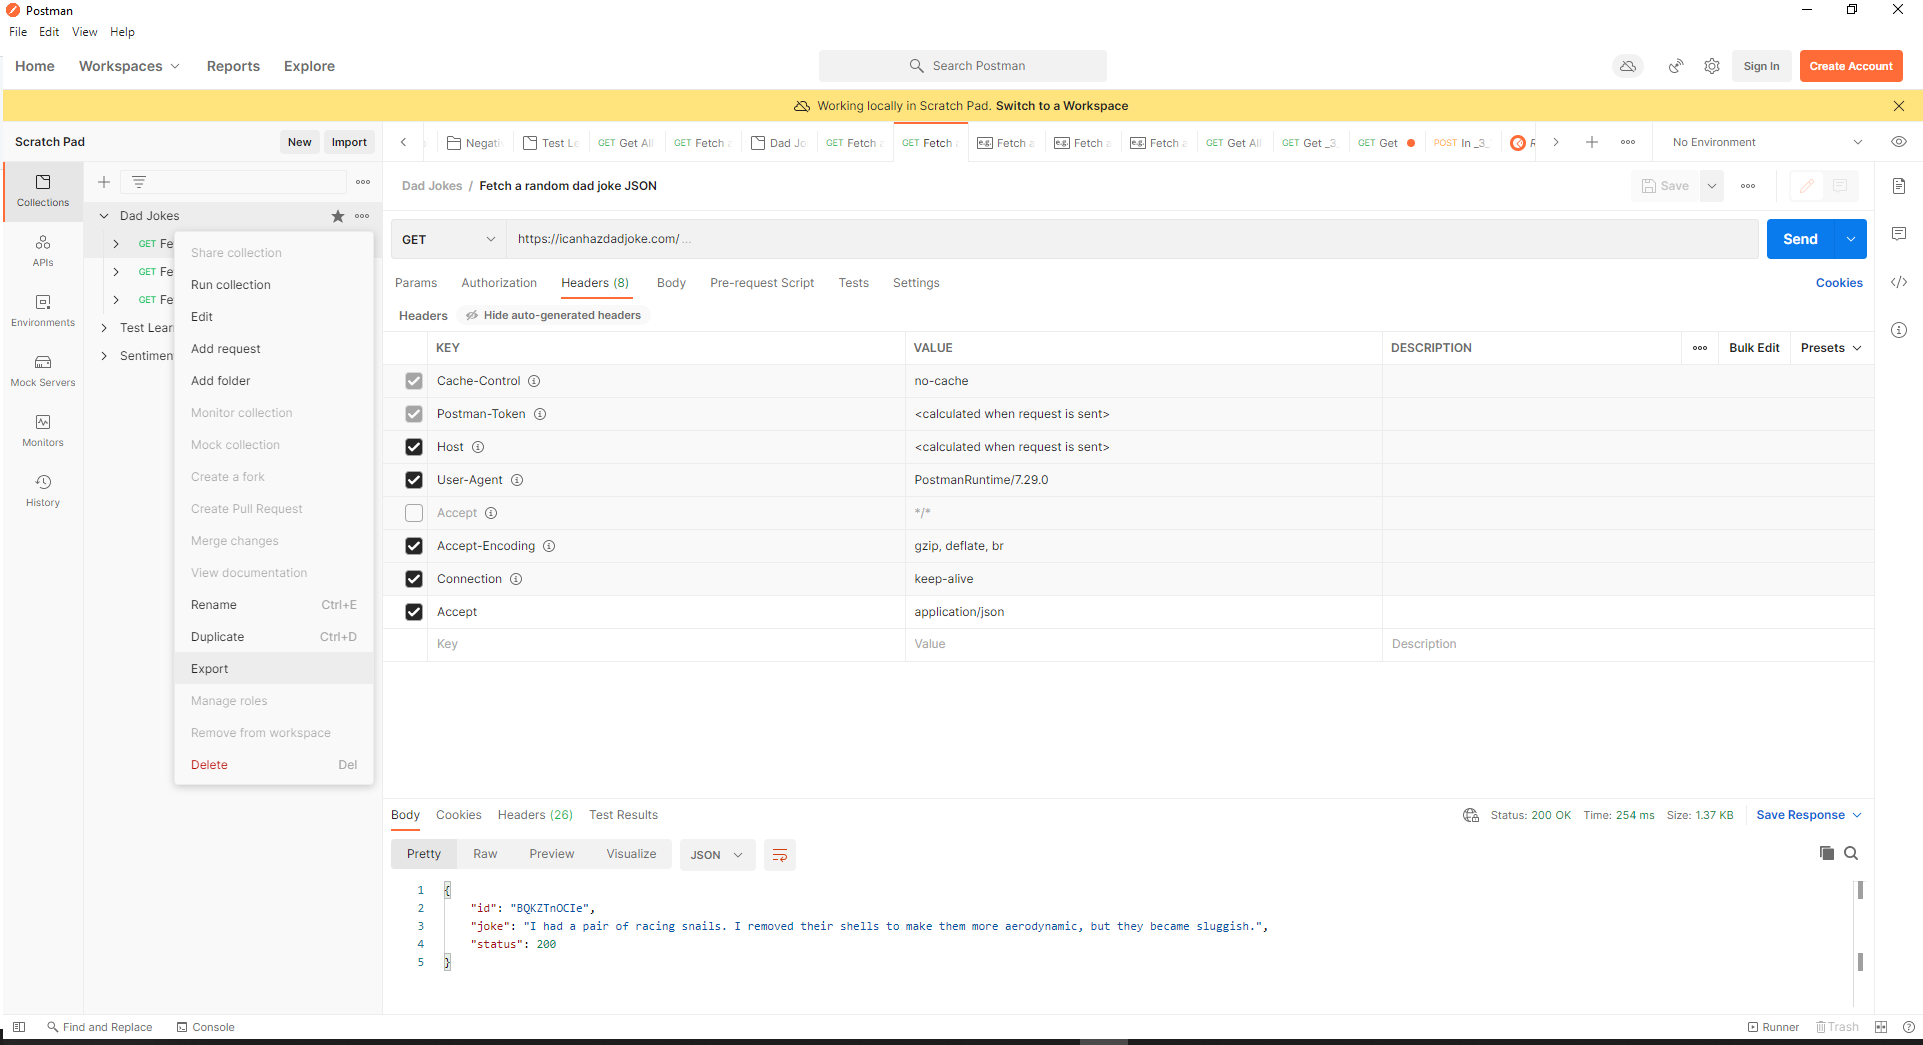
The Export menu option can be found next to the collection name.
One tricky part of this process was that the current version of Postman only exports versions 2 and 2.1, while Power Platform custom connectors can only import version 1.
Reading the Postman documentation, I found a way to convert a version 2 package to version 1 using a utility for Node in a command line window. This part of the process is described in reverse at Postman: Importing and exporting data: Converting Postman collections from v1 to v2. The command npm -v in a terminal window will let you know if you have Node available.
If you haven’t got Node, you could try the alternative method of installing an older version of Postman, as described in this Medium article: How to FIX: Postman Collection Format v1 is no longer supported.
So I exported the collection from Postman using version 2.0 format:
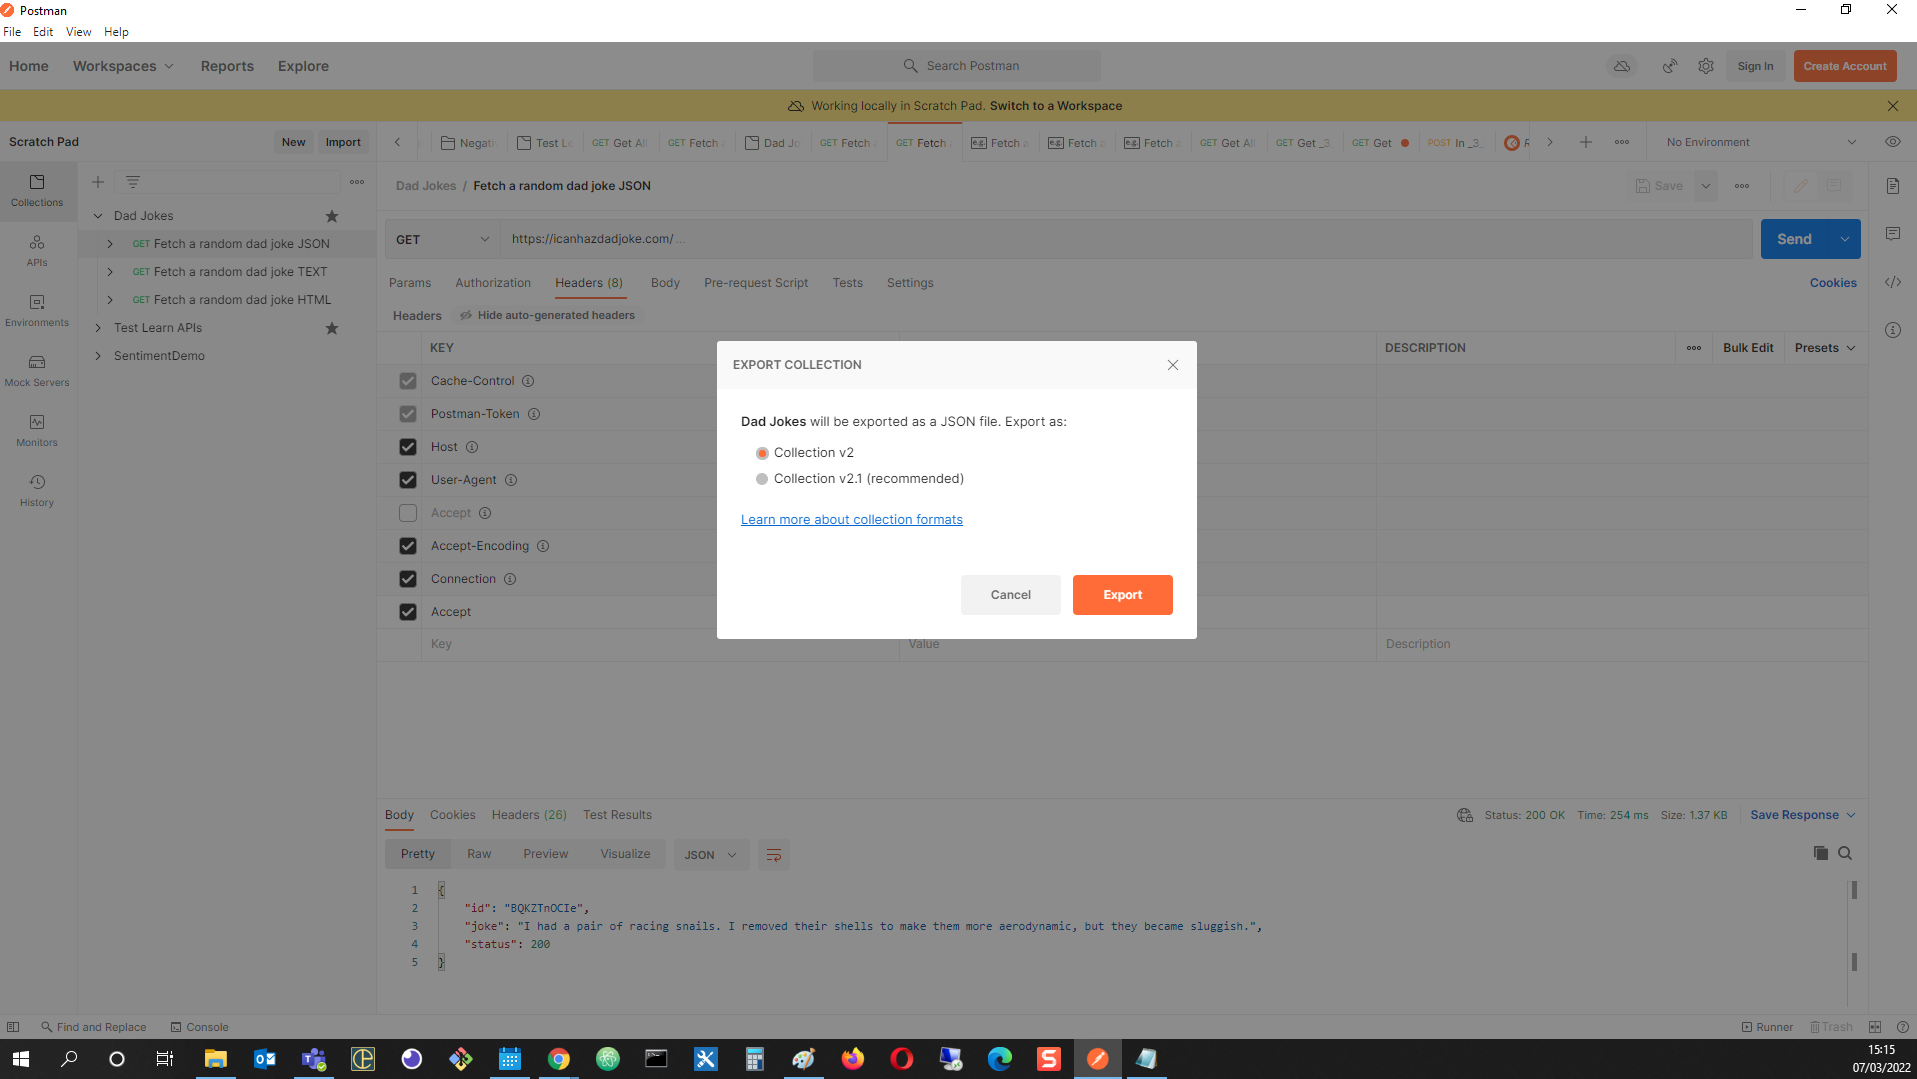
Exporting in version 2 in the hopes I can convert it to version 1.
It might not sound like progress, but it works 🙂
Next, I ran a command line utility in a Unix emulator window to convert the exported collection from version 2 to version 1.
This is the command line instruction to install the Postman Collection Transformer utility:
npm install -g postman-collection-transformer
This is the command line instruction for converting to the earlier Postman format:
postman-collection-transformer convert -i Dad-Jokes.postman_collection-v2.json -o Dad-Jokes.postman_collection-v1.json -j 2.0.0 -p 1.0.0 -P
Creating a Custom Connector in Power Apps
Next, I imported the collection to create a Custom Connector in my Power Apps environment.
Going into Power Apps, I chose ‘Custom Connectors’ from the Data menu options in the left hand menu, then ‘New custom connector’. ‘Import a Postman collection’ is one of the options in the drop down list that appears:
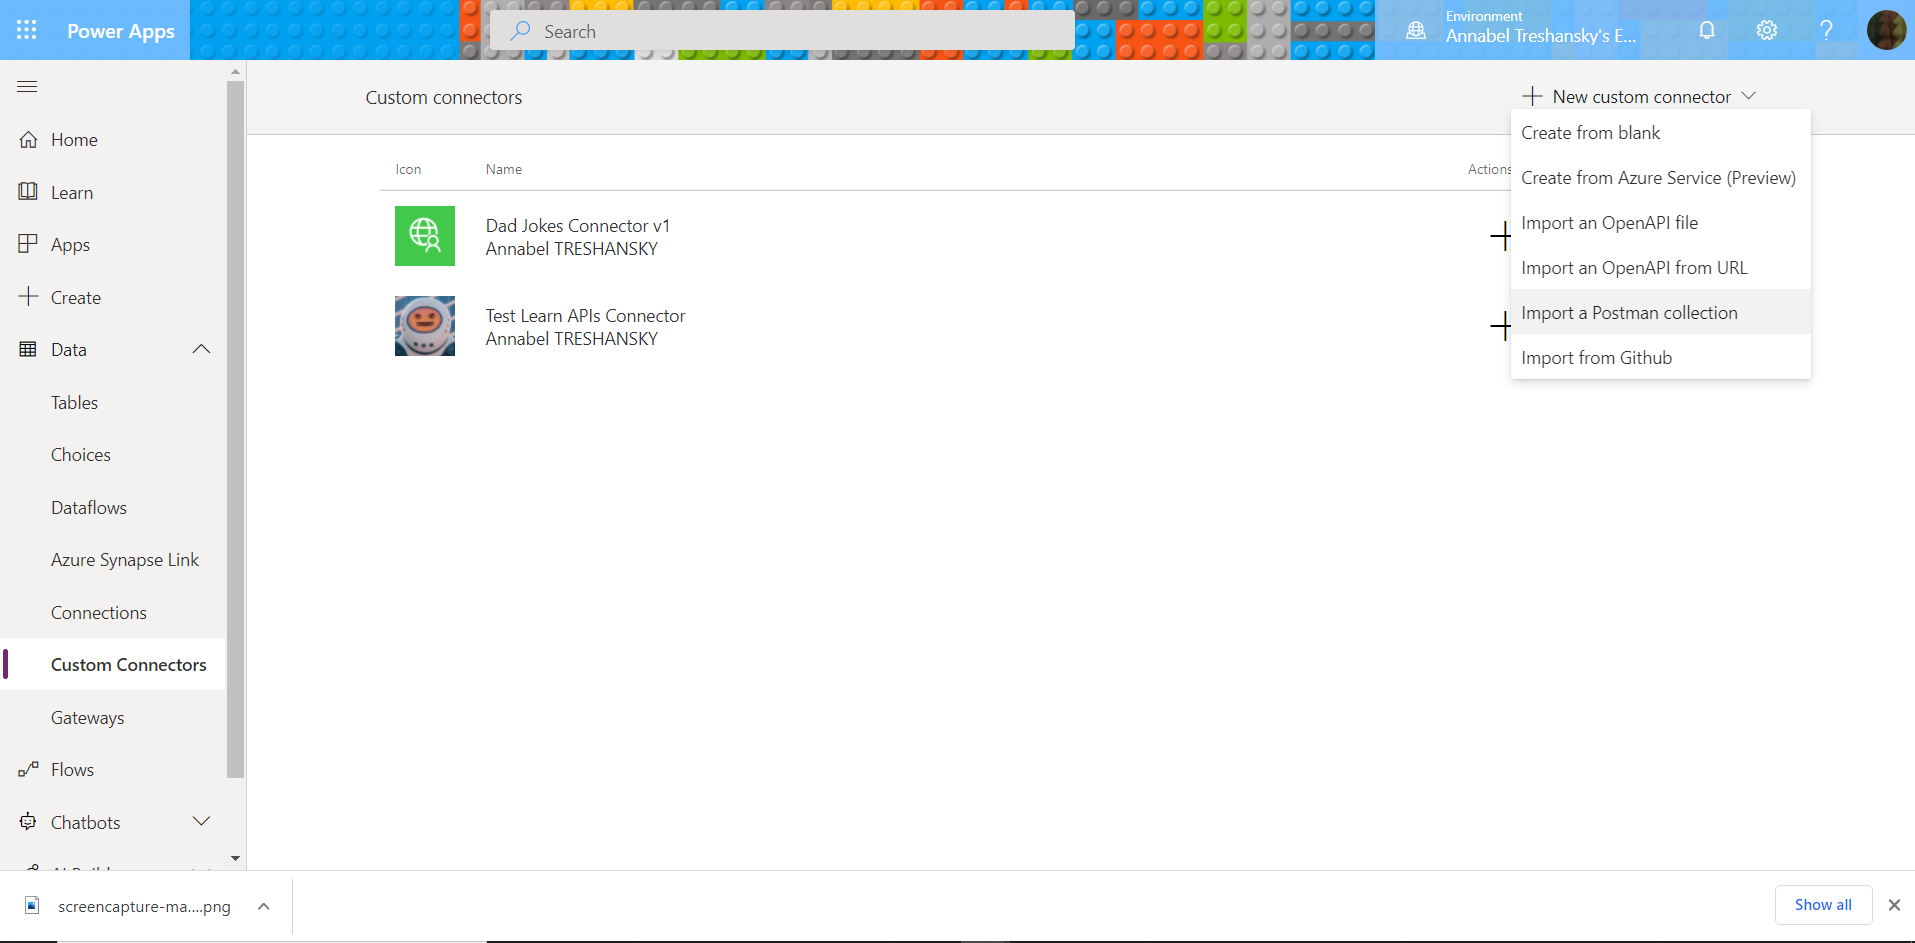
Ignore the fact it’s already there… 🙂
I entered a name for my connector, and then selected the exported version 1 Postman collection. Although the file I selected was a zip file, what appears in the dialogue box is generatedApiDefinition.swagger.json.
The next stage takes us to an editing screen for the connector, with five pages that you can step between:
- General:

I definitely should have given this a better icon
The host and base URLs have been extracted from the file, and there is a text box to enter a description and the option to add a better icon for your connector, which I should have done. This would have to be a PNG or JPG, and less than 1MB in file size.
- Security:
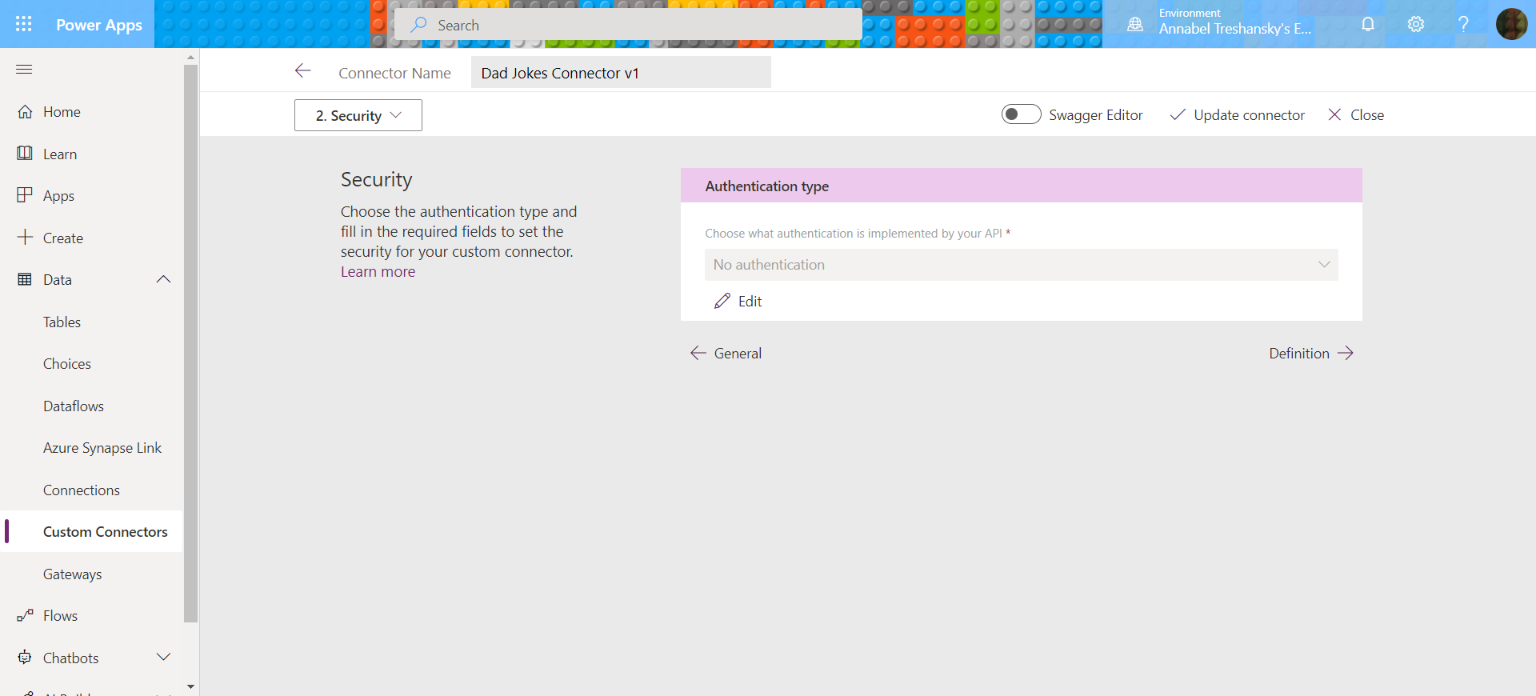
Good thing this isn’t a nuclear plant
The next step is security, which in this case is none, as there is no authentication required to use the Dad Jokes API.
- Definition:
This is a longer page and I can’t get a good screenshot of the whole thing, so I’ve broken it down. First we have text boxes for the name and description, and the name you’ll be using to call it from your Power Apps editor:
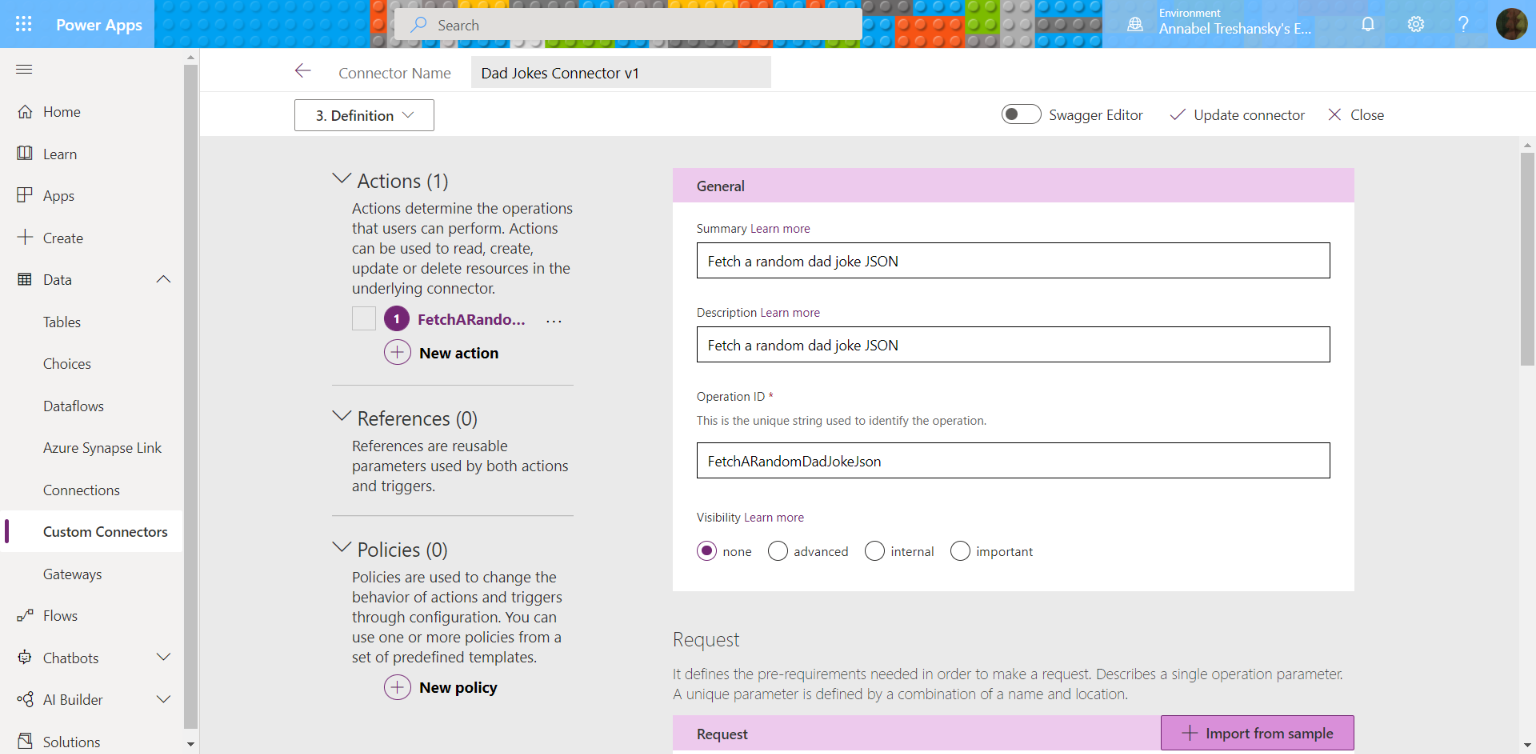
The third box is for the name you’ll be using to call your request in Power Apps
I left ‘visibility’ as the default setting and that was fine.
The next part of the Definition screen is for Request parameters. We can see that the Accept header has been included, and there appear to be possibilities for adding path variables and query parameters too, not that we need them for this app:
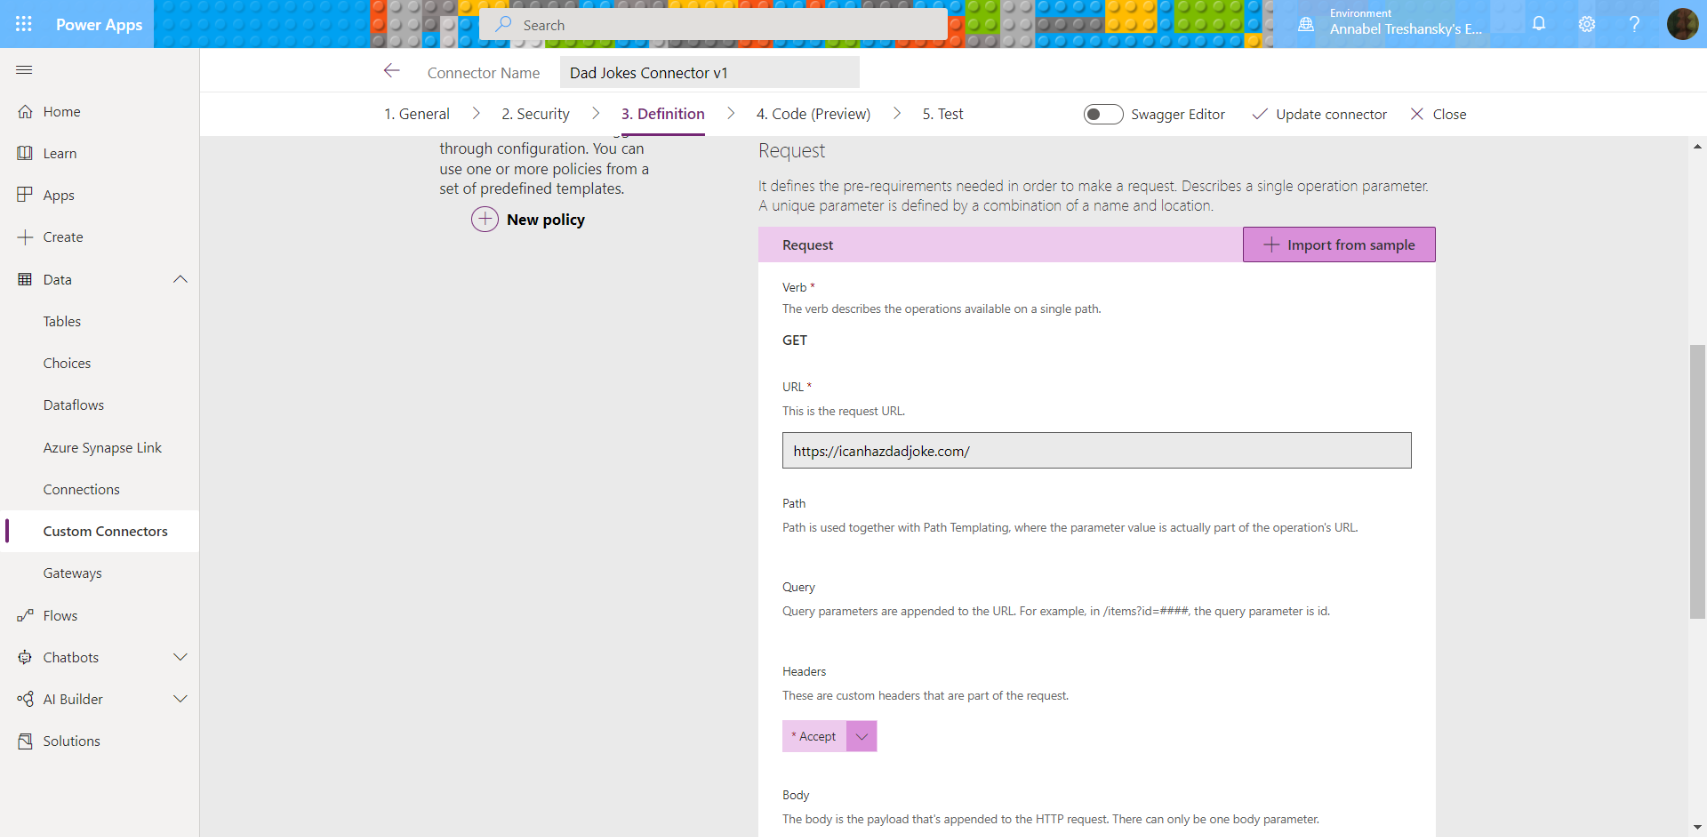
Good to see that Accept header listed…
Clicking on ‘Edit’ to look at the ‘Accept’ parameter in more detail allows us to check that the correct value of ‘application/json’ has been imported from Postman:
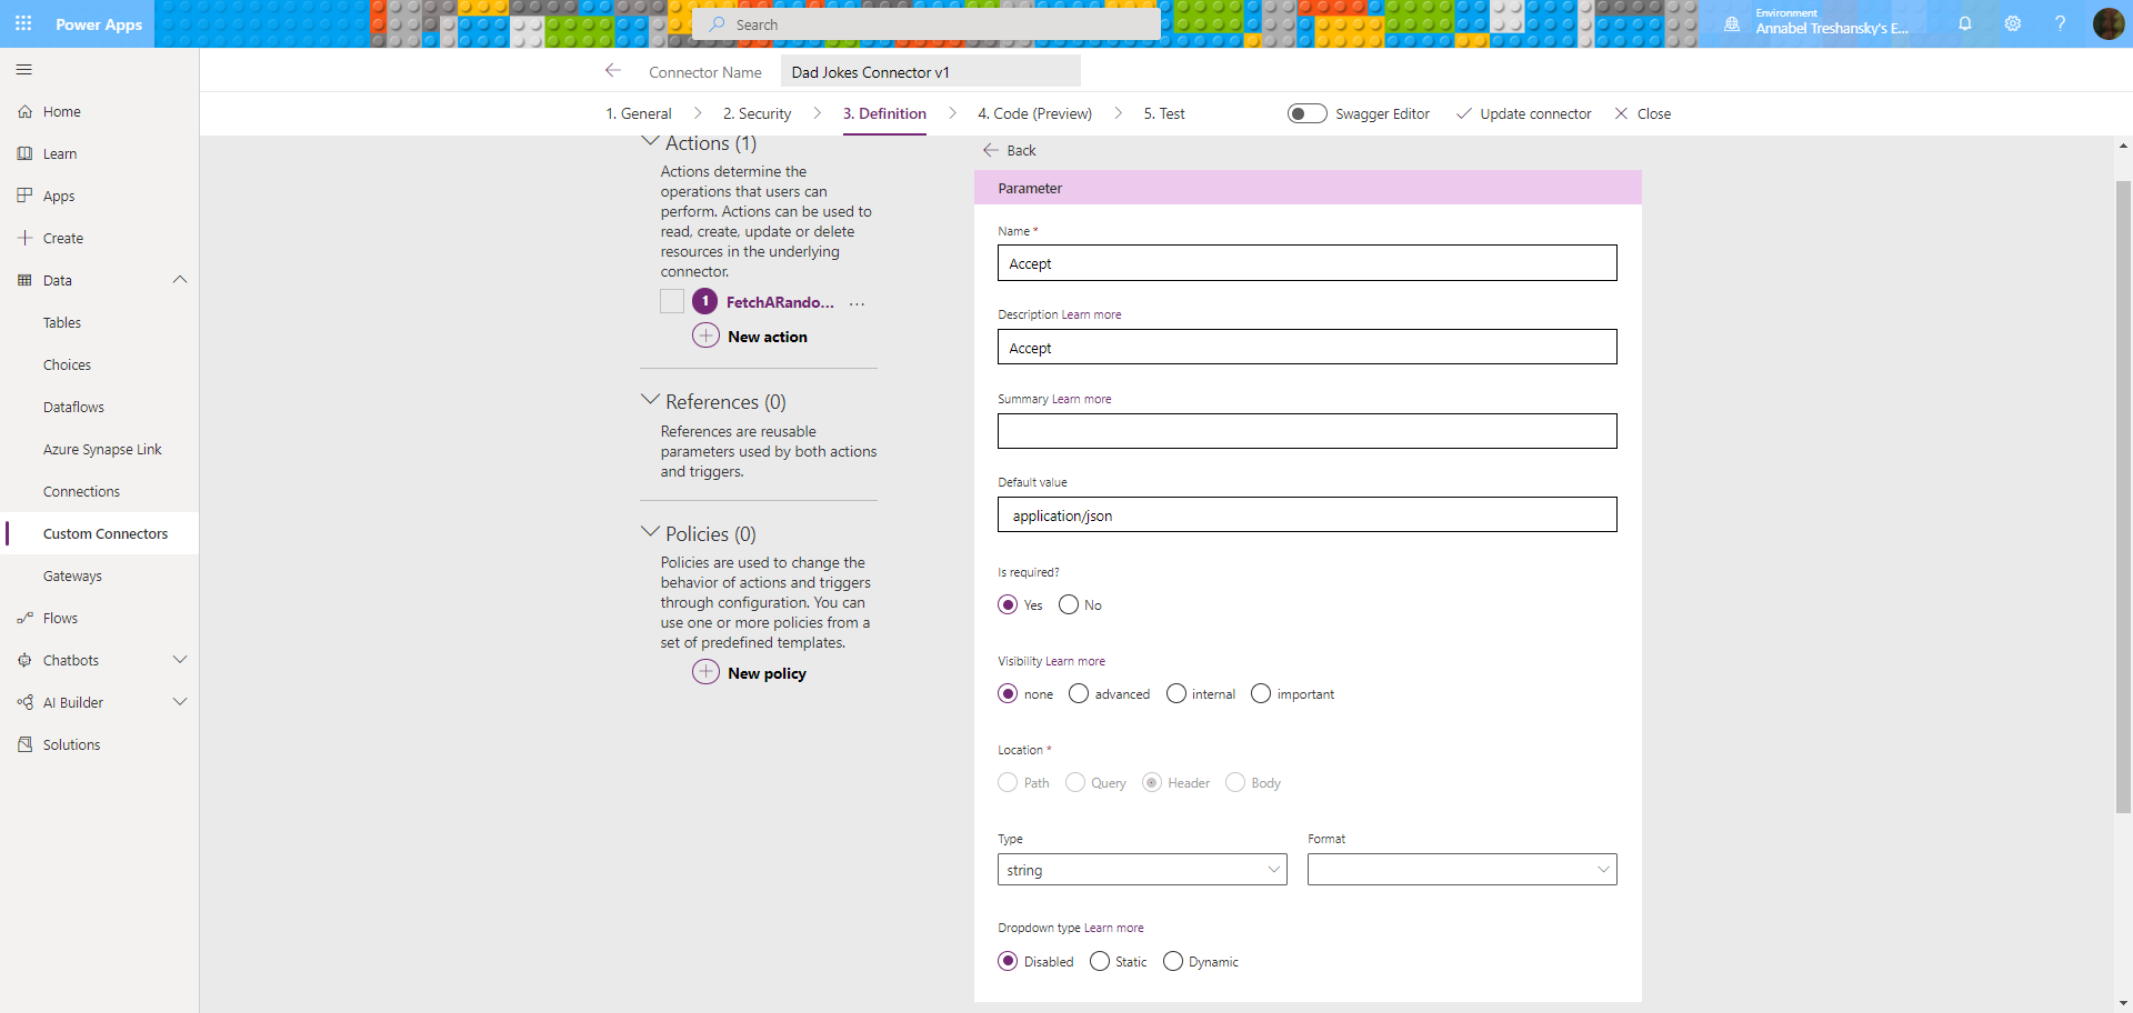
The request is correctly defined to receive the response in JSON format, which allows us to do more with the jokes as variables
Collecting the response in JSON format will give each joke an identifier, a response status code, and a string variable containing the text of the actual joke.
The last section of ‘Definitions’ details the request response and possible status codes, and shows that a validation test has succeeded:

Validation succeeded: that looks promising
- Code (Preview):
The next step allows for adding custom C# code to act on the request and response payloads. Thankfully, that isn’t required now, but it’s an option that’s there:
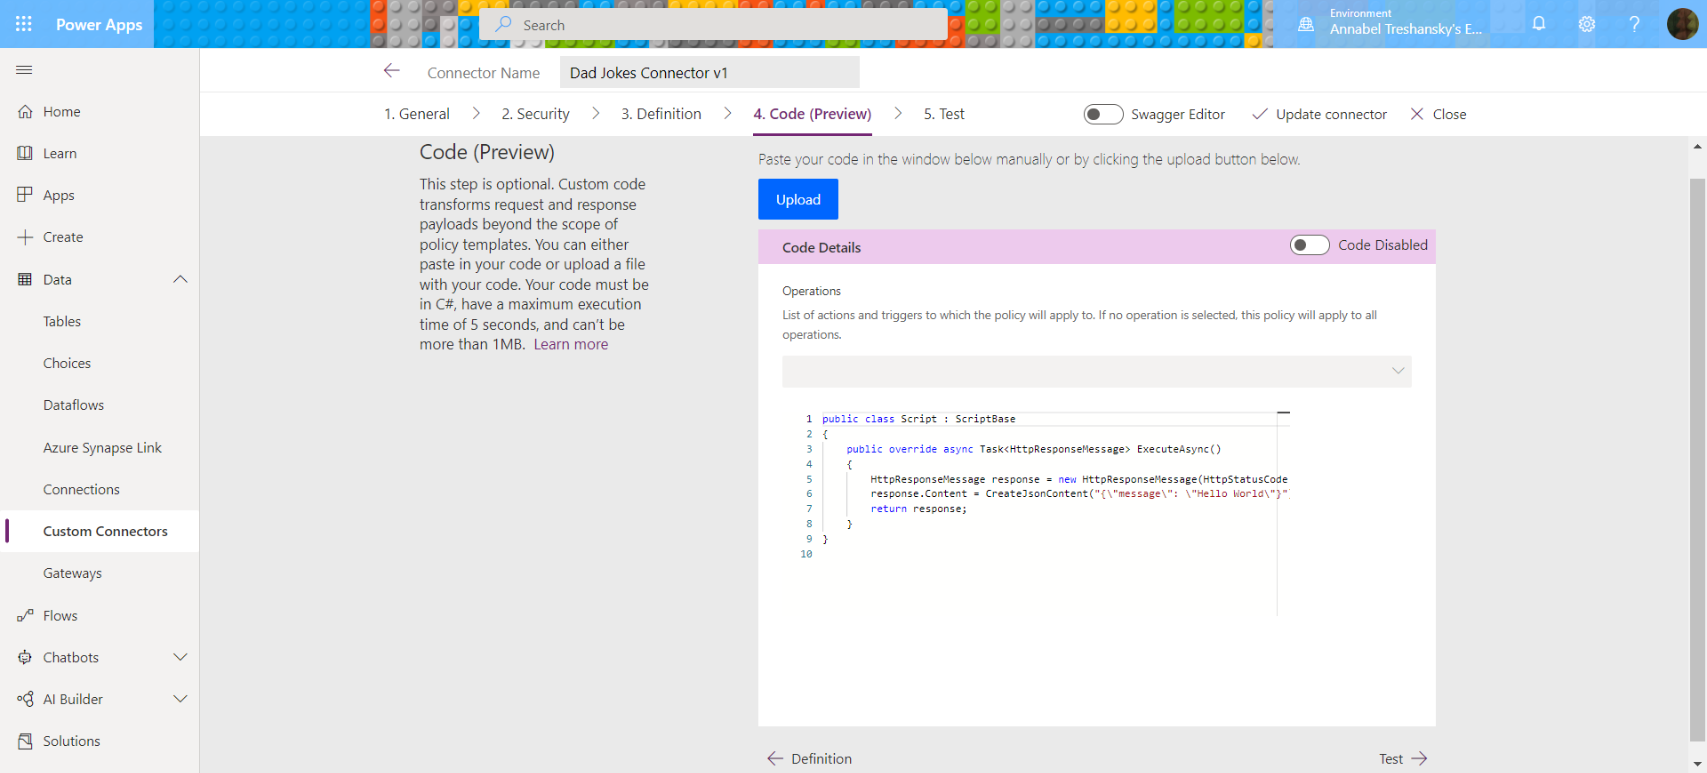
See how much more we could complicate this
- Test:
Finally, the Test screen allows us to create a connection using the connector, test it and see the results in two output text boxes. You have to create a connection and click on ‘Update Connector’ first, then click on ‘Test operation’ to test it:
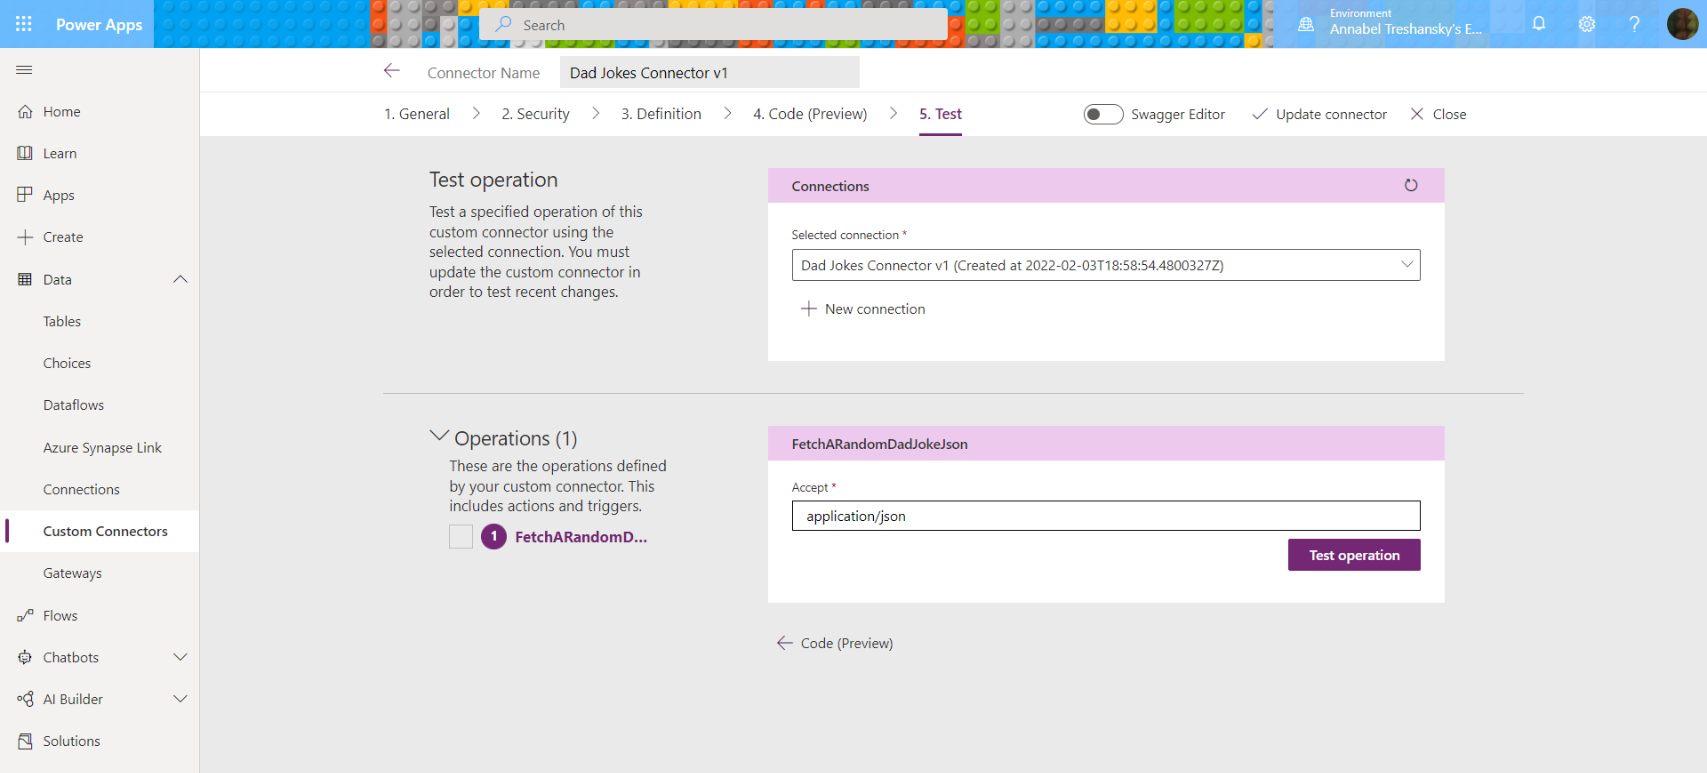
The Connector is used to make the Connection. Then you test the operation of the connection.
Here’s a sample output obtained using the custom connector:
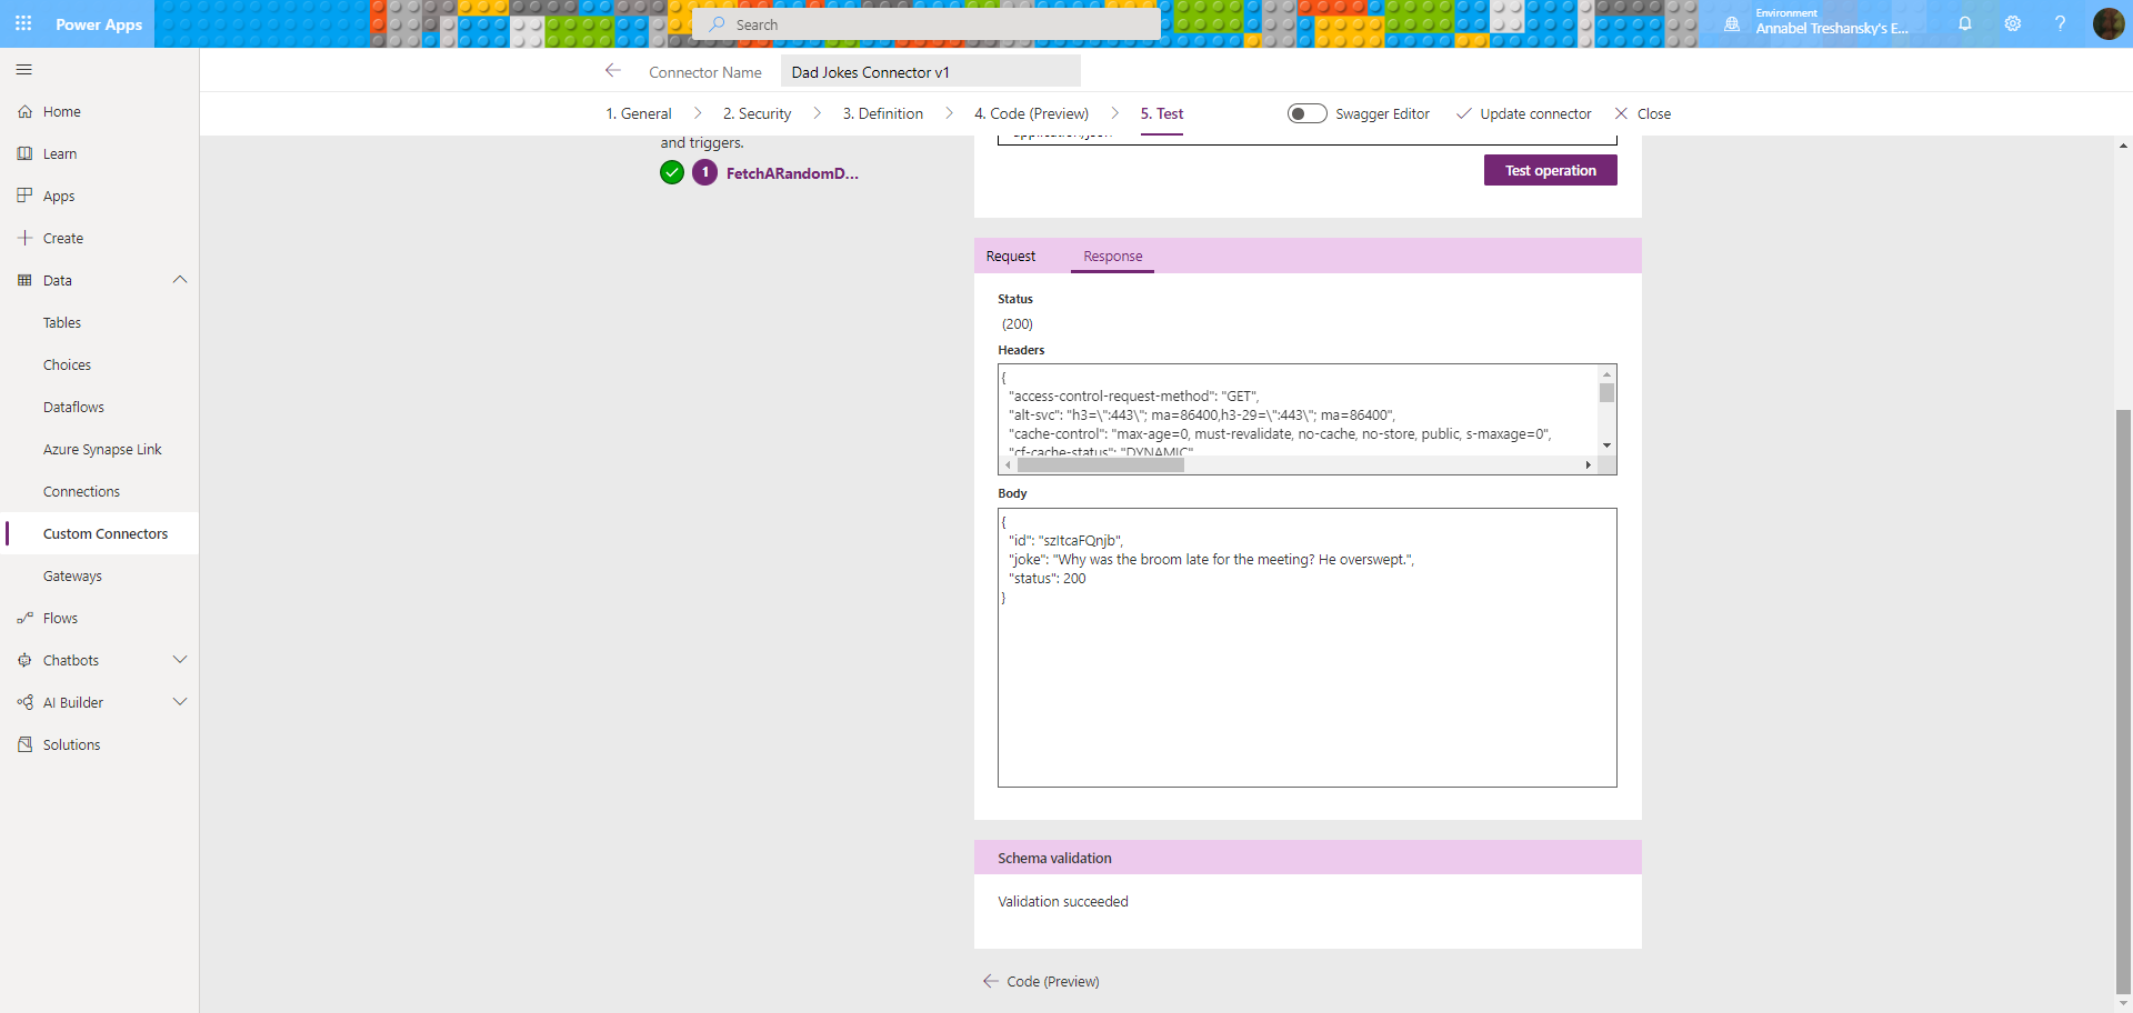
“Why was the broom late for the meeting? He overswept.”
This is the sample JSON that was fetched in the response body:
{

  "id": "szItcaFQnjb",

  "joke": "Why was the broom late for the meeting? He overswept.",

  "status": 200

}
I was also surprised to discover that the request goes through Azure anyway, and uses their authentication for that, even though the API itself doesn’t require any authentication at all:
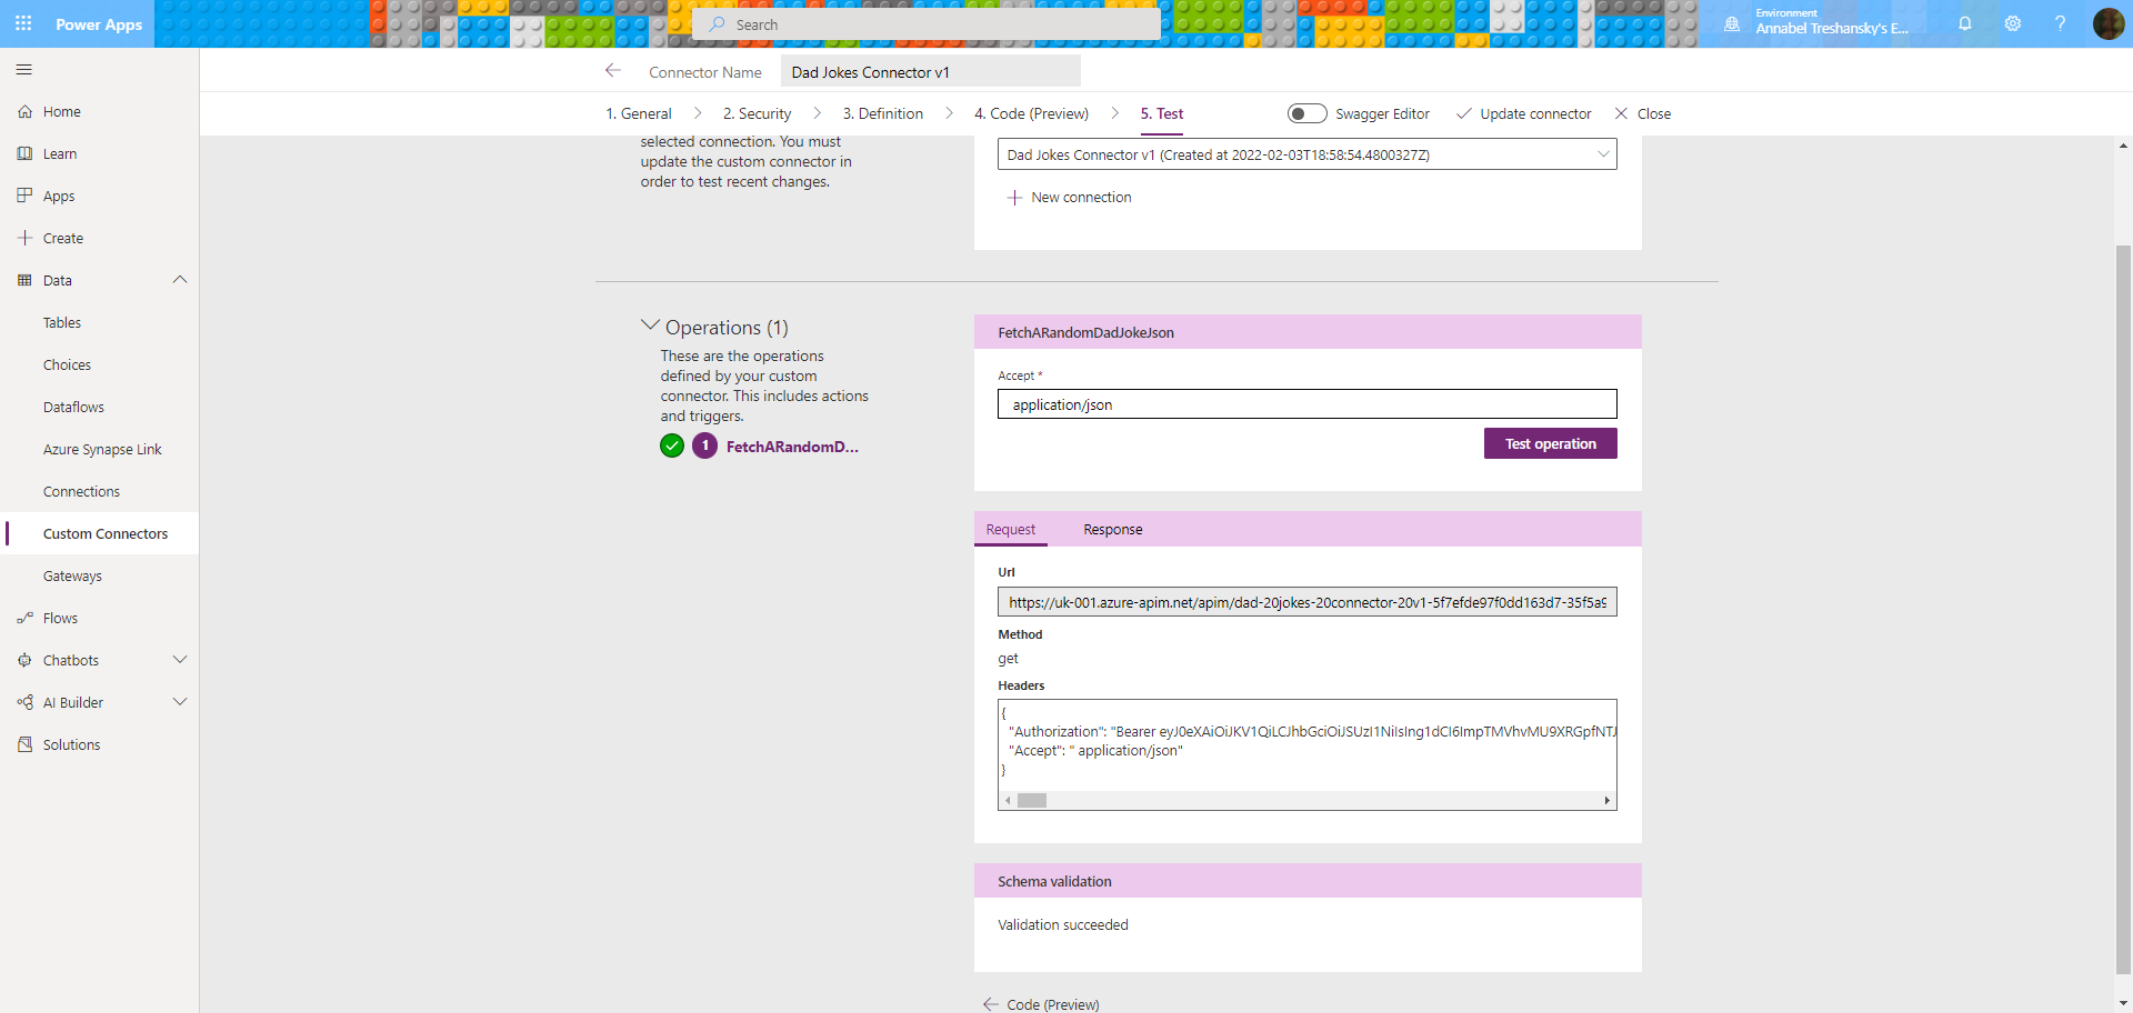
Ugh, Azure: The blue wall of impenetrable Microsoft hell.
- The Swagger Editor:
Finally, out of curiosity, this is what the Swagger Editor looks like, though it isn’t required for this task:

The Swagger Editor: another place where the custom connector could be customised
Using the Custom Connector in Power Apps
The next step was to add the custom connector to a Power App and get it working. To try this out, I went back and adapted the original Microsoft instructions with the ‘Sentiment Analysis’ example that I didn’t have permission to add to Azure. This can be found here: Use a custom connector from a Power Apps app.
I created a new blank app in the default Tablet / Landscape format.
Next, I added a Button to fetch the joke, an HTMLText box to display the results, and added my data connection from the left hand menu, by choosing Data > Add data, then selecting my custom connector from the list of available connectors.
It was worrying to see that actually using custom connectors in Power Apps is a Premium feature, and I didn’t know if we had the kind of plan they require or not:
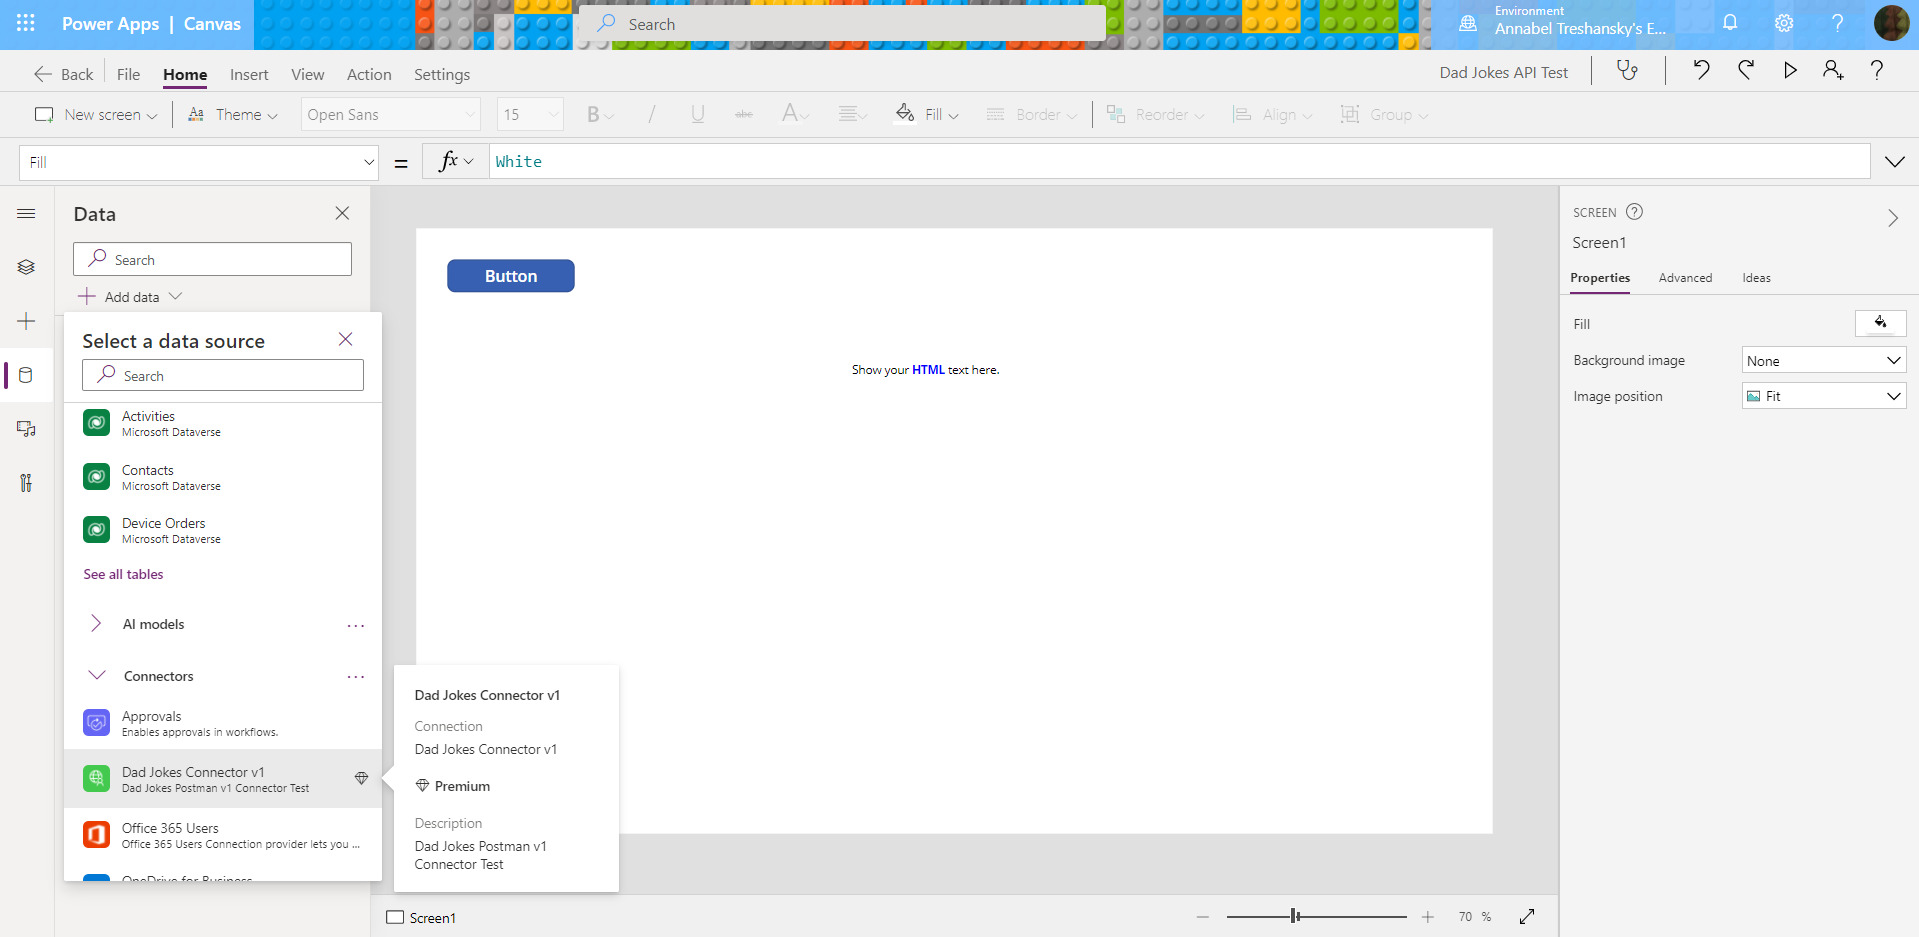
Adding the custom connector in Power Apps – but will it work..?
This was a potential problem, but I decided to see if it worked, first in my developer environment and then in the main university environment.
The plan would be similar to the Microsoft example: clicking the button would activate the function in its OnSelect property to call the REST API through the custom connector, fetch the JSON object containing the joke and store it in a collection. The HTMLText box would then display the text string from the first object in the collection’s ‘joke’ data field.
As a great comparison that makes anything else look like progress, here are those first two fields, doing nothing:
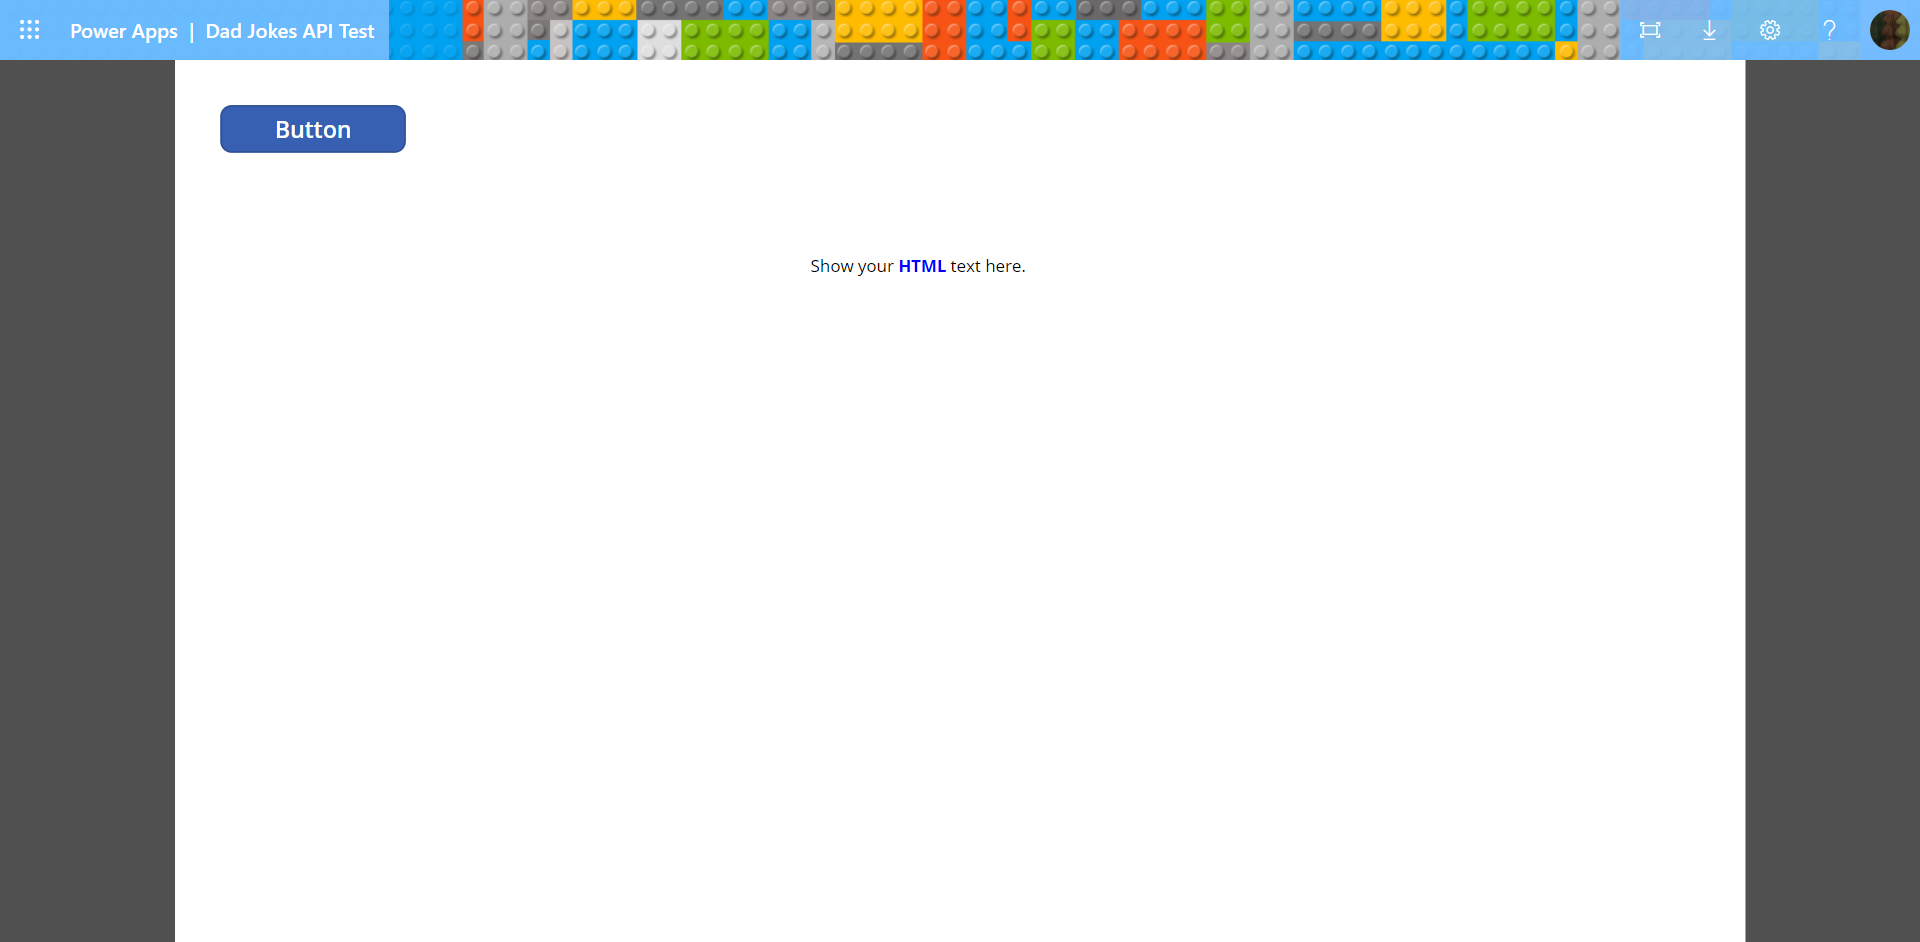
Let’s see if we can improve on this… 🙂
Working from the Microsoft example, I went to the OnSelect property of the button and entered the name of my connector (DadJokes), followed by a full stop (‘.‘), which brought up the name of my GET request function (FetchARandomDadJokeJson) as an autocomplete option. As in the Microsoft example, I used the ClearCollect function to create and / or empty a collection called dadJokesCollection and add the result of the GET request to it. Error messages indicated that it was expecting me to add a parameter in brackets as well, so I tried 0.
On attempting to run this, it gave me the error message that the response data was invalid and it was expecting a valid JSON object:
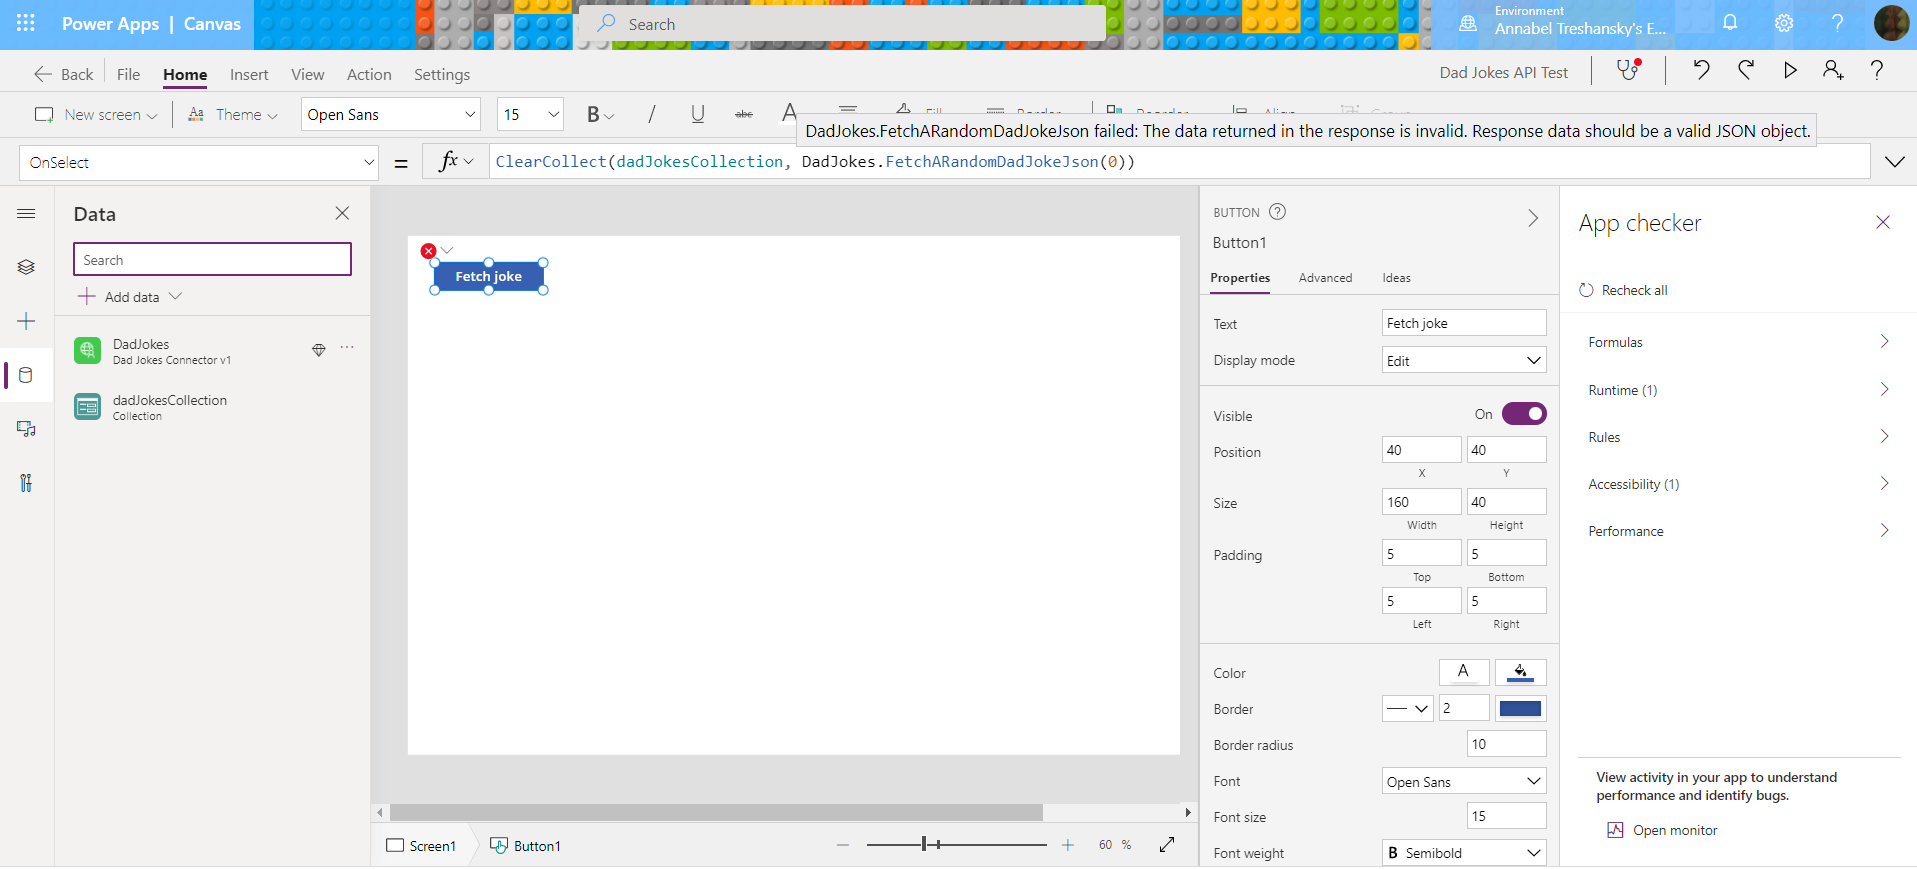
Response data should be a valid JSON object… I agree, so why isn’t it?
I discovered a very useful monitor in the App checker, which lists details of the operations carried out while running the app:
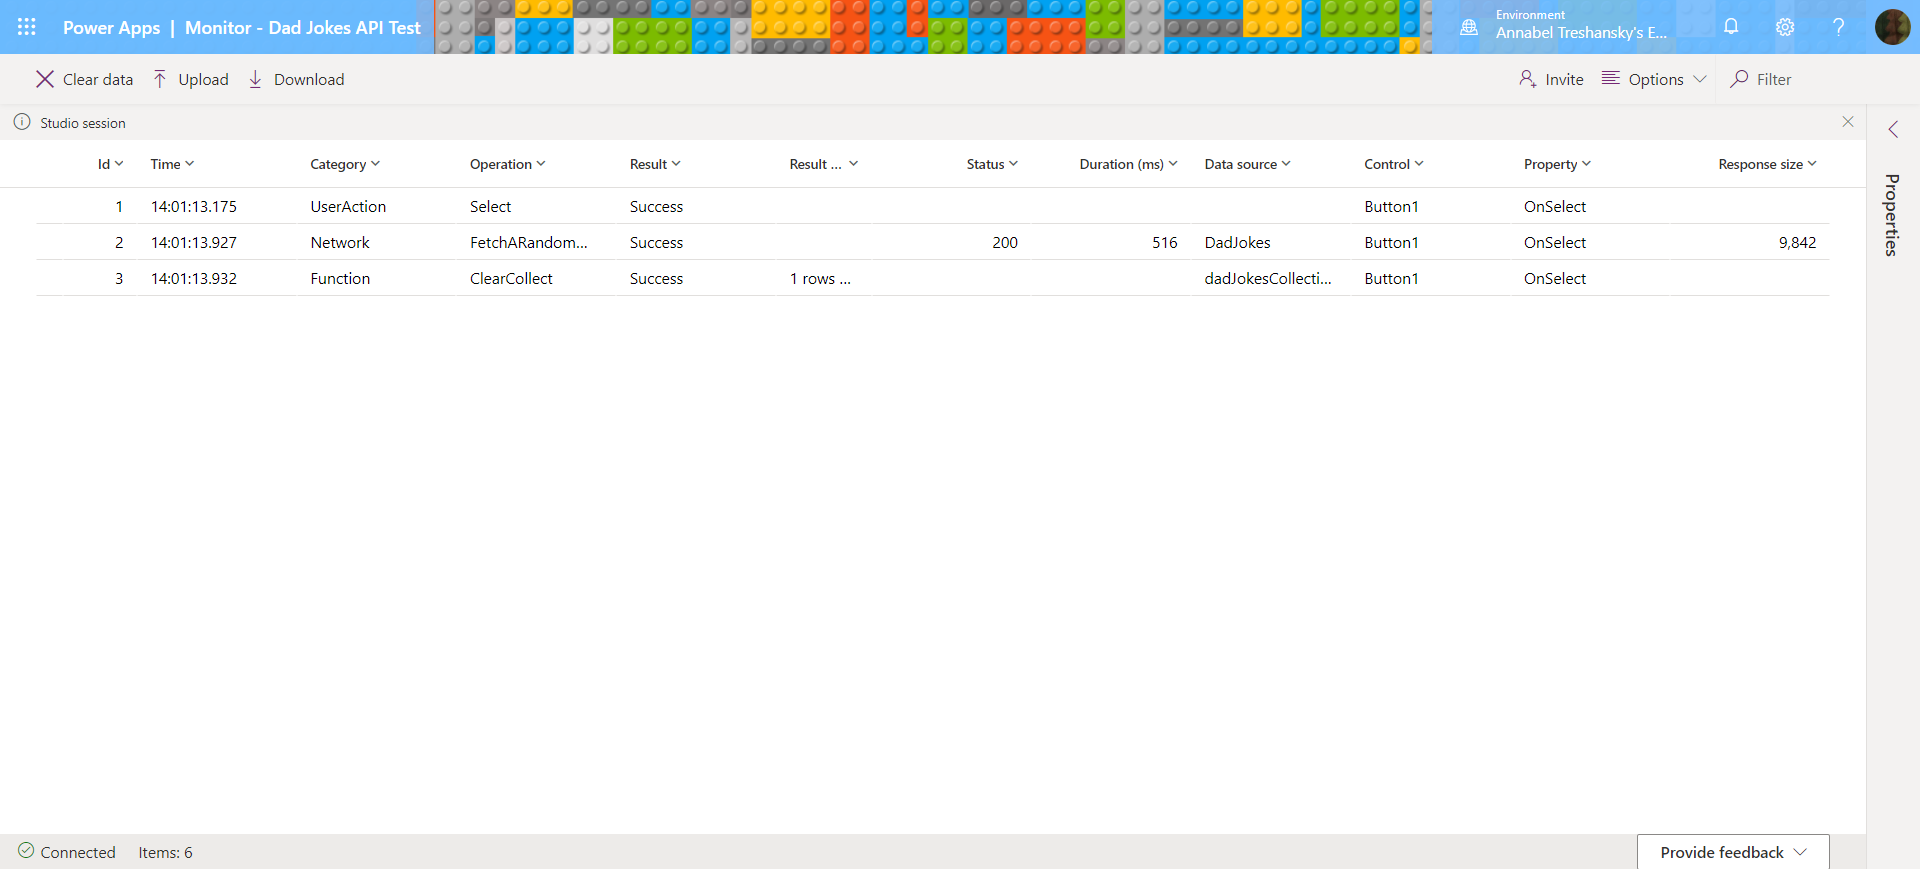
This looks very promising…
It showed me that my request was returning the HTML for the API’s home page instead of the JSON data:
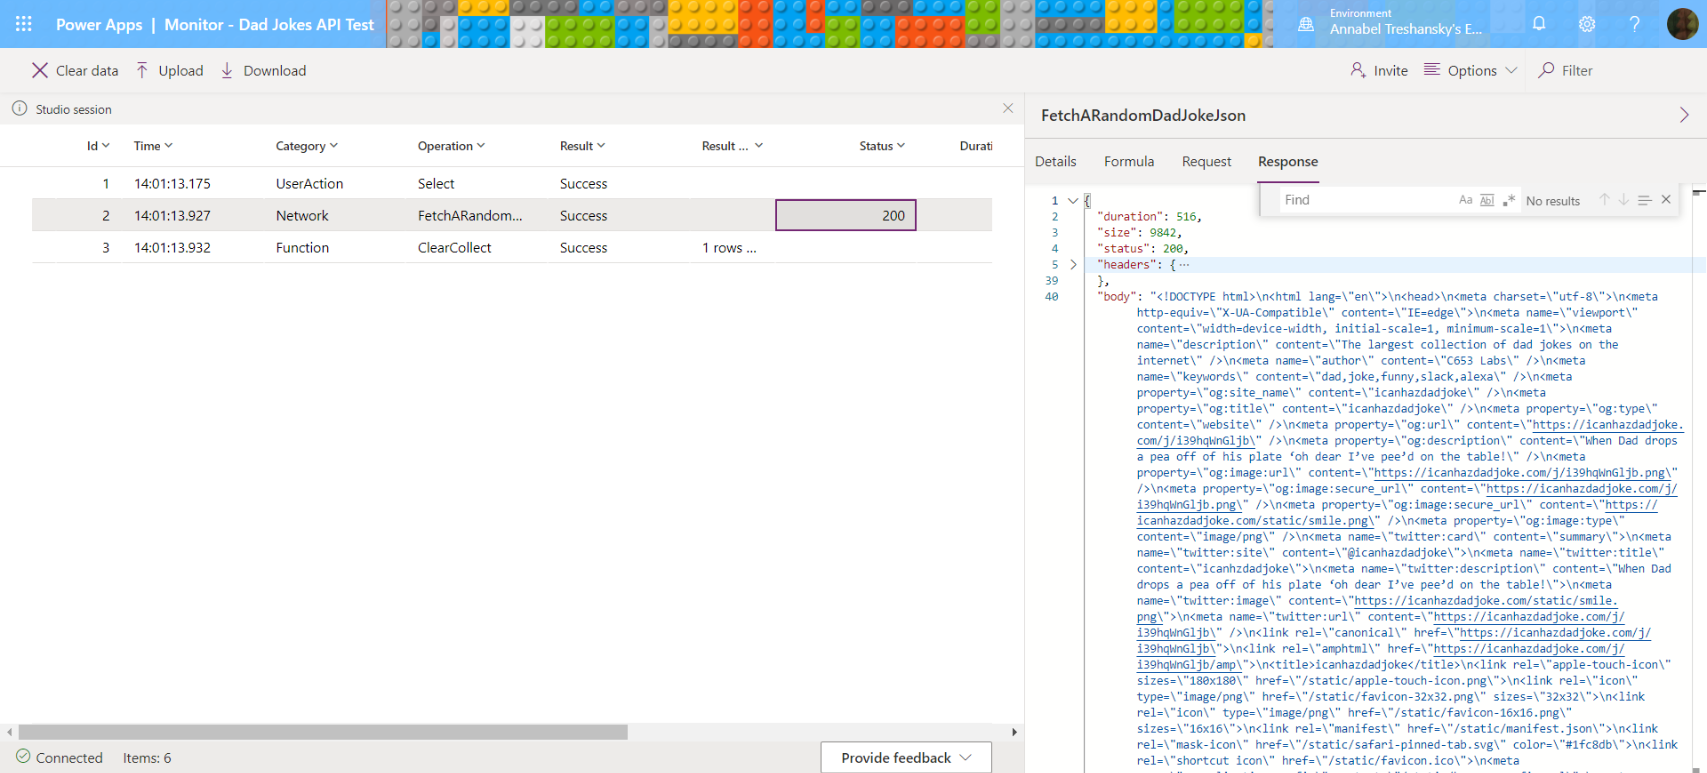
The home page HTML: Did not expect that!
This got me wondering if the parameter it was expecting might be the Accept header value ("application/json"), so I tried that and it worked:
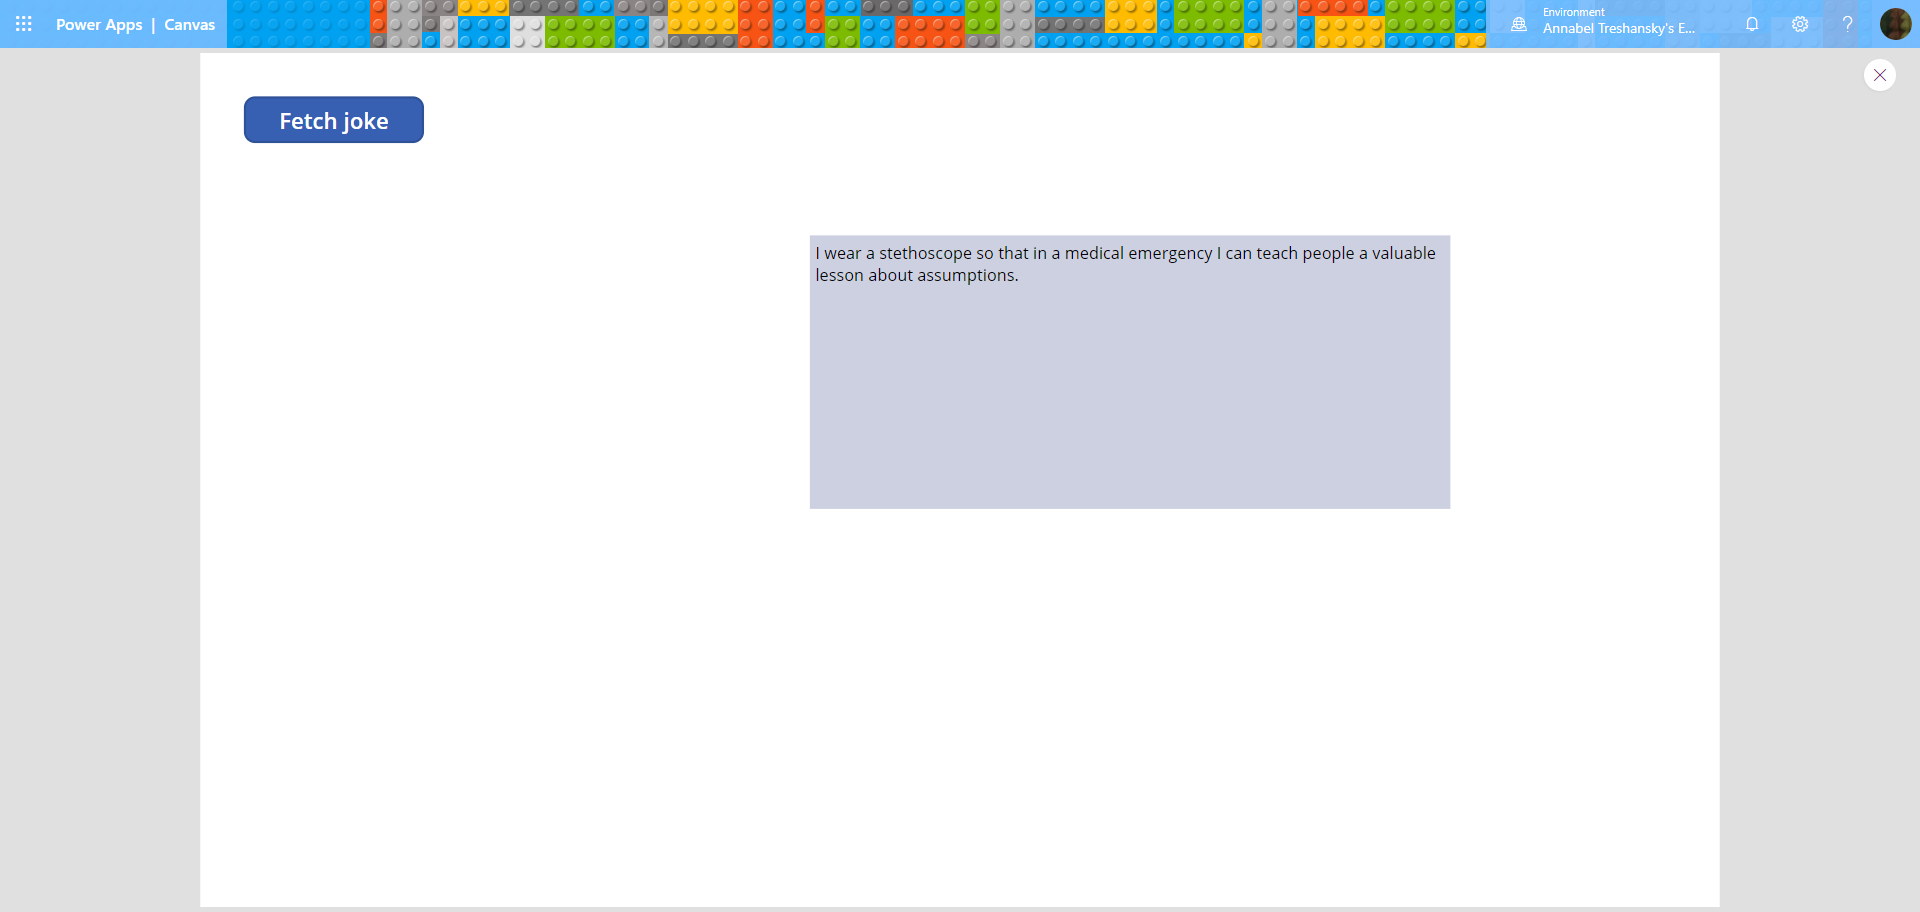
It works! That’s taught me a valuable lesson about assumptions.
The button OnSelect code is now
ClearCollect(dadJokesCollection, DadJokes.FetchARandomDadJokeJson("application/json"))
and the HtmlText box contents is
First(dadJokesCollection).joke
The correct response format in the monitor looks like this:
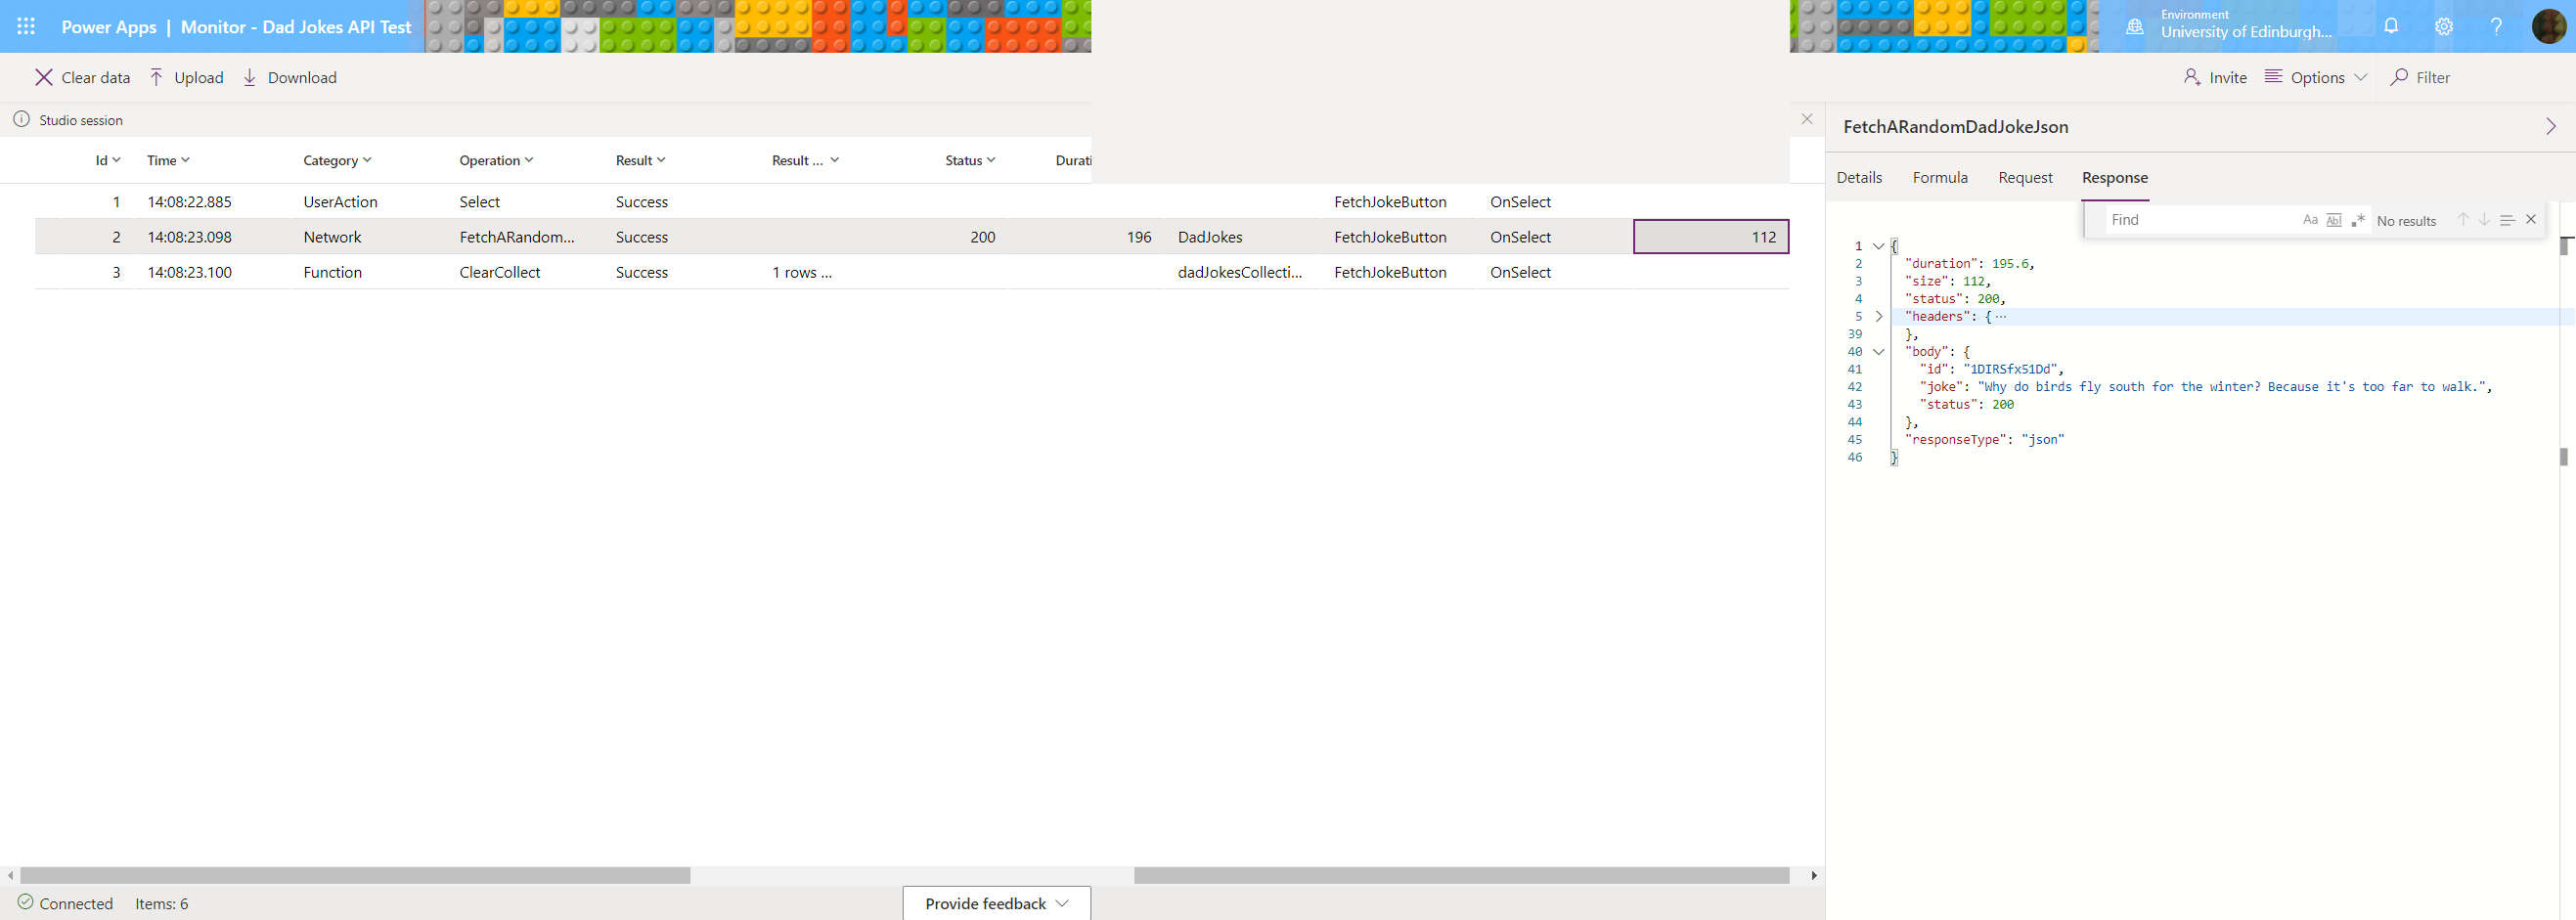
I like the monitor even better when it works
This could be because I had saved three versions of the GET request with different headers in my Postman collection.
Design and Layout
I had an old visual design I had created earlier to build a similar project as a gift for a friend. This is a screenshot of the original design, which I built using HTML, CSS, Javascript, a couple of background images and a Reader’s Digest illustration from the 1960s that had been widely posted on social media in 2020 (see links for credits):
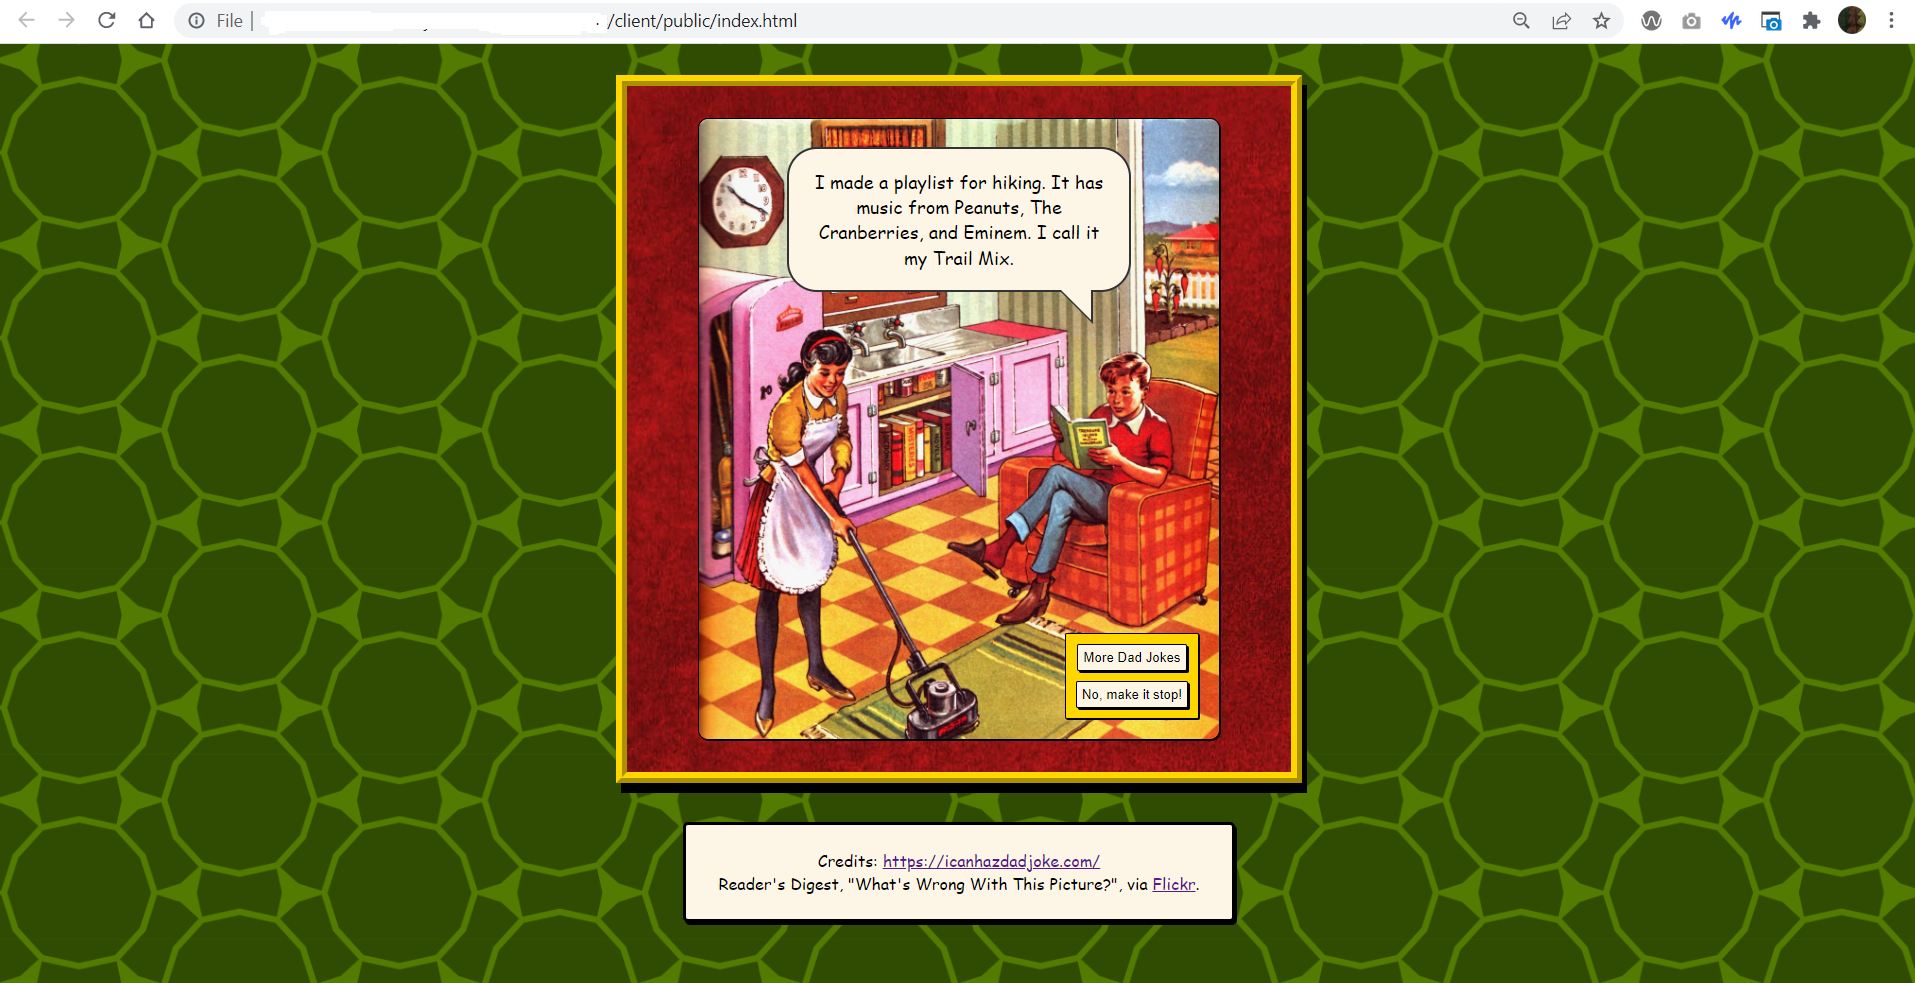
A more rectangular speech bubble would have been much easier too
I wouldn’t recommend this approach in general because, as I discovered later, Power Apps has its own responsive layout templates and containers that would make it much easier to build a design that works responsively across a variety of devices.
However, as this project was just a demonstration of getting the REST API connection to work, I thought it would be fun, and relatively quick, to build it with my original design.
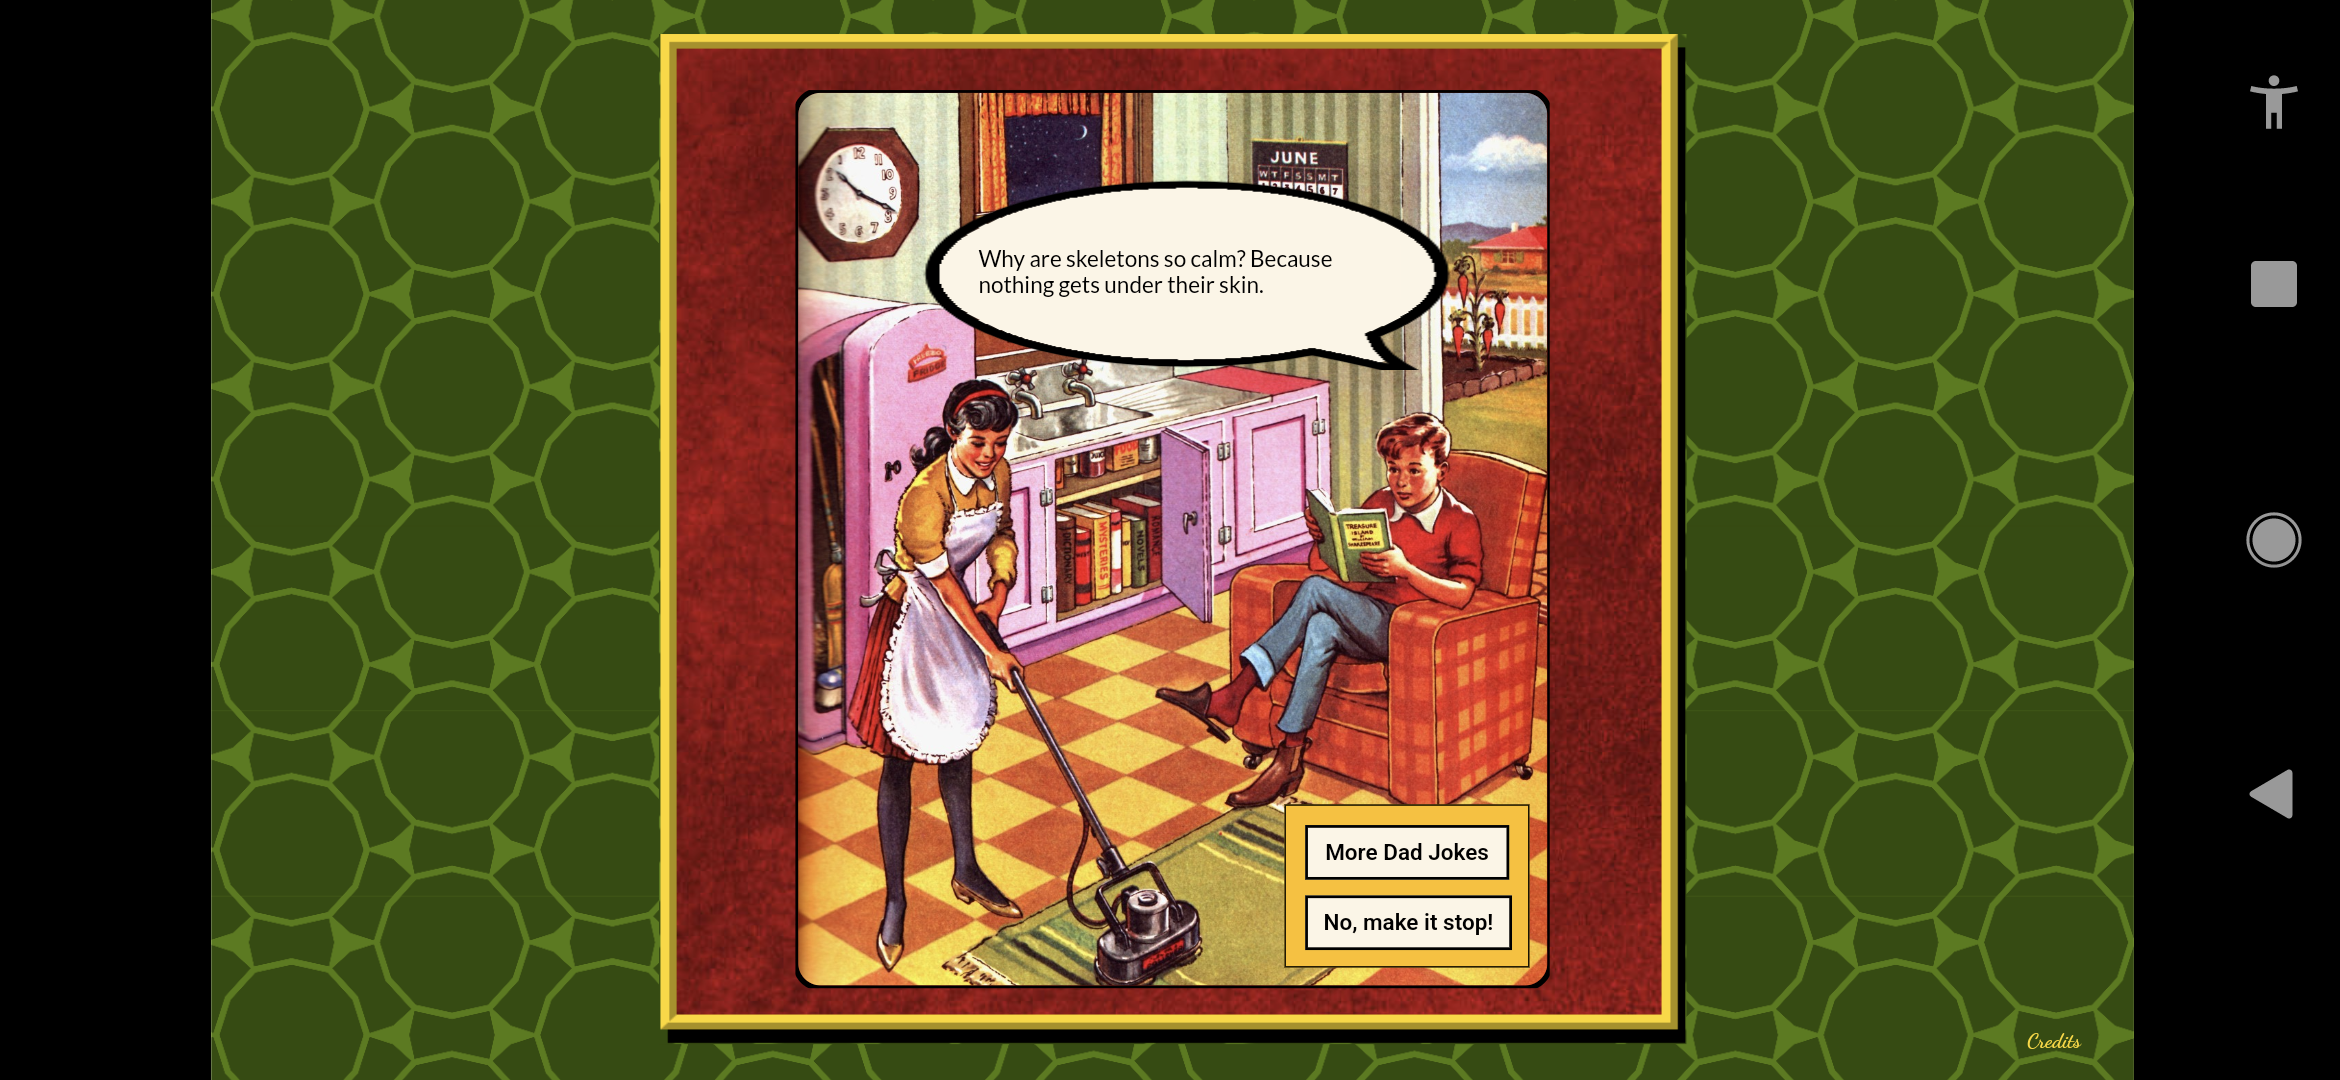
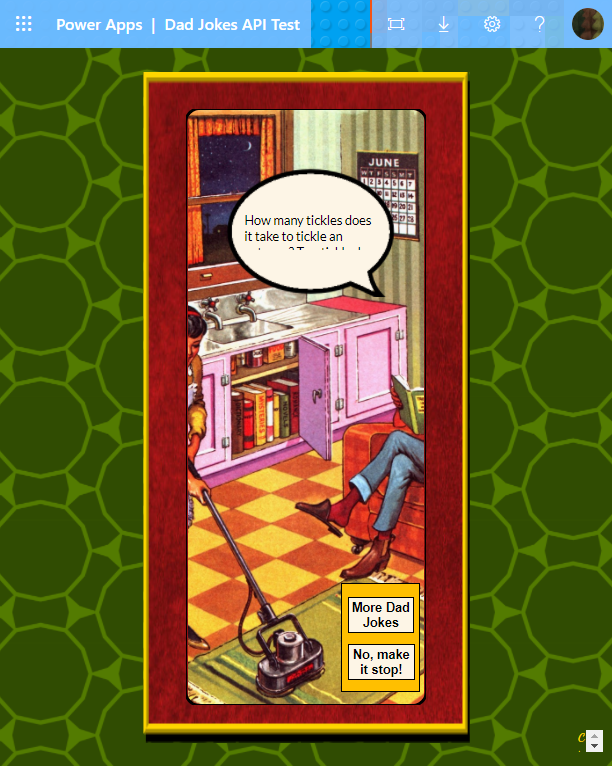
I also thought the Reader’s Digest picture was the perfect illustration for Dad jokes: it has the perfect space for locating a speech bubble next to a man sitting happily in an armchair, giving the overall impression of a happy overlord, while his wife smilingly tolerates both jokes and chores, and none of the closer details in the picture make sense.
Copyright Disclaimer
Unfortunately, I think it’s possible the image “What’s Wrong with this Picture?” could still be under copyright from Reader’s Digest. I found it posted online on Twitter, Imgur, Imgur (full version) and Flickr, where it was listed as having been published in The Reader’s Digest Young People’s Annual 1963.
I searched the US Copyright Public Records database and could not find a copyright registration for that book, although it is a real book, according to this first edition listing on eBay. Many Reader’s Digest copyrights from that year were renewed in 1991, but if this one wasn’t, it might be out of copyright now, according to the section ‘Mandatory Renewal’, in the US Copyright Office’s Circular 15a: Duration of Copyright:
Mandatory Renewal
Works originally copyrighted between January 1, 1950, and December 31, 1963. Copyrights in their first 28-year term on January 1, 1978, still had to be renewed to be protected for the second term. If a valid renewal registration was made at the proper time, the second term will last for 67 years.
However, if renewal registration for these works was not made within the statutory time limits, a copyright originally secured between 1950 and 1963 expired on December 31 of its 28th year, and protection was lost permanently.
However, even if the original copyright wasn’t extended at the time, it’s also possible this image might have been included as part of another copyright registration. It’s not an assumption I would make in a project for sale or publication.
In this case I think it meets the criteria for fair use anyway, due to this app being developed as a personal, non commercial, educational project, making a transformative use of a small part (one illustration) from the originally published book, with the blog post (also not for profit) discussing it’s development for educational purposes. As such, I have added what picture credit information I could find, indicating copyright to be on the safe side, and added the following disclaimer for the app in the credits:
This app is a personal educational project and is not for publication, not for profit, and not for commercial purposes.
For a more detailed discussion of all the quirky elements appearing in this picture, see Imgur and Flickr.
This is a screenshot of the Credits screen in the editor, showing a similar nested structure of elements to the main screen:
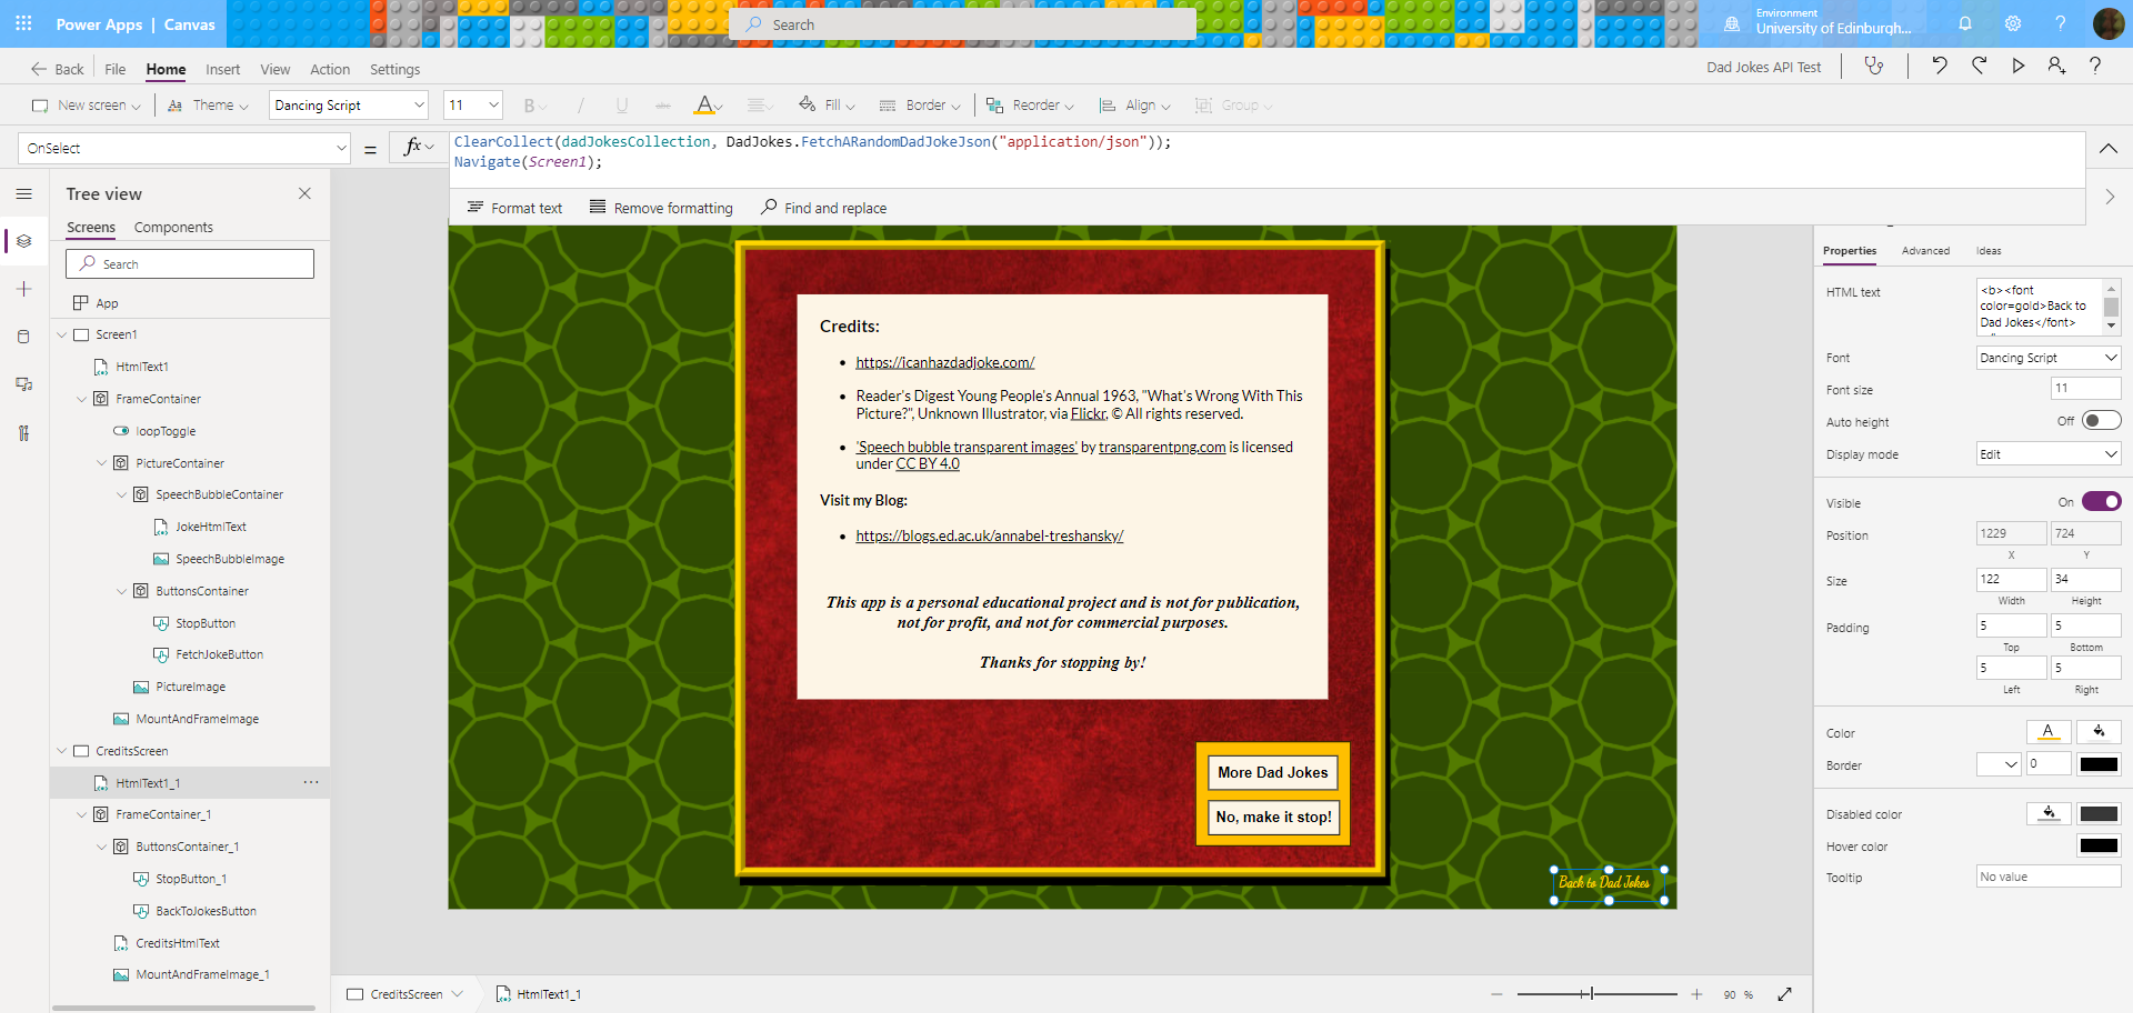
This screen isn’t as much fun, so let’s move on…
I’ve highlighted the link back to the main page to show to OnSelect code that fetches a new joke and navigates back to the main page:
ClearCollect(dadJokesCollection, DadJokes.FetchARandomDadJokeJson("application/json"));

Navigate(Screen1);
Recreating the Layout
It was easy to recreate most of this layout in Power Apps, but the original yellow frame and speech bubble were created using CSS. I was able to crop a screenshot of the yellow frame, shadow and red watercolour background inside it by commenting out everything inside it in the HTML file.

Add your own great work of art to this 🙂
I created a container with a fixed height and width and no padding, called FrameContainer. I centred this container horizontally and vertically, and everything inside it was sized and positioned relative to this:
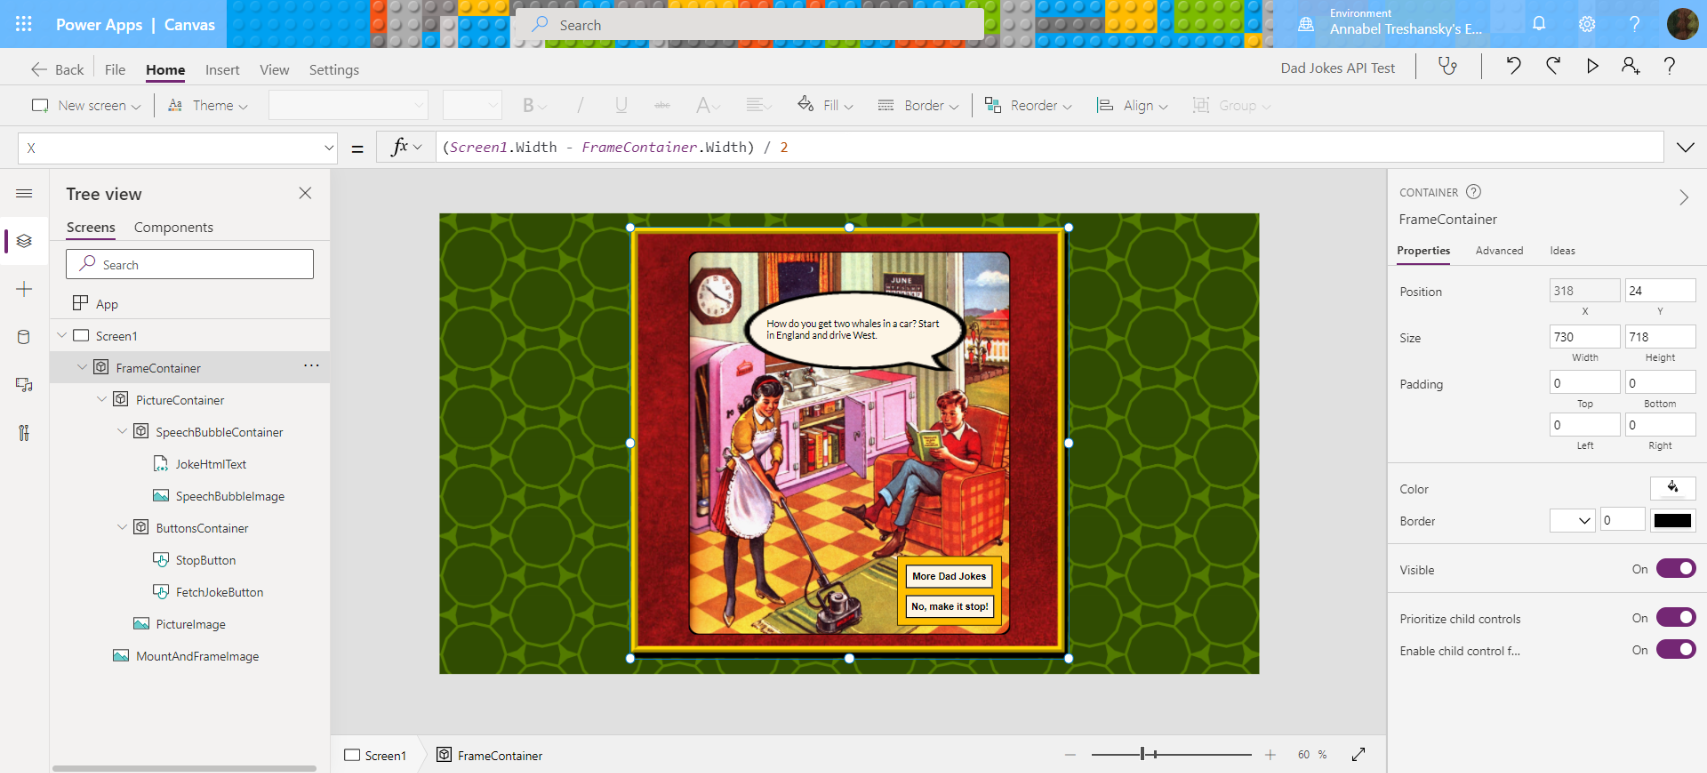
I feel like it would fit with the theme to call this my small nest of occasional elements
FrameContainer there is a nested structure of elements:
MountAndFrameImage:
This is relatively positioned at 0,0 and stretched to fill theFrameContainer, with no margin in between the two edges.PictureContainer:
This is sized and positioned relative toFrameContainer. It contains more elements:PictureImage:
This is the main image. It is set to fill its container, and given rounded corners and a black border in the ‘Properties’ settings.SpeechBubbleContainer:
This is described in more detail in the next section. It contains two more elements:SpeechBubbleImageJokeHtmlText
ButtonsContainer:
This is positioned relative to the bottom right corner ofPictureContainer, and it contains two more elements:FetchJokeButton:
TheOnSelectproperty of this button makes the request to fetch a new joke.StopButton:
TheOnSelectproperty of this button uses the code
ClearCollect(dadJokesCollection, {id:"0", joke: " ... ", status: 200})
to replace the joke text with'...'. Many years ago, I tested a video game called Shadow Hearts for a living, and'...'is what the characters in that would say when they had nothing to say.
The Speech Bubble
The speech bubble was more difficult as I don’t have a good graphics program at the moment, so I found a transparent speech bubble graphic online and filled its contents with my chosen HTML colour.
Personally, I like HTML colours with names because they remind me of crayons, so here’s a good collection of them sorted into groups: W3Schools – HTML Color Groups: Color Names Sorted by Color Groups.
The tricky part about the speech bubble was the need to expand it as required for longer text without breaking the layout.
The layout settings could handle this up to a point: I created a container called SpeechBubbleContainer, which contained the image, SpeechBubbleImage, and an HtmlText box, JokeHtmlText.
All of them had a fixed width. The height of the JokeHtmlText box was set to ‘Auto’, and the height of SpeechBubbleContainer was determined by the formula: JokeHtmlText.Height + 100. The height and width of SpeechBubbleImage were set to the height and width of SpeechBubbleContainer, plus a constant amount to allow for the transparent edges of the image to overlap outside the container:
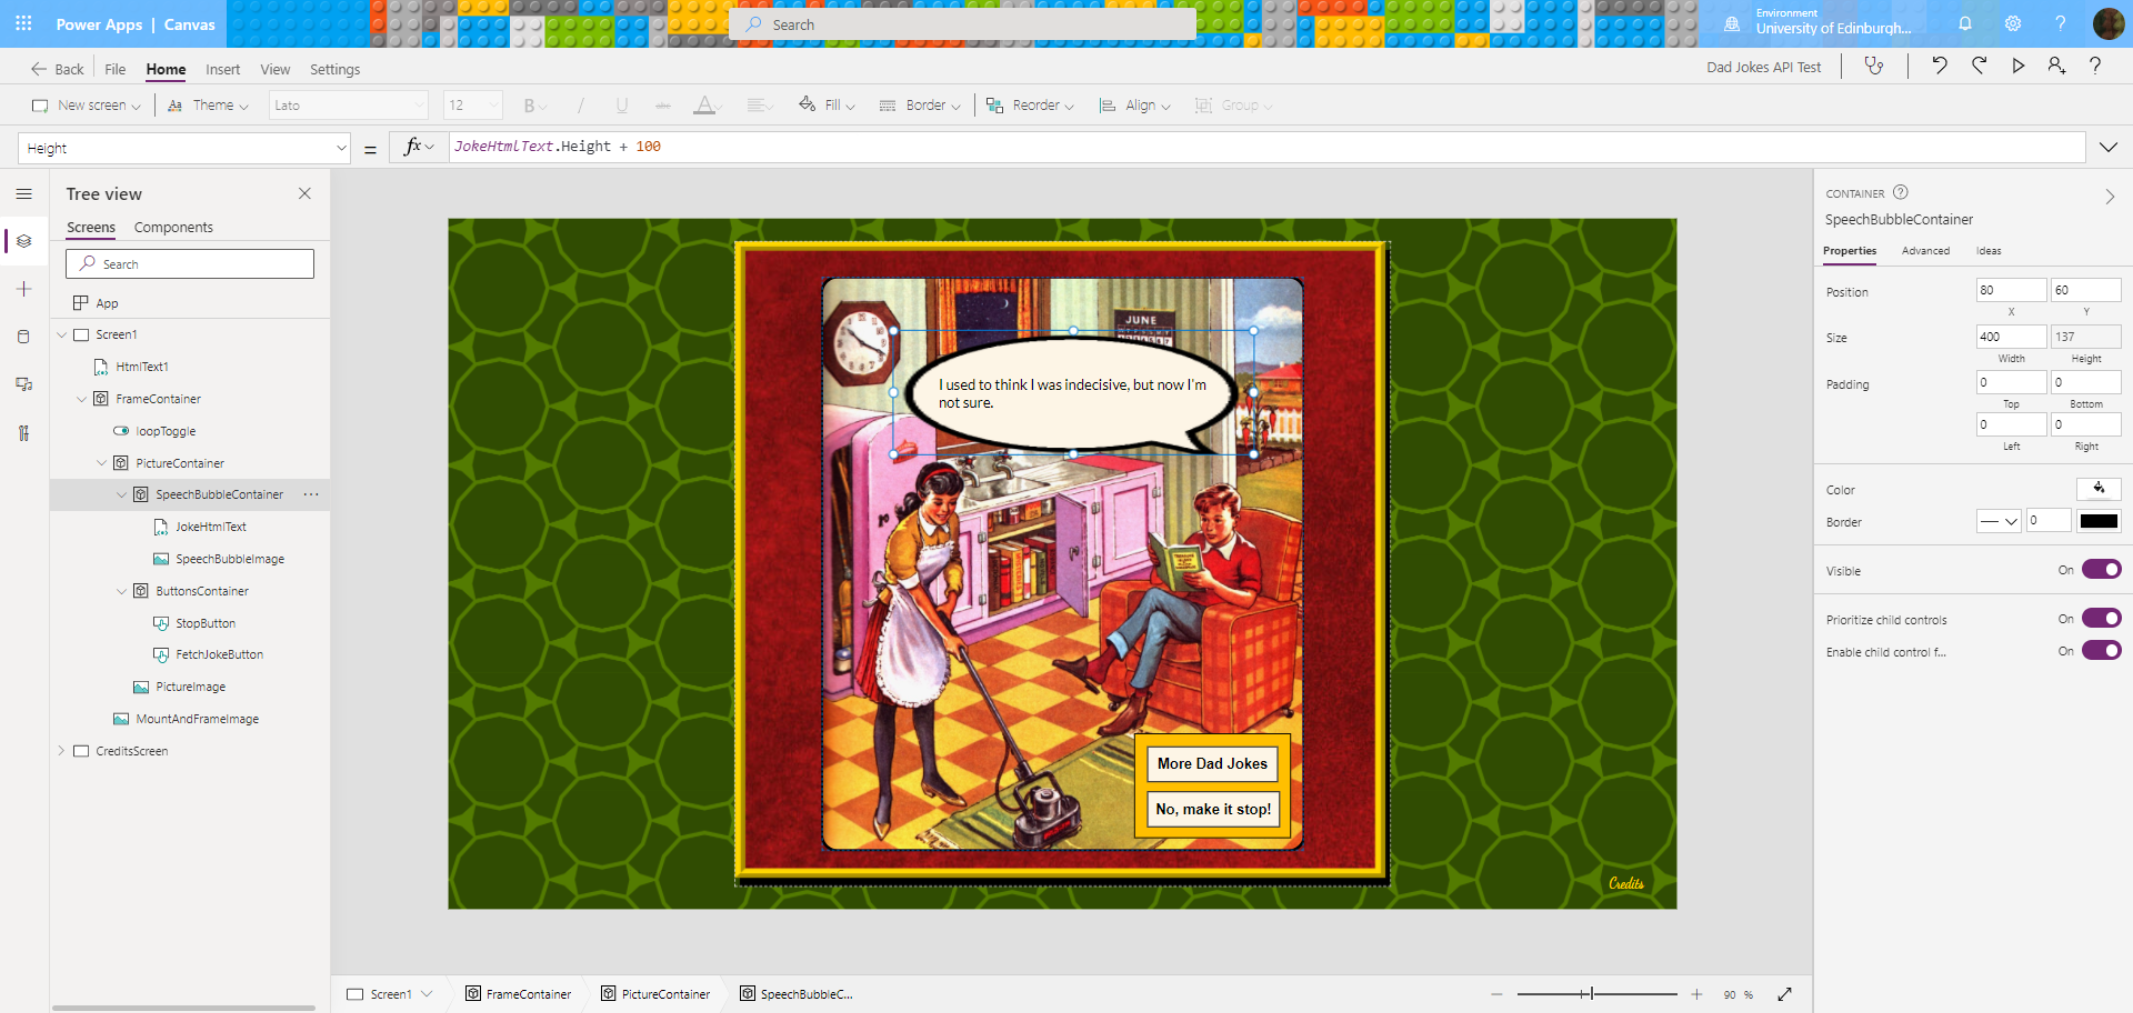
Really should have stuck with a rectangular speech bubble
This was a fiddly process, which was exacerbated by the roundness of the speech bubble. A more rectangular shape would have been easier to work with. However, even given more flexibility, there was no guarantee of a maximum length to the text returned by the API, and I realised it would be necessary to set a maximum length within the app:

As Shakespeare could have told him, ‘brevity is the soul of wit.’ I should probably learn from that…
At first, I thought of two possible ways to limit the length of the joke text that was displayed:
- Fetch within a loop that tests the length against a maximum limit.
or, - Keep a reserve joke and replace the one in the collection with that if it’s too long.
The second option sounded more complicated, and with either less variety, more API calls, or more complication use of collections, so option seemed better.
However, this turned out, surprisingly, to be much harder than I expected.
Power Apps Operations
The string length function was straightforward and easy to find: it is documented by Microsoft at Len function in Power Apps. In this case, the syntax would be Len( String ), specifying the string value as the argument, and returning the value of the length as a number.
‘If’ statements were also easy to find. They vary from simple to potentially long and complicated, and can be found in the Microsoft documentation at If and Switch functions in Power Apps.
This is the syntax for the simplest version:
If( Condition, ThenResult [, DefaultResult ] )
Further conditions and results can be embedded in the If statement like this:
If( Condition1, ThenResult1 [, Condition2, ThenResult2, ... [ , DefaultResult ] ] )
Finding the Maximum Text Length
Estimating I could fit 40 characters per line in the speech bubble, I thought 4 lines (160 characters) would definitely fit, and 5 lines (200 characters) might be ok too.
This gave me a good opportunity to make some text strings of known length using Bob Ross Lipsum.
I also found it helpful to discover how to comment my Power Apps code, so I could easily test strings of different length one after another. Line comments can be added using //, and block comments can be added using /* */.
After my first experiments with 200 character strings, I discovered the limit would have to be 160, so these were the test strings I used:
Text strings for testing a 160 character maximum length:
159 characters:
We’ll put a happy little sky in here. Little trees and bushes grow however makes them happy. Isn’t that fantastic that you can make whole mountains in minutes?
160 characters:
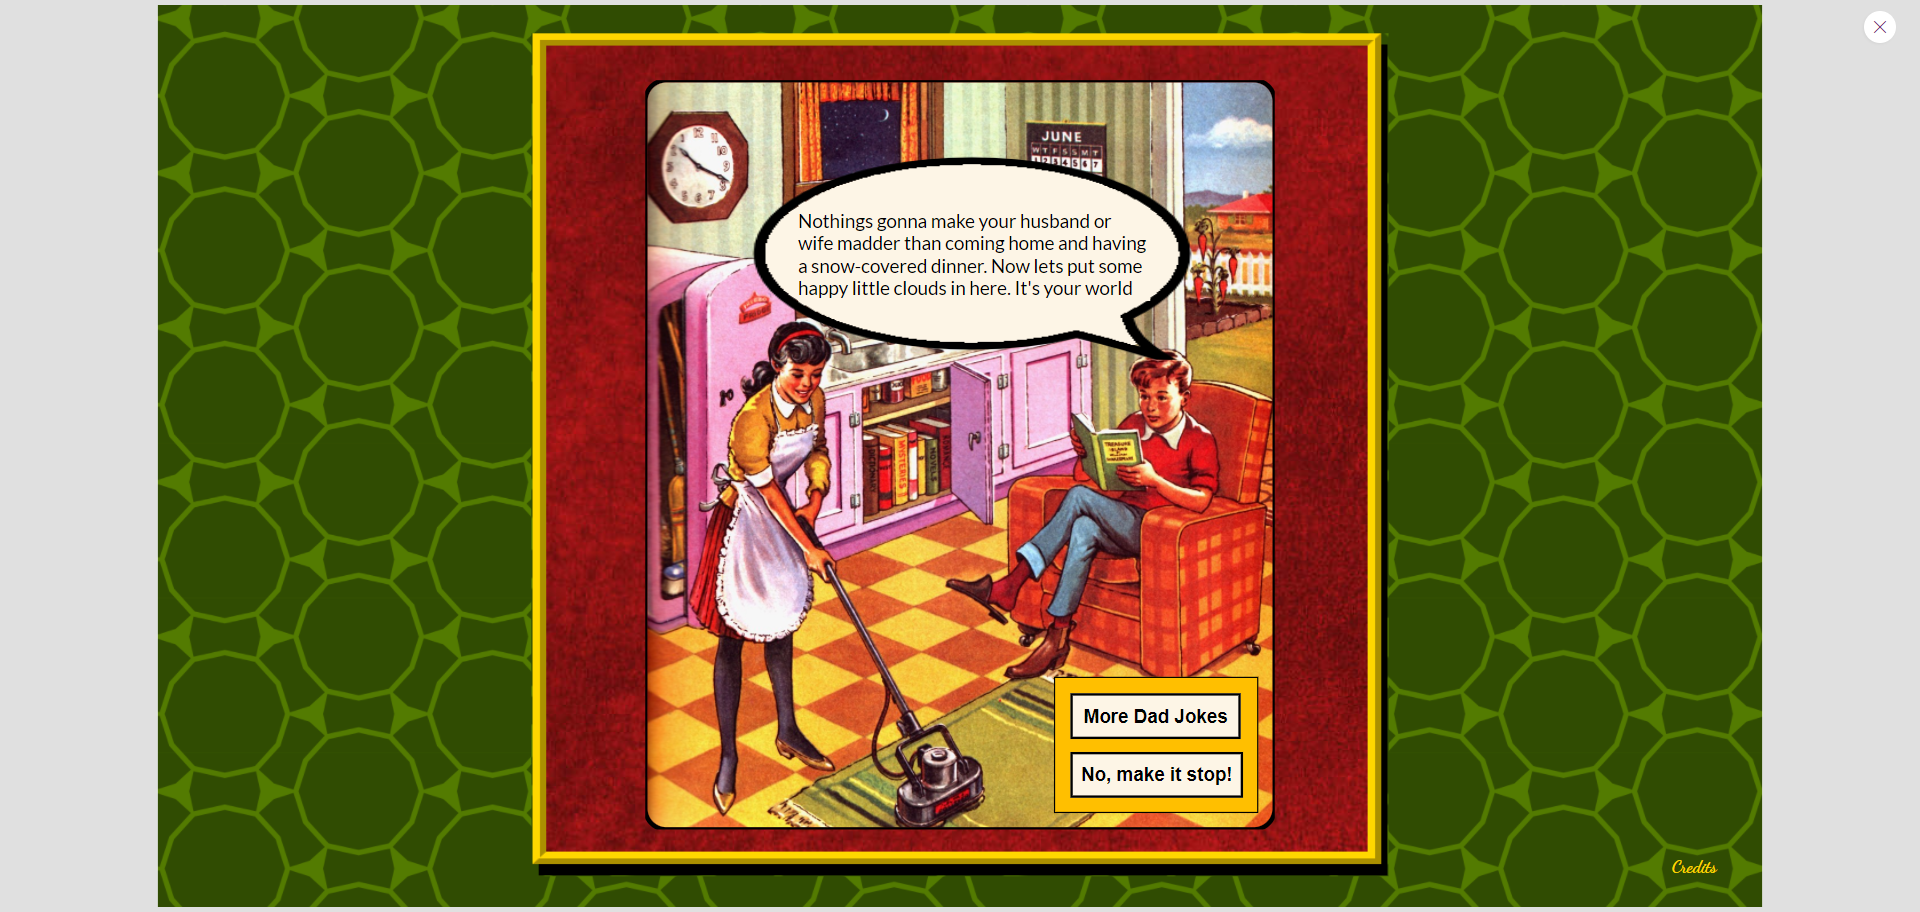
Nothings gonna make your husband or wife madder than coming home and having a snow-covered dinner. Now lets put some happy little clouds in here. Its your world
165 characters:
Maybe there’s a happy little waterfall happening over here. Put it in, leave it alone. Let’s get crazy. This is your world. Let’s put a touch more of the magic here.
That’s one way to take the stress out of testing 🙂
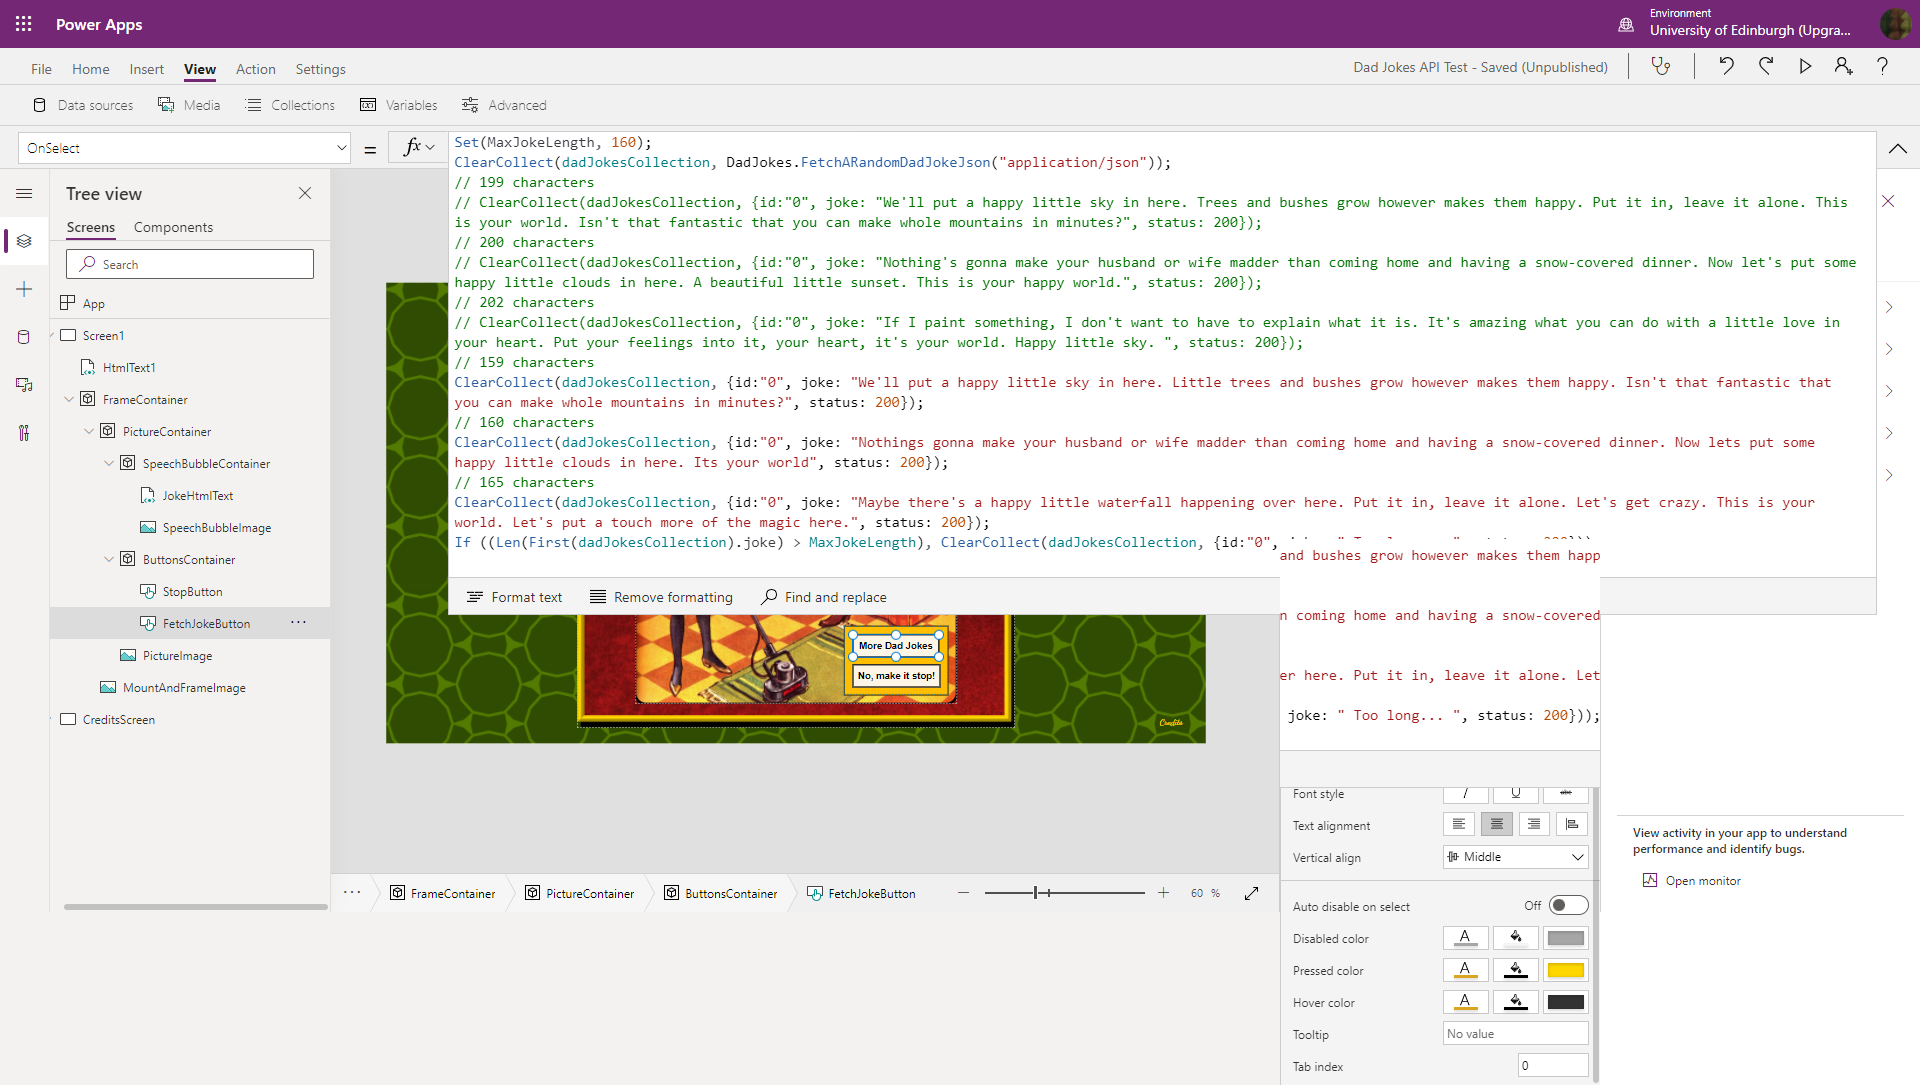
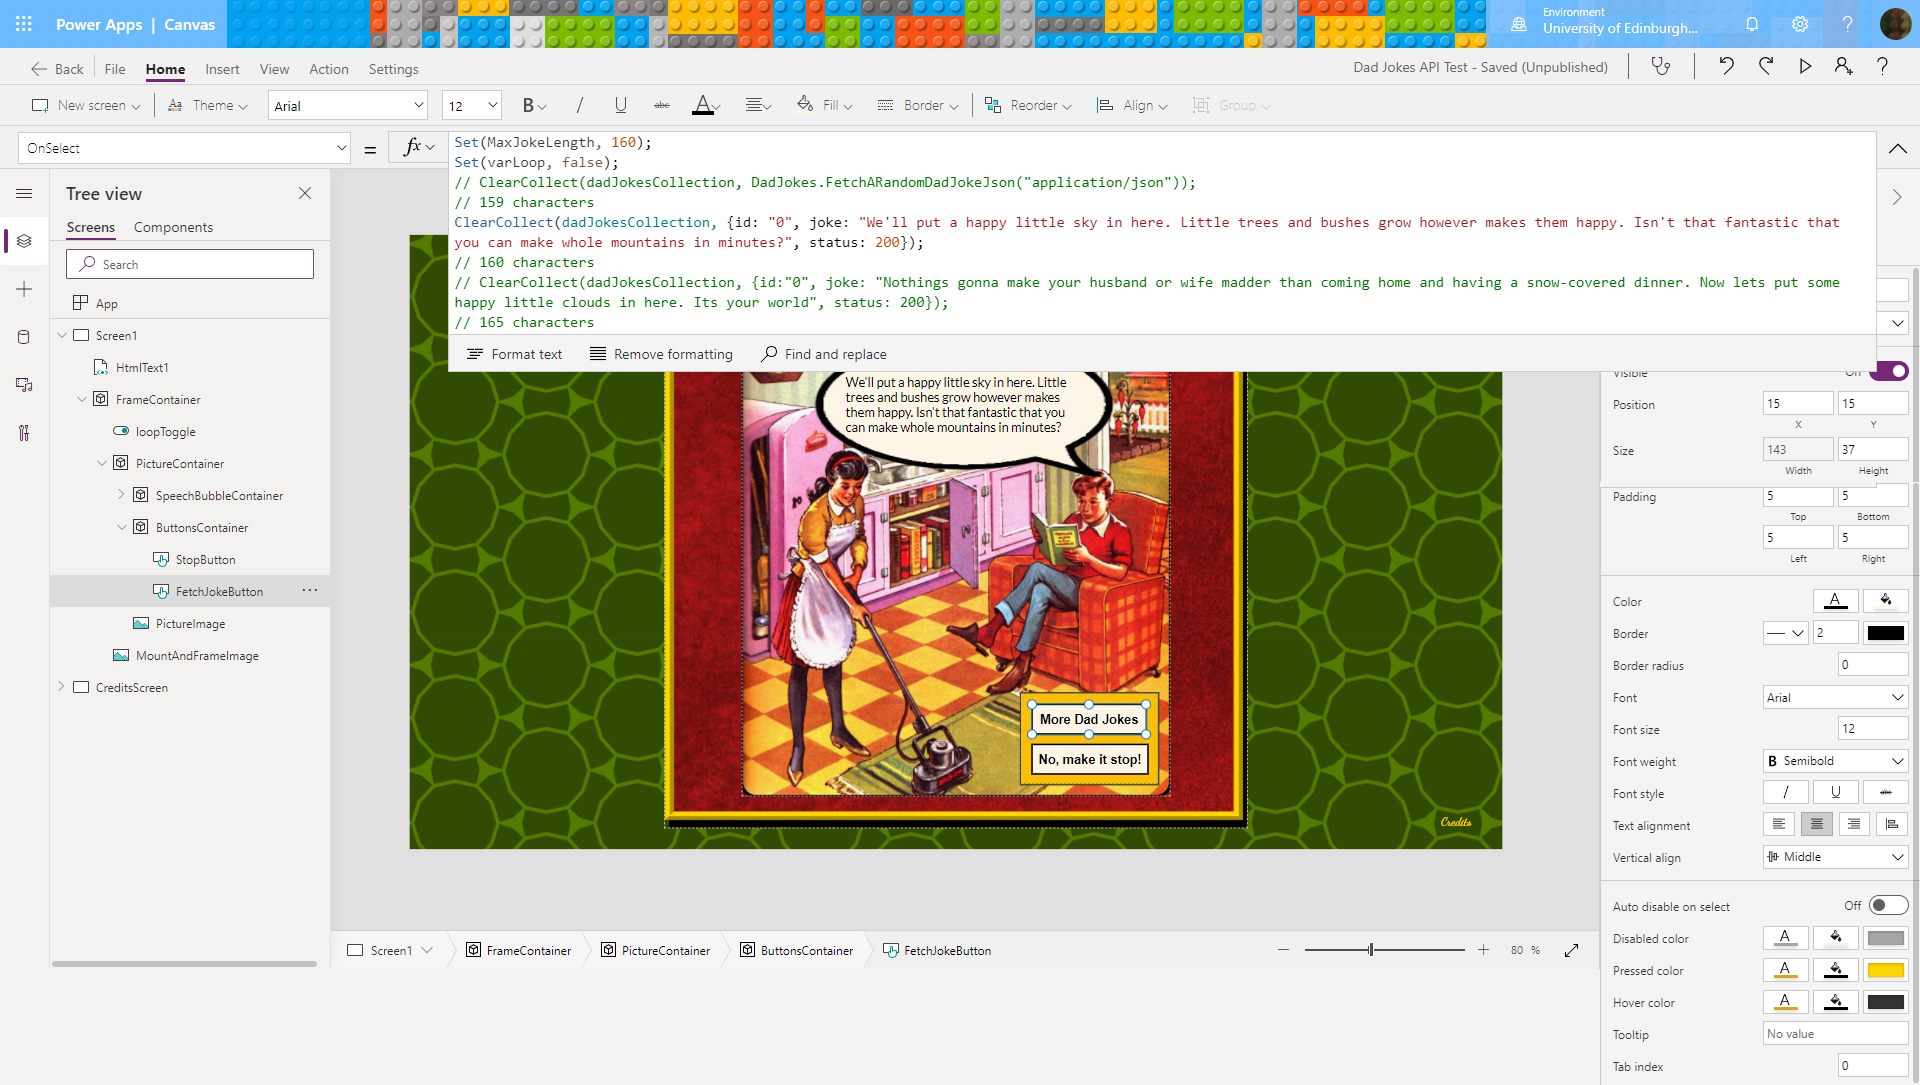
Testing string length and conditional statements in a Power Apps button
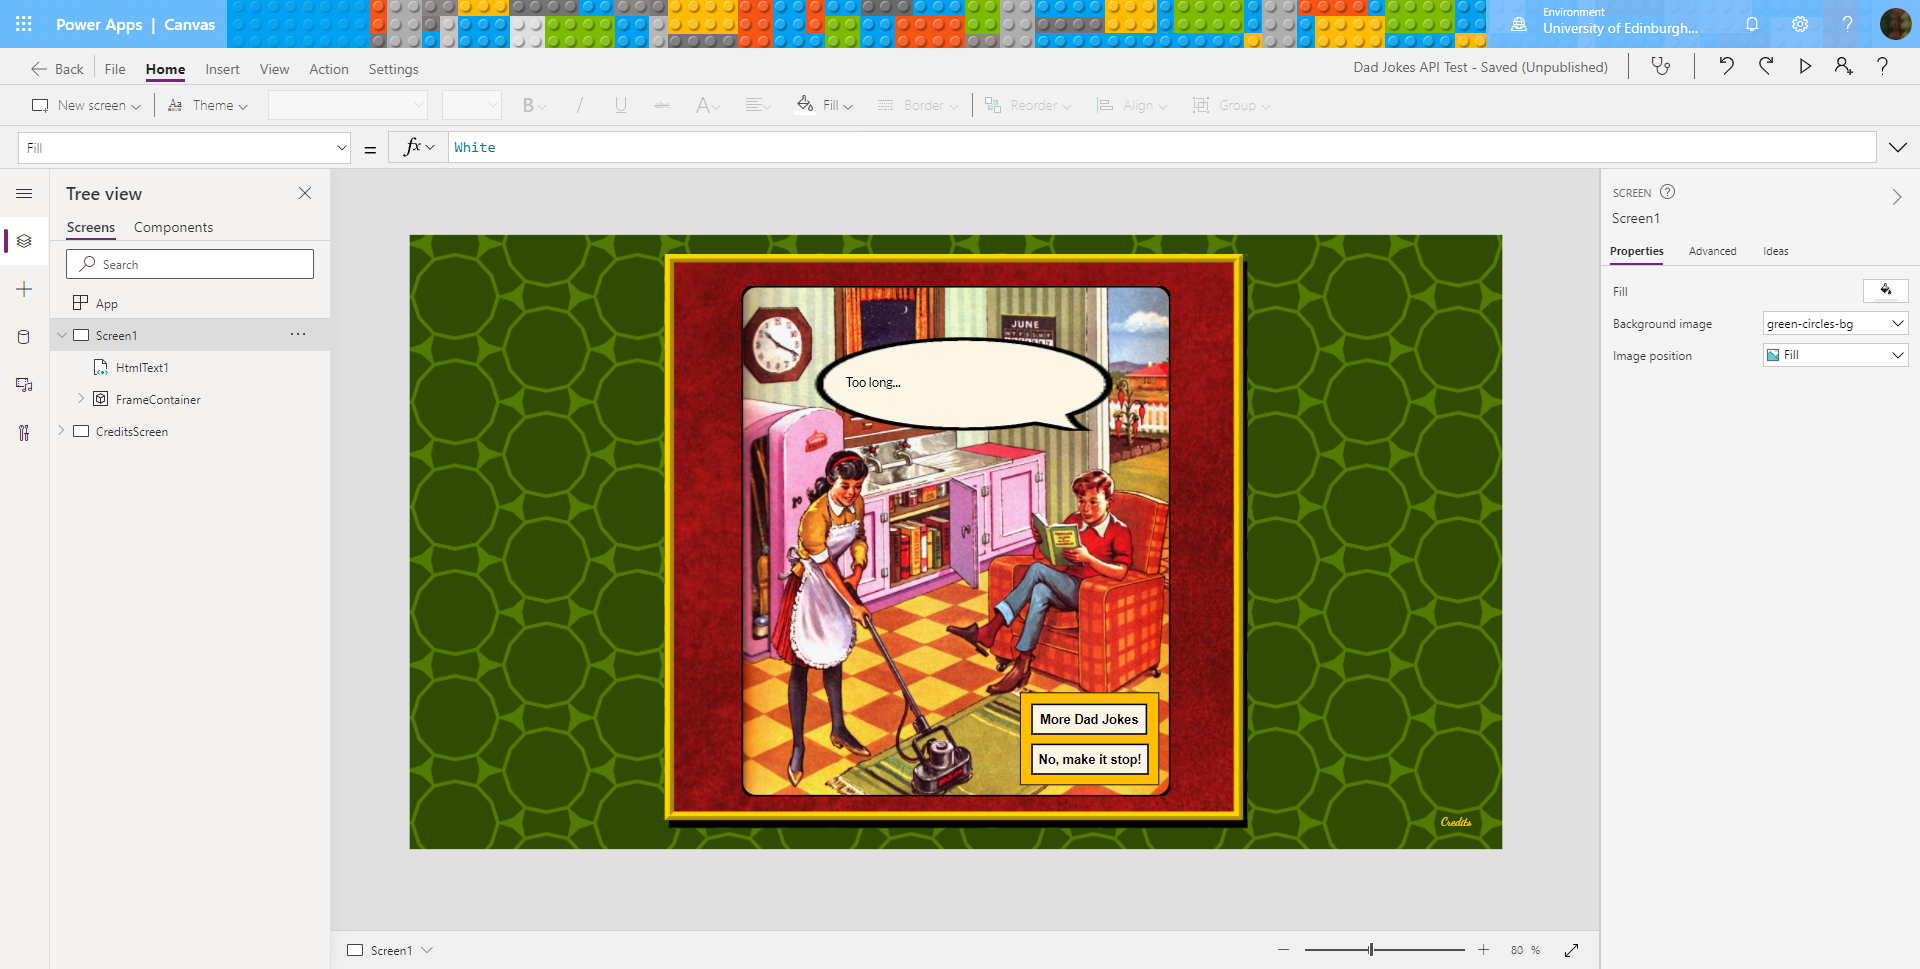
I edited the OnSelect property of the FetchJokeButton to add an if statement checking the length of the joke text input against a ‘MaxJokeLength’ local variable, which I set to a limit of 160. If the joke is too long it is replaced with the text ‘Too long’.
This was the code for setting the variable:
Set(MaxJokeLength, 160);
This was the code for setting the 159 character test string:
ClearCollect(dadJokesCollection, {id:"0", joke: "We'll put a happy little sky in here. Little trees and bushes grow however makes them happy. Isn't that fantastic that you can make whole mountains in minutes?", status: 200}));
This was the code for checking the length against the limit:
If ((Len(First(dadJokesCollection).joke) > MaxJokeLength), ClearCollect(dadJokesCollection, {id:"0", joke: " Too long... ", status: 200}));
These were the results at 160 characters or less:
At 160 characters or less it displays the joke
And here are the results for more than 160 characters:
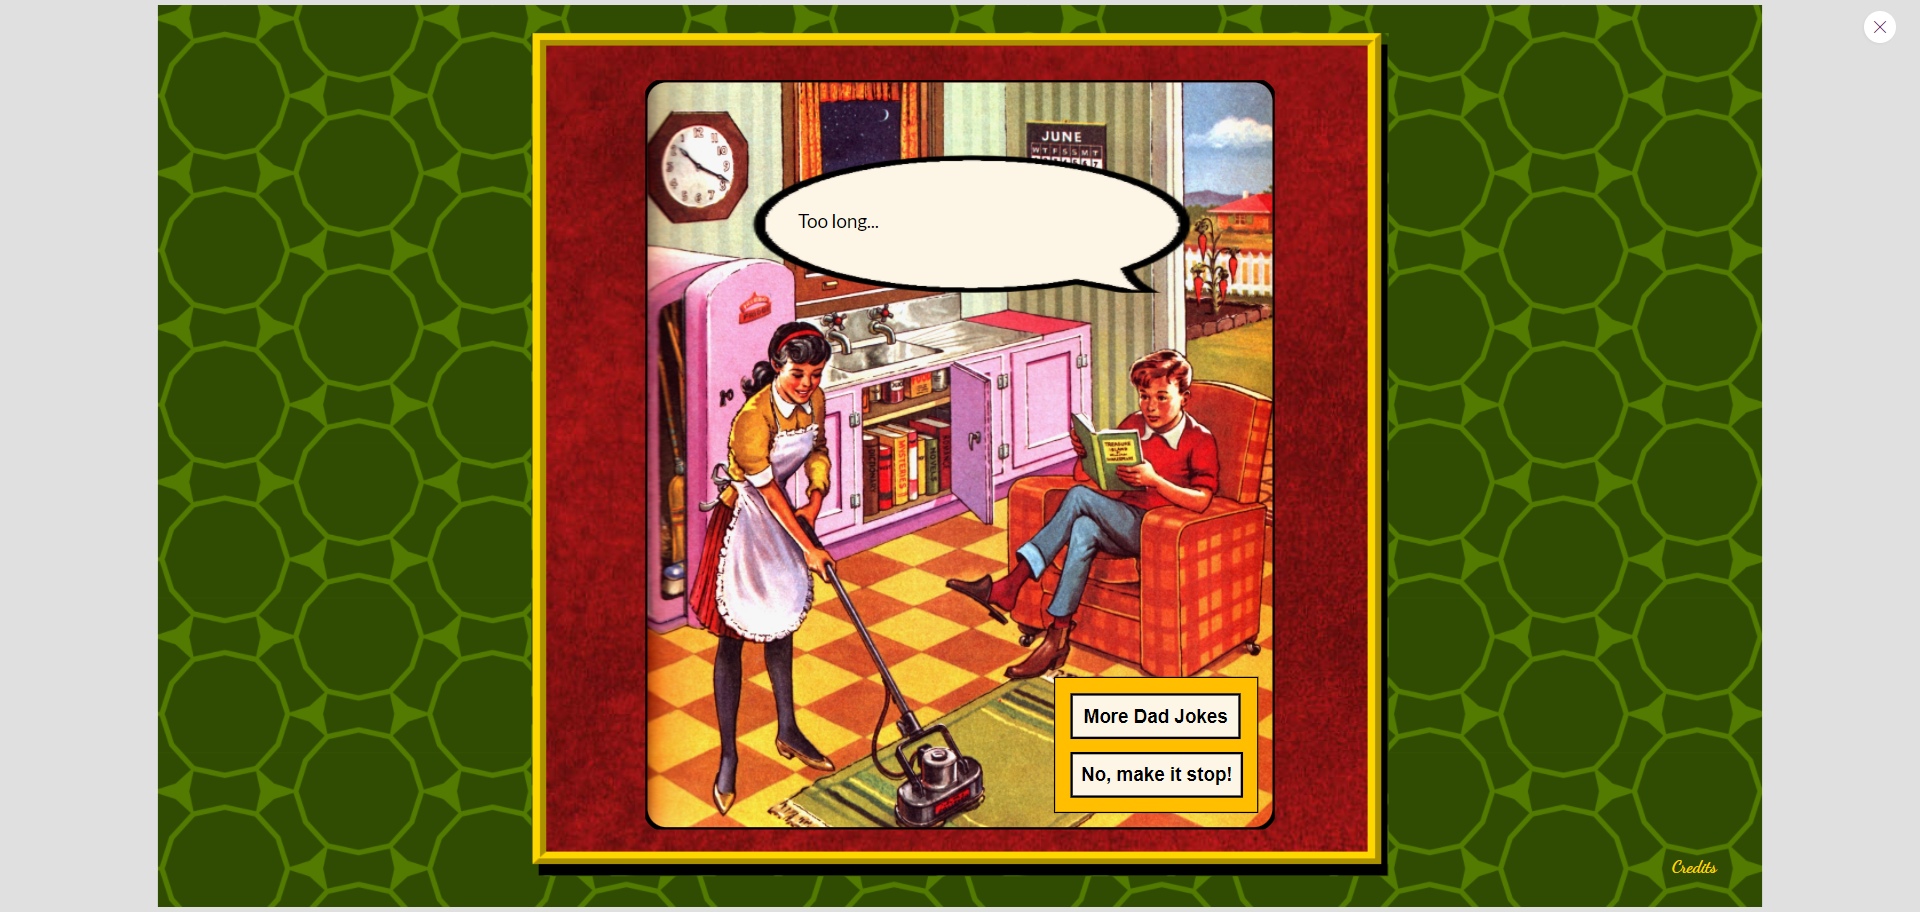
The test works: more than 160 characters is too long
Now that the length and conditional testing worked, it needed to be moved inside a loop, to keep fetching jokes until the text returned was short enough.
However, looping in Power Apps turned out to be tricky.
Making a While Loop in Power Apps
Unbelievably, I discovered there is only one kind of loop in Power Apps: ForAll, which is used for looping over tables and collections. Power Apps really doesn’t have any other kind of loops, or even GoTos.
At first, I wondered if I could use ForAll in something like this pseudocode example to keep adding new items to a collection until a short enough joke was found:
ForAll

    (dadJokesCollection,

        If joke in place "0" is too long {

            Replace "0" with a new joke

            Add a new item ('Too long') after it like Gromit with train tracks so the loop keeps going

        }

    )
It’s a collection so it wouldn’t be sequential, but we’d only ever be checking the one with id:”0″.
Unfortunately, but not that surprisingly, Power Apps doesn’t allow you to make changes to a collection or table while you’re looping over it.
This could go on for a long time…
I found several Power Apps bloggers and forum users who had come up with loop solutions involving nested ForAll loops, timers, toggles and other controls that were very clever, complicated, and not quite what I wanted:
- Patch records (for, while loop)
- Definite and Indefinite Looping in PowerApps
- [PowerApps QuickTips] Creating a proper WHILE LOOP
- Canvas App – Loop Example
- How to do ForEach or Do while loops in power apps (canvas)?
- Loop in a Canvas App – Dive in from a developer into a #lowcode method
People were coming up with very clever workarounds, but the more complicated they got, the less confident I was in these solutions as long term generalisable fixes, or that they would be up to the tasks of interacting with the much more complex REST APIs and data for our Learn courses. If I couldn’t get a loop working, or even a GoTo, this might kill off our Power Apps project.
I went down a lot of rabbit holes and listened to a lot of Microsoft Learning Paths trying to find the way around this problem.
Some of the Microsoft Learning Paths were helpful for shedding a bit more light on this:
- Microsoft Learn: Use a control to modify the property of other controls
- Microsoft Documentation: Controls and properties in canvas apps
- Microsoft Learn: Working with Data in Power Apps
But although I was briefly cheered up by these helpful tips followed by master trolling in the comments (10 tips I wish to know before I’ve started with PowerApps), I was starting to think Power Apps might not work for us after all.
Perhaps I needed this guy’s 8 year old son to help me:
NATHAN, JUNE 24, 2021 AT 8:42 PM
Makis, sorry to hear of the issues you are having with this citizen development platform. My 8 year old son has grasped all the concepts this excellent article details and he thrives on teaching lower skilled students how to achieve their desired outcomes with simple tech! I’m sure he would love to help you out so feel free to drop me a line if you continue to be overwhelmed, don’t give up, you can do this! 👍
It’s the thumbs up that really makes it, I think.
Finally, I reached one miraculously clear headed day when it all came together, and I stepped through every screenshot of every control shown in this video and understood what he was doing enough to adapt it to the particular condition-testing WHILE loop I needed:
[PowerApps QuickTips] Creating a proper WHILE LOOP By R2Power – Learning Power Apps
When you break it down, it actually looks quite reasonable. It would also work as a FOR loop if you used the counter variables that he uses in the video as well.
Here’s the explanation of what the controls do in the video:
Reset button:
This initialises the variables, including setting varLoop to false
I thought I might not need this button as long as I set varLoop to false somewhere.
Loop button (this will be the More Dad Jokes button):
- Test the loop condition
- If a loop is needed, set varLoop to true (this instantly activates the toggle)
- Set varLoop to false
Toggle control
Toggle Default Property
The Toggle’s default property is set to be varLoop.
Setting varLoop to true ‘checks’ the toggle.
Toggle onCheck property:
The Toggle onCheck property holds the function to carry out during each iteration of the loop, (ie, fetch a new joke).
To re-test the loop condition:
Automated clicking of the loop button (more dad jokes) could be achieved by adding Select(loop button) to the end of the Toggle onCheck property.
This left me with two questions:
- How and when do we fetch the original joke without fetching one twice?
- Would it work to move the action out of the toggle to the loop button and only use the toggle to automate re-clicking the loop button?
I thought I could do this with just the loop (More Dad jokes) button and the toggle:
New simplified version for my loop:
More Dad jokes (loop) button:
- Sets
varLoopto false - Fetches joke
- Tests loop condition
- If loop is needed, sets varLoop to true
Toggle default:
Toggle default property is set to varLoop
Toggle onCheck:
Toggle onCheck property calls the function:
Select(more Dad jokes button)
Testing the shorter quotes separately confirmed that the loop does not activate when the quote length is at maximum length (160 characters) and below:
The shorter Bob Ross text appears, showing the loop is not activated when the text is less than 160 characters long.
To avoid an infinite loop when testing the longer quote (ahem), I had to move it outside the loop, adding
// 165 characters

ClearCollect(dadJokesCollection, {id:"0", joke: "Maybe there's a happy little waterfall happening over here. Put it in, leave it alone. Let's get crazy. This is your world. Let's put a touch more of the magic here.", status: 200});
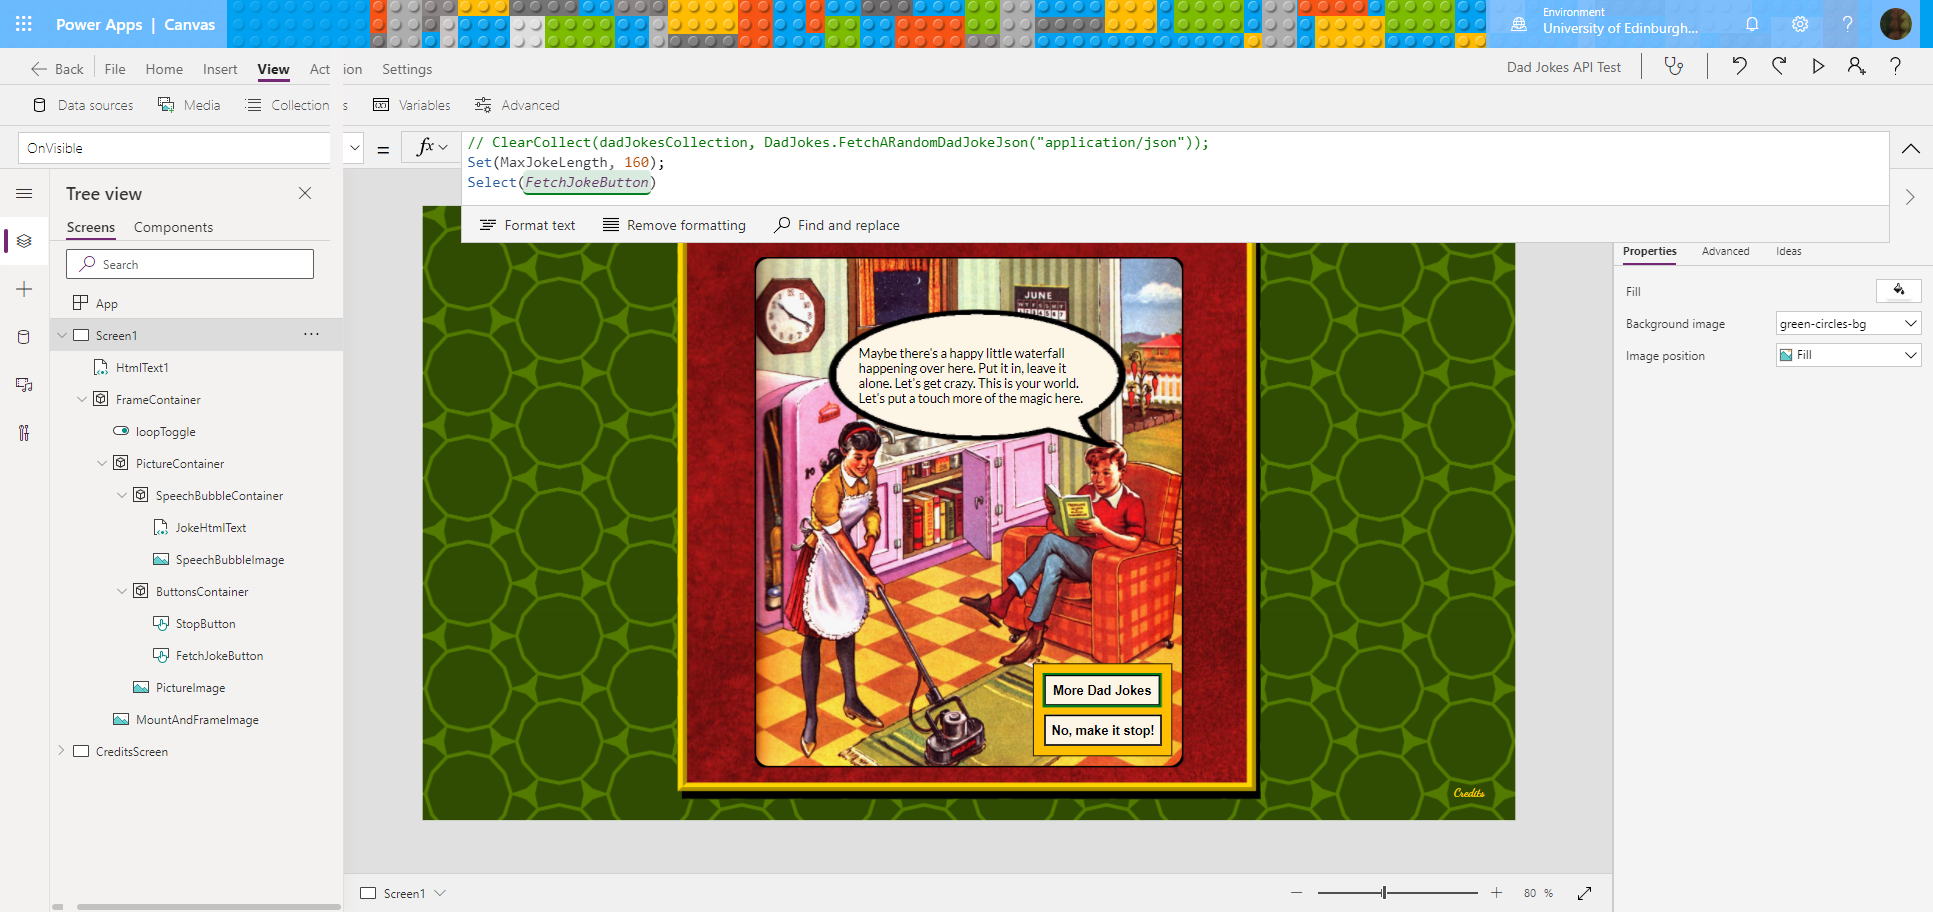
to Screen1.OnVisible, and ClearCollect(dadJokesCollection, {id:"0", joke: " Too long... ", status: 200}); to the OnCheck property of the toggle, to show when the loop condition tests true and the toggle is activated. I moved Set(MaxJokeLength, 160); out to Screen1.onVisible too as I should only need to set it once.
Setting variables in Screen1.OnVisible meant that I had to save the app and restart it to test this. However, when I tried this, it initially loaded with the ‘happy little waterfall’ long text:
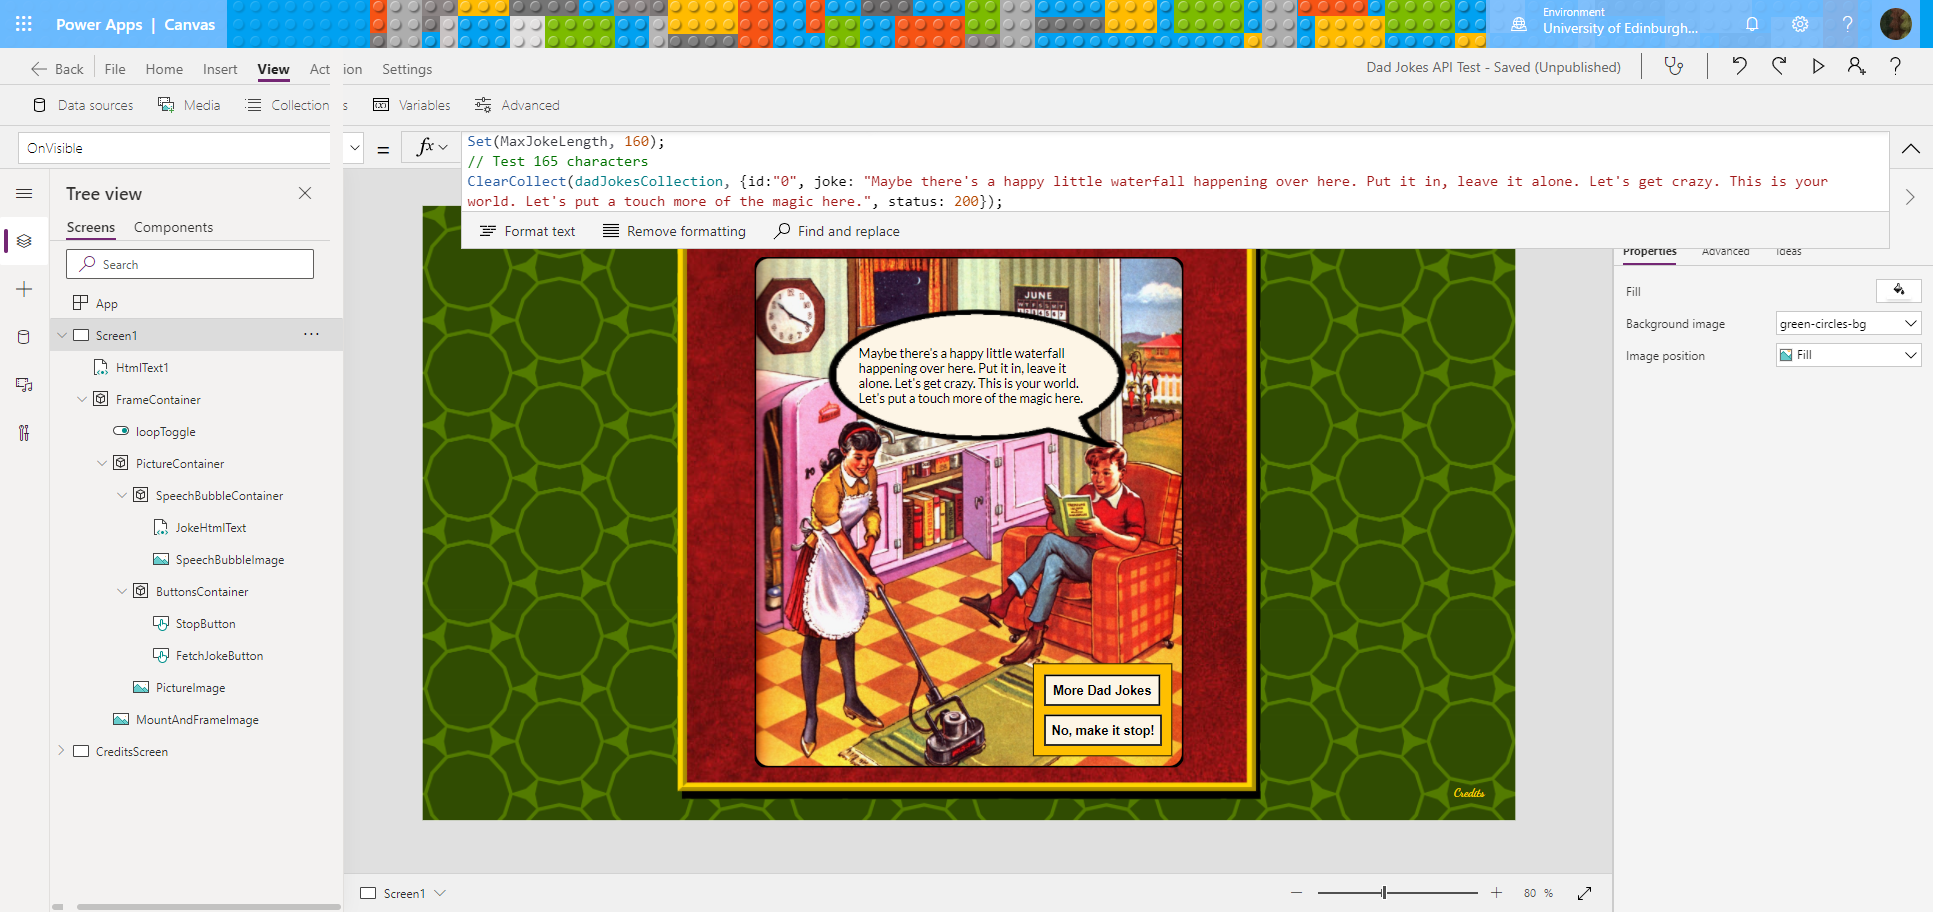
The long quote appeared when the screen first loaded
and then changed to ‘Too long’ when I clicked the button, as expected:
After clicking the button: the app enters the loop and the text changes to ‘Too long’
Finally, I realised I wasn’t checking the very first joke. So instead of calling that directly from Screen1.onVisible, I should call Select(FetchJokeButton):
This will ensure that the first joke it loads fits into the speech bubble
After removing the test code and re-testing the app, the first joke seemed very appropriate:
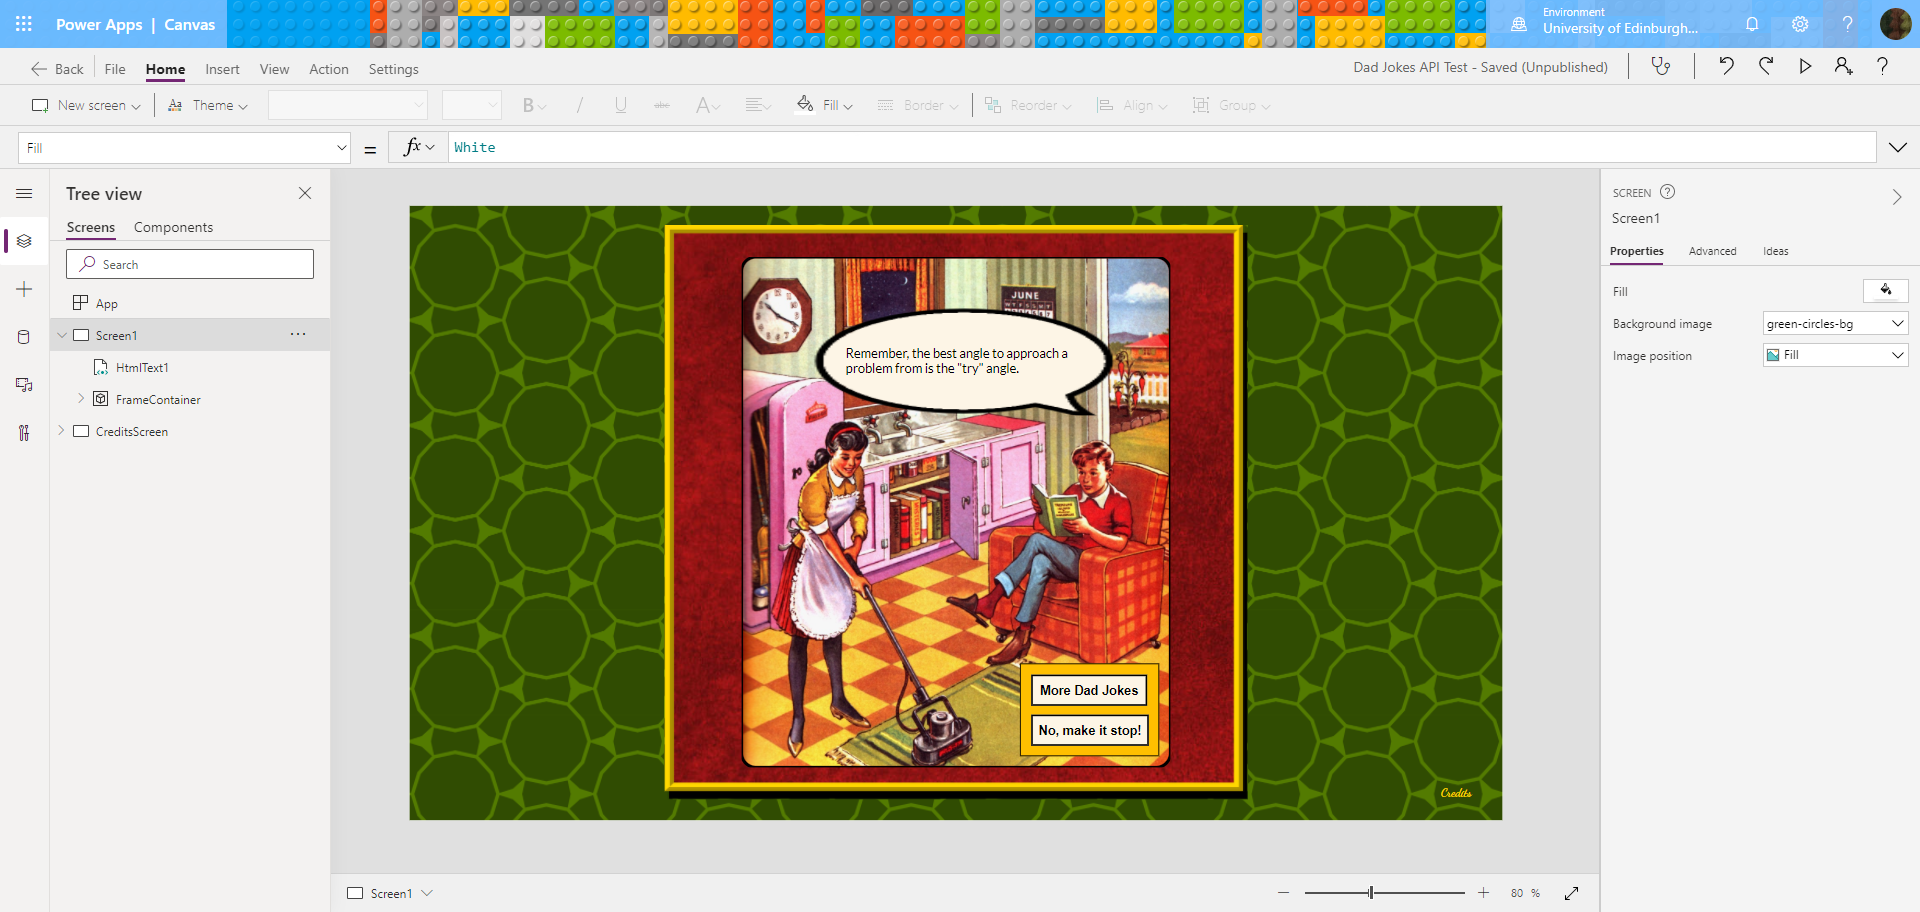
“Remember, the best angle to approach a problem from is the ‘try’ angle”
Settings for the working WHILE loop with a Toggle
Here are the settings that worked:
Screen1.OnVisible

When the app screen first loads, it sets the maximum joke length variable and loads the first joke by making an automated call to the ‘More Dad Jokes’ button
This is the code that goes in
Screen1.OnVisible:Set(MaxJokeLength, 160);
Select(FetchJokeButton)
The Loop Toggle
The loopToggle control is added inside the FrameContainer. Its Default property is set to varLoop and its Visible property is set to Off so it stays hidden from view except as an outline when it is selected for editing:
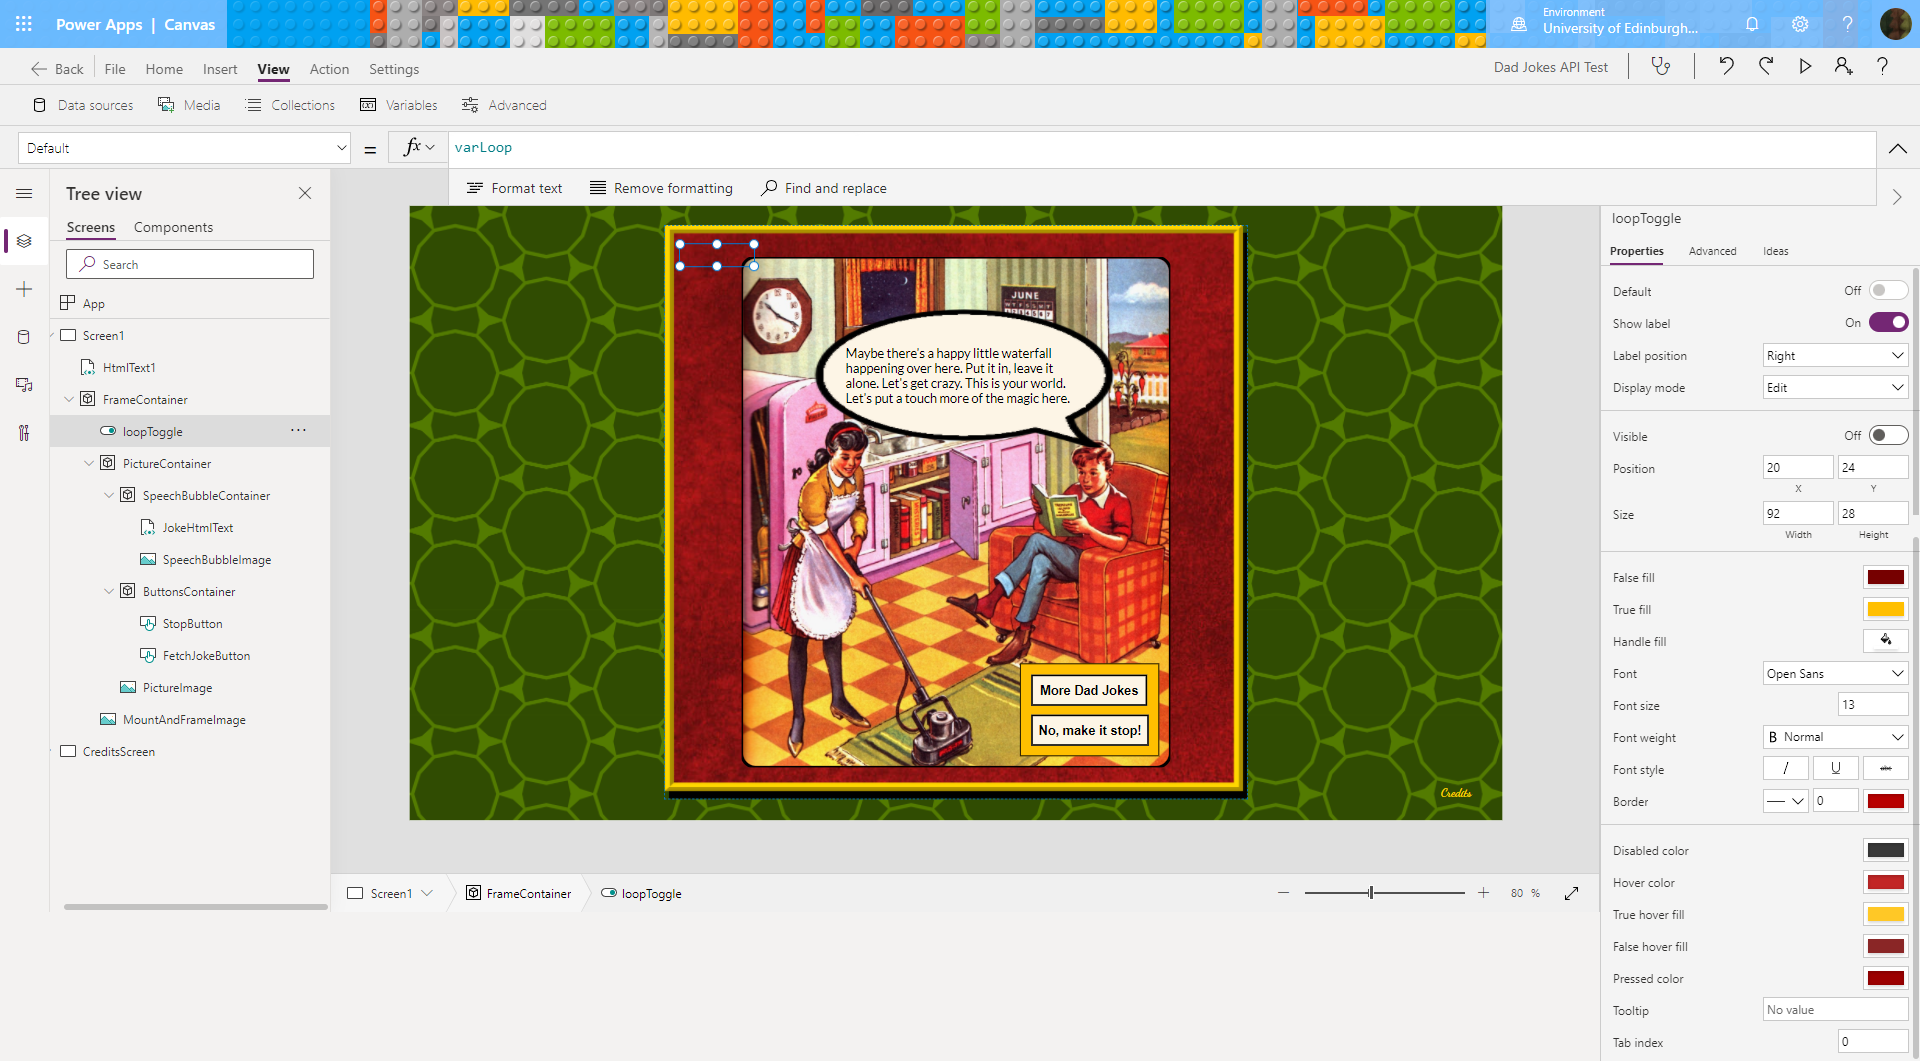
The Toggle value will turn on and off depending on the value of varLoop
The loopToggle’s OnCheck property is set to Select(FetchJokeButton):
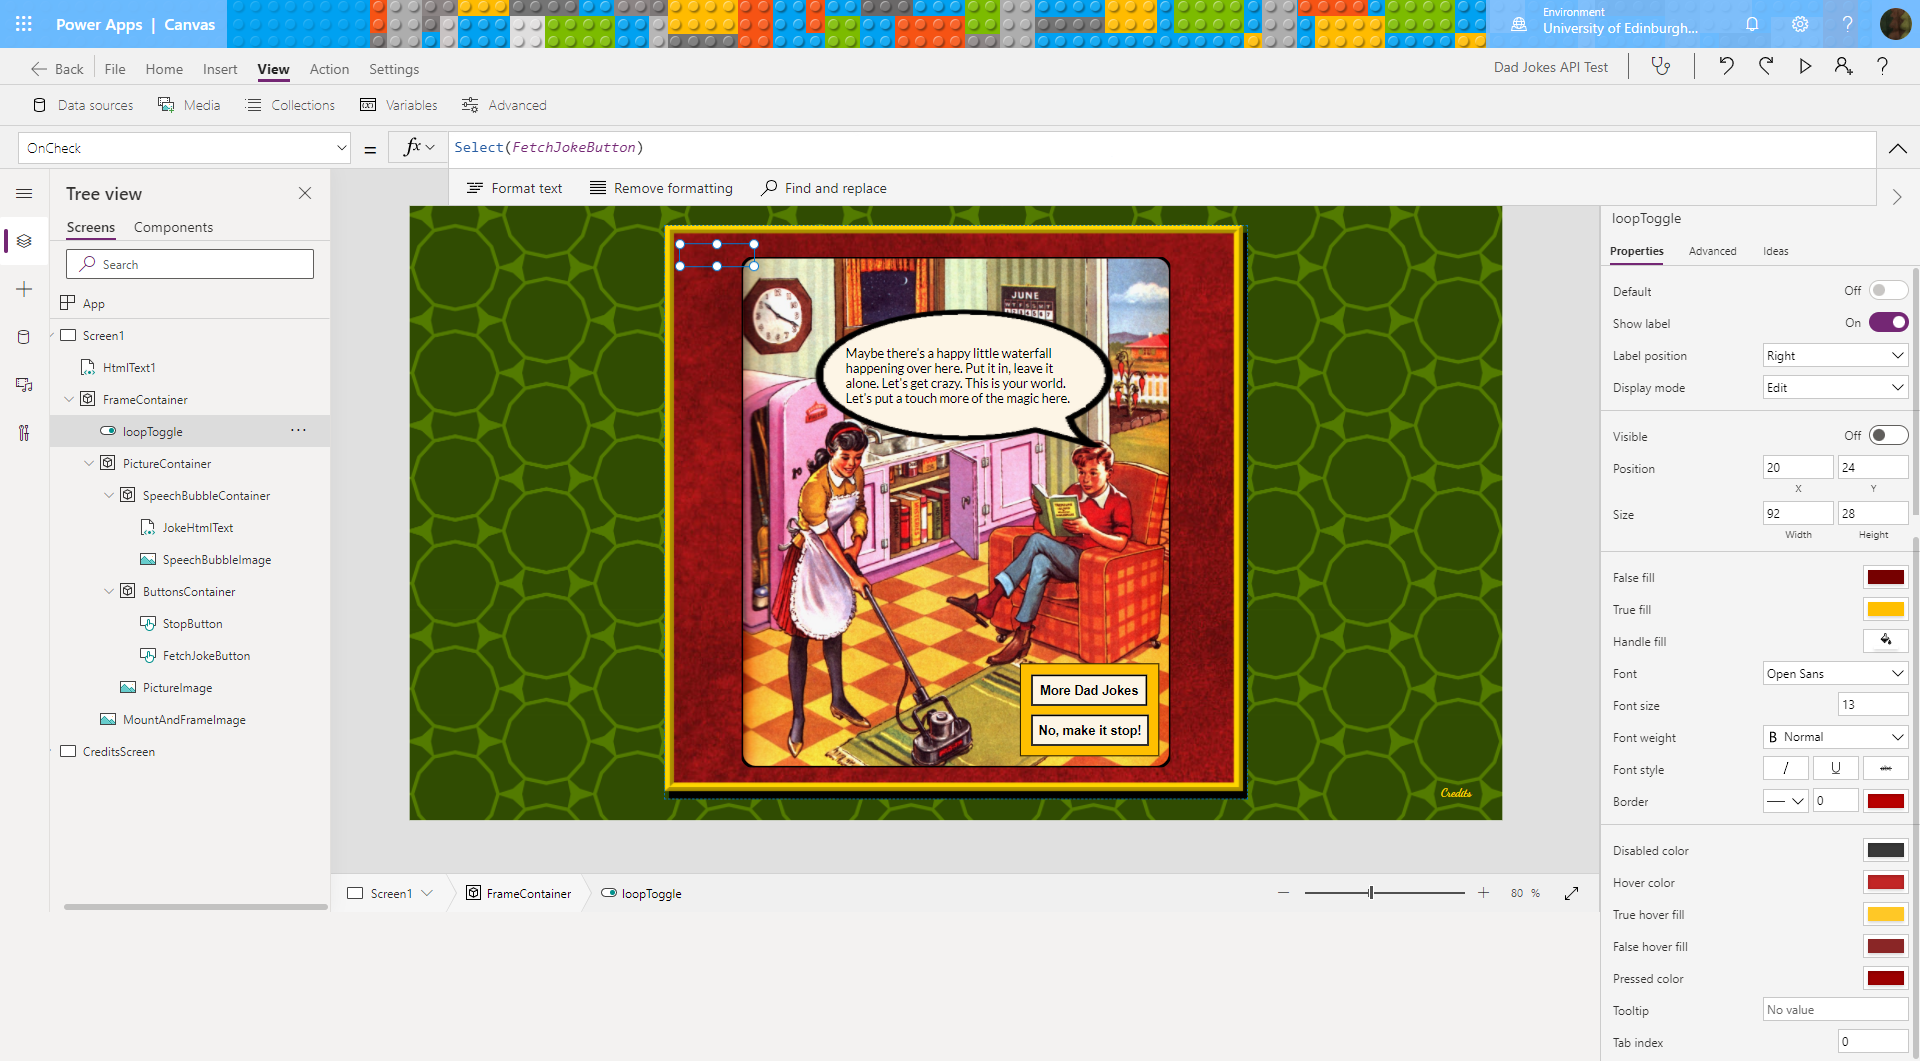
When the loop Toggle is switched on, it performs an automated ‘click’ on the ‘More Dad Jokes’ button
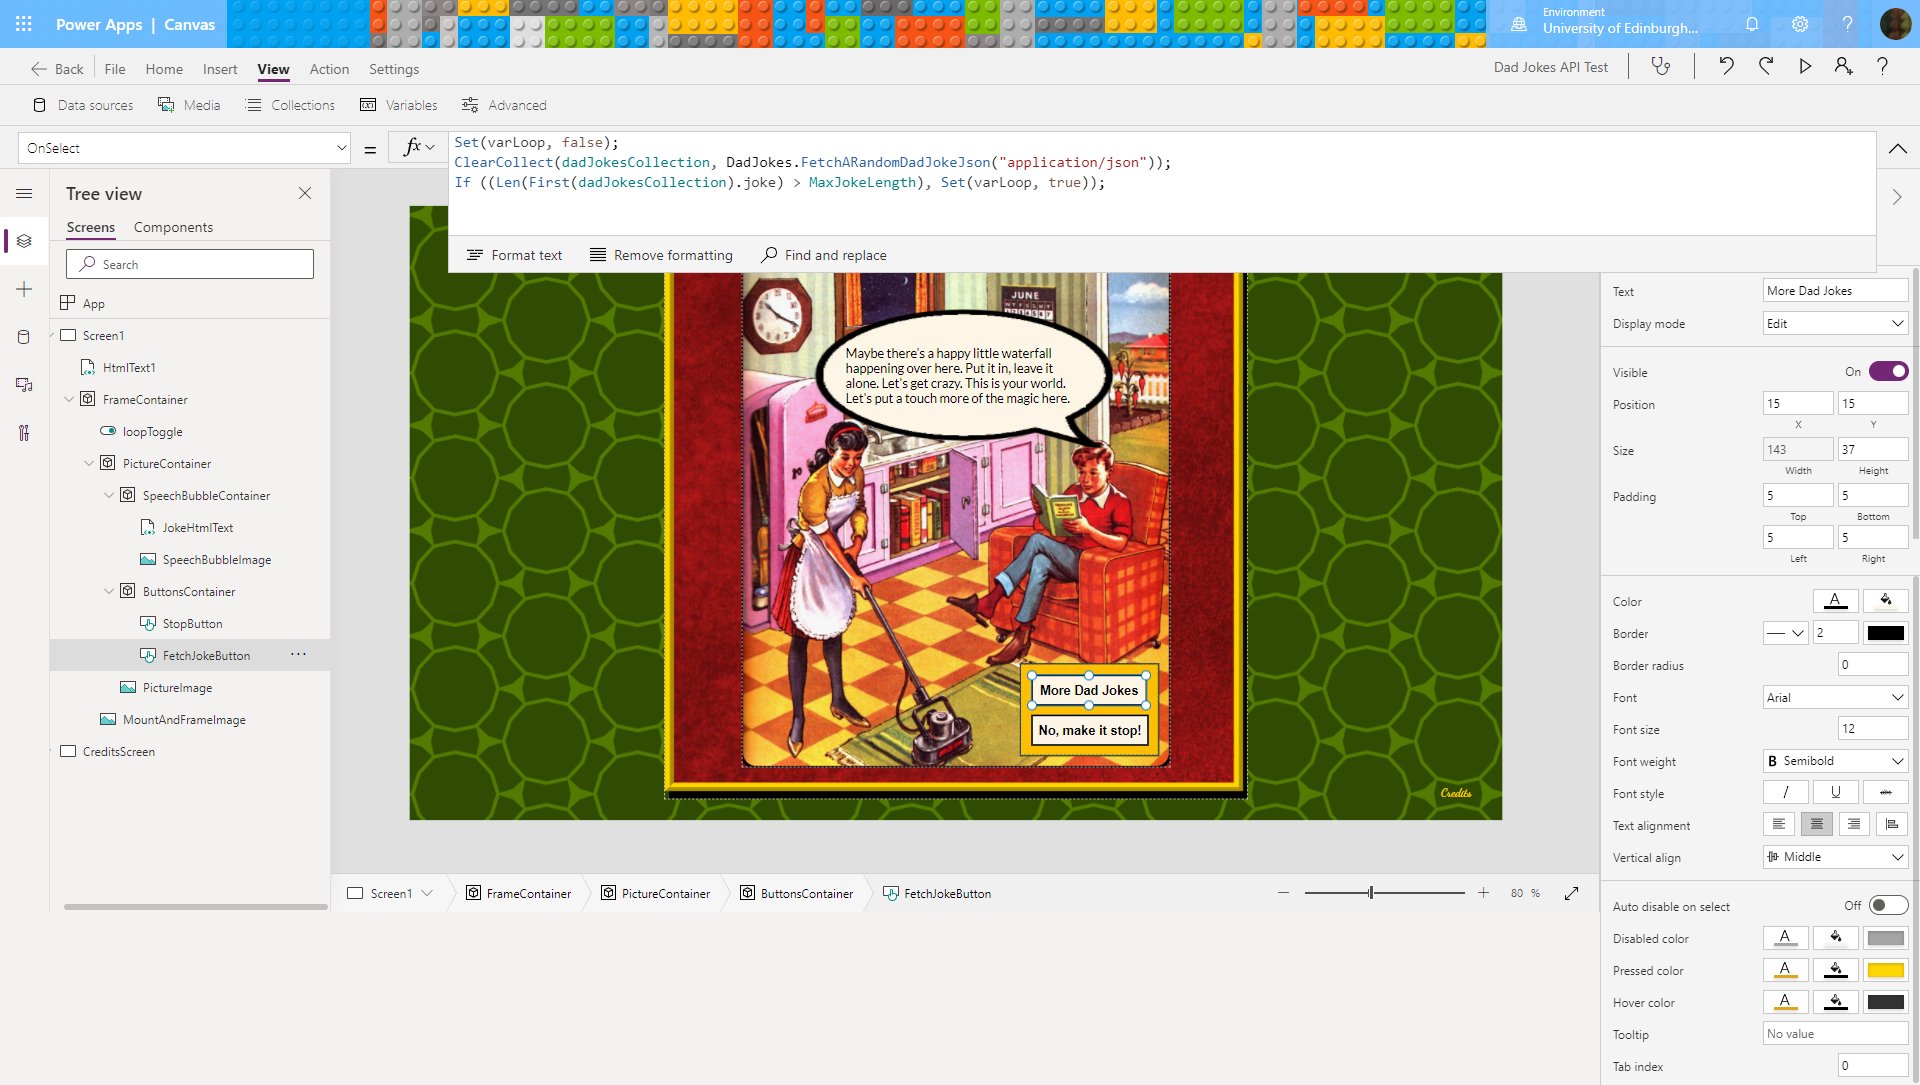
The ‘More Dad Jokes’ Button
Finally, this is the code in the OnSelect property of the ‘More Dad Jokes’ button:
Set(varLoop, false);

ClearCollect(dadJokesCollection, DadJokes.FetchARandomDadJokeJson("application/json"));

If ((Len(First(dadJokesCollection).joke) > MaxJokeLength), Set(varLoop, true));
Clicking the ‘More Dad Jokes’ button, whether manually or by automation, resets the toggle back to Off, clears the collection, fetches a new joke and adds it to the collection (of one!), tests whether the joke is too long, and if it is, it switches the toggle back on, which restarts the loop by ‘clicking’ the button again:
Am I imagining things, or is this like a modern, event driven version of a GOTO?
Exporting the Power App to a different Environment
I needed to export my Power App from my own Developer environment to the regular University environment to make sure that all the features I used, such as the Custom Connector, would still work.
This turned out to be quite easy. I had to recreate the connector in the new environment first, but I just followed the same procedure to ensure that no changes were introduced that might complicate testing.
The ‘Export Package’ option can be found either from the three dots next to the app name in the list of your apps, or in the ribbon at the top of the app’s Details page:
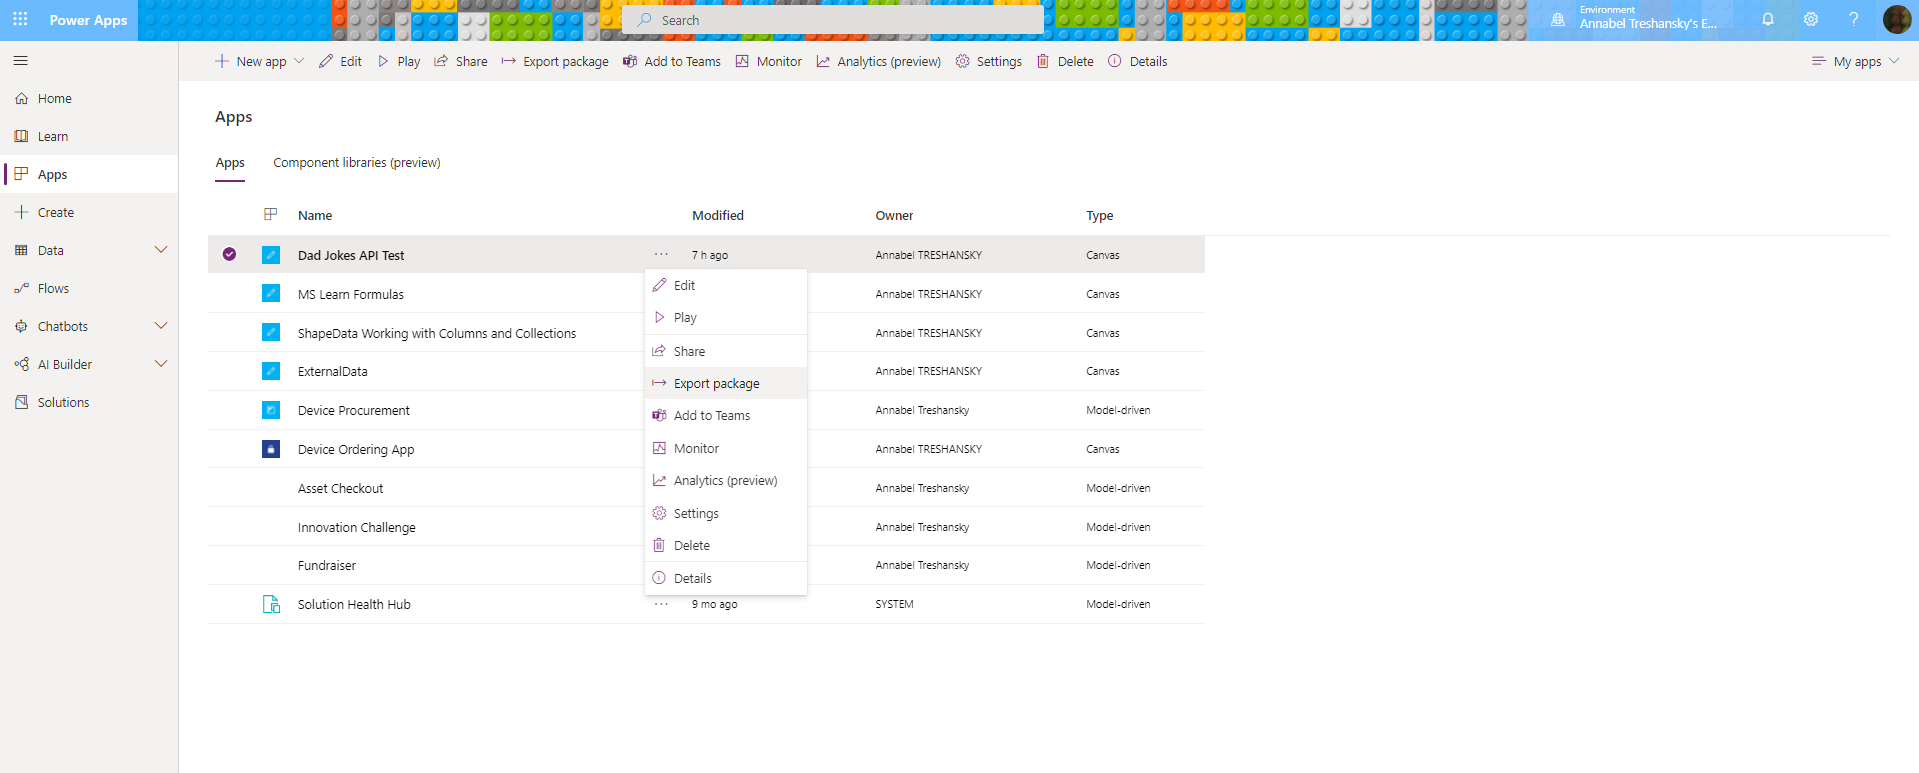
Where to find the Export Package option
This brings up a screen where you can enter the name and description for your app, and choose whether you want to create it as new or update an existing version that you already have in the environment you’re moving it to:

You can also add notes, in case you export different versions
Importing the app into the new environment is also straightforward, as long as you’ve re-created the custom connector first. Power Apps asked me to choose my connector and grant it permission during import:
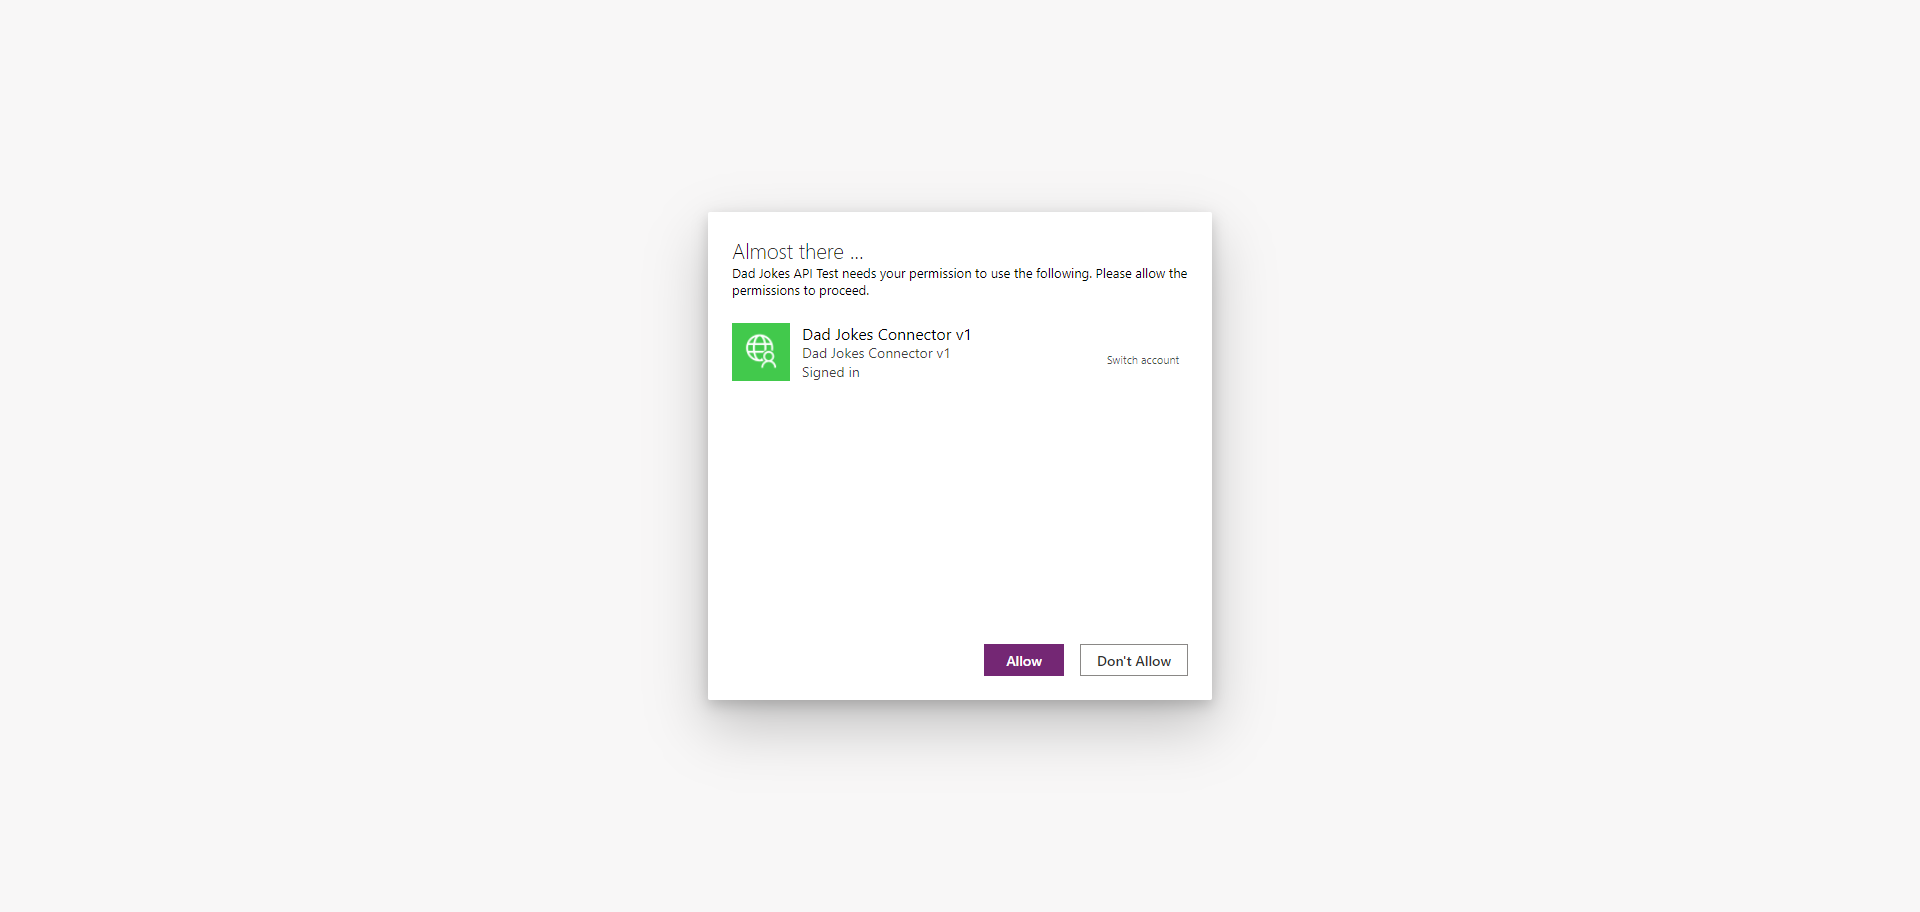
The connector is chosen and the connection is enabled during import
Finally, it worked:
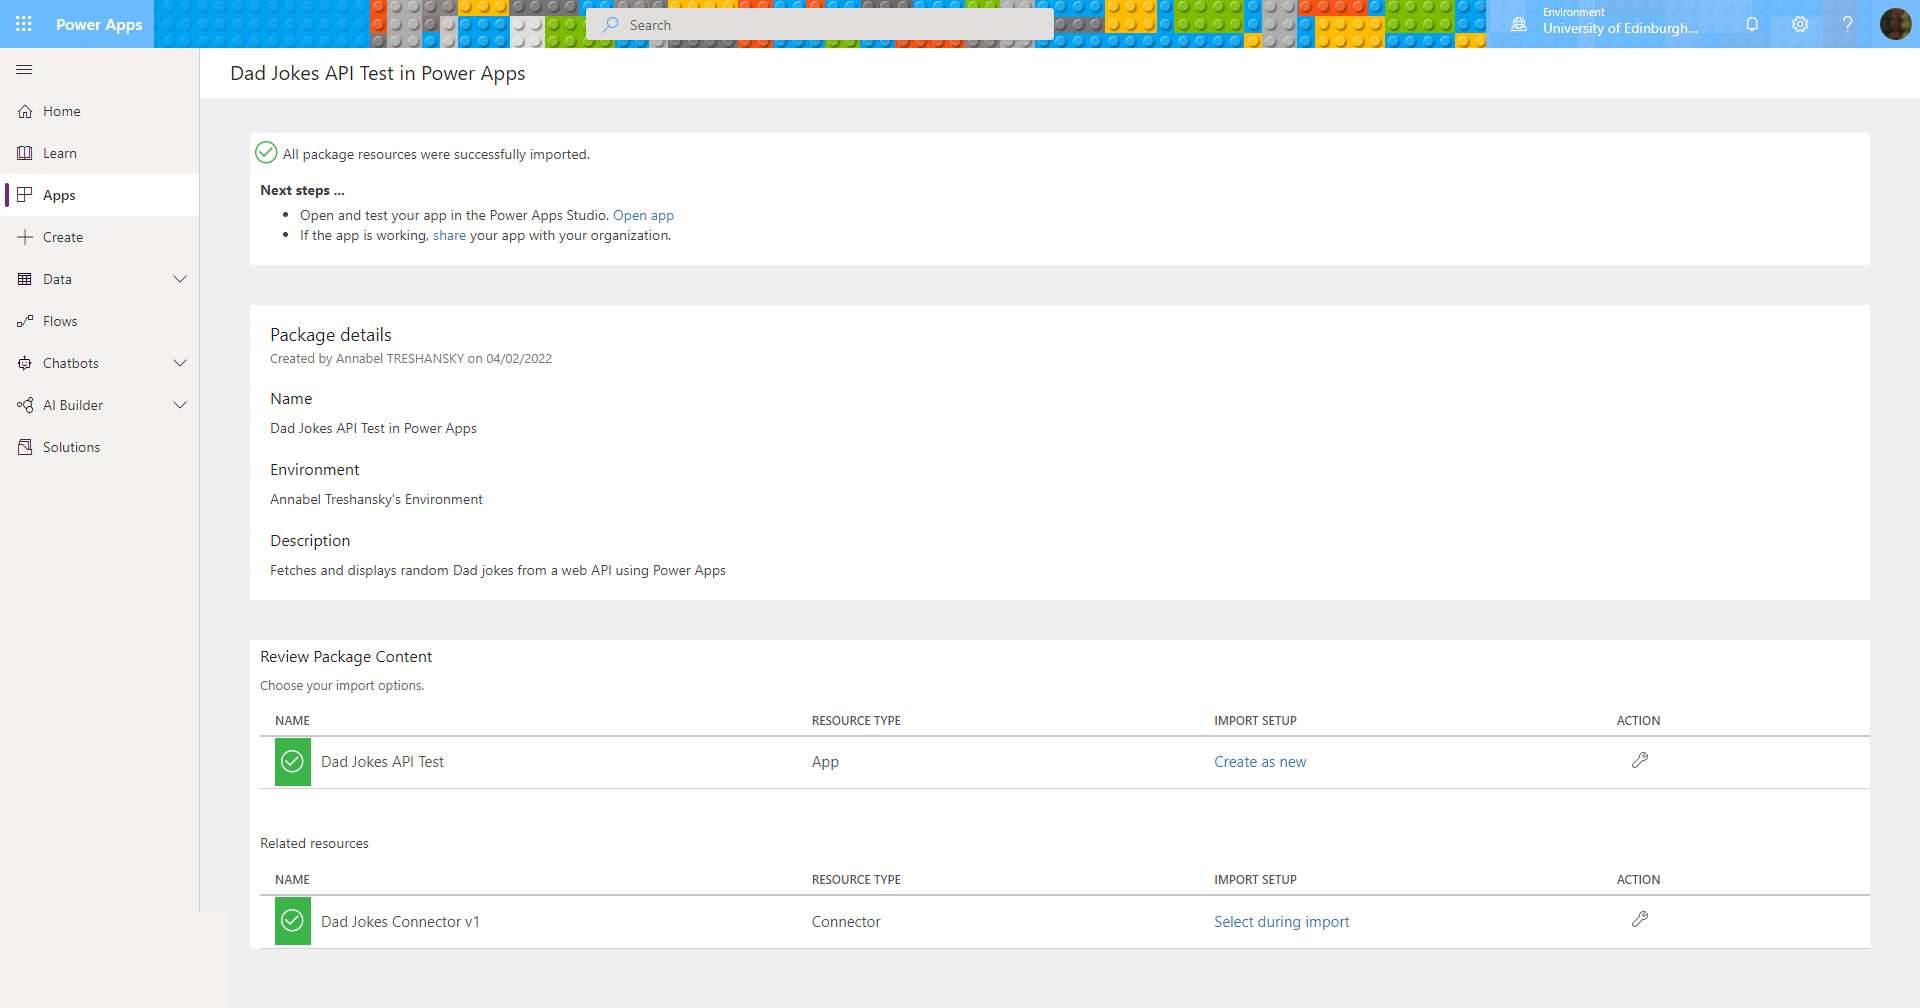
Success! 🙂
The only thing that didn’t carry across was the version history.
Testing Responsive Design Settings in Power Apps
Before sharing the app with any of my team members, I wanted to make sure it worked as well across different devices and browsers as it could.
As I said further up, retrofitting is not the ideal way to do this – perhaps I never really believed it would get this far!
Ideally, it would have been better to create it with one of the built in responsive templates from the start. However, having got this far, I discovered a few basic display settings that might help.
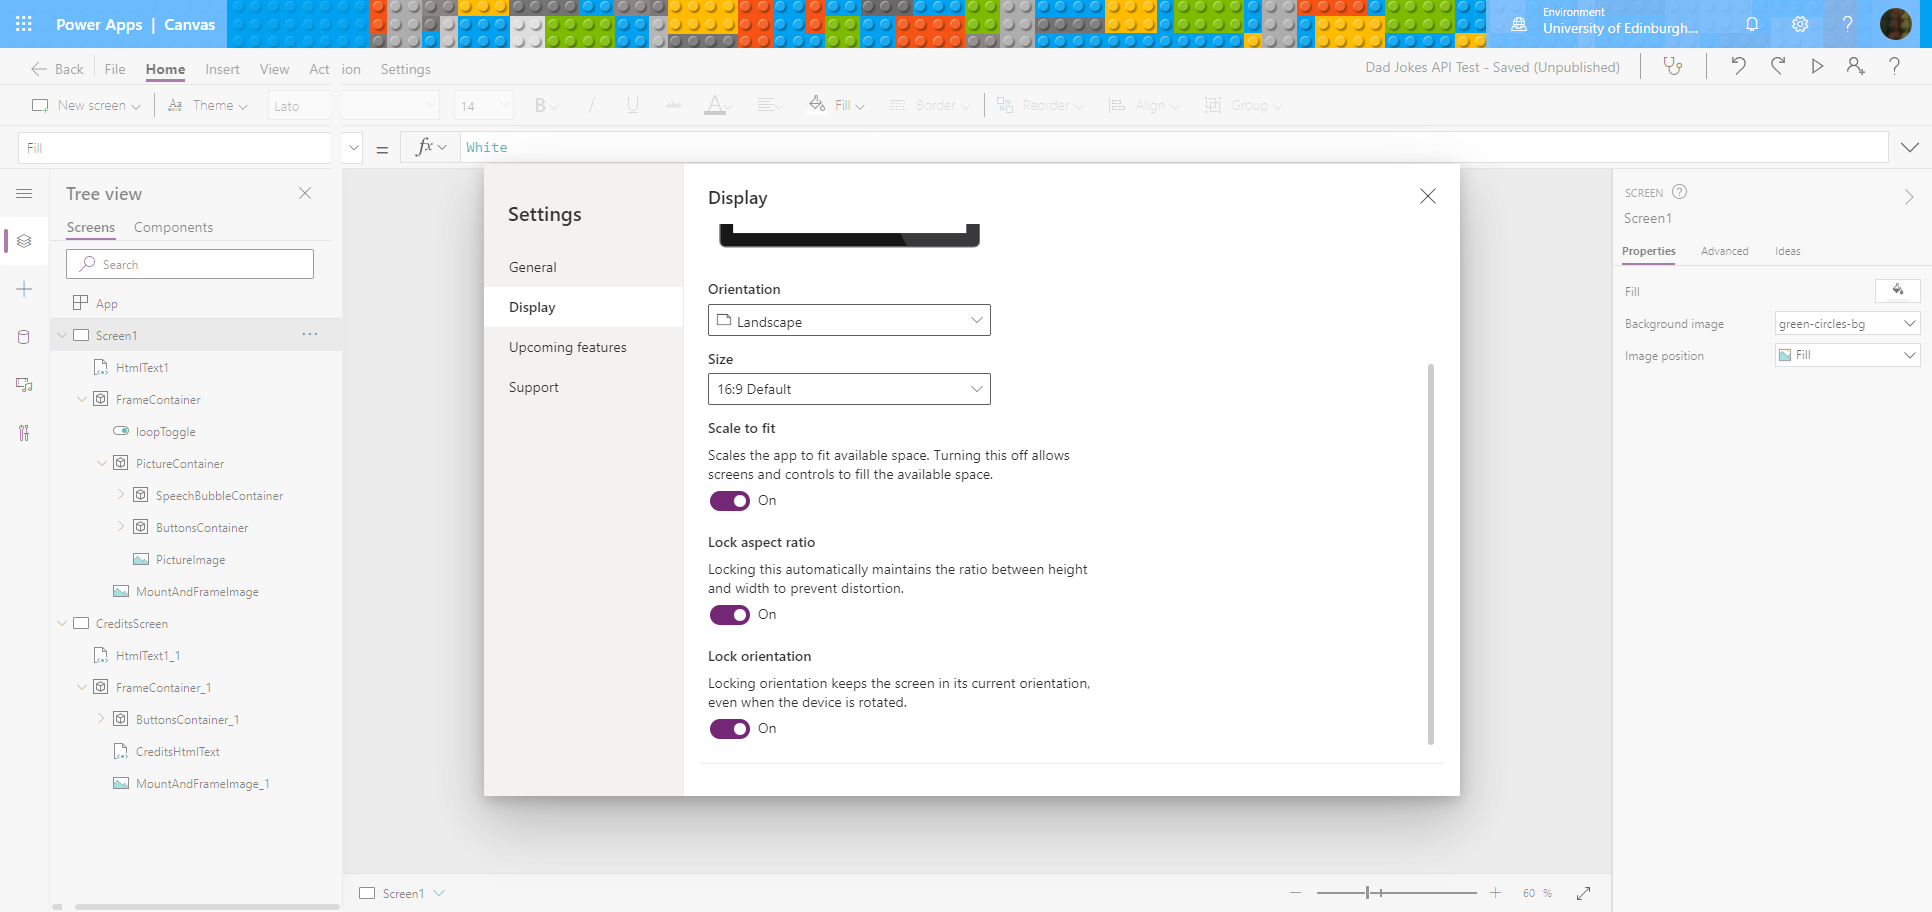
The three settings that can easily be changed are:
- Scale to fit
- Lock aspect ratio
- Lock Orientation
Scale to Fit
Scale to fit is described as,
Scales the app to fit available space. Turning this off allows screens and controls to fill the available space.
As a default, Scale to fit was turned on, so I tried turning it off.
One annoying feature I found with this was a bug preventing display settings from resetting. If you turn off Scale to fit it also turns Lock aspect ratio off and disables that option:

Turning off Scale to Fit has automatically turned Lock Aspect Ratio off
The issue was that when I turned Scale to fit back on, it looked as if Lock aspect ratio was also back on, but it wasn’t. I had to try turning it off and back on by itself, then saving and publishing the app again to get the setting back to the way it was.
The other issue with Scale to fit was the way it affected the layout on the phone. On both sizes of computer monitor, it filled the window very nicely in both browser preview and a Teams tab:
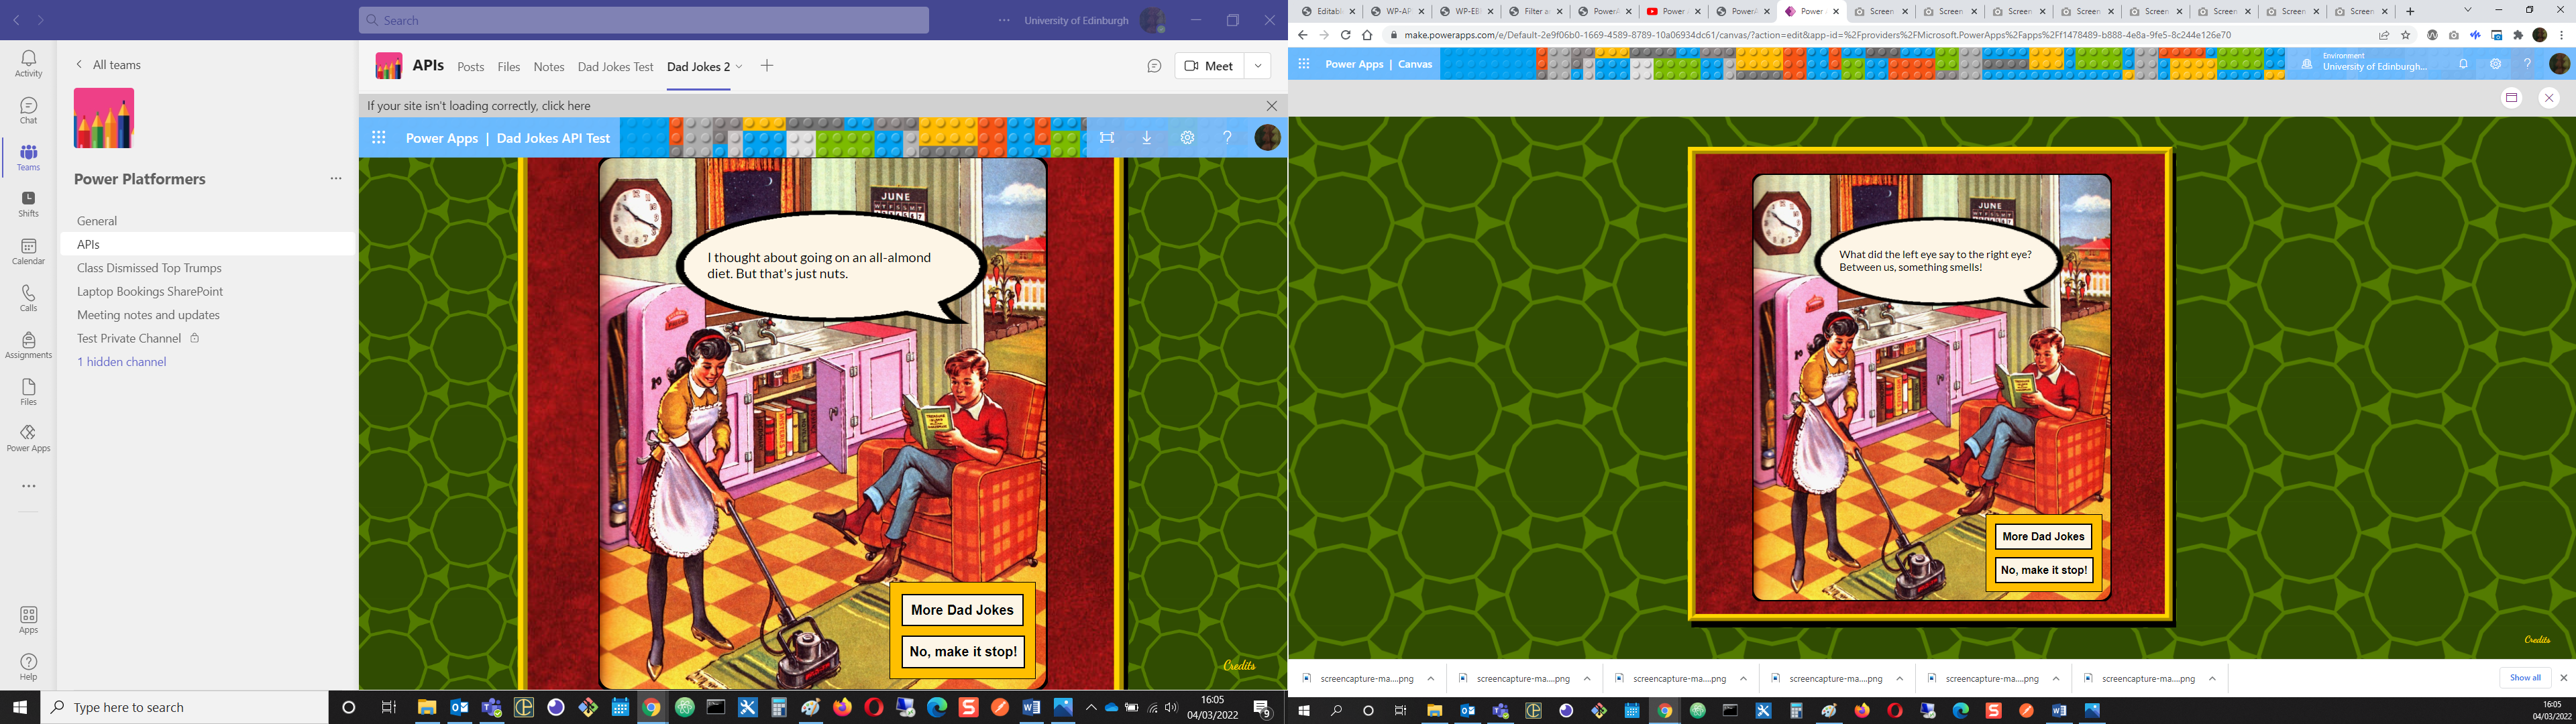
 |
Turning off Scale to fit was an improvement for displaying the app on the computer screen.
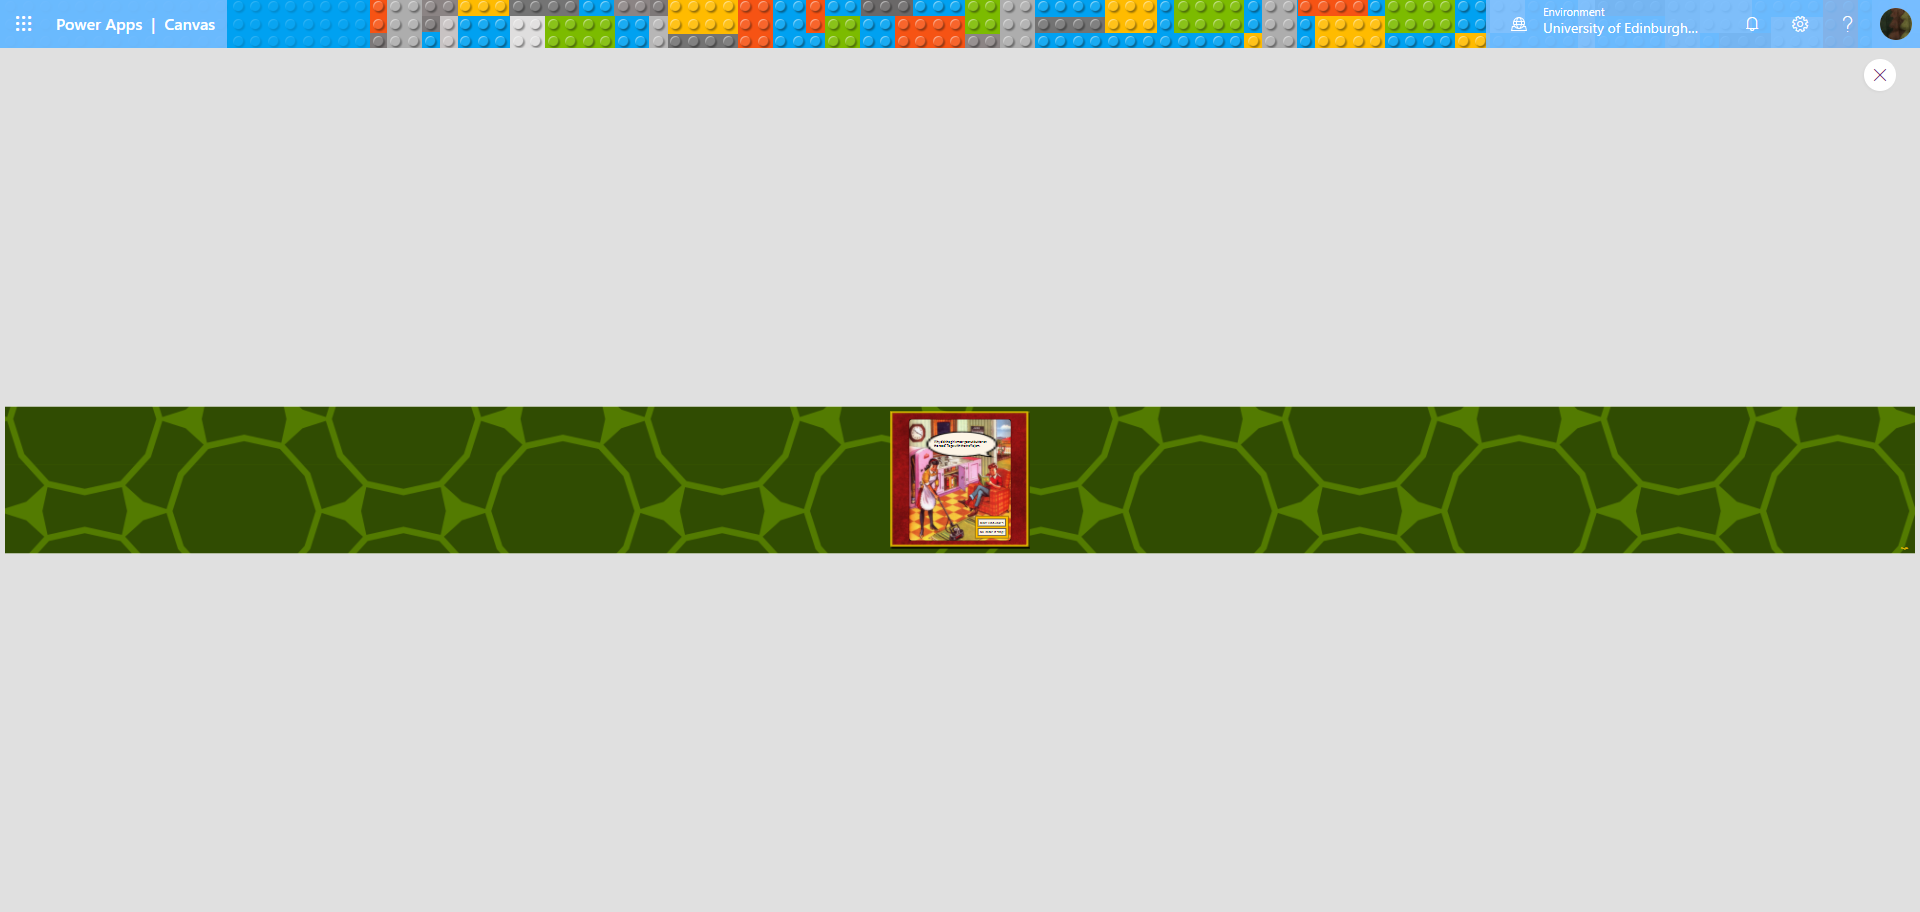
Unfortunately, on the phone, it overflowed the windows unusably in every type of display. At least the text is there, but the buttons are off the screen! |
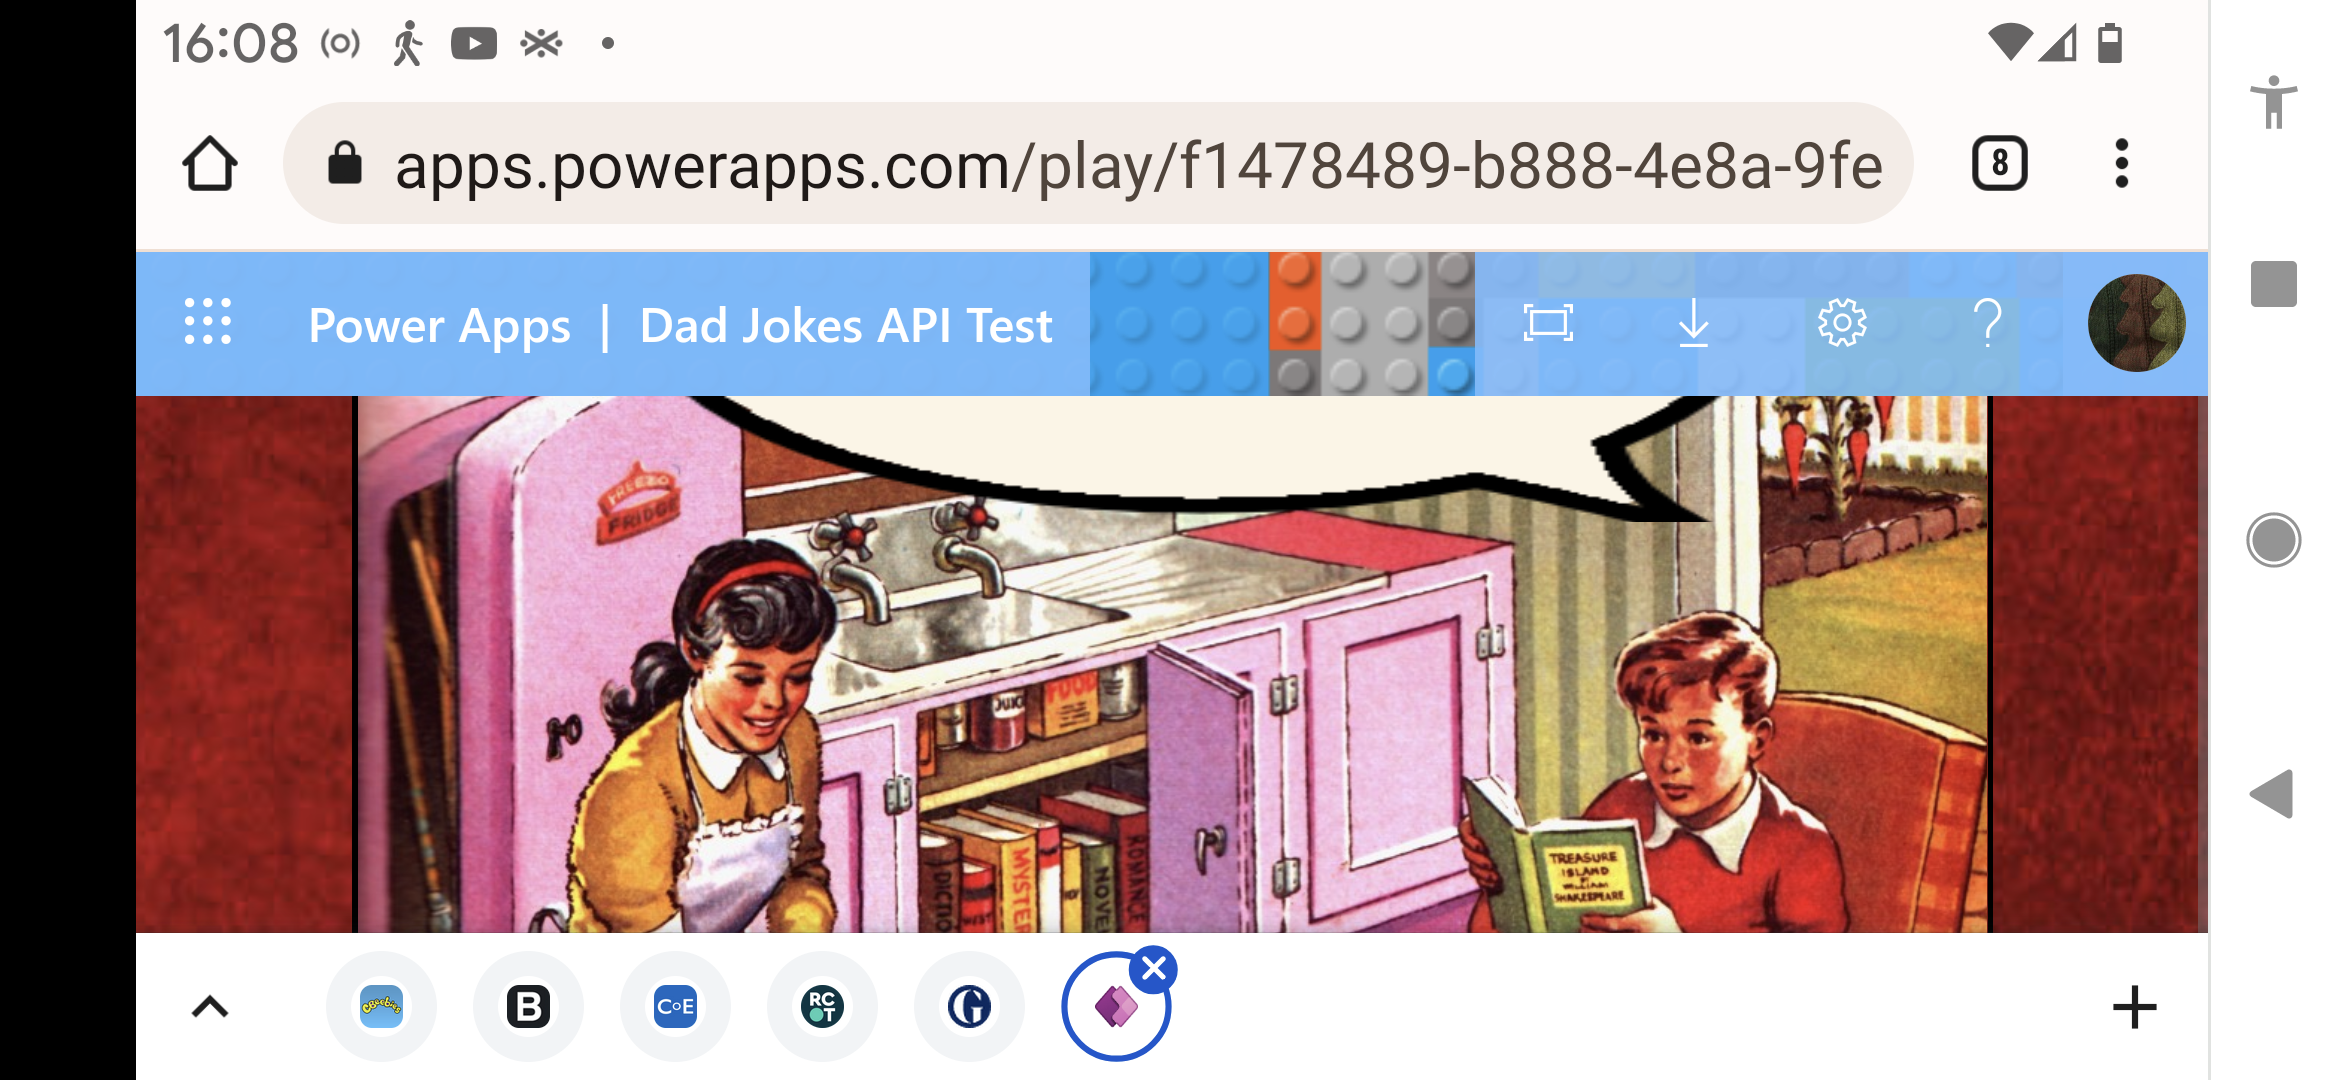
Landscape orientation is even worse: everything except the people’s faces is off screen
Even the Power Apps app display isn’t much better with Scale to fit turned off.
So Scale to Fit had to be on.
Lock Aspect Ratio
Locking this automatically maintains the ratio between height and width to prevent distortion.
|
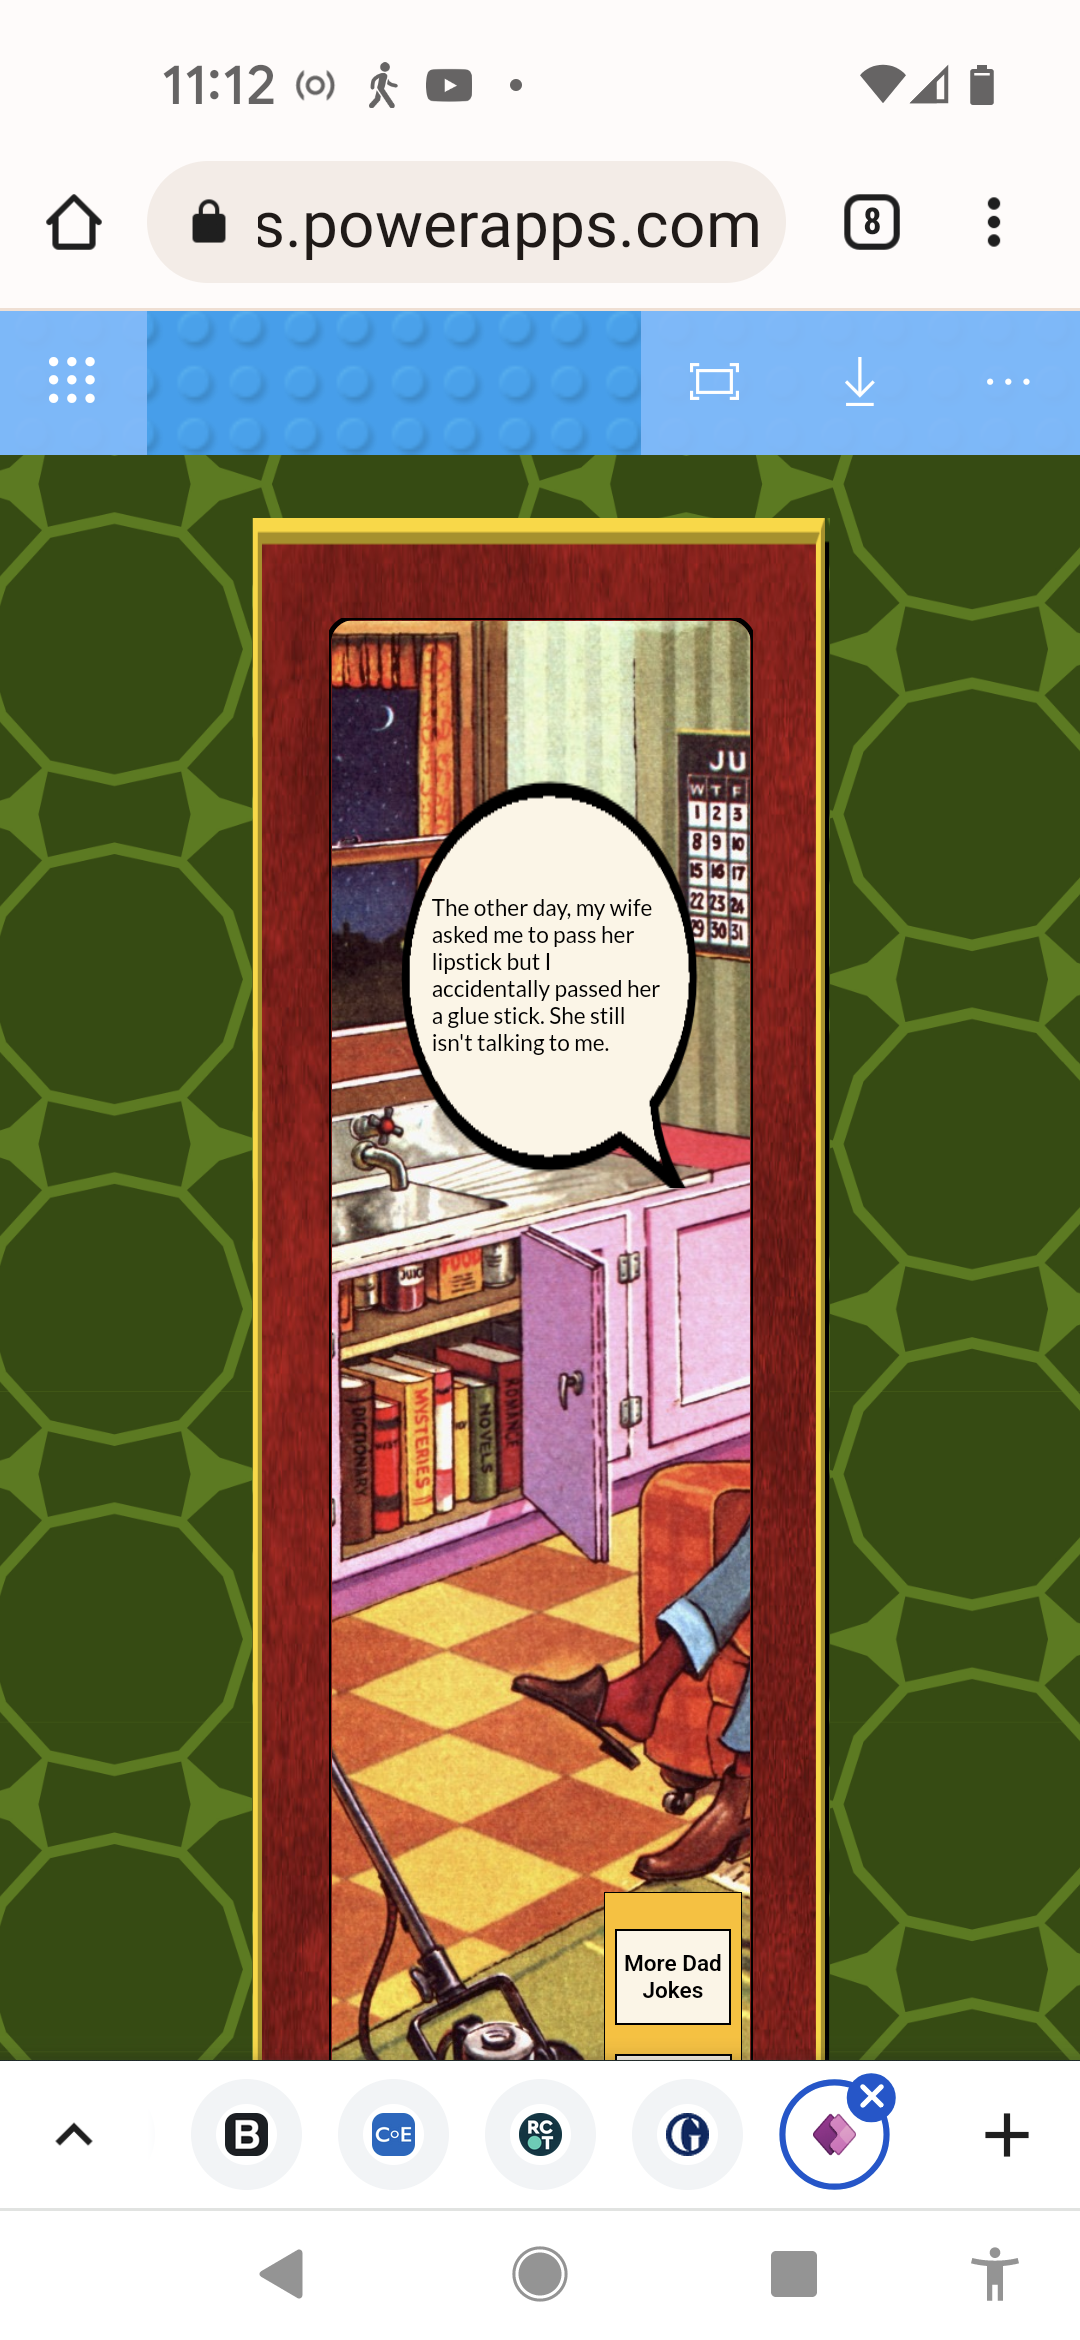
Turning off Lock Aspect Ratio meant the app loaded fine in everything except the phone browser, where it looked like this:
So Lock Aspect Ratio had to be on. |
 |
Lock Orientation
Lock Orientation keeps the screen in its current orientation, even when the device is rotated.
Locking orientation made the display fill the computer screens slightly less well, but it had a very good effect in the Power apps phone app. It now starts in the best display orientation and won’t rotate:
I think this is the best result
The best combination
Having tested each setting, I think this is the best combination in this case:
- Scale to fit: On
- Lock aspect ratio: On
- Lock Orientation: On
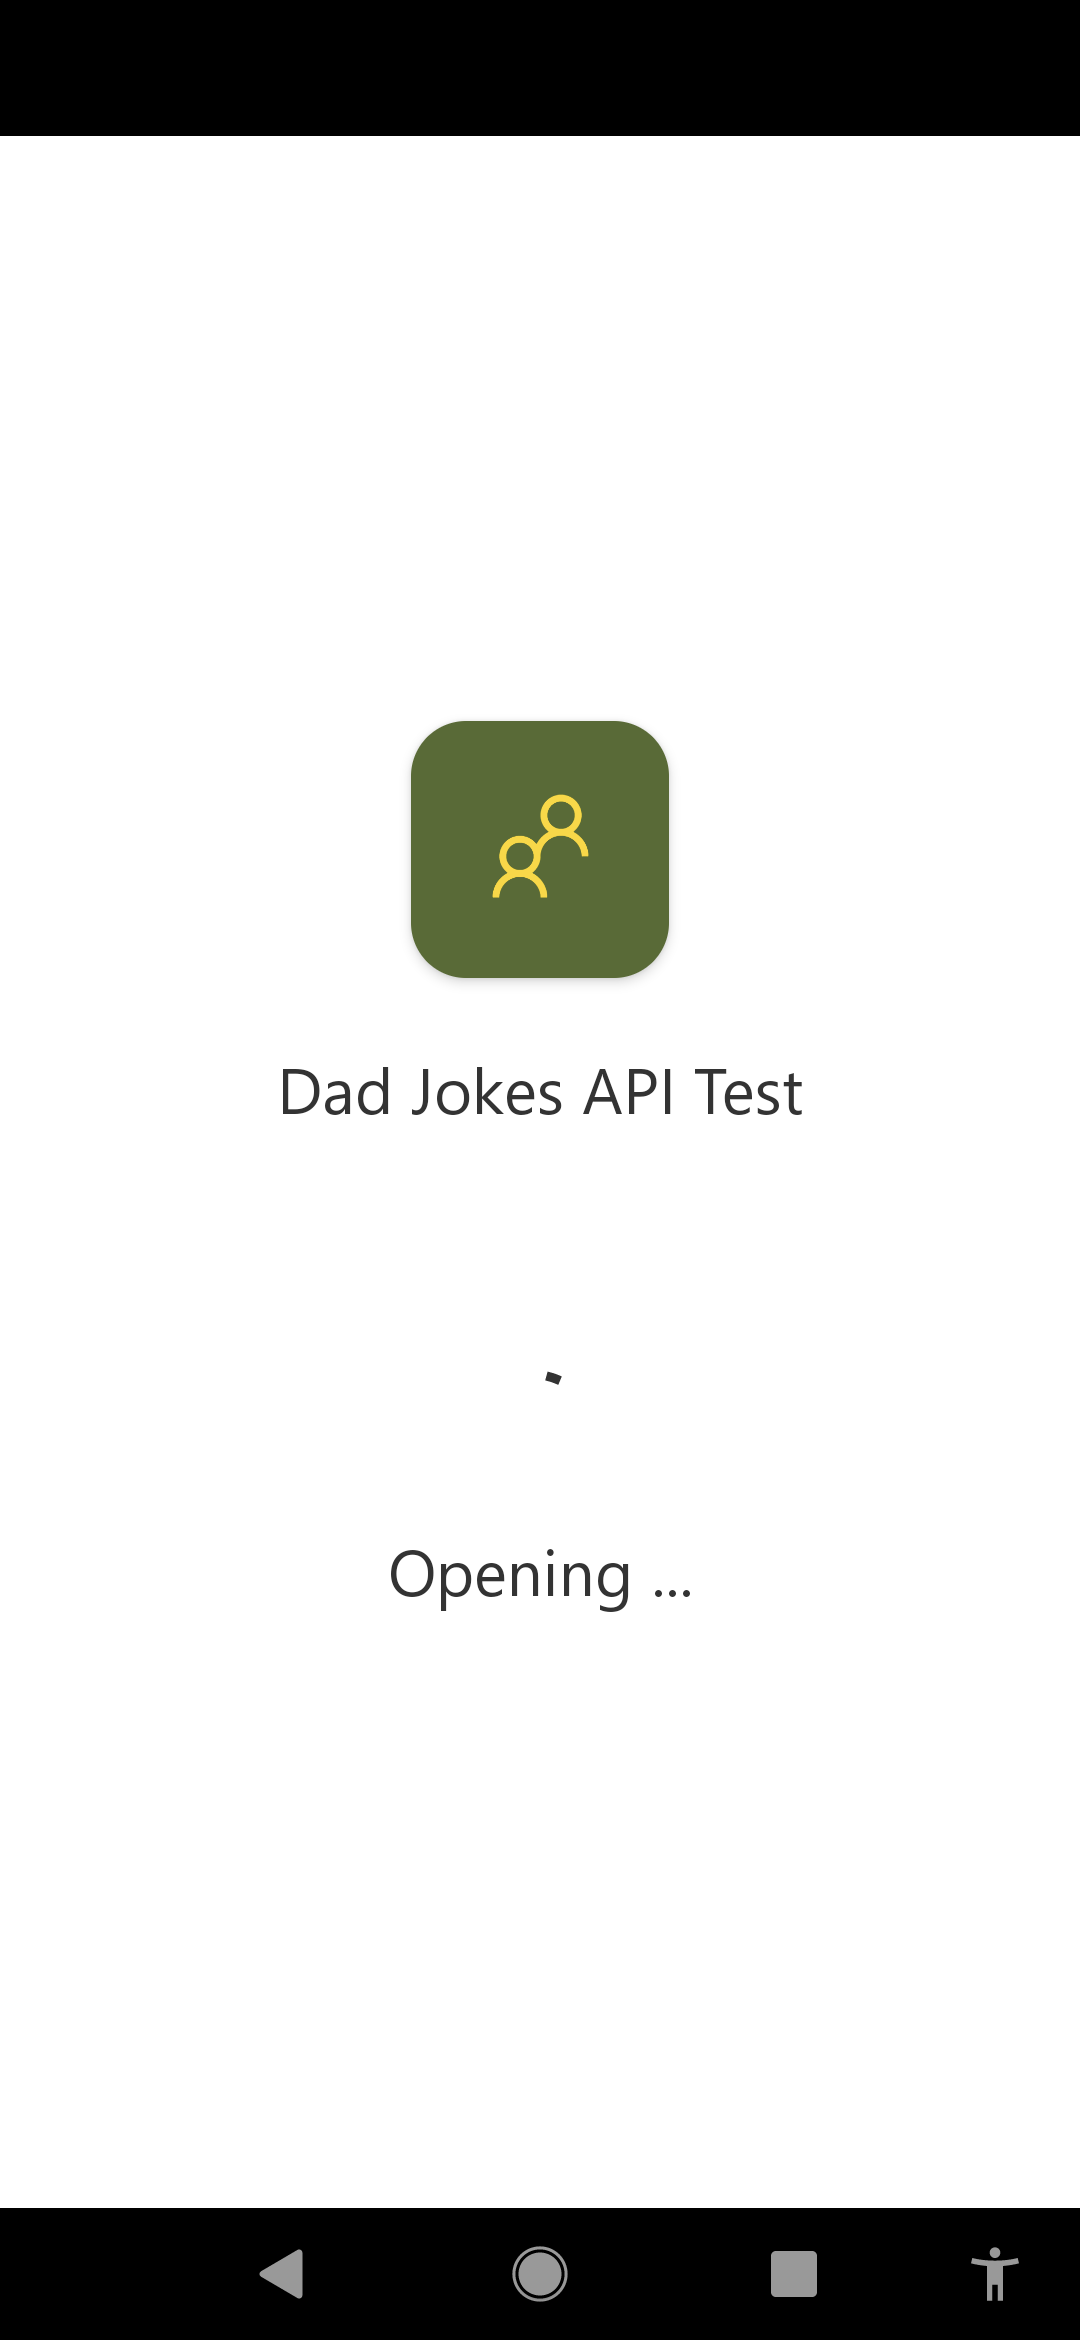
I really like how the phone app loading screen looks with my app icon as well 🙂
It worked best in this case with all of them on
Bloopers
Here’s where I share some of those hilarious outtakes that didn’t make it into the final er, app.
How about that time I was trying to get the background to fill the whole window and so I changed Screen1.Width from Max(App.Width, App.MinScreenWidth) to Max(10000, App.MinScreenWidth)!
‘…’
 |
Or the time I turned off Lock aspect ratio and changed the height and width of the picture to relative, so the window resized like this:
I would have liked to be able to set a minimum and maximum height and width… But clearly, in this case the picture sizes cannot be relative to screen size! |

How we laughed… 😁
Sharing and Publishing Power Apps
Sharing the app can be done very easily from a ‘Share’ menu option on the ribbon along the top of the app’s Details page:
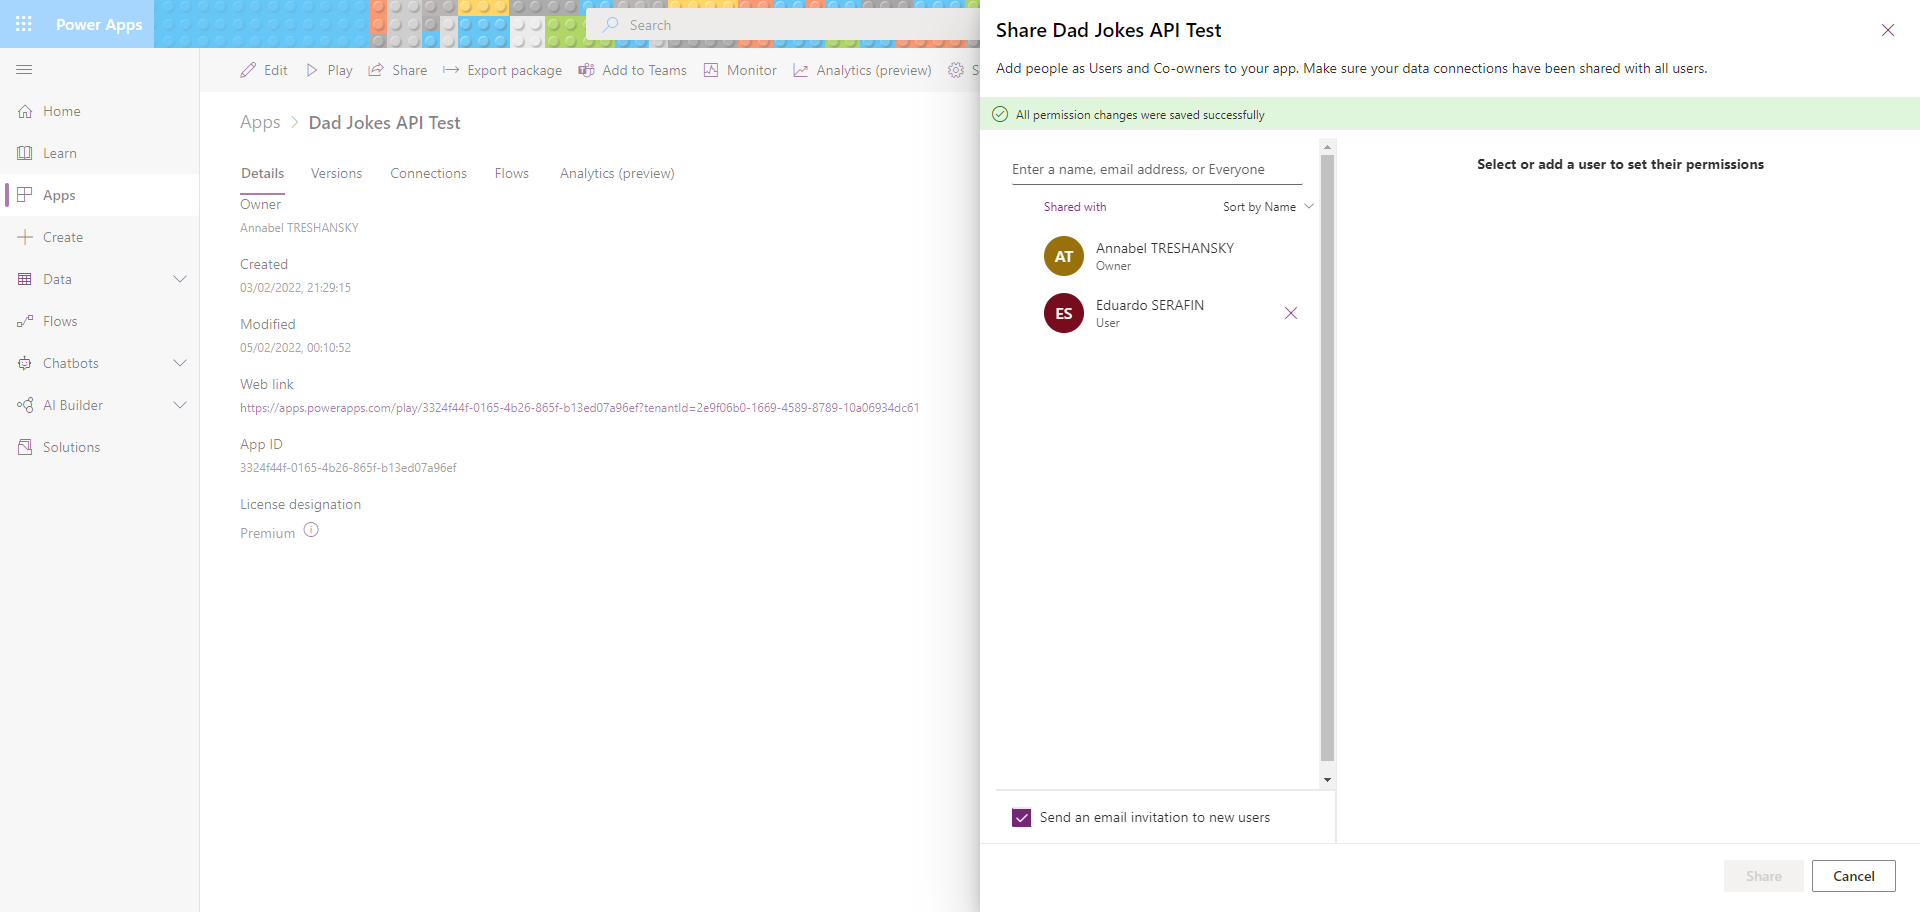
You can add people either in a User role, or as Co-owners, which means they can use, edit, and share the app but not delete it or change its owner.
According to the Microsoft documentation at ‘Share resources used by canvas apps’, the custom connector is shared implicitly when you share the app, although it also sounds as if your users might have to add or agree to have their own connections to it.
One thing I discovered during testing was that you have to publish the version of the app that you’re working on if you want to test it in the phone app, via the browser link or in Teams. The helpful side of that is that every time you save the app, it adds a new version to your version history, and if you add meaningful comments when you save, it makes it easier to change between different versions and review the changes you’ve made. Here’s a screenshot of the Version History page:
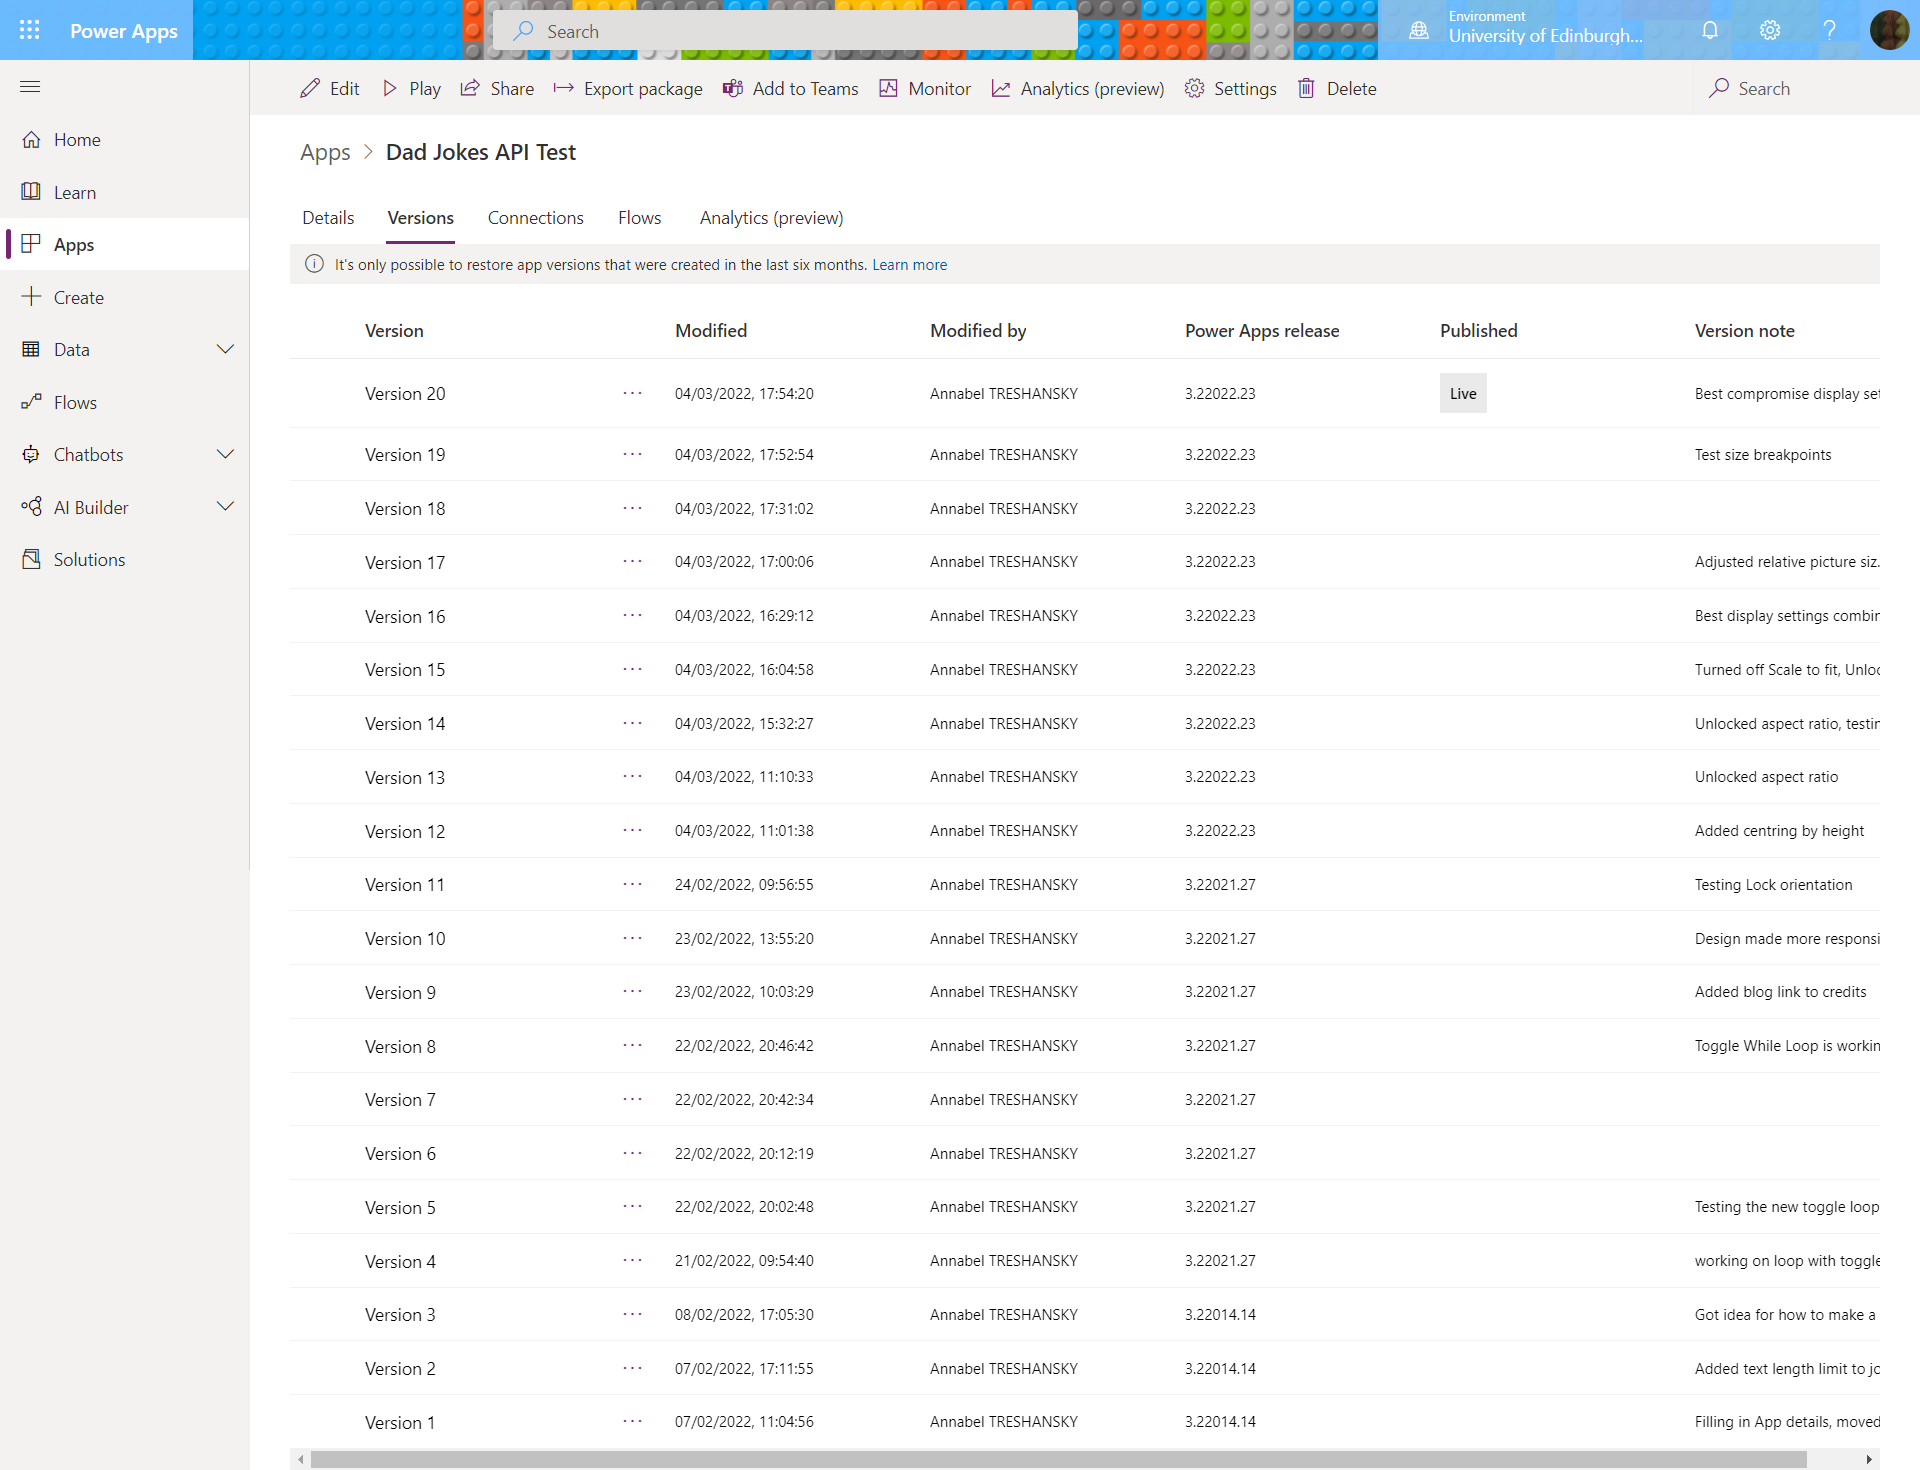
Mostly useful comments, I’m glad to see!
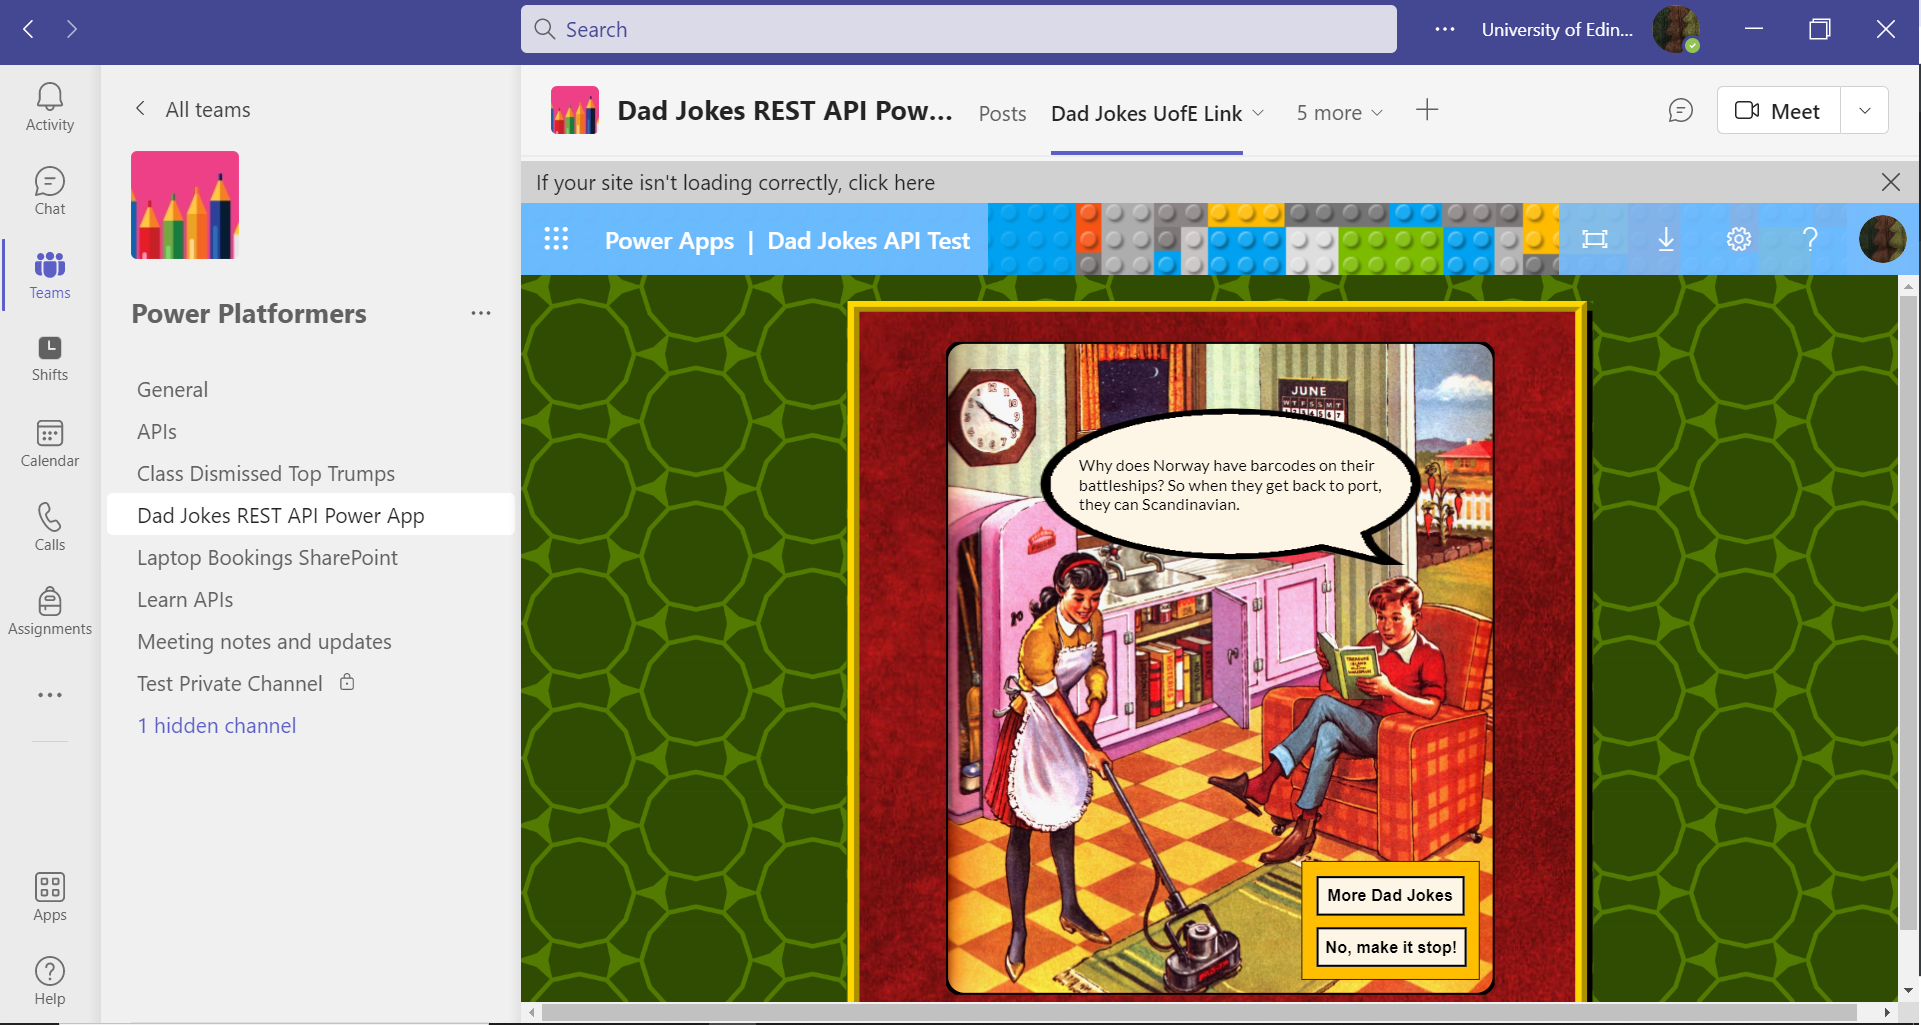
Displaying the Power App in a Teams tab
If you click on the ‘+’ sign to add a new tab in Teams, you can add a Power App using either Power Apps itself or a Website Link, which would be the direct link to the app:
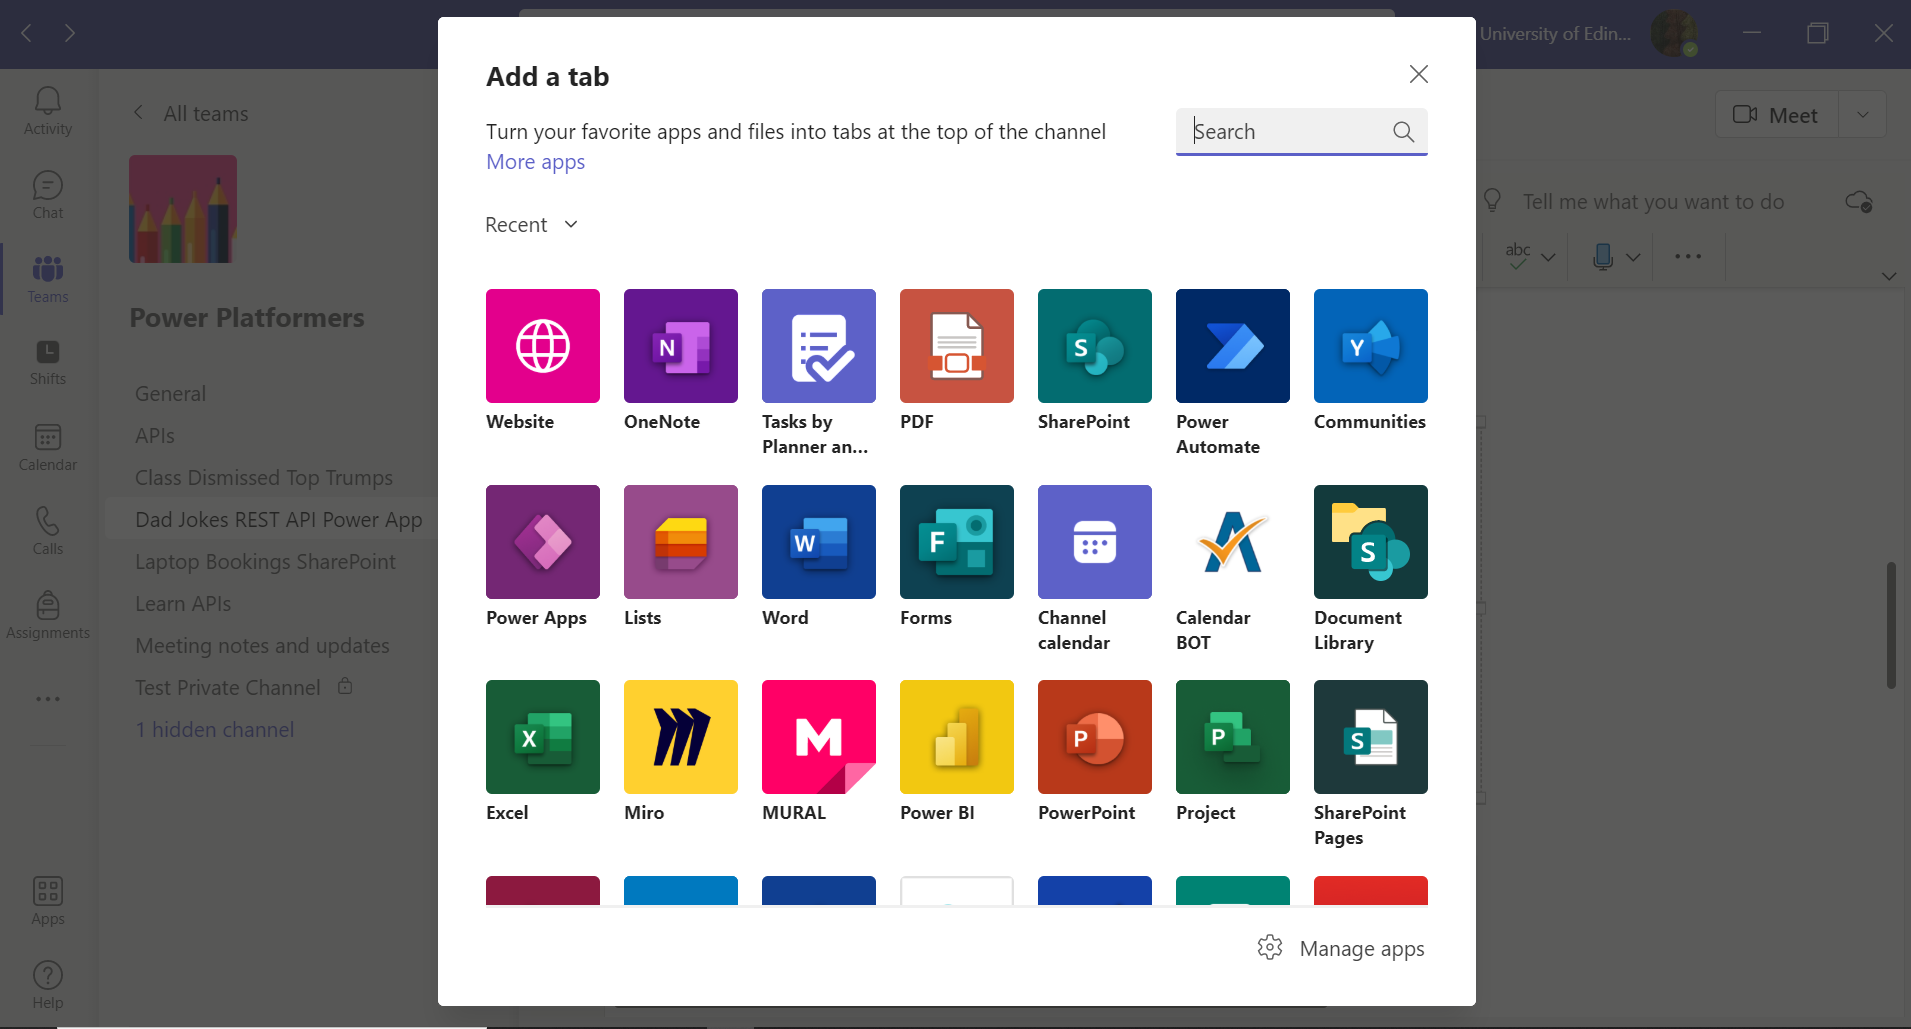
Two ways to add your Power App to Teams
If you choose Power Apps, it will offer you a list of the Power Apps you have permission to add:

Oh, the possibilities
Depending on which way you add it, it will look slightly different in the Teams tab.
Here it is, added as a website link, showing some of my Microsoft 365 window chrome:
It works, but I think it looks a bit messy
Here it is added using Power Apps, and looking much tidier:
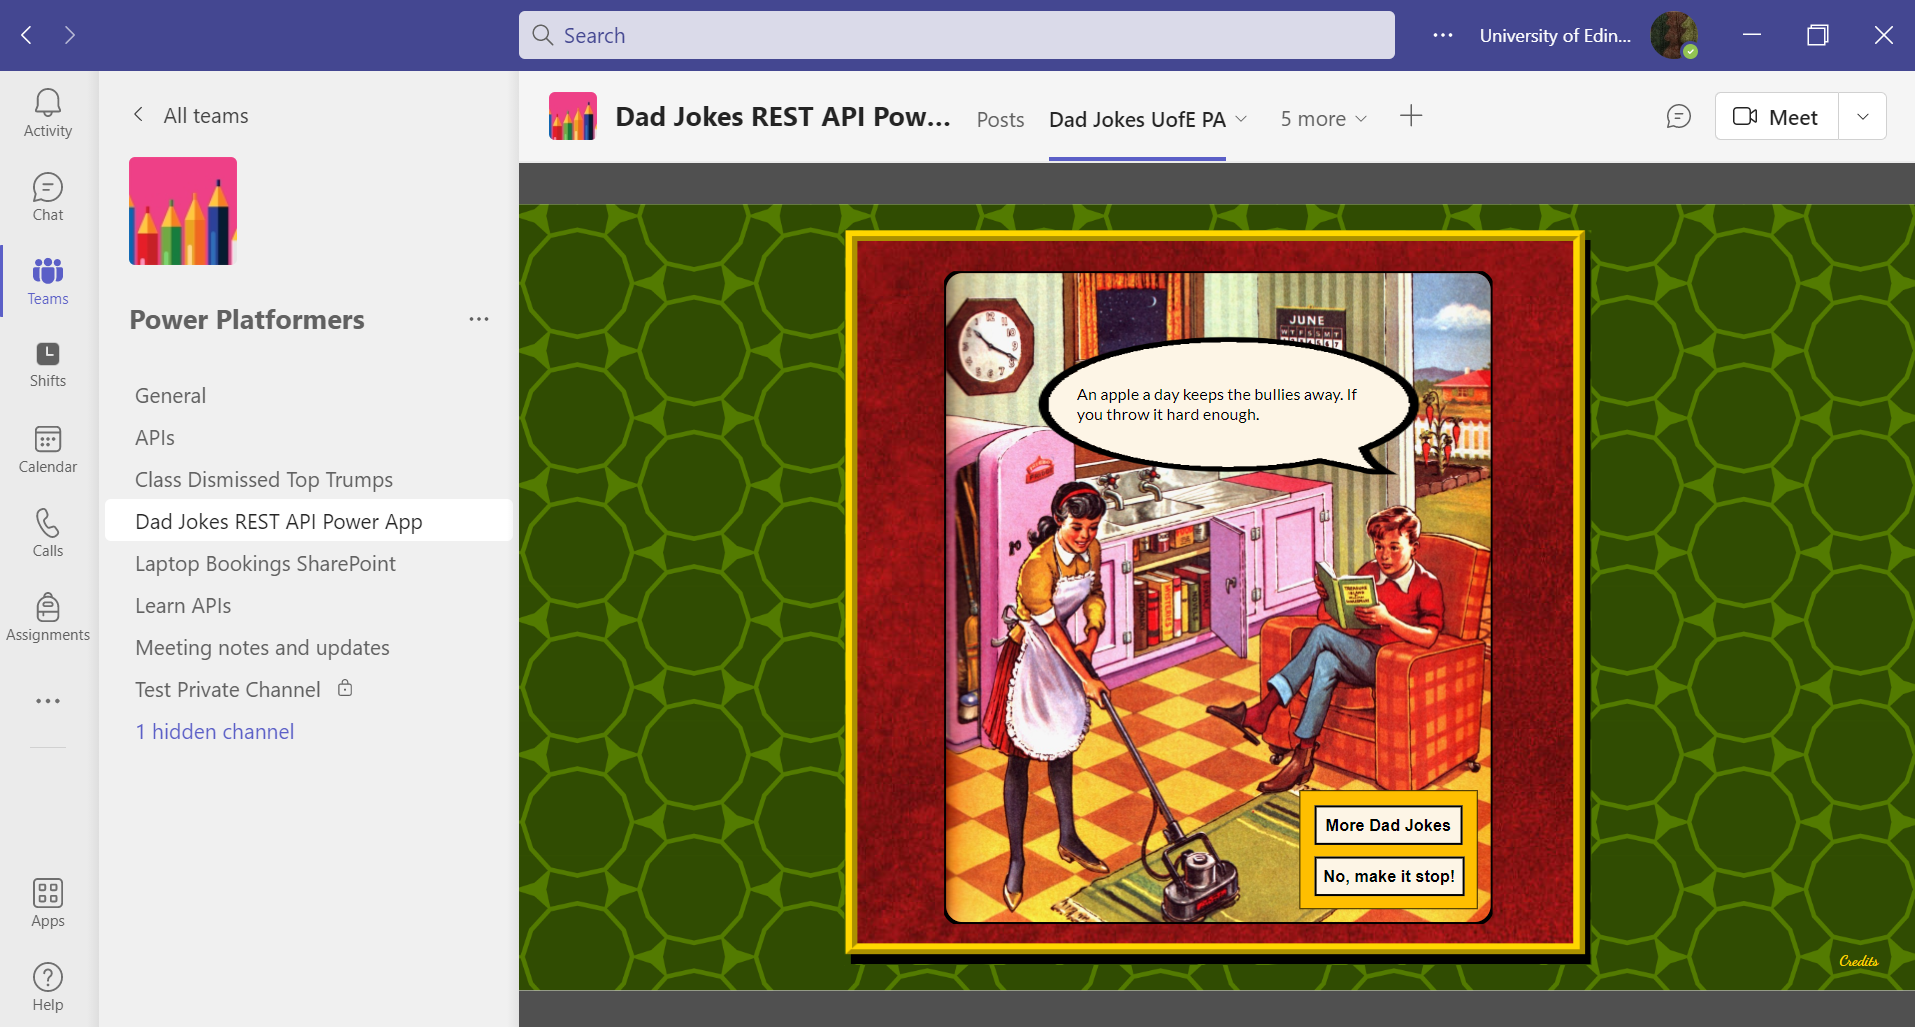
This looks much better I think
I’m pleased with my app anyway – and I’ve added it to a tab for the rest of my teams 🙂
Well, that’s finally the end of my marathon post! If you’ve made it this far, thanks for reading, and do leave me a comment with your own Power Apps or other Microsoft or development blog 🙂.
And Finally…
This post and its contents were originally published at https://blogs.ed.ac.uk/annabel-treshansky/2022/03/10/making-a-dad-jokes-app-using-rest-apis-and-power-apps-custom-connectors and may not be republished without agreement with the author.
Links
- Dad Jokes Power App link: https://apps.powerapps.com/play/f1478489-b888-4e8a-9fe5-8c244e126e70?tenantId=2e9f06b0-1669-4589-8789-10a06934dc61
- Power Apps
- Microsoft PowerApps Tutorials
- Using APIs With Microsoft Flow & PowerApps
- Dad Jokes API
- CodeClan
- Microsoft Docs: Custom connectors
- Microsoft Learn: Overview of the custom connector lifecycle
- Microsoft Docs: Custom connectors for canvas apps
- Learning Postman
- Learning Postman: Grouping requests in collections
- Create a Postman collection for a custom connector
- Microsoft Learn: Use postman for your custom connector
- Microsoft Docs: Create a custom connector from a Postman collection
- Postman: Importing and exporting data: Converting Postman collections from v1 to v2
- How to FIX: Postman Collection Format v1 is no longer supported
- Microsoft Docs: Use a custom connector from a Power Apps app
- Microsoft Learn: Work with external data in a Power Apps canvas app
- Microsoft Learn: Move data between collections and data sources by using Collect
- “What’s Wrong with this Picture?”, published in “The Reader’s Digest Young People’s Annual 1963”, Unknown Illustrator, via Twitter, Imgur, Imgur (full version) and Flickr
- US Copyright Office: Circular 15a: Duration of Copyright
- US Copyright Public Records System search for “The Reader’s Digest Young People’s Annual 1963”
- Example listing of “The Reader’s Digest Young People’s Annual 1963 First Edition Book Vintage” on eBay
- Business Advice: Our guide on fair use copyright in the UK
- US Copyright Office: More Information on Fair Use
- Free background graphics from OnlyGFX.com: 6 Dark Red Watercolor Textures (JPG)
- Dark Green Seamless Circle Pattern Background Image by stockgraphicdesigns, free Standard Licence with free trial of Adobe Stock
- Adobe Stock Standard Licence
- Shadow Hearts
- ‘Speech bubble transparent images’ by transparentpng.com, licensed under CC BY 4.0
- W3Schools – HTML Color Groups: Color Names Sorted by Color Groups
- IvyPanda: When Polonius says, “brevity is the soul of wit,” why is it ironic?
- Len function in Power Apps
- If and Switch functions in Power Apps
- Understand variables in canvas apps
- Bob Ross Lipsum
- Comment your PowerApps code!
- 10 tips I wish to know before I’ve started with PowerApps
- Gromit Placing Rail Tracks for 10 Hours
- Patch records (for, while loop)
- PowerApps – ForAll function with examples
- Definite and Indefinite Looping in PowerApps
- [PowerApps QuickTips] Creating a proper WHILE LOOP
- Canvas App – Loop Example
- How to do ForEach or Do while loops in power apps (canvas)?
- Loop in a Canvas App – Dive in from a developer into a #lowcode method
- Microsoft Learn: Understanding true and false
- Microsoft Learn: Understanding control behaviors and actions
- Microsoft Learn: Use a control to modify the property of other controls
- Microsoft Documentation: Controls and properties in canvas apps
- Microsoft Learn: Working with Data in Power Apps
- ‘Share resources used by canvas apps’
- Implicit Sharing
- Create responsive layouts in canvas apps
- Use new screen properties for responsive canvas apps
This post: © 2022, A Treshansky.


Grace
Amazing ingo!
power apps developer
Fantastic article! I love the idea of creating a Dad Jokes app using REST APIs and Power Apps custom connectors. Your explanation of the process was clear and easy to follow. I am now motivated to create my own app and share it with my friends. Thanks for sharing your knowledge and expertise in this area!