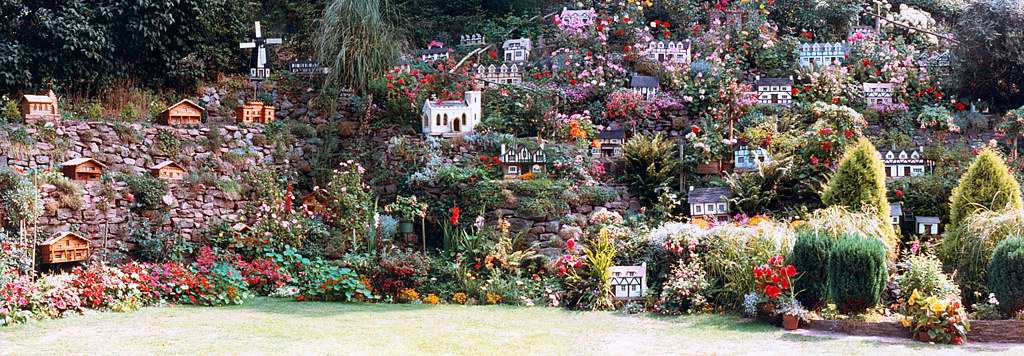
Model Village: A Participatory Art Assignment
Summary
A step-by-step guide for building a small ceramic house. The overall idea is for all houses created from this OER to become part of a wider participatory art project- but this is not an essential element of the task- you can complete it just as well without engaging with this element. However, I would encourage participants to consider this element of the task for a fuller experience.
Introduction / Context
When you think of ‘Model Villages’, you might immediately think of miniature houses. This is by no means incorrect- but the term ‘model village’ can also refer to the industrial ‘model villages’ designed by architects to house industrial workers. By making this ceramic house you are constructing your own small part of a ‘model village’ – as you craft your ceramic house, you are invited to consider individuality, progress, and uniformity. You are also invited to consider creating something fit for purpose. You are invited simply to consider creating something with (or without) purpose that will form part of something bigger than itself as you follow this toolkit.
Aside from the wider context, this toolkit aims to teach basic slab-building techniques, allowing anyone to understand the processes of making a basic ceramic structure, but it also aims to stimulate the creative imagination, and illustrate creative individuality, even within rather strict constraints. Follow the toolkit step-by-step, and hopefully you will emerge with a new clay creation, and will have experienced participating in a wider participatory art assignment!
Please do not worry too much about making your house look perfect! The main idea is simply to hopefully take the first steps towards learning a new skill, and it is factored into the toolkit that each product will probably look different. Unintentional individuality is a good thing. Try to follow the steps as closely as possible but also don’t worry too much about the outcome.
(Disclaimer: This task has various adaptations written into it to accommodate for various styles of learning. If an instructor is using this resource to facilitate the task then it is expected that the instructor will provide all the materials for the learner(s). If you are self-leading this then you will have to source the materials yourself. To improve accessibility you can also follow these steps using air-drying clay so that access to a kiln is not necessary.)
Tools
Some of these tools may not be immediately accessible to you, if you need to, please consider purchasing them from a local independent ceramics supply store. Please remember that if you are using B17C you/ whoever is facilitating the workshop must have access to a kiln in order to fire your structure.
Flexibility is of course permitted when it comes to all of these below resources. These are simply the ideal tools for the task at hand, but if you feel that they would be difficult to access then please feel free to make adjustments as you see fit.
- Kidney Tool/ Ribs
- 500g Stoneware B17C Clay, air-drying clay or plasticine.
- Clay Building Slip
- Paintbrush
- Rolling Pin
- Wooden Slats
- Ruler
- Potter’s Knife
- Needle Point Tool
- Modelling Tools
- 5×5 cm Square Card Template (This should be premade for your learner(s) if you are facilitating the task.)
Step 1 – Ram’s Head Wedging (2 mins)
Take your lump of clay and begin to press it down and through with your hands on either side of it – forming a ‘ram’s head’ shape. Do this for a couple of minutes only until the clay is soft enough to roll out into a flat slab.
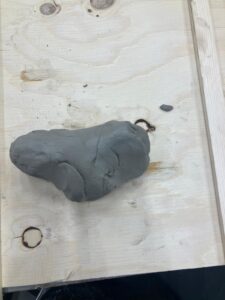
This is how your clay should look as you begin to wedge it- pushing and rolling the sides down.
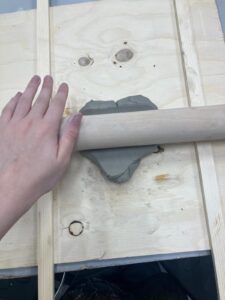
Step 2 – Rolling (1 min)
Simply use your rolling pin to roll the clay out into a flat slab, about a centimetre thick ideally. If you are using slats (the flat wooden sticks) then roll the clay to about the thickness of your slats. Otherwise use a ruler to check, but precision is not key- so don’t worry too much about this- just aim to make it as consistent as you can!
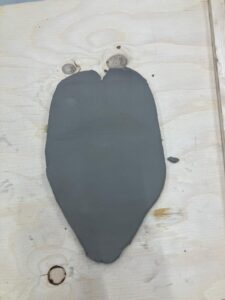
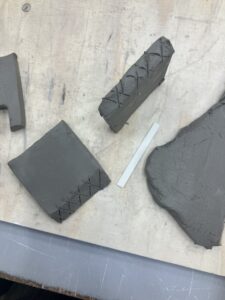
Step 3 – Cutting (5 min)
Use the templates provided/ that you have premade to guide you to cut out five 5cm x 5cm squares using a potter’s knife (or other suitable knife).
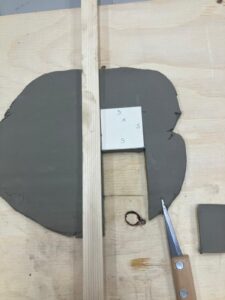
Use a ruler or a wooden slat to guide your cutting. Cut in a straight line according to the template and cut squares guided by the template.
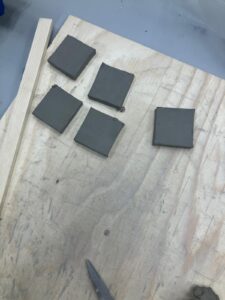
This is roughly how your squares should look once you have finished cutting them. You should have five.
Step 4 – Building (1) (-1 min)
Cut a doorway out from the piece you have designated to be your front facing piece.

Use a ruler to guide you as you cut a small rectangle out of your front piece.
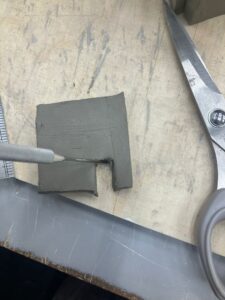
You can use a needle point to neaten up your shape if you feel so inclined.
Step 5 – Building (2) (2 min)
Cut downwards in a 45 degree angle on the side on the side of two pieces you wish to join, crosshatch with the knife on the side you have just cut, then apply some clay slip to both sides using the paintbrush.
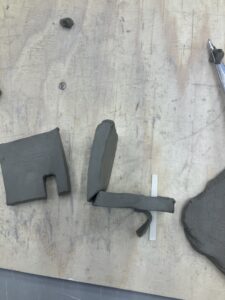
Cut a diagonal line downwards as you see in the top piece. Check that the two pieces will join together nicely.
Crosshatch your sides like so using your knife.

Apply slip to your crosshatched sides using a paintbrush like so.
Step 6 – Building (3) (1 min)
Press the two sides together. Don’t be afraid to squeeze them together roughly. You can use a kidney tool to neaten up edges if you feel it necessary. If you feel the join is not secure, you can create a small sausage-like piece of clay that you stick into the inner corner and blend using a modelling tool.
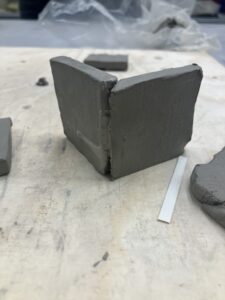
This might be how your join will look before you neaten it and press the sides together more firmly.
Step 7 – Building (4)
Repeat the steps above for the other two sides so that you have four walls for your house.
Step 8 – Building (5)
Attach the roof on top with slip in much the same way that you did with the walls. You might have to reshape the form a little bit to accommodate for extra clay. Don’t be afraid to simply do this with your hands! The form of your finished house can be rough.
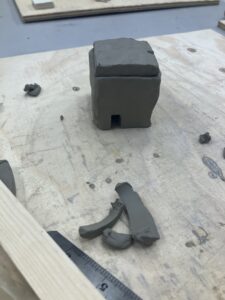
Use slip to roughly fix the roof piece to the rest of the structure.
Mould your clay structure until it is somewhat smooth like this. Use a kidney to smooth out edges and to remove clay from the top.
Step 9 – Building (6)
Remove excess clay from the top of the form using your potter’s knife, then smooth out the top using your kidney tool.
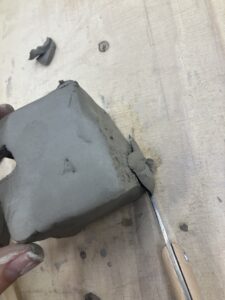
Use a knife to remove excess clay from the top of your structure.
This might be how your house might look after moulding and smoothing out the edges.
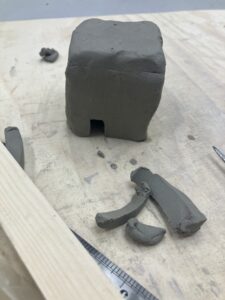
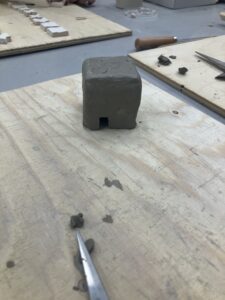
Step 10 – Finish
You should now have a finished house structure! If you have used stoneware clay it is now ready to be glazed (if you wish) and fired in a kiln. If you have used airdrying clay – please leave it to dry out.
An example of how your finished product might look!
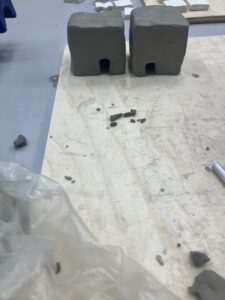
If you give consent for your work to be used in the wider participatory artwork- please leave your ceramic house after you have built it so that it can be taken away and fired.
If you are completing this OER remotely (I.E. away from the original context in which it was created) or you wish to hold on to your work, please consider emailing a photo of your house to the following email address: ceramichouses45@gmail.com.
I also welcome feedback on the process. If you wish to accompany your photograph with some feedback on the experience of the toolkit, then please feel free to write some.
The Instagram site @modelvillage25 will be posting the results of this participatory project if you wish to follow the results.
Further Resources:
If you are interested in engaging further with the concept of the industrial model village, there are some resources below that have been helpful in informing my creative research.
Additionally, this OER aims to engage ‘metacognitively’ with its status as an open resource, in that the purpose of the resource is not simply to teach the skill, but to open up a wider paragogical learning experience in which all participants are contributing horizontally to an art assignment. If you are interested in learning more about paragogy or participatory art assignments I have also included some resources related to this.
DISCLAIMER: please do not share or repurpose these resources, they are simply there to inform you further if you so wish.
A Poetic Community: Colonel David Humphreys’ Model Industrial Village.: EBSCOhost
Modernity, Tradition and the Design of the ‘Industrial Village’ of Dormanst…: EBSCOhost
Bloomsbury Collections – Paradise Lost
ProQuest Ebook Central – Reader
Re-imagining the Art School: Paragogy and Artistic Learning | SpringerLink
("Model Village" by C.K.H. is licensed under CC BY-ND 2.0.)