Enter the world of Pop Art

Reading Time: 4 minutes
Summary
Learn about the Pop Art movement and create your own pop art inspired portrait.
STEP 1 Learn about Pop Art and Andy Warhol
-
POP ART
Pop art is an art movement that emerged in the United Kingdom and the United States during the mid- to late-1950s. The movement presented a challenge to traditions of fine art by including imagery from popular and mass culture, such as advertising, comic books and mundane mass-produced objects. One of its aims is to use images of popular culture in art, emphasizing the banal or kitschy elements of any culture, most often through the use of irony.
-
Andy Warhol
Andy Warhol was an American visual artist, film director and producer. A leading figure in the pop art movement, Warhol is considered one of the most important artists of the 20th century. His works explore the relationship between artistic expression, advertising, and celebrity culture that flourished by the 1960s.
STEP 2 Prepare a photo that you want to work on
Prepare a photo of a person. The photo should be a close-up of the person with clear features. You are encouraged to use your own photo (You can shoot it now), or a photo of a person you have taken by yourself.
If you don’t want to use the mentioned photo, you can look for a photo of a person at this link: https://www.pexels.com/search/bank/
Example of a photo
STEP 3 Download the required application
Download the Hypic (Chinese name is Xingtu) app from your phone or tablet app store. It’s a great photo editing app.
You can download it at this link: https://www.retouchpics.com/?ref=openi.cn
App’s logo
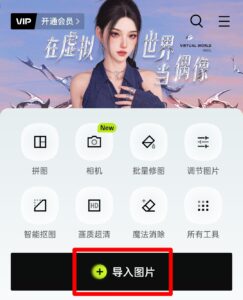
STEP 4 Import the image
Open the app, click on Import Images and select the prepared photos.
Import a image
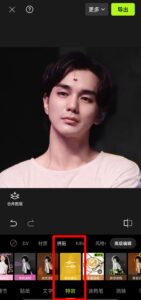
STEP 5 Click on the single color fill
Find the Single Color Fill feature in Effects – Collage at the bottom of the screen and click on it.
Single Color Fill
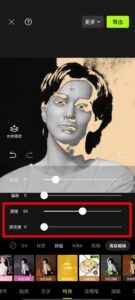
STEP 6 Adjustment of fixed values
Click Single Color Fill and the Value Adjustment page appears. Fix the third row of filter to 50 and fix the fourth row of transparency to 0.
Adjustment of fixed values
STEP 7 Adjustment of quantitative values
Adjust the number in the first row. There is no standard value, just find the effect that works for your photo. Please note that this value needs to be fixed in the following steps.
STEP 8 Adjustment of the offset value
Adjust the offset in the second row. Different values will give different color effects. After you get a satisfactory color effect, click on the upper right corner to save the image.
Import the original image again and repeat steps 4-8. Repeat 8-9 times until you get 8-9 images of different colors. Note that only the offset value needs to be changed.
Your artwork doesn’t have to be the same color as the example.
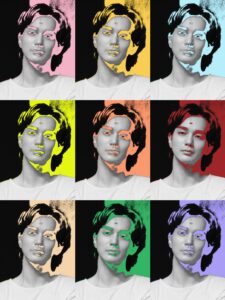
STEP 9 Putting pictures together
Use any image editing application to combine 8-9 images of different colors to form the final artwork.
yooseungho
STEP 10 Share your artwork
Congratulations!
You have completed an artwork in the style of Pop Art.
Feel free to share it with your friends or post it on social media♥
-
welcome to upload your creative artwork to the link below:
https://1drv.ms/f/s!Amrl9uFNLcl0hhRa6w4lLnpuM8kb?e=GOLBFs
-
If you’d like, you can also leave your thoughts in the comments section below this page.
-
If you have any suggestions for this page, please contact me by e-mail.
E-mail: xujinghan1013@163.com
Enter the world of Pop Art © 2 by J is licensed under CC BY 4.0 ![]()
![]()