I have described in the past how I received gravity meter D-154 back from a service and convinced myself that it was working. It has been used on a number of field trips since that time, and has not, until recently, shown any sign of giving the wrong answers. However, until 2021, on all of these trips the area surveyed was small and the changes in gravity were mostly within the range of the electrostatic measurement subsystem. Little or no turning of either of the two calibrated micrometer screws was needed. In September 2021 we were in Shropshire (staying at the splendid Coalbrookdale YHA). An unusual trip it was, too, we had only our own students and had to teach several methods usually covered by our French and German colleagues (see here and here). Rather casually, we tried to tie our very small gravity survey into the Britain-wide BGS dataset. Our other instruments agreed that the gravity difference between the field site and a point on the BGS network was 26.42 ± 0.05 mGal, but D-154 said it was 24.92 mGal. These gravity differences are far too large for the electrostatic measurement system; the fine dial of D-154 was turned 392 turns. The disagreement was large enough for me for me to question whether the calibration tables I had for D-154 were correct. (I have worked in old-fashioned mGals here instead of the more modern gravity unit (GU) — 1 mGal = 10-5 ms-2 and 1 GU = 10-6 ms-2. This is partly because the calibration tables are given in mGal.) In delving into this problem I opened a right old can of worms.
I checked the coarse dial first. We never use the coarse dial to take measurements, but we do use it to bring the instrument into the correct range when it is moved to a new site, as we do for the other instruments. To do this, some unfortunate person, often me, has to sit and turn the dial many hundreds of turns by hand. For several of the places we have been to on the trip I have noted down the new reading in the instrument maintenance log. I went back through the log and calculated the gravity difference between Edinburgh and other places using all three instruments. I chose G-275 to believe and plotted the other two against it. D-145 gave a nice straight line of slope 1, but D-154 gave an entirely different slope.
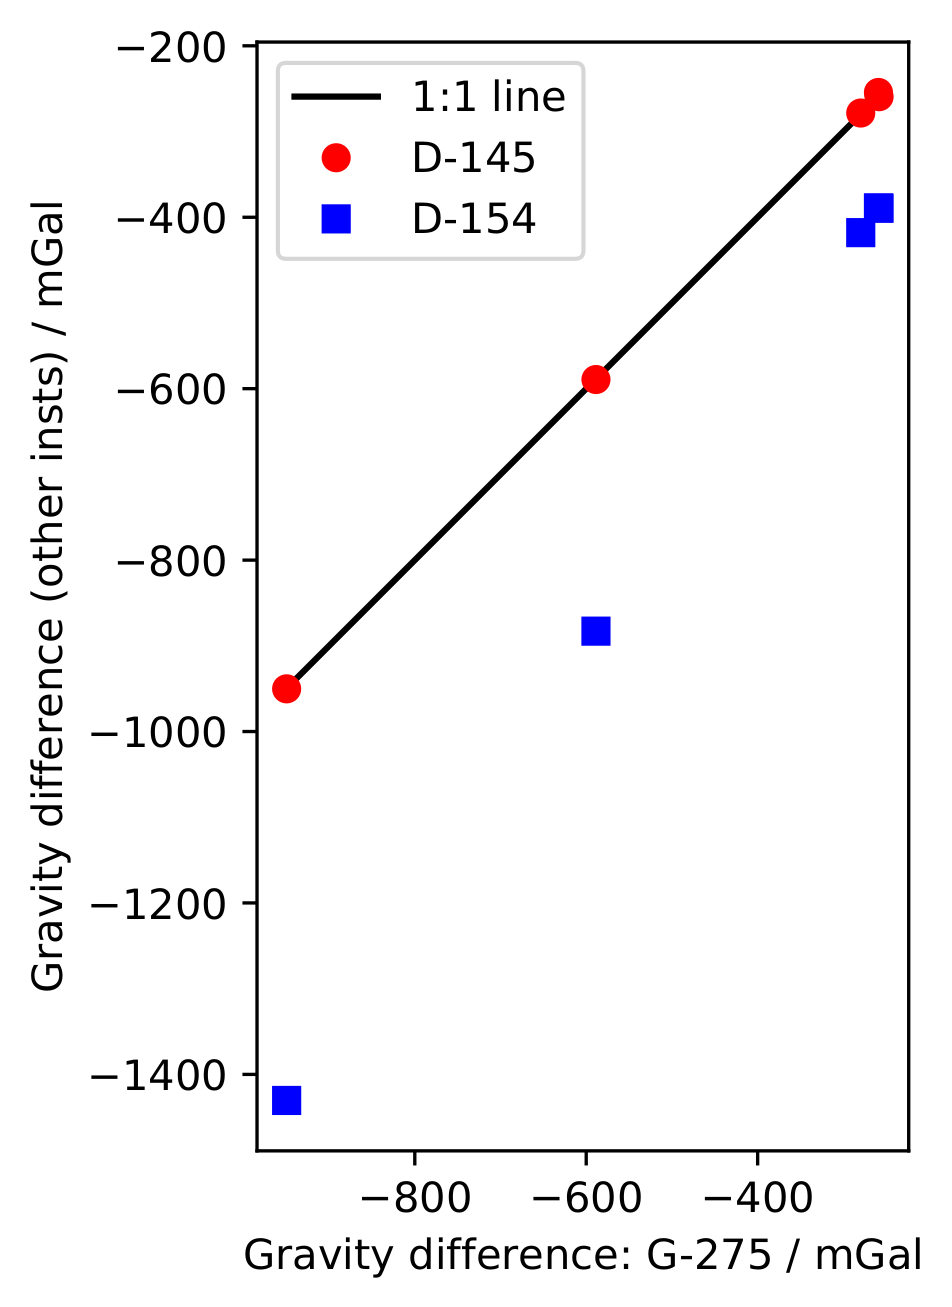
The calibration value for D-154 calculated from these measurements, and assuming that the other instruments are correct is 0.745 ± 0.003 mGal/turn, a very long way from the 1.1223 ± 0.0005 mGal/turn in the supplied calibration table. The difference is startling, but largely academic because we never use the coarse dial to make measurements.
For the fine dial I didn’t have data lying around that I could use. Instead, I took D-154 and G-275 for a drive up into the Lammermuir hills during the Christmas holidays.
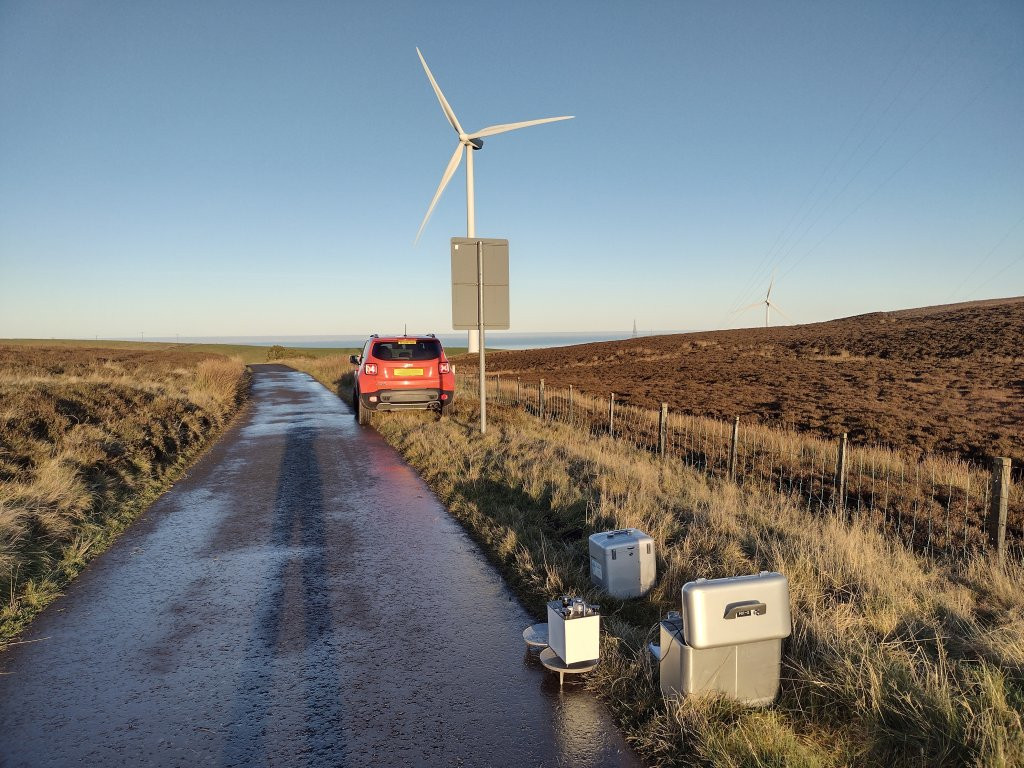
Because the measured gravity decreases with height, this allowed me to get a fairly large range of gravity measurements in a fairly short drive. In addition, All of the stations except one (that was in my house) were points on the BGS dataset, so I was not relying on G-275: I had a second opinion. I initially plotted the data as I had for the coarse dial: you had to squint hard to see that there was anything wrong. I therefore subtracted off the results from G-275; the results look like this:
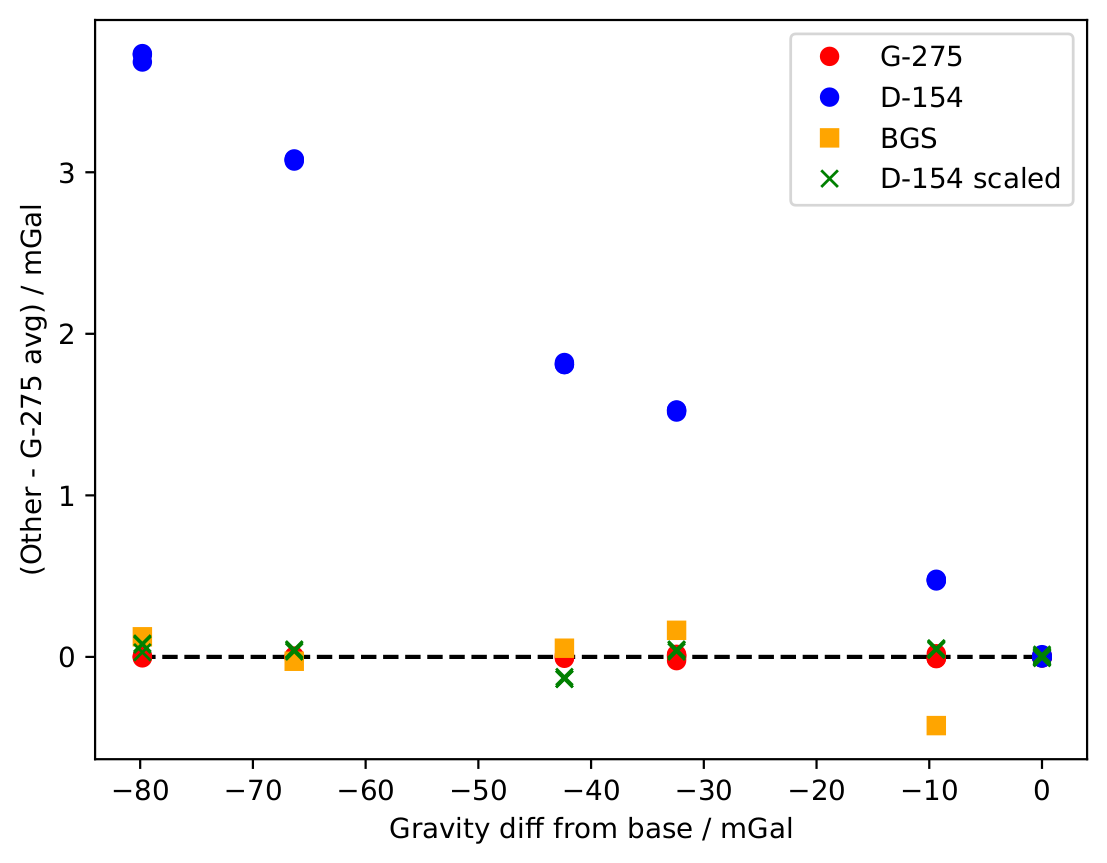
It appears that the fine dial calibration is not correct (blue dots) but it becomes reasonable if multiplied by 1.048. This in turn implies that the the values in the calibration table are all about 5% too small — instead of being about 0.0652 mGal/turn they should be closer to 0.0683 mGal/turn.
In an attempt to make a replacement calibration table that would be good enough for student work (and hopefully as good as the ones for the other instruments) I decided to take two gravity meters to a pair of stations with a suitable height separation and make repeated measurements at each part of the range of the fine screw. The stations I chose were on floors 2 and 7 of the James Clerk Maxwell building on the University’s Kings Buildings campus — it is a swift lift ride from one station to the other. After a couple of days of monotonous repeated measurements I had enough data to produce this plot:
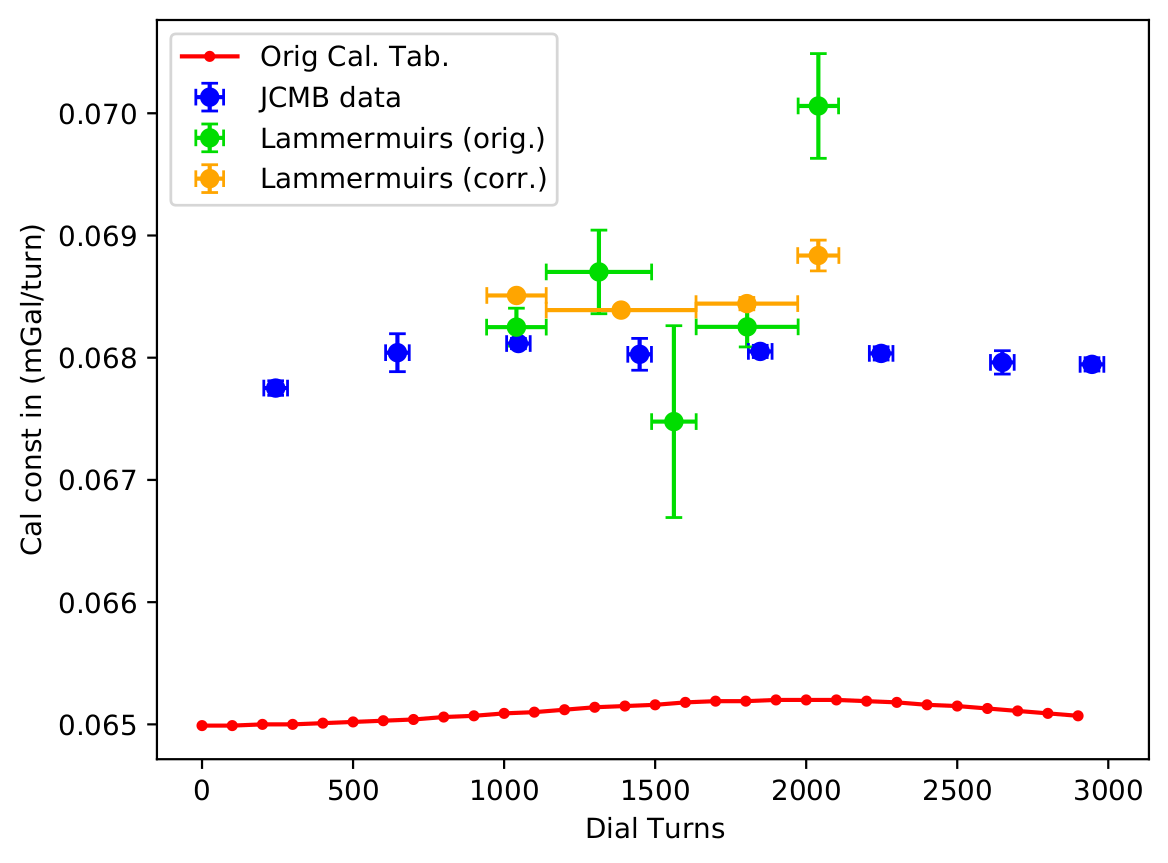
The JCMB data are a lot more reliable than the data from my day in the hills (green/orange), despite my efforts to include the electrostatic correction and throw out a clear dud point (orange). But every measurement I have made is a lot higher than the ones in the supplied calibration table (red dots).
I was not entirely satisfied that I knew what was really going on, so I went back to the Lammermuirs, where I repeated the calibration tests between two stations chosen for convenience, and then revisited my original stations. And the situation became muddier rather than clearer.
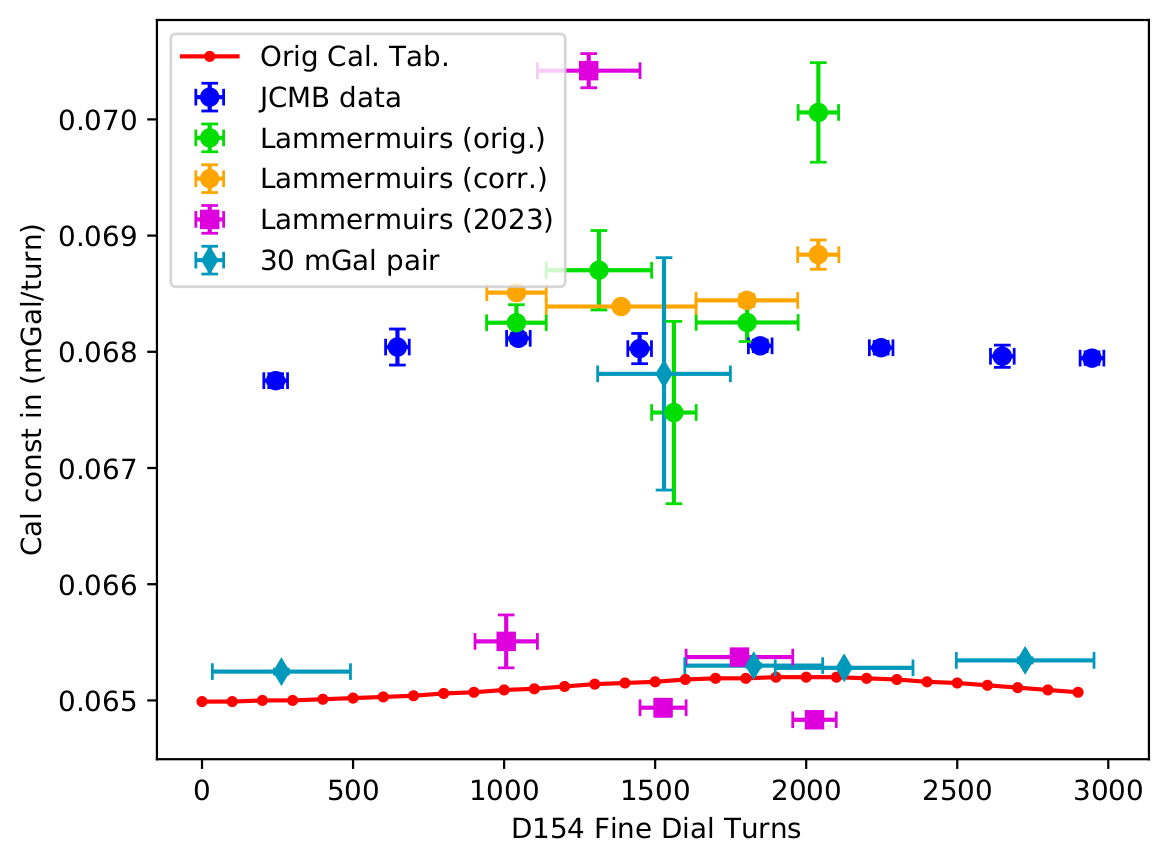
Most (but NOT all) of the extra points (Lammermuirs (2023) and 30 mGal Pair on the figure) agree with the original calibration table rather than with my earlier attempts to generate a new calibration table. This could all be operator error, of course, but it could also be some sort of erratic behaviour on the part of the instrument.
I was puzzled for a long time as to why the calibration tables are wrong. The calibration has to be done when the instruments are built to remove the effects of tiny imperfections in the manufacture of the micrometer screw (which is between the dial that the operator turns and the gravity-sensing mechanism). Once done, the calibration should be stable for the life of the instrument — G-275 dates back to 1971 and is still giving the correct answers. No-one I have spoke to had an explanation: I have asked colleagues who knew the instruments before I did, and also the firm who have serviced the instrument.
For the coarse screw, I was particularly puzzled because I knew that the instrument had been used to set up a high precision network across Britain, and the short publications I was able to find on this network made no mention of an incorrect calibration table. I eventually found the answer buried in an appendix of a Ph.D thesis from the mid-1990s:
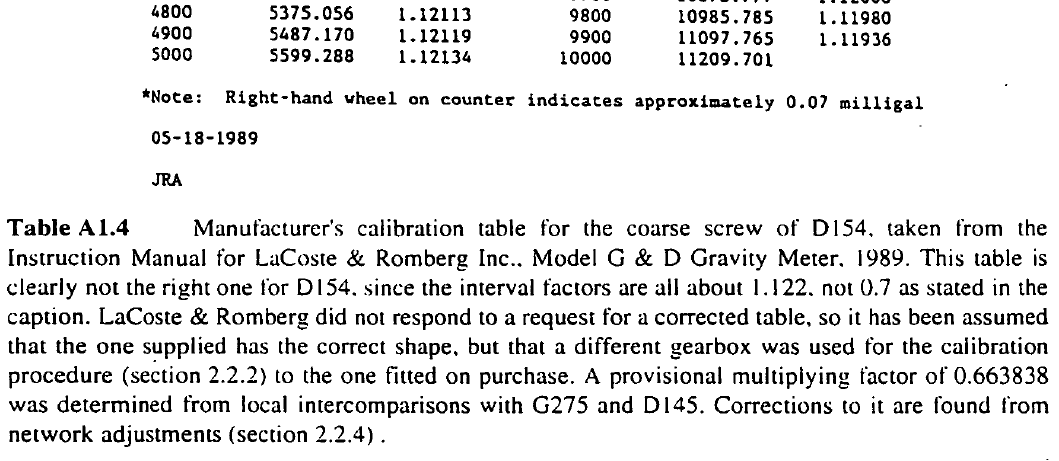
(The author of the Ph.D was called Kate Charles.) Clearly, my predecessors in using the instrument knew all about the fact that the calibration table was wrong, and had accounted for it in their own work. But the knowledge never got passed on to me, possibly because the instrument was not working when I took over its care.
The problem with the fine dial appeared initially to be an incorrect calibration table. But attempts to confirm this suggest that the instrument is not stable in some way, and that the effective calibration of the fine dial can change unpredicatably. I suspect that the problem may have to wait until the next time that the instrument is serviced.
(Post originally made in July 2022. Updated in December 2023 to reflect new information.)

