Any views expressed within media held on this service are those of the contributors, should not be taken as approved or endorsed by the University, and do not necessarily reflect the views of the University in respect of any particular issue.
Proofs are an important part of mathematics. In many courses, proofs will be important in two ways:
reading proofs – e.g. to understand new ideas in the course through the proofs of important results, and to see applications of earlier concepts or theorems,
writing proofs – e.g. to show understanding of ideas from the course by being able to apply them to solving “unseen” problems, including proving results that go a bit beyond what was covered in the course.
This post is focused on the first of these. Developing students’ abilities to read proofs is something that is not often done explicitly – there may be an assumption that students will pick it up by osmosis. There is some research into how to help students to develop these abilities (e.g., Hodds et al.. 2014), and a key part of this is having a good way to measure students’ level of comprehension of a given proof.
Proof comprehension framework
Mejia-Ramos et al. (2012) give a framework for assessing proof comprehension, with 7 different types of questions that can be asked:
Local
Holistic
Meaning of terms and statements
Logical status of statements and proof framework
Justification of claims
Summarizing via high-level ideas
Identifying modular structure
Transferring the general ideas or methods to another context
Illustrating with examples
You can see some more detail about these different categories in a recent talk by Pablo.
The framework is helpful when trying to write questions to assess students’ understanding of a given proof, as it gives ideas for different types of questions you can ask.
Examples
A few years ago, I used this framework to put together some multiple-choice proof comprehension questions for our Year 3 course, Honours Analysis.
My experience of these is that students found them quite hard – the mean score was around 75%, so they are not trivial for students to answer.
References
Hodds, M., Alcock, L., & Inglis, M. (2014). Self-Explanation Training Improves Proof Comprehension. Journal for Research in Mathematics Education, 45(1), 62. https://doi.org/10.5951/jresematheduc.45.1.0062
Mejia-Ramos, J. P., Fuller, E., Weber, K., Rhoads, K., & Samkoff, A. (2012). An assessment model for proof comprehension in undergraduate mathematics. Educational Studies in Mathematics, 79(1), 3–18. https://doi.org/10.1007/s10649-011-9349-7
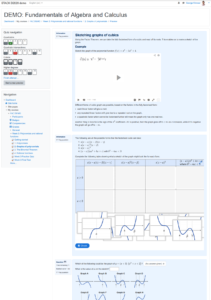
I’m working on a paper just now about my online course, Fundamentals of Algebra and Calculus. I’d like to include a high quality screenshot to show what the online course materials look like, and have finally found “one weird trick” that makes it easy!
Based on that, here’s an easy way to take a screenshot as a PDF:
Using Chrome, on the page you want to screenshot, open the developer tools (e.g. by right clicking the page and choosing “Inspect”)
Click on the “…” menu at the top right of the developer tools window, then choose “More tools” > “Rendering”. This should open a new pane with various options.
Set “Emulate CSS media” to screen
Now when you go to print the page in Chrome, and choose “Save as PDF” for the printer, you will get the webpage as it looks normally, rather than the special printer-friendly style.
For the page I was saving, I found that setting the paper size to A2 gave good results. I also set Margins to “Custom” and made the page slightly narrower. I think you just need to play around with the page size, scaling and margins until you are happy.
I also used the developer tools window to tidy up the page a little, e.g. deleting some irrelevant navigation boxes, and instructor-only tools.
Last week’s topic in FAC was complex numbers, and I’ve had some difficulties with STACK questions asking students to give their answer in polar form, e.g. when the correct answer was 4*(cos(pi/3)+i*sin(pi/3)) an answer of 4*(cos((1/3)*pi)+i*sin((1/3)*pi)) would be marked incorrect!
The issue was that:
with simplificatiwon turned on, Maxima will automatically simplify polar form to cartesian form, so I need simplification off.
with simplification off, Maxima won’t see those equally valid ways of writing the argument as the same.
I was using the EqualComAss answer test to check whether the student answer (ans1) was equal to the model answer (ta1), and this was failing in the cases above.
The solution I came up with is to add some code to the feedback variables box at the top of the PRT, to replace cos and sin with alternate versions so that Maxima can’t simplify the expressions to cartesian form. I can then use ev(…,simp) to make use of simplification when comparing the expressions:
This will ensure that COSINE(pi/3) and COSINE((1/3)*pi) will cancel out, thanks to the simplification being turned on.
But since Maxima doesn’t know anything about COSINE, it can’t cancel out COSINE(-pi/3) and COSINE(5pi/3) (as it would do with cos) if students give their answer with the wrong value for the principal argument.
It was then just a case of replacing the test for EqualComAss(ans1,ta1) in the PRT with a test that AlgEquiv(proper_form, true), and regrading. Out of ~160 attempts this picked up 8 students who deserved full marks!
Update (08/11/2021): One year on, and STACK now has a new feature which makes it easier to grade these answers correctly! The new EqualComAssRules answer test lets you add a list of different algebraic rules so that two answers should count as equivalent if they differ only by those rules – e.g. x and 1*x.
To fix this question, it’s enough to change the first PRT node to the following, using the “Test options” box to specify the list of algebraic rules:
We’re using Gradescope to mark 5 of our remote exams at the moment. Here, I’ll outline the process that we’ve used.
Preparation
As with all our exams, we go through a process to prepare a folder of anonymised PDFs, one for each student.
Gradescope provides two different types of assignment:
Exam / Quiz – where the instructor uploads a batch of scripts, but these all need to have a consistent layout (e.g. when students complete an exam on a pre-printed booklet).
Homework / Problem Set – where the student can upload a script of any length, and then identify which questions appear on which pages.
Unfortunately neither of these quite fit our situation – we have a set of variable length scripts, but we need to upload them (since we wanted students to have a consistent submission experience across exams, whether or not we used Gradescope to mark them).
Fortunately my colleague Colin Rundel is a wizard with R and he was able to semi-automate the process of uploading each script individually to the “Homework / Problem Set” assignment type. All our marking is done anonymously, so we’re only using the students’ Exam Number in the Gradescope class list, and for each student Colin’s R script uploads their PDF submission.
Zoning
Once the scripts are uploaded, we still need to identify which questions are on which pages – a process I’ve taken to calling “zoning” since that’s the terminology used in RM Assessor (one of the other tools we’ve been trying).
To do this, we’ve employed several PhD students, who would normally have been helping out with various marking jobs for our 1st/2nd year courses (but those exams were cancelled for this diet).
These PhD students were set up as TAs in the course, and tasked with marking up which questions were on each page, just like the students would normally do in Gradescope. This is surprisingly a difficult workflow in Gradescope, requiring multiple clicks to move between scripts (and there is no summary of which scripts have been “zoned”). To get round this, Colin prepared a spreadsheet with direct links to each script in Gradescope, and the zoners used this to keep track of which ones they had completed (and note any issues). I wrote some very brief instructions on the process (PDF) – this included a short video clip of me demonstrating how to do it, but I’ve redacted that here because it shows student work.
Marking
The process in Gradescope is based on using rubrics (see https://www.gradescope.com/get_started). These can work with either positive or negative marking; we have been using the default of negative marking in the exams so far, which is different to our usual practice but seem to work best in this system. Essentially for each question, you develop a set of common errors and the associated number of marks to take off. That way you can then tag responses with any errors that occur, giving more useful feedback about what went wrong.
Each course has worked a little differently, but the basic idea is for the Course Organiser to develop a rubric and make sure it works on the first 10-15 scripts.
Sometimes the CO has developed the rubric first, then went through the first 10-15 scripts to check it made sense and make any adjustments
Other times, the CO has just started marking the first 10-15 scripts, and used that process to develop the rubric.
Other markers can then be assigned a question (or group of question parts) each, and they go through applying the rubric. We’ve asked that they flag any issues with the rubric to the CO rather than editing it directly themselves (e.g. to add a new item for an error that doesn’t appear already, or if it seems that the mark deduction for one item is too harsh given the number of students making the error).
A nice feature is that you can adjust the marks associated to rubric items, and this is applied to all previously marked scripts in the same way.
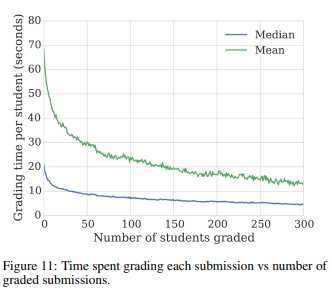
Feedback from markers so far has been very positive. They have found the system intuitive to use, and commented that being able to move quickly between all attempts at a particular question has meant that they can mark much more quickly than on paper. Gradescope have also done some analysis of data from many courses and found that markers tend to get quicker at marking as they work through the submissions:
Moderating
Once marking is completed, the CO can look through the marking to check for any issues. The two main ways of doing this are:
checking through a sample (10-20 scripts) of each question, to make sure the rubric is being applied consistently (and following up with further checking if there are any issues).
checking whole scripts, particularly any which are failing or near the borderline.
Gradescope provides the facility to download a spreadsheet showing the mark breakdown for each script, and also a PDF copy of the script showing which rubric items were selected for each question part. We’ll be able to make those available for the moderation and Exam Board process.
Conclusions
Gradescope is clearly a powerful tool for marking, and I think we will need something like this if we are to do significant amounts of on-screen marking in future.
However it does come with some issues – we had to work around the fact that it is not designed for the way we needed to use it. For long term use it would make sense to have the students tag up which questions appear on which pages, but that would require integration with our VLE and would add a further layer to the submission process for students (and another tool/system to learn to use). I was also concerned to see news that Gradescope crashed during an exam for a large class in Canada, and there are obvious issues about outsourcing such a sensitive function.
Throughout April and May 2020, we’ve had 42 different exams running remotely in the School of Mathematics. These would normally have happened in exam halls, with students writing on paper and the scripts then passed around between staff for marking and moderation.
With the exams now happening remotely, students have instead been scanning their work and uploading it in PDF format.
So, how are we dealing with marking and moderating over 2200 PDF exam scripts?
We’ve taken the opportunity to try out three different approaches:
We’ve used this as our default approach, with a mean of around 50 scripts per exam.
Gradescope– this is a popular web-based service, now owned by Turnitin, that we had heard about from colleagues in other mathematics departments some time ago.
We have used this for 5 of our largest exam papers, in courses with over 150 students, because it has enabled multiple markers to work together more easily.
RM Assessor – this is a service used by many school exam boards, including the SQA, with tools in place for managing large distributed marking teams.
We have used this for our largest exam, with around 180 students.
Students have the consistent experience of submitting their exam script through a Learn assignment. These have been set up across all 42 courses by a team in our teaching office, using a consistent template. We then use the bulk download feature to export all the scripts, and do some offline processing (described in a previous blog post) to get a set of PDFs ready for whichever tool will be used for marking.
Marking (and moderation) is still underway, so it’s too early to say what our preferred solution is. But so far, it seems that on-screen marking is working well – some markers have reported saving time by not having to shuffle through lots of paper, and by not having to do mundane jobs like adding up marks.
We’re all thinking about how best to arrange for students to be able to work together online, and being able to work together on written mathematics is a key requirement for our disciplines.
In the workshop, we tried four different approaches:
Video – using smartphones as document cameras, to show writing on paper,
Digital whiteboard – using a free online whiteboard tool, where participants can collaboratively write (we tried NoteBookCast.com),
Collaborative notebook – using a shared OneNote notebook,
Typing – in the collaborative LaTeX editor, Overleaf.
I was in the Video group, and found it worked quite well.
Setup
The approach is to use a smartphone (a common piece of kit!) as a document camera.
Ahead of the meeting, I installed software on my phone and on my laptop, that enables the phone’s camera to appear as a webcam on the laptop. I followed the instructions in this article and installed DroidCam on both phone and laptop.
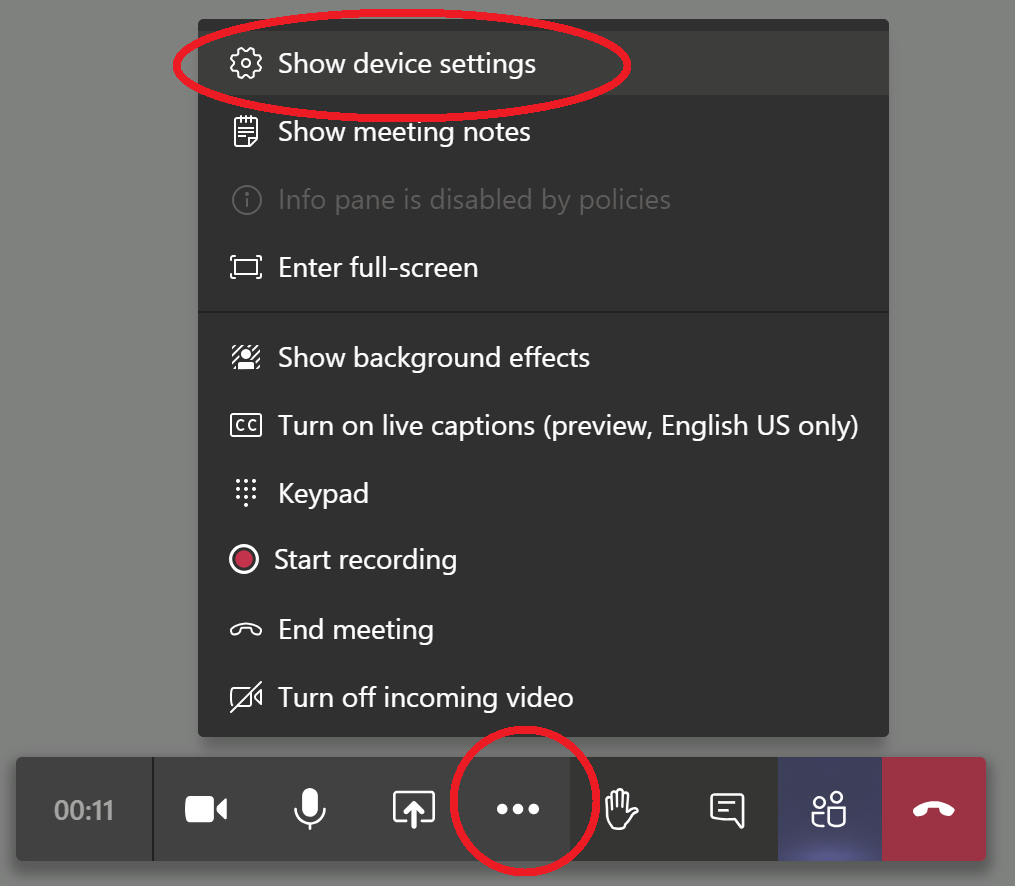
We were using Microsoft Teams for the meeting. It’s easy to switch between different webcams, once you know to click the “…” on the toolbar, and select the “Show device settings” option:
Assuming you’ve got DroidCam (or equivalent) running, you should then see it appearing as an option in the dropdown list under Camera.
During the meeting, I was able to switch between using my laptop’s webcam, and my phone’s camera. I have a cheap tripod that holds my smartphone, so I was able to use that to point the phone camera my page of writing. Others were making do with holding their phone above the page, but given how cheaply you can get hold of a reasonable holder (e.g. this one for £12) I think that would be worth the investment!
Alternative method in Teams
It’s also possible to join the Teams meeting from the smartphone, if you have the Teams app installed. Make sure you use the options when joining the meeting on your phone to turn off the mic and the audio output – otherwise you will get horrible audio feedback.
If you have the video turned on when joining the call on your phone, that will take over from your laptop webcam. Other participants will see the video from your phone instead. If you want to switch back to your laptop webcam, simply pause the video on your phone (tap the video icon on the toolbar, like the one at the left of the screenshot above).
This approach was much simpler to set up – just install the Teams app on your phone, and no fussing with apps like DroidCam.
However I found it a bit counterintuitive in Teams at first – the view of the call on my laptop showed no indication that my phone was involved at all. It was still showing the little preview of my laptop’s webcam, and I couldn’t see the view from my phone that other people were seeing (though of course, I could see that on my phone screen).
Advanced setup
I’ve been doing some further experimenting, to see if I could get round the issue of having to choose which camera to show. The solution I found is to use the DroidCam approach, with some further software on top of it:
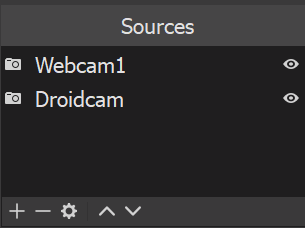
OBS Studio – which lets you control multiple video streams
OBS VirtualCam – which makes the output from OBS available as a webcam on your system
With those installed, I fired up DroidCam, then set up a picture-in-picture view in OBS Studio by adding both my laptop webcam and the DroidCam as sources:
Here is what it looks like:
Final thoughts
During the session, it took colleagues about 20 minutes to get settled in to using the technology. I think that’s a one-off setup cost, that we would obviously need to sort out with all students as part of induction.
On balance, my rank order of recommendations would be:
using the Teams app on the phone to join the call,
using DroidCam or similar to let you switch between cameras on your laptop,
the more complicated picture-in-picture setup.
Using the Teams app on your phone is the simplest technically – and once you are used to how it works, it’s quite straightforward.
This whole approach does have its downsides – in particular, it’s hard for participants to work collaboratively since it relies on one person doing the writing. I think there are ways around that, like having well-defined group roles like “scribe” which students would rotate through. But it would need some careful thought and lots of practice on our part – not least to make sure tutors are comfortable facilitating groups working in this way.
Even if we decide not to use this approach in our teaching, I’m confident that it would be useful for students who might want to work together outside of scheduled classes.
I was pleased when the title of this post popped into my head, as it can be read (at least) three ways:
I’ve finally started this blog!
Depite setting it up shortly after the service launched nearly two years ago, I’ve never got round to posting anything.
I’m not making any promises, but I do want to try using this blog to record my thoughts – both about technical things (like code that I’ve written), and about theory (like my thoughts on papers that I’m reading about mathematics education).
I’ve been picking this up over the past couple of weeks, to do some work on the GradeX tool which we’re using to manage our exam marking process in the School of Mathematics. I’ve been pleasantly suprised with how quickly I’ve got up and running in this new language, though I do feel that at this point I am mainly hacking away to get things working, rather than trying to write “effective Go“.
We’ve got our exam marking process up and running
Since we are continuing to run exams remotely for students in Years 3/4/5 and on MSc programmes, there has been a pressing need to figure out how we will handle the nearly 3000 scripts that we expect to be submitted over the next few weeks.
I spent last week putting the finishing touches on our process for handling the submissions, and this week we’ve finally got the first scripts out to markers. I’ll now need to turn my attention to the checking/moderation process.
In the spirit of using this blog to record thoughts about technical things, I though I’d describe our process for handling exam submissions.
Submission. Students submit scripts to a Learn assignment. We’ve set this up to allow unlimited attempts, and made clear to students that only their last (on-time) submission will be marked.
Backup route. There’s also a backup submission route (through Microsoft Forms). We’re clear with students that we’ll only check this where they have been unable to upload to Learn for some reason.
Download. After the deadline, someone (currently me or Steven) downloads a zip file of all the submissions from Learn. We use the option to download all submitted attempts, since the other option (last attempt only) might mean that for some students we only see a late submission, when in fact they had previously submitted before the deadline.
Processing. We then run the gradex-ingest script on the unzipped folder of submissions. This also reads in the class list, which has each student’s UUN, anonymous Exam Number, and whether they are entitled to extra time for the exam. It takes care of the logic of deciding which submission to use for that student, and spits out a single PDF of that submission. It also produces a log file showing any submissions that were late, or malformed (e.g. students uploading multiple files, or non-PDF files).
Mopping up. There’s then a bit of manual mopping up to do. This involves checking the backup Forms submissions to see if there are any further submissions to add in, and also assembling a single PDF for any students who did not manage to do that. Fortunately that has been rare on all the exams so far.
Also, just to try out the new code highlighting tool on this blog, here is a crucial bit of code in this process:
// Decide if the submission is LATE or not
sub_time, _ := time.Parse("2006-01-02-15-04-05", submission.DateSubmitted)
if(sub_time.After(deadline_time)) {
    if(submission.ExtraTime > 0) {
        // For students with extra time noted in the class list, their submission deadline is shifted
        if(sub_time.After(deadline_time.Add(time.Minute * time.Duration(submission.ExtraTime)))) {
            submission.LateSubmission = "LATE"
        }
    } else {
        // For students with no allowance of extra time, their submission is marked late
        submission.LateSubmission = "LATE"
    }
}
This uses Go’s weird-looking syntax for parsing dates to read the submission time of the student’s attempt, then compares that with the deadline while also taking account of the student’s entitlement to extra time. Later on in the script, we skip over any late submissions, then pick out the most recent submission for each student.