Polka Dot: A Symbiotic Voyage of Nature and Art

Summary
In this activity, you will enter the creative world of polka dot art and nature. Choose one of the two polka dot collage creation methods to make a real or virtual polka dot collage, and experience the process of returning artworks to nature. This practice will help you explore how polka dot art and natural materials can collide to create a unique aesthetic, and feel the interdependent and inseparable relationship between art and nature.
Introduction
Seurat’s color logic in pointillist painting stemmed from his observation of natural light and shadow;
Yayoi Kusama’s childhood observation of millions of white stones in her family’s nursery became the initial inspiration for her polka dot creations;
The symbolic foundation of polka dot art lies hidden in the texture of nature. The “dot” form is an abstract refinement of natural things—cells, stars, water droplets, petals, insect eggs, etc., in nature are all natural dot prototypes; and the order and infinity of nature are concretely expressed through polka dot art. The repeated arrangement of polka dots echoes the biological communities in nature, such as forests, following the law of repeated growth; the infinitely extending polka dots simulate the boundless sense of the universe and ocean, making polka dots an artistic language for interpreting nature.
And we all know that the creation of art is inseparable from natural materials.
Then try to imagine this: these artworks, derived from natural materials, could return to nature, coexisting with it, forming a symbiotic relationship, or even becoming part of nature itself. This would create a wonderful cycle—art originates from nature, and art returns to nature.
As ecological philosopher Tim Morton once said, “We must transcend the illusion of nature and truly understand the intricate interdependence between us and non-human beings.”
Through this toolkit, you can create simple artworks using natural raw materials in a variety of lightweight and readily available ways, with polka dot art as the theme.
By returning it to nature, you can create a close connection between your polka dot artworks and its natural environment, and experience that:
“Art originates from nature and returns to nature.”
Choose A Creation Method
Based on your own conditions, determine the form of participation and choose one of the following options:
① Handmade Leaf Polka Dot Collage
② Digital Polka Dot Collage
Are you ready to build a bridge connecting art and nature?
That’s get started!
①Handmade Leaf Collage Creation (15 min)
(If you have chosen the second option, please scroll down)
Step 1: Preparation
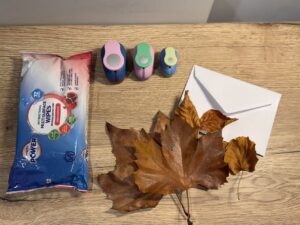
- Materials: blank postcards, fresh fallen leaves.
An additional guide for selecting fallen leaves: The varying moisture levels of the leaves will affect the difficulty of the process and the shape of the dots. Therefore, you should choose and use fresh leaves whenever possible. If you collect fallen leaves in advance, store them in a cool, shady place and spray them with water regularly to maintain humidity. You can also consider the unique characteristics of different natural materials while preparing for this step.
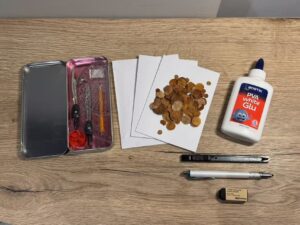
- Tools (essential): Circle punches(in different sizes), Drawing Tools (ruler, compass),Blank Postcards, White Glue, Scissors, Blank postcards, Pencil, Eraser.
- Tools (optional): Envelopes(for holding artworks), Wet Wipes (for wiping dust off fallen leaves)
Alternative material options: Since circular punches are difficult to obtain, you can choose to use a compass, coin or other circular tools to draw circles and use scissors to cut out dots.
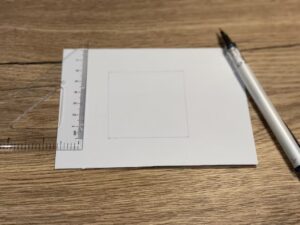
Step 2: Conceive and Sketch the Shape (1 min)
- Combine your understanding of nature and quickly sketch a simple basic shape with a pencil on paper.
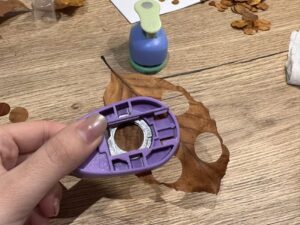
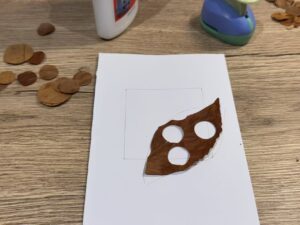
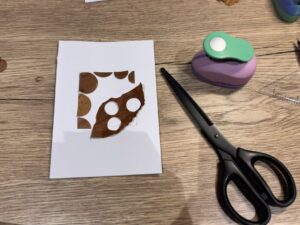
Step 3: Cut the leaves into round shapes (4 min)
- Based on the size and shape of your draft, use circle punchs to cut fresh fallen leaves into dots of varying sizes.
Step 4: Cut and Collage (10 min)
- Based on the sketch, cut the dots and the cut-out leaves to the appropriate size. If the leaf dots are the right size, they can be used directly.
- Using white glue, paste the materials one by one within the pencil outline to complete the collage artwork.
The process of creating testers in BarCamp is attached for reference:
②Digital Collage Creation (15 min)
Step1: Inspiration Collection (3 min)
- If you are outdoors, observe and feel the natural things around you, and record the moment with your camera;
- If you are indoors, try to find natural elements within your sight, such as potted plants or the view outside the window; you can also think about how a specific object is made of natural materials.
Step2: Image Processing (3 min)
- Open the photos of natural environments taken with your mobile phone.
- It could be a photo you just took, or a memorable natural moment from your album, such as grasslands, woods, flower clusters, etc.
Step3: Polka Dot Addition (9 min)
- Use the sticker or graffiti function of photo editing software (such as Hypic) to add dot elements and adjust their size, color, and position to complete the digital dot collage picture.
Return Your Artwork To Nature (3 min)
You can choose one or more of the following ways to bring your artwork back to nature:
- Bring the handmade collage work or open the mobile phone digital collage picture, return to the environment where the materials came from, and take photos of the work combined with the natural environment to form the final artistic record;
- Take a photo with your artwork with readily natural elements that are readily available around you, such as indoor potted plants or natural scenery outside the window;
- Based on your memory or imagination, draw a sketch of the natural environment from which the material came on another piece of paper, and take a photo with it and the artwork you created.
- Open your phone (or other electronic device), select a natural landscape image you like, and take a photo with it using your artwork.
Share Your Artwork With Others (2 min)
You can share your materials, process, artwork, reflections and suggestions by using this Miro Board.
Link: https://miro.com/app/board/uXjVJkogr5o=/
The Miro Board is divided into five sections:
- Sharing your material preparation (various types of fallen leaves, nature photos);
- Photos or videos of your creation process;
- Your collage artwork and how you brought it back to nature;
- Reflections on the process;
- Suggestions for the tookit.
You are free to use this platform to leave comments on other people’s work and engage in real-time discussions!
Whichever method you choose, you have successfully completed a poetic practice of art returning to nature.
Congratulations!
Additional Readings
If you’d like to learn more about artists who create polka dot art, here are some examples:
- Yayoi Artist: The World Through Dots – Exploring the Life and Art of Yayoi Kusama https://laboostudio.com/blogs/news/yayoi-artist-kusama-dots#heading-4
- Damien Hirst: The Complete Spot Paintings 1986–2011 https://gagosian.com/exhibitions/2012/damien-hirst-the-complete-spot-paintings-1986-2011-new-york/
If you’d like to know more about contemporary artists rooted in nature, you can refer to the following links:
- Andy Goldsworthy https://andygoldsworthystudio.com/for-andrew-mckinna/
- Christo and Jeanne Claude https://christojeanneclaude.net/
If you’d like to explore more about the historical connection between art and nature, the following provides some texts worth learning about:
- Arts and Crafts Movement https://www.tate.org.uk/art/art-terms/a/arts-and-crafts
- Pre-Raphaelite https://www.tate.org.uk/art/art-terms/p/pre-raphaelite