Informatics Teaching Festival 2022: Design of Teaching and Learning

The Informatics Teaching Festival is back for a third consecutive year and will run Monday May 9th to Wednesday May 11th 2022.

The 2022 Informatics Teaching Festival will focus on the design of teaching and learning and consist of the following sub-themes:  

  • overview of course design (Day 1, May 9th 2022)  
  • design to develop student skills, including for the industry (Day 2, May 10th 2022)
  • design of assessment (Day 3, May 11th 2022).  

Each day will include both presentations on school and university processes, tools and support, as well as the sharing of experience and good practice around different approaches to the design of teaching and learning, and internal (Informatics or university-based) as well as invited external speakers.

If you’d like to attend any of the following sessions, and are not a member of the School of Informatics, please register your interest here, and a Collaborate link will be emailed to you in advance of the session(s).

Schedule* –

Day 1: Overview of Course Design. Monday, May 9th 2022

Topic (and links to recordings after event) Date/Time Speaker, with linked Resources
Opening / Welcome Session 9-9.10am Björn Franke
Morning Session –
Designing a new course:
Morning Session: 9.10-12.30pm
Process and experience of designing new courses:
Designing a new Informatics Course – Sharon Goldwater;
Design Decisions and Dilemnas in a new data science course – David Sterratt;
Designing INF2-IADS – John Longley
9.10-10.40am Sharon Goldwater
David Sterratt
John Longley
Coffee break 10.40-11am Meet in Gathertown
Support for course design (ELDeRs) 11-11.30am Fiona Hale
Cristina Alexandru
Sharing positive experiences on improved courses 11.30am-12.15pm Heather Yorston on DMP
Pavlos Andreadis
Discussion 12.15-12.30pm
Lunch break 12.30pm-2pm
Afternoon Session –
Improving an existing course:
Afternoon Session: 2-5pm
Course proposal / improvement
(involving Board of Studies approval)
2-3.20pm Aurora Constantin
Felipe Costa Sperb
Heather Yorston RS for CAM
Coffee break 3.20-3.40pm Meet in Gathertown
Course improvement
(not involving Board of Studies approval)
3.40-4.30pm Cristina Alexandru on SEPP
Pavlos Andreadis
Discussion 4.30-5pm
Day end 5pm

Day 2: Design to develop student skills. Tuesday, May 10th 2022


Topic (and links to recordings after event) Date/Time Speaker / Resources
Morning Session –
Developing core Informatics skills:
Morning Session: 9-12.30pm
Cristina Alexandru, Heather Yorston, and Brian Mitchell:
Teaching students with varied profiles in UG1

Judy Robertston:
Teaching First year students with varied backgrounds

9-10am Cristina Alexandru on Varied Profiles UG1
Heather Yorston on FAC and MC
Brian Mitchell – Prize and Prejudice
Judy Robertson – prerecorded video
Teaching programming 10-11am Pawel Orzechowski
Charlotte Desvages – Day 2
Judy Robertson – prerecorded video
Michael Glienecke
Discussion 11-11.15am
Coffee break 11.15-11.30am Meet in Gathertown
Teaching Modelling:
Reflection on including the industry perspective in our teaching
11.30am-12.30pm Pavlos Andreadis
Sanjay Rakshit
Lunch break 12.30pm-2pm
Afternoon Session –
Developing transferrable skills:
Afternoon Session: 2-5pm
Guest Presentation:
Back to the future: shaping software engineering education with lessons from the past (abstract)
2-2.45pm Joseph McGuire
Coffee break 2.45-3pm Meet in Gathertown
Developing research skills 3-4pm Felipe Costa Sperb
Stefano Albrecht – pre-recorded video
Skills for the industry:
Rebecca Clacy-Jones on “Employment for Informatics Students” and Pavlos Andreadis on “View of Informatics Students”
4-4.35pm Rebecca Clacy-Jones
Pavlos Andreadis
Skills for the industry:
Large companies and what they require
4.35-4.55pm Michael Glienecke
Day end 5pm

Day 3: Assessment. Wednesday, May 11th 2022

Topic (and links to recordings after event) Date/Time Speaker / Resources
Morning Session –
Philosophy of Assessment
Morning Session: 9-12.30pm
Assessment in Informatics 9-9.45am Björn Franke
Guest Speaker:
Vertically integrated assessment in Physics (abstract)
9.45-10.30am Ross Galloway,
School of Physics and Astronomy
Coffee break 10.30-110am Meet in Gathertown
Asssessment Approaches:
“Let’s talk about Groupwork”: David Sterratt
“A brief introduction to WebPA”: Meredith Corey
“Why and how to assess and give feedback on code
(using standard tools)”: Charlotte Desvages
11am-12.15pm David Sterratt
Meredith Corey
Charlotte Desvages – Day 3
Update on Asssessment Plans (from ILTS and ITO) 12.15-12.30pm Toni Noble
Meredith Corey
David Sterratt
Lunch break 12.30pm-2pm
Afternoon Session –
Marking Approaches
Afternoon Session: 2-4pm
Rubrics Cube:
Puzzles in designing rubric-based marking schemes
Aurora Constantin
How do we set challenging assignments without encouraging
students to throw arbitrary amounts of time at them?
Iain Murray
Marking to the Common Marking Scheme
with Criteria & Decision Rules
Paul Anderson
Closing Ceremony 3.30-4pm Jane Hillston
Day end 5pm
* The schedule is still subject to change. As best we can we will not make big adjustments to speakers and timings.



Zoom – two big changes now in place for teaching

A year after first being licenced at the University, Zoom is now 1) licenced to cover teaching and 2) integrated within the University Learn VLE. Both of these changes should benefit many teaching staff (and students) within the School. When first licenced and implemented within the University teaching was not covered within the Zoom licence. This has now been changed.

And over the summer 2021, Zoom was integrated within the Learn VLE, which allows staff to schedule and access Zoom meetings within their Learn courses. After adding the Zoom tool to a Learn course, staff and students will be able to access a course-specific meeting schedule and cloud recording library and the scheduler will display all meetings scheduled for the course.

More details on Zoom, the integration with Learn and the training available for using Zoom are available from the ISG website here. Support for Zoom is available from IS.Helpline@ed.ac.uk.


Informatics Teaching Festival 2021: Sharing experience and planning for online and hybrid teaching

The Informatics Teaching Festival is back for a second consecutive year. 

 Join us for the opportunity to:

  • hear interesting presentations around lessons learned in the past year and good practice in online/hybrid teaching from colleagues and inspiring speakers from other schools
  • listen to the feedback provided by student representatives regarding their experience with studying in an online/hybrid context
  • listen to the feedback provided by teaching support and administrative staff as to their experience with teaching and administration this past year
  • learn about new approaches to teaching and educational software
  • share your own experience with teaching delivery, student support and course administration during workshops and informal GatherTown meetings
  • reflect and come up with ideas together for improving our delivery of online and hybrid teaching, both as a school and in our different courses.

If you’d like to attend any of the following sessions, and are not a member of the School of Informatics, please register your interest here, and a Collaborate link will be emailed to you in advance of the session(s).


Schedule
Topic and links to recordings Date/Time Resources
Opening/Welcome Monday 7 June, 10-10.30am Björn Franke
Keynote: Experience with online/hybrid teaching in 2 other schools Monday 7 June, 10.30-11.30am Charlotte Desvages

Brian Rabern

Coffee break & GatherTown meet and greet Monday 7 June, 11.30am-12pm n/a
Student experience with online/hybrid teaching in 2020-21; Suggestions for the future Monday 7 June, 12-1pm n/a
Personal Tutoring and Student Support: Sharing best practice and providing views on upcoming changes Monday 7 June, 2-3pm n/a
Lectures in an online/hybrid context Tuesday 8 June, 10-11.15am Iain Murray

Mary Cryan

Fiona McNeill

Coffee break & GatherTown meet and greet Tuesday 8 June, 11.15-11.45am n/a
Teaching support staff experience with online/hybrid teaching in 2020-21; Suggestions for the future Tuesday 8 June, 11.45am-12.45pm n/a
Practical sessions (tutorials, labs, workshops, etc.) in an online/hybrid context Wednesday 9 June, 10-11.15am Fiona McNeill

Pawel Orzechowski

Tim Drysdale

Sharon Goldwater

Coffee break & GatherTown meet and greet Wednesday 9 June, 11.15-11.45am n/a
Case study: practical sessions in IRR and IPP Wednesday 9 June, 11.45am-12.45pm IRR/IPP
Case study: Teaching Ethics in Computing Wednesday 9 June, 3-4pm David Sterratt

email James for Shannon’s paper

Assignments in an online/hybrid context Thursday 10 June, 10-11.15am Padlet
Coffee break & GatherTown meet and greet Thursday 10 June, 11.15-11.45am n/a
Exams in an online/hybrid teaching context Thursday 10 June, 11.45am-12.45pm Padlet
Learn Foundations: UX (Emma Horrell) Thursday 10 June, 2-3pm Emma Horrell
Equality and Inclusion (Decolonizing the curriculum and Congressive Teaching methods)
Friday 11 June, 10-11.15am Decolonizing the curriculum
Coffee break & GatherTown meet and greet Friday 11 June, 11.15-11.45am n/a
Final reflection, Informatics Awards Ceremony Friday 11 June, 12-1pm will be uploaded after the session


More MS Teams Tips

The features available in Teams are constantly being added to and evolving for the many use cases in business and education settings.

ILTS have been trying to collect some of the lesser-known features and tips to share. Feel free to add some more tips to the comments below!

Meetings

Roles in Meetings

It is worth noting that some of the features described in this section are only available if you are the “organiser” of the meeting, which means you were the person who setup the meeting. The most obvious tasks where this would be relevant to teaching scenarios is for managing breakout rooms or downloading attendance sheets.

It is possible to set the roles of a meeting in advance or during the session, the instructions for this are below:

Roles in a Teams meeting

Meeting Recordings

You will find the option to record a meeting from within the “ellipsis” menu button at the top of your meeting window.

Record a meeting in Teams

If you are recording meetings for your class you need to make sure these recordings are readily available and accessible. Your recording will be stored by default within the Teams space for 20 days and is accessible from the meeting instance.

Note: ILTS have been working with Information Services to get this 20 day restriction removed. All Semester 2 course organisers have now been moved to a license which removes this restriction. If you are still seeing this restriction within your Team, please get in touch with us asap.

You can choose to move your video to storage in OneDrive / Stream, or choose to download your recording and upload it to the Media Hopper Create service. In both instances you must ensure that you have enabled the auto-captioning feature.

This process is changing across Teams in early 2021 – up-to-date guidance on how to link/share meeting recordings can be found below:

Play and share a meeting recording in Teams

Benefits and Disadvantages of Transitioning from Media Hopper Create to MS Stream

Attendance Tracking

Meeting organisers can download a spreadsheet of all participants of a Teams Meeting. You can find this option at the top of the participants panel from within the team meeting.

Microsoft Teams – Create Attendance Report for Online Class Lecture

Polling

In the classroom it can be really useful to do quick snap-polls to trigger some engagement with the class, gauge reactions, spark debate.

Using the integration with MS Forms it is possible to link polls/surveys to your meeting to be complete before or during a meeting. MS Forms is a really useful survey tool as a standalone solution but the integration means it is possible to direct participants to the poll from within the meeting.

Poll attendees during a Teams meeting

TopHat is of course available as an alternative to Forms if you already use this service for class interactions.

Breakout Groups/Rooms

The use of breakout groups has been a long-standing requirement of virtual classrooms to allow for smaller discussions, sub-topics, activities, etc. This functionality has recently been added to MS Teams and can be triggered by the meeting Organiser.

Use breakout rooms in Teams meetings

Note this functionality is only available in meetings with multiple participants (not just 1-1 or small meetings). This functionality is only available via desktop clients.

Raise Hands

Raising hand in a busy session is a polite way of alerting the host of the session that you wish to contribute without interrupting the flow of the meeting. The functionality is very simple and available to all participants. If multiple hands are raised the participants will be placed in the order that the hands were raised.

If you are chairing a meeting it can be a good idea to let participants know that they may need to raise their hand before the floor will be open to them.

Raise your hand in a Teams meeting

Noise Suppression

If you are attending a meeting from a particularly noisy location: air-con in the office, a busy café, or working from home while home-schooling, then you can turn on noise suppression to try and minimise the background noise when your mic is turned on.

Reduce background noise in Teams meetings

Best practice is to have all microphones off for all those who are not speaking. We would also strongly recommend the use of headphones for all participants to minimise feedback.

Zooming-in

Not to be confused with the other video conferencing platform – it is possible to zoom-in and zoom-out of the contents being shared to screen to make things more clear to see, something especially useful if working from a small screen or window.

Similar to how you might increase or decrease your browser contents you can use Ctrl or Cmd +/- depending on your device.

Zoom in and out of Teams

Notifications

Customising Team/Channel notifications

As we are all becoming involved in an increasing number of teams, the amount of content and activity you need to be aware of and prioritise becomes a challenge. Some of your spaces might be of just general interest, so choose to browse at your leisure; there are some spaces that you might check on a more regular basis; and some that you want to have your finger on the pulse for so you can react to the latest posts.

The notifications allow you to customise your general settings as well as the settings on a per team and channel basis. You can also choose what notifications you should be emailed about.

Manage notifications in Teams

Using the @ tag for triggering notifications

If you want to make sure that important content is not missed you can force notifications to be sent out to specific people or to members of a team or channel by using an @mention. In your comment start typing @ and you will be able to pick from a list of individuals or channels if you want to highlight something to them in a post or reply.

If you forget to include your @mention then the person may not be notified, especially if the post is a reply to another post.

Use @mentions to get someone’s attention in Teams

More…

I’m sure many of you will have found a handy tip that has improved the way you use/manage the content in Teams. Please feel free to share using the comments below and we can try and incorporate these in future posts and guidance.


Creating a Shared Course Arrangement

There are several examples in Informatics where a course is delivered to both an ‘on campus’ cohort and a ‘distance learning’ cohort. These terms can be nebulous, however, you will be aware of the courses being discrete within EUCLID. The on campus course will have a course code beginning INFR with the DL course beginning with INFD.

If you are a course organiser for such a course, please read on.

Each discrete course within EUCLID has a corresponding instance in Learn. If you are delivering the same course to both cohorts it makes sense to create a Shared Course Arrangement. This will feed the enrolments from one cohort (‘the child course’) to another (‘the parent’). You can then hide the child course within Learn to avoid potential confusion.

Further information on how to create this shared course arrangement can be found here:

https://www.ed.ac.uk/information-services/learning-technology/virtual-environments/learn/instructor/building-managing-content/shared-courses 

If you would like to discuss this in relation to your own course, please get in touch.


Reporting on submission times in Gradescope

There are many times when you may need to check submission dates and times for coursework or exam hand-ins. The way you do so will depending on the mechanism used to submit.

The following instructions are for when a student has submitted via the Gradescope link within Learn.

Go to the course in Learn and find and select the link to Gradescope.

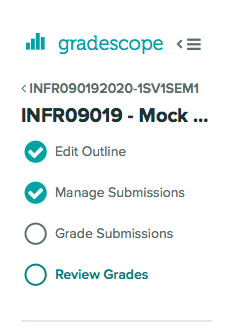
Select the assignment name within Gradescope to open. Select Review Grades.

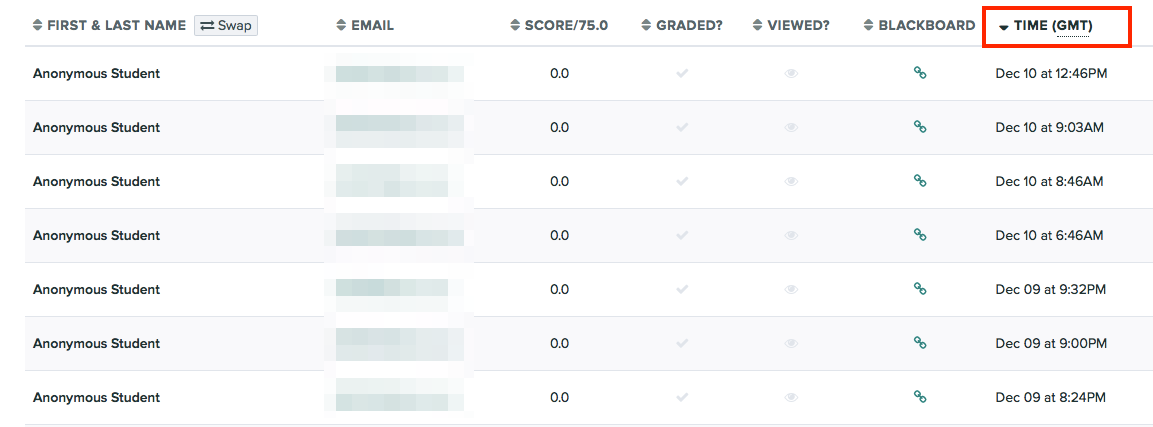
Sort by the Time column header to see which submissions were made after the deadline.


Associated links

Reporting on submission times in Learn


Gradescope: guidance for students

This blog post is aimed at all students sitting an exam or submitting coursework using Gradescope Homework assignment.

Submitting your PDF to Gradescope

  • Navigate to the appropriate area in your Learn course (this will be the “Exam” content area for taking an exam, or the “Assessment” area if submitting coursework)
  • Open Gradescope by clicking “Submit via Gradescope”
    • Gradescope will open in a new tab
    • You will be taken directly to the corresponding course area in Gradescope
  • Open the submission area for the question
  • Select the file you wish to upload for your answer – this can be uploaded directly from your device. Upload your file – note that Gradescope does not provide a progress bar, and so it will look like nothing is happening while your file submits. Please be patient and do no click Back or Submit again while you wait.
  • You will be shown a preview of your submission. You can rearrange pages if required.
  • You will be required to tag which pages from your document correspond to the question part being answered. If your answer to a particular section spans multiple pages please tag each corresponding page. Please also make sure you have labelled each page with a note of which question you are answering. This tagging process takes place after the submission and can be done after the submission deadline without affecting your timestamp for submitting your response.
  • Check all pages have been tagged correctly, and confirm your submission by clicking Submit.

Video Demonstration of the PDF Upload & tag process


Marking an exam or homework assignment in Gradescope

Gradescope is now the School of Informatics’ default platform for marking exams and some coursework assignments.

The technology takes a much more innovative approach to marking which better aligns to the standard practices for marking paper-based exams, with some added benefits over traditional marking.

  • Horizontal marking (i.e. Mark papers by question) by default
  • Rubric based marking, with the option of dynamic edits which recalculate previously marked papers
  • Inline annotation / notes for markers

The exam spaces and initial setup is now managed by the ITO team.

Marking Submissions

You’ll find detailed help and guidance from the Gradescope Help section, but some key elements and videos have been highlighted in this article.

Horizontal Marking

The preferred marking workflow is to mark each question across all submissions, rather than marking a whole paper one submission at a time. The interface for marking is set up this way to apply your mark to the question and then proceed to the next ungraded question.

Rubric Marking

The points per question will be setup prior to the exam. The rubrics will use positive marking by default. Ahead of the exam, course organisers will have a chance to discuss with ILTS how they want their rubric initially setup for all questions. One of the key features for Gradescope is that the rubric can change and be adapted throughout the marking process with the changes being reflected in papers that have already been marked.

Making changes to the rubric can be done by any marker and could be for the following reasons:

  • Tagging responses marked in a certain way
  • Tagging responses for additional review
  • Awarding partial points based on certain criteria
  • Realising the original rubric design needed altered

Grading a Simple Question

Some tips

Students map their questions to the pages submitted

As part of the submission process students are asked to map which questions have been answered on which page of their PDFs. Some question components may be answered across multiple pages. You can check to see if there is an additional page by using the next arrow or using the “K” keyboard shortcut.

Rubric components can be scored the same and culminative

You can use rubric components for identifying features of how a question has been answered. You can award a rubric item the same points as any other rubric element. This allows you to allocate marks while identifying features of how the question was answered. You can then report on the marking breakdown by each rubric component to get a detailed understanding of how each question was answered across the cohort.

You can select more than one rubric element for each question and the score can build a running total. These settings can be customised and configured as required.

Moderation during the marking process

A suggested workflow for moderation during the marking process is as follows:

  • CO marks first sample of questions to confirm the rubric fits well
  • Markers continue to mark remaining questions
  • CO reviews rubric changes and areas for attention in stages throughout the marking process
  • Papers can be filtered based on the rubric criteria to look for anomalies
  • Standard moderation after marking can still take place

Keyboard Shortcuts

To help speed up marking Gradescope uses a number of keyboard shortcuts to apply the rubric components using the number keys, and you can traverse your stack of marking using a number of keyboard shortcuts.

An overview is available via the video below:

Grading Even Faster with Keyboard Shortcuts

Practice exam

Finally, we would like to stress the importance of running a practice exam, using Gradescope accessed via Learn. As with the real exams, the ILTS team will set these up, but you should identify a suitable timescale to run these, and ensure all students have completed this process prior to the date of their real exam.

Feature requests?

If you are interested in the development of Gradescope, you can view and contribute towards their roadmap here:


Learn Assignment “Gotchas”

There are a wide-range of assessment options built into or integrated with Learn. Each assessment has its own workflow and a plethora of settings to choose from.

In this blog post we look to highlight some of the common issues, quirks, and key settings to be aware of.

This is part of a series of blog posts related to Tests and Assignments:

Learn Assignments

Due Dates

Assignments should have a date/time when submissions should be made by. This date will send notifications to students as the due-date approaches.

We recommend a due-date in working hours so that support is available from ITO or ILTS for any issues that might arise around the submission. So a deadline that is on a Friday at 5pm is not ideal.

Upload Progress

There is no progress bar displayed to students to indicate that the file submission is being processed. The browser will also not show a “spinny-wheel” in the tab to indicate that the page is processing. Students should be instructed to only click the submit button once and be patient.

When the file is submitted the student will be able to see their submission and will receive an email confirmation.

Submission Receipts

When a Learn Assignment is successful the student will receive a submission receipt via email. The students can also see a list of their receipts from their Grades panel which they can access from the top-right of any page.

The general rule is worth following: “if a student does not have a copy of their submission receipt, the submission has not been made.”

Anonymity

Marking should be done anonymously in the majority of assessment scenarios. In Learn Assignment the anonymity settings are very strict – it is not possible to see which student have submitted, and it is not possible to review any attempts related to a specific student until anonymity has been removed.

We recommend setting the anonymity-release date in the future and then changing this when you are ready for anonymity to be removed.


Gradebook

Visible to students

Any activity within Learn that can have a mark associated with it (formative or summative) will have an entry in the Gradebook, which is located in one of the tabs across the top of the course Learn page. The default option for the column is to have the grade visible to students.

By opening up the entry for an assessment, you can choose whether to hide or show it to students.

Calculated Items

The calculated and weighted items are a great way of aggregating grades across activities. However sometimes a calculated item can sometime release a grade from a hidden entry which it is related to.

We recommend taking time to review and manage your Gradebook. You can find out more about navigating the Gradebook here.

You can get in touch with lt-support@inf.ed.ac.uk if you need further support.


Where does Kaltura store your video files locally?

The Kaltura desktop recorder is designed for easy upload to Media Hopper Create. However, there may come a time where you wish to have access to the native video files on your local machine. You can find these as follows:

Windows

  1. Right click on the Kaltura Capture icon on the desktop.
  2. Select Properties.
  3. Click on ‘Open File Location’ and go up one folder to the ‘Capture’ folder.
  4. Or simply go to: C:\Users\<username>\AppData\Local\Kaltura\Capture\

Mac

  1. Go to the Finder.
  2. From the Go menu, select Go to Folder.
  3. In the form, enter ~/Library/Preferences/Kaltura/Capture/
  4. Click Go.
  5. Or simply go to: /Users/<username>/Library/Preferences/Kaltura/Capture/