
Piccolo3 System User Guide. Section 02. Powering up and getting connected
Turning on/powering up the Piccolo3 system
Supply power to spectrometers attached to the Piccolo3/RPi as required . See Section 07. Power Requirements. Note QEPros each have two have indicator lights (Fig. 2) where two QEPros are shown. The lower one indicates correct power being supplied and the upper one that the thermo-electrically cooled detector is at set temperature. Both should be ‘steady’ green for the system to operate correctly. NOTE if a thermo-electrically cooled detector is not at it its set temperature the USB connection will be dropped and the system not operate until it is re-established.
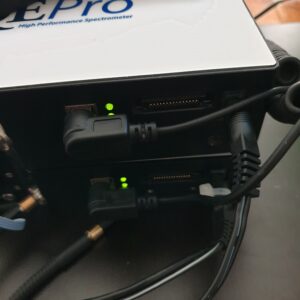
Figure 2 QEPro indicator LEDs
Power up the Piccolo by connecting a 12v battery. 12v DC power supply (minimum 1.2amps) or connecting a Piccolo3 Power Block (which requires 12 to 36v DC minimum 5 amp )
There are several light-emitting diodes (LEDs) that indicate the status of the device (Figure 3).
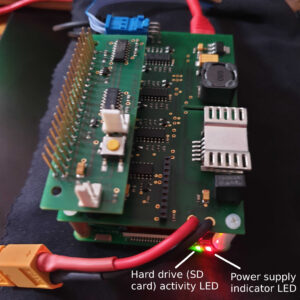
Figure 3 Power and hard drive (SD card) indicator LEDs
The red LED labelled PWR on the Raspberry Pi should be illuminated. This indicates that the Raspberry Pi is powered up.
The green LED labelled ACT, adjacent to the Red LED should flash intermittently whilst the Raspberry Pi is booting. It indicates that the Raspberry Pi is loading the operating system and the Piccolo firmware from its Secure Digital (SD) card. It should stop flashing once loaded but flash when it is being accesses by the system .
The green LED next to the blue shutter cable connector on top of the Piccolo3 control board will flash when the spectrometers listed on the piccolo.config on the Piccolo3 controller/RPi memory stick are recognised and the system is ready to operate and to be accessed via the browser interface. If this green light is not flashing the system is not ready to operate. Common reasons for this are: 1) piccolo.config is in wrong format; 2) piccolo.config does not have the spectrometers that are connected to the system listed or; 3) the USB cable to the spectrometers are not connected or not connected correctly.
Any of these faults need to be rectified, then the system rebooted, before it will operate correctly and connect via the browser interface. However, the Piccolo3’s RPi can be accessed from a laptop terminal using ssh and that will need to be done to poweroff or reboot the system. See Connecting to the Piccolo3 below. NOTE DO NOT POWER DOWN BY DISCONNECTING THE POWER SUPPLY AS THIS MAY CAUSE DAMAGE OR CORRUPT THE OPERATING SYSTEM.
To connect to the Piccolo3 from a laptop using ssh over an Ethernet cable
This needs to be done first so that sudo poweroff (or sudo reboot) commands can be used (with user password) to turn Piccolo3/RPi off or reboot without damaging the OS, if manual poweroff/reboot buttons are not mounted on the system.
- Connect Ethernet cable to Piccolo3/RPi and a laptop
- Set computer network to allow link-local. On a Ubuntu system > open Network Connection > give the Connection a name (say “RaspberryPi” or more descriptively “Piccolo3 link-local”) > open IPv4 Setting tab > select Link-Local Only from Method drop down options > save and > close. . See Fig. 1 below
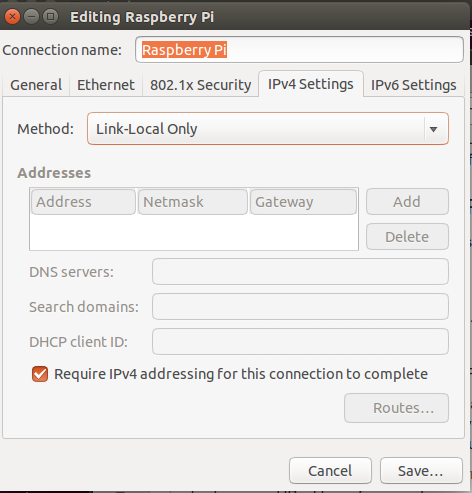
Figure 1. Screenshot of Ubuntu Link-local dialogue
- Select the link-local named connection for the Ethernet connection (Piccolo3 should previously have been powered up prior to connecting the Ethernet cable)
- open a terminal on the laptop
- After powering up ssh to the Piccolo using either the systems own id (i.e. ssh pi@piccolo3-9.local) or the RPis assigned ip (i.e. ssh pi@169.254.213.46).
Warning! Plugging the Raspberry Pi into a network may make it available to other computers on the network or the internet. It is a good idea to change the default password for the pi user from the default (the raspberry or the default password provided to you by TeamPiccolo) to something more secure. See standard Raspberry Pi documentation online.
Note Raspberry PIs do not have real time clocks so will loose time if shut down
Setting Piccolo time. Use sudo timedatectl set-timezone *** in the terminal to set Piccolo time where *** is the users selected time zone (i.e. sudo timedatectl set-timezone UTC )
The Piccolo3 system can now be controlled from this terminal. Use sudo poweroff to power the system down. The red power light will remain on. To stop power supply to the RPi disconnect power supply. This will need to be done before the system can be restarted Note it is not possible to remotely restart the Piccolo3 system after poweroff has been used without disconnecting then reconnecting the power supply. The sudo reboot command can be use if the system just needs to be rebooted and this can be done without disconnecting the power supply.
All functions of the Piccolo3 can now be controlled from a browser interface or from a terminal after the Piccolo3 has been powered up and the spectrometers defined in the piccolo.config file on the memory stick are connected and powered as appropriate. See Section 03. Browser control interface
To connect Piccolo3-*dsk (configured for Coolbox operation) using a directly (HDMI) connected monitor
See Section 03a for detailed guidance
Comments are closed
Comments to this thread have been closed by the post author or by an administrator.