
Piccolo3 Long Range Wireless connection for UAVs by Big Sky Science
Dr Rick Thomas rick@bigskyscience.com
DISCLAIMER: These notes are from Big Sky Science internal documents and may not be fully complete, coherent or work on your system! Please use at your own risk, Big Sky Science cannot be held responsible for damage resulting from use of information within this document. However, we can answer questions on the wiki and provide more services to help with your system – just let us know at Rick@bigskyscience.com Thanks!
Introduction
The aim is to use long range wifi transmitters on the M600 pro and basesation to connect to the Piccolo through a supplementary wifi network at a range of up to 500m (VLOS).
Main risk is RF disturbance of the flight control link. However, experience has shown this is unlikely and this connection is extremely robust. Flight parameters should be double checked for loss-of-link actions.
The best way to achieve a piccolo link is through the RC link. The solution presented here is a working fix for now until funds for such development become available.
Very simply, this solution involves using a long-range wifi booster on the piccolo, coupled with a long range access point at the launch site. Any device connected to the access point can talk to each other.
Equipment
For Piccolo/UAS: Brostrend AC1200 AC3L – e.g. https://www.amazon.co.uk/BrosTrend-Linux-Wi-Fi-Adapter-AC3L/dp/B07FCN6WGX
Ground station: TP-Link 5GHz N300 Long Range Outdoor CPE for PtP and PtMP Transmission
https://www.amazon.co.uk/gp/product/B00N2RO63U/ref=ppx_yo_dt_b_asin_title_o03_s00?ie=UTF8&psc=1
(I would consider a dual band next time- with 2.4 Ghz, so more wifi equipment can connect)
You will also need portable power for the ground station (and possible laptop, though can use a phone/tablet). We a car battery and an inverter.
Setup
‘Rover’ wifi
Raspi pi – a brostrend AC1200 AC3L is attached to the rasp pi via a USB port. Was a pain to install due to the kernel version on the pi. Here are some pointers:
- On the piccolo pi ssh connection, type: unmame -a //tis displays the kernel version
- If the kernel version is current (5.4.51), then skip to 4), otherwise:
- Type: sudo apt update , then: sudo apt full-upgrade //this will update and use the newer kernel
- Type : sudo sh -c ‘busybox wget deb.trendtechcn.com/install -O /tmp/install && sh /tmp/install’ //to install the driver
Further info on driver installation is here: https://deb.trendtechcn.com/
- May need a reboot – check wifi is there with: ifconfig
Should see wlan0 and wlan1 – e.g. two wifi adapters. If you have the pi setup over wifi already then it should connect to you existing network, but with a different IP. See networking steps below for how to add pi to wifi network.
- Disable the onboard wifi:
edit /boot/config.txt and add this lines:
dtoverlay=pi3-disable-wifi
Optionally can disable bluetooth by adding this:
dtoverlay=pi3-disable-bt
After reboot, onboard wifi is disabled. Confirm only one wlan is present with ifconfig and that is is the ACL3. To undo, comment out the same line above.
- While we are here, set the SSID for new wifi network we are about to create below:
sudo nano /etc/wpa_supplicant/wpa_supplicant.conf
And add a block like this with the correct details:
network={
ssid=”FieldLAN”
psk=”piccolo is cool”
id_str=”FieldLAN”
priority=2
}
- Priority 2 is added to make sure it connects to the fieldLAN above my home network, which has priority=1, change numbers accordingly for different setups.
- Check DCHD settings with:
sudo nano /etc/dhcpcd.conf
‘Basestation’ wifi
Tp-link PHAROS – 13Dbi directional antenna. This is plugged in at base and pointed at the aircraft. There are some mounting considerations in the manual.
To set it up, power it on and attach to the ethernet port of a computer. Set a static IP to 192.168.0.10. Then open a browser and go to:
192.168.0.254
My user/pwrd:
bigskyscience
C00nected
Router IP set to:
192.168.0.254 (home router set to 0.1)
Or
169.254.185.106
SSID: FieldLAN
pwd: piccolo is cool
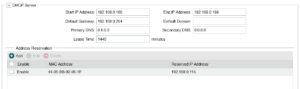
In network settings make sure DCHP is enabled, lease time set to at least a day 11440, and a range say .100 to .200. (we will fix these for devices soon).
Reboot.
Hopefully the piccolo pi will now reboot and join the new local network. Once this is done, go back into the router settings and fix the IP address through: network, address reservation: select the pi by mac address.
Piccolo trigger/logger
- Add SSID for the FieldLAN wifi network created above:
sudo nano /etc/wpa_supplicant/wpa_supplicant.conf
And add a block like this with the correct details:
network={
ssid=”FieldLAN”
psk=”piccolo is cool”
priority=3
}
(Priority 3 as I have my phone as 2.)
11. That’s it, it should all work and be ready to go in the field. Do test and refine the above based on your own experience though, and let me know any improvements.
Comments are closed
Comments to this thread have been closed by the post author or by an administrator.