This year we have seen an increased uptake of the Test tools available in Learn. Tests allow for a mixture of auto-marked and manually marked question types to be set for students. The options when deploying the test allow you to change the nature of the test and can be configured in many ways to make it suitable for formative or summative assessment approaches.
In this article we will explain the test options available and provide some recommendations on how they can be applied in different scenarios.
This is part of a series of blog posts related to Tests and Assignments:
Full documentation for Learn Tests is available via the Blackboard Support pages
Accessing Test Options
Test options are only available after you have “deployed” the test, which effectively means adding the link to the test in the student view. This can be done by selecting “Assessment > Test” from the menu in the content area where you would like your test to be located.
Test Information
As per any item on Learn you need to give your test a meaningful title which will act as the link on the content page for the student to open up the test.
You can also choose to include some additional information that will be visible on the course page.
Test Cover Page
The test itself has its own section for Description and Instructions which will be displayed throughout the test. You will see a preview of these fields in the Test Options page and can choose to include these before the test starts.
I would recommend selecting the option to display the description and instructions on the preview page that students see before the student chooses to “begin” the test.
A summary of the exam criteria is also displayed on the cover-page for the test which students see before starting the test.
New Window
Personally I don’t normally set the test to open in a new window as I feel it can cause a bit of confusion. That being said the main benefit of the new window approach is that the Test is displayed standalone without the course menu on the left-side of the screen which could be accidentally clicked during the test.
Test Availability
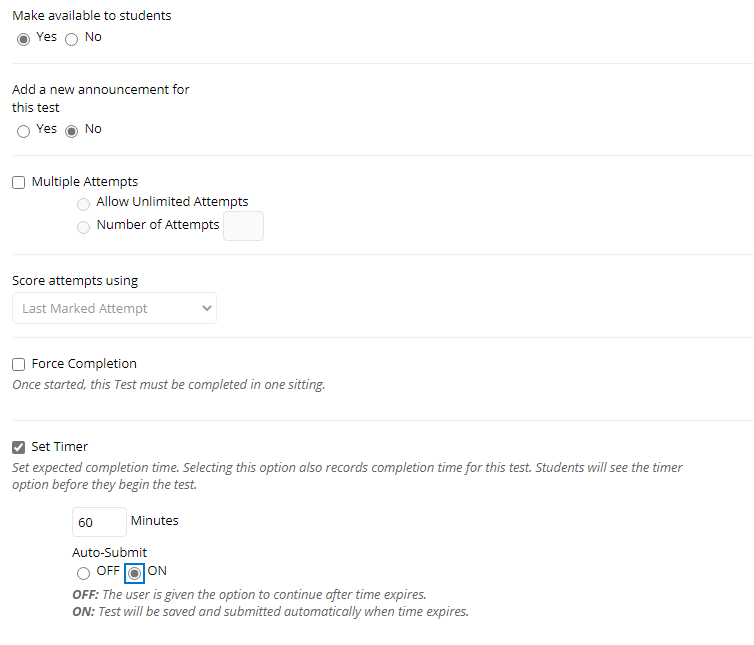
Make available to students
This must be set to Yes for the students to be able to view the test.
You can add additional restrictions for date availability within the options, and you can also include adaptive release rules to the visibility of the item from the course page – but if the test availability is set to No the test will not be seen by students regardless of your additional settings.
Add Announcement
An automated announcement will be made. I recommend setting this to No and crafting your own announcement – this way you have more control over your message to the students.
Multiple Attempts
If the test is to be summative then it is mostly likely you will only allow a single-attempt.
You can choose a set number or unlimited attempts if you need this option. If multiple attempts are permitted you have to choose how the score rewarded is to be recorded: Highest, Lowest, First Attempt, Last Attempt, Average of Attempts.
You have the ability to add additional attempts for students with exemption criteria, and attempts can be managed at an individual student level via the grade centre if required.
Force Completion
If enabled this will submit the student attempt if the user navigates away from the test.
This option is not recommended in any scenario as it can submit an attempt if a student inadvertently loses access to the test page.
By keeping this option disabled a student is able to re-enter the test to complete their submission as long as the test is available to them based on the date/time restrictions applied.
Set Timer
You can set a timer for the test as a number of minutes from the time the students hits the “Begin” button to open the test.
A timer progress bar is always visible at the top of the screen, and an alert will highlight different intervals to the test being complete.
Timer Auto-Submit
You can choose to have the submission auto-submit as soon as the timer expires. Question responses auto-save after every state change and continue to save during regular intervals.
I would recommend having this option checked if using a timer as it means the student doesn’t need to hit submit and it ensures that the test has been submitted correctly and will be available to be marked. It is not possible to submit a test on a students behalf if the test has not been manually submitted – this cause the submission to be left in a limbo state.
Additional time extensions can be applied to students in the test options to ensure those students have the additional time that they are permitted.
Display After / Display Until
The dates and times that the link to the test is visible on the course page.
If a student is still in the test environment after the display until date/time is reached they will still be able to continue the test. This date only controls when the link to access the test is available.
Please note if the Grade Centre column for the test is set to visible to students, then the student will be able to access a summary of when their attempt was submitted, and depending on the feedback settings see their responses, score and feedback.
Password
It is possible to set a password to restrict access to the test.
The most common scenario for this is when the test is being used in exam settings and you want students to access the test, but you control access by only providing the password when invigilators are happy to start the exam, and limit who has access to the password.
Test Availability Exceptions
These settings are often overlooked, but allow you to override certain settings for the test for individual students or applied to specific groups of students. This is most often used to grant additional time for assessments.
The options that can be set include:
- Additional Attempts
- Addition time on the test timer
- You can change the auto-submit setting if using a timer
- Change the dates/time that the test link is available
- Toggle the setting for force completion
It is advisable to use these settings rather than trying to create multiple versions of the test, or trying to encompass a universal set of rules that then need to be checked manually during the marking process.
Due Date
The due date is largely superficial. It is used to provide students with notifications about upcoming assessments and missed deadlines. It also can add a marker to the grade centre to highlight if a submission is after the deadline.
Learn does not apply any penalties based on late submissions, it is just a point of reference.
Do not allow students to start test after due date
It is possible to prevent the test from being started after the due-date. This can be used if you have a strict assessment window and you do not wish to accept any late submissions. In this case you should make sure the due-date does not adversely affect any students who have additional time arrangements.
Self-assessment Options
If the test is being used purely for formative reasons and you have no need to log any scores or performance you can limit the information that is collected in the Grade Centre.
You can even choose to hide the test entirely from Instructors in the Grade Centre.
Do not use question types that need to be manually marked for self-assessment types of tests.
Results and Feedback Visibility
These settings often cause confusion as there is a specific quirk if you want no hint of scores to be visible to students after their submission – this is detailed in the related post about assessment quirks.
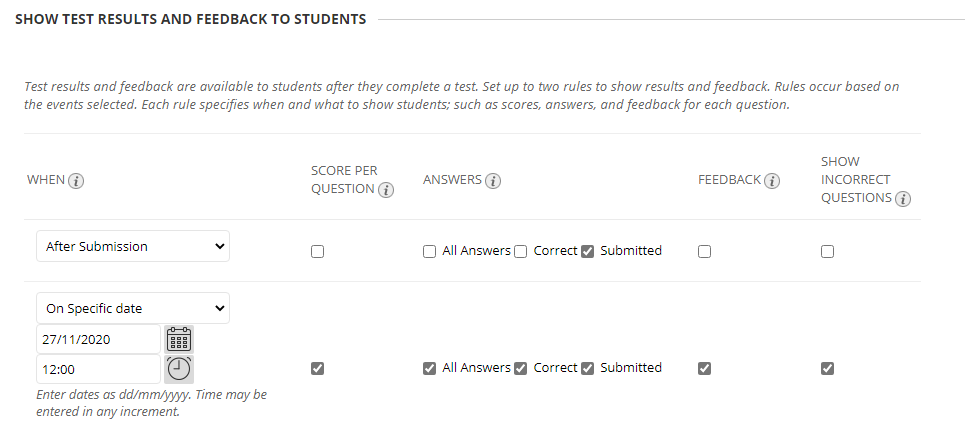
You can set 2 periods of time that feedback can be visible to students.
For each time period you can choose what level of feedback is to be displayed to the student from the following checkboxes:
- Score per question
- Answers – All possible, Correct Answers, Submitted Answers
- Feedback
- Highlight questions where the answer was incorrect
This feedback relates to the questions which can be reviewed when viewing a detailed summary of the submission. The student may also have access to an overview of their test performance. The overall performance is stored in the grade centre and you may need to change the visibility of the grade centre column to restrict access to the test feedback.
Students will see a summary page after completing a test which shows the date/time the test was started and submitted etc. It is also possible for tutors to view the stats for an attempt from the test marking interface.
Test Presentation
Do you want your questions displayed all at once, or question per page? This is purely a preference for how you feel that your test will be displayed to students.
I usually follow the rule: if there are 10 questions or less then display all on the one page, if more than 10 questions then display as one question per page.
Please do not select “prohibit backtracking” as this prevents the students from going back and updating their answers. Many students like to read all questions before they start answering the questions and this setting would prevent this from happening.
Randomise Questions
You can choose to have all of your questions appear in a random order for each student. The purpose of this is to prevent cheating by students sharing their answers by question number because the numbers will be shuffled.
The one potential downside of randomising questions is that it makes it harder to troubleshoot any issues with questions as a student might say they have a problem with Q3, but they will need to provide the details of the question itself as their Q3 might not be the actual Q3 in the test design.
There are other ways of shuffling and randomising in tests. You can choose to shuffle the distractors on a per-question (or all questions) basis. You can also build “Pools” of questions where you can present a student with 3 random questions out of a bank of 10.