This guide was written using macOS and an iPad. The Reflector software is available on Windows. Reflector can support any device using AirPlay, Google Cast or Miracast.
How to use record your iPad screen wirelessly on desktop using reflector:
1. Download and install the app here.
2. Click the Reflector app in the menu bar to see devices connected.
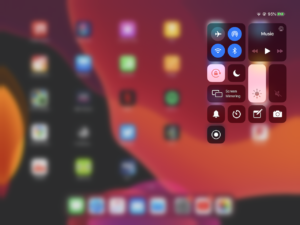
3. On the iPad, swiped down from the top right of the screen to access the control centre. Tap Screen Mirroring and select the desktop device you want to reflect to.
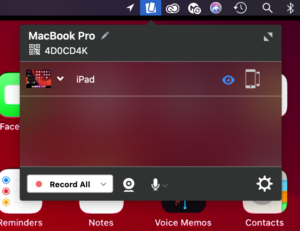
4. On the iPad image on the desktop, click the cog on the top left to choose a frame for the image and adjust the scale, device rotation and choose whether the mobile screen image floats on top.
5. Click the menu bar icon for Reflector, click the camera or microphone icon to choose to enable webcam and audio recording. Click Record all to begin the recording.
6. Click the red record button again on the iPad stream image to end the recording. Once the recording is finished you can give the recording a name and choose where to save it.
Advantages:
-Reflector supports iOS devices using Airplay and Android devices using Google Cast.
-Reflector allows you to reflect multiple devices to your desktop at once, allowing a simultaneous recording of both.
-Ability to reflect devices wirelessly by using the same network is convenient and simple to set up.
-Allows you to record screen of mobile device and webcam of desktop simultaneously.
-Allows you to record screen of mobile device while hiding it on the desktop screen.
-Places mobile device video feed on desktop screen. This means you can use other software to do a screen recording that will capture the desktop and mobile device simultaneously in one video file.
-Allows you to use frames for the device’s feed e.g. you can make an iPad video stream look like an actual iPad device.
-Changeable video quality settings, as well as different frame rate recording options to help decrease video file size.
-Reflector teacher allows use with reflector director, reflector student and is preconfigured for classrooms.
Disadvantages:
-Due to the connection to the mobile device being wireless, there is potential for lag in the recording if the network is weak.
-The trial version of the app has a significant watermark on recordings.
-Can’t screen record desktop and mobile device at same time on its own.
-Difficult to change the scale of the image on the screen.
-If mobile device recording is separate from other components of lecture recording, the 2 videos would need to be synced up after recording.
Alternative – How to record the iPad using QuickTime Player (wired connection):
- Plug your iPad into your Mac and launch QuickTime Player, built into macOS.
- On the app menu bar, click File>New Movie Recording.
- On the video control panel, click the downward arrow beside the record button and select your iPad as the video and audio source.
- Click the record button. When you are done recording click the stop button.