
Raspberry Shake: Installation Guide
[TODO – update with better photos from field installation]
Final Assembly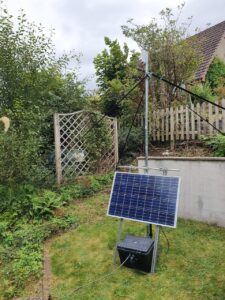
- Sensor Enclosure
- Connect the right angled end of the 8 pin M12 sensor cable to the sensor box
- Site the sensor in the desired location, ensuring it is level and has appropriate coupling to the ground
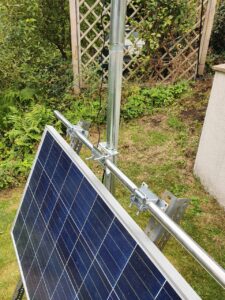
- Solar Frame
- Build is summarised here, for more details see Solar Frame
- Connect the central pole to the base plate (NB up to 3 pole sections can be stacked if required for antenna height)
- Use ratchet straps to secure the pole vertically
- Loosely attach the horizontal cross bar (so as the height can be adjusted)
- Bolt the 2 slotted aluminium angle pieces to the cross bar
- Affix the solar panel and adjust to the required hight and angle.
- Attach the GPS and 4G antennas near the top of the pole.
- Some cable management will be required, cable ties etc.
3.
Battery and Case
-
- Position the case so that it receives as much shade as possible, e.g directly behind the solar panel. (Also consider covering the case with rocks or turf when ready)
- Connect the sensor cable, GPS and 4G Antenna cables to the ports on the outside
- Place battery in the outer case, with red/positive on the right
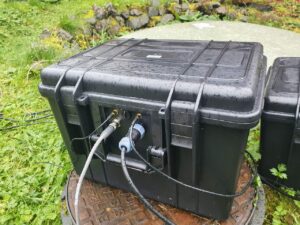 Outer Case
4. Power Panel
-
-
- Attach the spade connectors for the solar panel
- Screw the negative and positive battery leads to the battery, taking care not to short the terminals with tools etc.
- Slide the power panel down into the outer box, beside the battery
- Connect the solar panel to the external 2-pin socket on the box.
-
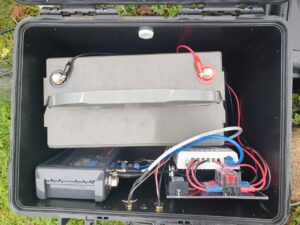 Components Inside the Case
5. Pi Enclosure
-
- Ensure an SD card is present in the raspberry pi with the correct software.
- Ensure a valid SIM card is present in the 4G dongle.
- Attach 4G and GPS antenna SMA leads to the enclosure
- Attach the 3 pin comms connector for the charge controller.
- Attach the 8 pin M12 cable for the sensor
- Finally, the DC barrel plug can be screwed in which will power the pi and start the boot process.
- The Pi Enclosure should be positioned to the left of the power panel.
 Pi Enclosure
Confirming Operation
After the station is powered, wait at least 30s then check to make sure it has acquired GPS and 4G signal:
- The 4G dongle will show a constant blue LED
- The GPS module will flash red approx once every 10s. (Rapid flashing means it has not locked on yet)
After signal is acquired, the station will automatically establish a connection to the project server and start publishing telemetry data.
Checking the project Thingsboard dashboard is the simplest way to confirm that both SEED and auxiliary telemetry are active. Set the time window to ~10 minutes and look for new data being plotted under all sections, but particularly geophone data and battery voltage data. (NB, the station may need to be manually added to thingsboard if it has never been active before.)
Comments are closed
Comments to this thread have been closed by the post author or by an administrator.