Signposting for students

Hybrid Teaching put additional emphasis on the content and communication that comes from your Learn course. We have already looked at the way the Informatics courses follow a standard structure to give some consistency to students to help them know where to look for content… but what additional signposting could we consider?

As course materials will sit on Drupal now and course admin on Learn, it is especially important that students know where to go to find what they need. Find out more about the communication tools available on our blog post: Communicating with students

Some Assumptions

Below are a series of contexts and assumptions that we might expect your students to follow during the semester. We have tried to outline some of the things that a student might expect from the course and have offered some tips on ensuring this information is clearly signposted to them.

Student Behaviour

Below are some loose assumptions about the primary audience for your course, the students:

Some students will not read everything

  • Use headings, summaries, and bullet points to present important information in a concise manner
  • Don’t bury important information in long prose
  • If there is a “call to action” for the student make this clear and include a description of what is expected of them

Some students don’t know what they are looking for

  • Provide guidance and pointers to help a student get started
  • Announcements are a good way of providing a timely narrative to support your course content – these are generally displayed chronologically so can provide an overview as the course evolves through a semester

Students are not yet subject matter experts

  • Avoid using language or concepts in the titles that the student may not yet be familiar with
  • Provide overview of what the student is expected to learn in each week / topic unit
  • Reference materials that might be pre-requisite or used for revision purposes

Students are juggling multiple courses with varying schedule and deadlines

  • Make sure the course schedule is clear
  • What synchronous events might be taking place

Students are likely having to plan their own self-study workload

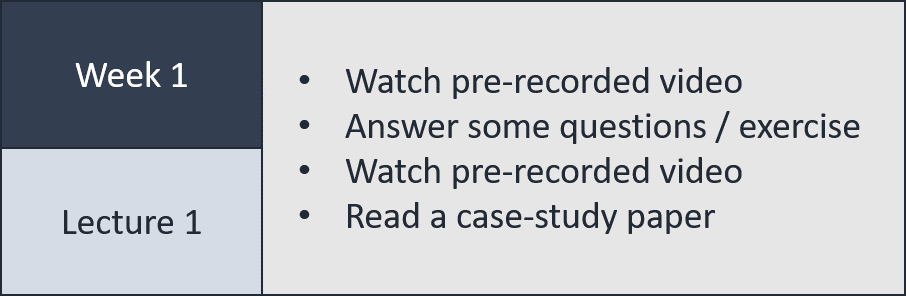
  • Provide an overview of how much time a student is expected to spend in a week
  • Give insight into which materials are essential reading/viewing, and which might be additional information only, or just for fun/consolidation
  • Some students will want to make sure they read everything that is posted to the course, so if you include information that is a reference only you might need to indicate that this is not core-reading

Students might not be able to follow the standard course structure/timeline – this could change at any point during the semester

  • Is it clear where recordings or alternative materials are located?
  • Is there a summary of what a student is required to do each week?

Students might not realise that an element in Learn needs to be clicked for more information

  • Try only using a short description/summary in clickable elements in Learn as these can often be overlooked by students
  • Provide the full information from within the folder/section
  • Use a different colour for the link

Why/When are students accessing the course?

Based on previous work students tend to access courses for the following reasons:

Start of term – just browsing all content

  • Check the course readiness article (2022 update) for what is expected for Week 0
  • If content is not visible and is due to be released, give an indication to students of when materials will be available and where to find them.
  • Scheduled items in Drupal and hidden items in Learn do not show anything at all, not even a placeholder. If all content is hidden a student will see an empty page.

Week to week, looking for specific materials to support their studies for a specific week

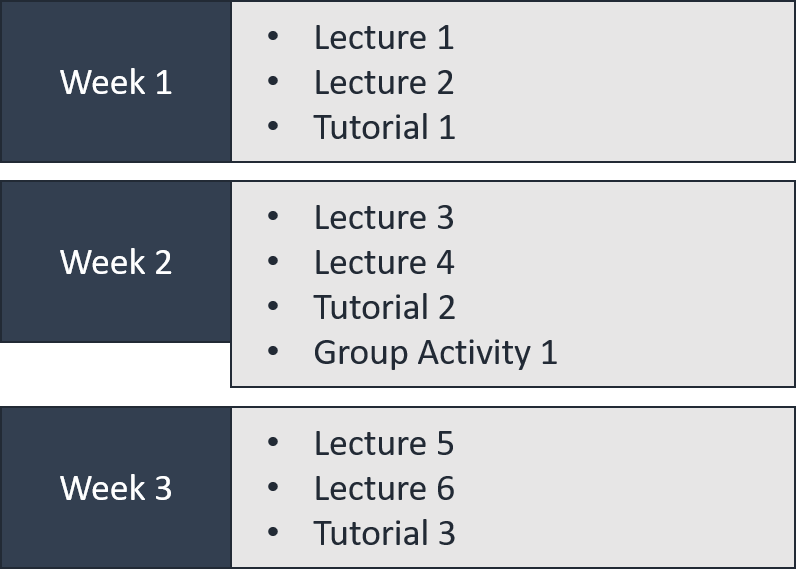
  • Be sure to identify the week number in titles and links, you can include the date too if relevant
  • Try to also include a title or summary of the topic for that week, this will make it easier to find materials when reviewing.
  • Announcements are a great way of setting the scene for the week’s teaching.
  • In Drupal, using either the schedule table or having a page for each week of the course makes it easy for students to navigate to what they need

Take part in set learning activities

  • If there are set actions, dates, and deadlines required for a student to participate be sure that the instructions and link to activity is displayed clearly and consistently
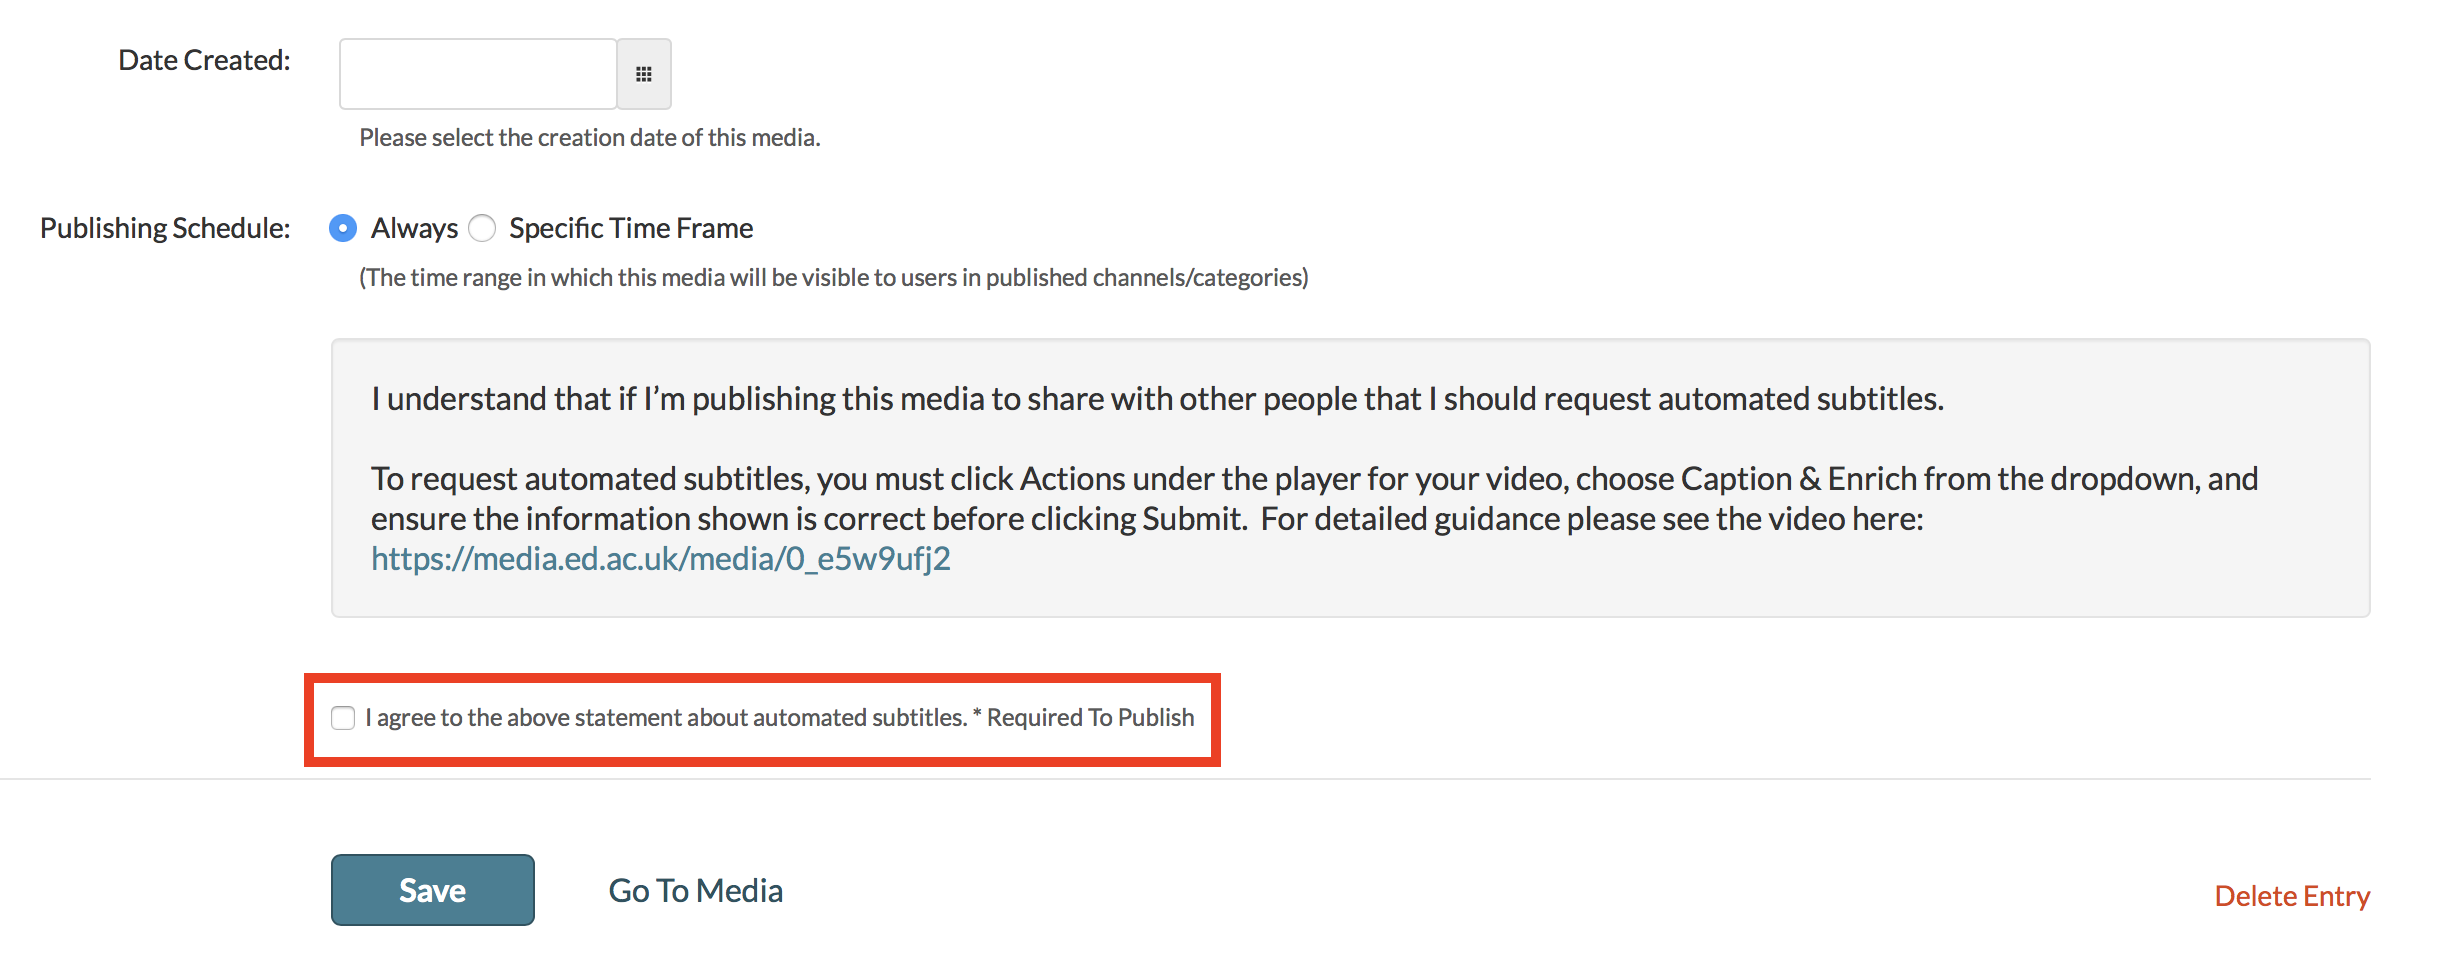
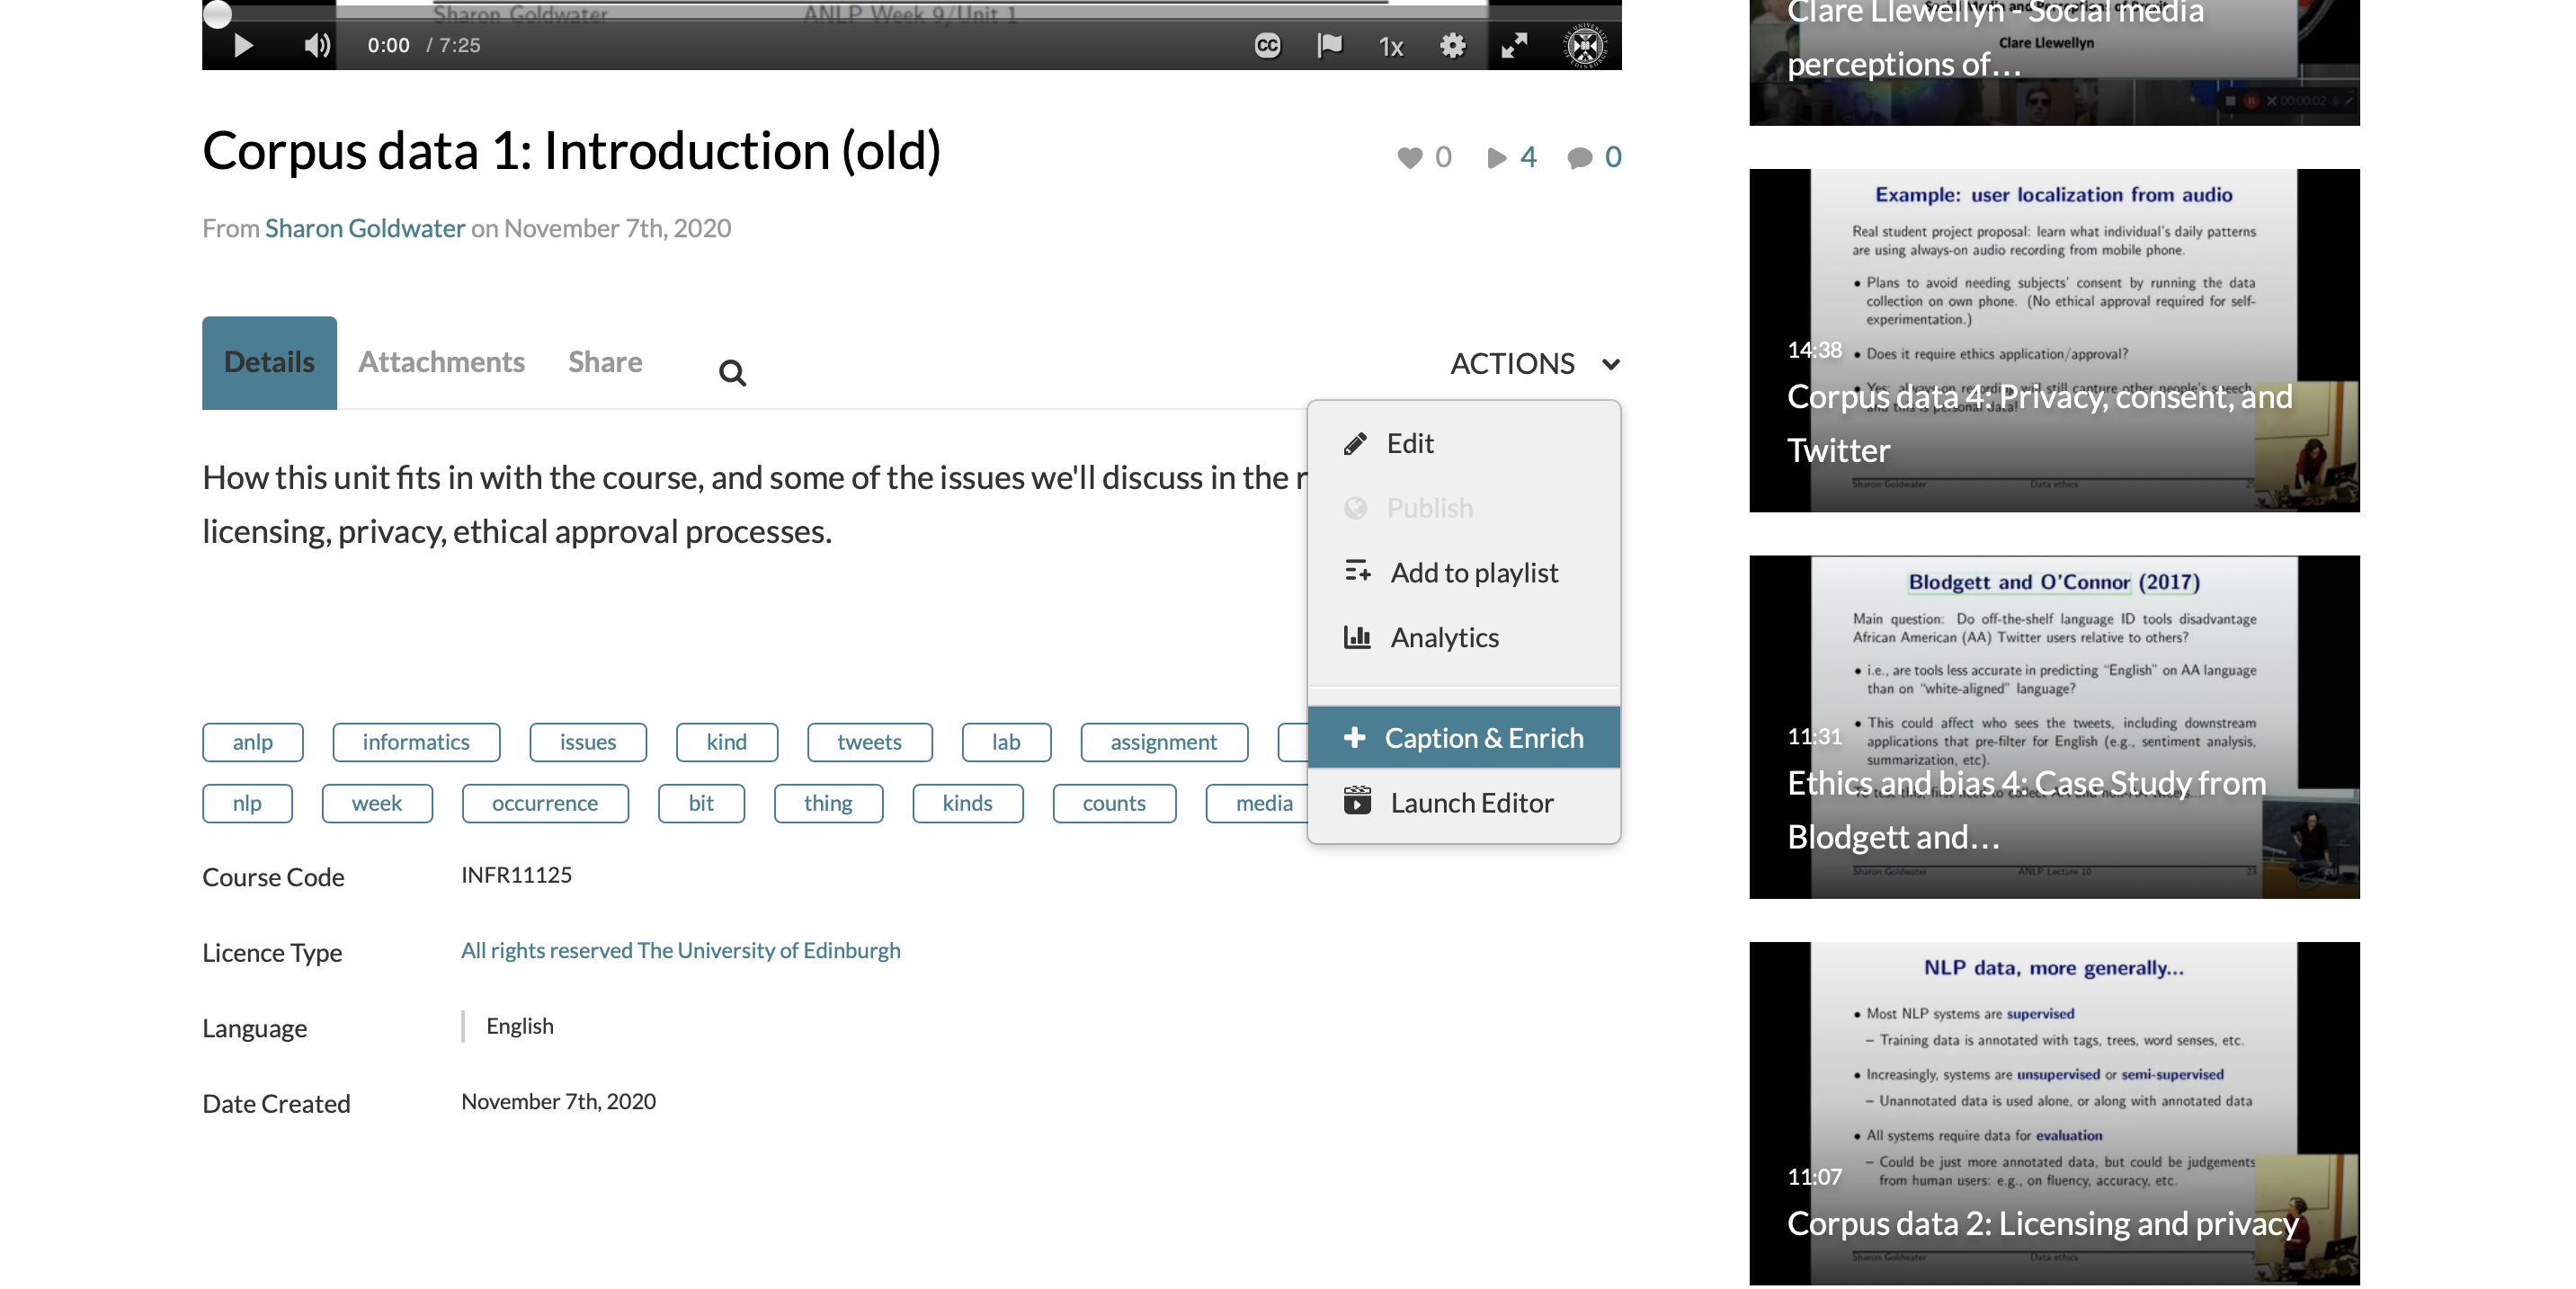
  • It is useful to add an announcement at the start of each week identifying what is expected of a student. Please see this example of an announcement, with the option ticked to also send it as an email, from Week 2 of AML (with thanks to Oisin for letting us share this): Applied Machine Learning (2022-2023)[SEM1]- AML Week 2 Instructions.pdf

Revision of topics before some form of assessment

  • If materials are organised by week is it still clear which topics and areas where covered in those sections
  • Give content meaningful titles and summaries so resources are not just referenced by Week 1, Lecture 1 – this shows when the lecture took place but not what it covered.
  • You can add links to your content in Drupal. This allows you to link to content in a different section without having to duplicate content.

Looking back at courses studied in previous years

  • Students have access to their courses studied in previous years and may wish to review content so meaningful titles can aid them in finding the materials they are looking for

Following up on an announcement / notification in Learn

  • Many students will use the email or Learn app notifications to trigger them to accessing the course
  • Announcements and notifications are pooled into separate lists on the app to make it easy for a student to see all activity across their Learn courses from a single feed without having to navigate each course individually looking for updates.

Signposting and Structure

The above information is looking at how information could be presented to students to make sure it is easy to find and presented consistently. We have touched a little on what content you might want to include in your course setup – but we have listed some outlines of content that a student might be expecting to find in your course.

Take a look at the list below and think about whether this information is available within your course, and if it isn’t, how would you expect the student to find it?

Expected Content

Below is a summary of the type of information a student is likely to expect within your Learn course:

  • Course Information
    • What is the course all about?
    • What is expected of me in this course?
    • Is there a timetable/schedule of teaching and deadlines?
    • Who is running the course, who can I contact if I need help?
  • Course Content
    • What information do I need to prepare for teaching activities?
    • What is happening this week?
    • What should I have learned about this topic?
    • Where can I find the materials used during the teaching?
    • Is there a live teaching session or is it only via recording?
    • How much time should I set aside for this?
    • Is there additional reading or revision materials I should be looking at?
    • Does the teaching refer back to any of my previous studies?
  • Assessment
    • What am I being assessed on?
    • When do I need to submit my assessments / when are assessments taking place?
    • How will I be assessed?
    • How do I submit my work?
    • When will I get my feedback?

Test it out

Sometimes as a course organiser you can be a bit too close to the material to view the materials as a student would. You can use Student Preview in Learn or paste a Drupal URL into a private web browsing window to see what a student can see in your course, but you will need to try and think about the questions above to see if you can find the information that a student would expect to see.

Alternatively why not get a friend or colleague to try the course out as a student would to find  specific information. Sometimes a person with no background knowledge of your subject area can be a great person to test the structure of your course; ideally the course should be usable without prior knowledge of the subject.


CodeGrade

Following a successful pilot in 2019-20, pre-honours Informatics students will have access to CodeGrade for select courses. Please get in touch to see if there is a budget to cover a CodeGrade license for your course.

You can find helpful videos covering all aspects of your interaction with CodeGrade on their YouTube channel here: https://www.youtube.com/channel/UCedAzCujQ7aT2pFbnzlMc8Q/playlists.

If you do not have access to YouTube, or prefer your guidance in text format, you can find extensive documentation on using CodeGrade here: https://docs.codegra.de.

For Students

For Markers


How to upload a video with dual feeds to Media Hopper Create

If you need to upload a video with two feeds (e.g. lecture slides and lecturer cam) to Media Hopper Create, this is possible through https://videomigrator.is.ed.ac.uk. When a video has dual feeds on Media Hopper Create, the user has full control over the size and location of both feeds while they watch the video. This is very useful for dynamic lecture videos when the focus changes between the two feeds and ensures the user can move the secondary feed out of the way of the main feed when needed. To upload a dual feed video:

  1. Log in to the media migrator and choose the primary video file (the video feed that will be larger by default).
  2. Create a title for this file (this title will be the one that appears for both feeds) and upload the primary video file.
  3. After the primary video file has completed upload you will receive a success message.
  4. You can now repeat this process to upload the second feed (the smaller feed that will hover on top).
  5. The second feed also requires a title but this will not appear on the final video page.
  6. The video with dual feeds will appear on your ‘My Media’ section on Media Hopper Create where you can then edit the video details and publish it.


Publishing videos to a Media Hopper Create channel.

How to publish a video

To upload a video, e.g. from another university source such as Blackboard Collaborate, click Add New on media.ed.ac.uk, then click Media Upload to begin.


When uploading a piece of media to Media Hopper Create, certain fields must be filled in order for the video to be published to a course channel. The required fields to publish can be filled in while uploading the content, or after uploading the content by finding the video and clicking Actions>Edit>Details and filling in the fields below. In order to publish the media fill out:

Name (The title of the video that will be displayed)

Description (Will be displayed underneath the video)

Tags (at least one tag word is required for the video to be published and help people find it easier)

License Type (This is the copyright license to be applied to the content. I normally select All Rights Reserved The University of Edinburgh from the dropdown menu but this is at the content creator’s discretion.)

Course code, Publisher, Language and Date Created do not need to be filled in order to publish the video but can be useful to fill in to make the video easier to retrieve later on. A publishing schedule can also be set so the media can only be viewed for a certain period of time (useful for perhaps making a video only available during one semester).

– You now need to agree to request automatic subtitles before you can publish your content.

NOTE: Selecting this box does NOT enable auto-captioning, this is done in the next step.

screen shot showing where to agree to automatic subtitles

After the details are filled in, on the video uploading page (or on the video editing page under Publish instead of Details), set the Publishing Status to Published (if Published is not selectable, there are missing video details that still need to be filled in). A drop down menu will appear giving the option to Publish in Category or Publish in Channel. Select Publish in Channel and select a channel you manage to publish to the channel.


Paired Programming: Usage Example for Google Remote Desktop

We are aware that many of you are considering how best to support paired programming online. The Computing Team have been investigating various options here. Some are still being documented, however, please see below one potential use case using Google Remote Desktop.

*Assumes both students are using a Remote DICE desktop.

  • One student runs Chrome from within their Remote DICE session (i.e.*not* on their personal device) and goes to the remote service URL.
  • They click on the get support button. This gives them a unique one time use ID they must separately exchange with the other student.
  • The other student runs Chrome from within their Remote DICE session and goes to the remote service URL. They click on the provide support button and enter the unique ID.
  • The first student will then be prompted whether to accept the remote connection.
  • After that both students will be able to share and interact within the first students remote DICE session. The best approach to coordinating activity will be to take turns, one student driving the other navigating and then swap over.

Caveats to note:

  • Since the students are using Chrome within a Remote DICE session the sharing and control is limited to that session window only as opposed to their entire personal device.
  • Both students need to have a Google account. We strongly suggest that students do not use their own personal google account, if they already have one, but create throwaway ones purely for the purpose of these sessions.
  • To setup a Google account you need to provide your name and mobile number for verification.
  • I don’t believe there is any way to have more than two parties share the session – so won’t work for groups of more than two.
  • You will need a fallback in case any students do not want to accept the T&C of a Google account. This does not need to be functionally equivalent, it can be a “lesser” experience.
  • A DPIA for use of Google Remote Desktop has now been approved.


Course Patterns

Your course will likely be made up of a number of patterns that will be replicated across the duration of your course. For example the majority of courses will likely break down their course materials by Week, creating folders within the Course Materials area in Learn for Week 1, Week 2, etc.

You can read the University’s detailed overview of Macro and Micro Patterns here.

Tip:
Provide more than just the Week number in your folder naming convention. Perhaps include a topic titles, and a summary of the points covered. This will help students who are looking back through the course for revision or consolidation purposes.

Macro Patterns

We have already touched on courses being broken down by Weeks. Each week might consistently have 2 lectures, 1 tutorial, and every other week have a group assignment. Your course should reflect this within the course materials and provide the outline to this from within the structure.

Week 1 (Lecture 1, Lecture 2, Tutorial 1), Week 2 (Lecture 3, Lecture 4, Tutorial 2, Group Activity 1), Week 3 (Lecture 5, Lecture 6, Tutorial 3)
Example of a potential Weekly Structure macro pattern

Micro Patterns

If using a flipped classroom approach, the way that you choose to deliver your lectures will likely also follow some “micro-pattern”. In your lectures you might consistently structure them as:

Week 1 | Lecture 1 (Watch pre-recorded video, answer some questions / exercise, watch pre-recorded video, read a case-study)
Example of a potential Lecture micro-pattern

If you can think about how your weekly content might be broken down in this way and represented in your course website, you can quickly repeat these structures for the materials giving your students a consistent and manageable experience.

If you are unsure how to identify these patterns and present your content and activities to students then please contact LT-support@inf.ed.ac.uk or attend one of the Consultancy drop-in sessions for further discussion.


Sharing OneNote in Virtual Classroom

In the recent Exploring Whiteboard Approaches blog post we shared different ways of presenting mathematical writing using whiteboards we touched on how OneNote might be used as a tool for demonstrating handwritten content as well as a collaborative space for mathematical note taking.

To expand how how to use this approach we have added some further explanation below:

Writing Maths with OneNote

OneNote is an ideal note-taking tool that allows for simple hand-writing tools to be used, but also have a convert to maths function available.

Writing with the ink and creating a conversion is relatively straight-forward, by using the “Fix it” option you can quickly sub-select components of your handwriting to find alternative symbols used in your maths writing.

This will need to be tried with your handwriting and device to test for suitability.

Use in Tutorial Session

To broadcast live annotations I would suggest the following approach if you have a desktop/laptop with stylus/tablet setup.

  1. Use desktop/laptop for Blackboard Collaborate, and choose to share your screen
  2. Use the tablet input to write your maths on OneNote
  3. Your annotations will appear on the shared screen after a short delay

Potential Issues

Heather Yorston has been using a similar approach and gave a short overview of this at a recent Teaching Hour with a session titled, “How do I teach Maths online?”.


Exploring Whiteboard Approaches

The questions around whiteboard approaches and mathematical writing have come up numerous time throughout the summer. There has been some really interesting discussion within the School of Informatics as well as more widely within the College.

Unsurprisingly, there is no single solution that solves all of the scenarios raised by colleagues. A good starting point is to consider the ways that you might want to use a whiteboard – we have summarised some solutions to the following approaches below:

  • Live demonstration to students
  • Recorded demonstration to students
  • Collaborative whiteboard tutorial

The following approaches are suggestions and not the only solution. You can check out further suggestions and alternatives via the Hybrid Teaching Technology and Tools Finder.

Live demonstration to students

If you are delivering teaching via a video conferencing tool / virtual classroom you may wish to demonstrate handwritten content that you would traditionally use a whiteboard for within a classroom.

First consider if you prefer to work with digital ink or using a standard pen and paper approach.

Digital Ink

Although writing with a mouse or trackpad is possible it is often an unnatural feeling for many people, with many preferring to use a stylus attached to a computer or used directly on a tablet device.

Both Collaborate and Teams have a whiteboard that offer some basic writing and annotation tools for whiteboards. These tools are often sufficient for quick demonstrations, but do have some limitations. It is important to note that any content created in the Blackboard whiteboard will be removed at the end of the session so a screenshot should be taken if you would like a digital copy.

An alternative tool is to use OneNote, you can broadcast your screen when writing in OneNote, but there are two additional advantages in the way that the content can be shared to students, and the writing can be converted to Math writing.

A description for how to broadcast your OneNote in a Virtual Classroom can be found in this additional post.

Pen & Paper

It may be that the easiest approach is to use pen and paper, and carefully positioning a camera or additional video-source you can broadcast your paper to the room.

You can choose the video source that you wish to share in both Collaborate and Zoom, additionally you can choose to join a meeting from an additional device such as a smart phone to use this as your additional camera source.

With a small tripod and a well-lit workspace you can share your handwritten work to the rest of the virtual classroom.

Recorded demonstration to students

You may prefer to record your demonstration as a standalone resource. This can often make it easier to focus on the task without having to consider other aspects of the technology compared to running a live demo. Another benefit of pre-recording is that the resource can be used on its own in addition to any other teaching activity.

Screen Recording or Recorded Meeting

As above, you can record your demonstration using the same tools and approaches you would as if you were running a live session. You can record a session (without other participants) in Collaborate or Teams.

How to record and view your iPad screen on desktop

You could also use Media Hopper Create to record your screen of any demonstration taking place on your screen.

Camera and Tripod

Using a camera or smartphone you could record a demonstration on whiteboard, or pen and paper.

Point the camera to a piece of paper at a reasonable distance to allow space for handwriting, but still easily legible.

Notes & Tips

  • Beware of autofocus trying to switch between focus of your hand and the paper, this should be relatively minor, and most phone apps allow a fixed focus if required.
  • Use a well lit room, but watch out for glare or excessive shadows
  • Should be relatively easy to colour correct the footage to white by doing a white-balance on the piece of paper (post production).

George Kinnear in the School of Mathematics has written a blog describing how he uses video to share mathematical writing giving a demo of how to do this using Teams.

On Campus Resources

Most teaching rooms have a high quality visualiser that can be used to broadcast/record paper and pen.

The University has also invested in a number of media recording pop-up studios which are equipped with the equipment that you will need for a high quality recording. Some locations have the option of a “clear board” to allow you to write on a transparent board allowing you and your writing to be visible on screen at the same time.

The studio spaces are bookable in advance and are being supported within current health and safety guidance. For further Information please consult the dedicated Media studios for hybrid teaching web pages.

Collaborative whiteboard tutorial

Using a whiteboard in a Collaborative tutorial it is a little harder to pinpoint a single solution. OneNote is clearly a useful tool as it has collaboration at its core in addition to the multiple handwriting tools.

It is possible to create a Class OneNote document and allow people to work on this as they wish. You could even distribute some proforma templates pages if there are specific tasks or formats you would like the students to follow.

The School of Mathematics recently held a workshop on a variety of approaches to collaborative working with whiteboards. This workshop has been written as a short report investigating how to “Share mathematical work synchronously”. In the report they look at filming their workspace, using an online whiteboard such as notebookcast.com, working on a collaborative document like OneNote or using LaTex in an Overleaf document.

Variety of Tools

As you will have seen there are a variety of approaches to tackle this scenario. The ILTS team are happy to advise if you have a specific use-case that you are considering. I’ve listed tools and resources mentioned in this post as well as some alternatives. Feel free to add more to the list using the comments below.

Hybrid Teaching Technology and Tools Finder

  • OneNote
  • Blackboard Collaborate
  • Teams
  • Microsoft Whiteboard

Other tools mentioned by colleagues


How to record and view your iPad screen on desktop using Reflector – Guide, Advantages, Disadvantages and Alternative

This guide was written using macOS and an iPad. The Reflector software is available on Windows. Reflector can support any device using AirPlay, Google Cast or Miracast.

How to use record your iPad screen wirelessly on desktop using reflector:
1. Download and install the app here.
2. Click the Reflector app in the menu bar to see devices connected.


3. On the iPad, swiped down from the top right of the screen to access the control centre. Tap Screen Mirroring and select the desktop device you want to reflect to.


4. On the iPad image on the desktop, click the cog on the top left to choose a frame for the image and adjust the scale, device rotation and choose whether the mobile screen image floats on top.
5. Click the menu bar icon for Reflector, click the camera or microphone icon to choose to enable webcam and audio recording. Click Record all to begin the recording.
6. Click the red record button again on the iPad stream image to end the recording. Once the recording is finished you can give the recording a name and choose where to save it.

Advantages:
-Reflector supports iOS devices using Airplay and Android devices using Google Cast.
-Reflector allows you to reflect multiple devices to your desktop at once, allowing a simultaneous recording of both.
-Ability to reflect devices wirelessly by using the same network is convenient and simple to set up.
-Allows you to record screen of mobile device and webcam of desktop simultaneously.
-Allows you to record screen of mobile device while hiding it on the desktop screen.
-Places mobile device video feed on desktop screen. This means you can use other software to do a screen recording that will capture the desktop and mobile device simultaneously in one video file.
-Allows you to use frames for the device’s feed e.g. you can make an iPad video stream look like an actual iPad device.
-Changeable video quality settings, as well as different frame rate recording options to help decrease video file size.
-Reflector teacher allows use with reflector director, reflector student and is preconfigured for classrooms.

Disadvantages:
-Due to the connection to the mobile device being wireless, there is potential for lag in the recording if the network is weak.
-The trial version of the app has a significant watermark on recordings.
-Can’t screen record desktop and mobile device at same time on its own.
-Difficult to change the scale of the image on the screen.
-If mobile device recording is separate from other components of lecture recording, the 2 videos would need to be synced up after recording.

Alternative – How to record the iPad using QuickTime Player (wired connection):

  1. Plug your iPad into your Mac and launch QuickTime Player, built into macOS.
  2. On the app menu bar, click File>New Movie Recording.
  3. On the video control panel, click the downward arrow beside the record button and select your iPad as the video and audio source.
  4. Click the record button. When you are done recording click the stop button.


Kaltura Capture Video Tutorial – Allowing End User To Control View Of Multiple Video Streams

  1. Open the KalturaCapture App.
  2. Check the screen feed, camera feed and audio feeds are on.
  3. Hit Record.
  4. When you want to finish recording, you can pause or stop the recording.
  5. Give the video a title, description and tags (optional) and click upload.
  6. When the video is uploaded, a link to the video on media.ed.ac.uk will appear. Click this link to check your video.\
  7. On Media Hopper Create, if your video had a screen and camera stream, both will be automatically controllable by the end user allowing for full screen of either of the videos and multiple split screen views.