Week 1
In week 1, AutoCad was introduced to me. I was asked to complete multiple tasks for a initial practice. When doing my straight line practices, the process was simple and intelligible. I started by selecting a base point for the line, then I need to select its orientation with my mouse and input the length that I want it to be. With the help of the 90 degrees snap, straight lines can be easily drawn.


The second practice that I did is to draw a pattern. For drawing it, I switched the 90 degrees snap into specific angle snaps and set the snap degrees to 15-30-45, this helps me to draw lines which have a small angle. By duplicating lines again and again, I successfully created a unique pattern for myself.


The third practice is to draw a object that has a lot of arcs. I first started by drawing it a 1000 unit long straight line, as this can help me to determine the circle’s radius and locate the starting point of each arc. Then, I selected the centre point of the line with the circle tool as my circle’s centre point. By setting the radius into 500, the circle tool created a perfect circle that can be used for my further work. For drawing the arc, I firstly divided the 1000 units long line into four equal parts. Then I can easily selected the right end point of each equal lines as the start point for my arc. With multiple arcs being created in different arc tool, I found that the ‘start, centre, end’ tool is the most practical option, as usually these 3 points are easy to locate. However, when experimenting with the arc tools, I found it confusing. Some arc tools do perform better in specific situations, but they also temporary relocate my coordinate origin. It took me a while to realize and familiarize with this feature. After creating multiple arcs, the third practice was being drawn.


The last practice is to draw a set of doors. It needs to use all of the tools that are mentioned above to create. In my personal perspective, it is relatively easy to create as I already finished the tasks above and knew how to operate each tool.

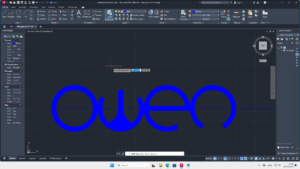
Along with the AutoCad practice, I was also asked to design my personal logo. After carefully evaluated myself, i found myself relatively dull, so i decided to focus on my names when designing my logo. The first several designs were designed to be angular and abstract, but it turns out that this idea performs poorly, the angular and abstract logos are hard to understand. Therefore, i tried to make the new designs less abstract and more curved as the curves serves as an efficient and crucial role in displaying specific letters like C, W and E.

After finished designing the logo in my sketchbook, I decided to draw it in Autocad. I chose the same starting method from the 3rd practice that I’ve done, which is to draw a 1000 units long line, this will be the base and the central line of the logo. Then I divided the line into 4 parts and used each of them as radius to create 4 circles, within those circles, I created another set of circle that is smaller than the original ones. With the help of the line tool and the custom snapping tool, I edited these 4 circles into certain letters. In the end, I used the hatching tool to generate hatchings in specific zones to highlight the letters that I created.