Allowing students extra time on quizzes

If students are permitted extra time on timed pieces of coursework as part of their extended time adjustments, then you will need to set this up for any timed quizzes/tests on your course.

If you are a member of teaching staff, please ensure that you talk to the ITO about this before enabling it for any student on your course, as there are different types of extra time adjustments that a student may have and they will help clarify for your course how these need to be applied.

Below are links for how to add these extended time adjustments in the two commonly used coursework quiz/test platforms. For both Gradescope and Learn tests, you can set up an adjustment for a student that extends across a whole course and any timed assignments within that course or grant an adjustment just for one or more individual assignments.

Gradescope: Extending assignment release dates, due dates, and time limits

Learn: Accommodations and Exceptions in Blackboard Ultra (with thanks to Teeside University for writing much better instructions on this than Blackboard itself provides)


Uploading marks (and feedback) to Learn Ultra

Note: Due to an ongoing bug in Learn Ultra, if you upload feedback to submission box in Learn, it will not be visible to students. If you want to upload feedback for an assignment that students submitted to via Learn, follow the instructions below to create a new “item” directly within the Gradebook itself, which (for some reason!) allows students to view the feedback you upload. Update: This bug appears to have been fixed, but let us know if you encounter any problems with the visibility of feedback for students.

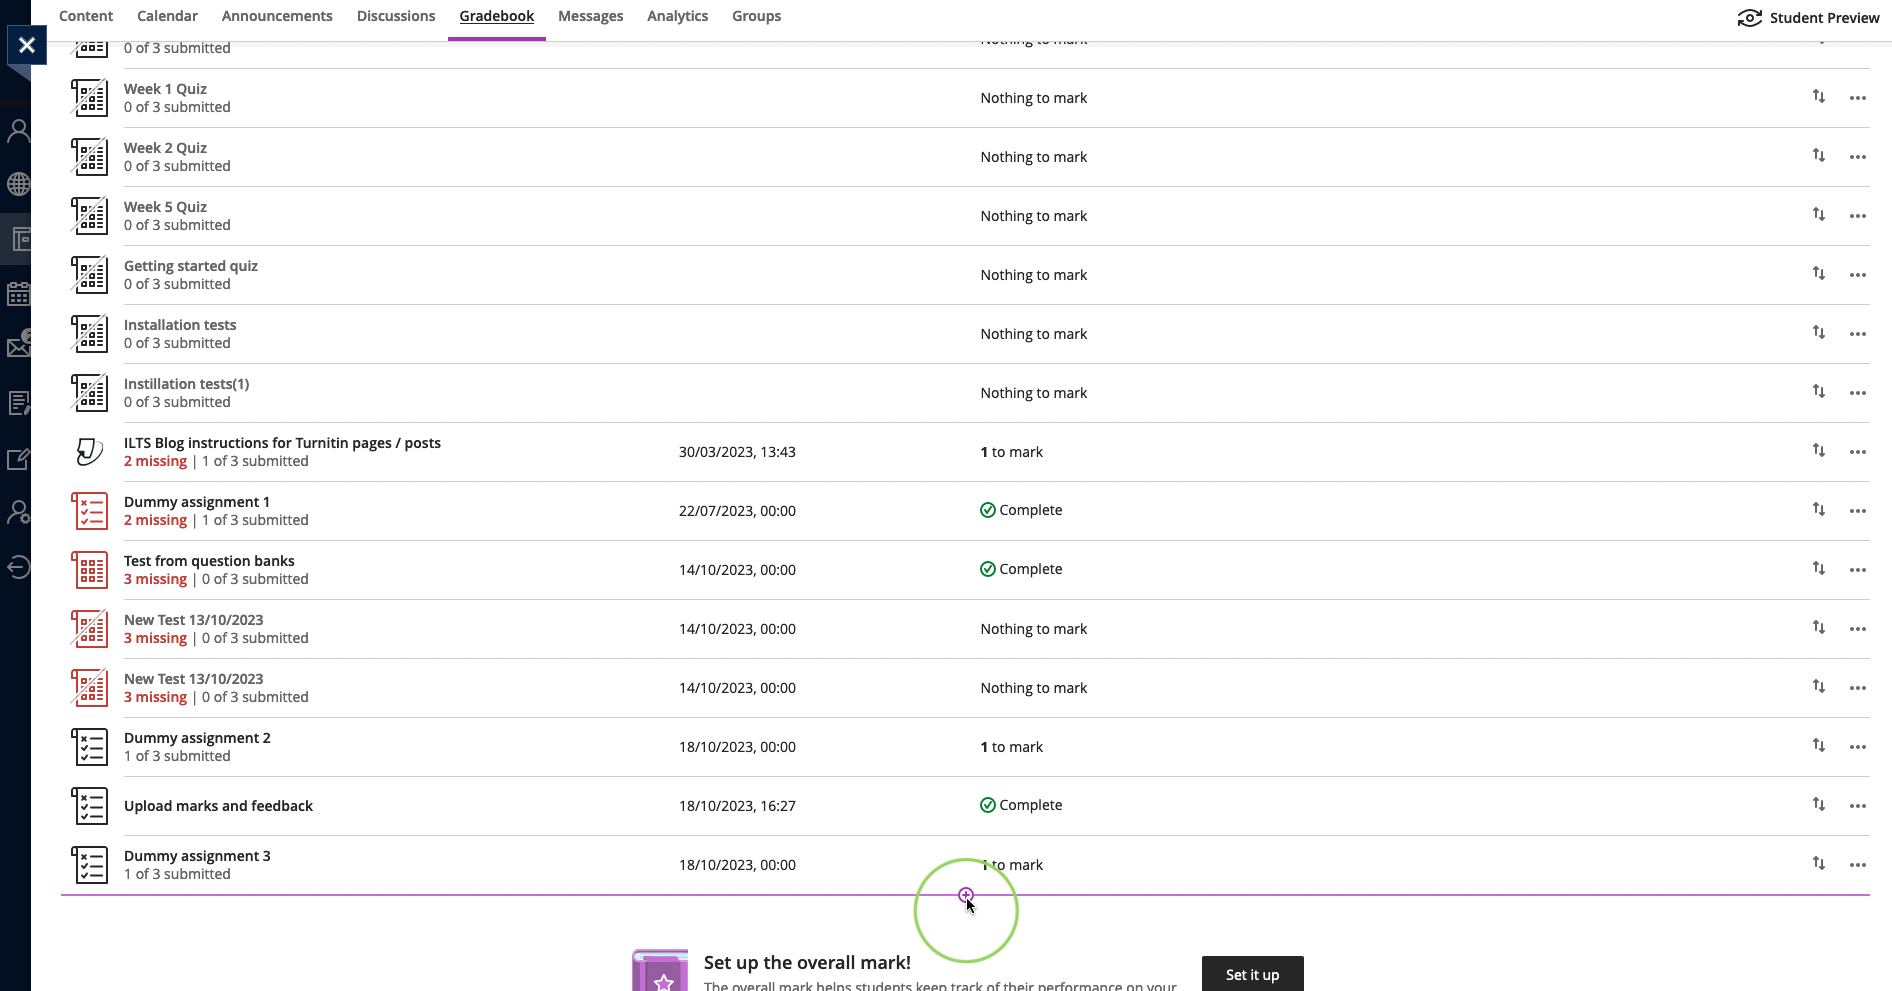
  1. Go to the Gradebook in the course Learn page.
  2. Add a new Item to the Gradebook by hovering over where you want to add it in the list and clicking on the purple (+) when it appears and then select “Add Item”.

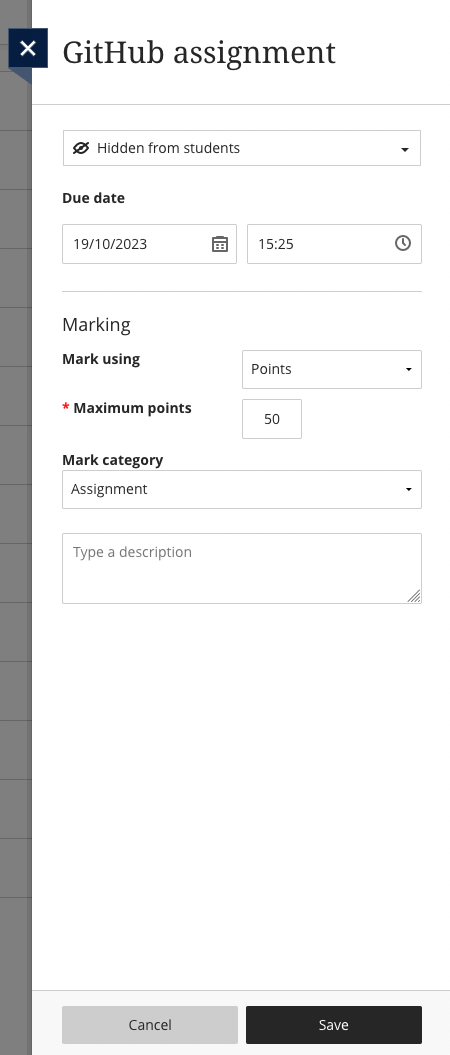
Then make the following adjustments when the item settings window opens:

  • It will give the item the default name of “New Item and the current date”; change this to the actual assignment’s name to ensure that students can locate it easily.
  • We recommend keeping this item hidden from student view for now.
  • The due date doesn’t really matter for this, so you can leave it as the default of the current time.
  • Set the marking as required (points, percentage, etc.) and, if points, the maximum number possible for this assignment.
  • For “Mark category”, choose Assignment.
  • Add a description if you want, but it’s not required.
  • Press Save.

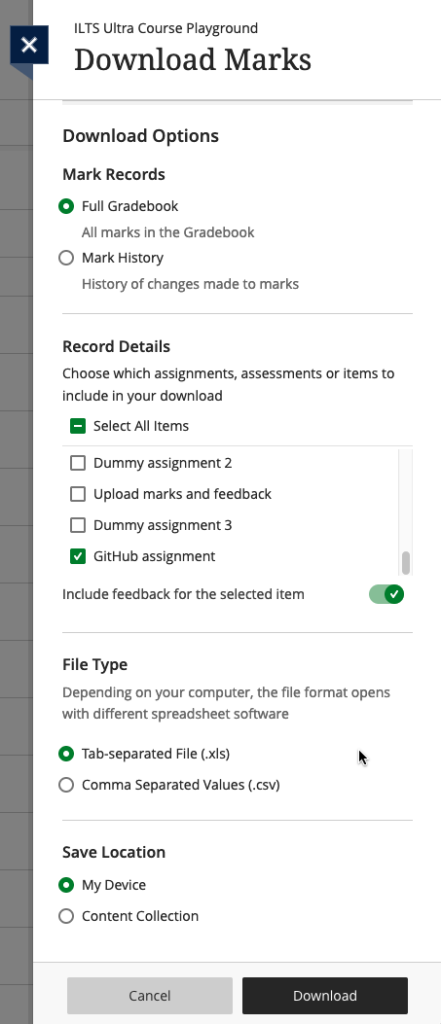
  1. Download the Gradebook, selecting just the new item that you created. Make sure to tick the option to include Feedback (unless you just want to upload marks, in which case, leave it unticked). Choose to save it as an xlsx file and save it to your computer.

  1. Open the file on your device.
  2. Make sure that the header for Column G is the assignment you want to be uploading marks for (i.e. the item you just created in the Gradebook).
  3. Input the marks in Column G.
  4. Input the feedback in Column J, if you need to share this with students.

Note: Make sure you do not change the header of any of the columns or Learn may not be able to read the file properly when you upload the marks. If you need to copy and paste data from another spreadsheet, make sure that it aligns with the columns as laid out in the file you downloaded from Learn.

  1. Save the file.
  2. Return to the Gradebook in Learn and now select “Upload Gradebook”.

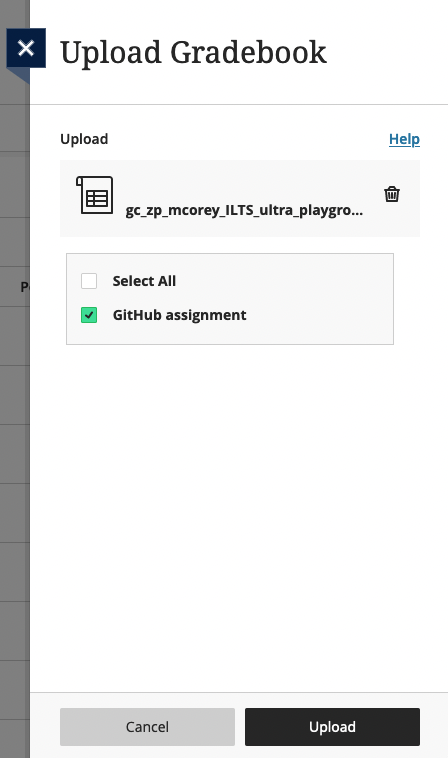
  1. Choose “Upload Local File” and select the spreadsheet you have just saved. Once it has loaded, untick the option for “Select All” and just leave the assignment you want to upload marks for ticked. Click “Upload”.

  1. Once Learn has uploaded the document, you will see how many students there are not marks for (i.e. those who did not submit the assignment) and also the option to post the marks that you just uploaded.

  1. Before you post the marks, it’s worth quickly checking that your upload worked. Click on the assignment name and you will be taken through to a list of all the students on the course. You can then check the a few of their marks and feedback in Learn with your spreadsheet to make sure that the upload worked properly.

Note: If you only want to post marks to certain students, you can do that from this view. Just click the “Post” button next to the name(s) of the student(s) whose marks you are to post.

  1. Once you are ready to share the marks with the students, Click to Post the marks. And then “Post All Marks” when the dialogue box opens.
  2. Go back in to the Edit view of the assignment (by clicking the three dots … at the end of the row for it) and from the drop-down menu choose to make it “Visible to students”. Press Save. The students will now be able to view their marks and feedback for this assignment.


Learn Ultra: sending a message to a tutorial group

  • Login to your Learn Ultra course page and select the ‘Groups’ tab in the top horizontal menu. Select the name of the group set to which your group belongs.

screen grab highlighting the 'group' tab and the name of a group

  • Scroll to find the name of the group to which you want to send a message. Select the three dot menu icon to the right of the group name and select ‘Message group’ from the drop-down menu.

screen grab highlighting 'message group'

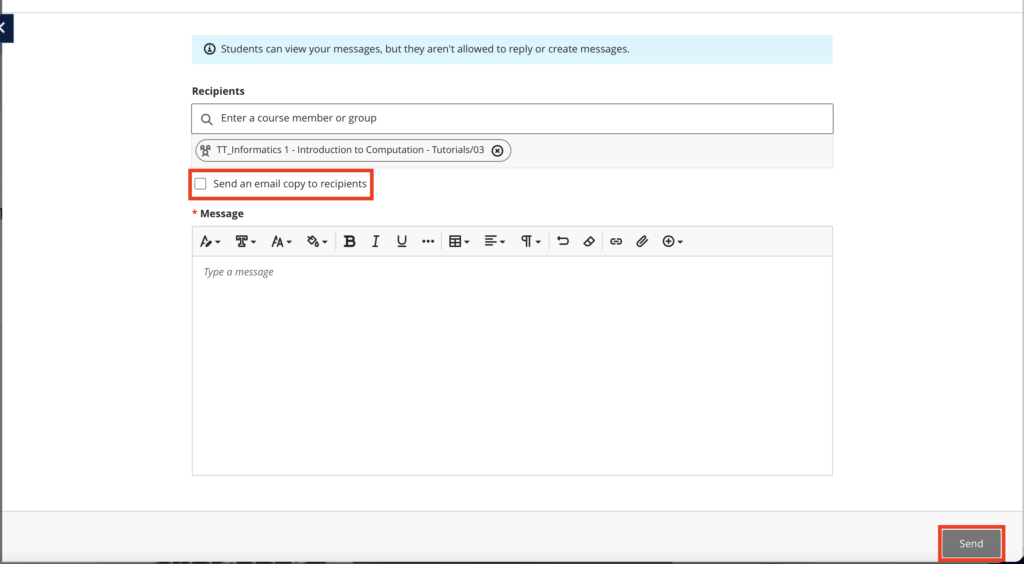
  • Compose your message. Select the ‘send an email copy to recipients’ checkbox if you want the students to receive an email copy in addition to the message within Learn. Press send.

screen grab highlighting the option 'send an email copy to recipients'


Adding a Zoom session to your Learn Ultra course

If your new teaching space does not support Media Hopper Replay (the UoE integrated lecture recording system), and / or if you will be delivering your class either from home or a non-supported room, we suggest the following approach:
  • Login to the Learn Ultra course for your class.
  • Browse to the area in the course where you want the link to appear.
  • Click the plus (+) sign to add content.
screen grab highlighting a plus symbol

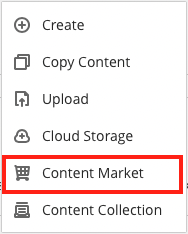
  • Click Content Market

screen grab highlighting a menu choice called "content market"

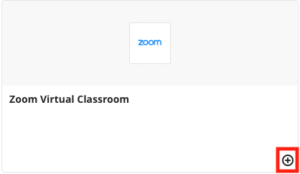
  • Click the plus sign next to Zoom Virtual Classroom.

screen grab highlighting a small plus symbol

  • Now back on the main content list in Learn, select the link to the Zoom Virtual Classroom that you’ve just added and then “Schedule New Meeting”.
  • Give your session a sensible name. Enter the date / time of your session. Select “recurring session” for any regularly recurring classes (eg every Wednesday 10-11am).
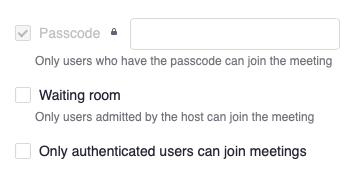
  • We recommend *not* either selecting the ‘Waiting Room’ or “Only authenticated users can join meetings” options.

screen grab showing security options in Zoom meeting

  • Ensure you are happy with the remaining options and select ‘Save’.
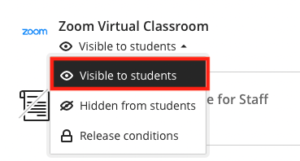
  • Be sure to remember to make the tool visible to students!

screen grab highlighting "visible to students" menu item

  • You will not be able to test this link with Student Preview in Blackboard. As long as the link works with your instructor account and is not hidden from student view, then your students will be able to see it.
  • You now have your link set up in your course. Let your students know about it in advance and direct them there to access your online class.
  • The passcode for Zoom meetings does not show to students. This should be shared separately.
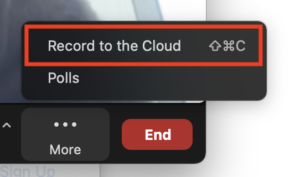
  • Note: don’t forget to record your session!*

screen grab showing "record to the cloud" option
*The recordings of Zoom sessions set up through a Learn page can be saved to your Media Hopper Replay (lecture recording) library and/or to the course lecture recording area. To find out more about how to enable, this please see IS’s Using Zoom with Media Hopper Replay.


Communicating with your students

With the introduction of Drupal as the host for course materials in Informatics, we want to provide clear guidance about how best to communicate with students in order to ensure they see all important information and to avoid duplication of effort or confusion about where to find what.

The Informatics OpenCourseWare site built using Drupal does not have a communication system built into it. That means that there is no way to draw someone’s attention to something posted on it via Drupal itself. The only sorts of things you might want to put onto Drupal is, for example, an “Errata” page to alert both students and any members of the public to something you realised was erroneous in the lectures slides you’ve shared.

For any communications you want to have with the enrolled students on the course, you need to do this via the course Learn page. The tools for this have changed a bit with the move from Learn Original to Learn Ultra, so we have outlined what your options are below.

We do recommend checking out our blog post on Signposting to students for some advice and examples of how best to communicate with students (and ensure they read what you say!)

Announcements (ILTS recommended tool)

Learn has a useful Announcements tool which allows you to post messages to students enrolled on your course. Announcements remain on the course site (unless you delete them) and they also appear in Activity Stream on Learn. When creating an announcement, you can select to send an email to all students with the same message. In a change from Learn Original, any new announcements appear as a pop-up the first time students log into your course after you have posted it. Students need to manually close the pop-up before they can view the rest of the course Learn page.

We recommend using Announcements (and opting to send them as an email, too) as the most reliable method to ensure that students on the course receive the information.

Sending a message to a particular group

You can send a message to a particular group in Learn Ultra. Instructions here: Learn Ultra: sending a message to a tutorial group.

Notifications

Notifications alert the user to activity on the course site. This may include new content being added or due dates for assignments. The default for notifications is a daily digest sent out after 5pm, however, these can be configured by each user so don’t assume a student has received a particular notification.

Other tools in Learn Ultra

You will see these tools, like Announcements, across the top menu bar on your Learn Ultra course page. Unfortunately, there is no way to hide the links from students for the tools which you are not using on your course (although this has been raised with Blackboard as something that would be very useful for them to introduce).

  • Discussions: This is Learn’s built-in discussion board tool. We strongly recommend using Piazza instead of this.
  • Messages: This is what IS has to say about the Messages tool — The Messages functionality allows instructors to send messages directly to students. However, as announcements are a more streamlined and comprehensive communication tool, we do not recommend the use of Messages.

TL;DR: We don’t recommend using Discussions or Messages. Announcements (with email option ticked) should be used for important things that you want to ensure students don’t miss and Piazza for more general chat/answering questions.

Where and how do students get notified?

IS have put together a helpful table comparing where students will see notifications for the different ways that staff might communicate with them. Some of these tools will be used more/exclusively by teaching staff and others by ITO/admin, but it’s worth being aware of all the details.


Get in touch

lt-support@inf.ed.ac.uk


Related links

Information Services Good Practice Guidance on Learn Ultra

Learn Ultra: Sending a message to a (tutorial) group 


Drupal course template (2023-24)

Top right menu

In the top right of each page are links to the 2023-24 Learn instance for the course, as well as the DRPS entry. If your course uses Piazza, a link to the course Piazza page will also be added here.

Course homepage

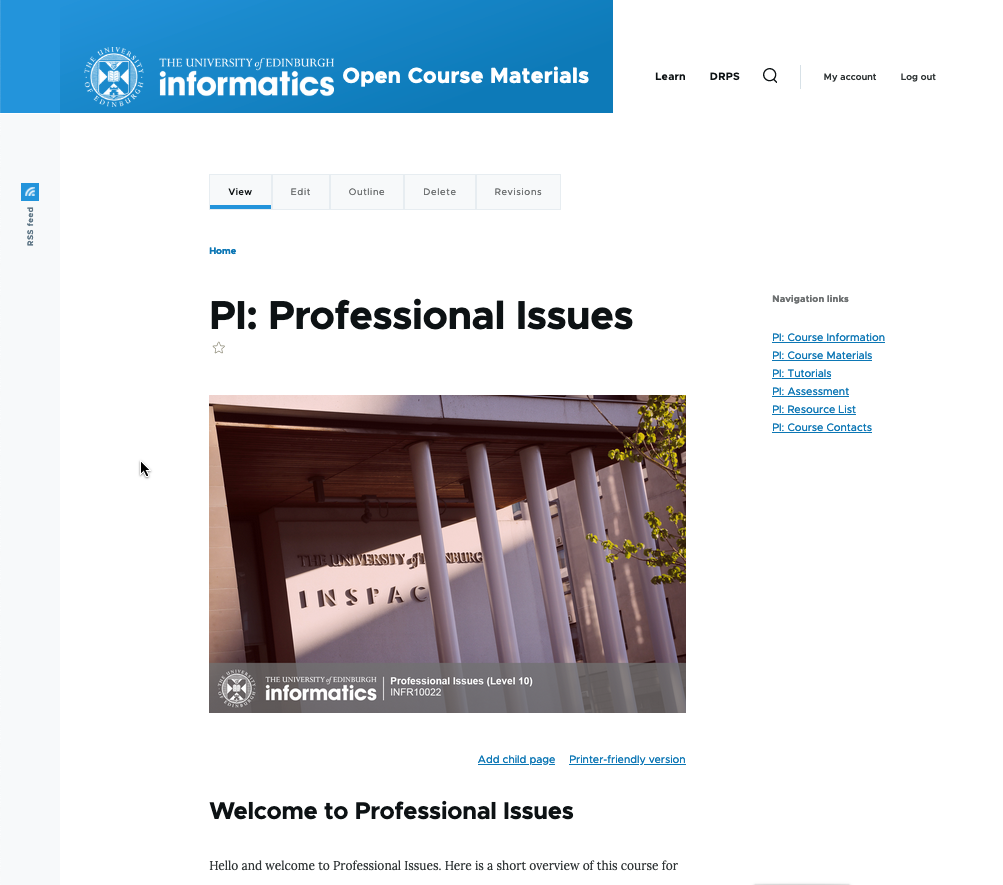
e.g. PI: Professional Issues – this is the welcome or home page for your course. You will see that it has an image identical to the image on the 2023-24 Learn page.

The information on this page is a combination of some of the items on the “Welcome” and “Course Information” areas on the old Learn pages. It will vary a bit by course.

Course Information

If there was an extensive amount of information on the Drupal homepage for your course, we have split some of this out into a separate “Course Information” page. Feel free to move things around these two pages, as you wish.

Right-hand menu

The right-hand menu is how you and students will navigate quickly around your course. The expands to include any child pages nested within a parent page. This keeps the menu from getting too long and overwhelming.

Course Materials

This is the area where all the teaching materials will be. It will vary a lot by course. Some courses just have a schedule page with links to all files, others have weekly pages with longer text and various files.

Tutorials / Labs

Some courses have tutorials and/or labs separated out from the other course materials; for other courses, they are sitting under Course Materials. You can move / create these pages for your course, if you would prefer to structure it differently in Drupal than you had in Learn.

Assessment

This is currently a standard template, directing students to the Assessment folder in the Learn page for the course. In the future, we also plan to push automated content (such as coursework deadlines) to this page.

All assessment instructions, dates, examples of previous students’ work, etc. must be added to the Learn instance for the course. If you want to share a copy of the assessment instructions on Drupal for curious members of the public, that is OK, but remember that what is in Learn will be considered the “golden copy” for our students. Please see the “Learn vs. Drupal” document sent out to teaching staff for more information.

Resource List

We strongly encourage you all to start using the Library’s Resource List tool and we must ensure that any third-party content you use in your course materials are cleared for copyright. You can choose to make the list itself open to the public to view, but any copyrighted materials on your list will only be accessible to someone with a UoE log-in.

For courses that already use Resource Lists, we have updated this to the 2023-24 link.

Copyright of content on Drupal

By default, we have added a statement at the bottom of every page assigning copyright to the University. If you prefer to share your content with an Open Educational Resource license, (which some courses already do), you can change this for your course. If you are unfamiliar with Open Educational Resource licensing, you can find out more here under Creating and Sharing OERs: https://open.ed.ac.uk/how-to-guides/


Adding files in Drupal

To upload files to your course Drupal site:

  • Go into “Edit” the page where you want to add the files.
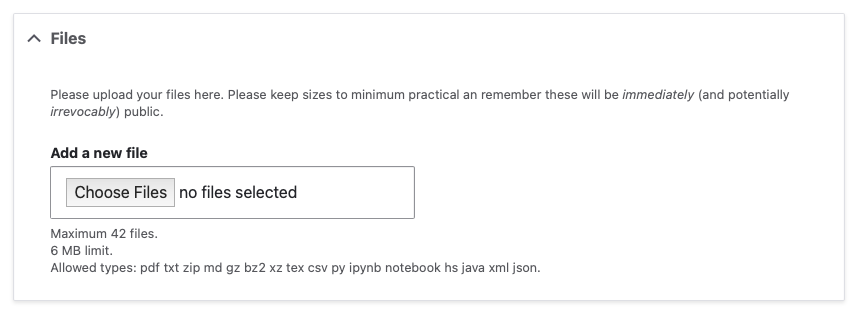
  • Scroll to the bottom of that screen and you will see a field called “Files”, as shown below.

Screenshot of the Files field in Drupal

  • Click “Choose Files” to add one or more files from your computer.

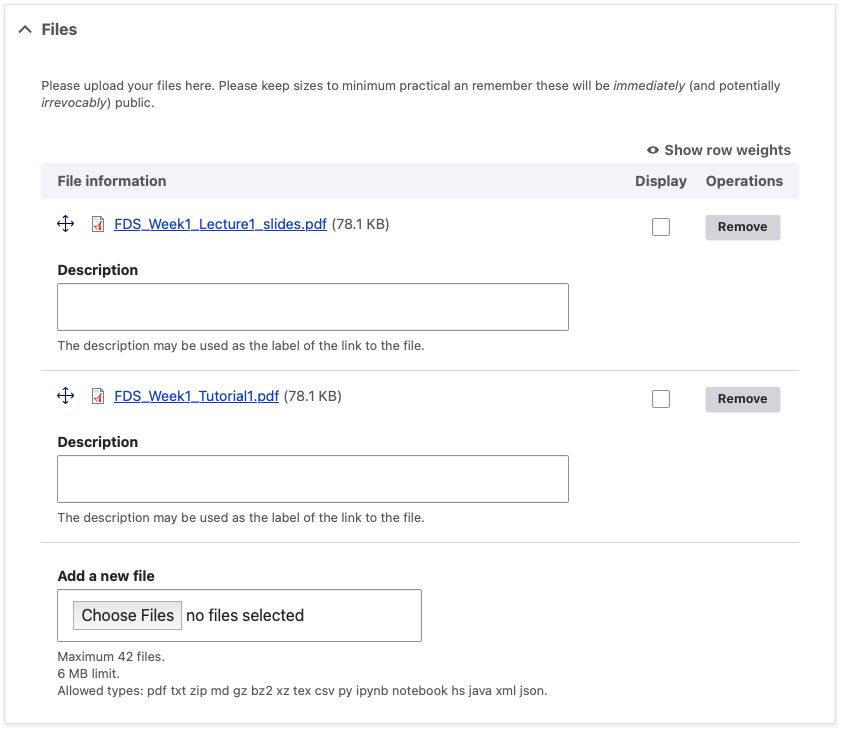
You can see in the screenshot below that I’ve uploaded two files to this course now. For each one, you can give it a “Description”, which will act as the document label, if you add it; if you do not add a description, then the document title will be the label.

Screenshot of Drupal interface showing file uploads

  • You can choose now to “Display” to one or more of the files to students, which means that they will appear at the bottom of the page for students to acces once you have saved your changes. This is how that would look:

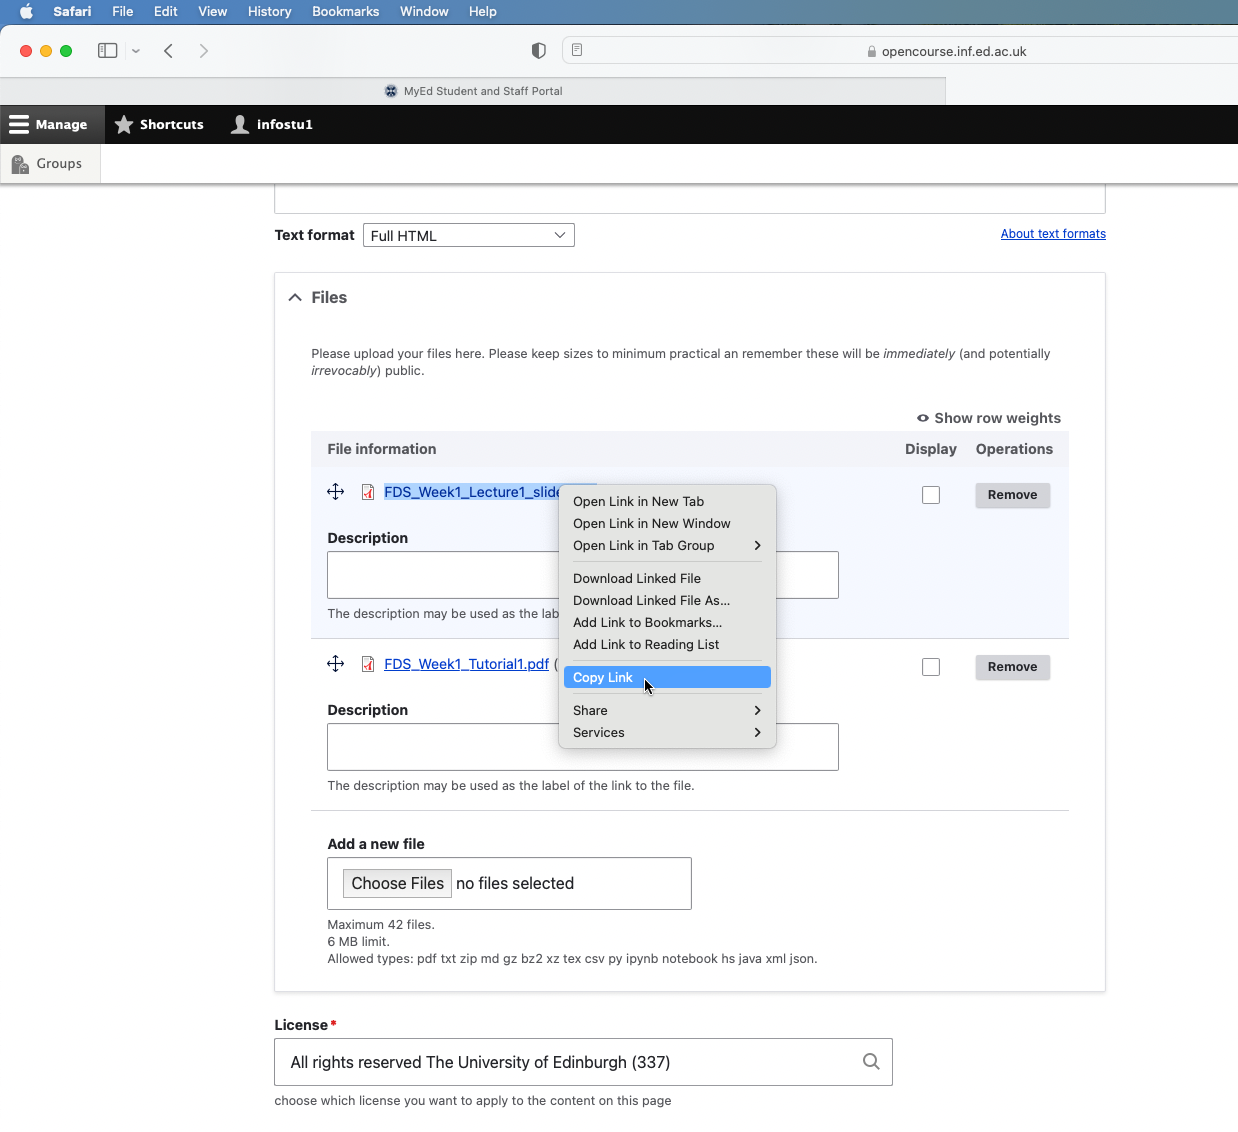
  • However, you might just want to share links to the files within the body text on the page. To do this, leave the “Display” option unticked and then Save your changes. You must save your changes now before the next step to ensure that you have proper links to the files and not just a temporary upload link.
  • Go back in to the Edit view and hover over each file you have uploaded and copy the link to the file URL (how you do this exactly will depend on your web browser; in the image below I have right-clicked on it in Firefox).

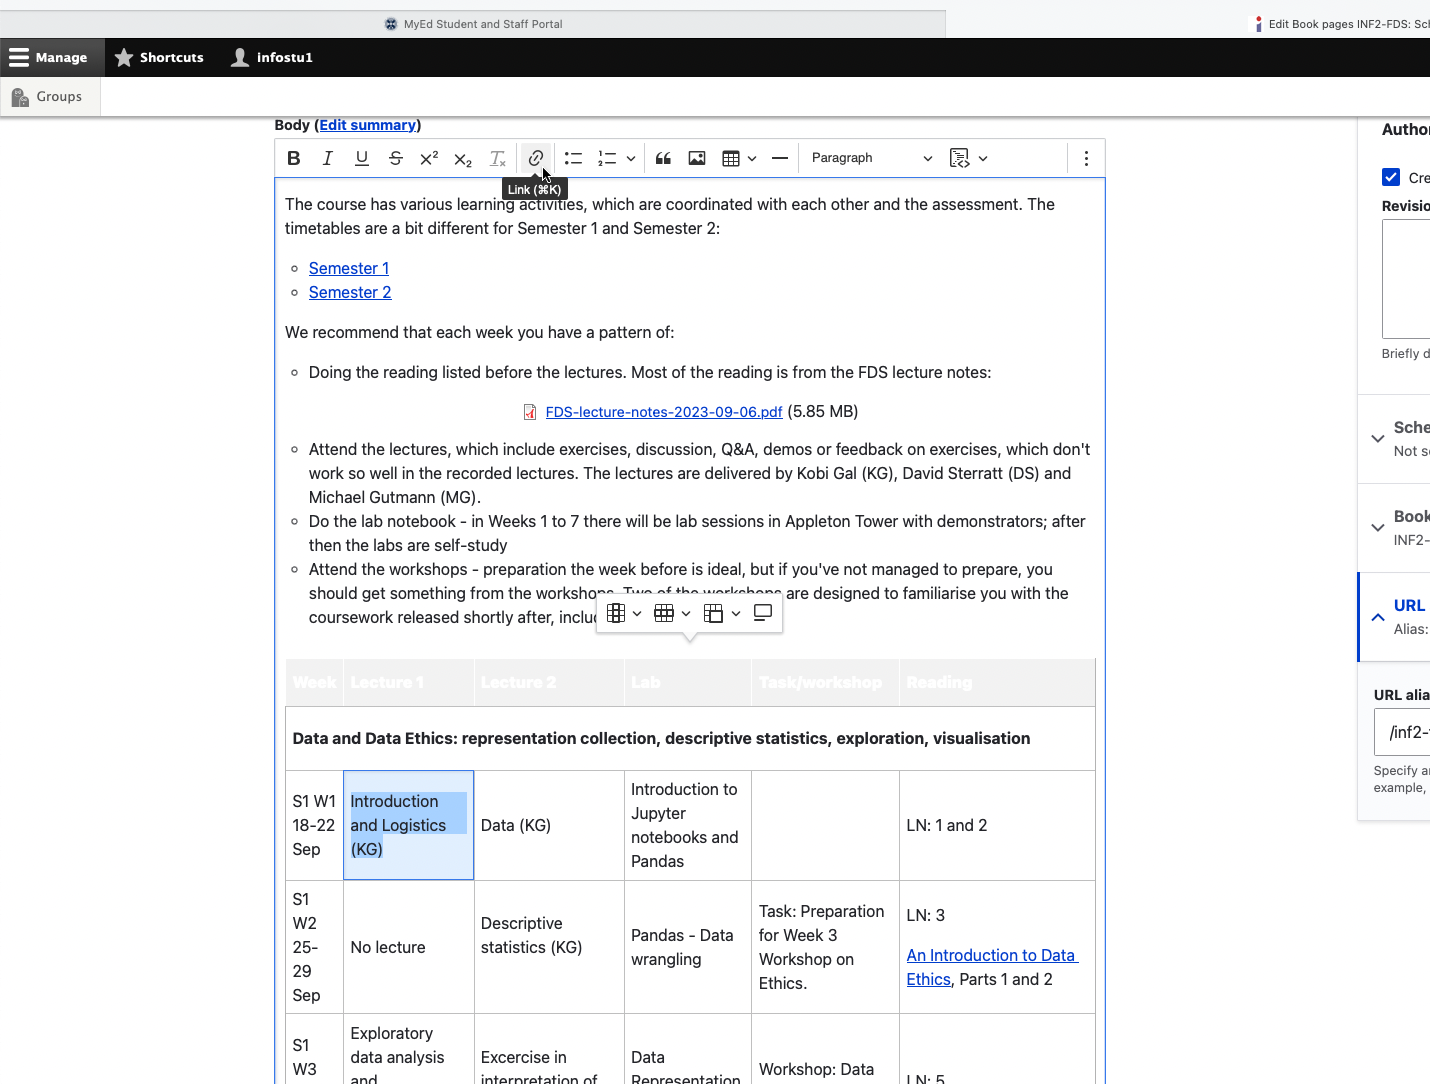
  • You can then navigate up to the body text of the page and insert the link you just copied as a normal hyperlink in any area of the text you want. (Shown below, I want make the text “Introduction and Logistics (KG)” link directly to my lecture slides file.) Now when you save the edits you’ve made, students will not be able to view the files as individual downloads at the bottom of the page, since you chose not to display them to students, but they can access them via the hyperlink in the body text.

Note: If you want to replace a file you have uploaded, please use the same steps above and click “Remove” next to the appropriate file (as shown in the second screenshot). You can upload the replacement file and share it with students following these instructions. Please make sure that you let your students know if you upload a new version of a file! Some may have downloaded/accessed the older version and will not realise that there is a new, updated version.


Getting started in Drupal

Accessing your Course Materials in Drupal

The following guidance is designed to help you get up and running with your Course Materials content in Drupal. Please comment below with suggested amendments / additions.

  • You will log in to Drupal using your UoE EASE account.
    1. Go to https://opencourse.inf.ed.ac.uk (or https://opencourse.inf.ed.ac.uk/<your course acronym>
    2. Select ‘Log in to edit’ in the top right of the screen. This will take you to an EASE login page. Enter your EASE credentials.

    Once you are logged in, you will only be able to access courses for which you are a member of teaching staff. Each course will be listed as a separate “group” in Drupal. See the details below about how to access the group for the course(s) you teach on.

  • Contact ILTS if you do *not* have access to your course(s) in Drupal.

Edit existing content

  • If your course has run before, you will likely start with course materials already migrated to your Drupal site. We have created a framework for you and hope you find this helpful. It is also designed to bring some consistency of experience for our students. To view existing content, select the Groups tab in the top left of the page (under Manage). Any courses for which you have edit permissions will be listed on this page. Select the group (course) name which you wish to edit.

screen grab highlighting groups tab and course name

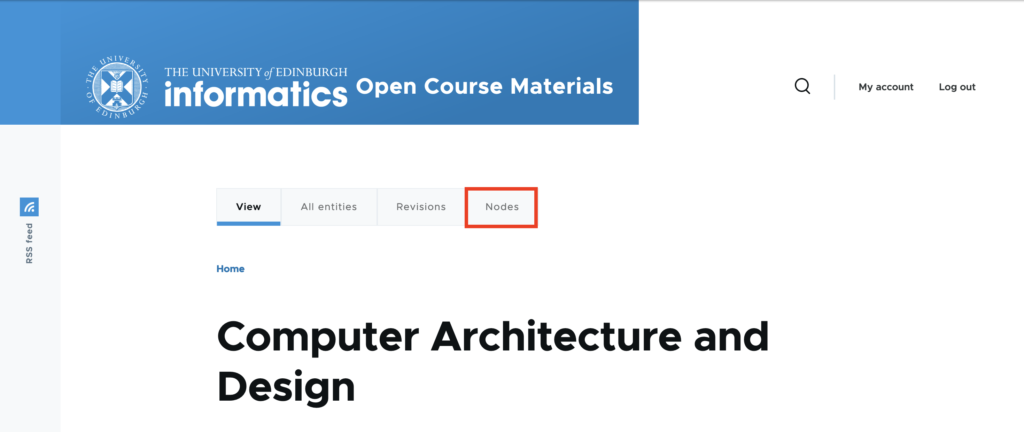
  • Select the ‘Nodes’ tab to see the list of nodes (pages) for this course.

screen grab highlighting nodes tab

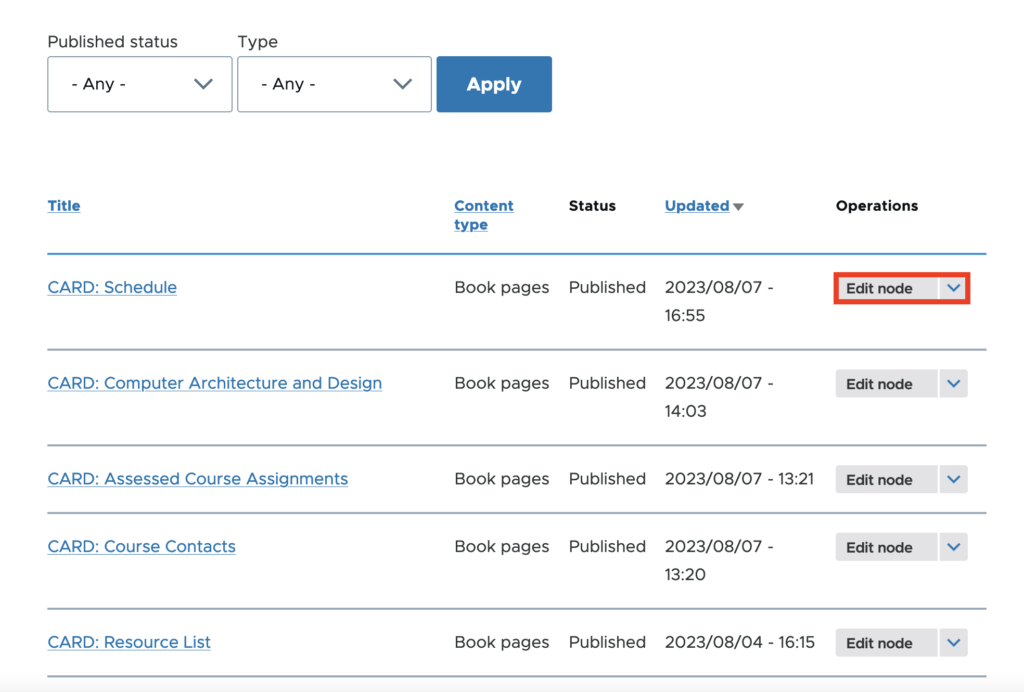
  • Select ‘Edit node’ to edit a node (page)

  • You will now see a web form with some content already added. You can edit content in any of the fields which follow. Change the Text Format option to ‘Full HTML’ if required.
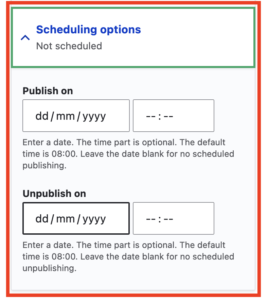
  • If you wish to hide a page until a later date, you can do so by using the scheduling options panel towards the right of the page. Set a date in the future for the page to be published.

screen grab highlighting scheduling options

  • When you have finished, select Save.

Adding new content

  • Select the Groups tab in the top left of the page. Any courses for which you have edit permissions will be listed on this page. Select the group (course) name for which you wish to add content.

screen grab highlighting groups tab and course name

  • Select the ‘Nodes’ tab to see the list of nodes (pages) for this course.

screen grab highlighting nodes tab

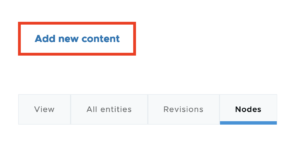
  • Select ‘Add new content’ to add a page to your course materials site.

screen grab highlighting 'add new content' button

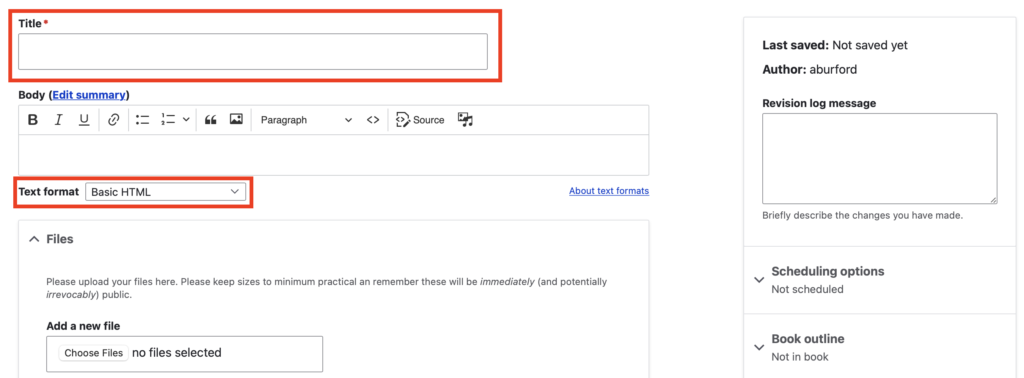
  • You are now taken to the ‘Add Group nodes (Book pages)’ page. Adding content via the group ensures that your new page is assigned to the correct course. You need to give the page a title, e.g. Week 7, or perhaps a particular topic you are covering. For the time being, please ensure that the title for every new page you create starts with the course acronym, e.g. ‘ANLP: Week 7, Lecure 2’ etc. You can then add text to the Body field. Change the Text Format option to ‘Full HTML’ if required.

screen grab of course add / edit screen highlighting node title and text format fields

  • A ‘Files’ field is made available to you. Adding files here will allow you to display the files towards the bottom of the page. You can also choose not to display the file(s) as a list, but rather copy the URL to use inline in existing text. For more detailed instructions on how to add files, see our blog post: Adding files in Drupal
  • Finally, there is a license field at the bottom of the page. This defaults to ‘All rights reserved The University of Edinburgh’. However, you can choose to change this to a Creative Commons license as you wish (if you are unsure what Creative Commons licenses are, you can find out more here). This licenses the content on the page.

screen grab showing 'license' field

  • To the right of the page are three further options you should consider:
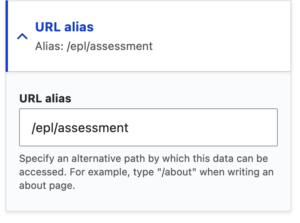
    • Firstly, you should assign a URL alias to your new page. This should begin with your course acronym eg /anlp/course-materials/week-7.

screen grab showing how to apply a URL alias to a Drupal page

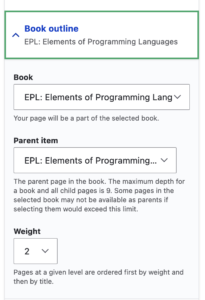
    • When adding a new page you need to ensure you you assign it to the correct ‘book’ to keep the navigation of your site comprehensible. You can assign a ‘parent’ page if you wish to nest your content and can choose the order of the pages by using the weighting mechanism.

screen grab showing the book outline in Drupal

    • Finally, you can also schedule a suitable date and time for the publication of this new page. Enter a date and time for when you wish the page to be published. You can also enter a date to unpublish the page.

screen grab highlighting scheduling options

  • When you have finished, select Save.

Files

We are pleased to say that we have now configured the site to allow the upload of zip files and code based files. If a file type is not currently supported, please get in touch with us to request. For instructions on how to add files, see our blog post: Adding files in Drupal

Student Preview

You can mimic the student view by simply accessing the site in an alternative browser *where you are not logged in*.

Support

The ILTS team are here to support you throughout this process. Please contact the team and we will be happy to help you. Contact details here.


Copyrighted material in teaching

It is vital that any third-party content you use in your teaching materials is cleared for copyright. This includes readings that you might set your students, images in your slides, or videos you share with them.

For course materials published on Drupal, the Course Organiser must ensure that all material posted on their course pages is copyright compliant.

Take a few minutes to read through this fantastic (and brief) summary from the University’s Open Educational Resources team about Copyright in Teaching and the three sub-pages detailing more about using book journals and texts, videos, broadcasts and sounds, and images. (If you need some background, check out What Is Copyright?) The University’s Open Educational Resources team run workshops on these topics, which you may be interested in attending; you can find more information about them here.

Readings

You should use the Library’s Resource List service for any essential / suggested readings. If you do not currently use this service, please familiarise yourself with it at your earliest convenience. It offers a lot of flexibility in terms of structure and layout to suit your course design. More information can be found on our blog post about Resource Lists.

Broadcast recordings and images

Some materials (often images or videos) are published under Creative Commons licenses, public domain, or other copyright cleared conditions and these may be available for you to use. However, ensure you that you check all the policies for the relevant license before you use them. If you are new to looking for images or other media you can use, Creative Commons is a great place to start. They provide great explanations, instructions on how to attribute what you use, and a search engine, which searches across a whole range of other platforms.

Below are a couple places you might be able to source materials to use in your teaching:

  • Are there any TV or radio programmes you want to share with your students? Check out Box of Broadcasts, which provides recordings you can share with your students (and unlike, say, BBC iPlayer videos, these won’t get deleted after a set time period!). This is service that the UoE subscribes to and which all students and staff can access.
  • The University’s Image Databases list is a great place to find other useful resources, some of which you will have access to only through your UoE account and others, such as Pixabay, Unsplash, and Creative Commons, anyone in the world can access.


Adding an LTI link to Learn Ultra

Many of the learning technologies we use for teaching in the School of Informatics are integrated into Learn via LTI links, which ensure that user information (e.g. name, email address, and student number) are fed from Learn through to the other tool. Examples of these are Gradescope, Piazza, Zoom, Media Hopper Create and Replay, and CodeGrade. This also means that information can be fed back from these tools to Learn, e.g. marks in Gradescope added to Learn’s Gradebook. Many of these tools, including Library Resources, Media Hopper Replay (aka Lecture Recordings), and Piazza are included on all Informatics courses automatically through our School Learn template.

The process for adding these tools to a Learn page for students to access has changed in Ultra. Please follow the instructions below on how to add a link to these tools on a course Learn page for students and other staff enrolled on the Learn course to access. (Click on any of the screenshots below to open them full size.)

  1. Navigate to the place in Learn that you want to add the link (this might be within a folder, e.g. for an assessment submission) and click on the plus (+) sign where you would like to add it on the Course Content page. You can see that the Gradescope link has already been added below using these steps and, for this demo, we will be adding a link to Piazza below it.
    Screenshot showing how to add an item within a Learn Ultra page
  2. From the pop-up list of options that opens, select “Content Market”.
  3. When the Content Market screen opens, navigate to find the tool you need. Do not click on the name of the tool, rather select the little plus (+) sign icon in the bottom right-hand corner for that tool, as shown below for Piazza QA.
    Screenshot showing the Content Market in Learn Ultra
  4. You will then be taken back to the main course Learn page, where you can see that the Piazza QA tool has been added, as you can see below. You can use the three dot icon (…) to open the menu for the item and edit its name and/or description. Once you are ready for students to access it, make it visible to them.
    Screenshot showing Piazza link on a Learn Ultra page