Copying a previous lecture recording (Media Hopper Replay)

Our most common enquiry is about how to use a recording made in a previous year in Media Hopper Replay.

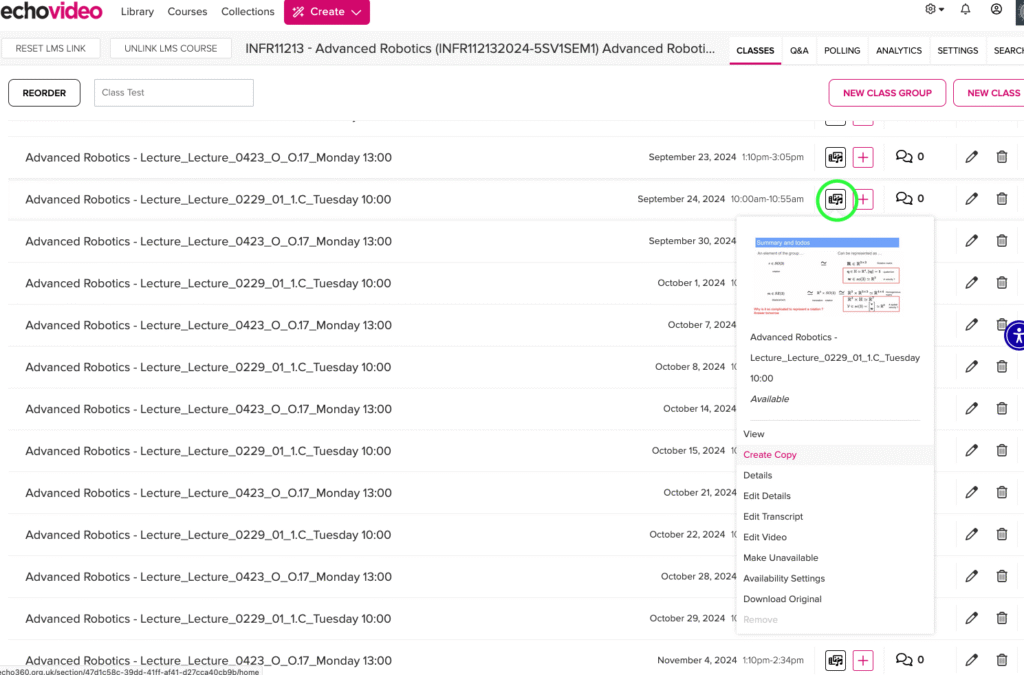
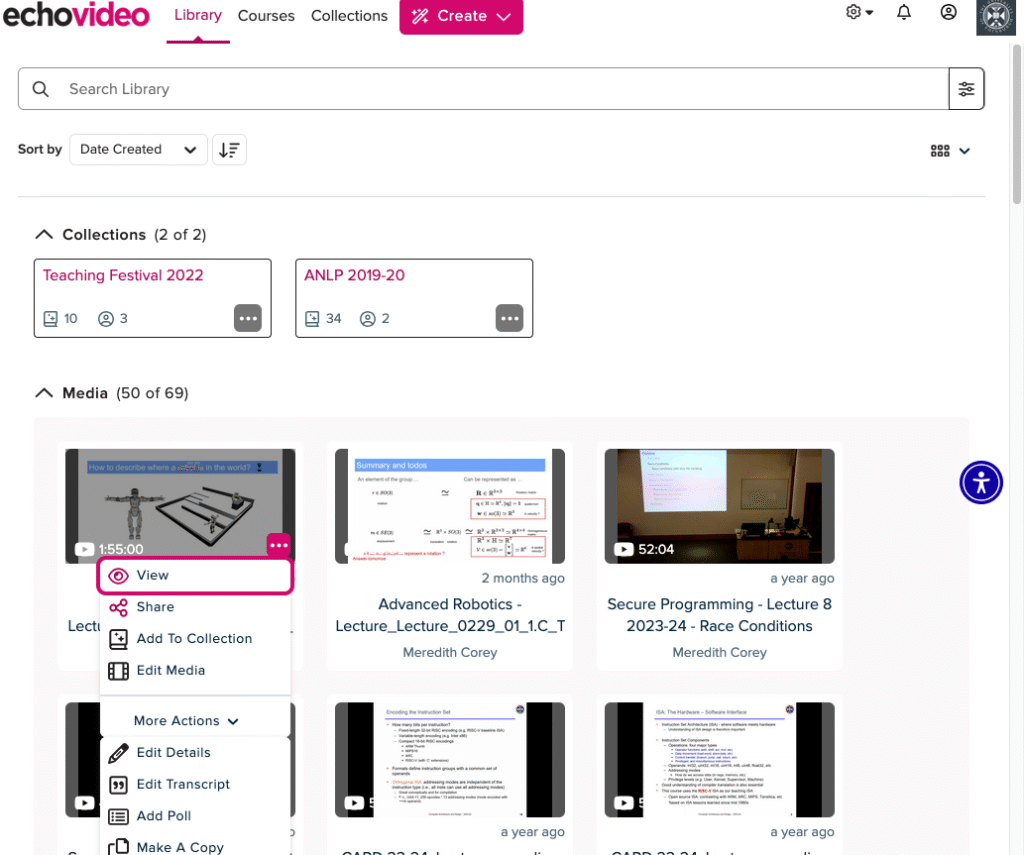
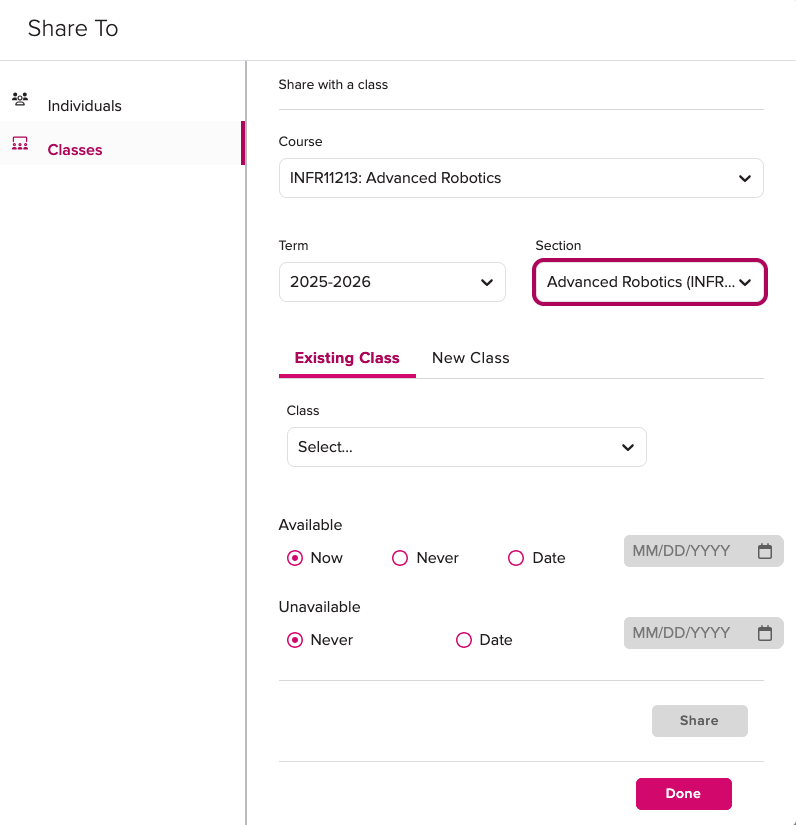
As an instructor, you can make a copy of a previous recording in Media Hopper Replay and then upload it to your personal library, thus allowing you to publish it to another linked course in Media Hopper Replay. This one page quick reference guide details the two step procedure to do this for each recording. View the PDF quick reference guide here.

This quick reference guide, along with many others, is available via the IS Media Hopper Replay quick reference guide website.

The IS Helpline supports Media Hopper Replay throughout the University. Contact details are listed here.


Gradescope Group Assignments: adding a fellow group member

If your instructor has allowed you and other students to submit as a group, you can (and should) add group members to your submission.

To add group members to an assignment submission:

  • On your submission page, either select Group Members in the action bar (along the bottom of the screen) or select ‘View or Edit Group’ in the outline area of the submission (in the right hand panel).

screen grab showing the 'view or edit group' option in Gradescope

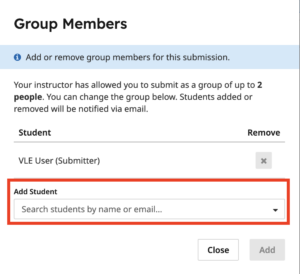
  • In the Group Members modal, enter a name to add other students, and then select Add.

screen grab showing the groups members modal for Gradescope

Note: If you cannot see your group member(s) listed in Gradescope, please contact the Course Secretary to ask them to re-sync the Gradescope roster with Learn.


Drupal – Course Structures

Introduction

When creating a course in OpenCourseWare (powered by Drupal) for the first time, the ILTS team can provide a starting course template in Drupal either based 1) on the course structure and content from Learn; OR 2) as a blank template with an agreed structure.

In this post, we would like to focus on the options available for a blank template structure within Drupal. We will use courses, already available within OpenCourseWare, as examples of the types of course structure you can choose from. The following is not an exhaustive list of all courses within OpenCourseWare, but a small sampling of courses within our chosen structures. The home page of Open Course has a list of all courses for you to browse, if preferred.

Course Structures

A) Structured by activity (e.g. lectures, tutorials, readings, etc.):

ARO and EPL

ARO Navigation Menu in Drupal - public view
ARO Navigation Menu, in Drupal (public view)


B) Structured by week (e.g. week 1, week 2, week 3, etc):

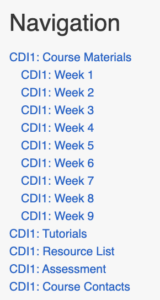
CDI1; IRR; and SDM

CDI Navigation Menu in Drupal
CDI1 Navigation Menu, in Drupal (public view)


C) Structured by schedule (e.g. a schedule table with links to slides, video, handouts, etc):

CT; EXC; and IQC

CT Schedule in Drupal


D) Courses with a mixed structure (e.g. by schedule, activities and weeks):

ANLP; CGGS; IQPS (aka QPS-11); and USEC

USEC Course Structure - Weekly View
USEC Course Structure – Weekly View


USEC Course Structure - Lecture View
USEC Course Structure – Lecture View

Further Information

When creating the course in Drupal, ILTS will provide support and guidance for you to choose a suitable structure for your course. This agreed structure will then make it easier for you to build your content and populate your course in time for Welcome Week.

If you’d like to discuss the options and contact ILTS then please visit the support page. We look forward to working with you.


EdStem

About

  • Edstem.org is a discussion board platform some Schools in the College of Science and Engineering are piloting – including Informatics.
  • Edstem is being seen as a potential replacement for Piazza with a much more up-to-date interface – and is feature-comparable with Piazza.
  • EdStem has been Learn-LTI enabled for the School – there is an EdStem MS Team space set up for interested parties – contact the ILTS team for info.
  • The following Informatics courses are participating in the EdStem pilot for 2024/25:
    • Advanced Robotics
    • Algorithmic Game Theory and its Applications
    • Computing in the Classroom
    • Natural Language Understanding, Generation, and Machine Translation
    • Programming for Biomedical Informatics.
  • Please note that our EdStem instance is in the EU zone (DP / InfoSec reasons) – so course URLs will be https://edstem.org/eu/… – you may at times see a drop-down for region – select ‘Europe’.

Setting Up

This is only for those courses above. No other courses in Informatics should be using this for 24/25 – continue to use Piazza.

Step 1

Go to + Content Market and hit + EdStem Discussion  to add a permanent link to your course. Link is hidden from students by default.


Step 2

Click on the + link. This will open up a modal above the content (not in a new tab) and after a sec will CREATE the EdStem discussion for this course – using Course Name and Id

  • This will do an initial sync of Learn users to the EdStem roster
  • Email addresses are of the form of <uun>@ed.ac.uk for both staff and students.
  • Staff or students will not have a password to begin with – you can add this via your profile icon (top right). Also add 2FA
  • At start of Semester 1 there is no SSO with EASE – students should be encouraged to come in via Learn – but also see Setting up a Password (optional) below.

Step3

  • Continue Setup then SKIP the Announcement. We recommend skipping the Announcement – as that will post an email to all participants (there’s no way to post without emailing – you do get a warning Post/cancel about this).
  • You probably don’t want to email students at the point of creation – you can add a Welcome announcement later.

Step 4: Using EdStem

Setting up a password (optional)

There are advantages in setting up a password – it allows you to login by clicking on edstem links in emails, for example. Choose a good, secure password.


Wooclap – electronic voting system

Wooclap is an electronic voting system that was brought in by the University to replace TopHat. We recommend it for lightweight, synchronous teaching activities, such as in-class polls or quizzes. There is a range of supported question types, so you can select which would work best for the type of activity/content. You can also include information slides between questions.

Wooclap can be integrated with a course Learn page using the LTI, if you want to connect it that way. You can also keep it separate from Learn and just create an event directly through your account that students can join.

If you are interested in using Wooclap, feel free to contact us with any questions you have about it. We also strongly recommend that you attend the Wooclap training sessions offered by IS.

(For asynchronous formative quizzes, we recommend using Gradescope or Learn tests, rather than Wooclap. Please get in touch with us, to discuss options or if you want help setting those up for your course.)

Note: One lecturer has fed back an issue that when the host/presenter changes slides on Wooclap, participants’ text being actively typed in what is now the previous slide is lost. So, be careful not to ‘peek ahead’ at slides, for example to remember what comes next, because returning to the previous slide does not restore participants’ partially typed text. One way to avoid this issue is to tell participants to type non-trivial text answers into a text editor or word processor and then paste into Wooclap.


Related links from UoE Information Services

Introduction to Electronic Voting Systems (i.e. Wooclap)

Wooclap Sharepoint (with full instructions and how-to guides)

Wooclap Participant Guides (you may want to share this with your students)


Miro – collaborative virtual whiteboard

The University has recently brought in an institution-wide license for Miro, which is an online whiteboard/canvas tool that allows for collaboration. You might find it really useful for some teaching activities where you want to gather students’ thoughts or for them to work with each other in a digital space. There are a range of templates you can use based on what type of project or activity the students are doing.

Miro also integrates with a number of the other University tools, such as Teams and OneDrive.

For further informtion on how to log in to Miro (using your UoE account), set up and manage boards, etc., please see the University’s IS pages on Miro.

Feel free to get in touch with us, if you would like to discuss ideas for using Miro (or other digital tools) in your teaching.


How to quickly and easily reduce the file size of your lecture slides

The Informatics Open Courseware service currently (as of January 2024) has a file upload size limit of 6MB. This is to ensure the performance of the site is not compromised at it continues to grow. If you have some files which currently exceed this size –  and which could be reduced – then you may want to consider the following options.

Mac Users

PDF files

For Mac users, if you are looking to compress a small number of files, the Preview App is probably your best friend here. Open the PDF in Preview and choose File>Export. Select the Quartz Filter pop up menu and then select “Reduce File Size’.

Word documents

For Word documents, you can use Pages instead of Preview to reduce your document’s file size.

Linux Users

Linux users may be interested in https://imagemagick.org/ – free, open source software for editing and manipulating digital images. This is especially useful for tasks requiring bulk image file manipulation.


Learn Ultra basics for Instructors

All teaching staff will need to interact with Learn Ultra, even if the course materials are hosted on Drupal. We have compiled links to instructions on the most common tasks you will need to perform in Learn below. If you do not see what you need below, please check out the following page, which has additional instructions and guidance materials on a range of other aspects of Learn Ultra: Using Learn as an Instructor.

Introduction to Learn Ultra: a series of short videos providing an overview of Ultra and how to navigate the site.

Adding and organising content:

*If you want to share a link with students to a file you have uploaded to the Content Collection for a course, you will need to adjust the permission settings in the Content Collection folder following these instructions from Blackboard.

Assessment and marking:

Please remember that the Course Secretary is now in charge of setting up most assignment submissions (other than things like CodeGrade or authoring quiz questions), so please contact the ITO about the creation of assignment submission boxes. Below we have provided links for guidance on accessing student submissions and how to give marks and feedback.

For Learn Assignments:

For Turnitin assignments:

  • See the Marking, Feedback and Grading section here

For Gradescope assignments:

Tools:

Note: All students, the Course Organiser, and Course Secretary will be automatically enrolled on the Learn course via a feed from EUCLID. All other teaching staff (i.e. additional lecturers and teaching support staff) will be enrolled via a feed from the School’s own databases; teaching support staff will only be enrolled in Learn once their contract is confirmed in PiP.


Collecting coursework submissions: Learn or Gradescope?

This blog post is intended to help course organisers decide which platform is most suitable for their needs with regards to coursework submission and marking. Learn Ultra – and its accompanying Gradebook – is quite a different beast to Learn Original, and so I thought it work highlighting the advantages and challenges of each approach. For simplicity sake, I have highlighted only those assignment types which are commonly used in the School of Informatics. If you have a requirement which sits outside of what is listed below (eg a graded blog) please get in touch with us and we can talk you through further options.

Learn Ultra

Learn Ultra supports the following ways of assessing students online:

Gradescope


Scenario 1 – student submits one individual PDF for marking

Learn Ultra

Learn Ultra can accept multiple files and file types. If one PDF is submitted, this should be displayed in the marking interface (although there have been multiple problems with how Learn handles PDFs in its own reader – particularly on a Mac – and so users are encouraged to download the PDF and open in their native application). A space is provided for the marker to enter grades and feedback. Delegated grading can be enabled for large courses where marking is distributed amongst a team of markers. In addition, parallel marking is now supported in Learn Ultra. This allows two markers to mark the same submission independently, with the course organiser acting as reconciler. Please note: parallel marking can only be enabled for individual submissions (ie *not* group assignments).

Gradescope

The Gradescope Homework assignment can only accept one PDF file upload. Marking can be distributed ‘horizontally’ – ie different markers marking different sections of the submission. Like all the Gradescope assignment types, anonymous marking is supported intuitively – and can be enabled and disabled as needs dictate. A marking scheme can be created in advance, encouraging consistency. Rubrics can be created in advance, or ‘on the fly’. One of the main advantages of Gradescope is the ability to change rubric values mid-way through marking, with marks previously assigned recalculated automatically.


Scenario 2 – group assignment

Learn Ultra

Learn Ultra can support a group assignment. The workflow remains: the groups needs to be created, a group assignment is submitted, one member of the group submits on behalf of the group. This is marked and the marks / feedback are cascaded to each member of the group. Please note: parallel marking can *not* be enabled for a group assignment – nor can delegated grading. So this is best suited for courses with only one marker. Also, anonymity can not be enabled for group assignments.

Gradescope

Gradescope can now support group assignments. As with Learn Ultra, the marker(s) mark as normal, but the grades / feedback are cascaded to each member of the group. However, with Gradescope group assignments, the responsibility for creating the group falls to the student submitting the coursework. Unlike with Learn Ultra, anonymity can be enabled however double blind marking is also not supported.


Scenario 3 – programming assignment

Learn Ultra

Learn Ultra can support a student uploading multiple files. These files can then be downloaded by the marker, with marking taking place offline. Marks and feedback can then be uploaded to the Gradebook via a CSV file upload.

Gradescope

Gradescope has a dedicated programming assignment type. Students can upload unlimited files, of any file type. Markers can build and use an autograder to automatically grade parts of the submission. Markers can also manually grade submissions. One of the main advantages of using Gradescope over Learn Ultra for programming assignments is you can perform a code similarity check within Gradescope.

* Please note: Gradescope Programming Assignments behave differently to Gradescope Homework assignments, in that the student can choose which submission they would like the marker to mark. Consider this when designing your assignment policy and communications.


Scenario 3 – multiple choice quiz

Learn Ultra

Learn Ultra has an inbuilt test functionality. Since the move from Learn Original, many of the question types are no longer supported. LaTex is, in theory, supported in Learn tests. However, in practice, this has proved problematic across the College and we currently do not recommend this approach.

Gradescope

Gradescope’s online assignment type can be used for MCQ type tests / quizzes. It has several advantages over Learn Ultra test:

  • a more intuitive interface for both question setter and student
  • you can use LaTeX and Markdown to format the question text
  • an in-built student preview (not available in Ultra tests).

Scenario 4 – marking by tutorial group

In the past, you may have appreciated the ability to mark by tutorial group in Turnitin. It is worth noting that Gradescope can now support this workflow. Please speak with a member of the ITO to help you set this up.


Summary

Gradescope provides a good user experience for all users and has become the default assessment platform for many courses across the School. We hope the above is useful, but please don’t hesitate to get in touch with us if you’d like to discuss specific requirements for your course.


Embedding a video in Drupal

To embed a video from Media Hopper Create (MHC) into a Drupal page for your course, please follow these instructions.

Note: you can mostly follow these steps for embedding a video from another platform  e.g. YouTube, but how you find the embed code on that platform will be different than the steps for MHC.

If you haven’t used Media Hopper Create before or need a bit of help, IS has extensive documentation and help guides here.

  1. Log into your MHC account at: https://media.ed.ac.uk/
  2. Make sure that the video you want to embed in Drupal is set to either Unlisted or Published. (Not sure how to check or change this setting? Please see IS’s guidance on Understanding privacy levels in Media Hopper Create.)
  3. Open the video you want to share in MHC and below it, you will see several tabs. Click on the tab “Share” and then select “Embed” (N.B. do not select oEmbed) and then select and copy the full embed code that appears in the box. (Note: you can use the options below the code to choose a different sized embedded player or start/end times for the video. Do *not* use Responsive Sizing at the present time.)
    Screenshot of where to find embed code in Media Hopper Create
  4. Go to the Drupal page where you want to embed the video. Make sure that the Text Format for the Body field is set to Full HTML (this is the default). Then use the three vertical dots on the right of the editing toolbar to open additional tools and select “Source”
    Screenshot of body field in Drupal
  5. Paste in the embed code you copied from MHC.
    Screenshot of embed code pasted into a Drupal page in Source view
  6. Use the three vertical dots to open the expanded toolbar and click Source again to go back to the main editing view. It may take a moment or two to load, but you should now see the video you just embedded.
    Screenshot MHC video embedded in a Drupal page
  7. You can, of course, add text before or after the video or embed multiple videos on a single Drupal page. Once you are done with the edits on the page, just remember to press Save at the bottom.

Important! You must have captions available on any video you use for teaching. MHC has auto-generated captioning available and it is very quick (just a click or two) to request this for your videos before sharing them with students. Please see this guide from IS: Requesting subtitles for your content.