Any views expressed within media held on this service are those of the contributors, should not be taken as approved or endorsed by the University, and do not necessarily reflect the views of the University in respect of any particular issue.

Bethany Hickling: Geoscience Outreach and Engagement (2021-2022)

Category: Project Progress Page 1 of 2

Final Thoughts

Yesterday, I delivered the final lesson of my sequence of five. In this blog post, I will reflect on how my last three lessons went, and any adaptations I made. I will also discuss my experience of the Outreach and Engagement course as a whole, and how this has influenced my future plans.

Lesson 3

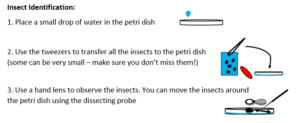
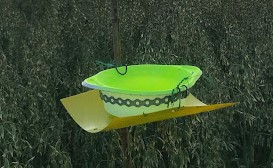
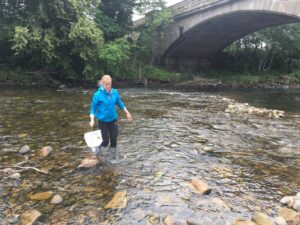
In my third lesson, we collected in all the traps that we had left out over the weekend. I was very pleased that the sampling method using the yellow bowls had been successful – despite it being relatively early in the season for insects to be around. The sampling method is known to be effective, as the yellow colouration actively attracts insects (Vrdoljak and Samways, 2011), though I think the warm and sunny weather also helped a great deal!

Generally, the students were initially quite disgusted at the insects they found, with comments bouncing round such as “eww”, “gross”, and “it looks slimy”. However, the majority managed to get over these feelings relatively quickly, after looking closer at the insects, and focussing on identifying them. All students managed to record the abundance and diversity of insects that they had trapped. The plenary activity at the end of the lesson involved students reflecting on something that they had done well in the lesson, and something that they had not done so well / had found hard. I had originally planned for students to write these points down on Post-it notes; however, given that we were running out of time, I conducted this as a quick-fire class discussion, instead. Many students thought they had done well to get the insects out of the pan trap, and manipulate them to identify and count them. It seemed that the students were pleased that they overcome their initial reaction of disgust.  Most students commented that the hardest part of the lesson had been trying to identify the insects. Indeed, this is something that takes a lot of practice. Most students got the hang of identifying whether an organism was an insect, based on the number of legs the organism has, but found identifying the different kinds of insect more challenging.

Circulating around the classroom, I found that some students were also finding it difficult to record insect diversity in the template data table. Thinking quickly, I helped students with this by covering the bottom half of the table containing additional sections.  I then asked the students to count how many different insect groups they had recorded by counting how many rows they had filled in in the table. I explained that each row in the table was a different insect group, so by counting the number of rows that they had filled in, we could work out the insect diversity. This worked well, and helped students better understand how to record insect diversity in the table.

One student commented, “This is so strange”, and at the end of the lesson someone else told me “I enjoyed that lesson”. The students’ enthusiasm, motivation, and comments made me think that they had enjoyed doing something different, in the form of a practical activity, the likes of which they had not previously been involved in.

Lesson 4

In the fourth lesson, I had initially planned for the students to make a graph, interpret their graph, and decide whether we could draw fair conclusions. However, we did not manage to cover the section on fair conclusions as quite a few students arrived late to the lesson from their previous class. Also, the students found making the graph very tricky. Instead of rushing them, and moving on to the next part of the lesson, I decided that it would be best to spend more time on the graphs to make sure that the students had properly understood their results, and had something to present in their poster. I was pleased that I did this as, at the end, all students were successfully able to present their graphs and interpret their results. I think if I had rushed on to cover the other section of the lesson, students would only have partially met each of the two learning objectives (present and interpret data in graphs, and draw fair conclusions) instead of fully meeting the one important objective (present and interpret data in graphs).

I made graph templates to help the students complete the graph, after their teacher advised me that the class I was teaching had struggled with graphing data in the past. The graph templates I made were extremely effective in helping the students to plot their results and understand their data.

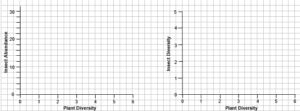
The graph templates I made for the students to fill in. The template contained axis with an appropriate scale for their data, and were pre-labelled.

The class I was delivering my project to had never done compound graphs before – and the graph templates I made were a very good tool to help them do this. I had wanted to include compound graphs in my lesson, because a benchmark of one of the Level 3 mathematics Es&Os  (MTH 3-20b and MTH 2-21a/3-21a) that I was covering was:

Organises and displays data appropriately in a variety of forms, for example, compound bar and line graphs and pie charts, making effective use of technology as appropriate”.

Learning from my experience, in the future, teachers delivering this lesson to an S1 class that are relatively new to compound graphs, should do as I did and cut the fair conclusions part out of the lesson, in order for students to have more time to plot and understand what their graphs show. However, if the lesson is being delivered to S2 students, then the second part of the lesson could be incorporated, as these students will have had more practice drawing graphs, and will be quicker at understanding how to plot and interpret a compound graph. I think the lessons I have planned allow sufficient flexibility for this to happen.

Lesson 5

In my last lesson, I asked the students to complete any sections of their poster that were unfinished. We then looked at the future of insects. The students seemed to enjoy researching entomological careers, and many were surprised and intrigued at some of the ones they found – such as a forensic entomologist! They seemed excited about downloading the iNaturalist app to identify insects and contribute to scientific records out of school – it was quite difficult to stop students getting their phones out to download the app before the end of the lesson! At the end of the lesson, I asked the students to fill in a feedback form, using the 4,3,2,1 approach, in which I asked them to note down four new facts or skills that they had learnt in my lessons, three words they would use to describe insects now that they have completed the project , two activities they enjoyed over the five lessons, and one thing that they will do in the future to help insects. I also asked them if there was anything that they had not enjoyed. Overall, I received really positive feedback, and the students seemed to have picked up most of the knowledge and skills in the lessons’ learning objectives. I will reflect on the feedback I received in further detail in my Technical Report.

Overall reflection

This has definitely been the most rewarding course I have taken whilst at university. Going from students thinking that insects are “scary” and “disgusting” at the start of the first lesson, to describing insects as “interesting”, and “helpful” at the end of the last lesson made me feel like I had made an impact on the students understanding, and had achieved my goal of raising awareness, and sparking interest in, what is often a very overlooked and underappreciated animal group.

Though my plans are currently to go into the field of ecological consultancy, completing the Geosciences Outreach and Engagement course has made me want to continue communicating ecology to a public audience, children and adults alike, as I found it to be highly rewarding. I will continue to raise awareness of my love of ecology on my nature-themed Instagram account, and in my spare time, I aim to be involved in outreach volunteering projects. To this end, I have already signed up to volunteer at weekends as part of Northumberland Wildlife Trust’s “Osprey Watch”. I will staff an osprey visitor hide, and communicate facts about these birds, and why they are important. I am sure the experience of planning my “Insect Investigation” project, and delivering my lessons will serve me well in providing an engaging visitor experience. For example, from my first lesson containing the insect quiz, I realised just how impactful startling facts can be in capturing people’s interest, and getting them to want to find out more. This is a tactic that will definitely prove useful when trying to communicate about the ospreys to hide visitors.

I look forward to spreading awareness about another aspect of ecology, and I will hopefully inspire even more people to take an interest in the natural world.

References

Vrdoljak, S. M. and Samways, M. J. (2011) ‘Optimising coloured pan traps to survey flower visiting insects’, Journal of insect conservation, 16(3), pp. 345-354.

Adapting and learning

Yesterday, I delivered the second of my 5 lessons. The students and I are currently waiting for the pan traps to (hopefully!) collect some insects. Whilst we wait, I will reflect here on how my first two lessons went, the adaptations I have made, and points that I will take with me into my last three lessons.

Lesson 1 Activities

My first lesson introduced students to insects, and I managed to dispel some common misconceptions. Many students thought spiders were insects, and after watching the video I made on ‘What is an insect?’, they realised that actually, since spiders have four pairs of legs, and insects have three pairs of legs, spiders are not insects at all. The ‘Who’s Who’ activity helped students to see a greater variety of insects, showing them that not all insects are “spiky” and “disgusting” – as some students originally had thought! Some students were sometimes a little unsure of how to complete the activities I had set, but when I went round and explained again, or gave little prompts, all students managed to complete the activities. In fact, there were some excellent justifications given for the diamond ranking of threats to insects. A particularly good response was “I put light pollution near the bottom because it doesn’t happen during the day, only at night, so only affects insects at night, but climate change happens all the time”. This kind of ‘out the box’ thinking was exactly what I had wanted to encourage, and I was pleased that the activity prompted students to do this.

Timings

Unfortunately, at the end of the first lesson, I ran out of time, and there was not enough time for students to fill in the background information section of their poster. I think I was not sufficiently aware of my timings, and I let myself be led off on tangents by students, with questions such as whether praying mantises and Komodo dragons were insects, and if we’d still be able to have crisps without insects pollinating potatoes! I didn’t want to not answer students’ questions as I felt it was important to engage them from the start, but I had not built a contingency into my lesson timings for this. In the second lesson, I made sure to keep better track of time and build some leeway into the lesson for students’ questions. I was more aware of when students were leading me off topic, and I managed to get through everything I had planned for the lesson. Also, before teaching the next session, I managed to adapt the second lesson, and allocate time for students to fill in the background information section of their poster, which we had not had time to do in the previous lesson. I was pleased that this had been possible and worked well, as it put my planning back on track, and made the objectives attainable once again.

Hypothesis construction

In the second lesson, all students managed to place their trap in their designated habitat, and record plant diversity, thus achieving the learning objectives of the lesson. The students did seem to struggle with formulating their own hypotheses. However, with prompts from both me and their teacher, and the support I had prepared on my PowerPoint to cover this eventuality, all students accomplished this, and some even managed to come up with hypotheses of their own, which was very pleasing. One student suggested that the rough grassland habitat would have more insects than the scotch broom habitat because there are more colours in the grassland, so more insects would be attracted to it. This was an idea I had not considered, and I was very impressed by the student’s creativity.

An unforeseen challenge, and new adaptations

A challenge that I had not foreseen, was students who had been absent from the previous lesson(s). There were a few students who were present in the second lesson, who were not present in the first which presented me with the challenge of how to include them and support them in the lesson. I overcame this by briefing these students as a group and individually, giving them an overview of what we had done in the previous lesson. I also got the students in their group to tell them what they had learnt. This not only helped the student who had been absent, but also seemed to consolidate the other students’ learning, and I was pleased with how well it worked as a strategy. This was borne out by the fact that all students were able to complete the background information section of their poster, regardless of absence from the previous lesson.

One thing that I have decided to change following delivery of my second lesson is not to ask students to re-write the diversity value that they recorded on their practical instruction sheet, on a class data sheet. I realised that this took up unnecessary time for little gain, as I could just collect in the practical instruction sheets, upon which students had already recorded their data.

Actions for future lessons

In my final three lessons, I will continue to identify adaptations that I can make to improve my lessons, and I will make sure to continue to be more aware of timings. I will also continue the practice of circulating around the classroom, and helping individuals at their desks. They seem to find this helpful as maybe I am more approachable. Giving further prompts and examples to what is on my PowerPoint presentations clearly supported students in completing the activities I set, and I think this approach will work for other activities in future lessons.

Preparing for Delivery

Last week, I finished making all of the PowerPoint presentations for my 5 lessons, the accompanying resources, and lesson plans. I go to Liberton High School in two weeks’ time to put my work into practice. Therefore, I thought it would be an appropriate time to reflect on the challenges that I have faced whilst planning the lessons. I will detail how I am overcoming these challenges, so I can be fully prepared for delivering my lessons later this month.

Keeping to time

The main challenge I have had has been lesson timings. Due to the school’s timetable, the lessons I have planned have had to be 40-50 minutes long. With these relatively short timings, it has been difficult to fit everything into the lessons that I would ideally have wanted, especially with the lessons involving practical activities outside the classroom. As a result, I have tried hard to ensure that the practical activities will run as quickly and smoothly as possible by making instruction handouts, with short, concise descriptions, and clear diagrams for those who have more difficulty reading or understanding.

A screenshot of a section of the lesson 3 practical instruction handout

I have also had to shorten some activities, and think of ways to prevent unnecessary time from being taken up. For example, I have decided to hand out certain worksheets at the beginning of the lesson, and pre-cut activity cards (such as those for the diamond ranking), so that they can be handed out in envelopes, ready to be used straight away. I have also found it difficult to gauge how long to plan for verbal discussion of topics, as I am unsure how confident the class will be in feeding back their answers to me. If necessary, I can adjust my timings after delivering the first lesson, once I have a better idea of how the class will respond to discussion activities.

Catering for different abilities

Another challenge has been ensuring my lessons are aimed at the correct level for students’ ability. I have been using the Scottish Curriculum for Excellence to identify concepts that students should already know. In doing so, I have been able to include refresher activities for certain concepts which I think students may need reminding of. For example, in my fourth lesson, I have included a starter activity on distinguishing between independent and dependent variables, by getting students to decide which variables in our experiment were independent, and which were dependent. This will hopefully set a strong foundation for the students’ learning. I have tried to make the lessons accessible to students of all abilities, not only by using a mixture of text and diagrams in instructions (as mentioned above), but also by providing supporting resources to those who may benefit. I will discuss potential students for these resources with the teachers. For example, in the lesson where we analyse the data, I will produce template graphs with pre-made axis titles, labels and scales for students who may otherwise struggle with this activity. I hope that by trying to cater for a full range of abilities, I will keep the students engaged as they will not feel unable to complete any activities. This will hopefully maximise their learning.

Minimising uncertainties

A final challenge that I have faced is the unpredictability of how many insects we will sample. I expect that there will not be many insects active in mid-March compared to the optimum time for sampling in summer months. I am also uncertain as to whether traps may be tampered with, or affected by weather conditions. I am going to try and reduce this uncertainty by bringing in pots of insects that I collected from two different habitats for my dissertation, for students to identify. This will ensure that students can still practise their insect identification skills, and meet the learning outcomes of the lesson. It may be exciting for them to see a sample of my own research. I have also produced a dummy dataset, with data that I have made up, that reflects differences in insect abundance, diversity, and plant diversity between two habitats. This will mean students can still practise their data analysis and presentation skills, even if we collect insufficient data ourselves.

Adapting

By trying to foresee potential challenges, and minimise uncertainties, I have ensured that I am as prepared as possible for delivering my lessons. As I progress through delivering my lessons, I will continue to reflect. I have allocated time for me to adapt my lesson planning accordingly should any new issues or challenges arise, as I see how quickly the students learn, how they react to me, and how effective my resources and delivery are.

Key word highlighting

My second lesson contains a variety of keywords that I want students to be able to understand, and use effectively. Whilst planning my second lesson, I started to research how key words can be used in teaching, to successfully embed definitions in students’ memories. Here, I reflect on the techniques that I found, and discuss how I will apply these techniques in my lessons.

Research

In a blog post by Joanne Miles Consulting, I read how it is important to teach key words early on in the learning process, to prevent future misunderstandings. This seemed logical to me, and I had already included keywords at the start of all of my lessons, so I am pleased that I have addressed this already. However, I also read about how important it is to label key words, to remind students of their meaning. I have not done any labelling or highlighting of my keywords, and found this concept especially intriguing. I decided to research it further, to see if it was something that would be worthwhile to do in my lessons.

I found a paper by Rello et al. (2014), who researched the impact of highlighting key words on how easy and understandable a piece of text was to read. Interestingly, the researchers found that highlighting keywords in bold can make text easier to understand for people with dyslexia. I will be using many keywords in my second lesson, including ‘habitat’, ‘community’, ‘abundance’, and ‘diversity’ – all of which have very different, but similar sounding definitions:

Habitat: The place where an organism lives

Community: All the different organisms living in a habitat

Ecosystem: All the different organisms living in a habitat, and the habitat itself

Biodiversity: The variation of living things in a particular area

Abundance: The number of organisms in a particular area

Distribution: Where organisms are located

The approach of highlighting keywords could therefore be very effective in distinguishing these key words, and improving students’ understanding of them.

Action

As a result of my investigations, I have decided to use a different colour font for each keyword, running through all of my PowerPoint slides. For example, every time I use the keyword habitat, I will put it in bold, in blue font. I hope that this will make the keywords clear to students, and help refresh their memories about what the words mean. It may also prompt them to look at their key terms glossary that I intend to give them, if they have forgotten what the word meant.

An example of how I will use key word highlighting in my PowerPoint presentations

However, if I colour highlight all my keywords, I realise that I will need to use a colour-blind friendly palette, to ensure that these words are also visible to colour-blind students. I researched some colour-blind friendly palettes, and found a palette which had been made to optimise colours for colour-blind individuals (Wong, 2011). By using the colours from this palette for my keywords, I hope that they will be clear to all students as well as accessible.  I feel that it has been useful to research some teaching methods and theories as they have helped me to plan what I hope will be effective lessons.

Next steps

Researching the impact of key words and key word highlighting really got me thinking about the accessibility of my PowerPoint presentations. By making the changes outlined in this blogpost, I hope to make my presentations more accessible and understandable to all students.

References

Miles, J., 2014. Embedding English: 13 Strategies for Teaching Key Words. [Blog] joannemilesconsulting, Available at: https://joannemilesconsulting.wordpress.com/2014/01/07/embedding-english-13-strategies-for-teaching-key-words/ [Accessed 14 February 2022].

Rello, L., Saggion, H., Baeza-Yates, R. (2014). Keyword Highlighting Improves Comprehension for People with Dyslexia. Proceedings of the 3rd workshop on PITR, 30-37. 10.3115/v1/W14-1204

Wong, B. (2011). Points of view: color blindness. Nature methods, 8(6), 441. https://doi.org/10.1038/nmeth.1618

Planning my first lesson

Over the past week I have been planning the first of my five lessons. In this blog post, I will discuss some of the challenges I faced, successes I had, and the things I learnt that will help me plan my other four lessons.

Challenges

The biggest challenge I faced in planning this lesson was making sure that the wording I used was appropriate to my target audience, of S1 and S2 students. I found myself having to go back and re-word sections of text, to make them more accessible. I also decided to include a list of keywords, to refresh students’ memories of key ecological terms such as ‘habitat’, and ‘ecosystem’. This should make it easier for them to complete the activities in the lesson and will hopefully support students who have difficulties such as processing or dyslexia. In addition to wording, I also found it hard to limit the amount of text I had on my PowerPoint slides. I wanted to keep a large font size, of at least 28, so that the text could be easily read from the back of the classroom. To do so, I had to cut some of the information. This was particularly hard in the part of the lesson where I wanted to explain what an insect is. I had originally planned to have some text on the board to discuss with the students. However, I realised that a large block of text, and me talking at the same time as they would be reading, would not be very engaging and I want to avoid students ‘switching off’ because they are overloaded with information. Instead, I decided to make a video with diagrams and a voiceover, which I think will be more visual and more effective in maintaining the students’ interest.

Successes

Something I found that would work to break up sections of text, was using animation to reveal short chunks of text at a time on the PowerPoint slides, this way I can gradually reveal the information when it is appropriate to do so. I also found it useful to look at examples of presentations teachers have openly shared on websites such as the TES, and look back at my notes from the lesson I observed at Liberton High School. I noticed that many lessons start with a brief overview of what is planned for the lesson, then the learning objectives are discussed, and students were told how they will know that they had achieved these objectives. Then, the main body of the lesson is taught, and a plenary activity conducted at the end. I used this structure for my first lesson plan, and will replicate it in my other four lessons. I think this structure will work well, as it will help the students to have a clearer understanding of whether they have met the learning objectives that I would like them to achieve.

Lessons learnt

By planning this lesson early on, I realised just how much time needs to be dedicated to organising the resources that will be used, making the resources, and creating clear and concise PowerPoint slides. I now have a much better idea of the amount of time I need to dedicate to planning the other four lessons in my project. Now have a basic template of a lesson plan, with learning objectives, keywords and a plenary section, I can use this for the subsequent lessons. This will enable me to be more efficient in my lesson planning. Additionally, by looking at examples of lessons made by teachers on resource sharing sites, I have a better understanding of the level of language that I should be using during my lessons.

Post-visit reflection

This week I visited Liberton High School. I met the class with whom I will be working, I discussed further my ideas with the biology teachers at the school, and saw the school grounds.

Meeting my class

I was surprised that the class I will be working with consists of only 15 students. However, a small group will make it quicker and easier to manage and carry out the practical work, and I will also be able to support individual students more closely. From my lesson observation of the class, the students seemed to enjoy practical activities and video clips. They were much less engaged with directly delivered oral information. Although this will be necessary in some instances, such as for explaining activities, I will try to keep this ‘lecturing’ style of teaching to a minimum, and think of other ways that I can keep the students engaged. One example I have thought of is with a starter activity on averages. Instead of recapping averages on the board, and delivering the information to the students verbally, I will create a multiple choice averages quiz. This active engagement will hopefully be more effective in refreshing the students’ memories of how to calculate averages.

Discussion with teachers

It was really useful to discuss my ideas with one of the biology teachers I will be working with. I was given a good insight into the needs of the class members, from the teacher’s perspective, as well as advice as to which learning tools will work well with the class. For example, I was told that many pupils struggle to formulate headings for tables, and axis labels and scales for graphs. I will therefore create a template table and graph for the students to use. It was also good to find out that the classroom has resources such as mini whiteboards, which the students could use as part of my insect quiz. I now have a much better idea of the equipment I will need to provide the school with, and can now organise this. I will provide the school with an equipment list for each lesson, to enable them to devise an appropriate risk assessment for practical activities.

After discussing the timings of the school day, I now know that the school’s lessons were shorter than I anticipated. Therefore, I have decided to deliver my material over 5 lessons, instead of the 4 I had initially planned. This will ensure that I can deliver detailed and clear information, without rushing the content to finish a lesson on time.

The school grounds

Now I have seen the school grounds, I am reassured that sampling can take place on site. This will mean that the students will have more time to identify the insects they collect, and analyse their results. I have decided that we will sample underneath a clump of the plant broom, and have another sampling location in a more diverse clump of rough grassland. I will group the class into pairs, and each student will be responsible for a yellow bowl in a different habitat (broom vs grassland). In addition to placing the bowls, students will also measure the diversity of the vegetation. To make this simple, I will get the students to count the number of different plants that they observe to be present within a 1 x 1 m quadrat. We will do a practice of this as a starter activity in the classroom, using a picture. I hope that this will mean students are better equipped to carry out this method of measuring diversity in the field.

Next steps

I now have a more concrete idea of the practicalities surrounding my lesson delivery, and I have begun to consider how I can keep students supported and engaged. My next steps will be to begin to design the lesson plans and resources, in preparation for teaching in March.

First meeting with my client

On Wednesday, I met with two biology teachers from Liberton High School. We discussed the details of my project, such as timings, the year group and class it would be most appropriate for, and the sampling method that would be best for the experiment.

Including a careers aspect to my project

I was pleased that the teachers were so positive and enthusiastic about my proposal. Overall, they seemed to think my project would fit well in the students’ learning journey and would tie in well with their previous learning. The positive ending to the scheme of lessons, through focussing on positive case studies and actions students can take to help insects, was well received. Before the meeting, I wondered if it would be relevant to include reference to future career possibilities as part of the lessons, as this would allow students to consider associated career pathways and would be an interdisciplinary opportunity, meeting E&O HWB 3-20a:

I am investigating different careers/occupations, ways of working, and learning and training paths. I am gaining experience that helps me recognise the relevance of my learning, skills and interests to my future life.” (Education Scotland, 2017).

Including this aspect in the final lesson will, I feel, reinforce the importance of insects in society that will have been previously covered in the introductory session. When I suggested this to the teachers, they thought it was a very good idea. I am going to start collecting resources which I could use to inform the students about ecological careers, such as the British Ecological Society’s “Where Can Ecology Take You” leaflet, and videos such as the Royal Entomological Society’s “What is an entomologist?”.

Chosen sampling method

It is likely that I will be working with a S1 class, around March time. The biology teacher is going to contact me soon to confirm more specific dates. We also talked about the possibility of me going into the school to observe some biology lessons, to meet the students, get a feel for the school, and identify suitable habitats around the school which could be used for sampling insects. The teachers seemed keen to try out the insect sampling technique using yellow plastic bowls. They thought that kick sampling in a river could be difficult logistically, and have previously tried pitfall traps, but with limited success. The yellow bowl technique is therefore looking likely to be the sampling method I use.

Equipment available

The school has access to hand lenses and microscopes, which will help the students to identify smaller insects, and get a closer view of insects, hopefully fostering a greater appreciation of the delicate and intricate structure of insect body parts. The teachers also mentioned that the school has lenses available which attach to phone cameras, and allow photos to be taken of small things, such as insects. They suggested students could use this equipment to take photos of the insects they find, and present these, along with their results in a poster. I thought this was a really useful suggestion, as the posters could give me an indication of what the students have learnt, and will give me material that I can present and evaluate in my technical report. I thought that having visual results in the form of photos may help to engage to less able students and appeal to a wider range of learner types.

Future plans

Moving forward, I am going to add more detail to my plans for the first lesson in the scheme of work. I will develop my plans for the other lessons once I have visited the school in the new year. This will give me a more concrete idea of where sampling can take place, and a better feel of the appropriate level at which to pitch the work.

References:

Education Scotland (2017). Benchmarks Personal and Social Education. [Online]. Available at: https://education.gov.scot/improvement/learning-resources/curriculum-for-excellence-benchmarks/. [Accessed: 14 December 2021].

CIEEM Webinar – Science Communication for Ecologists

Yesterday I watched a webinar by the Chartered Institute of Ecology and Environmental Management on “Science Communication for Ecologists”. It spoke of the effectiveness of using stories to communicate ecological concepts, the importance of visuals, and how to communicate in a way that is accessible and inclusive. I would like to implement some of what I have learnt from the webinar in my project.

Use of stories

Vicky Bowskill, a PhD student at the Open University, as well as a writer and illustrator, explained the importance of stories in science communication, and how to use them effectively. She highlighted how our brains are wired to remember things which are delivered in story form, and how structuring messages in this way can make them more memorable. One way to do this is to make your audience care about a conservation issue, and then show them what they can do to help, rather than focusing on the threats. This made me think about my current project plan. The last lesson currently finishes on the threats to insects – a rather negative concept to end on. Vicky also talked about using a story arc, for example, explaining what things were like before, what has happened, and how we can change things. I recognised this as already present in part in my own project: I introduce the background to insects and the wide diversity of insects in the UK, then explain how insects are threatened by habitat loss, which students will hopefully see in ‘real life’ through the practical. However, I am missing the last part of the story arc – how the students can change things, and what positive things there are to aim for. I would now like to include this at the end of the last lesson in my project, to end the scheme of work on a more positive, memorable note. To do this I could present a case study of where insect populations have recovered following habitat restoration. I could also discuss the work of charities such as Buglife, the Bumble Bee Conservation Trust, and Butterfly Conservation and show how they are helping to protect insects. I think a good way to end the scheme of lessons would be to ask the students how they think they can help insects, giving them some ideas, such as: sharing with friends/family how important insects are, recording the insects they see using apps such as INaturalist, and asking teachers and school staff for help with meaningful projects around the school to help insects – such as providing bug hotels, and pots of native wildflowers.

A section of my notes from the webinar of a diagram of a ‘story arc’. “Story Arc” by Bethany Hickling is licensed under CCBY

Visual aids

A common theme mentioned by all the speakers in the webinar was the importance of using visual aids to support a message, which was something also discussed in the webinar I watched a few weeks ago by National Museums Scotland. This webinar highlighted that people respond well to colour, and character. Therefore, I will choose colourful and appealing images for the activity resources I produce.

Accessibility

Admittedly, I had not considered accessibility in depth before watching this webinar. The webinar suggested ways to increase the accessibility of teaching materials including text formatting and colour choice, e.g. the size of font, and a clear font type, and avoiding clashing colours for autistic readers. After the webinar, I considered ways in which students could help insects, and initially thought about activities that could be done in gardens. However, I need to consider that not all students will have access to such a space. To make the actions I give students more accessible, I have come up with three actions (as mentioned above) that most students will be able to do (i.e. share information with friends or family, record insects on the iNaturalist app, and encourage their school to do more for insects).

Concluding thoughts

In summary, the CIEEM webinar was extremely valuable in getting me to think how I want to communicate the importance of insects to the students, and how I will get this message to stay with them. I am definitely going to make use of a story arc, and end my scheme of lessons on a more positive note, to inspire the students’ action and sustained interest.


New development: I have a client!

After coming up with some of the ideas outlined in my last blog post, I emailed them to my tutor and staff supervisors to indicate my more detailed plans. In brief, I intend to have a series of three lessons, the first will give students a broad introduction to UK insects, and in the second lesson they will then go out to sample and identify insects from two contrasting habitats, before analysing and presenting the data they collect, and discussing the results. They will consider the wider implications of their findings, and learn about the future outlook for insects in the UK, in the context of habitat destruction, pesticide use, and climate change.

I met with my staff supervisors on the 17th of November to discuss these plans, and I found that contact had been made with Liberton High School as a potential client, who have expressed interest in my project. In the meeting, we also discussed any potential problems which could occur in my project, and how the insect sampling could be done in a way that is more closely aligned to the benchmarks set out in the Scottish Curriculum Experiences and Outcomes.

Meeting reflections

Potential obstacles include the delivery date of my project, as the insect sampling will be most effective when conducted in spring/summer, when there is greater activity. However, if the client is flexible, and I plan my time effectively, it will be possible for me to conduct this part of my project in March, when there will be some insect activity. A further issue is if insufficient insects are collected by the students to identify, record and analyse. This could potentially be overcome by providing students with a dummy dataset, so they still have data to analyse even if they collect insufficient insects themselves. If insufficient insects are collected for them to identify, I could overcome this by bringing in some of the insects I collected as part of my dissertation, so the students still get a chance to practise using identification keys.

Before my meeting with my staff supervisors, I had only thought of one method of sampling insects for the students to use – involving placing a yellow plastic bowl filled with water and washing up liquid for 24 hrs in a slight depression in the ground, or directly on the ground with a rock inside to stop it blowing away. After the 24 hours, the bowls would be collected in and the insects inside identified.


An example of a yellow bowl (AKA a ‘pan trap’) which can be used trap insects. I used this method to collect data for my dissertation, and suspended the bowl in the air from a pole, but they can also be placed on the ground. (“Pan trap” by Bethany Hickling is licensed under CCBY)

However, following the meeting I thought of other insect sampling methods which could be used, including kick sampling river invertebrates, and pitfall traps and leaf litter sampling of ground invertebrates. I will outline all these potential methods to the client, so we can choose the one(s) which will work best for the school.

Me, kick sampling for invertebrates as part of a university summer project! (“Kick sampling” by Jill Hickling is licensed under CCBY)

A diagram of a pitfall trap – a plastic cup is placed in a hole in the ground, and any insects walking along the ground fall into the cup. (“Pitfall Trap” made on Microsoft PowerPoint by Bethany Hickling is licensed under CCBY)

Leaf litter. Sampling this involves taking a large handful of leaves, placing them in a tray, and doing a timed search for any invertebrates that are present, which are later identified. (“Leaf litter, Callan Park” by Mary and Andrew (Flickr) is licensed under CCBY)

In terms of the practical part of my project, my meeting made me realise that the experiment I had devised to sample insects did not thoroughly cover the benchmark outlined in the Scottish Curriculum which states:

collects and analyses increasingly complex data and information, for example, temperature and light intensity, to suggest reasons for the distribution of organisms within different habitats”.

However, this is something that could easily be covered. For example, if insects are sampled using the bowl, pitfall trap, or leaf litter methods, other variables such as vegetation height, or % vegetation cover could be measured to see if these variables explain any differences in insect abundance and diversity between habitats. For the river sampling methods, variables such as stream velocity, or water depth could be measured. Instructing students to measure such variables will add an extra layer of complexity to the data collection and analysis, which will more closely align with the Scottish Curriculum.

Concluding remarks

Overall, my meeting with my staff supervisors was extremely useful. It encouraged me to think more deeply about how my project can meet the objectives of the Scottish curriculum, and how I can overcome any problems that may arise to ensure the project runs smoothly. I will bring these ideas with me to my first meeting with Liberton High School, so that I can effectively promote my project as a useful resource, and pre-empt any potential concerns that they may have.


Thinking More Creatively

Since I wrote my last blog post, I have attended workshops that are part of the Geosciences Outreach and Engagement course about active learning, and using Linkedin Learning and Adobe Spark. Outside of the course, I have also participated in a webinar organised by National Museums of Scotland. This explored how the museum’s collections are being used to communicate the threats of climate change, and how art can be used to inspire action. I found both the workshops and webinar hugely influential in developing ideas for my project, and will explain how below.

Active Learning workshop

Throughout the workshop on Active Learning, I was making connections with activities I remember from my own learning at school, and I realised that these were created with the intention of inspiring active learning. I recognised the basic format/layout of many of the activities that Steve gave as examples, such as the odd one out activity – familiar from many of my own lessons at school, such as Spanish and geography. The fact that I could recall these activities reinforced to me the impact that active learning can have. Thinking back to these activities, and being able to consider them from a student’s perspective, but also the educator’s perspective provided by Steve, enabled me to start to formulate ideas as to how I could incorporate active learning into my outreach project.

Following the workshop, I collated a list of potential ideas for active learning for my project e.g. at the start giving students an ‘entrance ticket’ type activity where they write down three words they associate with insects on a post-it note, and stick these to a whiteboard. I imagine some students will say things like ‘boring’, ‘annoying’ or ‘scary’. This would enable me to address learnt stereotypes and dispel misconceptions, whilst highlighting the students’ baseline knowledge. Anticipating negative emotions or reactions, I will then use a multiple choice quiz to engage and inform the students and highlight the importance, diversity and declining status of UK insects using surprising and interesting statistics, photos and facts. Students could be placed in pairs to discuss and share their answers before they are submitted.

National Museums of Scotland talk

On the 4th November, I attended an online talk run by the National Museums of Scotland. It included panellists such as the museum’s assistant curator of entomology, Ashleigh Whiffin, and the artist Luke Jerram who designed the Earth artwork installation which many people will recognise from backdrops of news broadcasts and interviews from COP26 in Glasgow. Through this webinar, I hoped to gain insight into how insects can be used as mechanisms to communicate broad topics such as climate change, and get inspiration as to potential ways I could do this in my project. Ashleigh’s introduction to the National Museums’ entomology collection provided me with ideas as to how I can communicate the importance of insects to my audience. Ashleigh put key statistics into context, such as the number of insects in the world, by relating this to how many insects there are per human on the planet (1.4 billion insects for every human)! To convey the importance of insects, Ashleigh also described the services they provide to humans, such as pollination, and waste recycling. I think this will be an effective angle for me to take to engage students’ interest in insects.

The artist on the webinar’s panel also made me think about how I can engage students. They talked about how art can be used to invoke emotional uplift, and inspire people to take action on issues such as climate change. Photography was mentioned as a useful tool to do this, especially with insects, as macrophotography in particular can give you an insect’s eye view of the world. With this in mind, I have come up with an idea of playing a Who’s Who type game, using eye-catching photos of insects found in the UK. Students could be given bingo type cards containing information about different insects, such as their diet, favoured habitat, and conservation status. They could then work in pairs to place cards featuring photos of different insects on the correct piece of information for that particular insect. We would then go through the correct answers together. Not only would this use a technique recommended in the webinar to engage people with insects, but it would also be a form of kinaesthetic and active learning. By moving cards around, and deciding where to place them, students would draw on their existing knowledge and learn from the ones they got wrong. Furthermore, I could use the skills taught in the workshop on Adobe Spark to create eye-catching information and photo cards to be used in the activity.

Adobe Spark

I had not previously used Adobe Spark before the workshop on Thursday, however, after experimenting with it in my own time, I am impressed by the quality of graphics that you can produce with it, even with limited graphic design experience, like me! Inspired by this, I have already used the programme to produce an information graphic for an assignment for one of my other university courses. I have previously used Microsoft PowerPoint or Canva to create diagrams or graphics, but find Adobe Spark more user friendly. The ability to access premium features through my university account is a huge advantage.

A grid of 4 green squares display 4 different facts about National Nature Reserves in the UK, accompanied with white illustrative icons

A graphic I have made for one of my other university courses, using the skills I learnt in the workshop on Adobe Spark

Conclusions

Overall, the workshops and webinar that I have attended have greatly aided my process of idea development. They have helped me think more creatively about the activities and resources that I can implement in my project. Having found such thought processes so beneficial, I would like to take these forward with me as I develop my project further.

Page 1 of 2

Powered by WordPress & Theme by Anders Norén

css.php

Report this page

To report inappropriate content on this page, please use the form below. Upon receiving your report, we will be in touch as per the Take Down Policy of the service.

Please note that personal data collected through this form is used and stored for the purposes of processing this report and communication with you.

If you are unable to report a concern about content via this form please contact the Service Owner.

Please enter an email address you wish to be contacted on. Please describe the unacceptable content in sufficient detail to allow us to locate it, and why you consider it to be unacceptable.
By submitting this report, you accept that it is accurate and that fraudulent or nuisance complaints may result in action by the University.

  Cancel