Post Processing
Introduction
The purpose of post-processing in the MM&NN project is to create a unique visual experience for the character MM, who sees the world through a blurred and color-shifted perspective, distinct from the normal view of NN. Because post-processing in Unity can provide an aesthetic style to the game by adding filters to the camera, its functionality aligns with our objectives on character MM’s visual. This effect is enabled when the player is the MM, and disabled for the NN, as technical detailed in the Multiplayer System section.
Implementation
I made a mistake when implementing this functionality for the first time, which is directly adding Post-processing Layer and Post-processing Volume under the camera object. Since the project is built using Unity’s Universal Render Pipeline (URP), post-processing cannot be applied directly to the camera using the traditional Post-processing Layer and Volume components. Instead, it must follow the URP approach, which involves two key components:
- Volume Profile: A data asset that defines post-processing effects and their parameters.
- Global Volume: A component that applies the selected Volume Profile across the scene globally.
These two components are integrated into the First Person Controller prefab. To simplify enabling and disabling the effect through scripting, the Global Volume is placed as a child under the FPS Controller object, allowing easy access via GetChild() in the First Person Controller script.
The Volume Profile used here is called “FPS Volume Profile”, which contains:
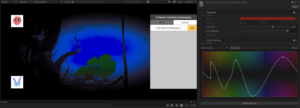
- Vignette: Adds a soft blur around the edges of the camera view. Intensity controls how much the effect applies to the camera. Smoothness blurred the effect’s edge. These two effects create a blurred and limited visual for the player.
- Color Curves: Applies a blue color tone to match MM’s unique visual perception. In the Color Curves settings, I used the Hue vs Saturation curve to increase the saturation of the blue and purple areas, while lowering the saturation of the green area. This made the blue in the scene more intense and harsher, creating an unsettling atmosphere.
The “Global Volume FPS” object uses the “FPS Volume Profile” and applies it globally when MM is the active player. Finally, MM character’s player will have a different aesthetic style from NN character’s player, building players’ difference to increase gameplay.