We’re excited to dive into the world of Arduino sensor testing! Our goal is to create an interactive experience where different videos play when our audience steps on a physical model of new steps. To accomplish this, we’ve chosen a particular sensor that’s both easy to attach and discreetly hidden beneath the steps.
Selecting the Ideal Sensor
After some consideration, we decided on using a photoresistor due to its ease of attachment and perfect size for hiding below the steps. Check out our ideal sensor implementation in Figure 1 below:
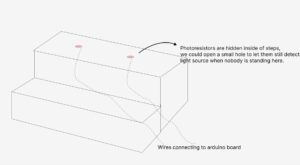
Figure.1. Ideal sensor implementation for the steps
Devices
- Arduino Uno R3
- Photoresistor
- 220-ohm resistor
- Jump wires
- breadboard
Software
- Arduino IDE
- Processing

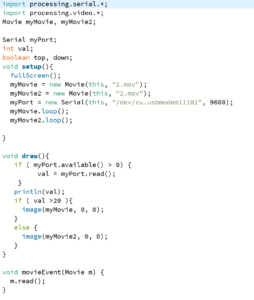
Figure.2&3. Screenshots of the code
Integrating Video Playback
Since Arduino doesn’t have its own video library, we need to link it with another coding program, such as Python, MAX/MSP, or Processing, to achieve the desired result. The logic behind this is using a serial port to transfer data from Arduino to Processing, and setting up two thresholds to switch between the recorded videos.
While these codes aren’t overly complex, they provide valuable insight into sharing Arduino data with other software. As a team, our long-term plan is to connect sensors with Unity or Touch Designer to directly manipulate the movement of the camera. However, it’s always smart to have a backup plan (e.g., video swapping) for the exhibition.
Stay tuned for more updates on our Arduino sensor testing journey!
Lets see how it works!
https://www.youtube.com/shorts/SvZ2pgWlxWo
If you’re reading this in order, please proceed to the next post: ‘Arduino 2nd Stage’.
Allison Mu
02/16/2023