Firstly, I picked up a 5 metre roll of WS2812B RGB LED Pixel Strip. This strip features individual colour control for each LED pixel, making it ideal for flexible and versatile lighting effects. Next, I chose the Arduino software as the control platform to enable precise control of the lights for live music.
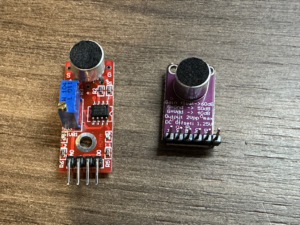
Initially, I used the LM393 sound sensor to capture the sound signal of the live music, and then tried to write code to convert the sound signal into lighting effects. However, after many attempts and adjustments to the code, the results were still not satisfactory.
After a series of searching and learning, I decided to try to use MAX9814 sound sensor instead. MAX9814 sensor has higher sensitivity and performance to capture the music signal more accurately, which improves the accuracy and response speed of the lighting effect. And the code logic was realigned. In the original code, the update of the lighting effect is executed based on a fixed delay, which may result in being out of sync with the music tempo. In the improved code, an interval-based update mechanism is introduced, using the millis() function to achieve timed updates. This allows for more precise control of the update frequency of the lighting effects, allowing them to be better synchronised with the music tempo.
By increasing the sensitivity of the sensor and optimising the structure of the code, I managed to improve the capture of the music signal and reduce the latency of the code to make the lighting effect smoother.
Final code:
#include <FastLED.h>
#define LED_PIN 5
#define NUM_LEDS 300
CRGB leds[NUM_LEDS];
int soundsensor = A0;
j
void setup() {
delay(2000);
Serial.begin(9600);
FastLED.addLeds<WS2812B, LED_PIN, GRB>(leds, NUM_LEDS);
FastLED.setBrightness(50);
}
void loop() {
int soundValue = analogRead(soundsensor);
Serial.print(“Sound level: “);
Serial.println(soundValue);
// int redValue = 0;
int blueValue = 0;
if (soundValue > 70) {
redValue = map(soundValue, 80, 1023, 0, 255);
fill_solid(leds, NUM_LEDS, CRGB(redValue, 0, redValue));
} else if (soundValue > 40) {
blueValue = map(soundValue, 50, 80, 0, 255);
fill_solid(leds, NUM_LEDS, CRGB(0, 0, blueValue));
} else {
fill_solid(leds, NUM_LEDS, CRGB::Black);
}
FastLED.show();
delay(20);
}
Next, I secured the light strips to foam tape to create a water ripple shape and positioned them in the area between the stage and the audience.