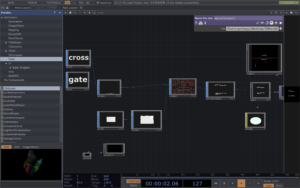
System Diagram-Hongpei

Current rent list:
- Genelec speakers. * 7
- Genelec sub. * 1
- Projector. *3
- 6.5 to XLR cables. *8
- HDMI long cables. *3
- Black Curtain. *1
- GoPro *2
- RME UCX. *1
System Test – March 23rd
During this week, we conducted our first system connectivity test in the Atrium. Owing to time constraints, we separately tested the interactive installations and the surround sound system components. The surround sound setup consists of five Genelec speakers and a subwoofer, connected to an RME UCXII sound card to receive audio from the computer.
Given the complexity of routing surround sound audio files directly from the computer, during actual performances, the main stage’s surround sound audio and projection videos will be played through a Protools output sound card and on the first expansion screen. Meanwhile, the television visuals will be displayed using QuickTime on a second expansion screen, ensuring there is no interference between the two systems.
Initially, we added spatial sound variations to a segment of pink noise. Through testers listening from the audience’s position, we achieved a relatively balanced effect by real-time adjustments of each speaker’s input level on the virtual mixing console. Subsequently, we played a completed surround sound segment, which resulted in a satisfactory performance outcome.
Following that, we tested the projection system and the Max interactive installation. Our initial idea was to create rock props fitting the scene, inviting audience members to jump around in the setting. We planned to capture the vibrations with a geophone and transform the visuals accordingly. However, in practice, we found the geophone to be extremely sensitive; it could detect strong sound pressure levels even from a distance or as soon as an audience member entered the door, making it challenging to set an activation threshold for the device.
Therefore, we intend to connect the system to percussion instruments, transforming the corridor scene into an interactive performance. When performers strike the drums, it will cause changes in the visuals. Additionally, we plan to optimize the interactive system to make it appear more diverse.
Video Design of Interactive Installation – Fangyi
1.Use ChatGPT and Runway, two tools, to create unique images and videos. Start with ChatGPT to generate an image.
This process begins by defining the type of image you want. Whether it’s a landscape, object, or abstract concept, you need to provide a detailed description, including the scene, objects, colors, and style. Once you have this concept, you can tell ChatGPT, and it will generate a unique image based on your description.
After the image is generated, the next step is to use this image as the basis for video production. This is where the Runway tool comes in. Runway is a powerful machine learning platform, specifically for image and video editing. First, you need to register an account and log in on Runway. Then, select an AI model that suits your project. Runway offers a variety of choices, each with different functions, and use various tools and settings to transform and enhance the image, such as adjusting colors, adding dynamic effects, or converting the image into a series of animated videos.
2.Add transitions in Final Cut
3.Creating font effects in Touch Designer:
• Create a text node, modify the font content. Use a merge node to combine different texts. Adjust the text’s position on the Y-axis. Increase the font thickness.
• Create and modify a grid:
Use a grid node to create a grid. Adjust the grid’s length, width, and height to make it rectangular. Add a noise node, connect it to the grid to create dynamic effects.
• Attach fonts to the grid:
Use attribute create to add normals and surface textures. Set up geometry, light, camera, and render nodes for rendering.
• Colors and materials:
Add materials and colors (such as pink) to the fonts. Optimize effects, including adjusting background color and resolution.
• Adding special effects:
Use nodes like feedback, blur, level, etc., to add visual effects. Combine different effects with a composite node.
• Creating a box background:
Create a box node and use geometry and render nodes to make a box background. Add dynamic effects with feedback, transfer, label, and composite nodes. Refine effects by adjusting parameters like scale and opacity.
• Final adjustments:
Adjust the position and angle of the lights. Adjust colors and transparency to ensure a cohesive overall effect. Add a bloom effect to increase brightness and vividness. Finally, add a breathing effect to make the box dynamically change.