
Details July 2023
- Partial and negative credit improvements for the Multiple Choice / Multiple Select question type
- Tab navigation for Assessments
- Add exceptions for anonymously graded assessments
- Exceptions panel updates
- Complete/incomplete grade schema
- Delete Grade Schemas
- Send reminders to non-submitters for anonymously graded assessments
- Start, Continue, and View Assessment options and file submission update
- Progress Tracking and Start / Continue / Completed options for Learning Modules
- Resizing media
- File deletion in the course also removes the file from the Content Collection
- Improvements to the Grades landing page on the Mobile App
- Improved flattening logic
- Formative Assessment Label
Partial and negative credit improvements for the Multiple Choice / Multiple Select question type
Multiple Choice and Multiple Answer questions are graded automatically. Answers are scored based on the instructor selected scoring option.
In the past, instructors could select from the following scoring options:
- All or nothing. A student must select all the correct answer choices to receive credit. If a student selects one or more incorrect answer choices, they earn no points.
- Allow partial credit. A student receives partial credit if they correctly answer part of the question.
- Subtract points for incorrect answers. A student will have points subtracted for incorrect answer choices. This option discourages guessing. The overall question score is not less than zero.
With the partial credit and subtract points options, all answer choices were equally weighted. Instructors were unable to control how much partial and negative credit is awarded for each correct and incorrect answer.
To provide instructors with more control we have made some changes. Now instructors can turn on partial and negative credit. This option allows instructors to:
- Define a positive percentage value to award credit for a correct answer(s)
- Enter a negative percentage value to subtract for an incorrect answer(s)
- Allow a negative overall score for the question
Image 1: Instructor view of the improved partial and negative credit scoring options

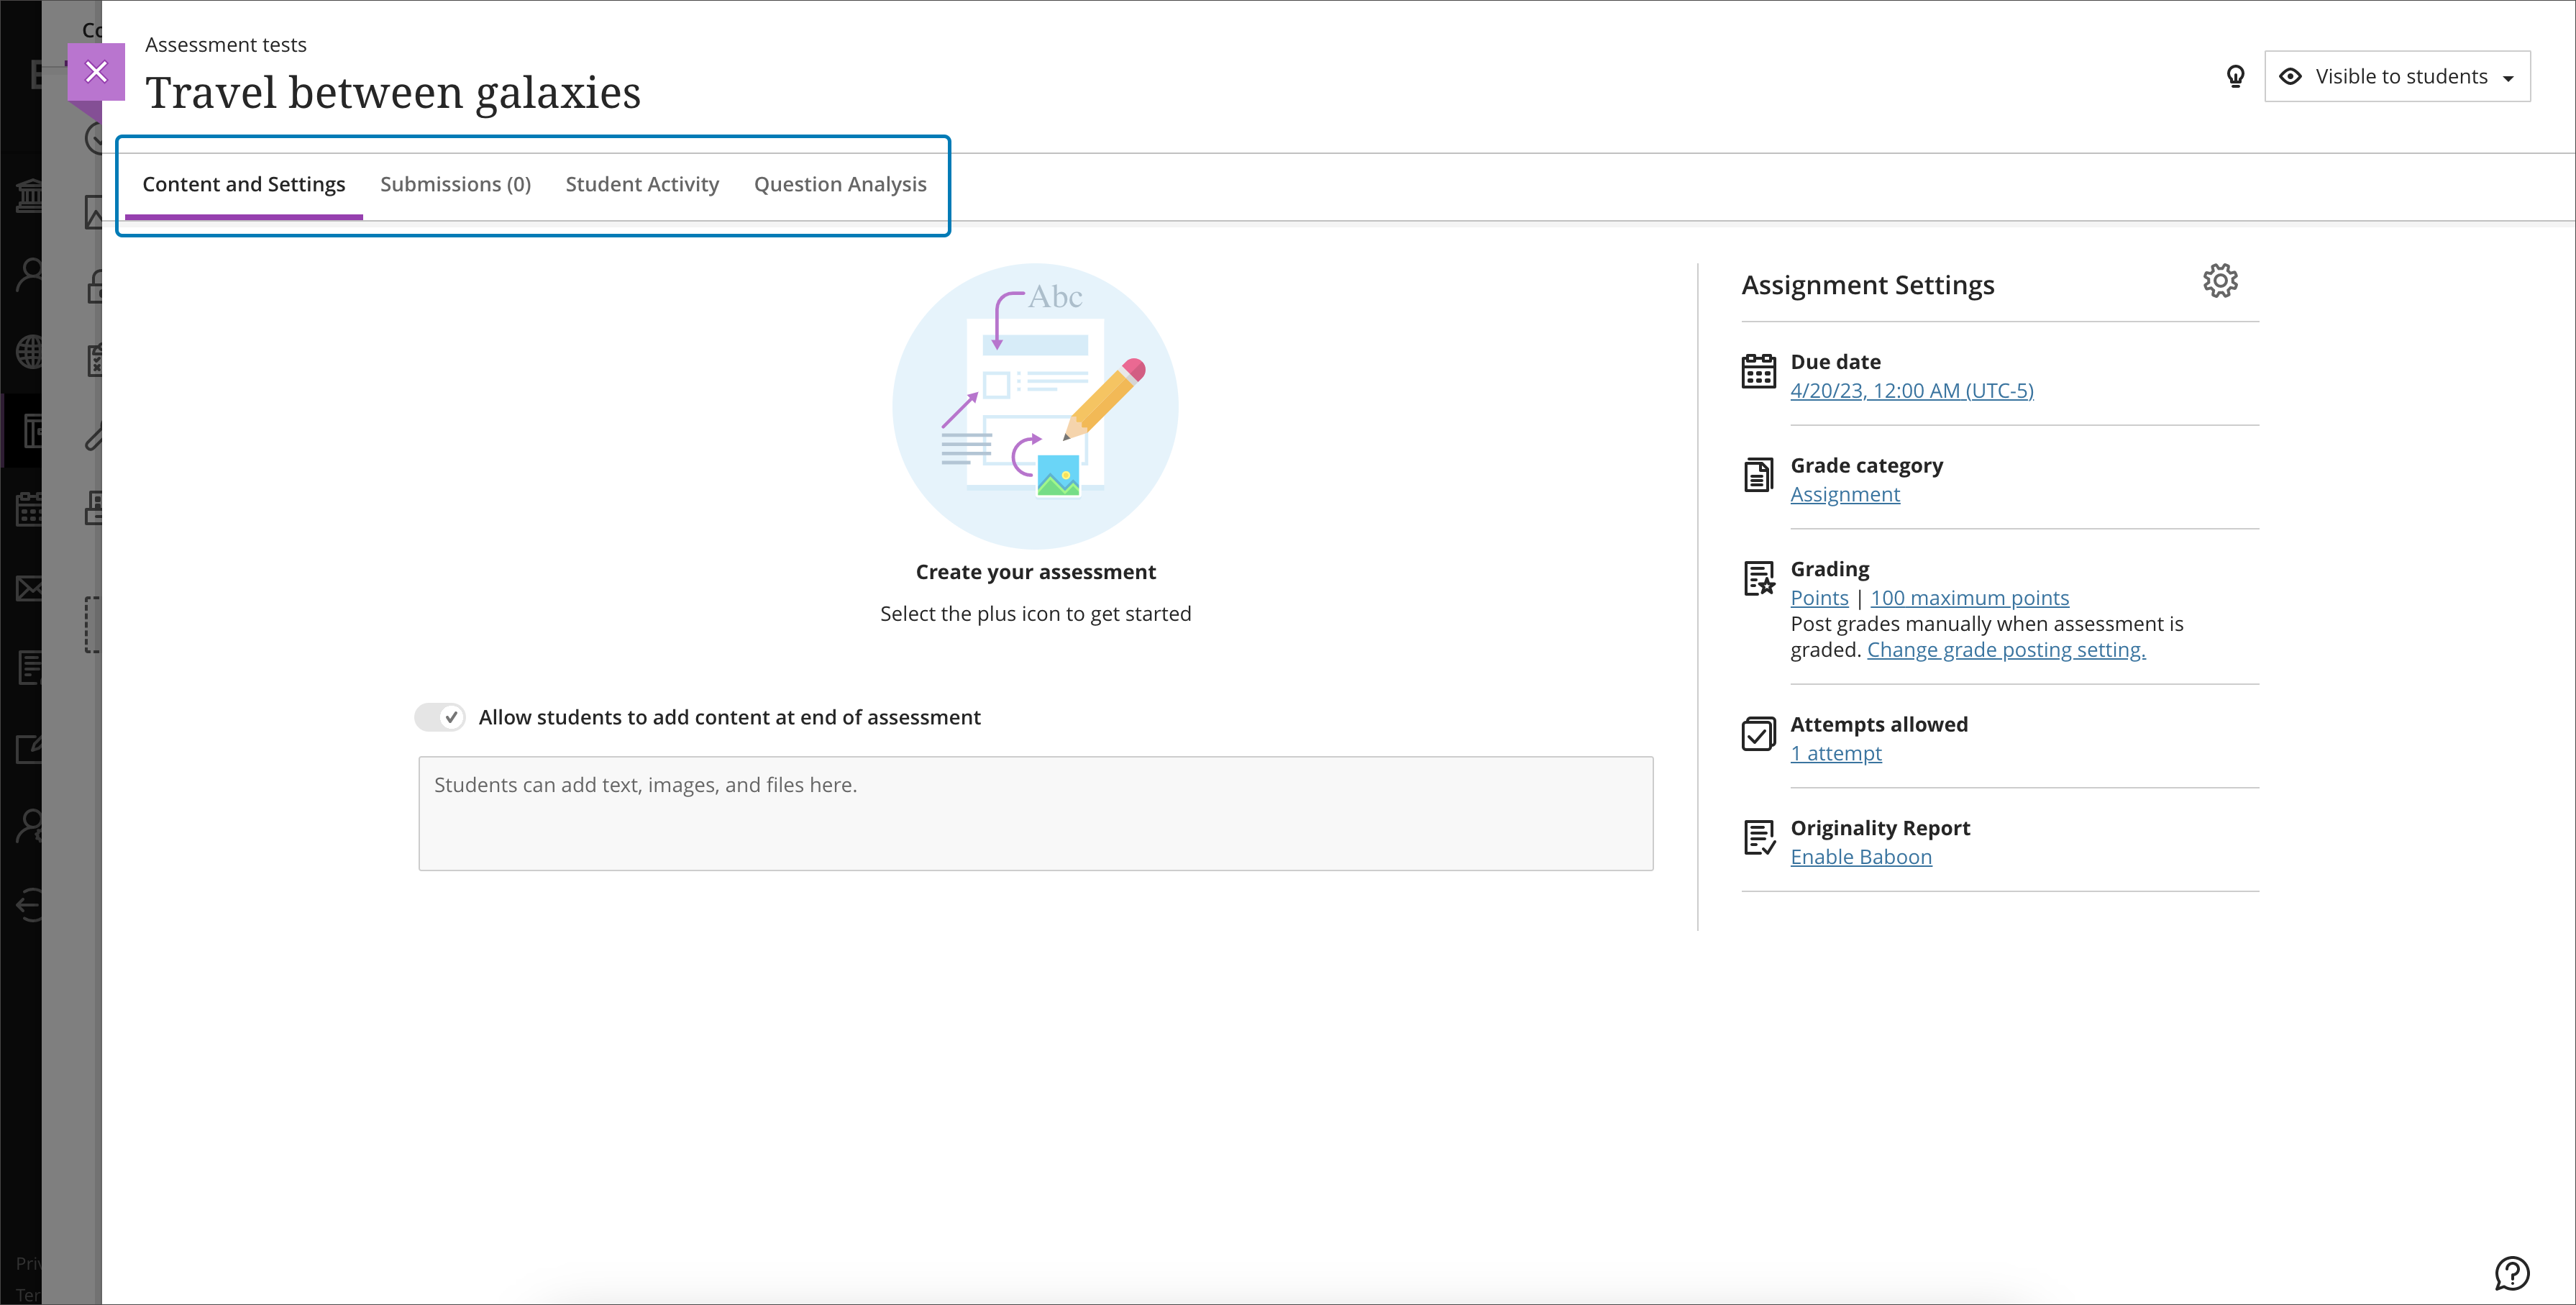
Tab navigation for Assessment
We have simplified the navigation for Assessments. Instructors now have convenient access to different sections using tabs:
- Content and Settings
- Submissions
- Student Activity
- Question Analysis
This improvement is designed to optimize instructor efficiency. It provides a more streamlined assessment management experience for instructors.
Image 1: Assessment with Content and Settings, Submissions, Student Activity, and Question Analysis tabs
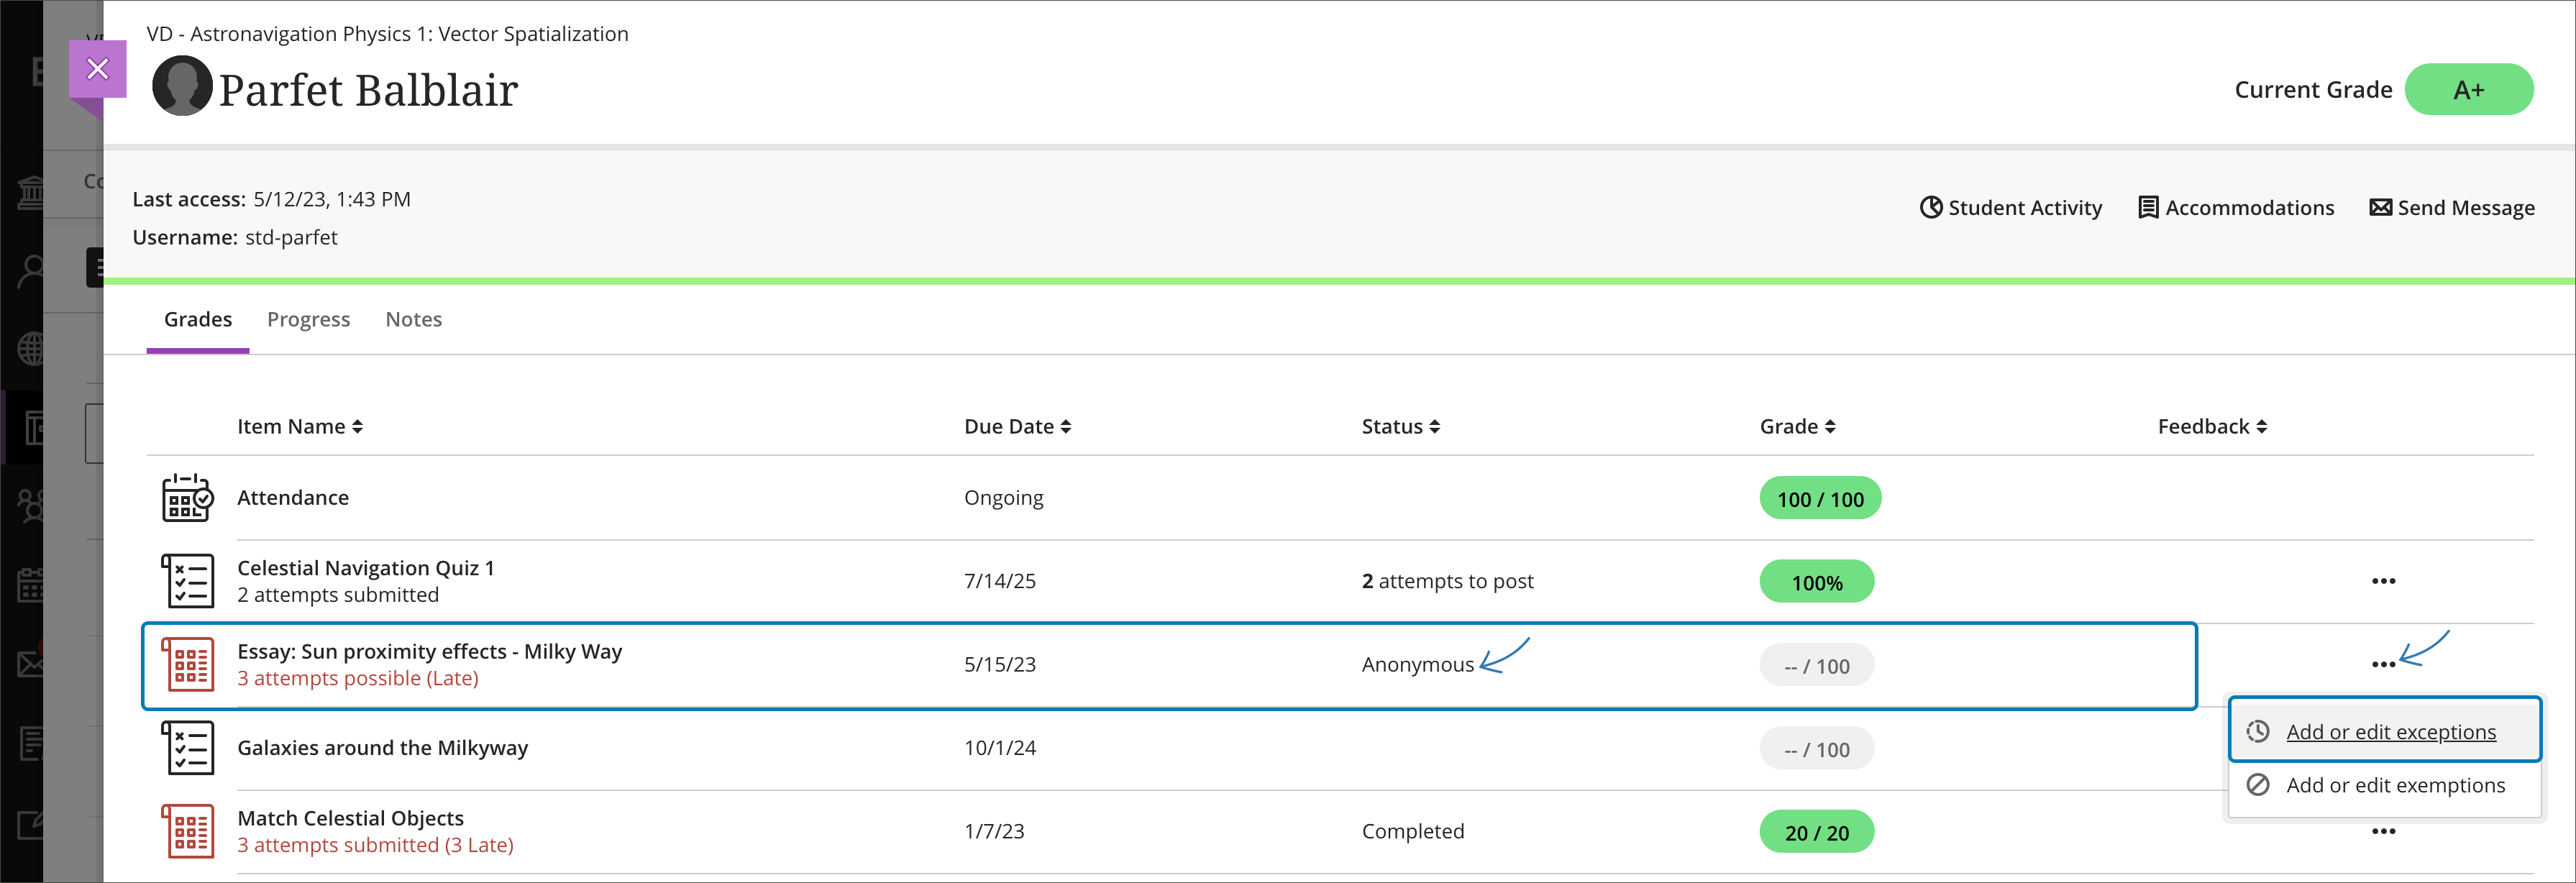
Add exceptions for anonymously graded assessments
We all live complicated lives and special circumstances often arise. When this happens, instructors may need to grant an exception to a student for specific tests or assignments. These exceptions may include the following:
- Granting additional attempts
- Rescheduling submission deadlines
- Allowing extended access
Now instructors can grant student exemptions for anonymously graded assessments. Instructors can access the exceptions options for all assessments from the Student Overview page in the gradebook.
Image 1: Add exception for an anonymously graded assessment via the Student Overview page
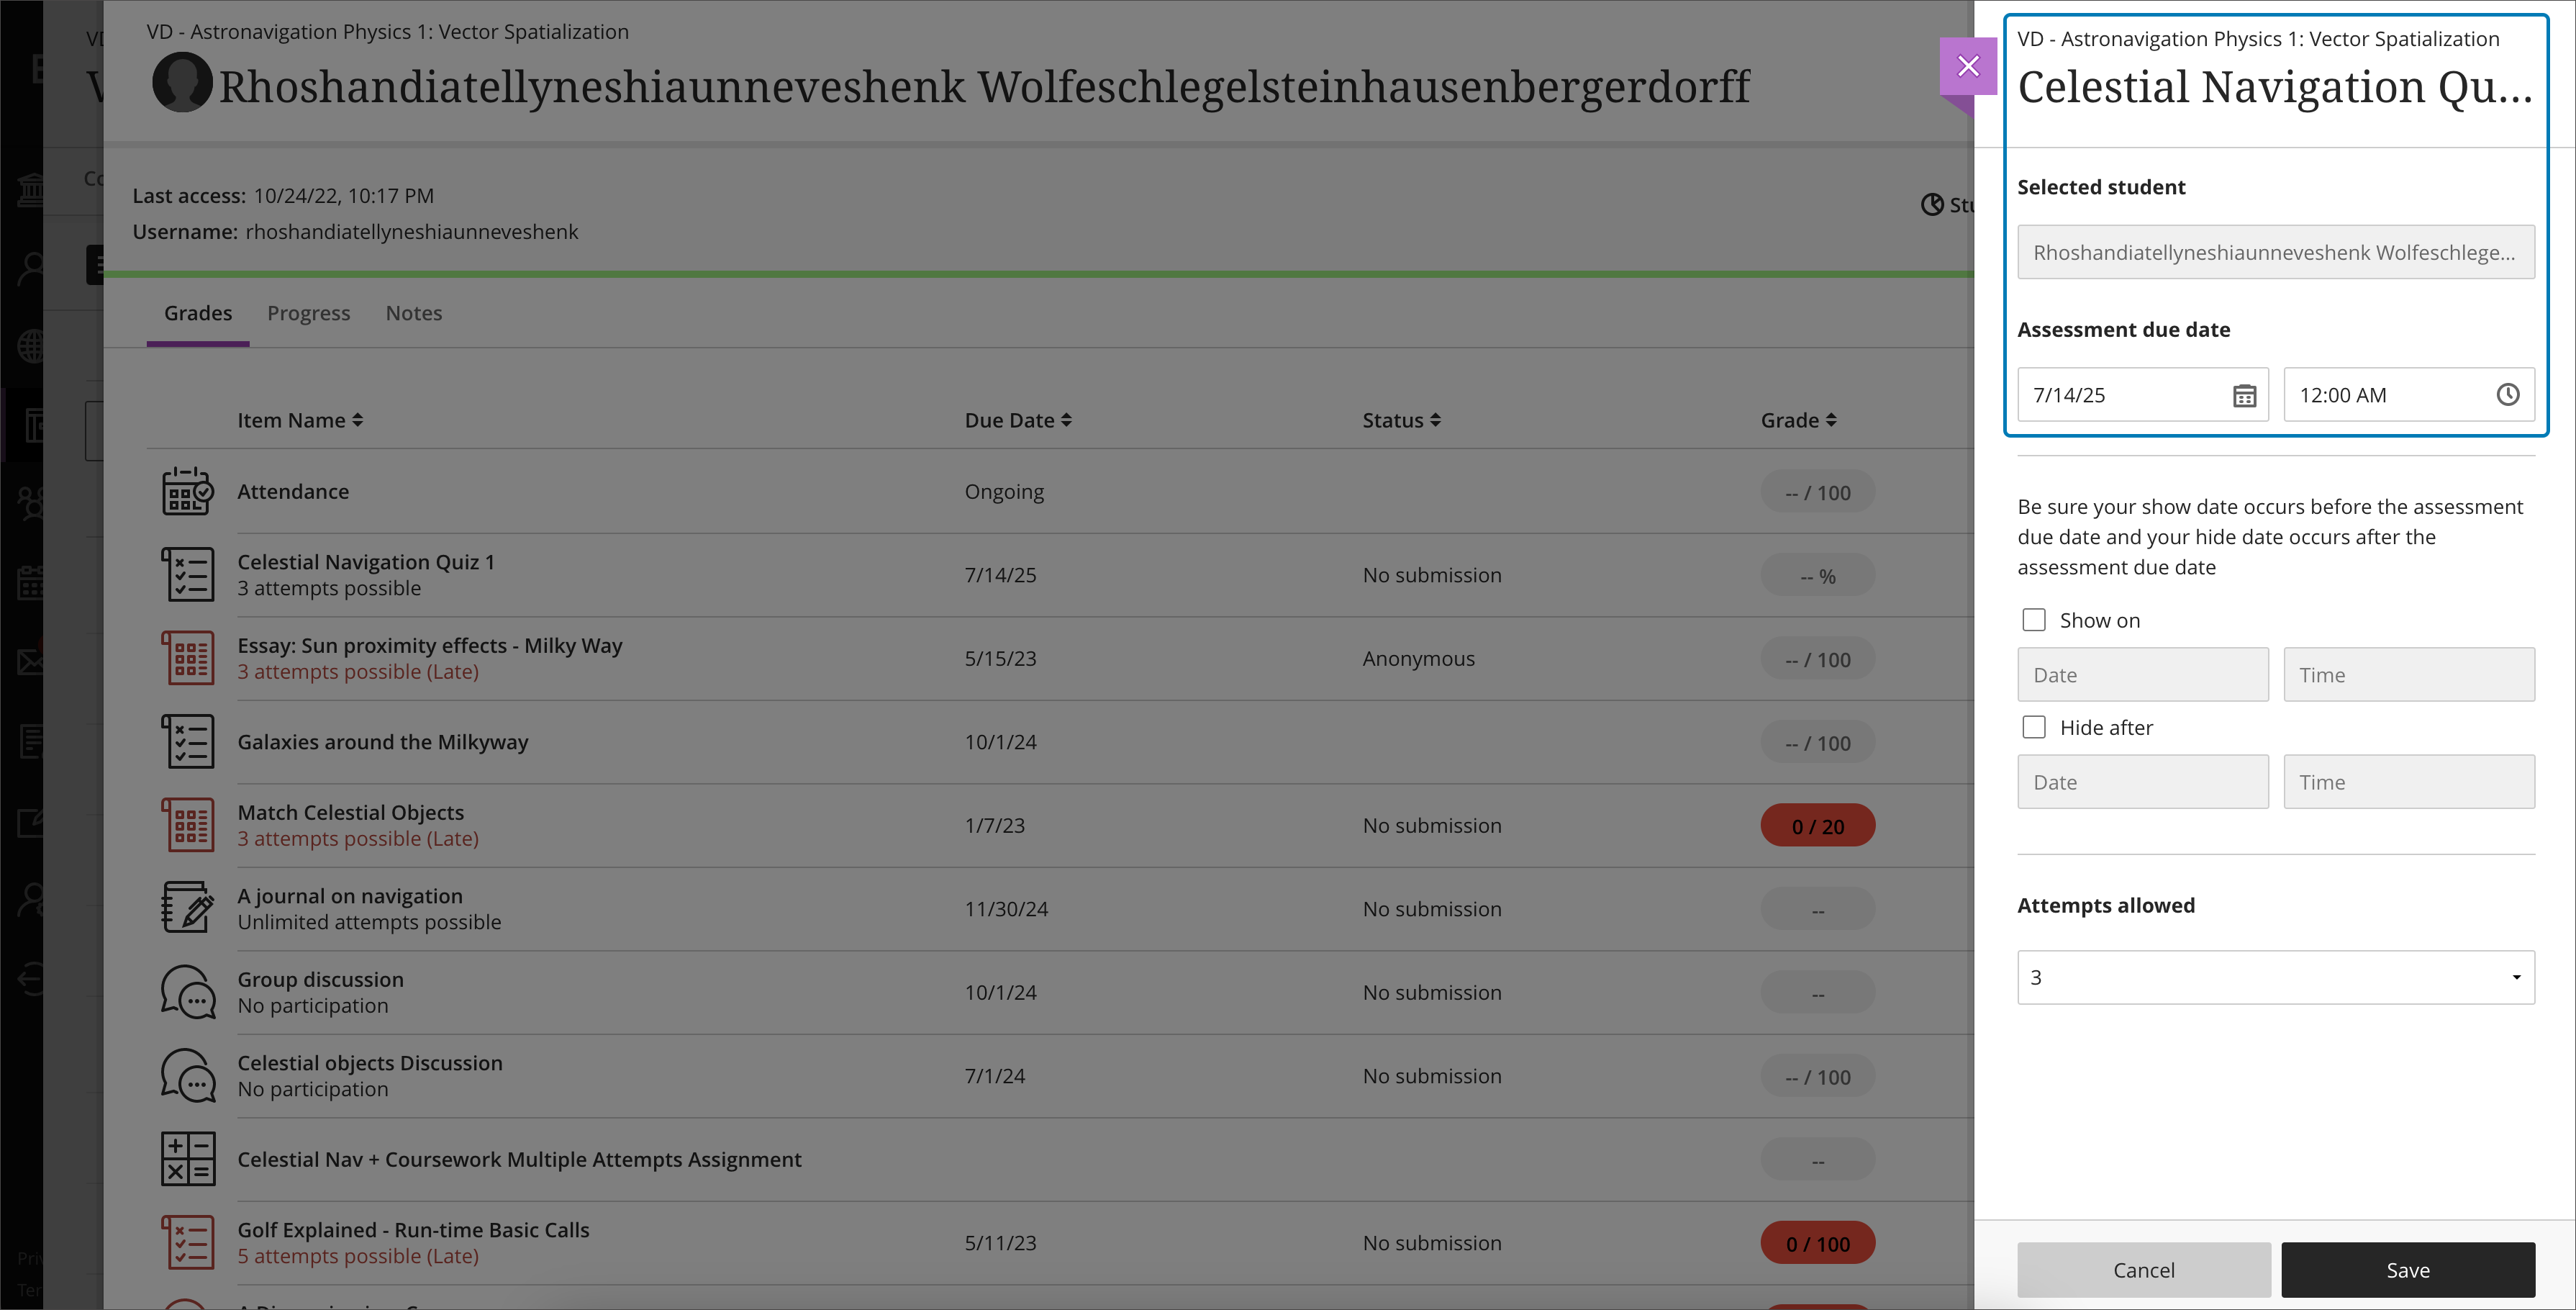
Exceptions panel updates
Exceptions are important for supporting students who experience unforeseen situations. Instructors can:
- Grant additional attempts
- Reschedule submission deadlines
- Allow extended access
We’ve updated the exceptions panel to display more information. The exceptions panel now features course, assessment, and student names. This improvement helps instructors to ensure the accuracy of the exception.
Image 1: Exceptions peek panel with course, assessment and student information
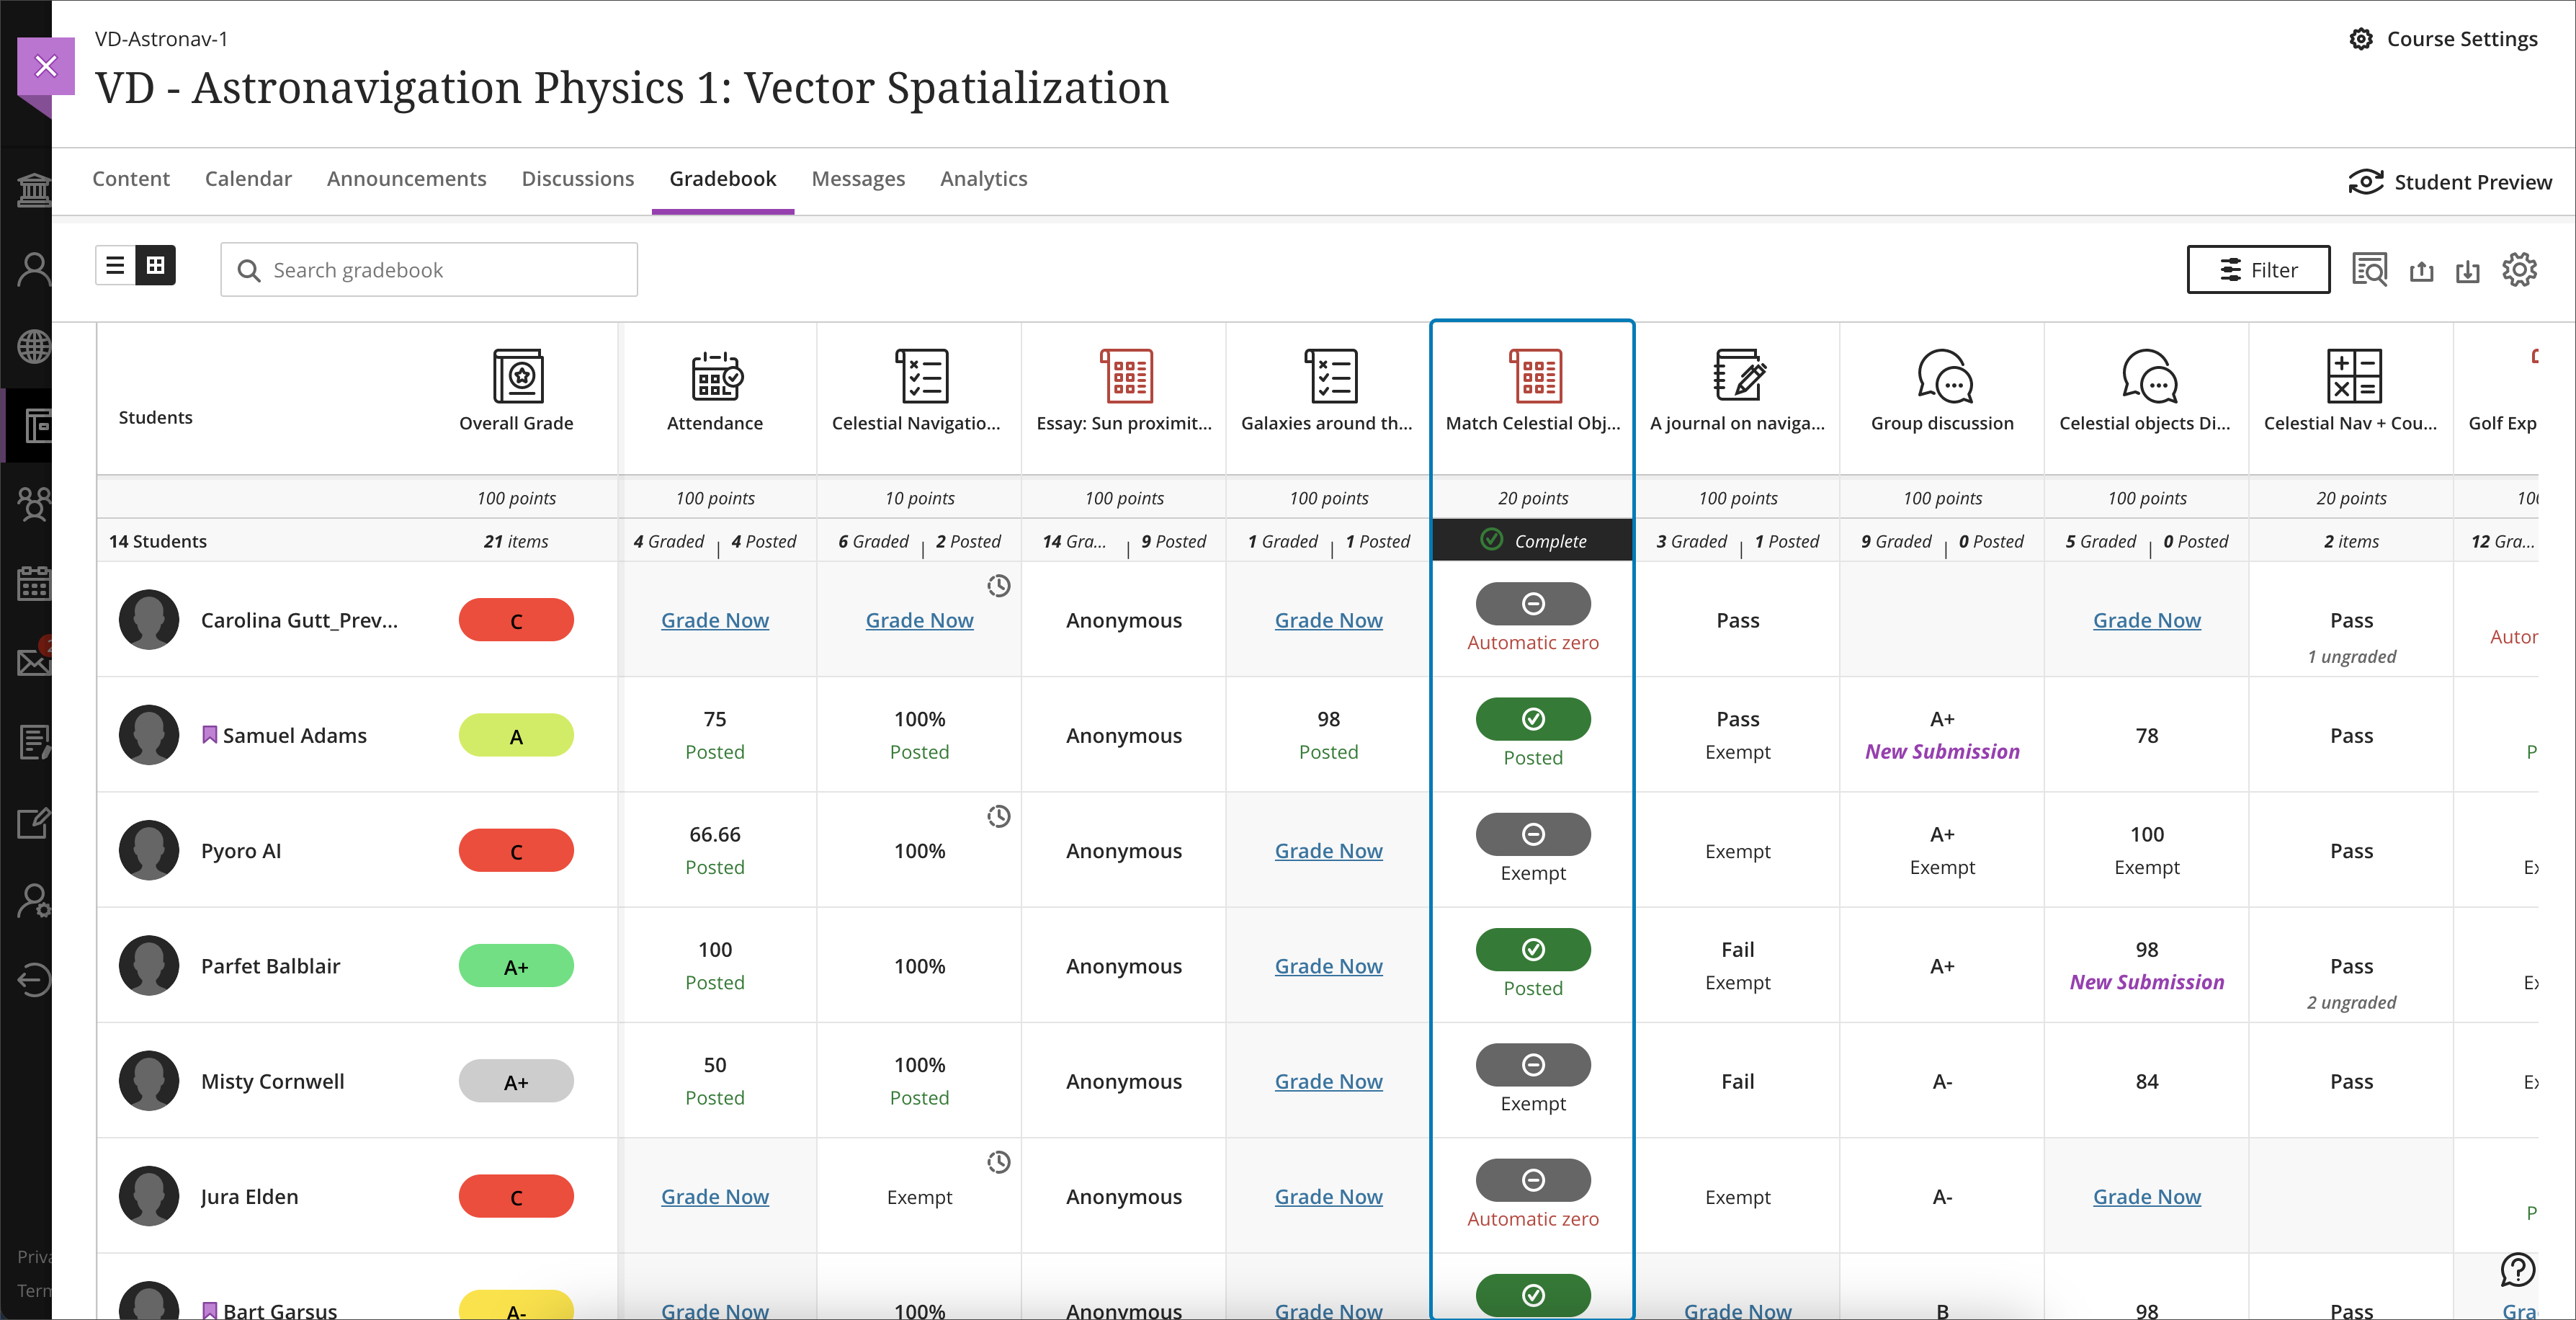
Complete/incomplete grade schema
The complete/incomplete grade schema is now available for the Ultra Course View. This grade schema helps to shift the focus from points earned to student effort and completion of tasks. It offers a more holistic approach to assessing student progress.
Instructors can select the schema in the settings panel from the Grade using section. When a grade is assigned, a checkmark is displayed on that item for the student in the gradebook. An incomplete is displayed as a dash in a grey-colored pill.
Assessments that use automatic zeros and the complete/incomplete will mark non-submitting students as incomplete.
Image 1: Instructors may select the Complete/Incomplete grade schema Grade using section of the Assessment Settings panel
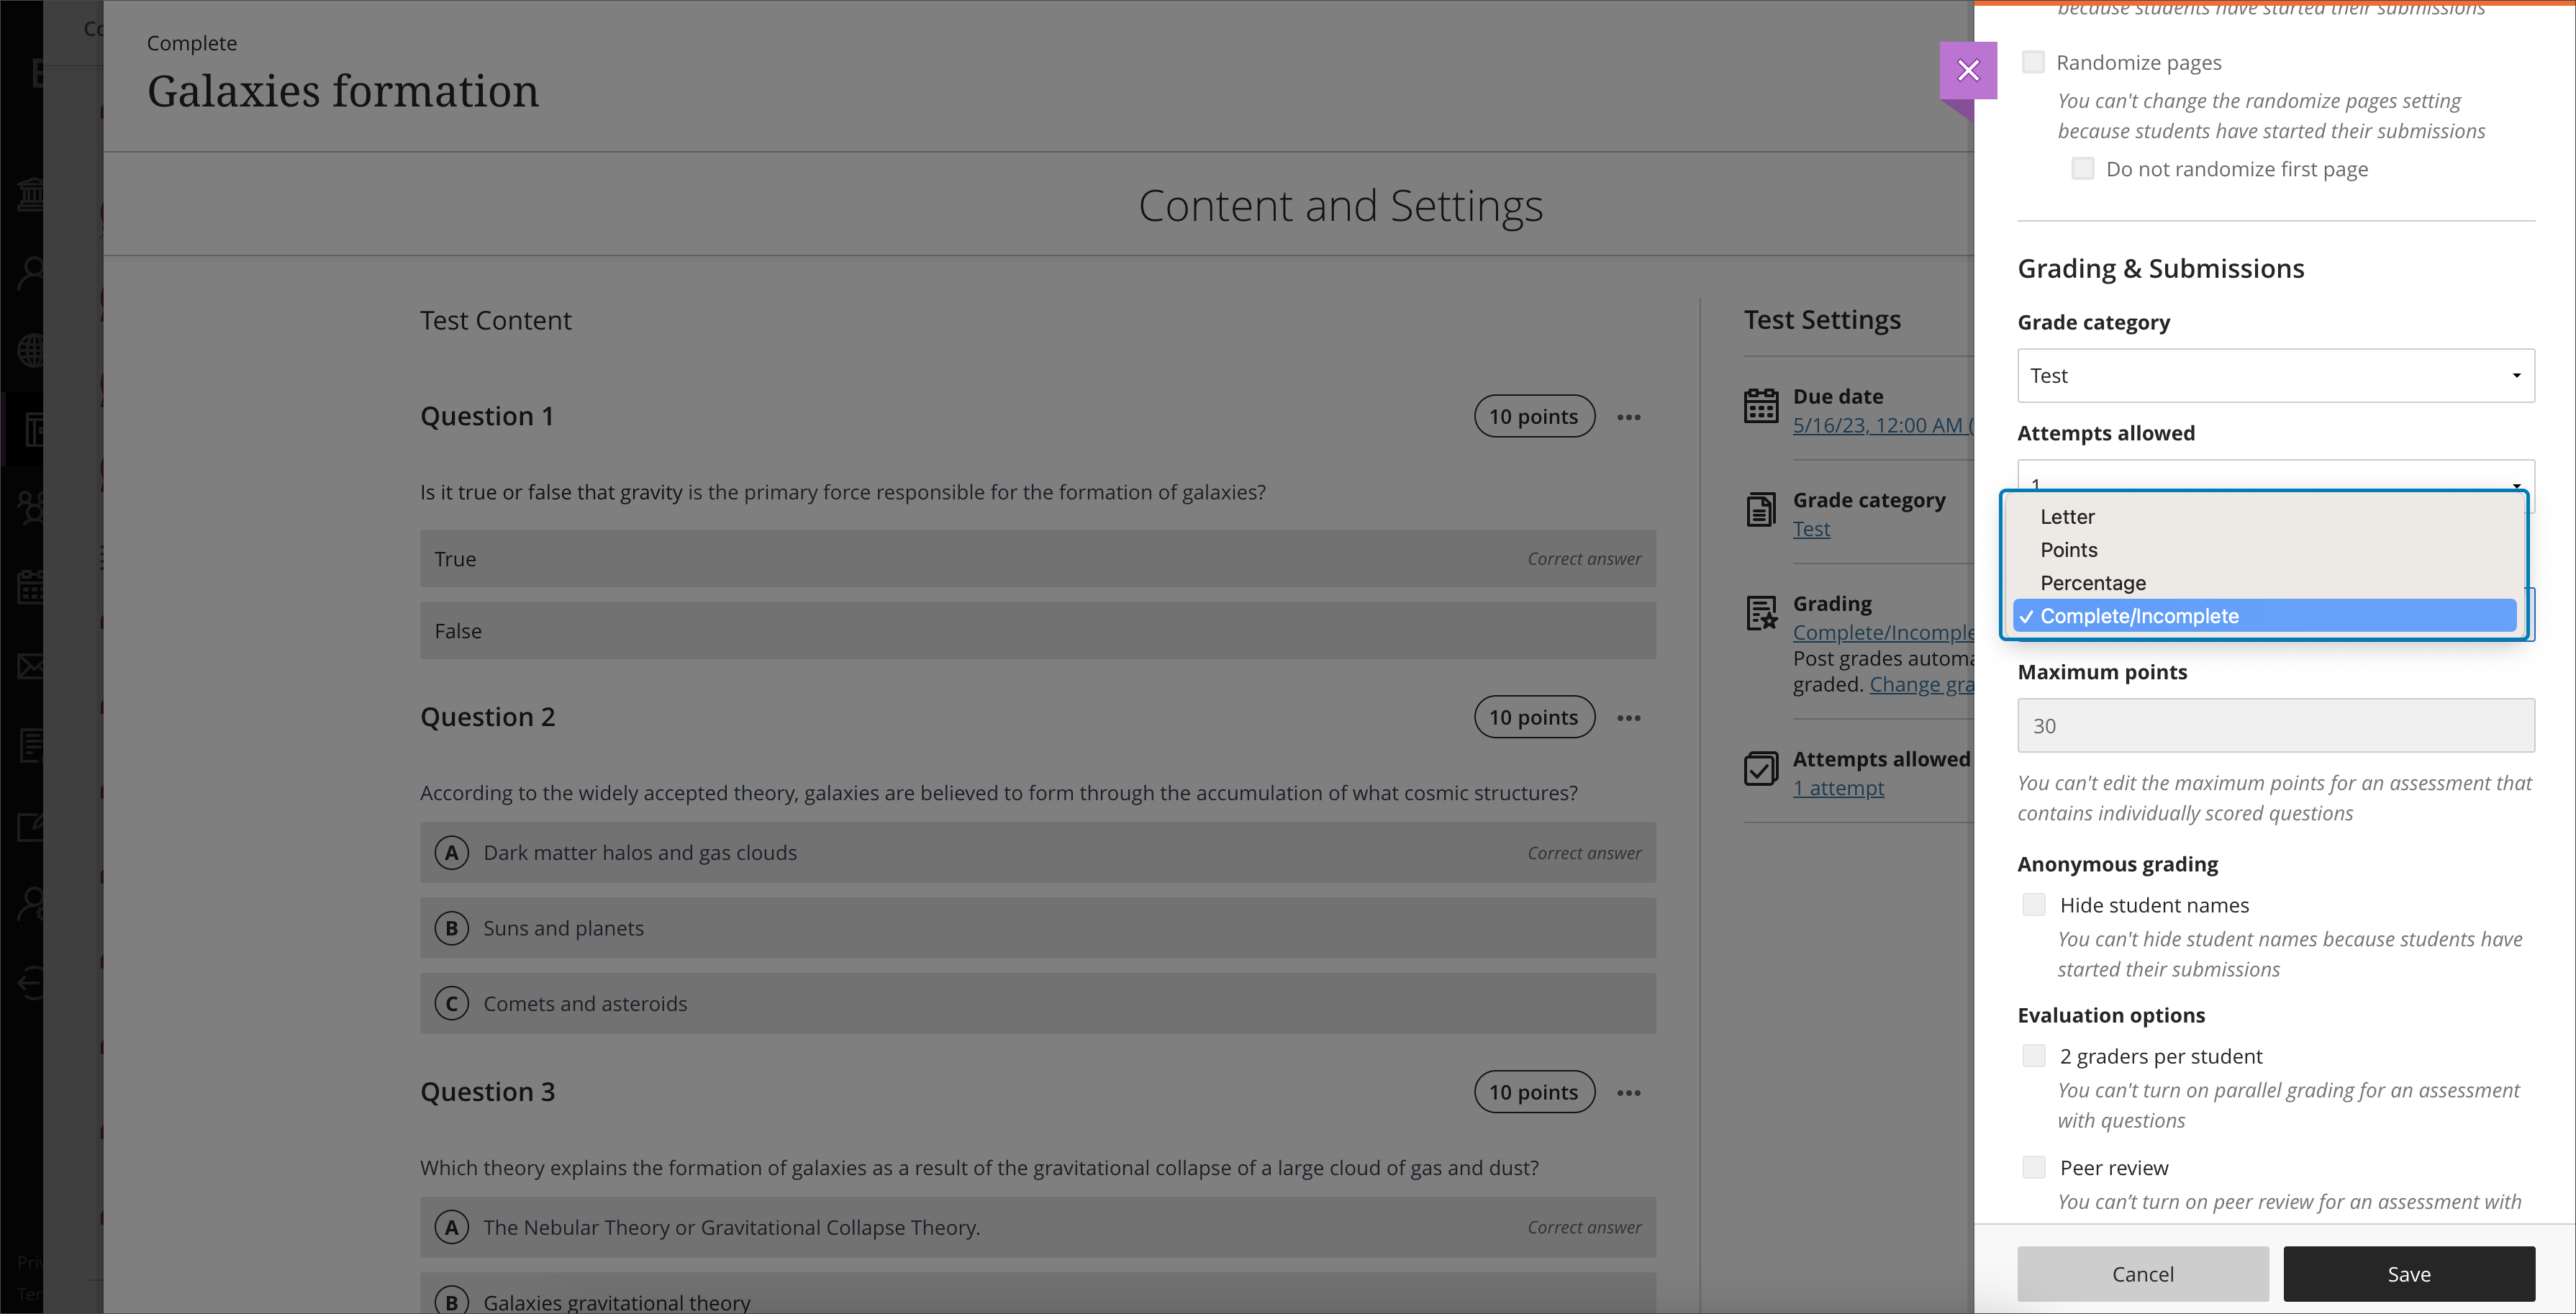
Image 2: Assessment using the Complete/Incomplete grade schema
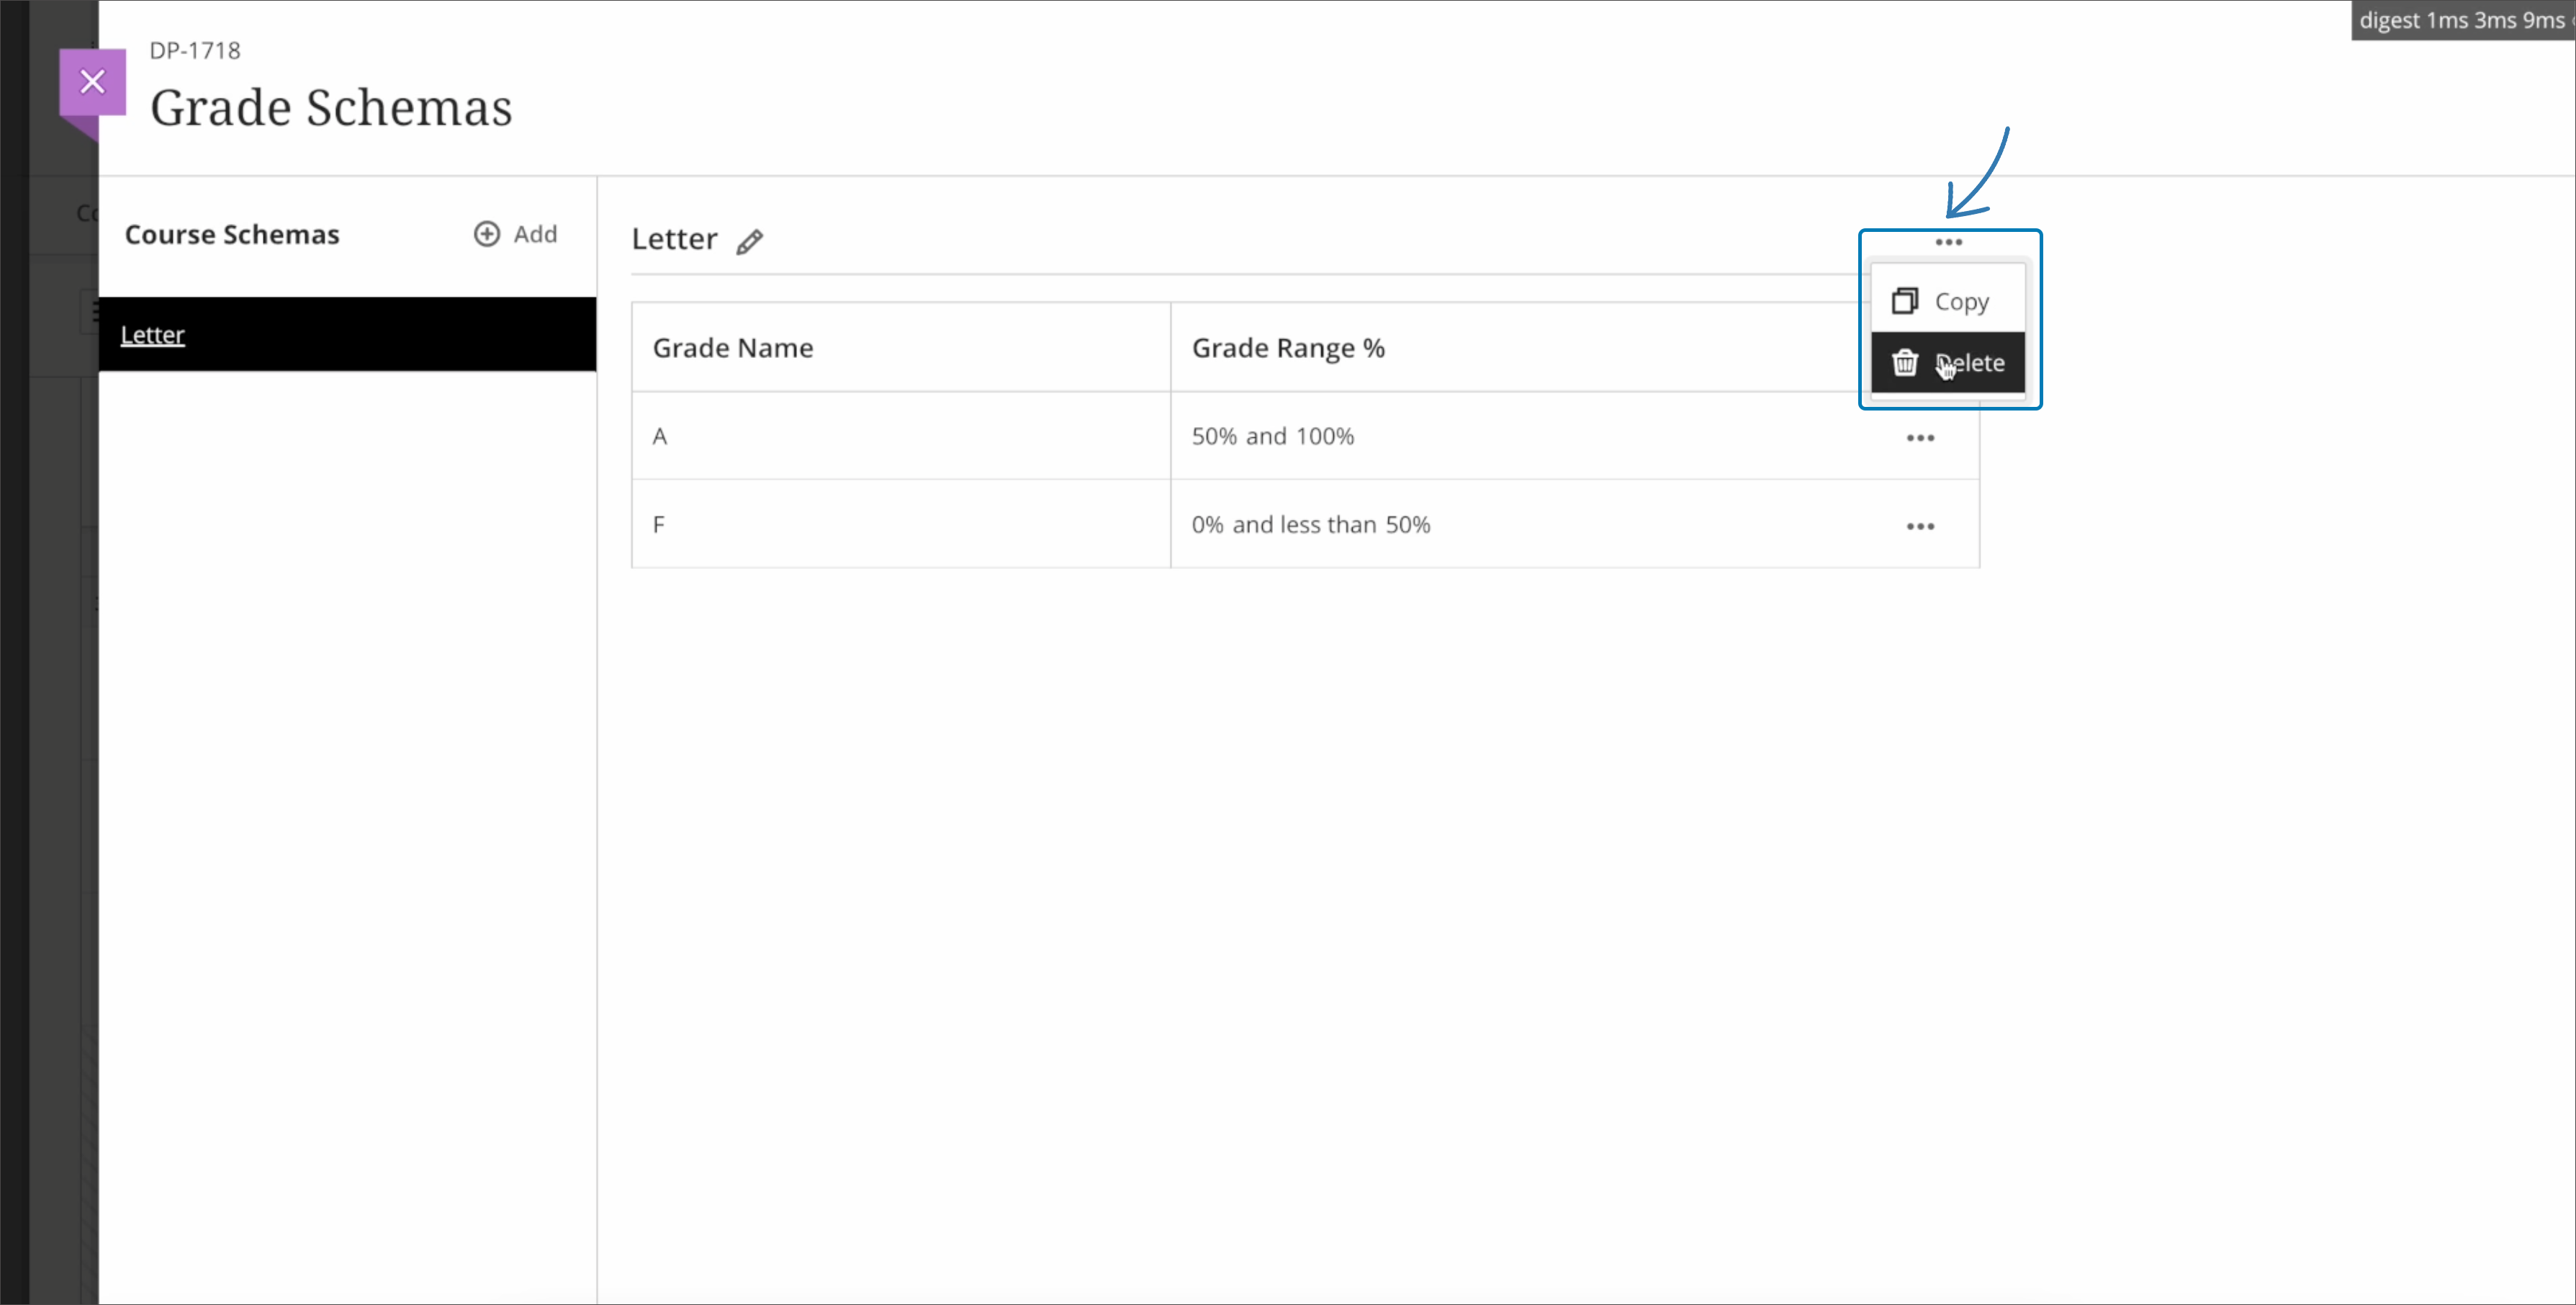
Delete Grade Schemas
In the past, instructors could only create and edit grade schemas. Now, instructors can also delete grade schemas that are not used in the course. The option to delete helps instructors maintain the grade schema list.
A Delete button now appears on schemas that are not in use. Schemas that are in use will only display the option to copy.
Image 1: Option to delete a grade schema that is not in use
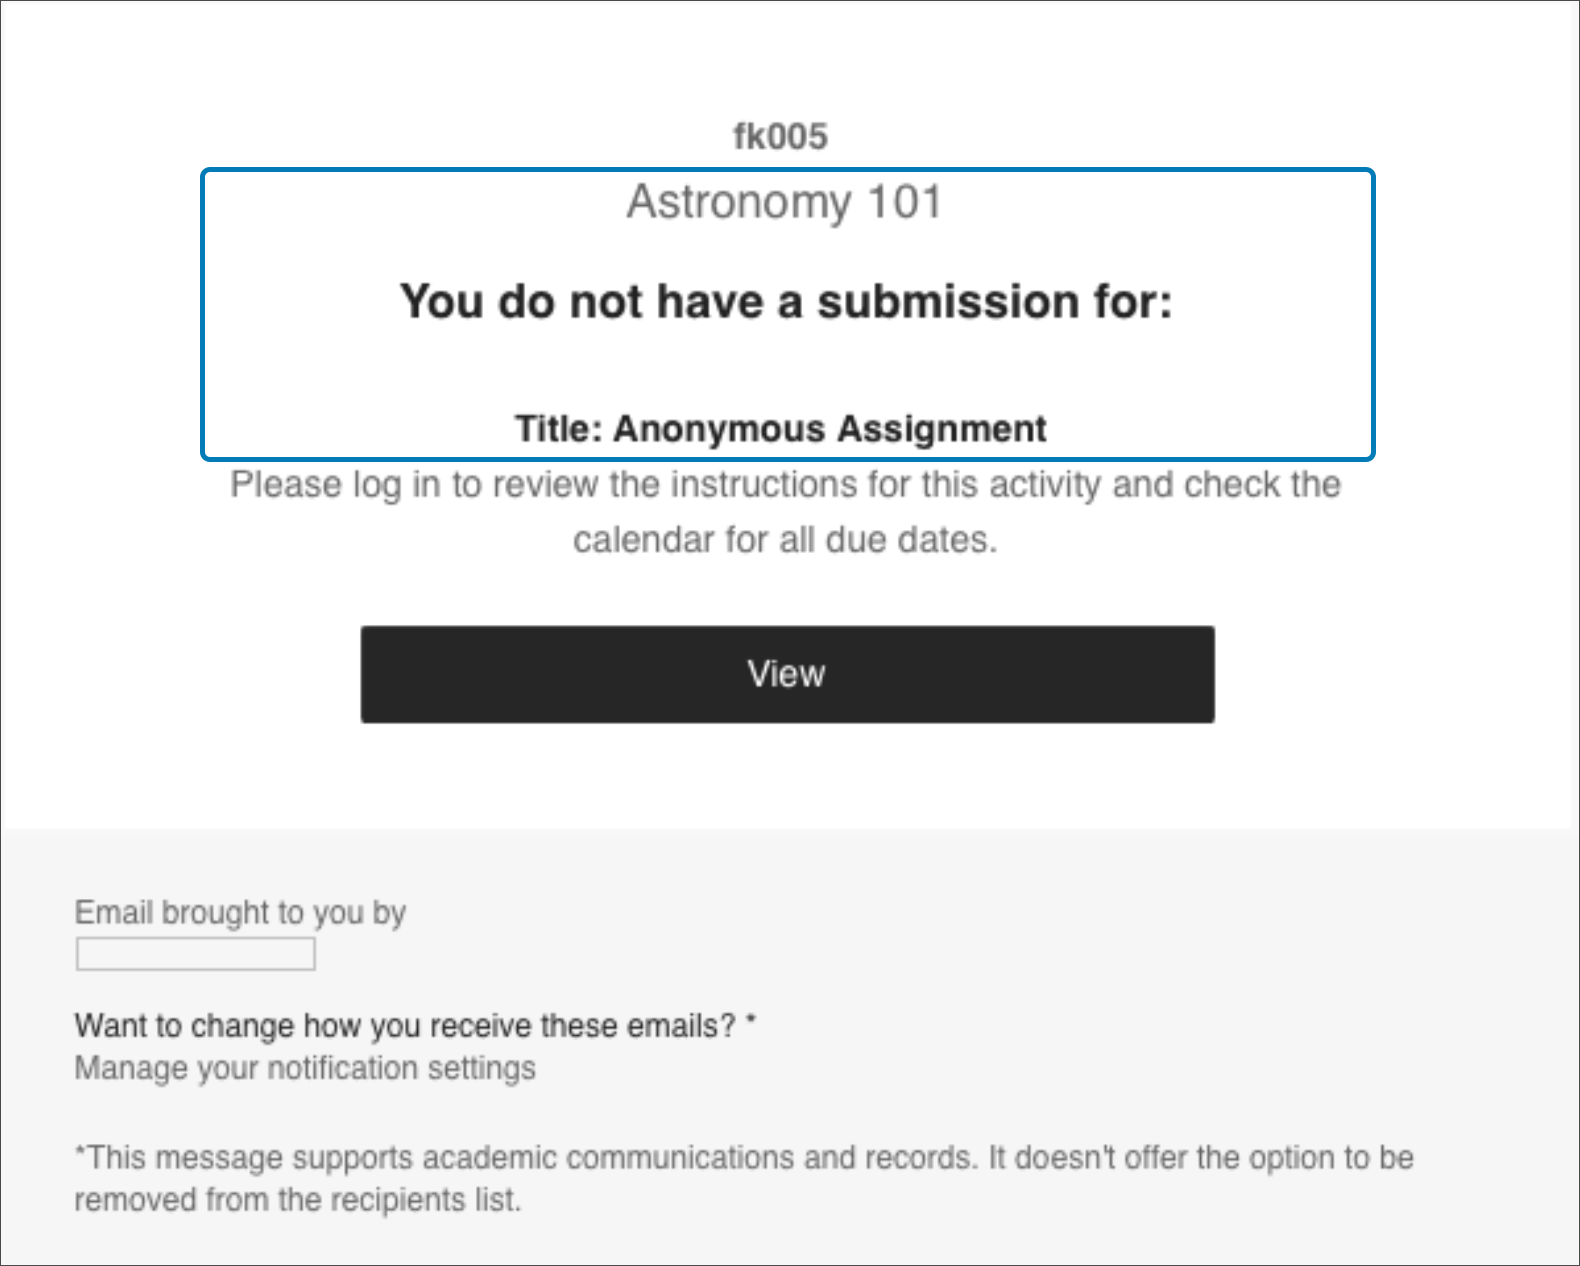
Send reminders to non-submitters for anonymously graded assessments
During an assessment, instructors may need to communicate with students. To support this need, instructors can filter and select the students they would like to message from the Submissions page. Instructors can craft a message appropriate to the audience and circumstances.
In the past, the instructors couldn’t message students for assessments that are anonymously graded. This is because instructors do not know which students had submitted.
Now we have introduced a Send Reminder option. This allows instructors to send reminders to students who have yet to make a submission for an anonymously graded assessment.
With the “Send Reminder” button on the Submissions page for anonymously graded assessments, instructors have the chance to confirm their desire to send the reminder along with the number of students who will receive it.
Image 1: An instructor can select Send Reminder to send an automatic reminder to students who have yet to make a submission
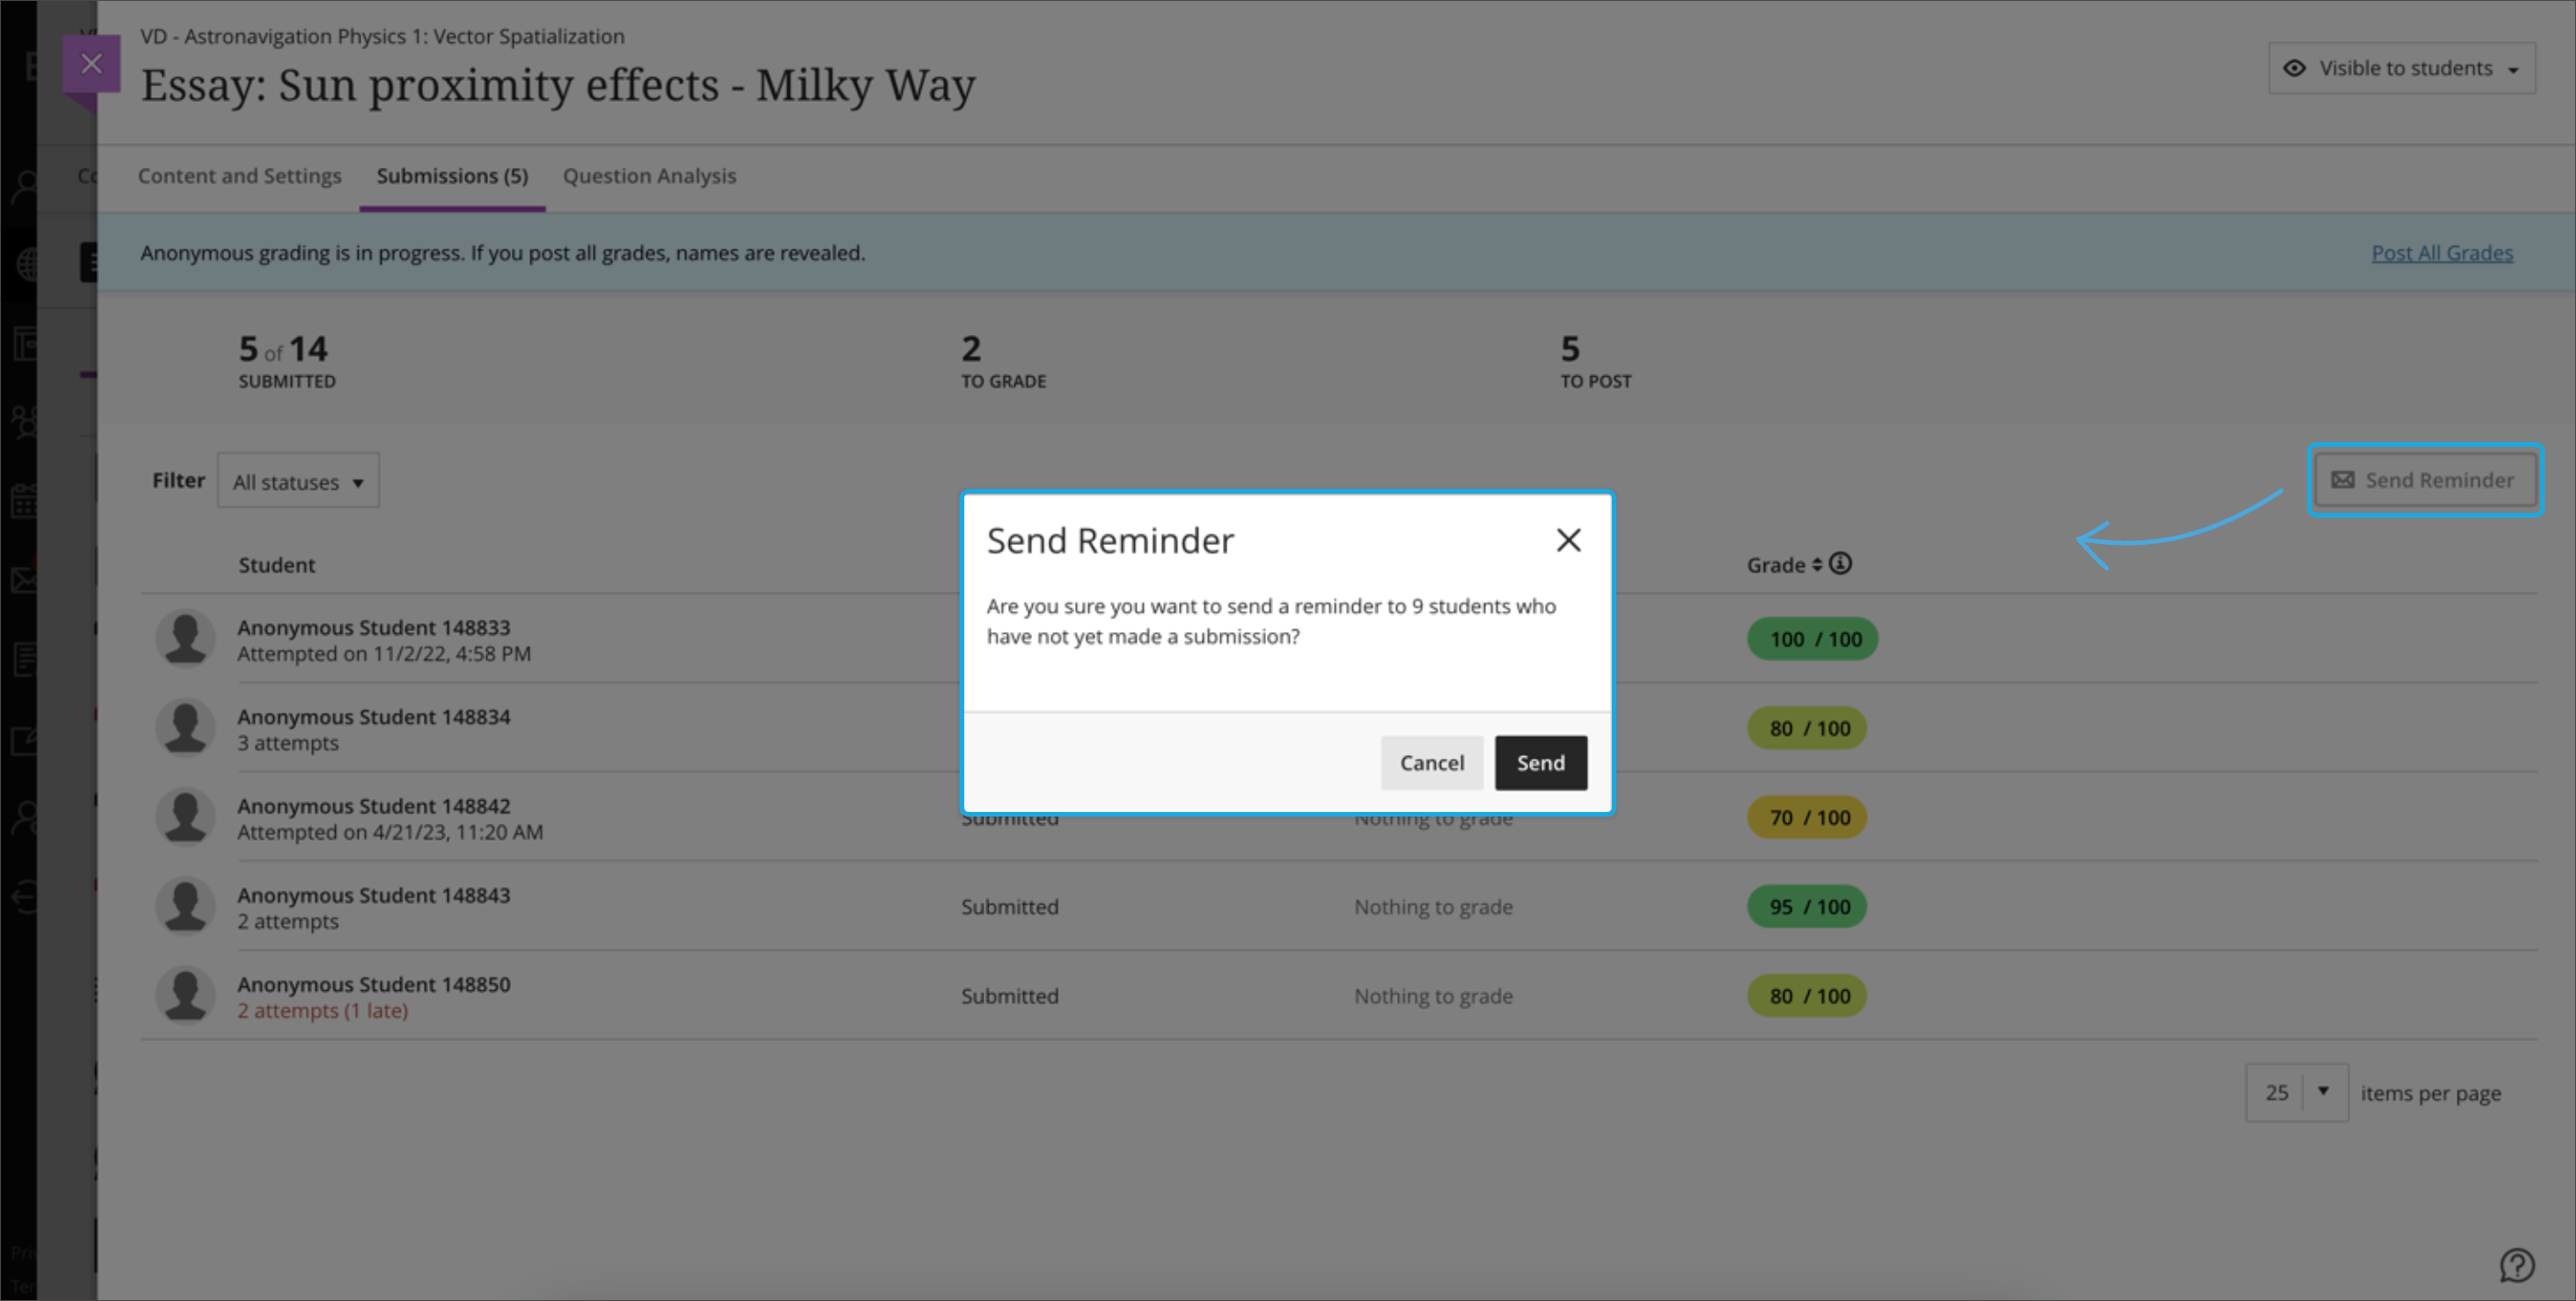
Image 2: Student view of the reminder
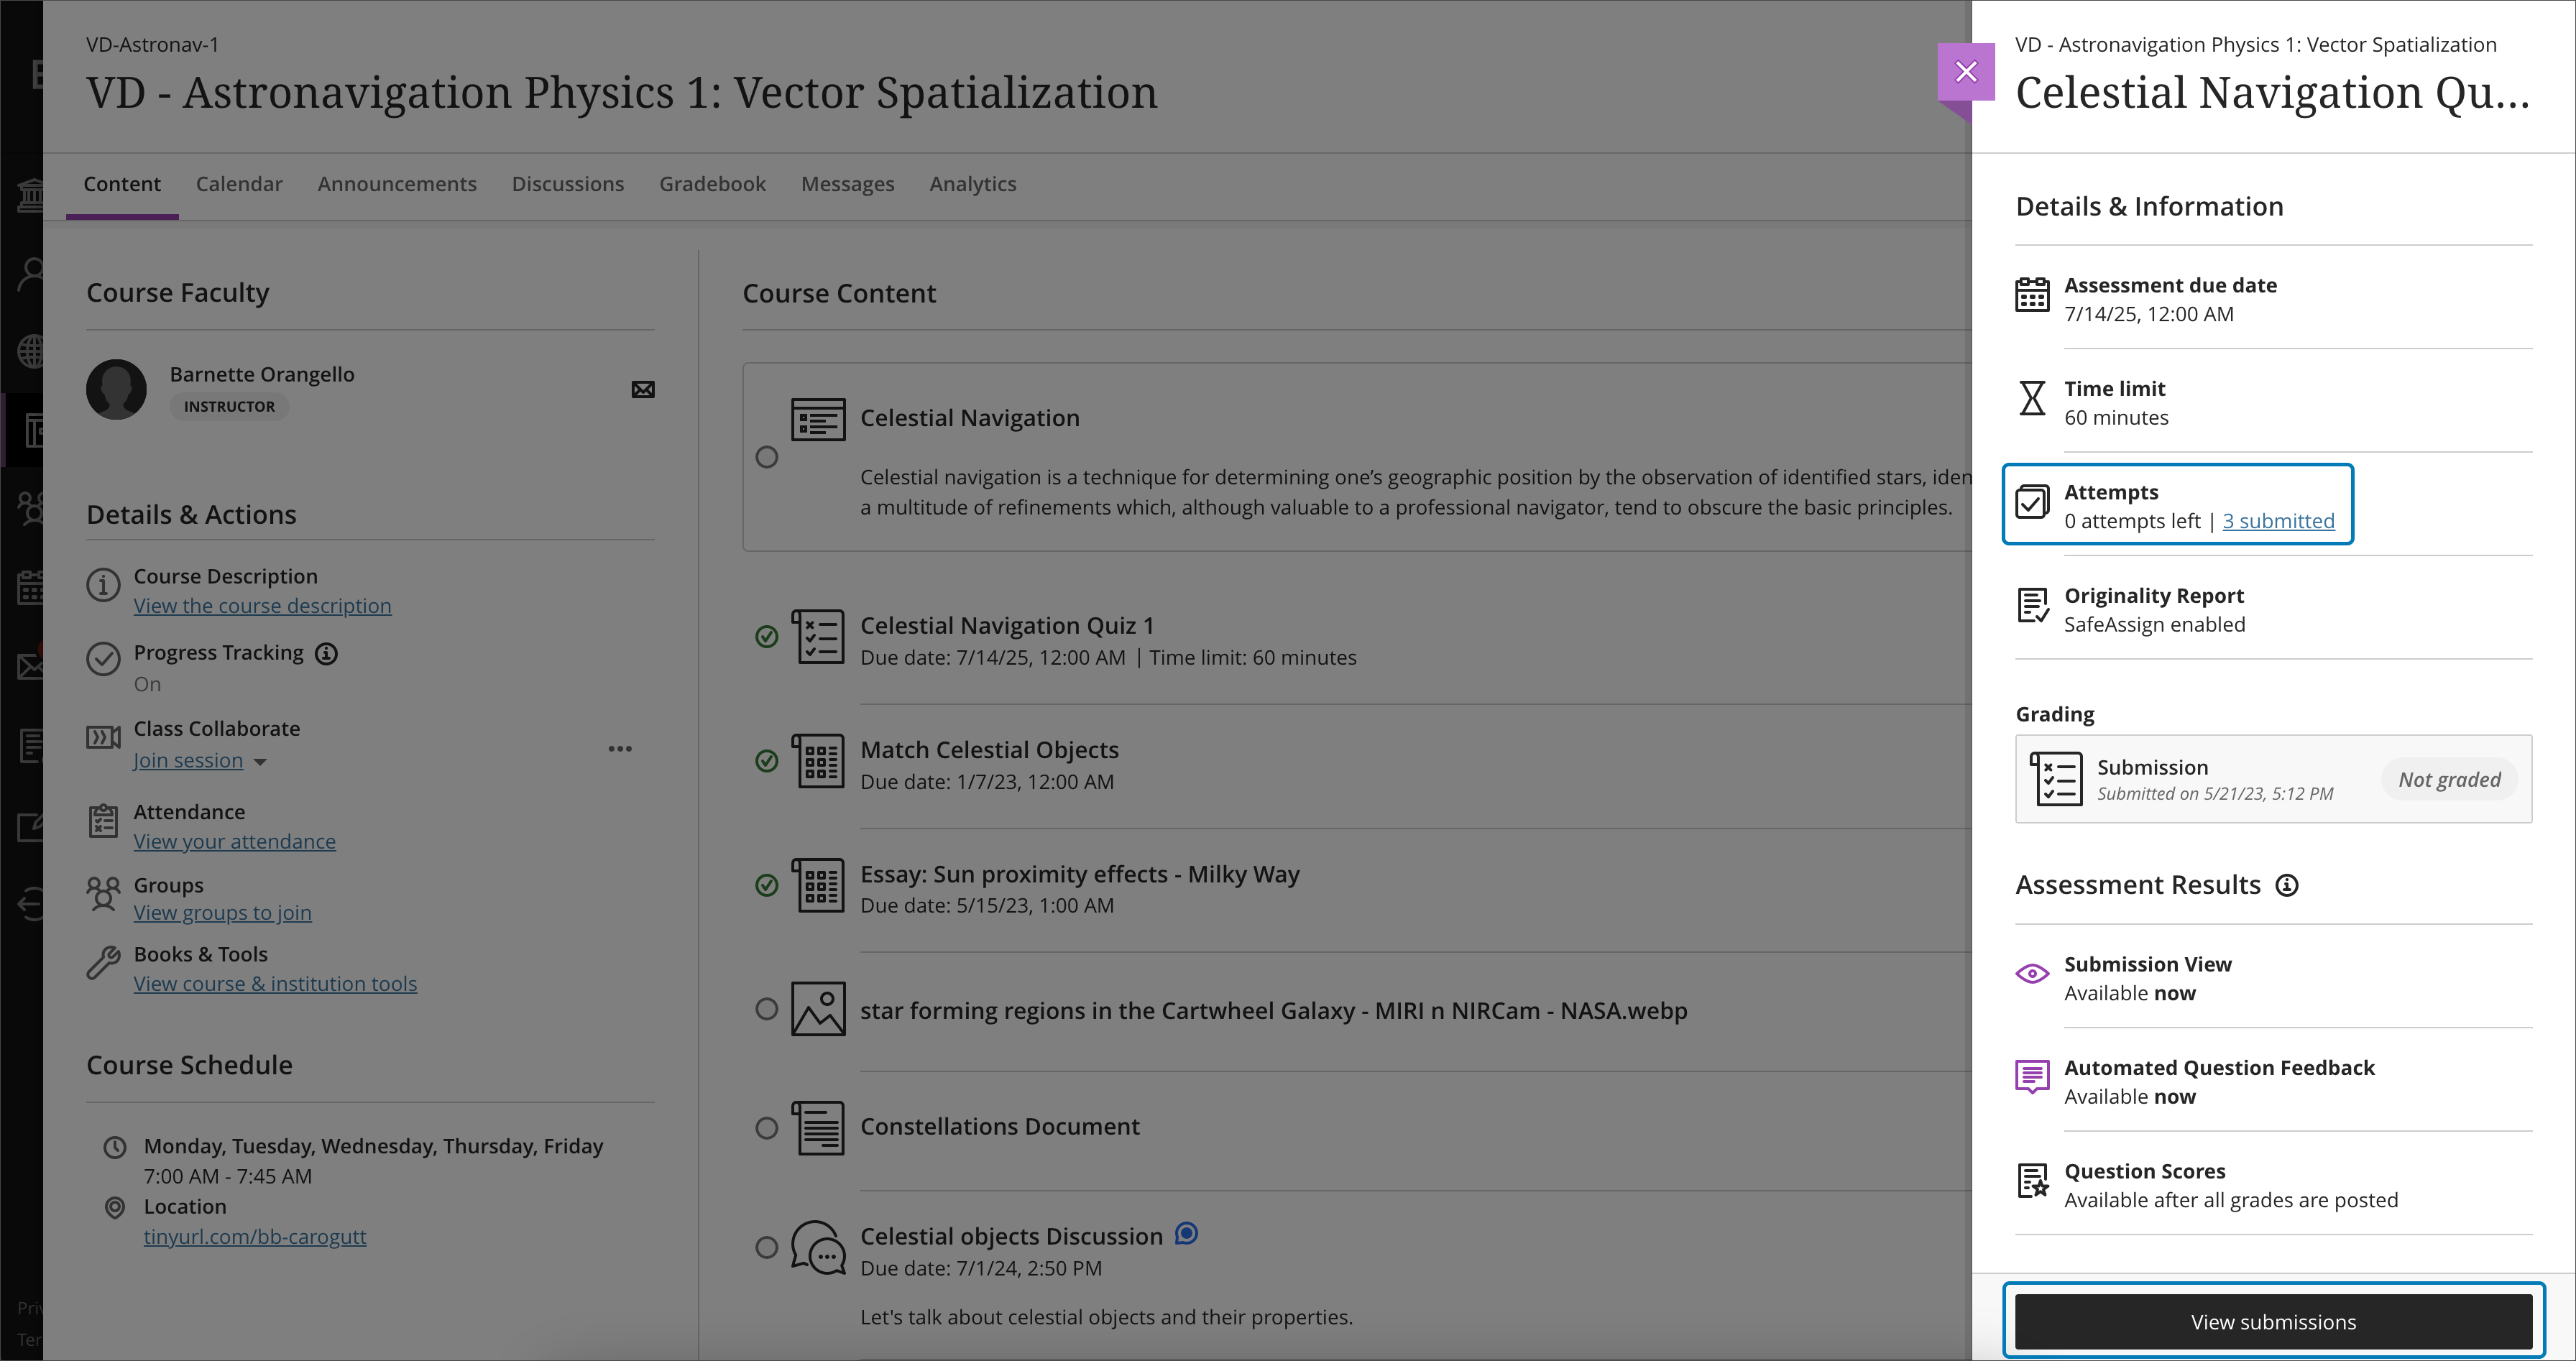
Start, Continue, and View Assessment options and file submission update
To increase clarity for students before they begin an assessment, we have made changes to the user interface. In the past, when a student selected an assessment, the Details & Information panel included an option labeled View assessment. Now this option is labeled as Start attempt. Additionally, the button displays different states based on the student’s progress:
If the student is eligible to make a new attempt, the button displays Start attempt alongside the next attempt number.
If the student has saved a draft, the button displays Continue attempt along with the current attempt number.
Once the student has exhausted all possible attempts, the button displays View submissions. This indicates that students can review their completed submissions.
These modifications aim to provide a more intuitive and informative experience for students. These changes ensure that students have a clear understanding of their progress and available options throughout the assessment process.
Image 1: Start attempt
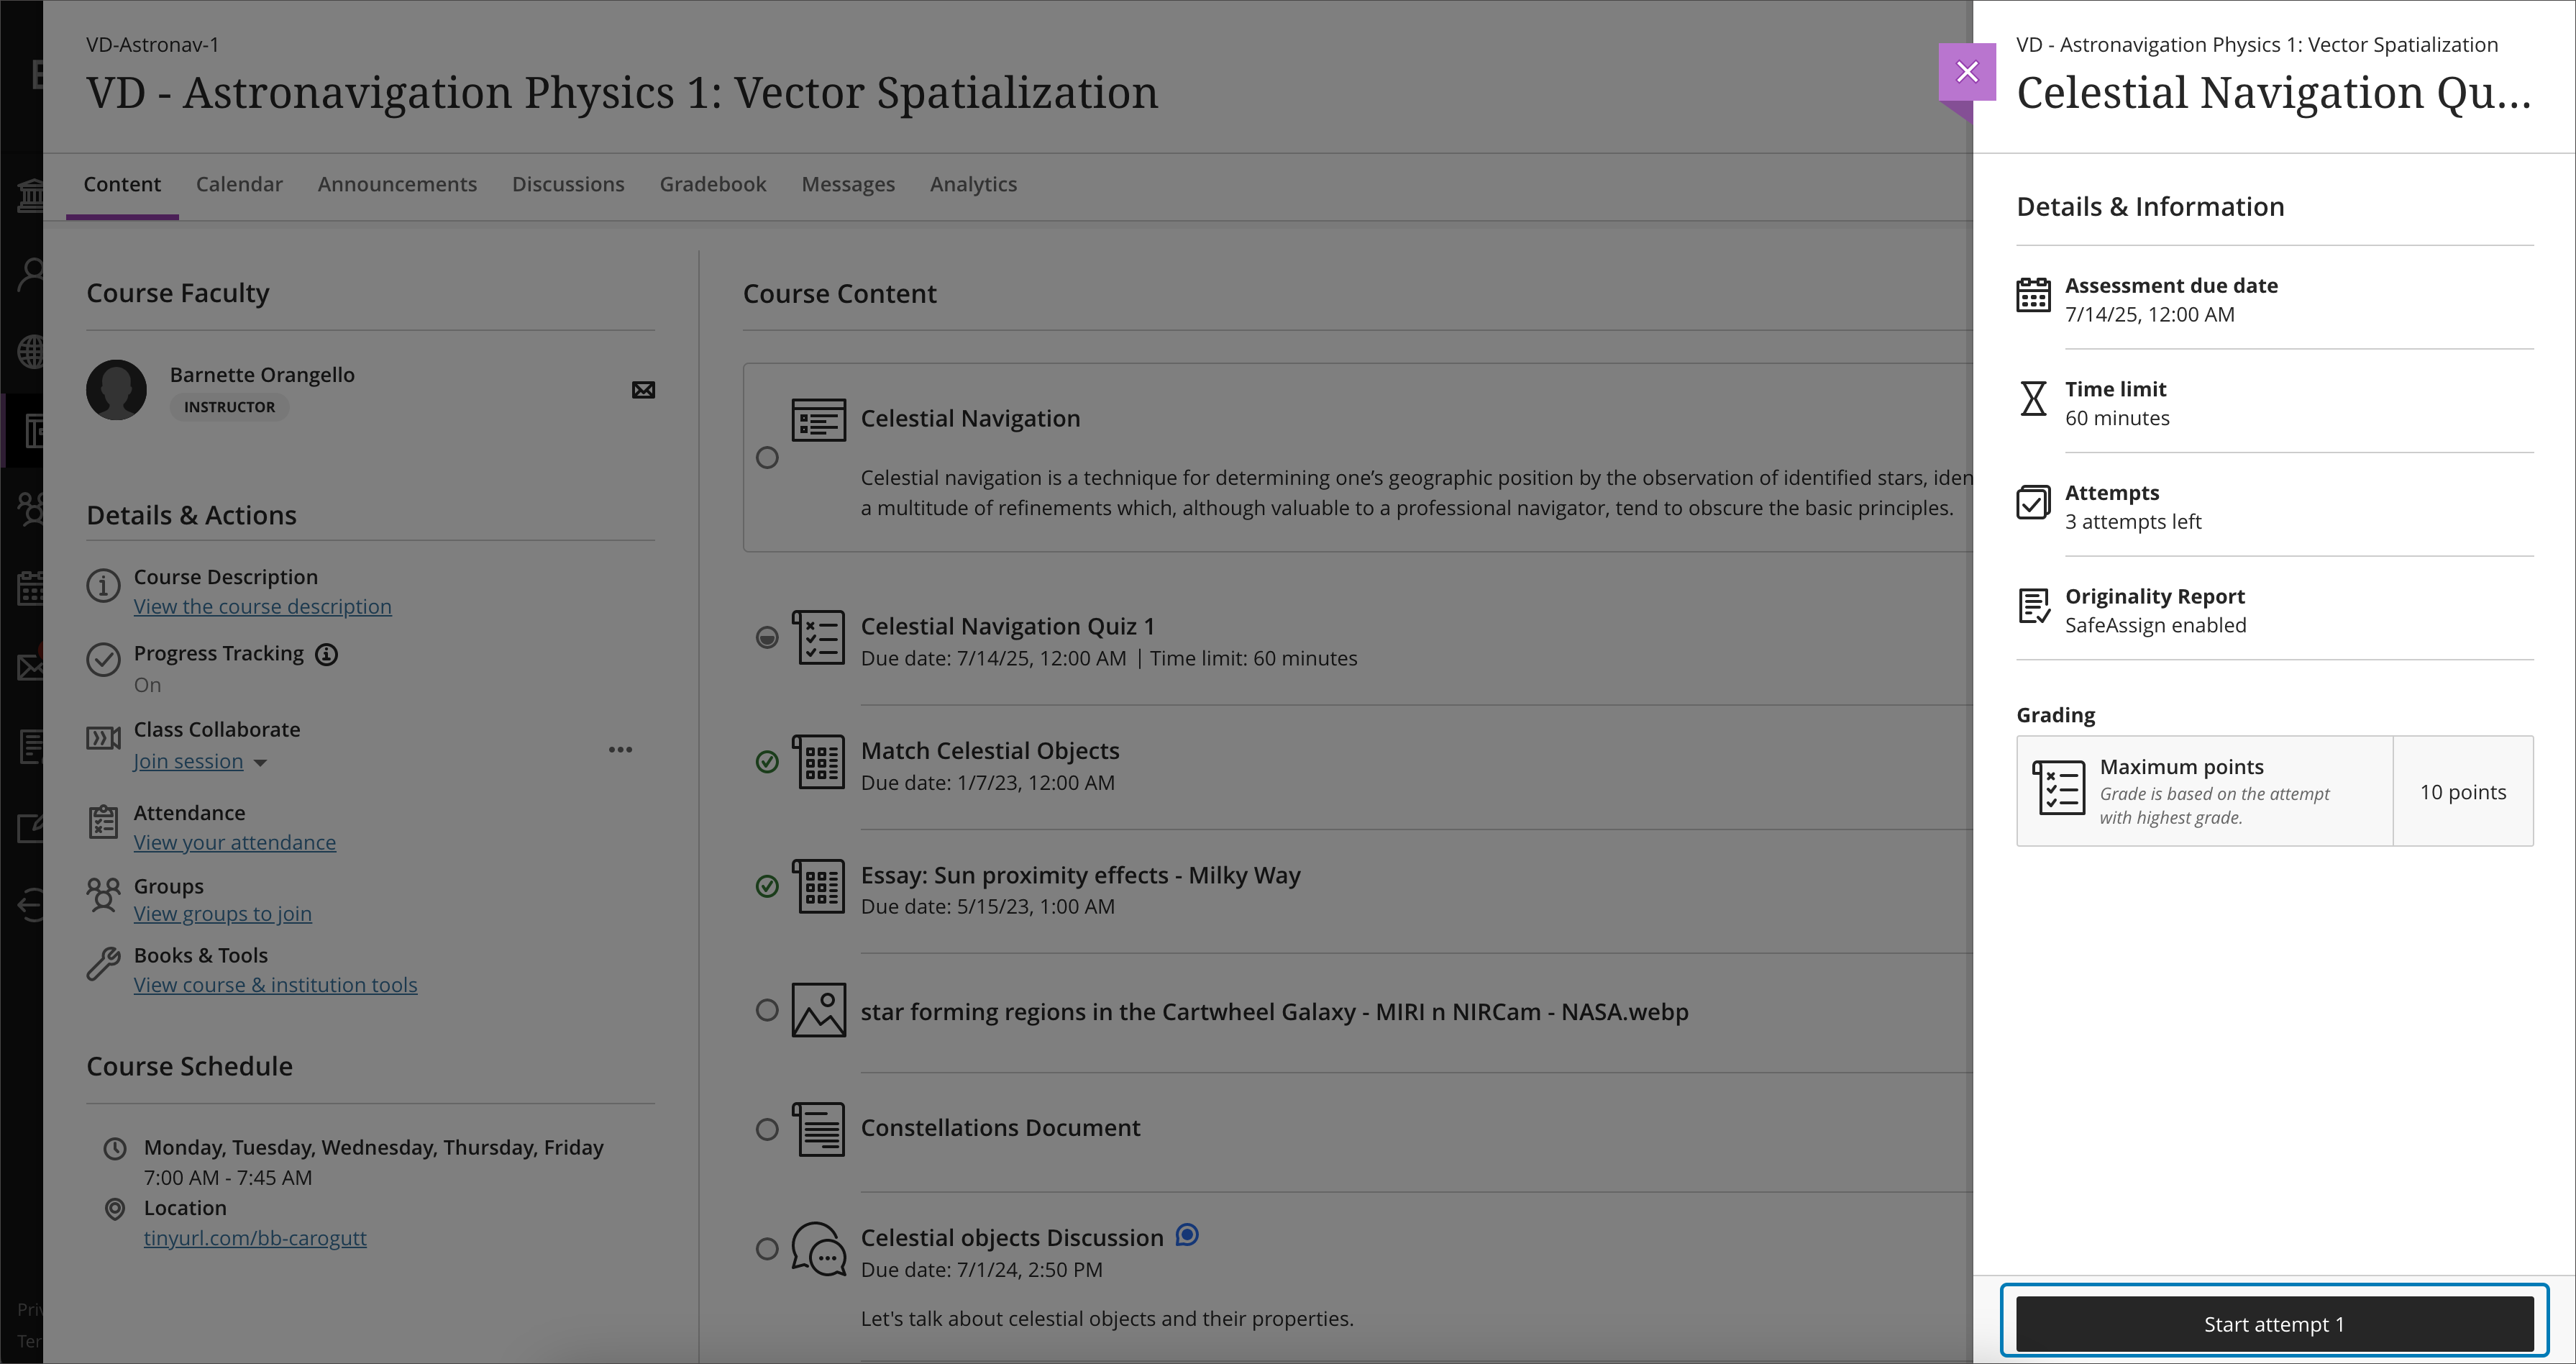
Image 2: Continue attempt
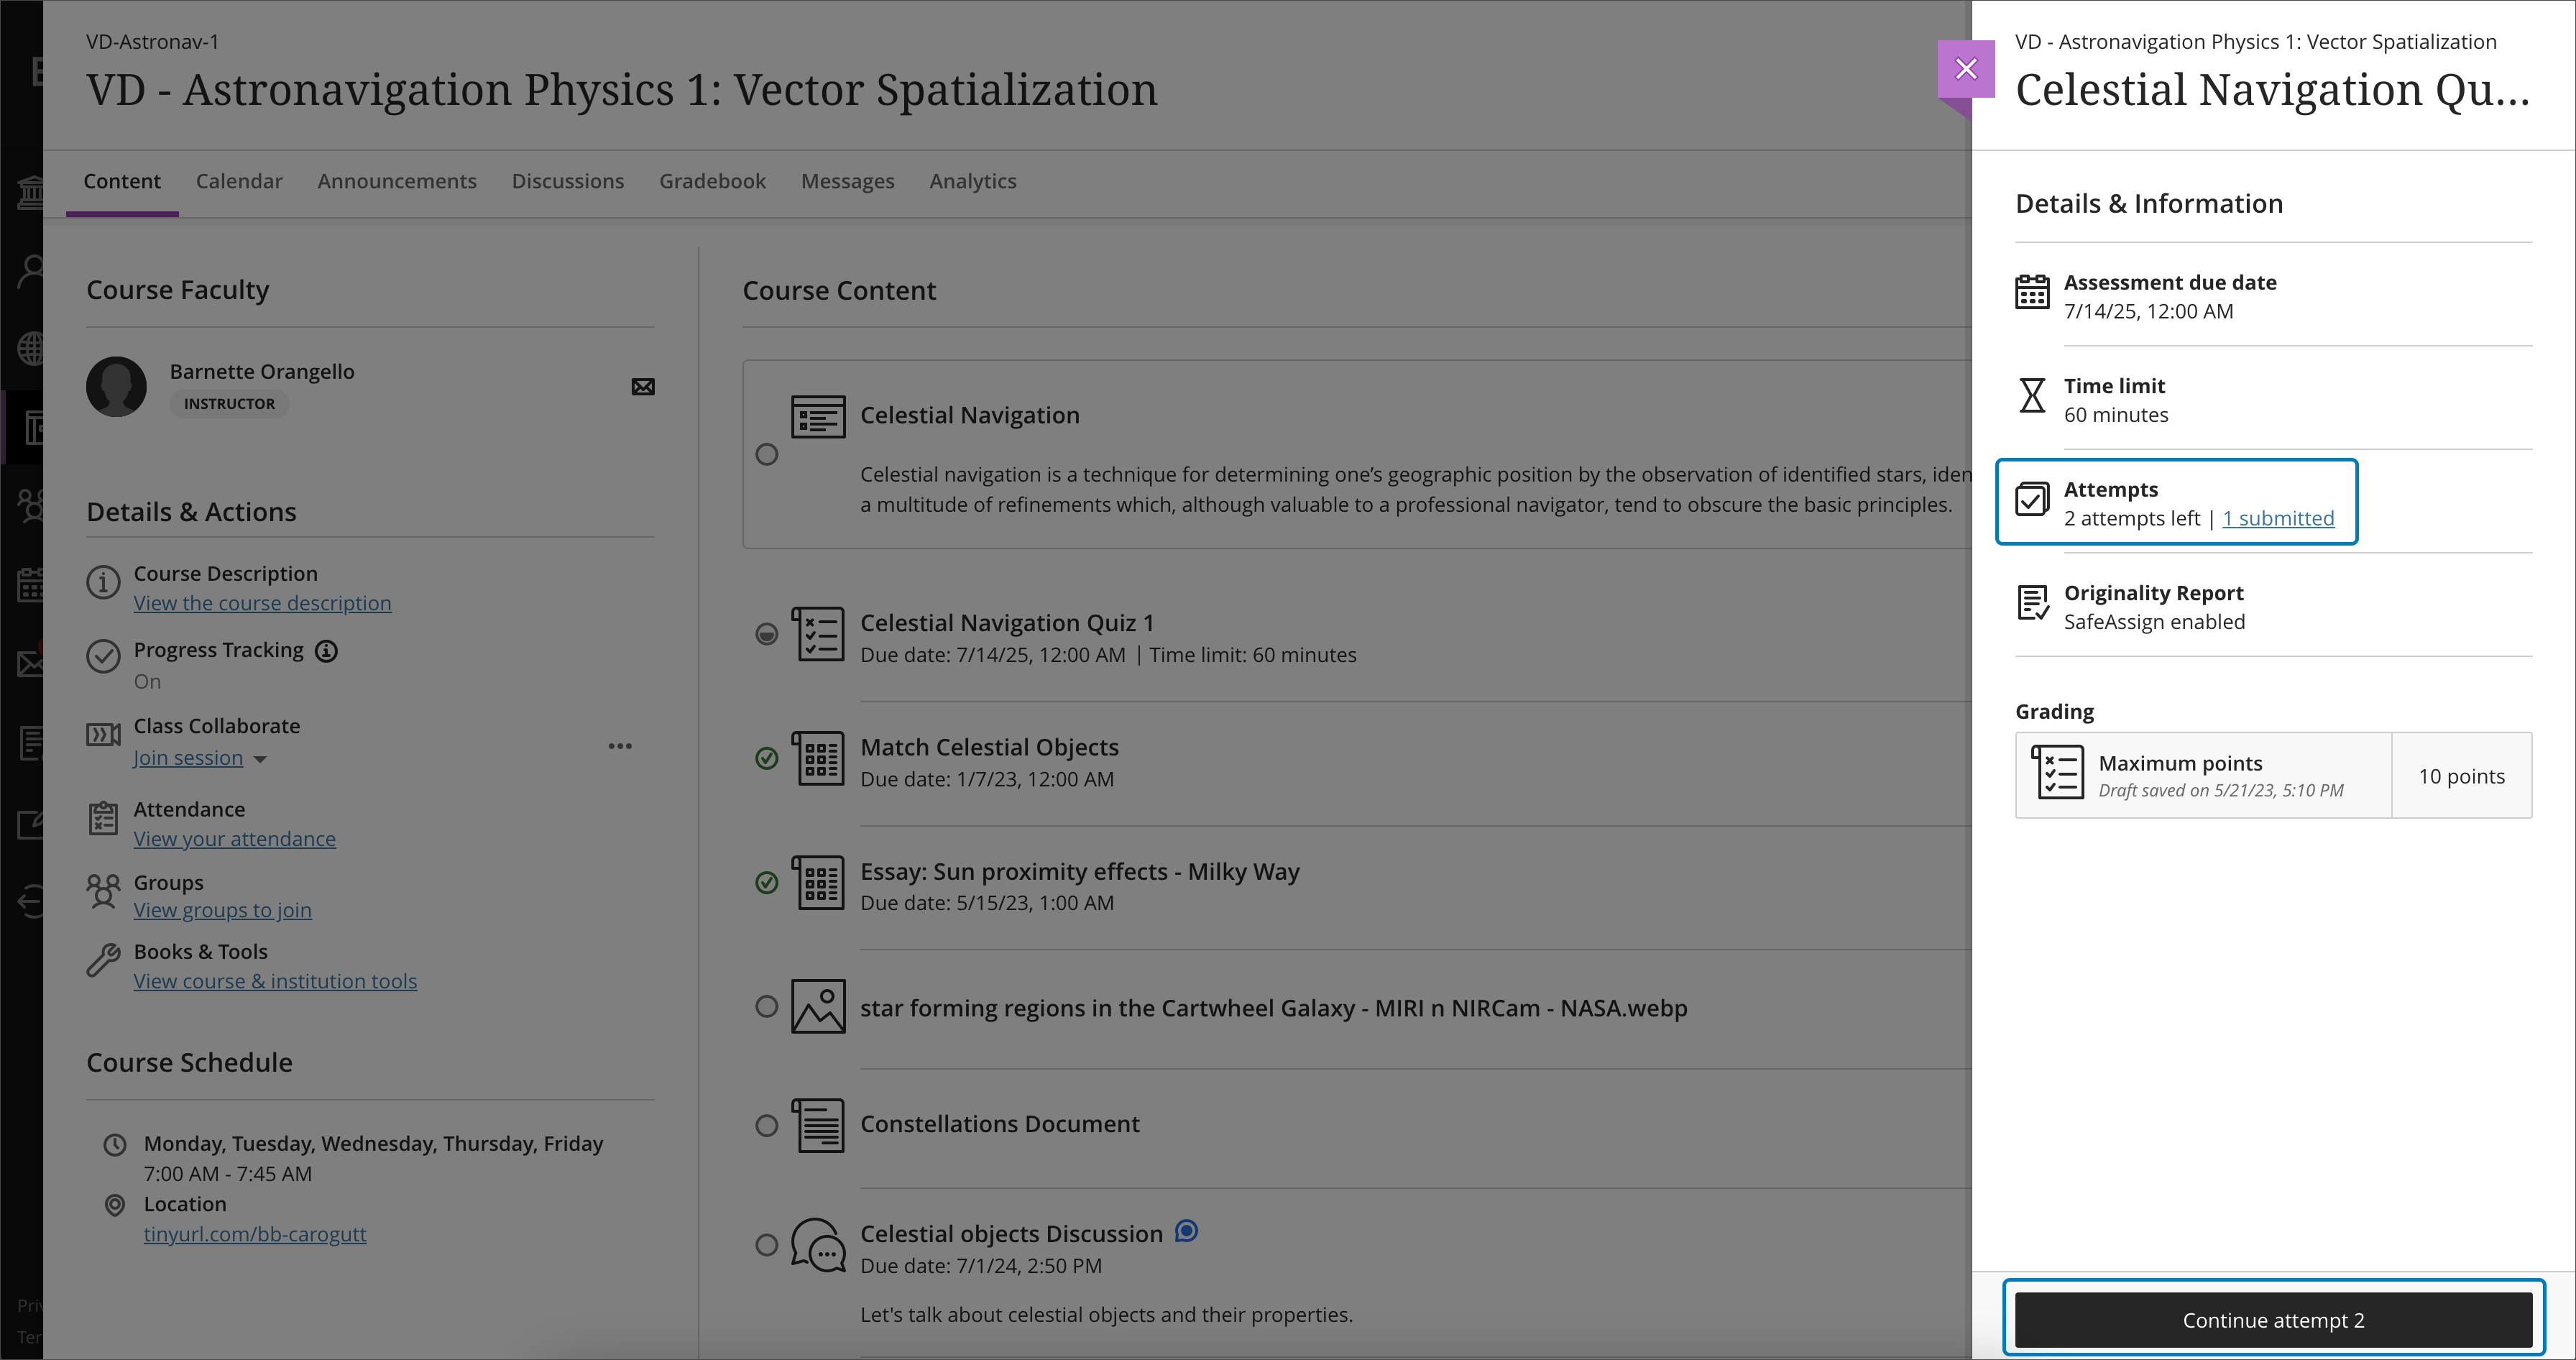
Image 3: View submissions
To clarify how a student can attach files or add content to their submissions, we have updated the instructions in the Submission section. The instructions now read as follows: Drag and drop files here or select (click) to add text.
Image 4: Student view of the assignment Submission area

Progress Tracking and Start / Continue / Completed options for Learning Modules
Progress Tracking provides students with clear visibility of their progress throughout a course. In the past, students would need to expand the module to view progress for the contents of a Learning Module. To save time and provide greater clarity, a progress summary for Learning Modules is now displayed at the top level.
Image 1: The progress indicator displays at the top level of the Learning Module and includes the total number of items in the Learning Module
Hovering over the progress bar informs the student of how much content they have completed, started or yet to start.
Image 2: Student hovers over the progress bar for more details
Now there is an option for students to ‘Start‘ or ‘Continue‘ progress in a Learning Module with a single selection. This option is dynamic based on the student’s progress in the Learning Module. Selecting the option takes the student to the first item, or next incomplete item. Students no longer need to expand the Learning Module to browse the content items.
Image 3: Start and Continue options change based on the student’s progress; when complete, the status changes to Completed
When a student progresses through the contents or otherwise marks content as complete, the Learning Module displays a ‘Completed‘ status. This provides a clear sign to the student that they have completed that module. If an instructor adds content to the Learning Module or the student marks the work from completed to started, the progress bar updates accordingly. The button text reflects the status change as ‘Continue.’ This reminds the student to re-engage with the content.
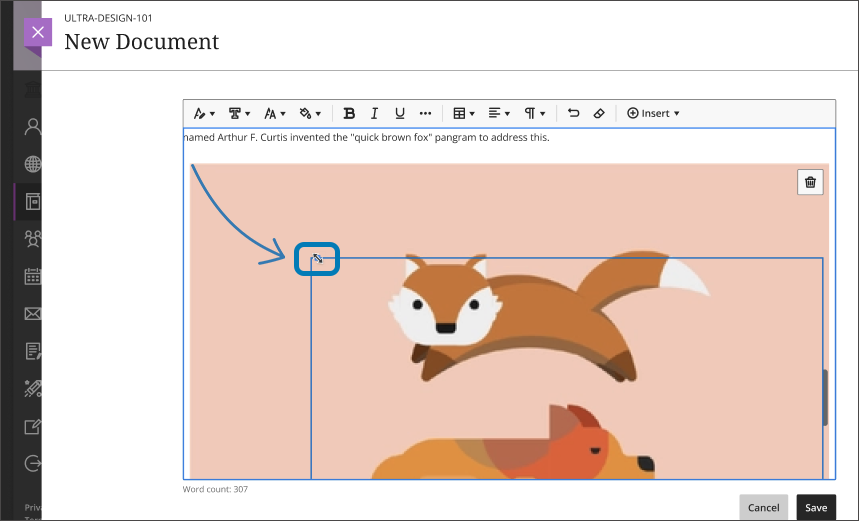
Resizing media
Instructors often strive to include media in their course design to help create an engaging course. Students may desire to include media in their discussions or assessment responses. When inserting media, users expect an easy way to control the size of the included media. In the past, this wasn’t easy to do. Users would have to size media before uploading it in the course.
Now media items have handles in each corner. Users can resize the media by dragging a corner handle. Users can also resize media via keyboard navigation. Media types available for resizing include images, videos, and media inserted via URL.
This enhancement provides users with a seamless and intuitive way to resize media.
Image 1: Resize media corner handles
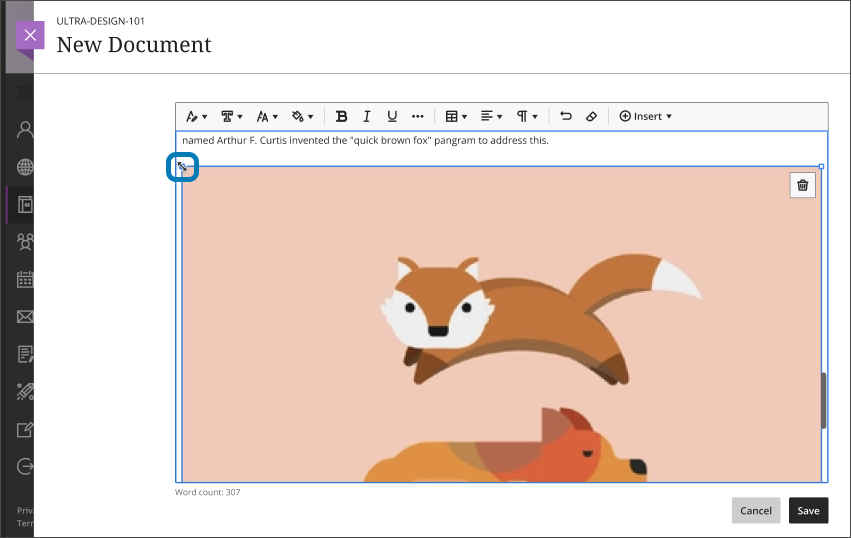
Image 2: Resize media by dragging corner handle
Based on client feedback, we made several additional changes:
- We removed the gray background of the media
- We relocated the delete icon to the top right corner of the media
- All media attached or inserted via URL maintains aspect ratio
- All media has center alignment (future milestones will permit other justification options)
- The maximum size of the media (100%) is the maximum width allowed by the content editor
- The minimum size limit for all media is 200 pixels
- We redesigned Image Settings to include the alternative text box and an option to force users to download the media
- When inserting a video in edit mode, a new icon displays in the top right corner to play the video from edit mode; this icon appears regardless of how media is inserted
Image 3: Resize media delete icon

Image 4: Image Settings includes the display name, alternative text, an option to mark an image as decorative, and an option to force users to download the media

Image 5: Resize media video play icon in edit mode
Resizing media is not supported on mobile devices.
File deletion in the course also removes the file from the Content Collection
The Content Collection is a valuable tool for organizing files and to support content reuse. In the past, if an instructor deleted a file from an Ultra course, the file remained in the Content Collection. This was the case even if the file was not used in other courses. Removing this file required additional steps from the instructor and was often overlooked.
Now, when a file is deleted from the course, it is also deleted from the Content Collection when it is not used in other courses or another place in the same course. This workflow simplifies file management and helps with responsible use of storage space.
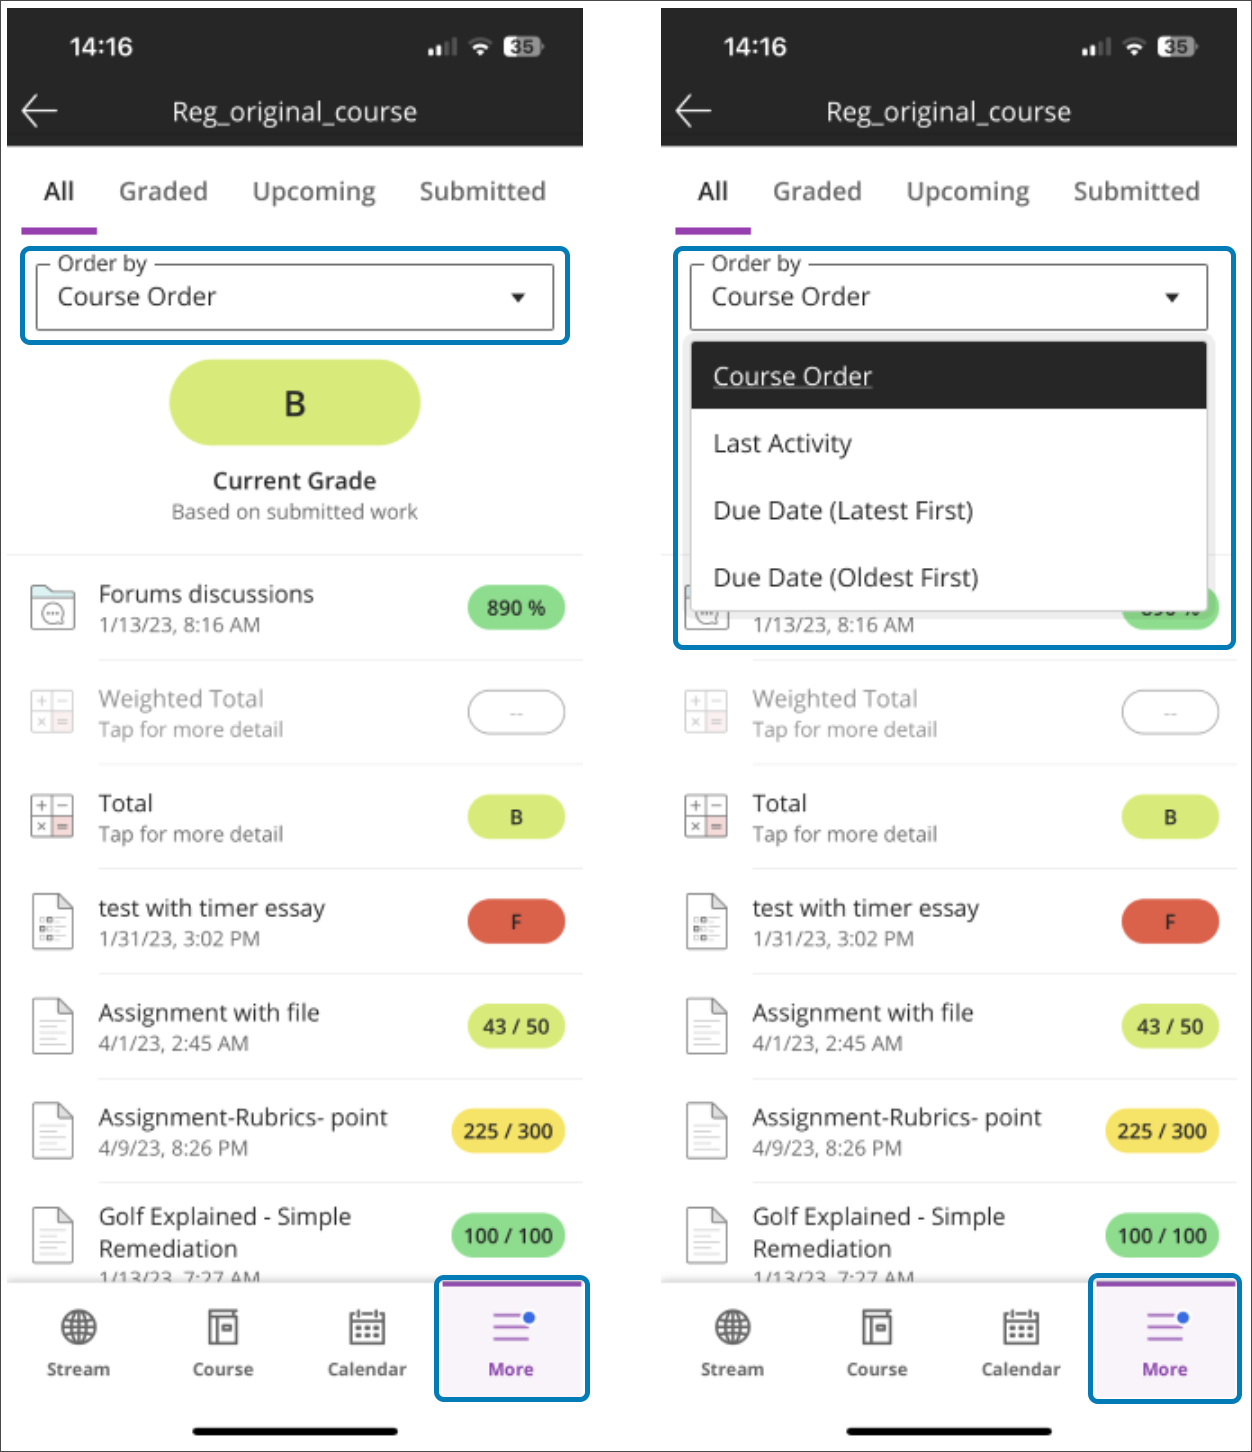
Improvements to the Grades landing page on the Mobile App
Mobile app users can now select the sorting criteria for their grades. Users can sort grades as follows:
- course order
- last activity (most recent grade posted)
- due date (latest or oldest first)
These sort options allow users to customize the Grades landing page to suit their preferences.
Images 1 and 2: Users may order their grades based on Course Order, Last Activity or the Due Date
Improved flattening logic
Items can move when copied, imported, or converted into Ultra courses. We call this the flattening process. The process moves items with a depth greater than two to the lowest supported level in Ultra courses. For institutions that have opted in to a third level of depth, items with a depth greater than three move to the lowest supported level. We received feedback from instructors calling for improvements to this process.
One issue was that items were not retained in their parent folder. As a result, a course could have many empty folders at the lowest supported level. The items that used to be in those folders would also be at the lowest supported level. This made it difficult for instructors to understand where items used to be. They had to spend a lot of time finding and moving items.
The second issue was with Learning Modules. Learning Modules could become nested inside other Learning Modules or Folders. Nested Learning Modules are not supported in Ultra courses. These nested Learning Modules set the wrong expectation for new users. This also broke the user interface.
With this update, we implemented new logic:
- Learning Modules are always brought to the highest level on the Course Content page.
- Folders are now brought to the highest level necessary to ensure that child items don’t move.
This change should help instructors organize their moved content.
Formative label and Gradebook filter
Formative assessment is an essential component of the teaching and learning process. Formative assessment provides ongoing feedback to both instructors and students. Its primary value is that it informs and shapes instruction, guides learning, and supports student progress.
You, our clients, shared in the Idea Exchange an idea to have a way to identify formative assessments more easily. When work on this feature began, it was the number one idea in the formative assessment area. Now instructors can apply a formative label to assessments.
When selected, this label serves as an indicator and appears to instructors in the following areas:
- Course Content page – on assessments set as formative
- Test and Assignment settings
- Gradebook list and grid views
- Question Analysis table view of assessments
- Student Overview
- Student Activity Overview
Comments are closed
Comments to this thread have been closed by the post author or by an administrator.