
Details August 2023
- Flexible Grading
- Gradebook: New default cell status in grid view
- Increased visibility of Gradebook ‘Move Item’ icon
- Bulk download of anonymous submissions
- Assessment Submission Receipt improvements
- Rubrics: Editing improvements
- Removal of Welcome guidance for first-time login and attendance user experience pop-ups
- Course Banner image improvements
- Learning Module image
- Replace files in course content
- Students with alert flags in the Course Activity report
- Groups in the top navigation bar and Group Spaces
- Unread Message indicator
- Group Messaging improvements
- Course status indicators
- Messages Off indicator
Flexible Grading
The Flexible Grading system was included in this release, however we have decided to delay the launch of this feature until at least after Semester 1. The initial release from Blackboard for this feature would not support all question types and would not be available for anonymous or groups assessments. This would mean very few courses would be able to make use and not all questions within a given assessment would be able to make use of the feature. We have decided to delay the release until such a time whereby all assessment types are supported and there will be no negative impact on existing workflow. We will make you aware ahead of time for our own release date for this feature.
For more information about the Flexible Grading feature please read the Blackboard release notes for Flexible Grading
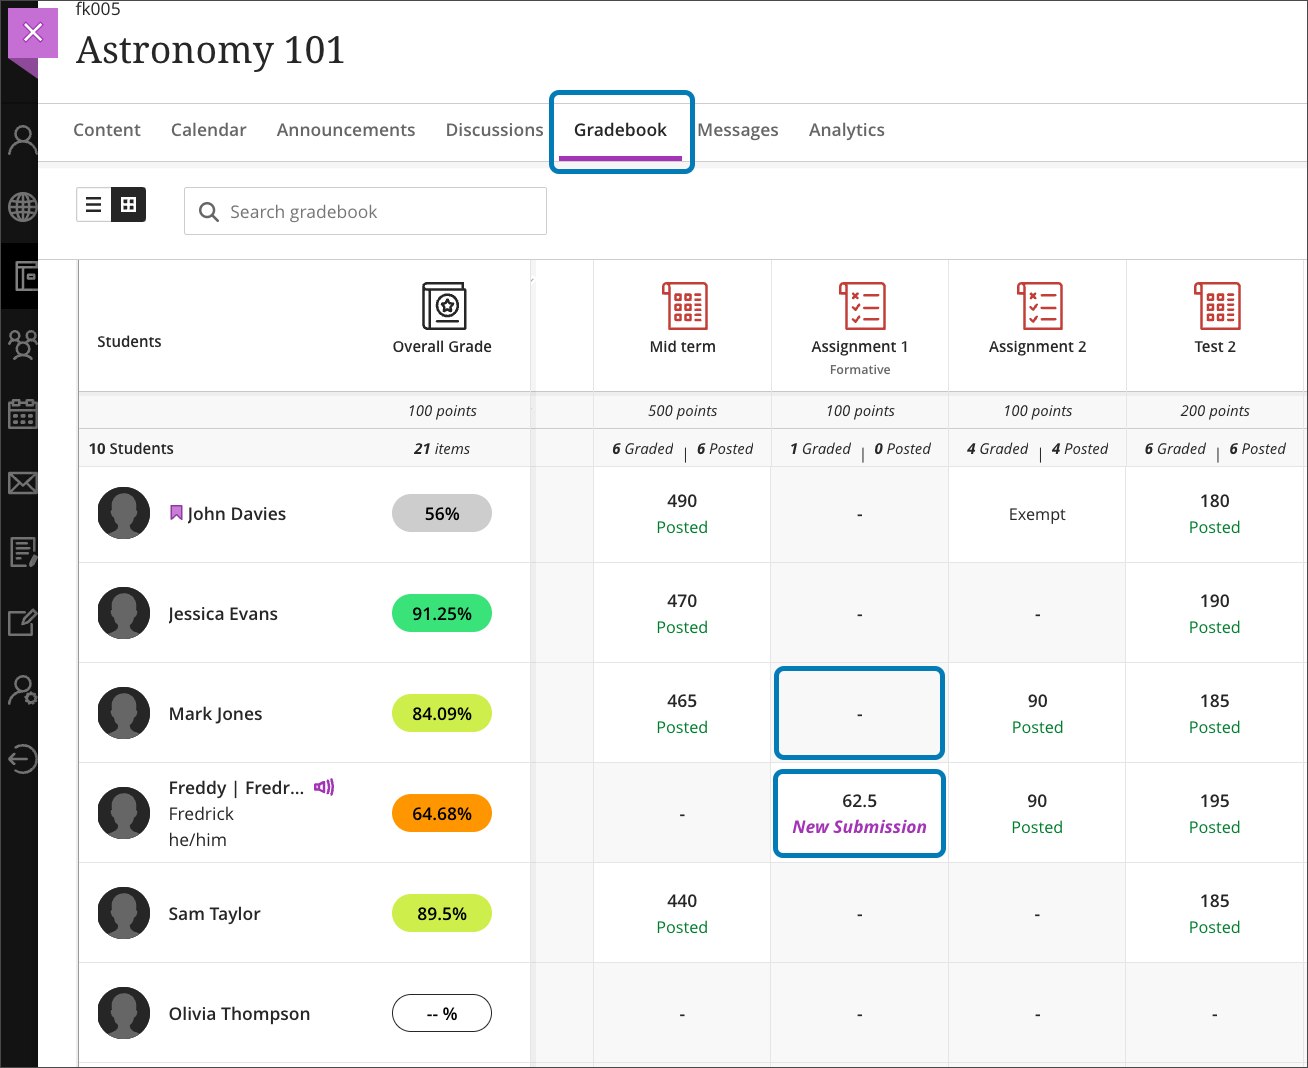
Gradebook: New default cell status in grid view
Instructors have varying preferences of the gradebook view. Some prefer the gradebook grid view to get an overview of student performance or locate new submissions. In the past, the gradebook grid view displayed “Grade Now” in each cell even when no submission had been made. This was confusing.
To remove confusion, the default state of a given cell in the gradebook grid view has changed from “Grade now” to “-” (a single dash). This change reduces the cognitive load on users working in the gradebook. This change also makes new submissions more obvious.
There is no change in gradebook functionality. Instructors can still select a given cell and enter an override grade.
Image 1: Instructor view of the gradebook grid view where cells without submissions are displaying “-” (a single dash); cells where there are new submissions still display the New Submission label
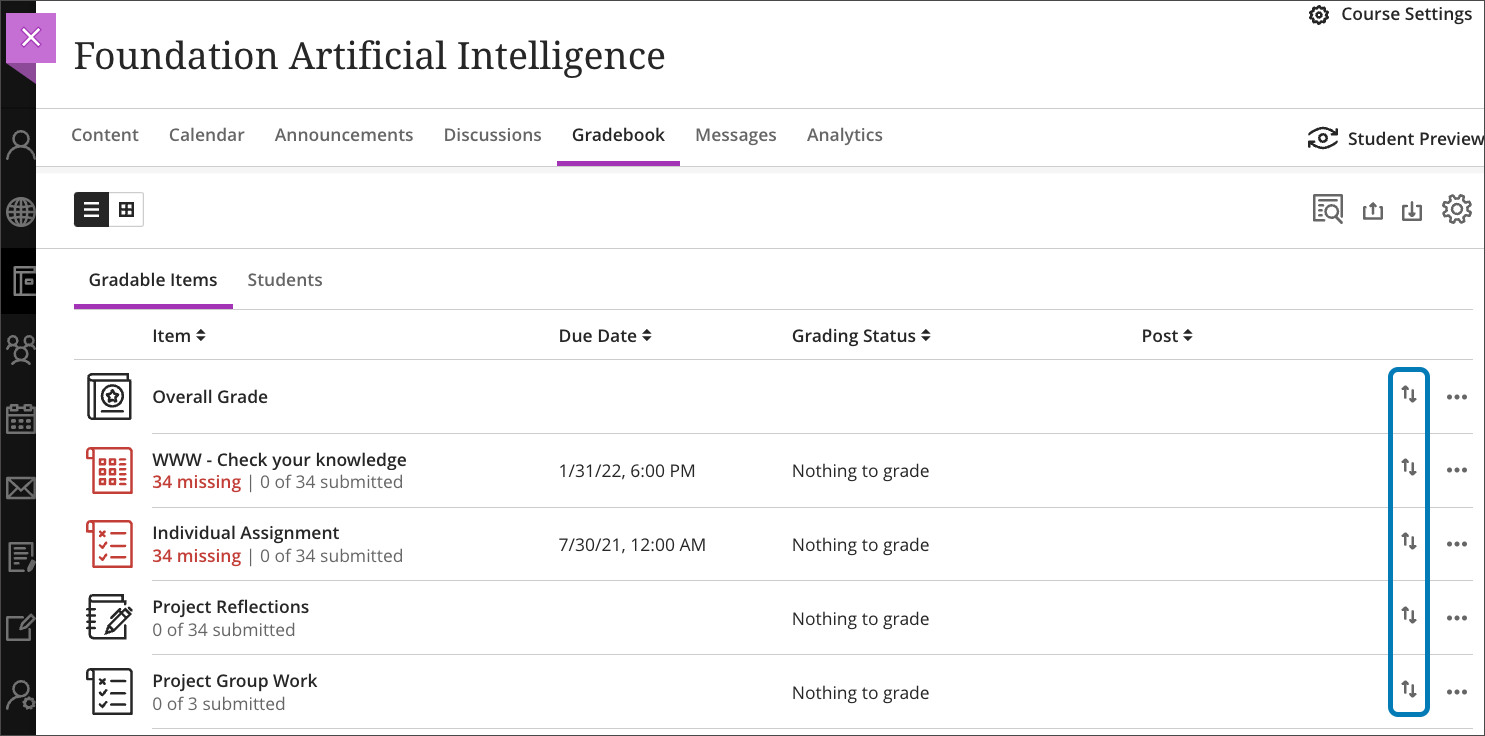
Increased visibility of Gradebook ‘Move Item’ button
Instructors may need to reorder items in their online gradebooks to align with the sequencing and structure of their course. Instructors can reorder items in their gradebook from the gradebook list view. In the past, this option was not obvious to instructors. Instructors had to hover over the option for it to become visible.
Now, the option to move an item in the gradebook list view is always visible.
To move an item in the gradebook, select the Move button for the item you want to move. Drag the item to the new location and release. The order you choose is also reflected in the gradebook grid view and in students’ view of the gradebook.
Image 1: Instructor view of the gradebook list view with the Move option visible
Bulk download of anonymous submissions
Sometimes instructors and graders want to download students’ assessment submissions for offline viewing. Downloading submissions for offline viewing provides flexibility and convenience. In the past, this option was not available for anonymously graded assessments.
Now, the Download Submissions option is available for anonymously graded assessments. Download submissions from the item’s menu in the gradebook grid view.
Image 1: Instructor view of the Download Submission option for anonymous assessments
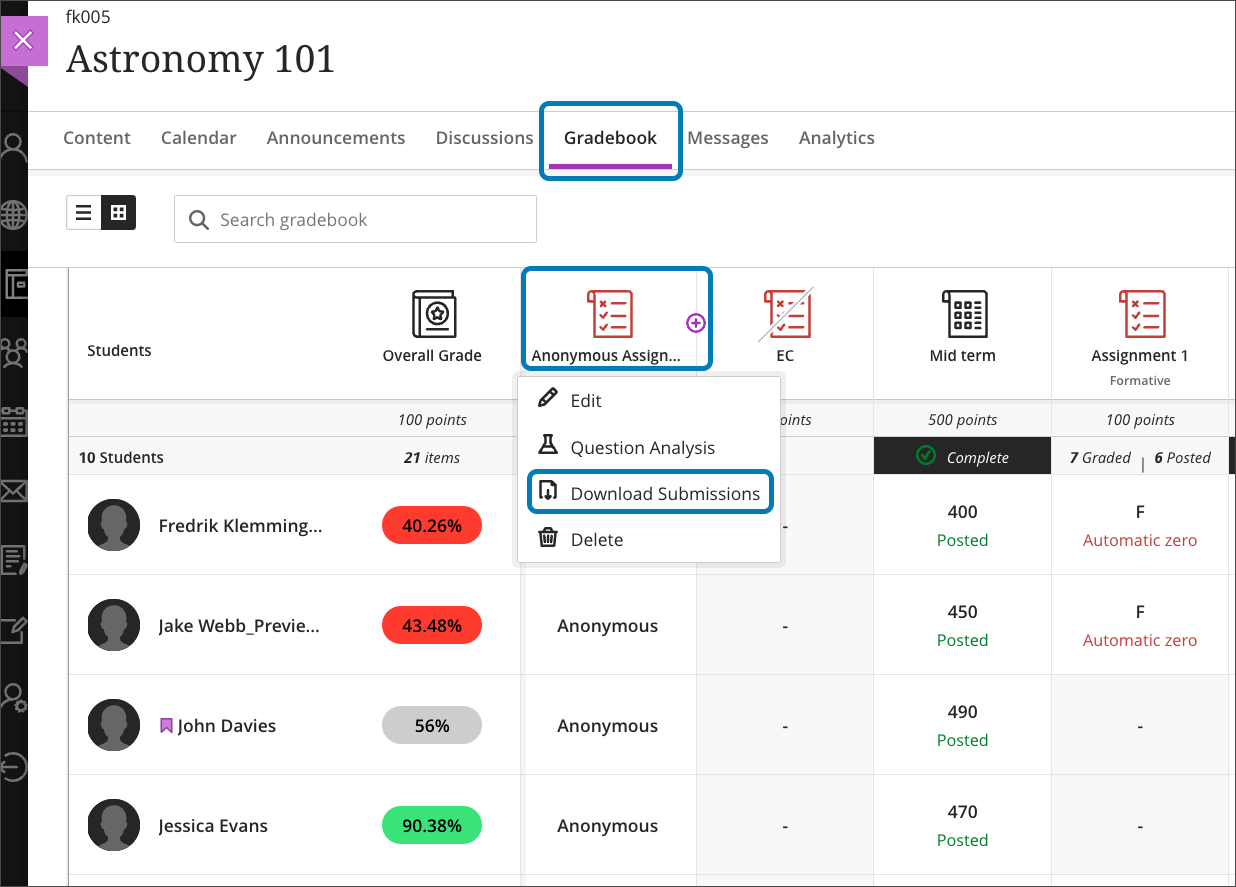
Image 2: Selecting the Download Submissions menu option generates a ZIP file with all students’ submissions.
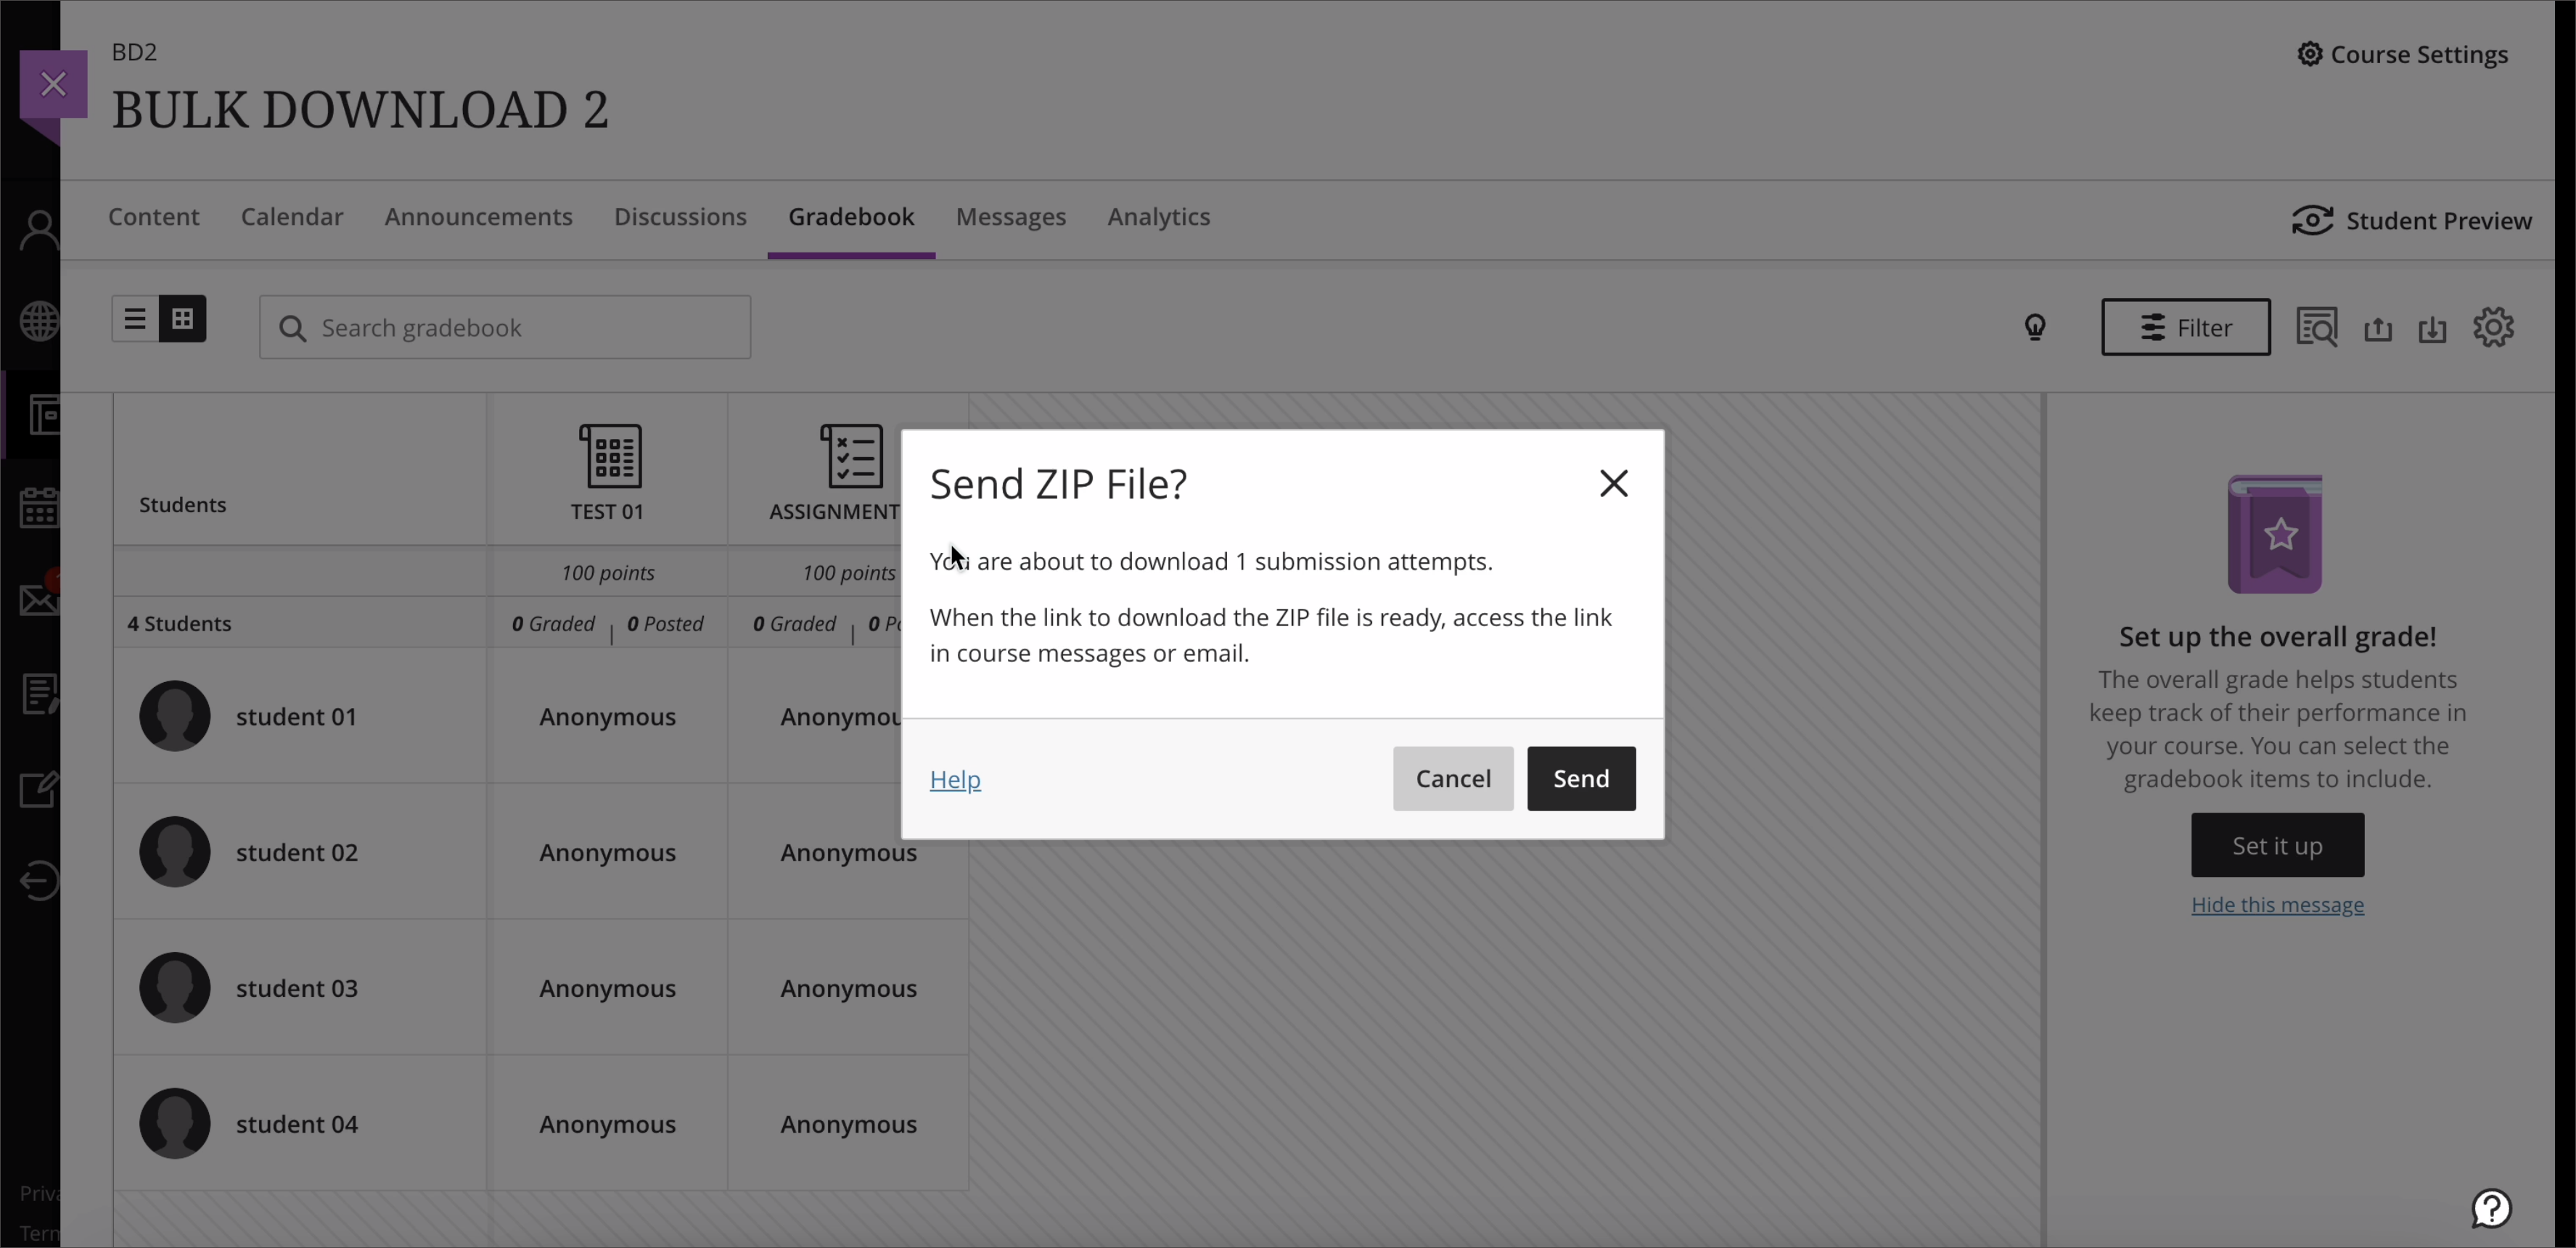
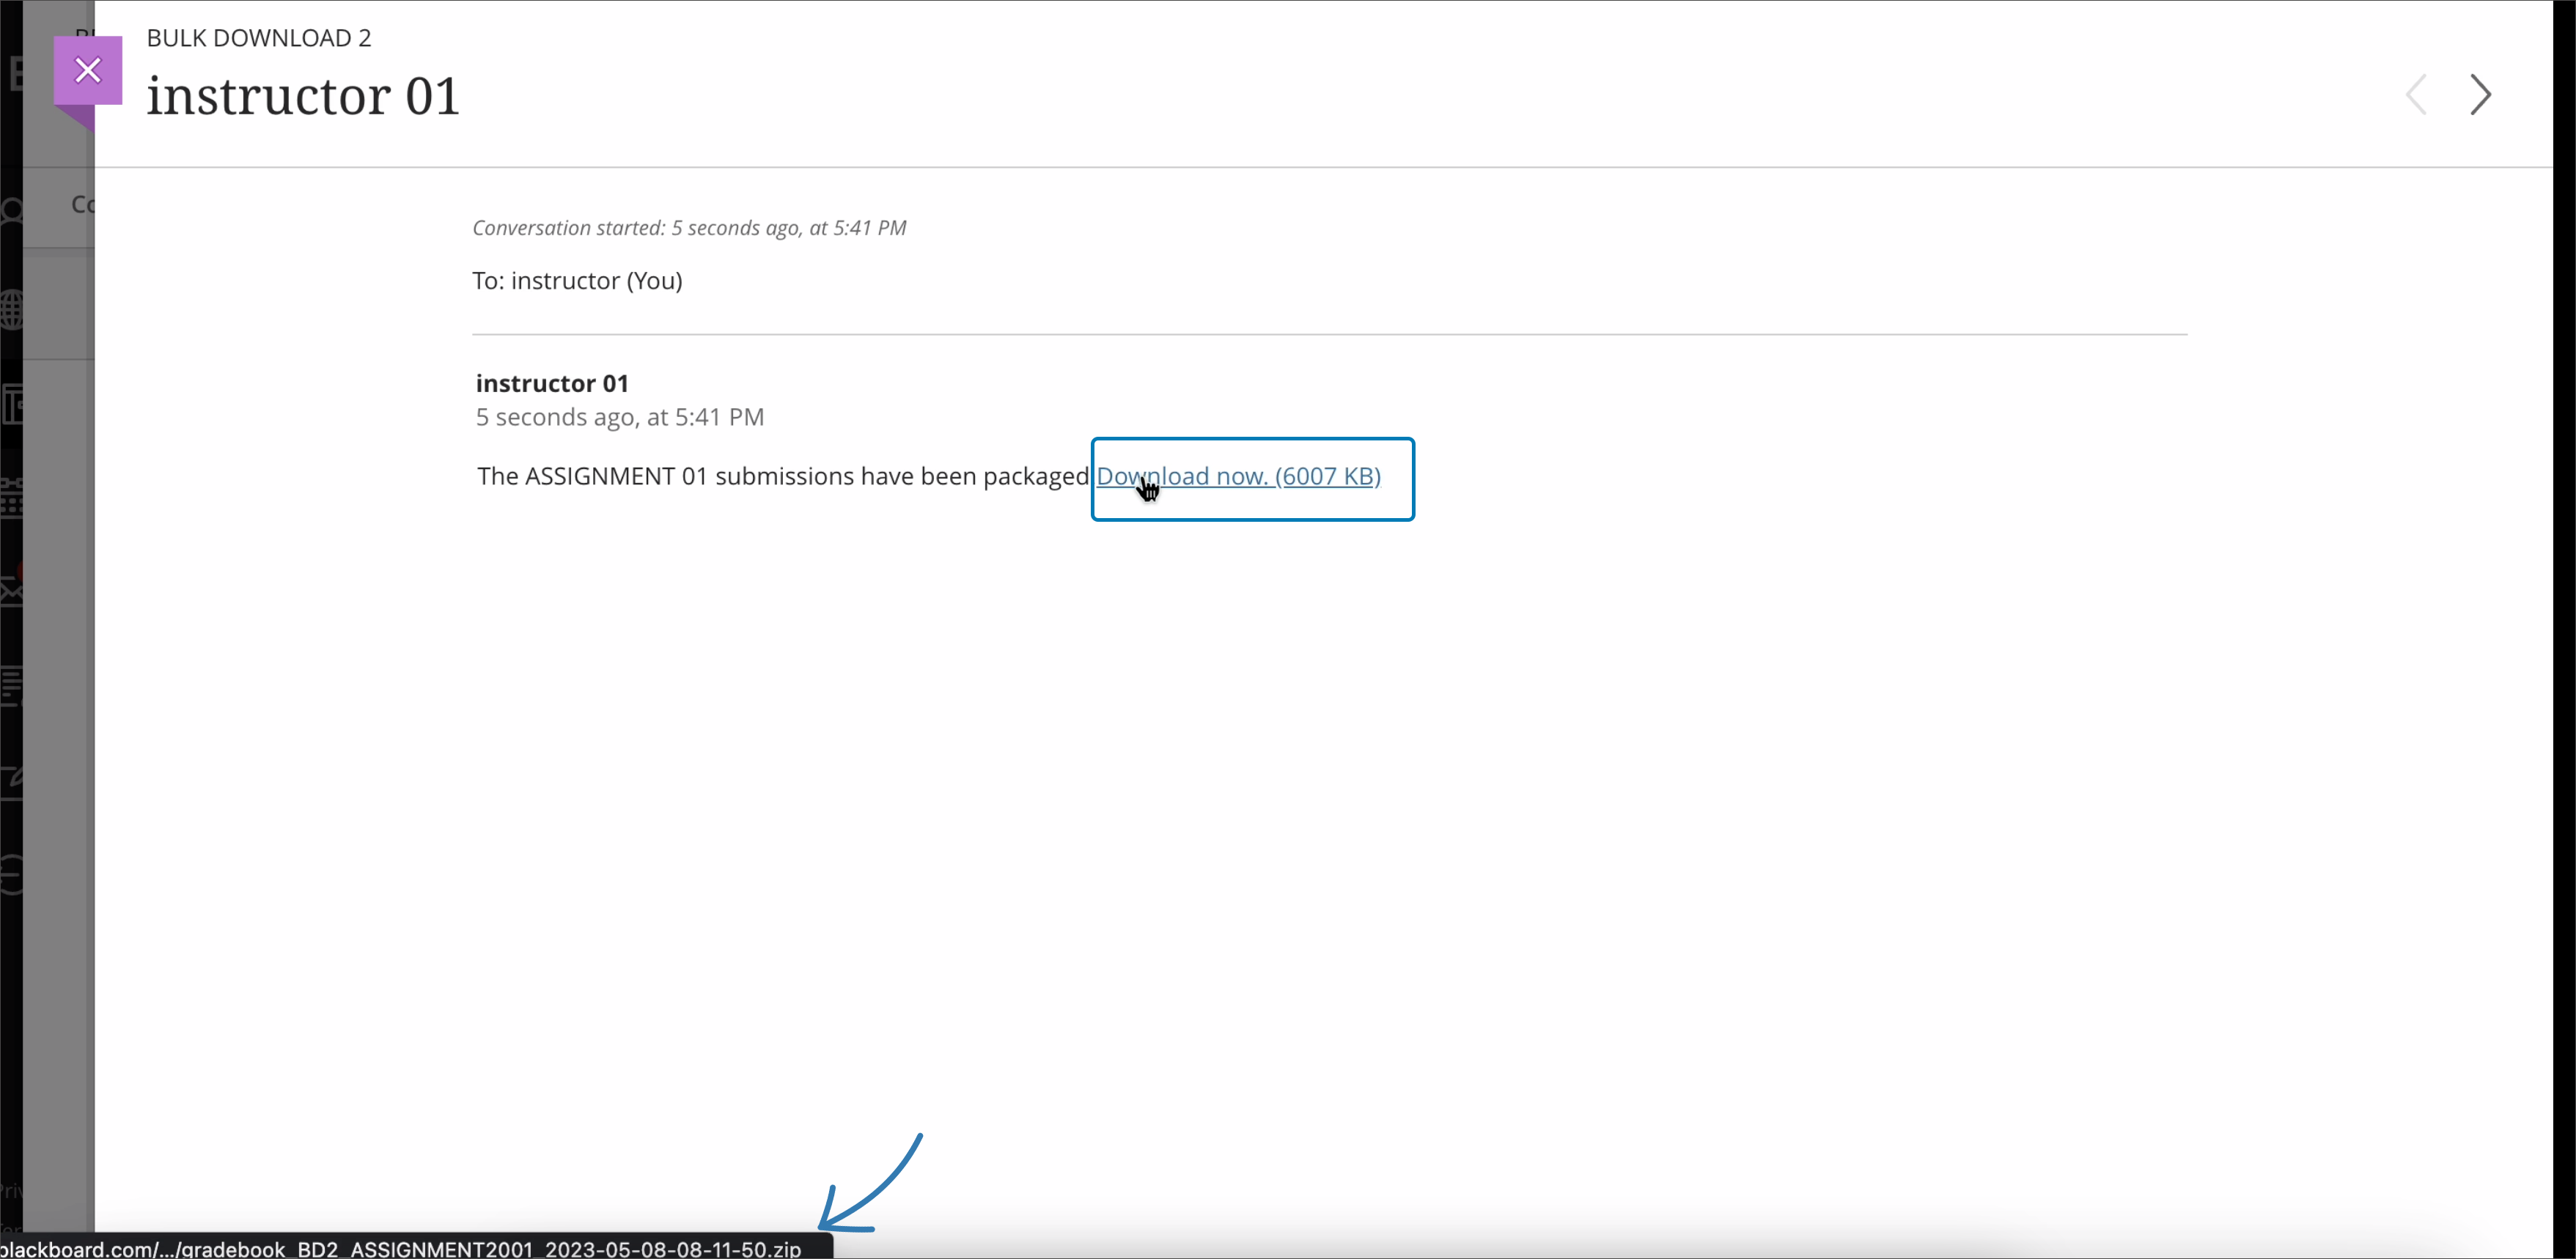
When the ZIP file is ready, the system sends a message with a link to the instructor. Instructors can access the message from Messages and select the link to download the ZIP file.
Image 3: Message with a link to the ZIP file
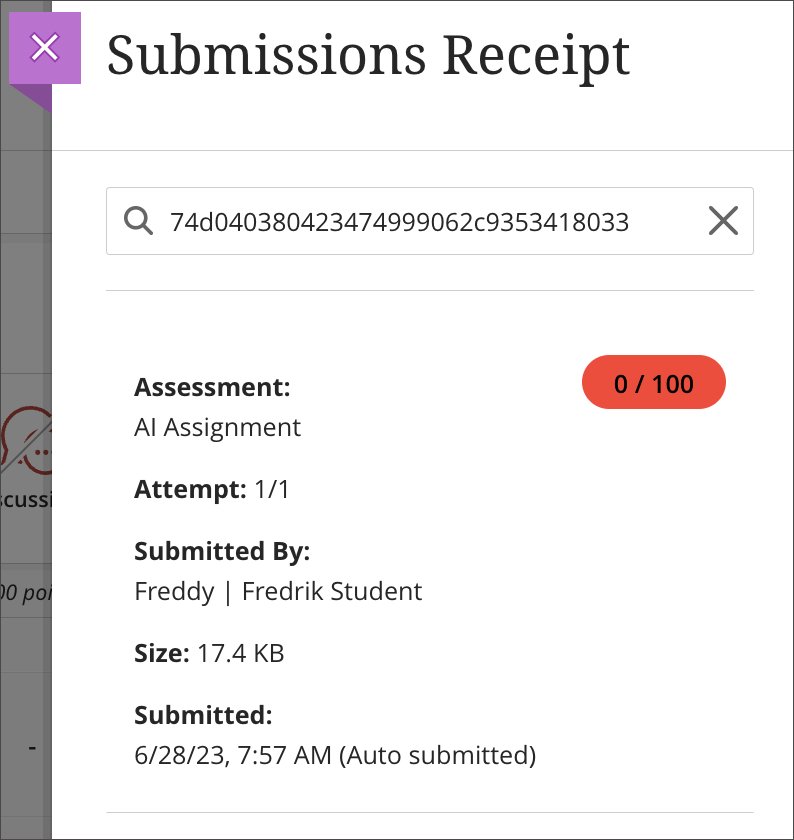
To preserve anonymity, the system renames the downloaded files based on the submission receipt number. To map a submission back to a given student attempt, use the Submission Receipt lookup option in the gradebook.
Assessment Submission Receipt improvements
Assessments can be stressful for students. Some instructors require students to submit attachments as part of the assessment requirements. Students need reassurance that they have attached the correct file for the right assessment. Students also desire confirmation that their submission was successful.
Based on direct feedback from students, we added the new information to the existing submission receipts:
- Course name and ID
- Assessment name
- Submission size – only included for file-based assessments and tests with essay questions
- Auto submit indicator – this indicator is present only if the assessment is automatically submitted by Learn as part of a timed assessment or the Prevent Late Submission assessment setting
Students can view the additional submission receipt information in:
- The confirmation modal displayed upon a successful submission
- The text file students can download from the confirmation modal
- The automatic email confirmation
Image 1: Student assessment submission receipt confirmation

Image 2: Student assessment submission receipt confirmation text file
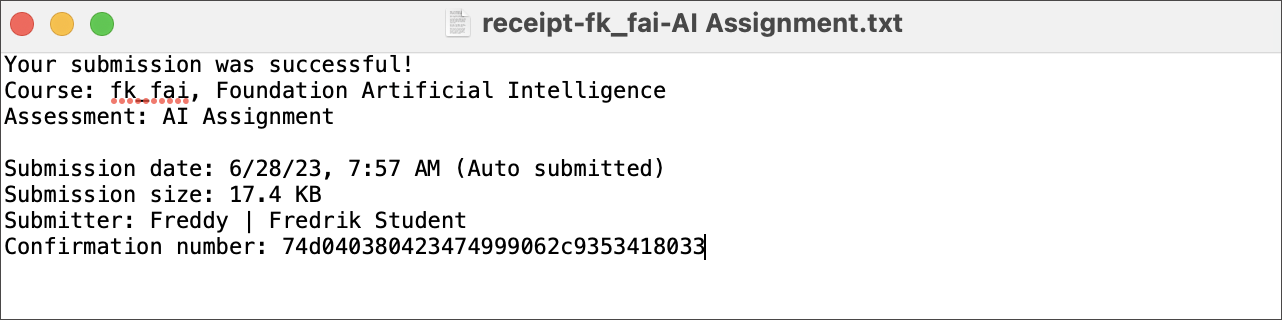
Image 3: Student assessment submission receipt email confirmation

The additional information in submissions receipts is also helpful to instructors. Instructors can look up a submission for a given student in the gradebook. The auto submit indicator reminds instructors that an assessment was auto-submitted as part of a timed assessment or because of the Prevent Late Submission assessment option.
Image 4: Instructor view of the submission receipt lookup; receipt displays the auto submit indicator on the student’s attempt
Rubrics: Editing improvements
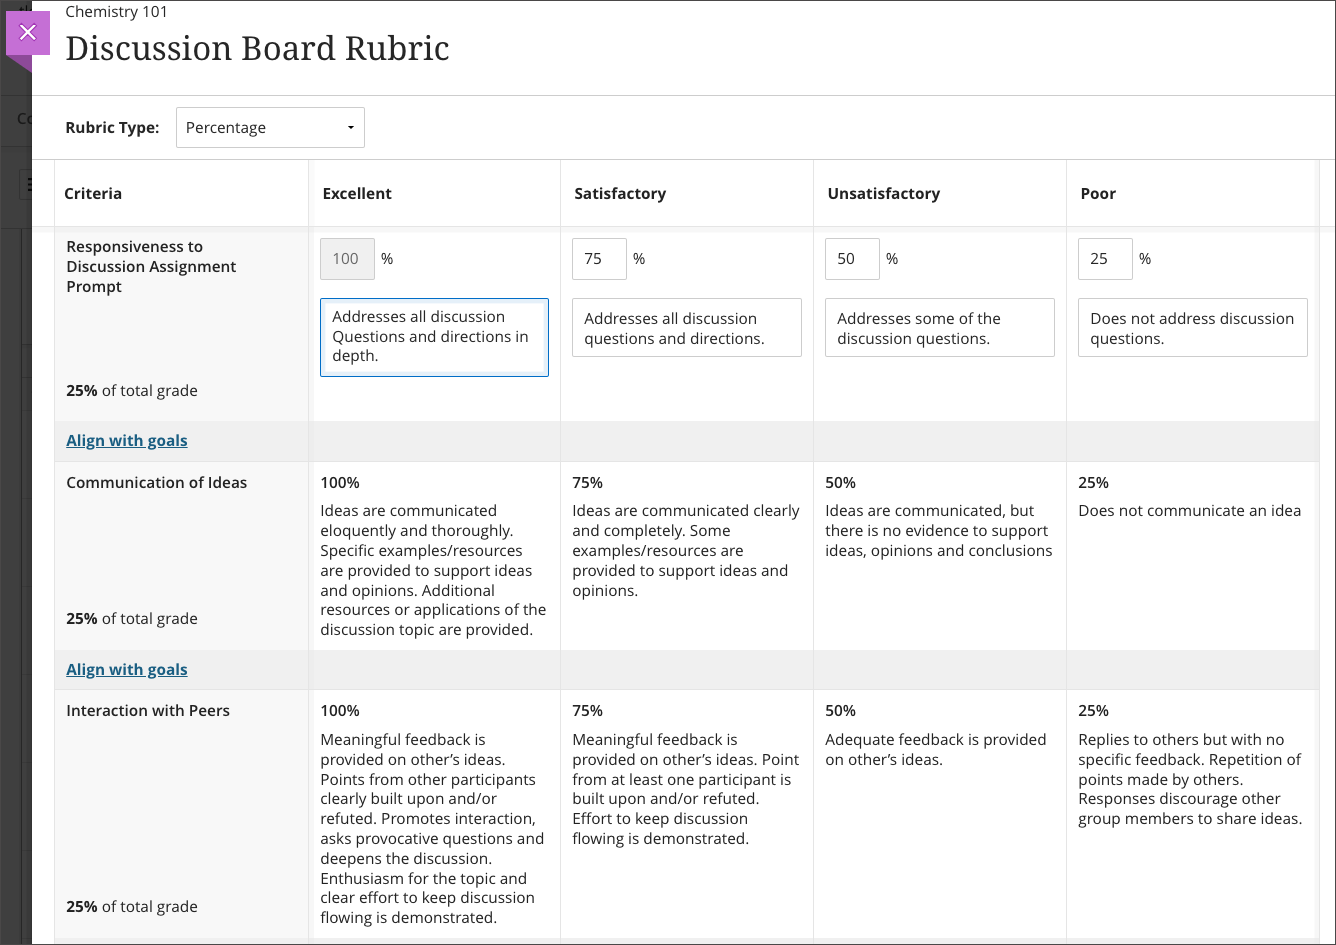
A grading rubric provides a clear and transparent framework for evaluating student work. Rubrics ensure consistency and fairness in grading. Rubrics also provide a means for giving effective feedback.
Instructors can edit any rubric not yet used for grading. In the past, selecting outside of an editable area would save edits and automatically exit out of edit mode. This made selecting text and editing rubrics difficult. Now, if users select text inside the rubric edit box and drag out of the edit box, the edit mode does not close.
Image 1: Instructor view of editing a rubric
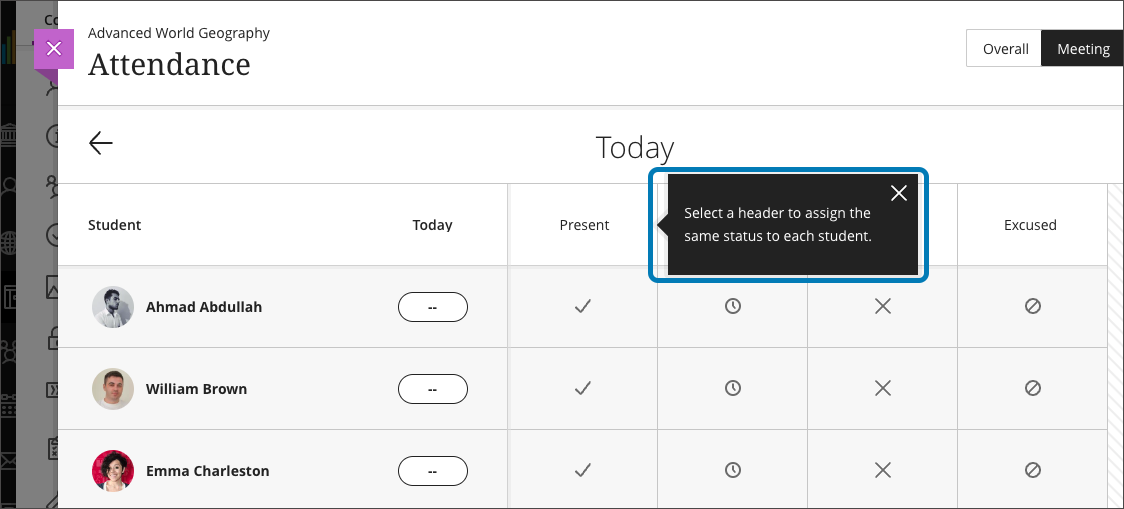
Removal of Welcome guidance for first-time login and attendance user experience pop-ups
First-time user experience guidance provides users with instructions and tips. This guidance shows users how an application works so they can start using it right away. To provide a better user experience, we are updating some of the guidance in Learn Ultra. Some guidance that is no longer needed is being removed. We’ll be making these updates over a series of releases.
In this release, we are removing the Welcome guidance for first-time login. This is a series of three scrolled screens before a user reaches the base navigation. This guidance is no longer applicable. Its removal provides immediate access to the base navigation after users log in.
Image 1: First-time user experience guidance that will be removed from the welcome screens
To streamline marking attendance, we are removing first-time user experience messages from the attendance tool.
Image 2: First-time user experience guidance that will be removed from the attendance
Course Banner image improvements
The course banner image provides a sense of identity for the course. The image establishes a connection between the content and the course participants. To provide a better user experience, we have improved the image setting workflow:
Image 1: Before (left) and after (right) – the panel is renamed, and the default course image is now clearly marked as such

To add a course image, select the Image button.
Image 2: Select image source – drag and drop or select ‘Upload file”
The image appears in preview. This helps the instructor ensure that the desired image is selected.
Image 3: Image preview
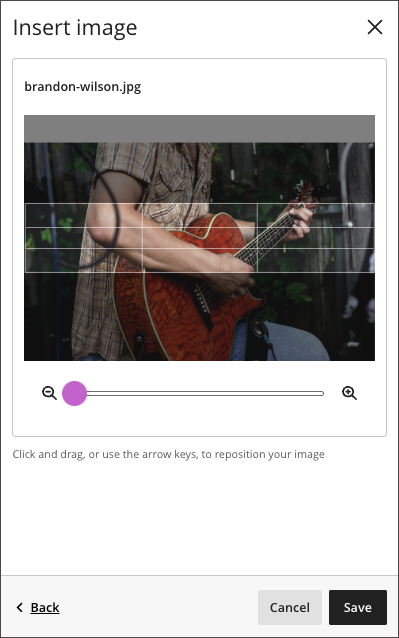
Instructors can drag the image and modify the zoom to select the image’s focal point.
Image 4: Drag or zoom the image to select the focal point
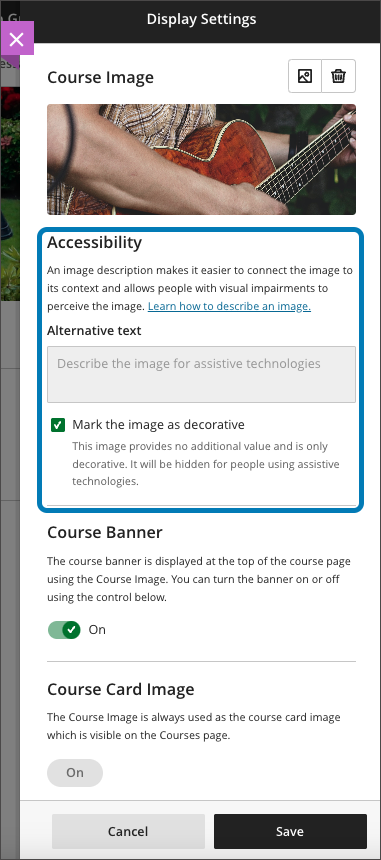
The instructor can mark the image as decorative or provide appropriate alternative text.
Image 5: Image accessibility settings
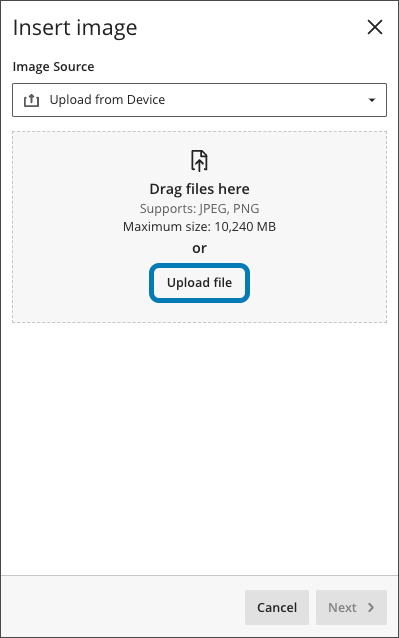
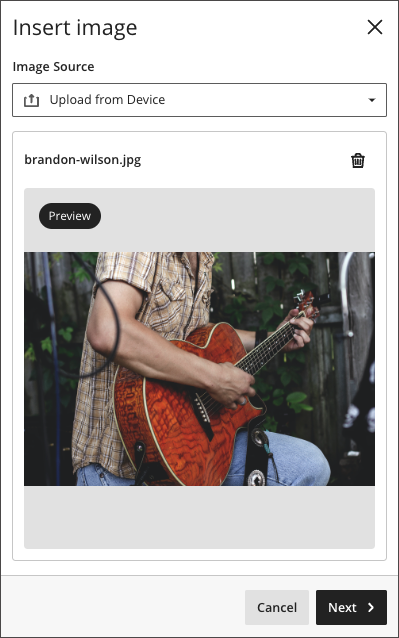
Learning Module image
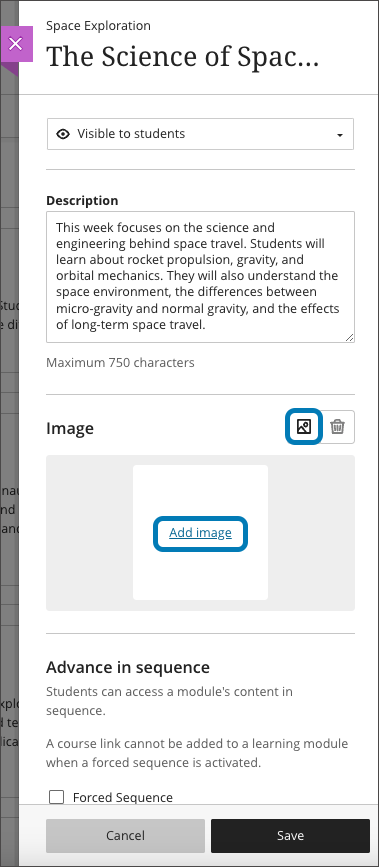
Learning Modules provide a way to organize and structure content. To enhance the visual aesthetics of a course and to aid in content identification, we now support the option to add images to Learning Modules.
To add an image to a Learning Module, instructors can edit the module.
Image 1: To edit the Learning Module, select edit from the Learning Module ellipsis menu

Image 2: The instructor can select ‘Add image’ or the image button
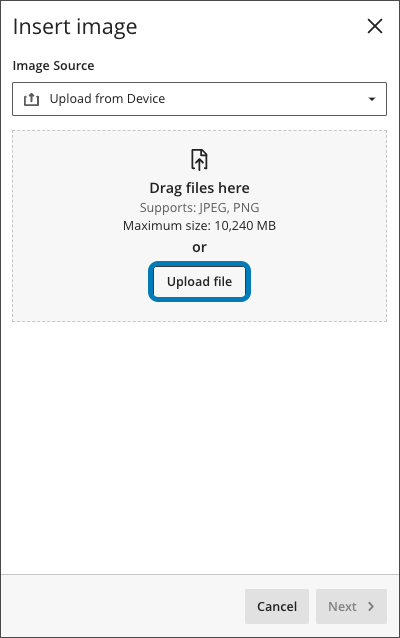
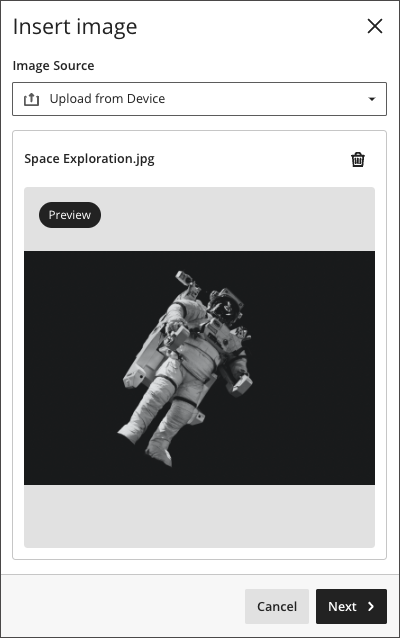
Instructors can drag and drop an image of their choice or upload one from their device.
Image 3: Drag and drop the image or select ‘Upload file’
The image appears in preview. This helps the instructor ensure that the desired image is selected.
Image 4: Image preview
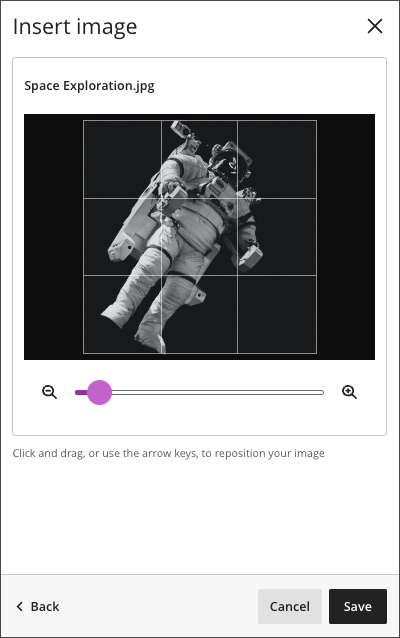
Instructors can drag the image and modify the zoom to select the focal point of the image.
Image 5: Drag or zoom the image to select the focal point
Instructors can mark the image as decorative or provide appropriate alternative text.
Image 6: Accessibility settings for Learning Module image
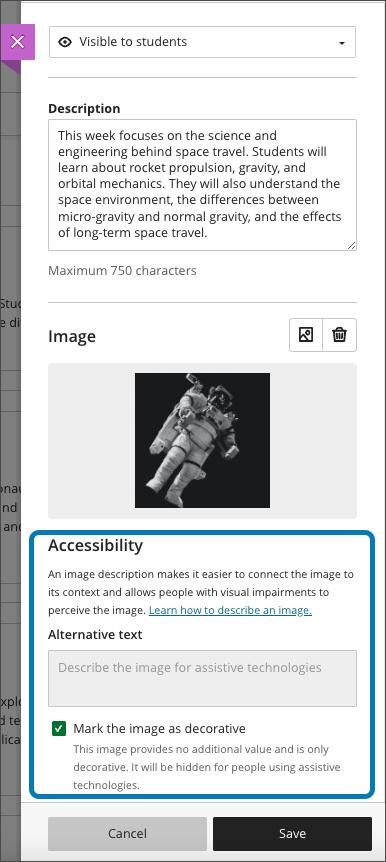
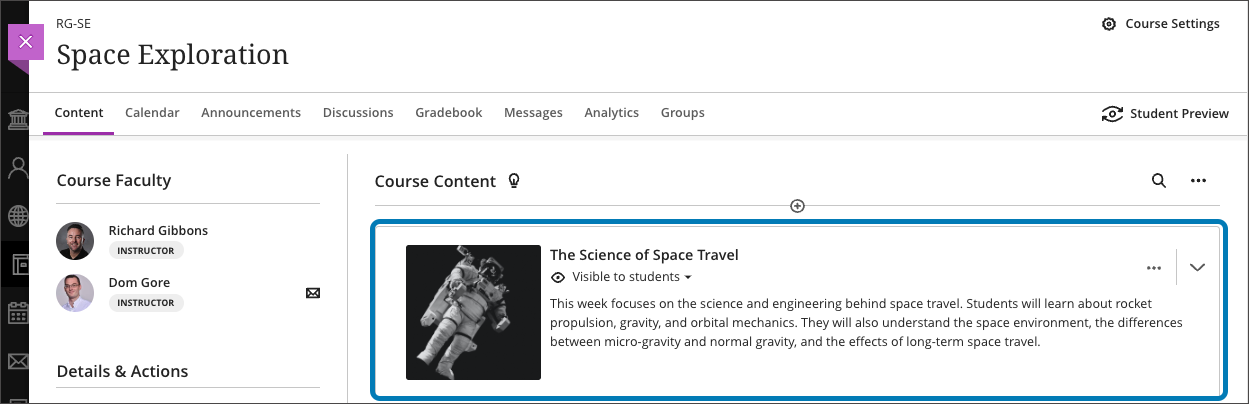
Image 7: Learning Module image on Course Content page
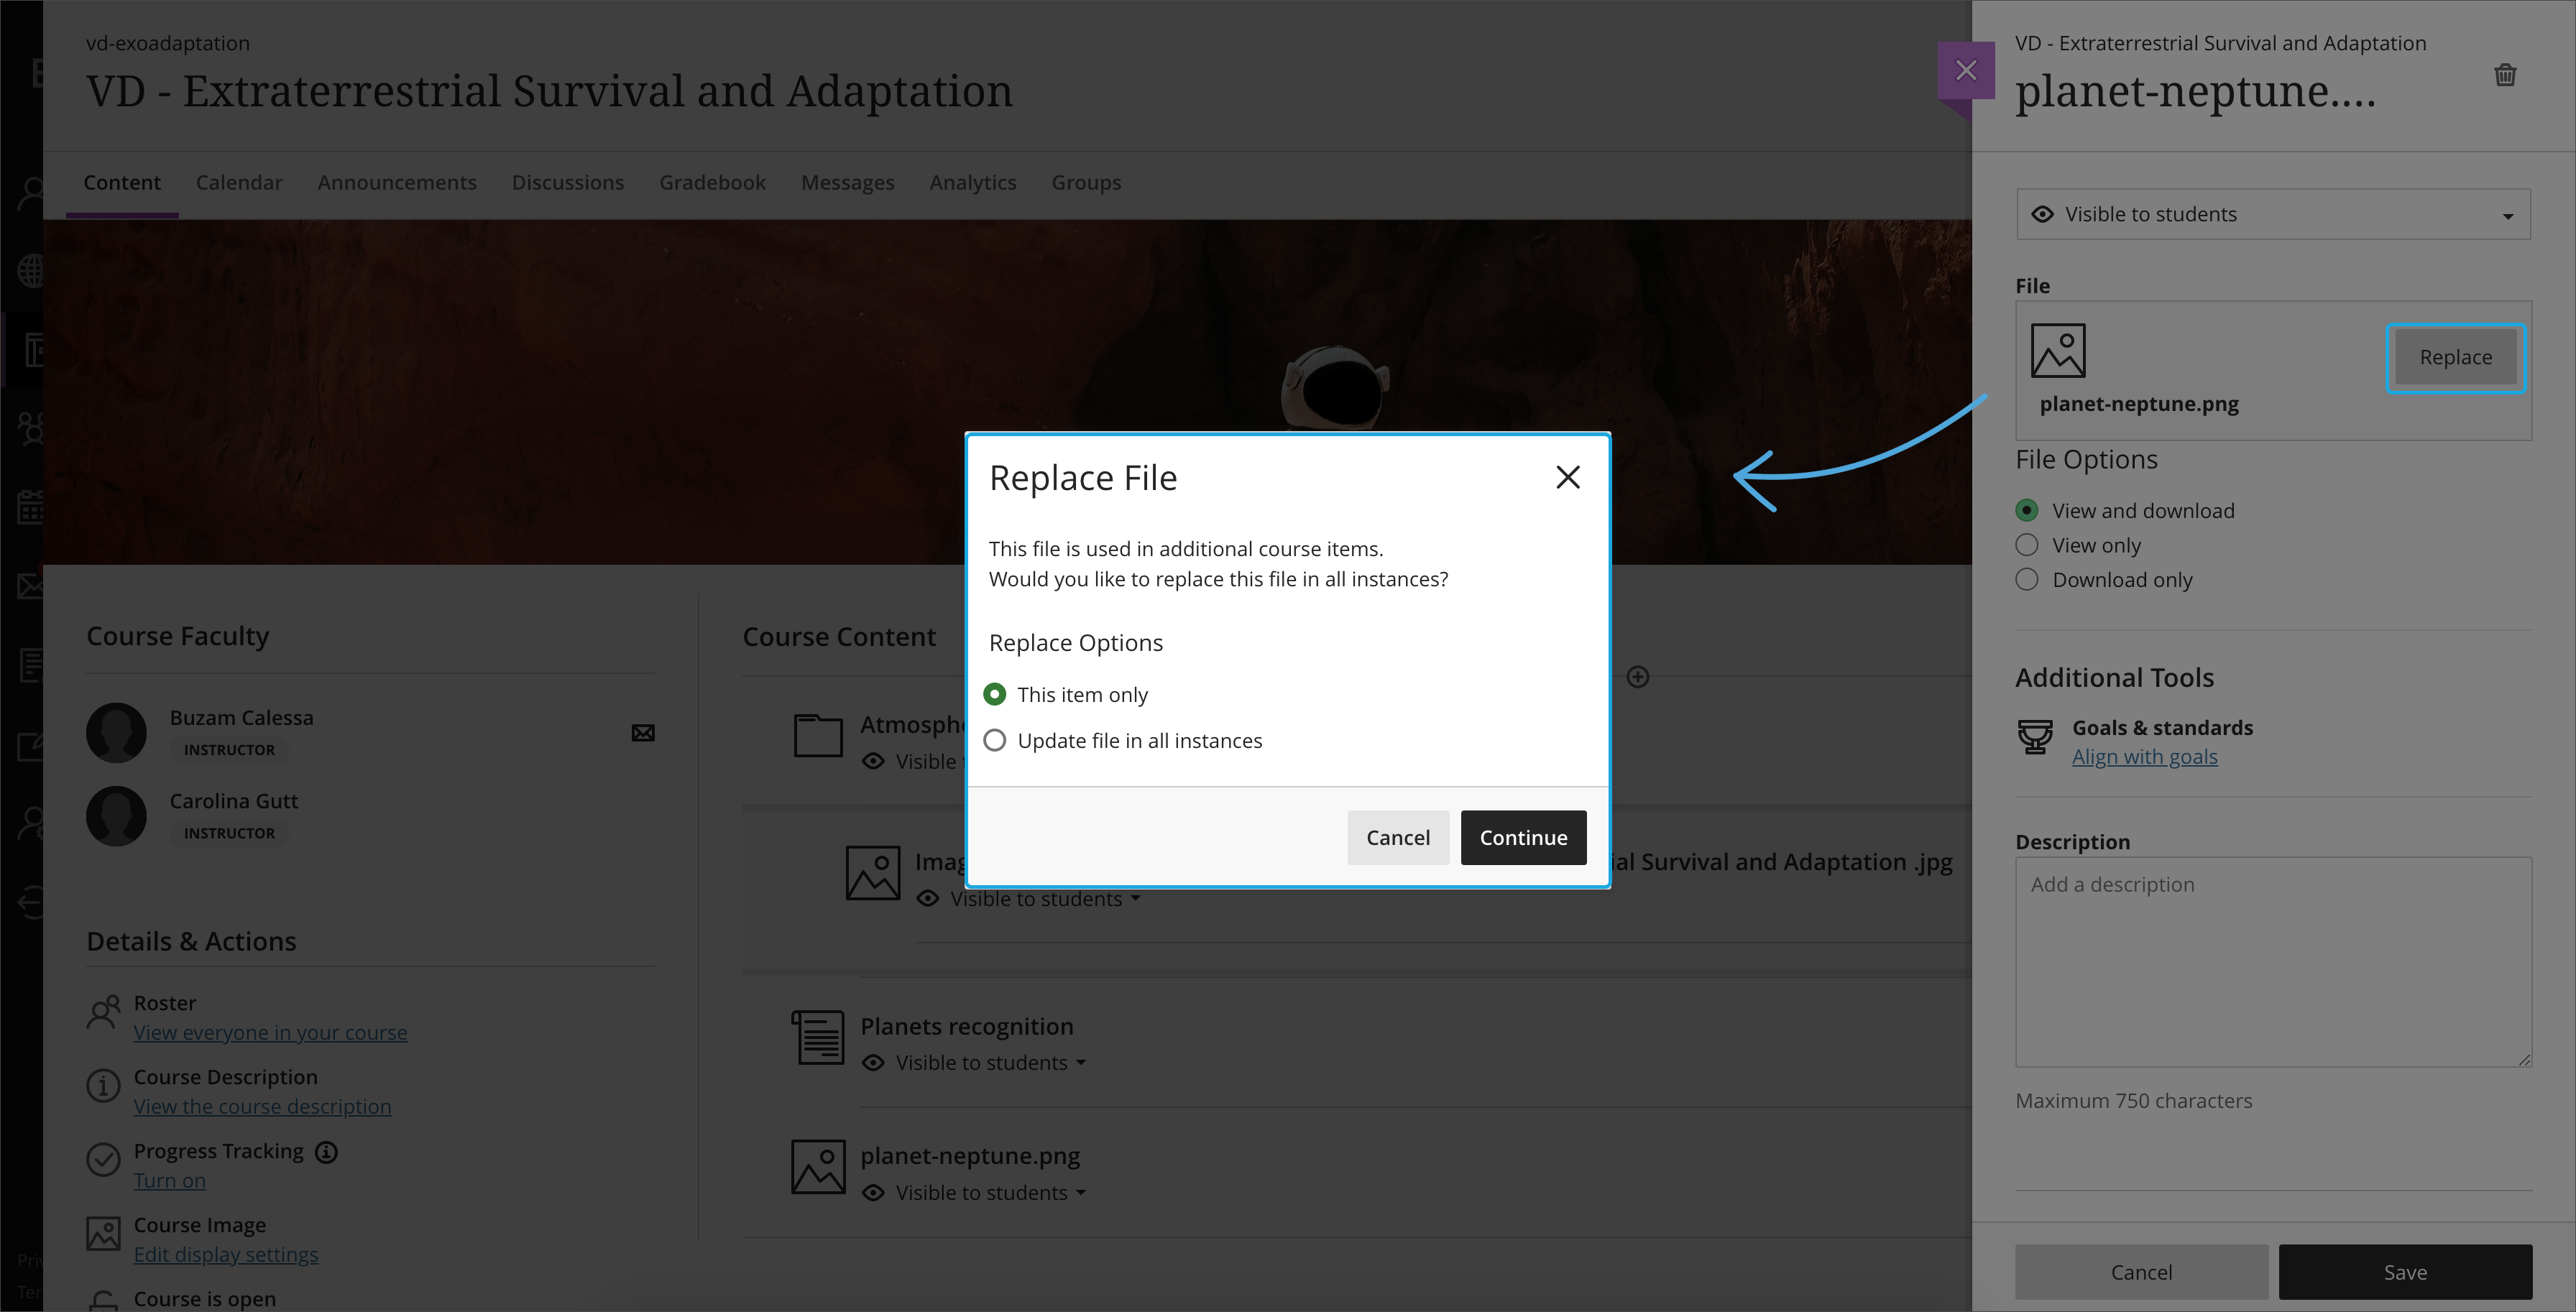
Replace files in course content
Responsible use of storage space matters to institutions. Before, when an instructor replaced a file in the course, the system created a new file version. Now, the system replaces the file. The system no longer creates new versions, freeing up storage space.
Image 1: Replace Options for files
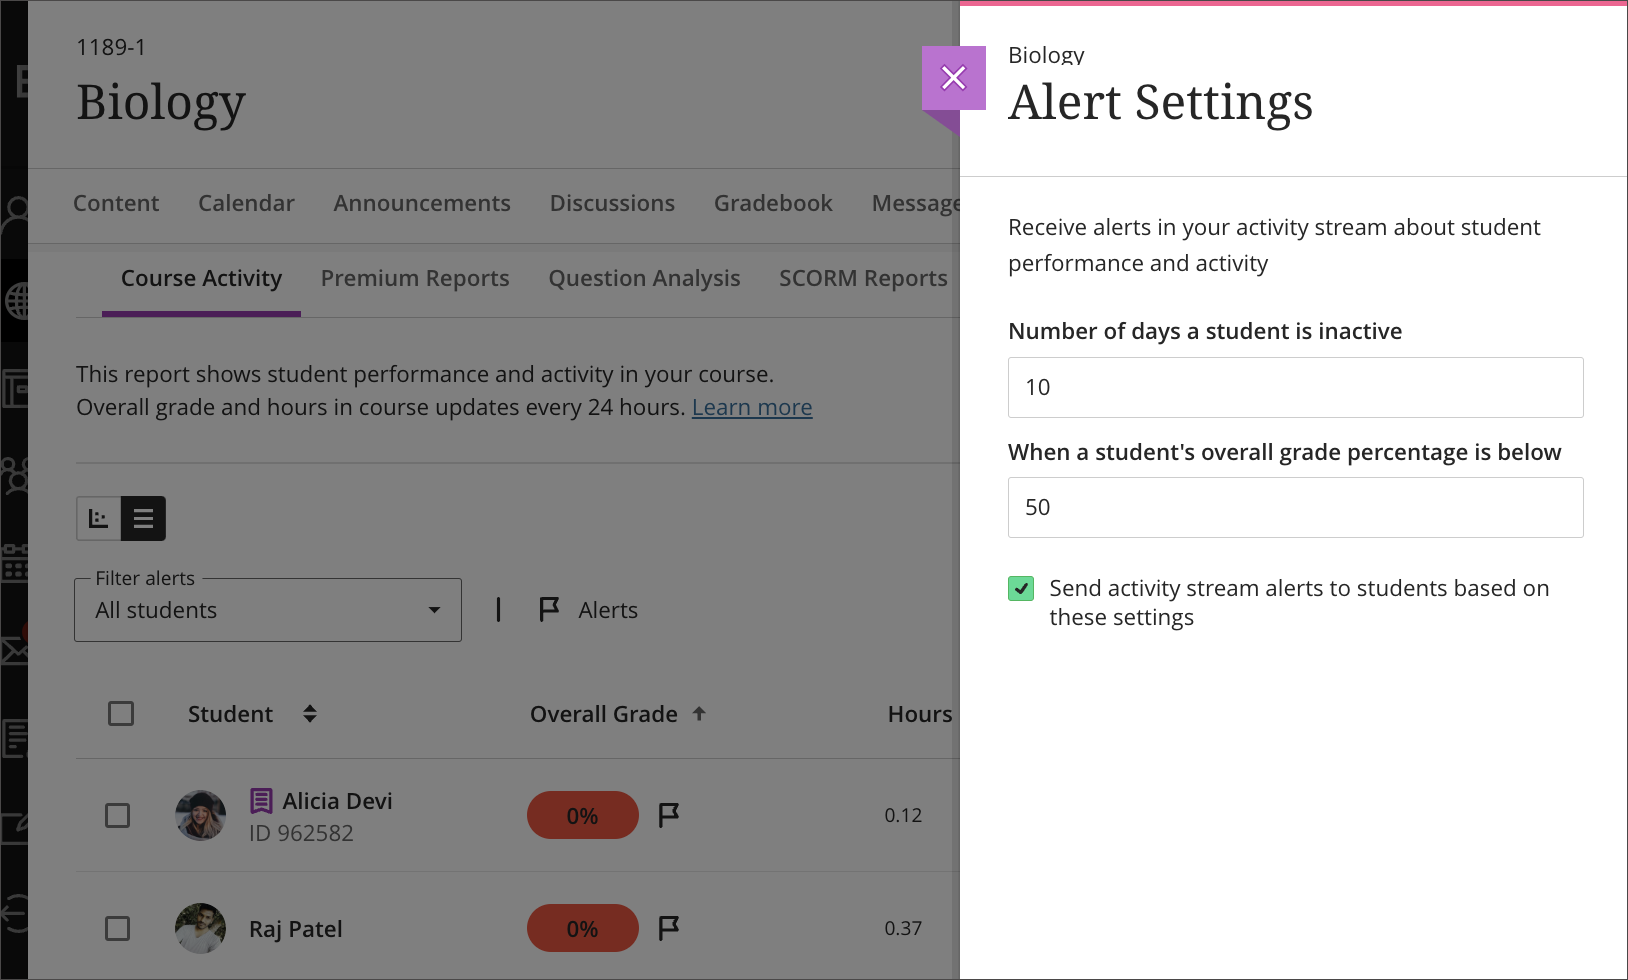
Students with alerts flags in the Course Activity Report
Identifying students at risk is challenging. This challenge is compounded when teaching multiple courses and large numbers of students.
Now, a flag appears for students with alerts in the Course Activity Report. Instructors can customize their course alerts based on the following:
- Number of days a student is inactive in the course
- A student’s overall grade in the course is below a specific percentage
Image 1: Define alert settings
The instructor may hover over a flag to view the alert type.
Image 2: Course Activity report for all students; students with alerts have the flag indicators
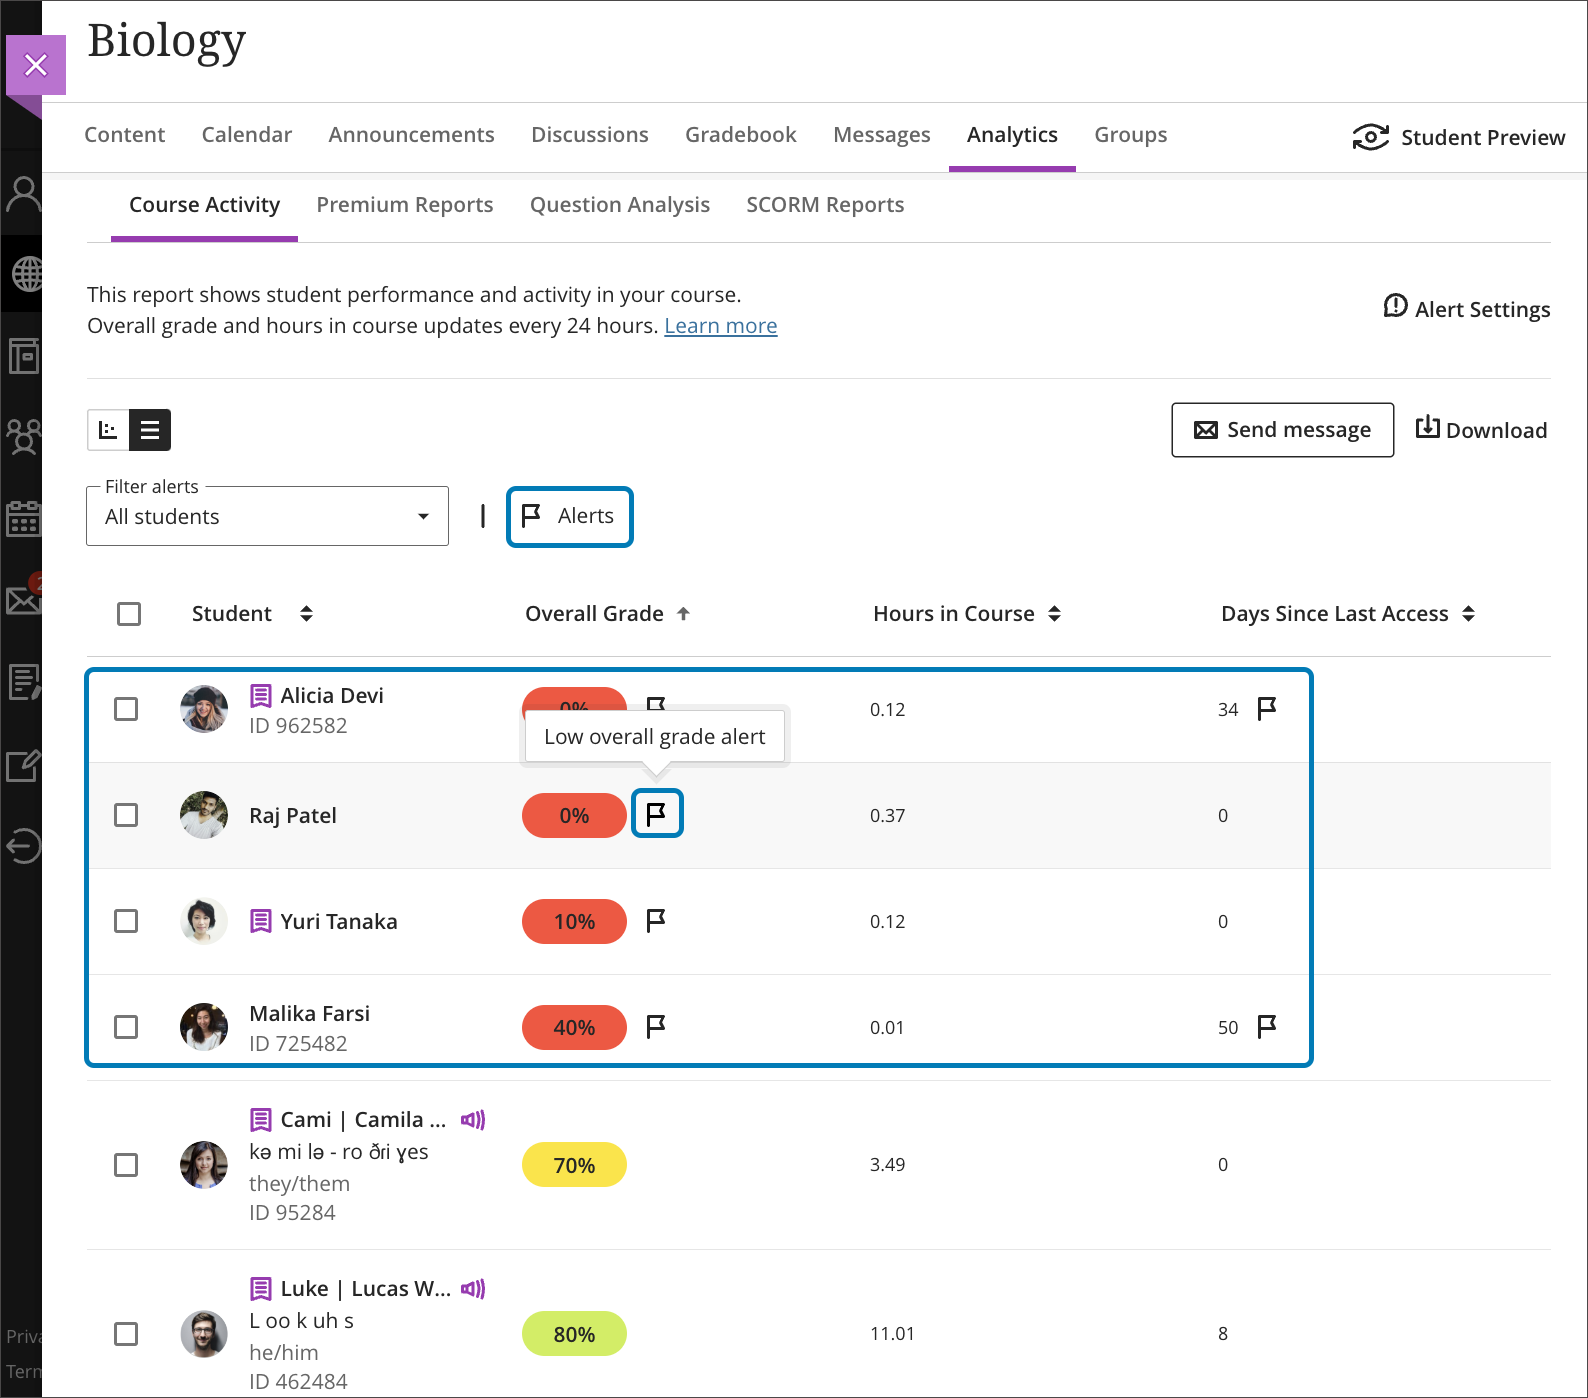
Instructors can filter alerts for:
- All students
- Students with alerts
- Students without alerts
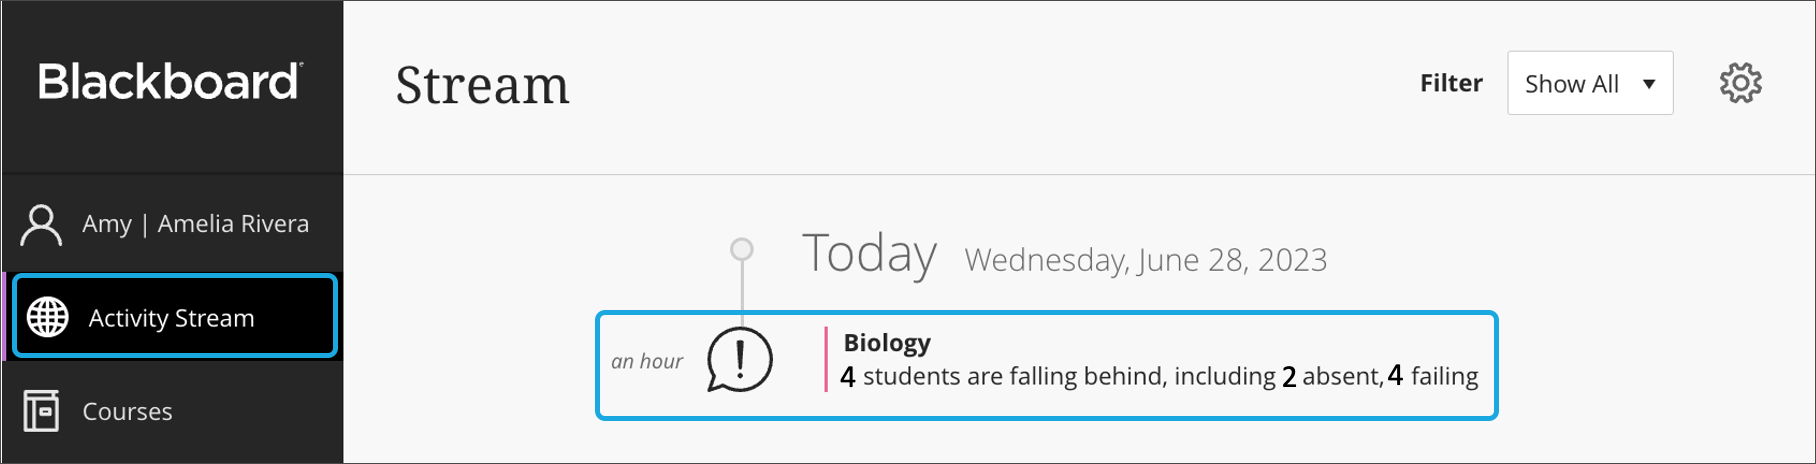
Instructors can identify students with alerts in other views of the Course Activity Report.
- In the chart, purple dots indicate students with at least one (1) alert. Instructors can select the dot to display student information. An alerts section explains the applicable alerts for the student.
- In the CSV download, the Low overall grade and Last access alert columns indicate when a student has an alert.
- As before, activity stream notifications summarize students with alerts per course. Instructors may select these notifications to open the Course Activity Report. When accessing the report via notifications, the filter “Students with alerts” is auto-applied.
Image 3: Students with alerts highlighted in the course activity chart

Image 4: Students with alerts identified in the CSV download

Image 5: Students with alerts activity stream notification
Key considerations:
- Instructors define Alerts Settings at a course level so that each course can have its own alerts values
- Five is the default value for the number of days a student is inactive alert; there is no default setting for overall grade alert
- Course alerts can be added, edited, and deleted at any time
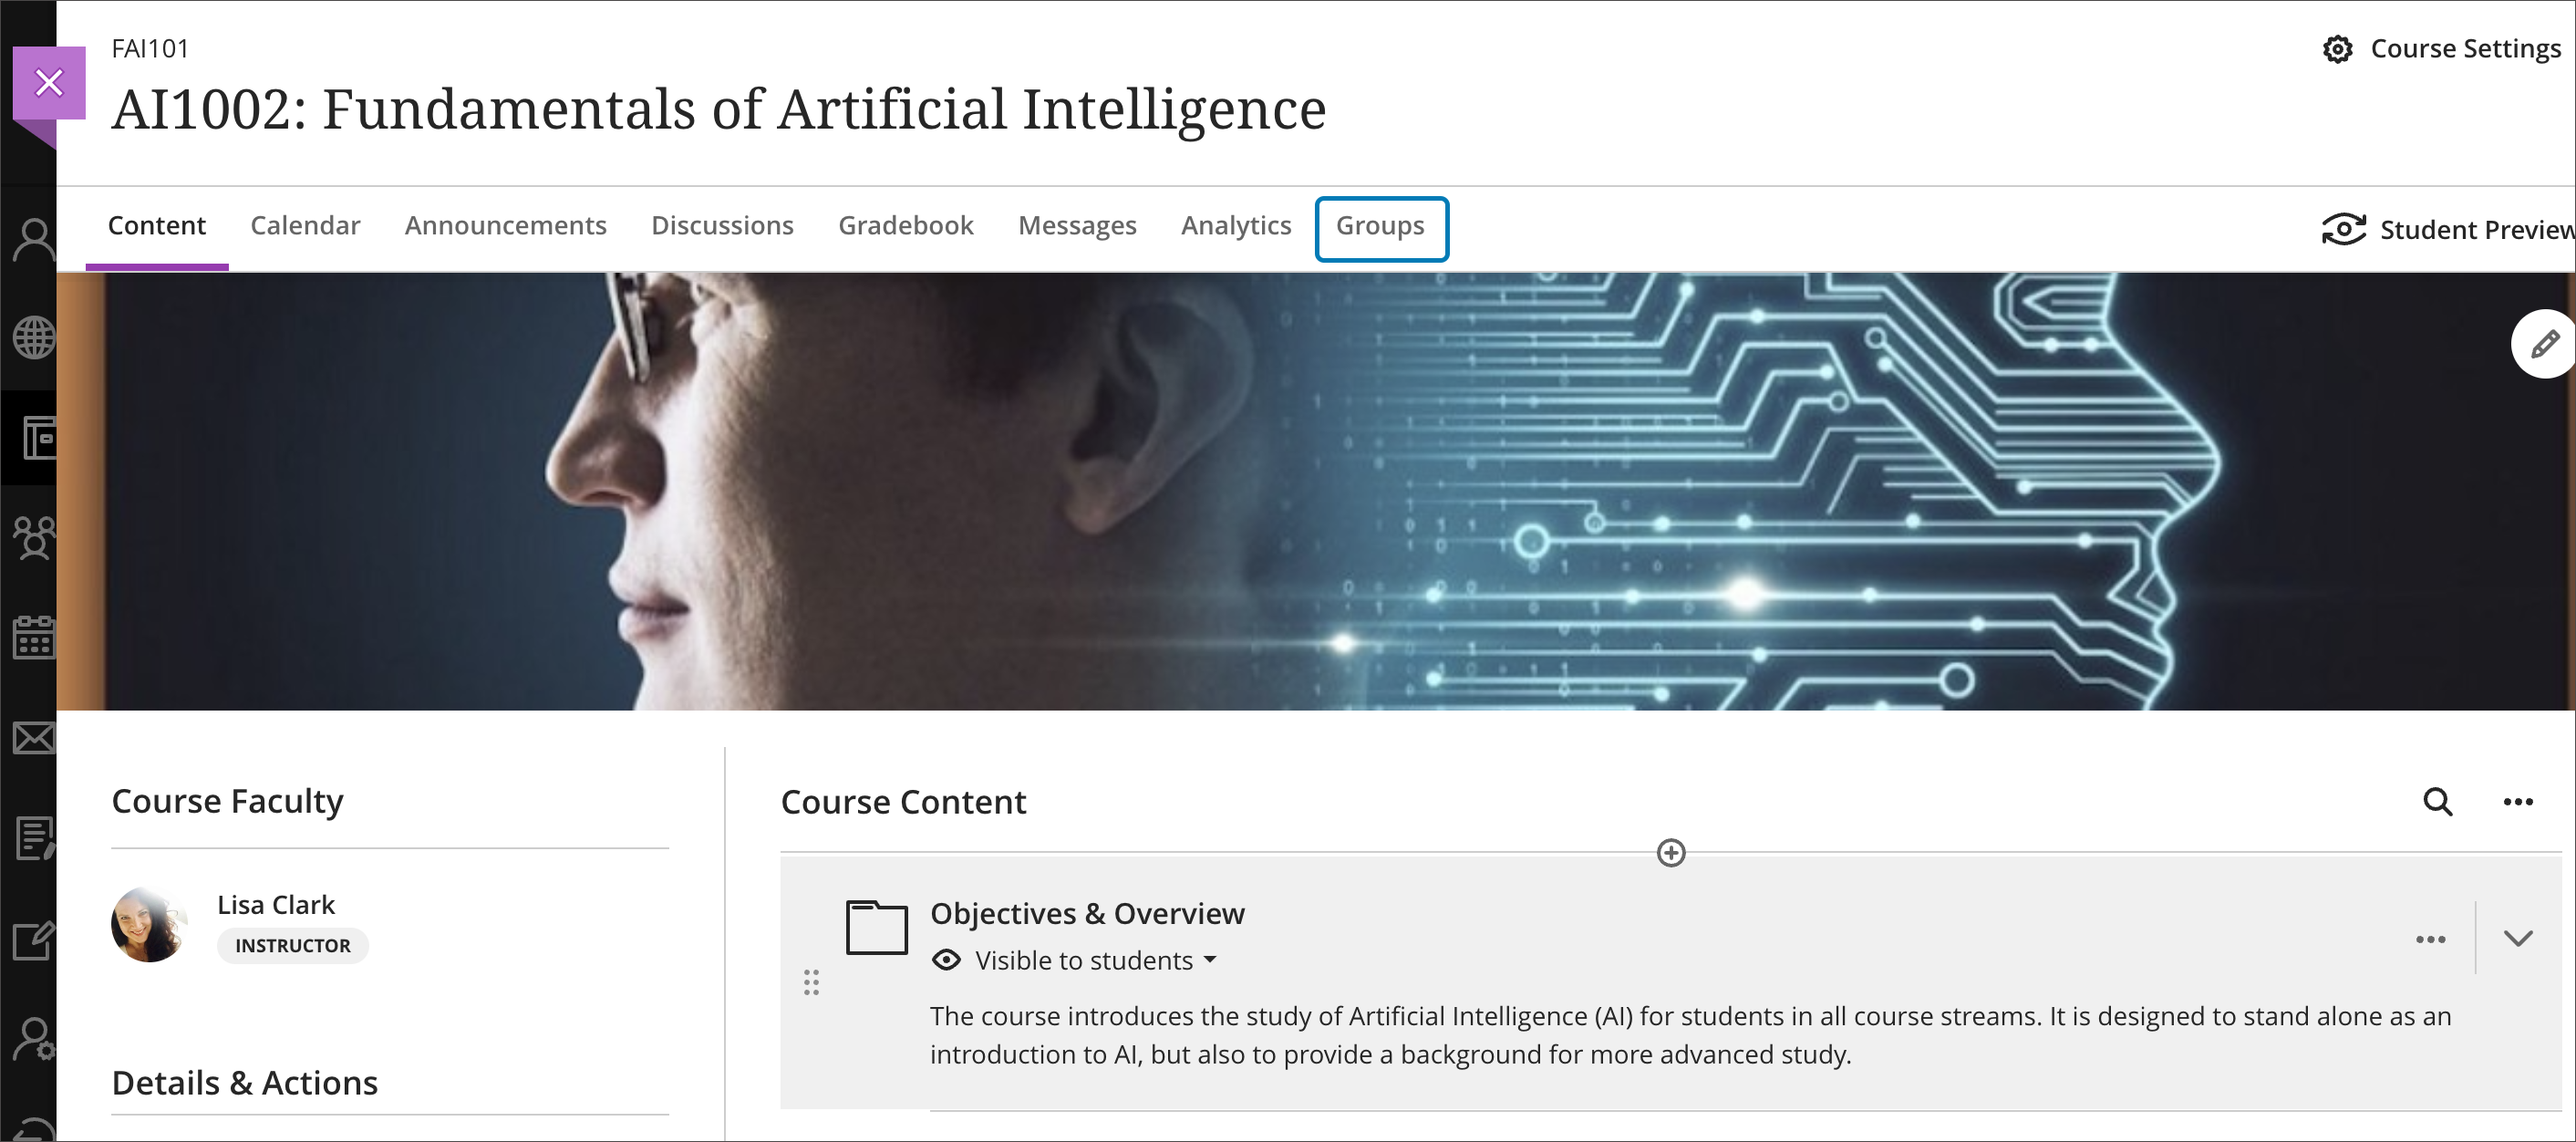
Groups in the top navigation bar and Group Spaces
Groups are essential for fostering collaboration, promoting active learning, and deepening understanding of course material. In the past, instructors could define groups and group sets. Instructors could also create group assessments. This release includes improvements aimed at helping all users make better use of groups.
We’ve moved Groups from the Details & Actions menu to the top navigation bar. This improves the visibility and prominence of Groups.
Image 1: Groups in the top navigation bar of a course
This release also introduces a new feature for Groups: Group Spaces. This first milestone of Group Spaces provides a list of all assessments by group.
From Manage groups, instructors still have access to:
- Group lists
- Show Members
- Group management options
To access a Group Space, instructors should select Enter Group Space from the group’s three-dot menu.
Image 2: Instructor view – Access to Group Spaces from Group Management
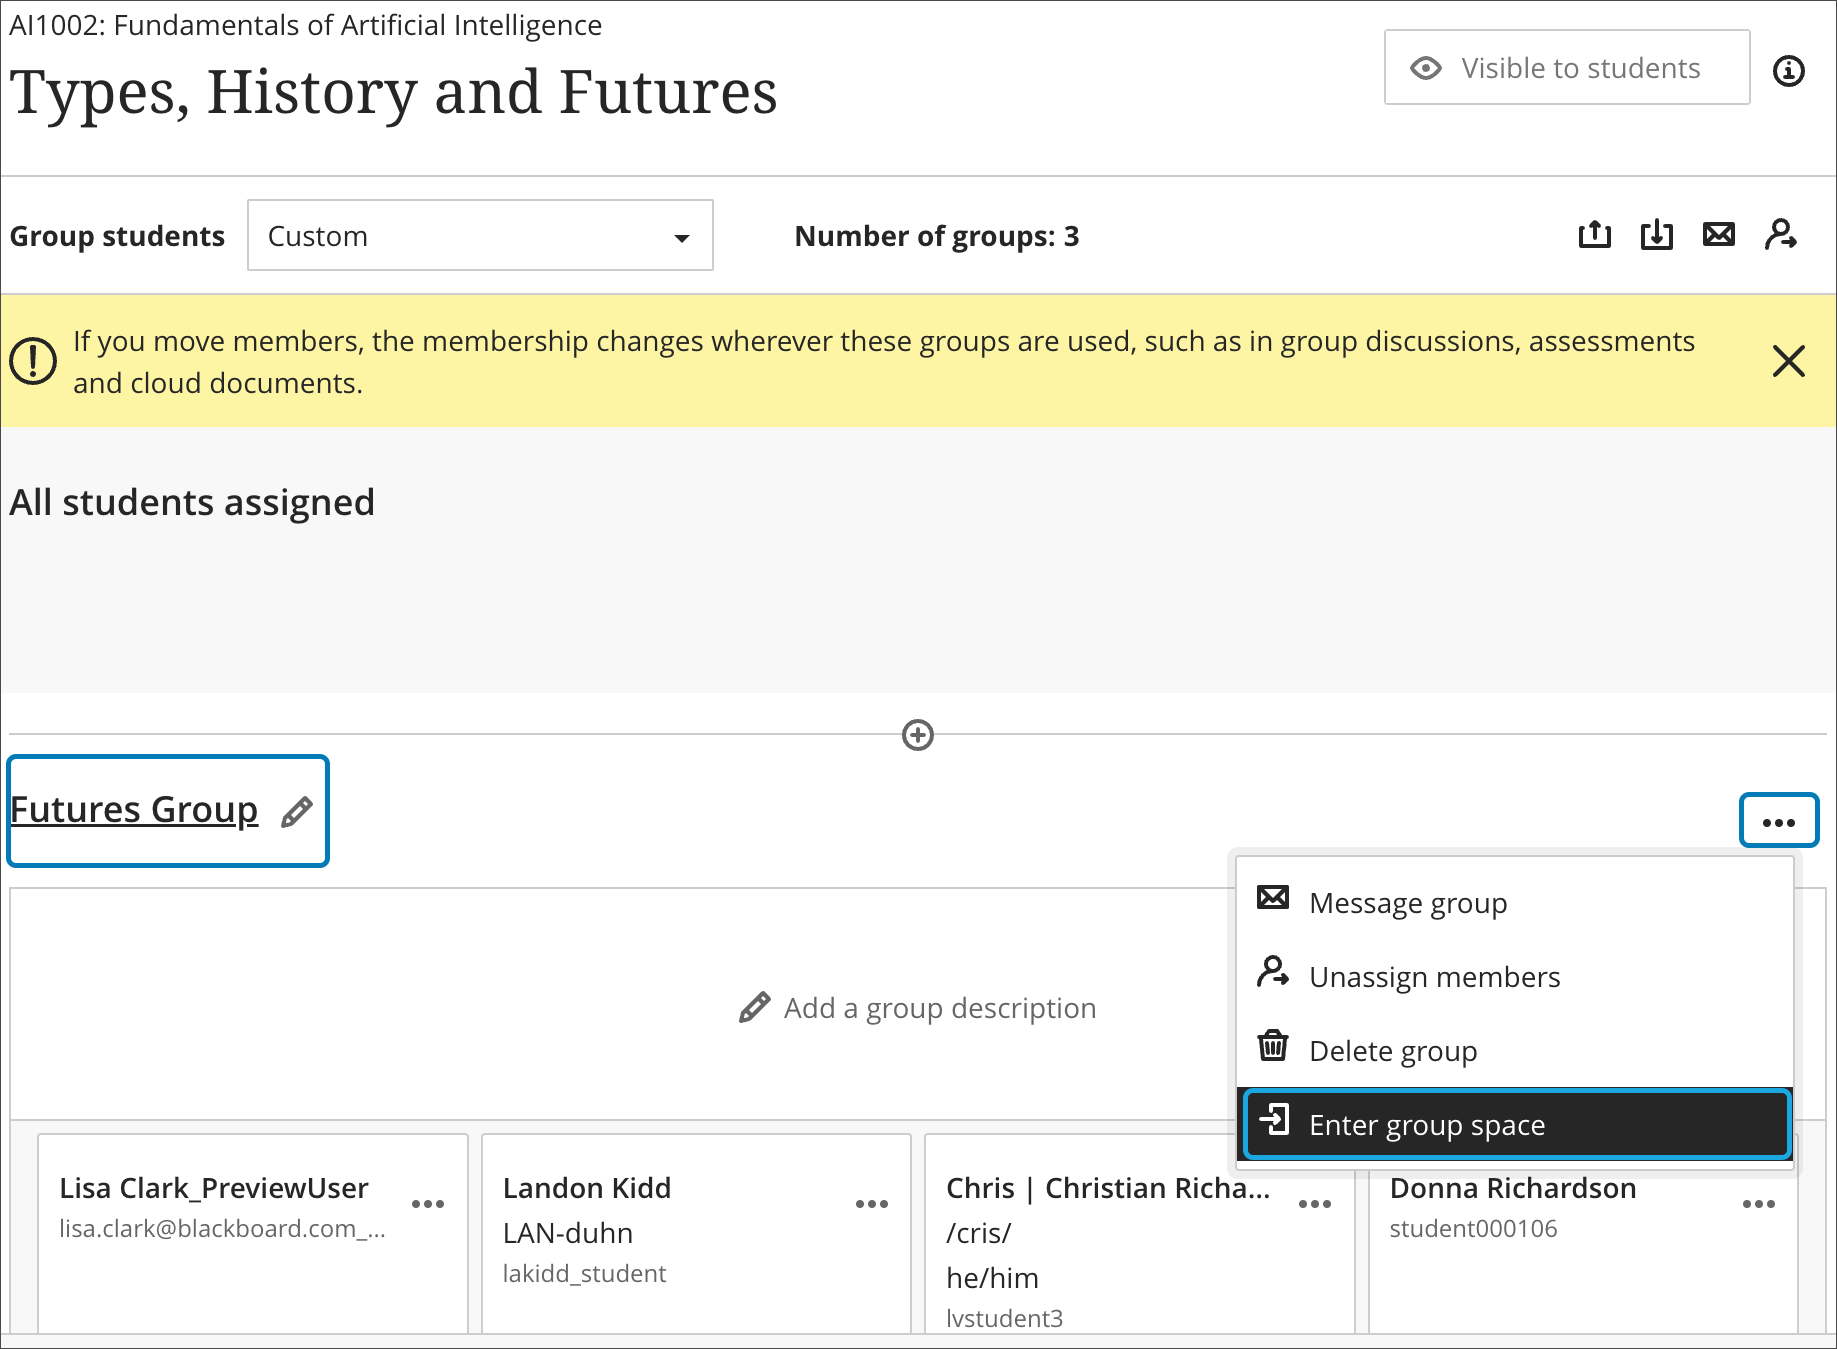
Instructors can access Group Spaces from the three-dot menu from Manage Groups.
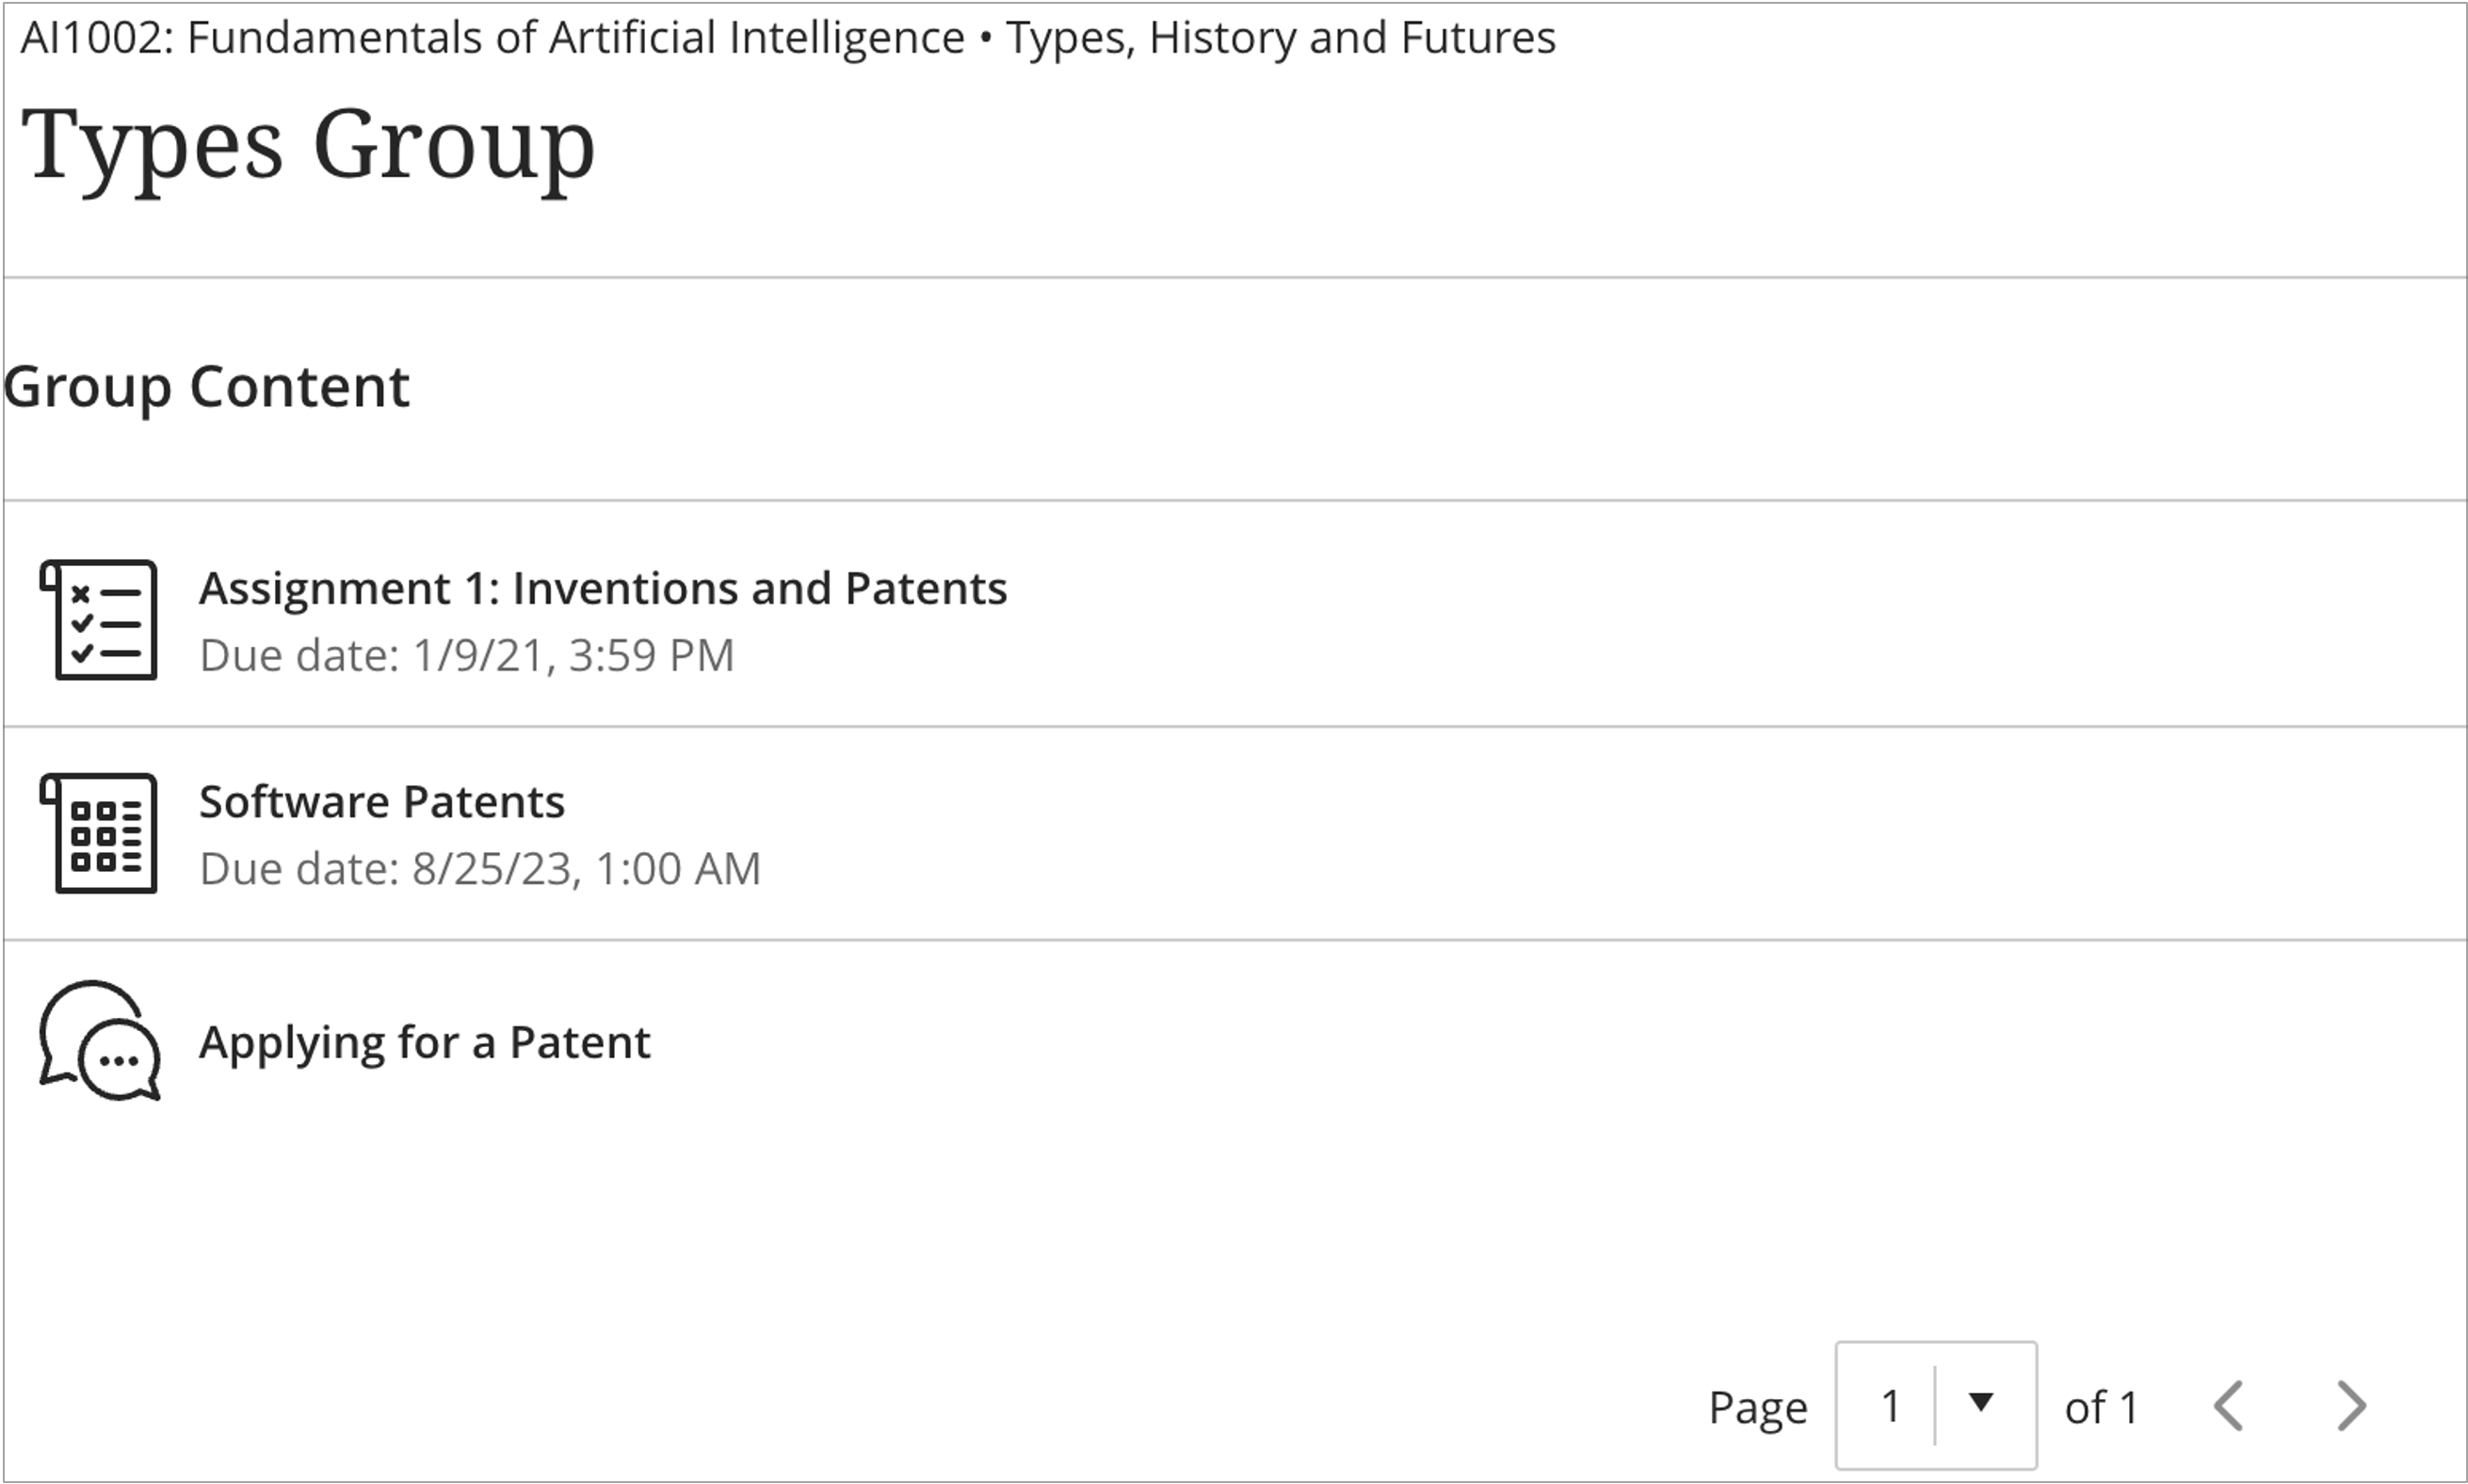
Image 3: Instructor view – Group Space for a group with a list of assessments
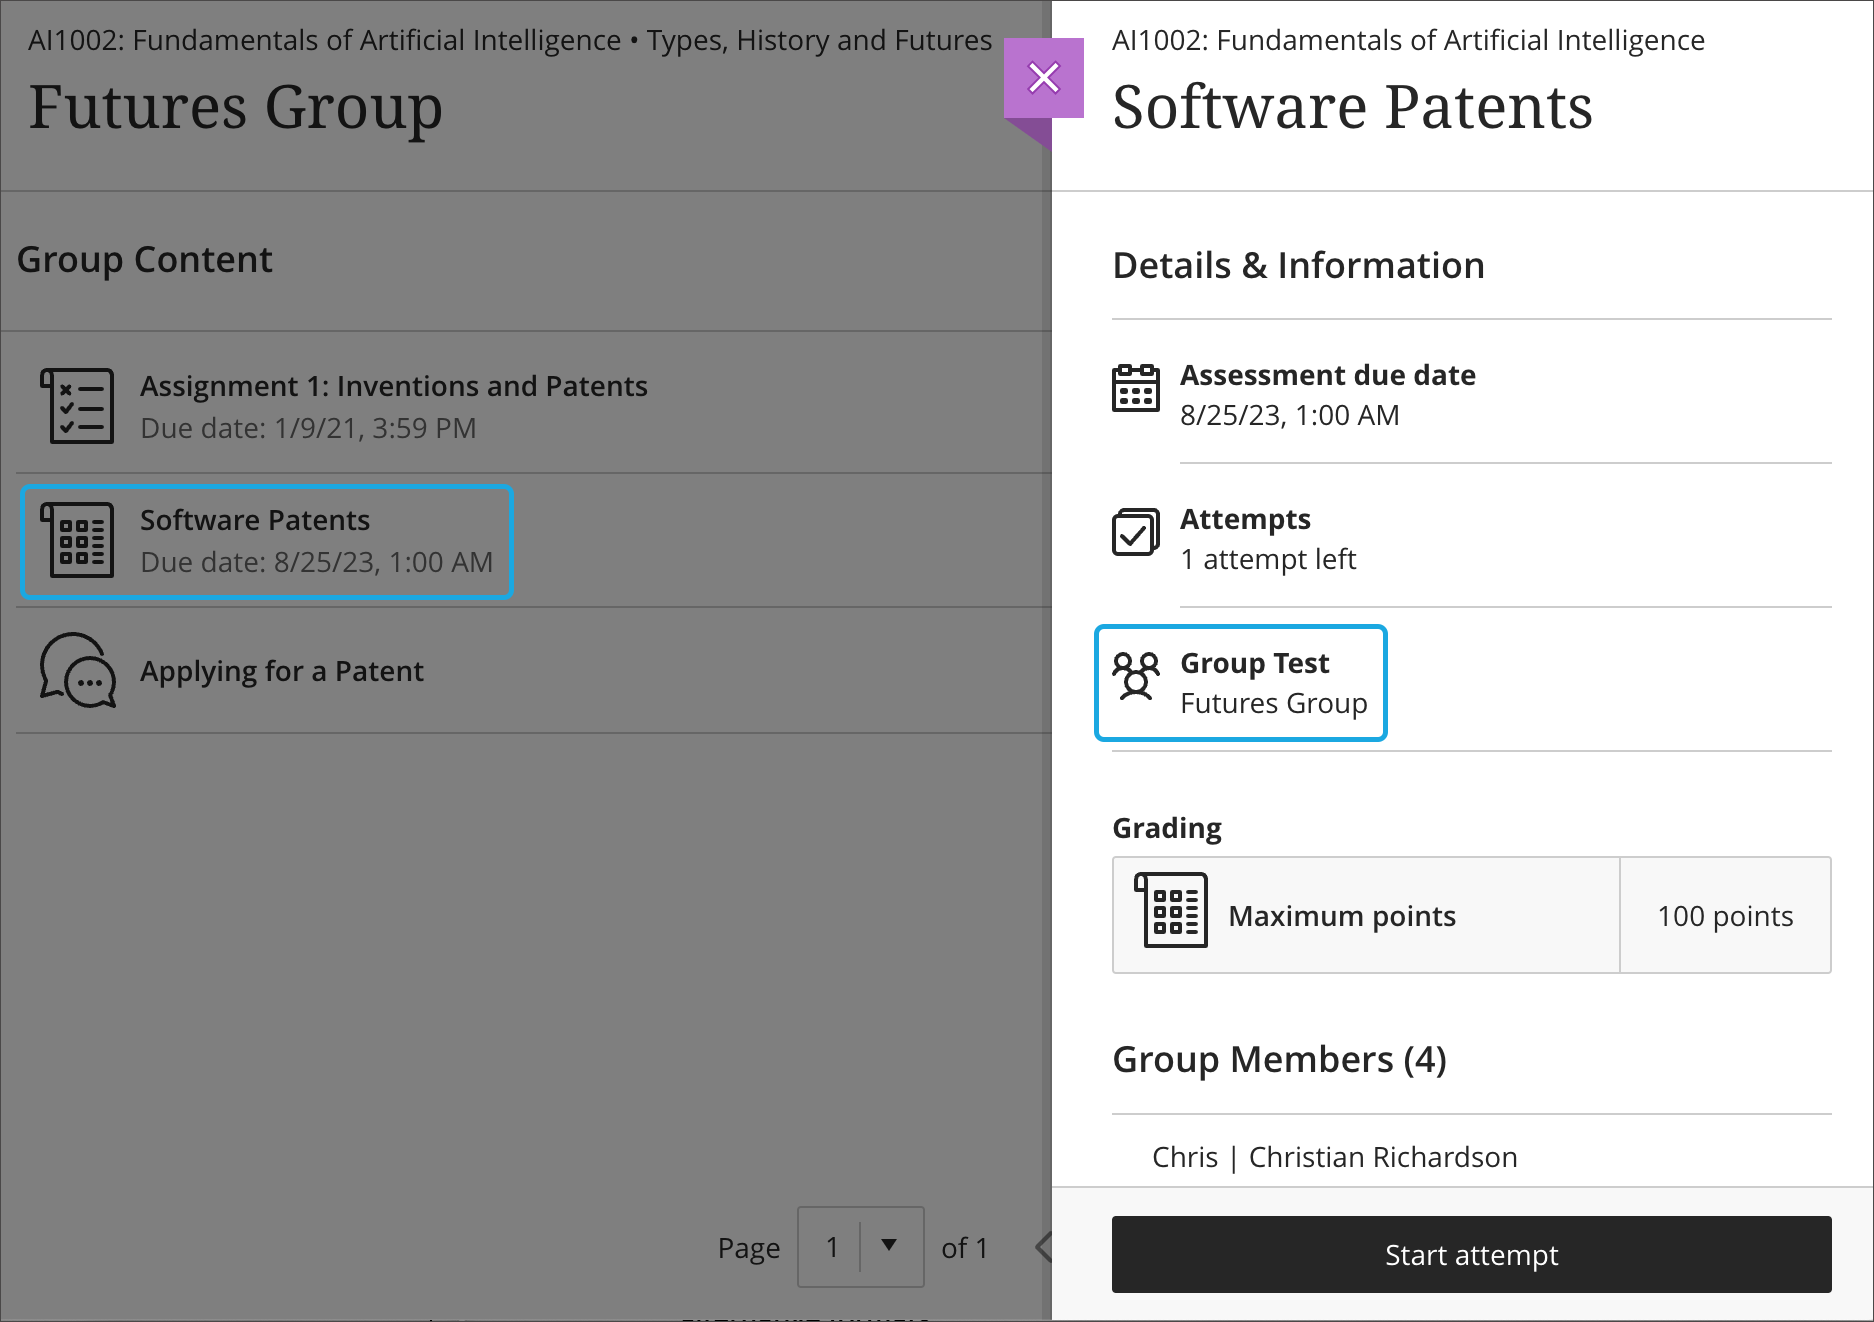
Students can access their assigned groups on the Groups landing page. From there, students can view all student members of their group.
Image 4: Student view – Group list, showing members of the Futures Group

To access a Group Space, students should select the group’s name. Once in Group Spaces, students can access all assessments aligned to their Group.
Image 5: Student view – view of a group assessment from Group Spaces
Future milestones will include synchronous communication and project management tools for students.
Unread Message indicator
Messages are an important means for course communication. The Message tab on the Base Navigation now displays courses with unread messages first. We removed the terms feature from the Message tab because users often missed messages from other terms. This experience is more aligned with how other messaging applications work. Users can now clearly identify courses with unread messages.
We have also increased the visibility of unread messages within Ultra Courses. The Messages tab now includes an unread message indicator. On the Messages tab, messages are displayed with the newest messages at the top. Unread messages are clearly marked.
Image 1: Messages tab in Base Navigation, courses with unread messages listed first
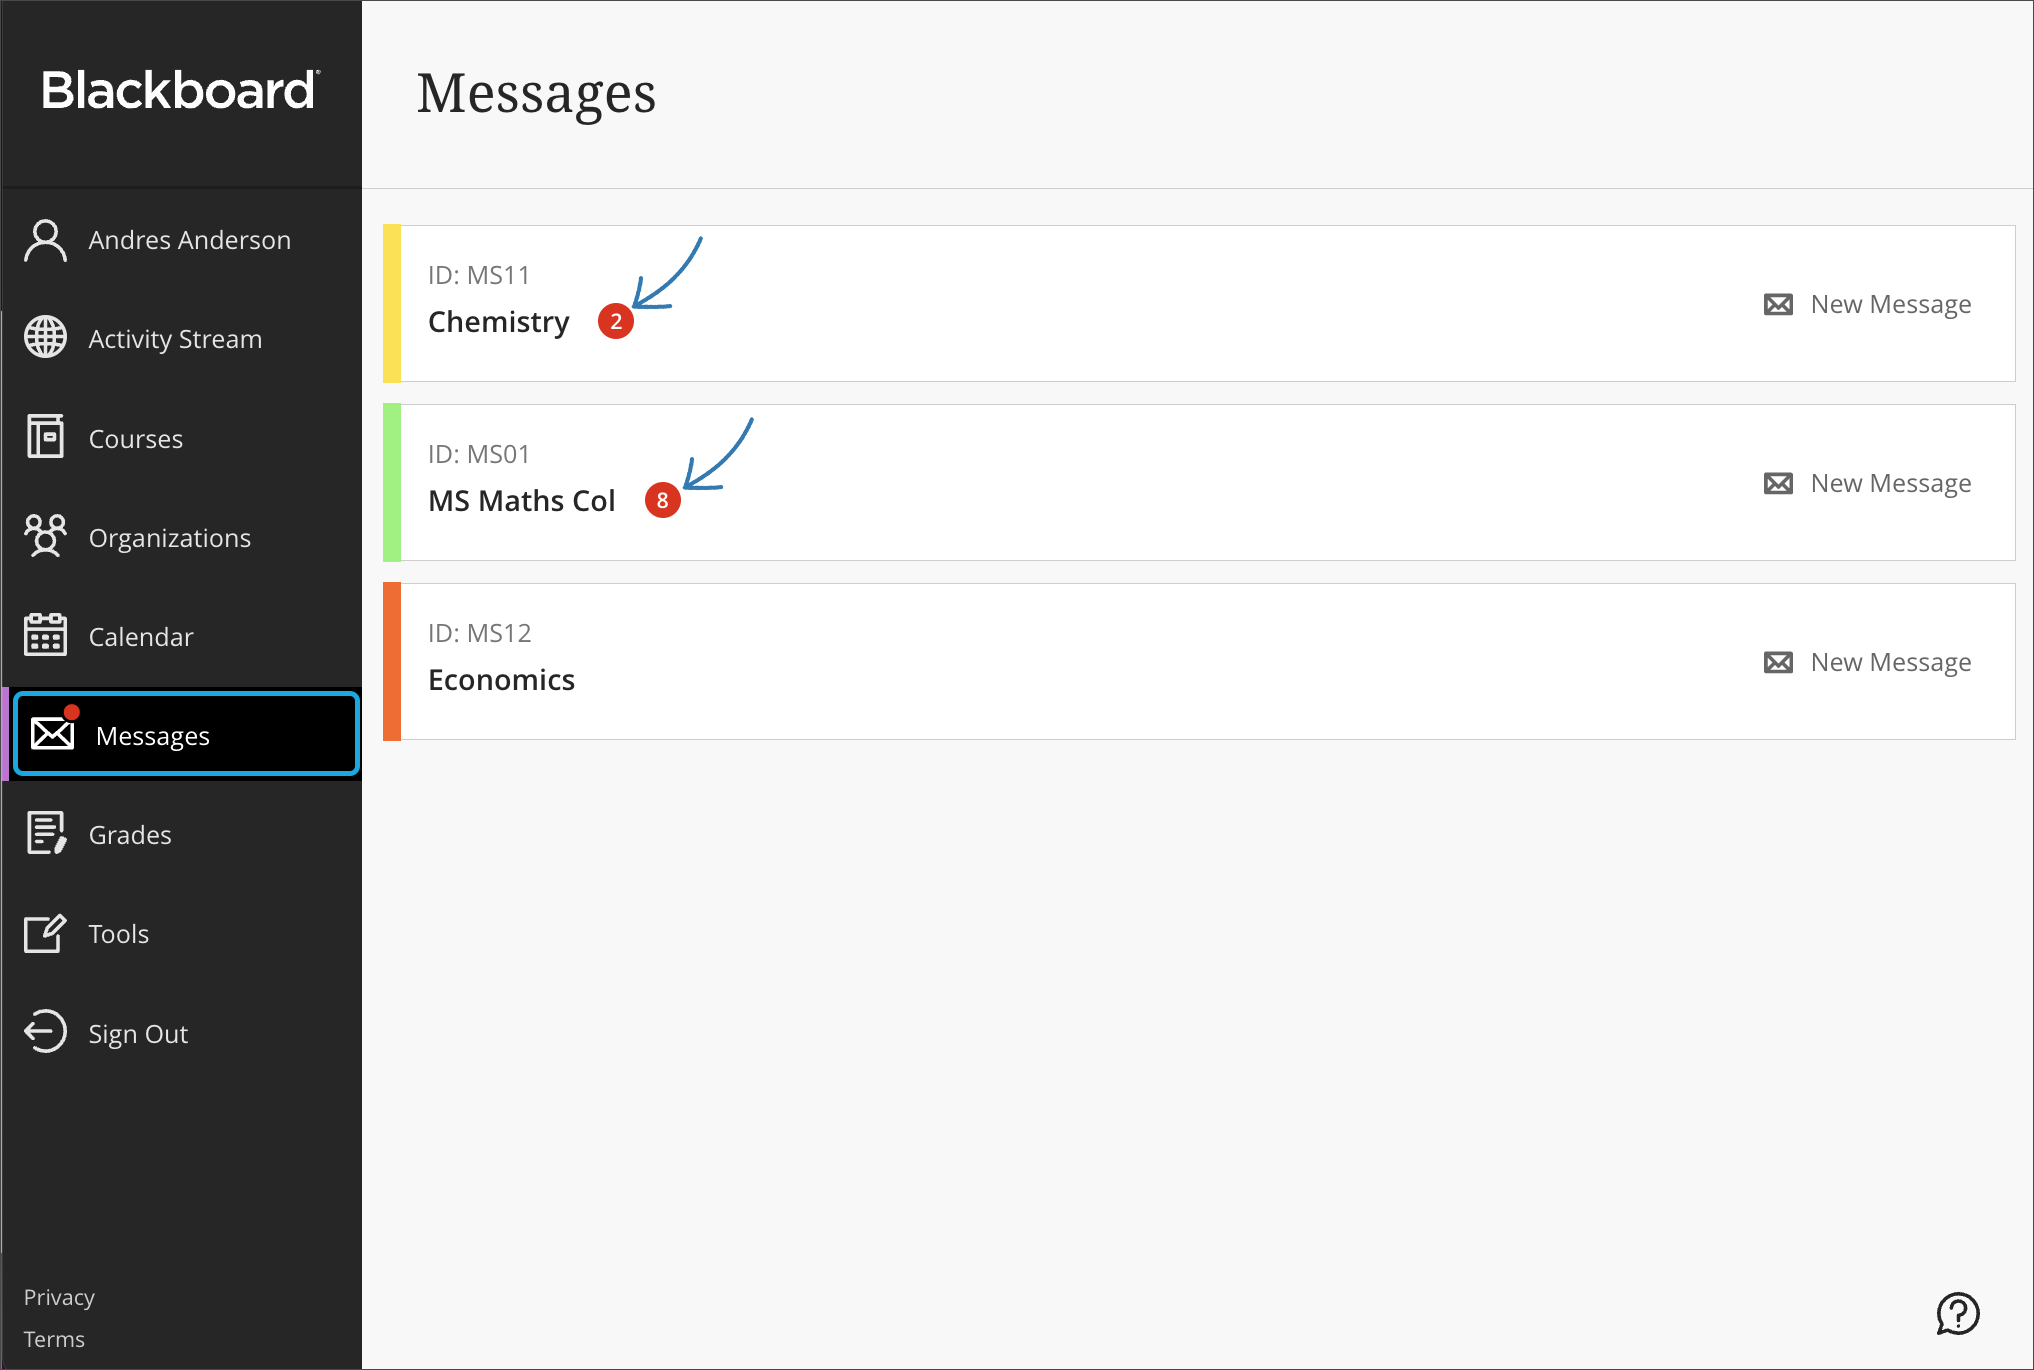
Image 2: Messages tabs in a course – messages are sorted with the newest messages at the top, and unread messages are clearly indicated; a new message indicator also appears on the Messages tab

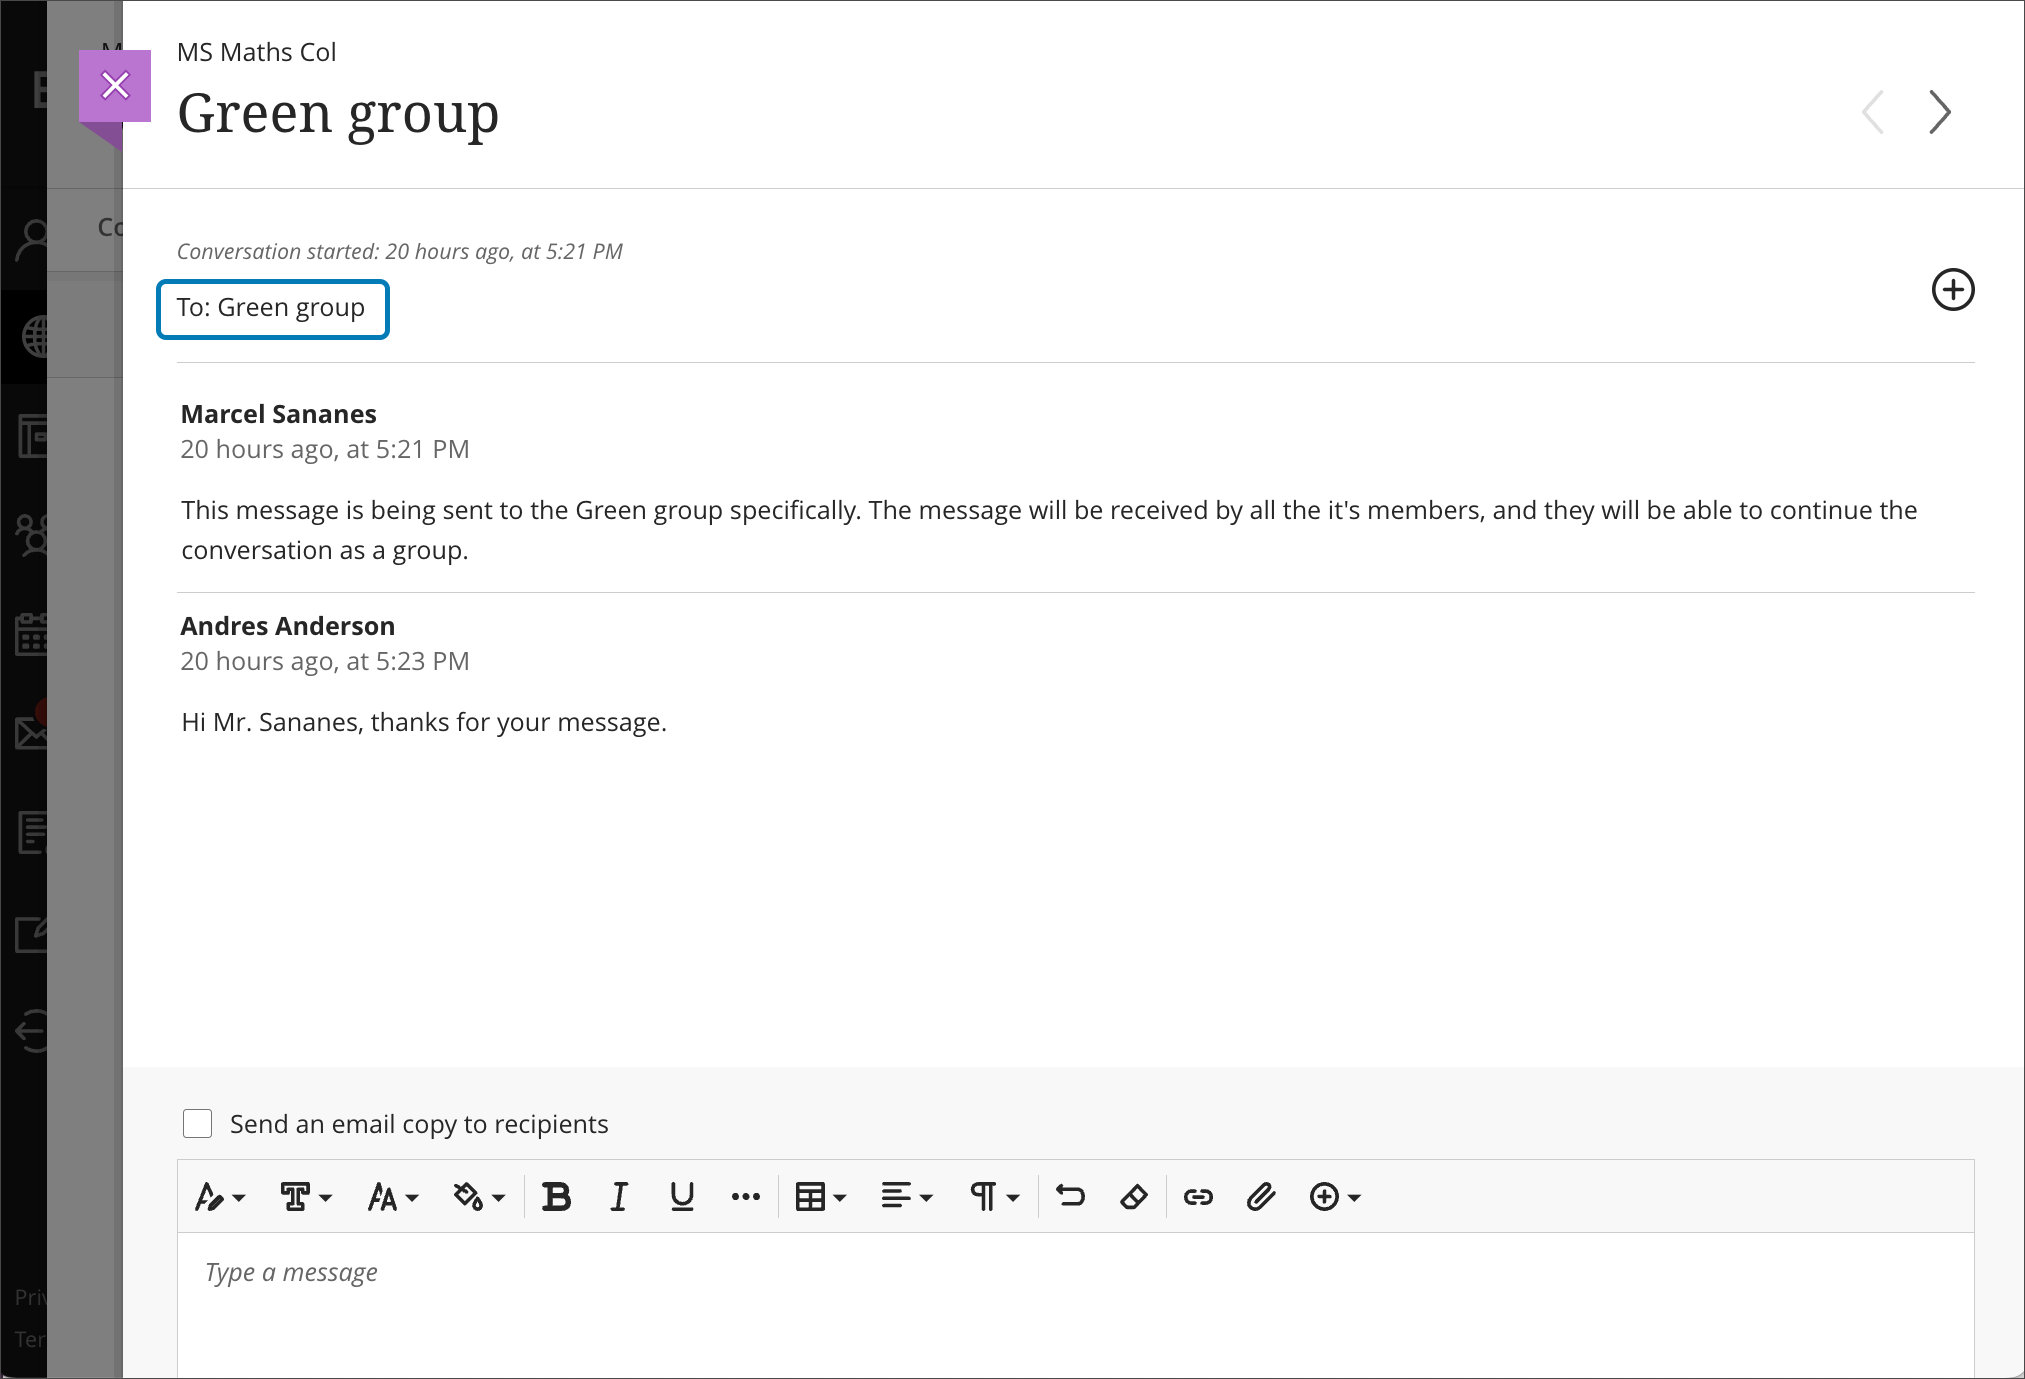
Group Messaging improvements
Communication and collaboration between group members is key. An instructor can now send a message to any group or group set. Instructors can also select more than one group as recipients of a message. Students can select their groups as message recipients.
Those in the message can view the groups or group sets that received the message. Recipients can view who sent the message.
The Groups page now includes a message icon that provides an easy means for messaging a group. The message auto-populates the recipient with the selected group. Users can change the recipients as appropriate.
Image 1: Instructor view – button to draft/send a message to specific groups
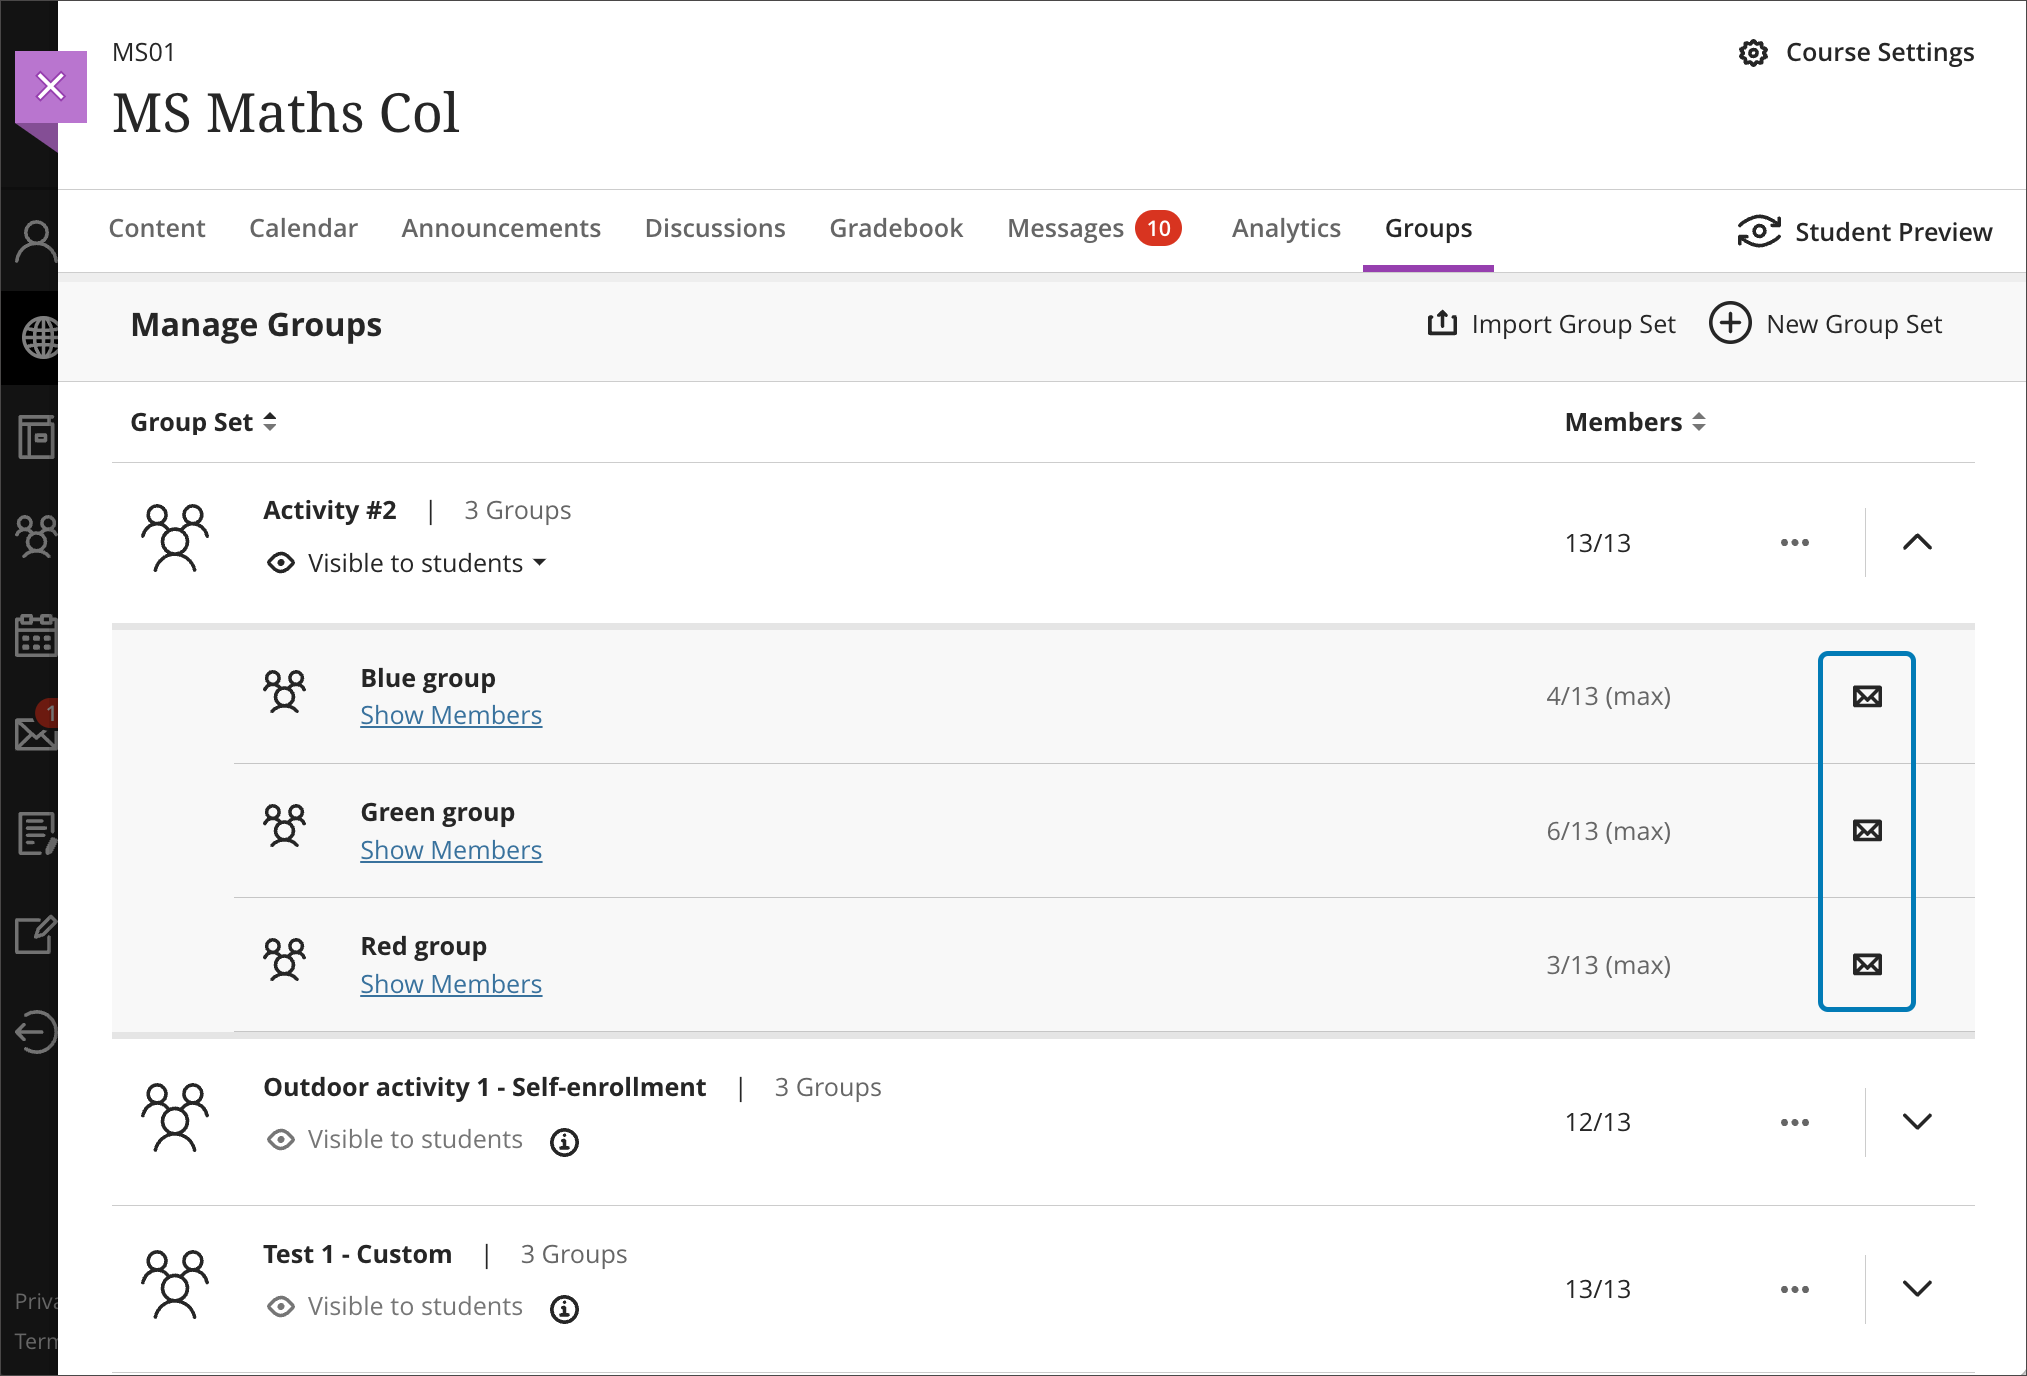
Image 2: Student view – button to draft/send a message to specific groups
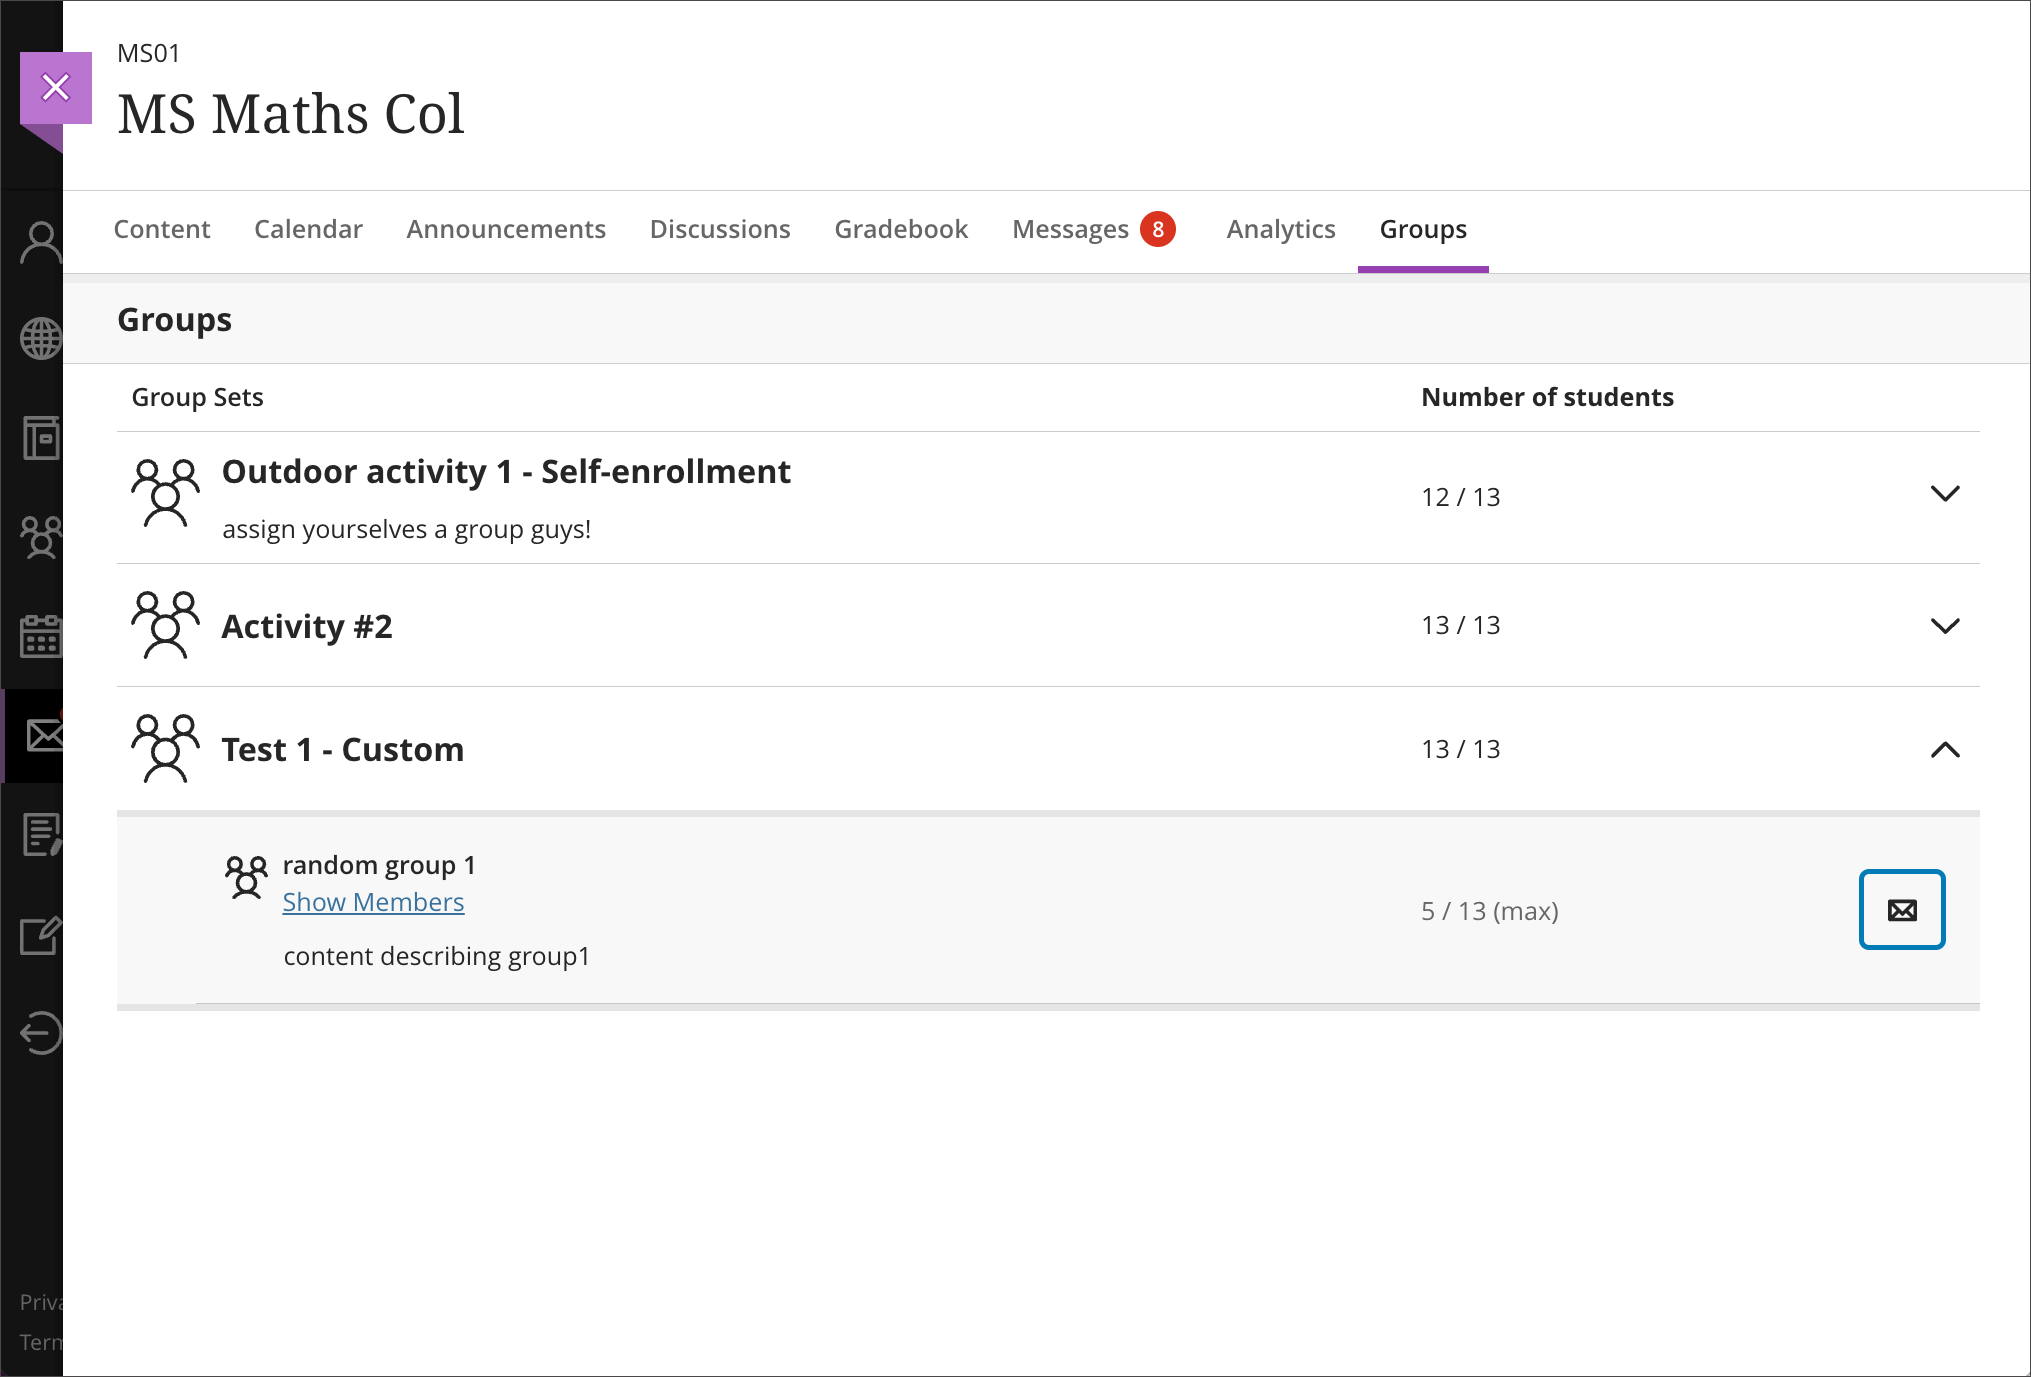
Image 3: New Message page with a group in the recipient list
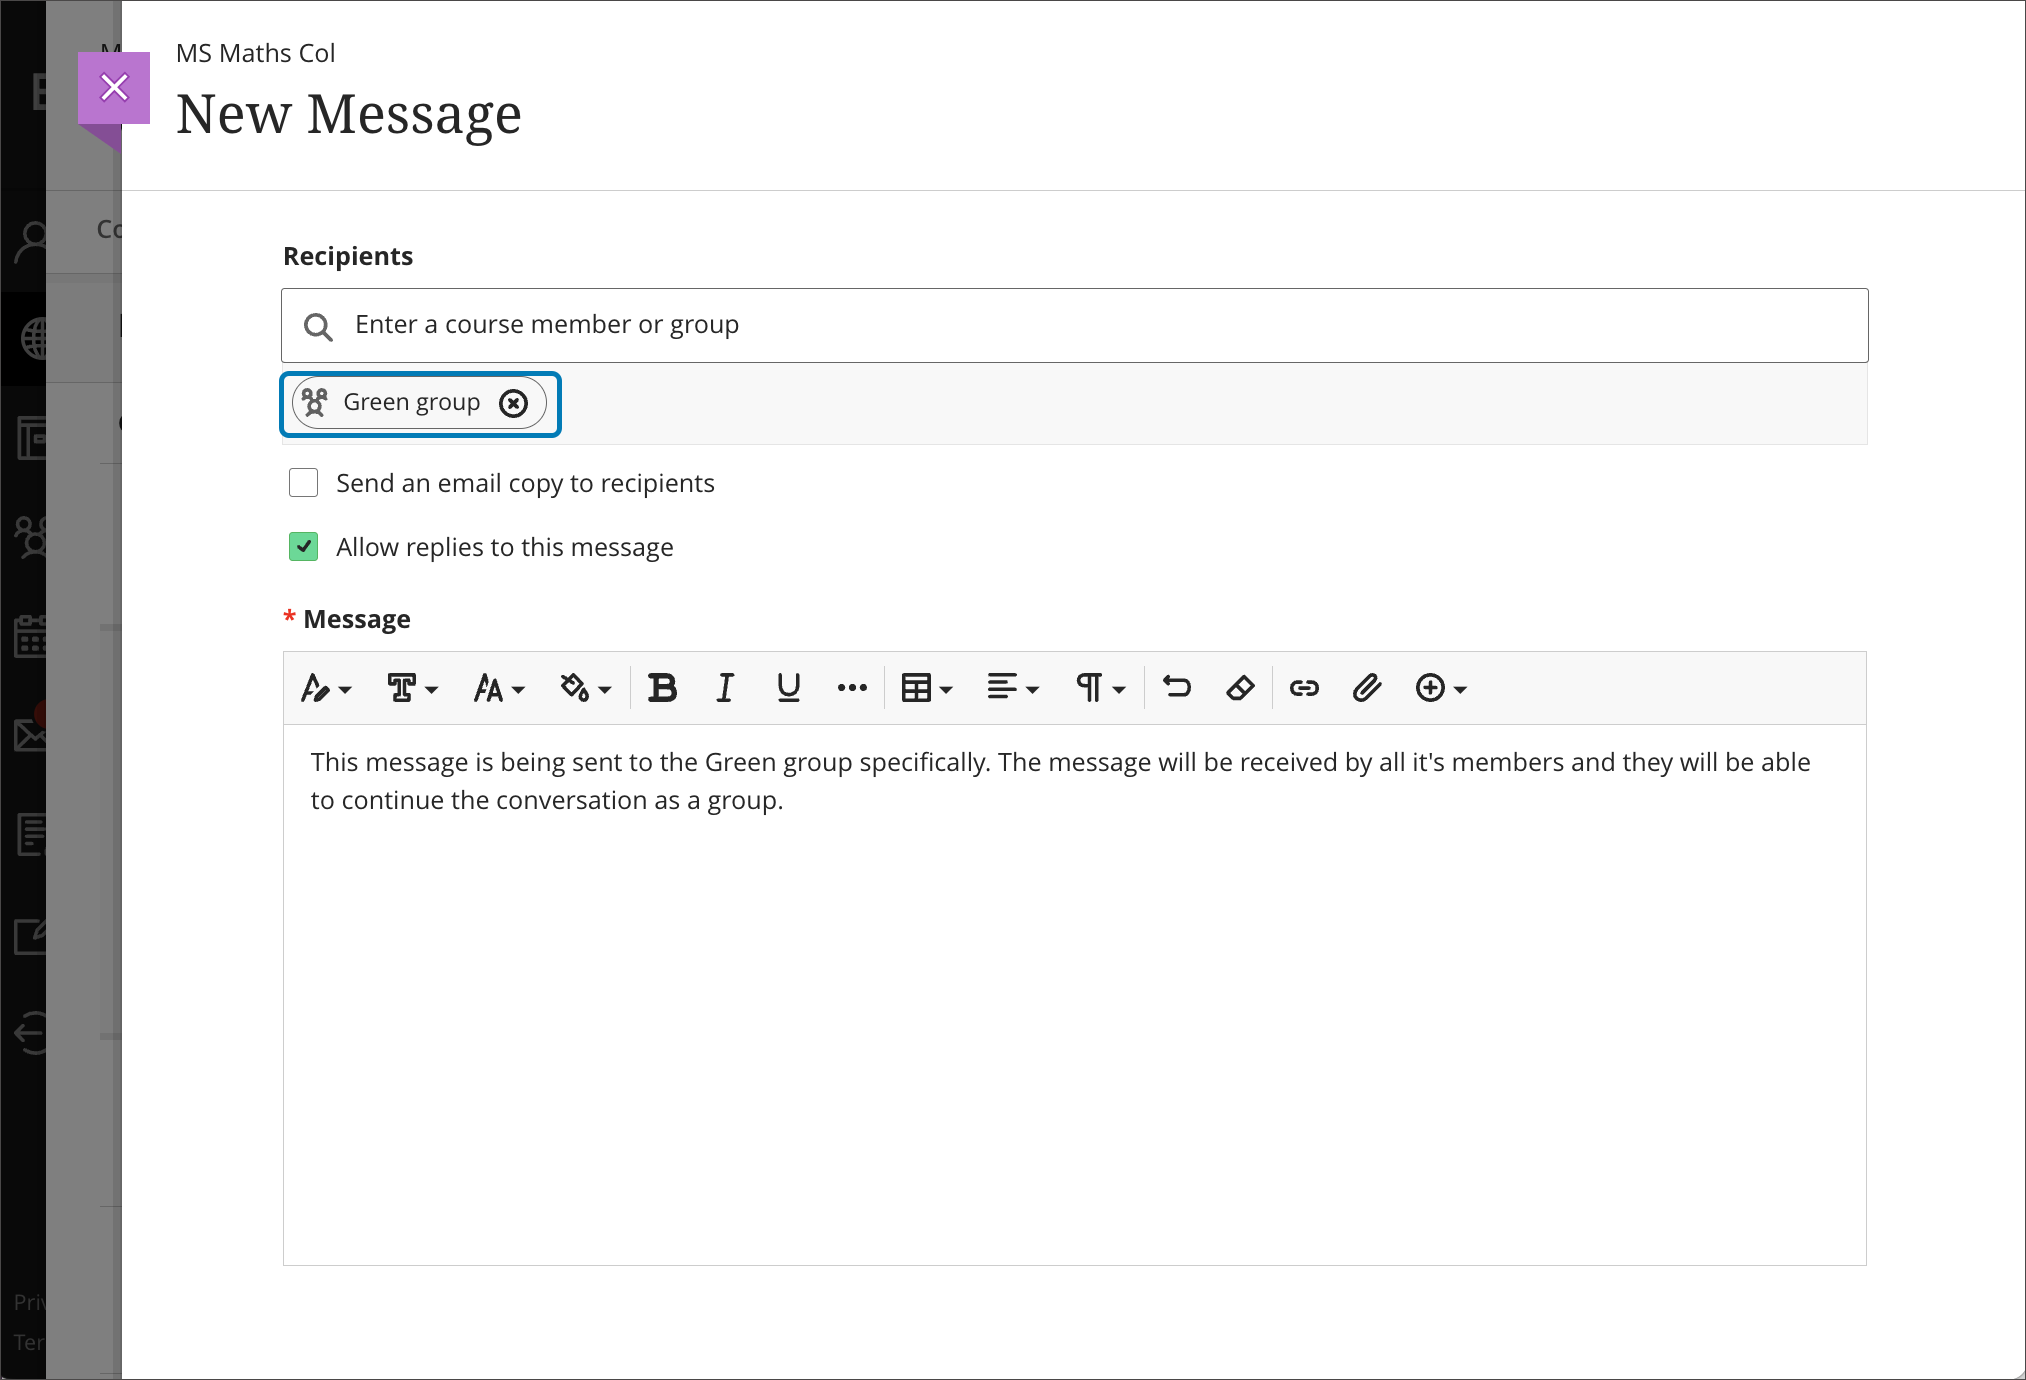
Image 4: Group message thread, with the group name in the recipients’ list
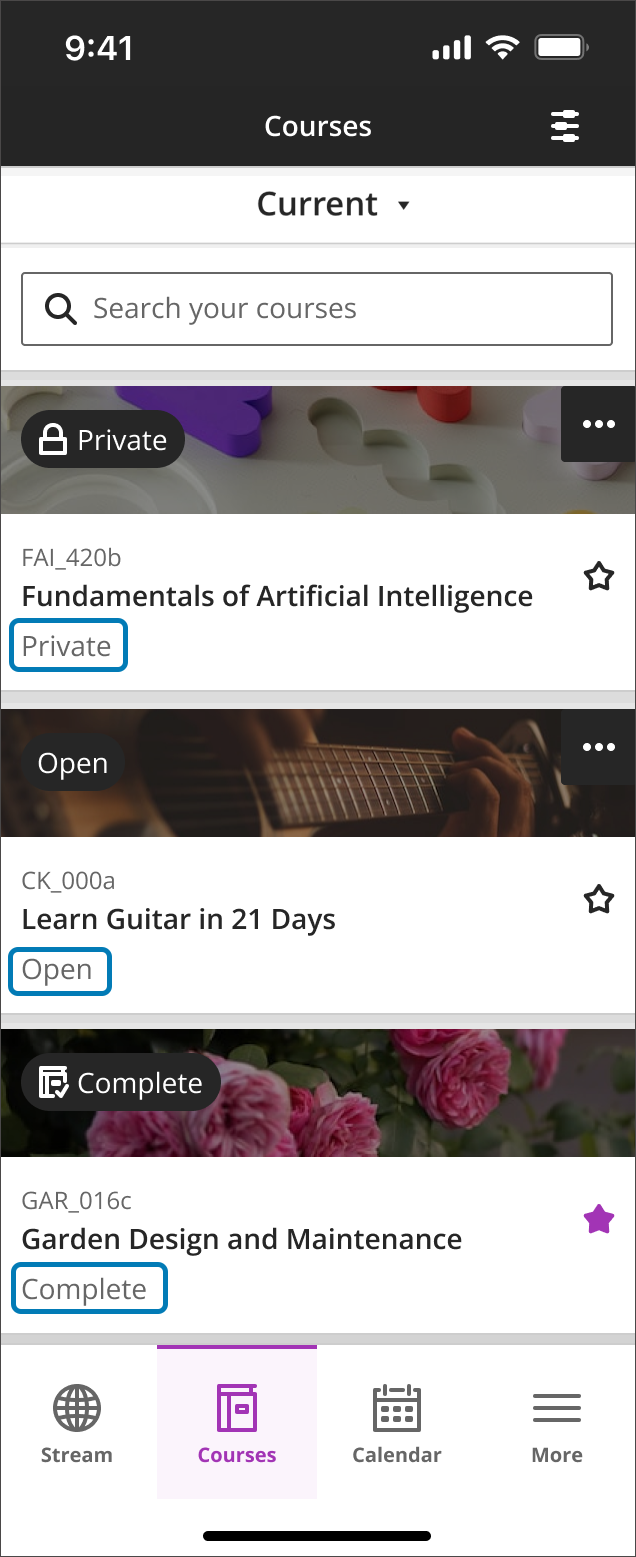
Course status indicators
The Blackboard Learn mobile app provides easy access to course material whilst on the go. We have enhanced the course list with status indicators for each course. These indicators help users to identify the status of each course.
Course status indicators include:
- Private (the student cannot access the course)
- Open
- Complete
Image 1: Course landing page enhanced by the course status indicator
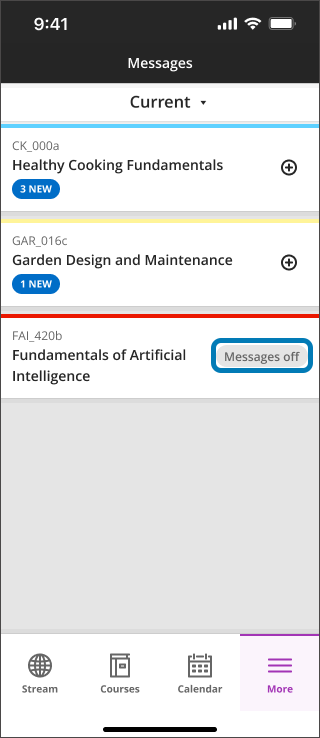
Messages Off indicator
Administrators can now turn off Messages for individual courses. When an administrator turns Messages off, the app displays ‘Messages off’ as appropriate.
Image 1: Messages landing page with ‘Messages off’ indicator for the applicable course(s)
Comments are closed
Comments to this thread have been closed by the post author or by an administrator.