How to upload a video with dual feeds to Media Hopper Create

If you need to upload a video with two feeds (e.g. lecture slides and lecturer cam) to Media Hopper Create, this is possible through https://videomigrator.is.ed.ac.uk. When a video has dual feeds on Media Hopper Create, the user has full control over the size and location of both feeds while they watch the video. This is very useful for dynamic lecture videos when the focus changes between the two feeds and ensures the user can move the secondary feed out of the way of the main feed when needed. To upload a dual feed video:

  1. Log in to the media migrator and choose the primary video file (the video feed that will be larger by default).
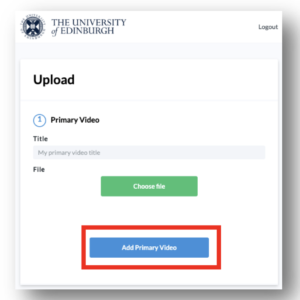
  2. Create a title for this file (this title will be the one that appears for both feeds) and upload the primary video file.
  3. After the primary video file has completed upload you will receive a success message.
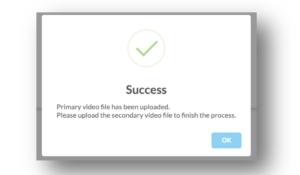
  4. You can now repeat this process to upload the second feed (the smaller feed that will hover on top).
  5. The second feed also requires a title but this will not appear on the final video page.
  6. The video with dual feeds will appear on your ‘My Media’ section on Media Hopper Create where you can then edit the video details and publish it.


Publishing videos to a Media Hopper Create channel.

How to publish a video

To upload a video, e.g. from another university source such as Blackboard Collaborate, click Add New on media.ed.ac.uk, then click Media Upload to begin.


When uploading a piece of media to Media Hopper Create, certain fields must be filled in order for the video to be published to a course channel. The required fields to publish can be filled in while uploading the content, or after uploading the content by finding the video and clicking Actions>Edit>Details and filling in the fields below. In order to publish the media fill out:

Name (The title of the video that will be displayed)

Description (Will be displayed underneath the video)

Tags (at least one tag word is required for the video to be published and help people find it easier)

License Type (This is the copyright license to be applied to the content. I normally select All Rights Reserved The University of Edinburgh from the dropdown menu but this is at the content creator’s discretion.)

Course code, Publisher, Language and Date Created do not need to be filled in order to publish the video but can be useful to fill in to make the video easier to retrieve later on. A publishing schedule can also be set so the media can only be viewed for a certain period of time (useful for perhaps making a video only available during one semester).

– You now need to agree to request automatic subtitles before you can publish your content.

NOTE: Selecting this box does NOT enable auto-captioning, this is done in the next step.

screen shot showing where to agree to automatic subtitles

After the details are filled in, on the video uploading page (or on the video editing page under Publish instead of Details), set the Publishing Status to Published (if Published is not selectable, there are missing video details that still need to be filled in). A drop down menu will appear giving the option to Publish in Category or Publish in Channel. Select Publish in Channel and select a channel you manage to publish to the channel.


How to record and view your iPad screen on desktop using Reflector – Guide, Advantages, Disadvantages and Alternative

This guide was written using macOS and an iPad. The Reflector software is available on Windows. Reflector can support any device using AirPlay, Google Cast or Miracast.

How to use record your iPad screen wirelessly on desktop using reflector:
1. Download and install the app here.
2. Click the Reflector app in the menu bar to see devices connected.


3. On the iPad, swiped down from the top right of the screen to access the control centre. Tap Screen Mirroring and select the desktop device you want to reflect to.


4. On the iPad image on the desktop, click the cog on the top left to choose a frame for the image and adjust the scale, device rotation and choose whether the mobile screen image floats on top.
5. Click the menu bar icon for Reflector, click the camera or microphone icon to choose to enable webcam and audio recording. Click Record all to begin the recording.
6. Click the red record button again on the iPad stream image to end the recording. Once the recording is finished you can give the recording a name and choose where to save it.

Advantages:
-Reflector supports iOS devices using Airplay and Android devices using Google Cast.
-Reflector allows you to reflect multiple devices to your desktop at once, allowing a simultaneous recording of both.
-Ability to reflect devices wirelessly by using the same network is convenient and simple to set up.
-Allows you to record screen of mobile device and webcam of desktop simultaneously.
-Allows you to record screen of mobile device while hiding it on the desktop screen.
-Places mobile device video feed on desktop screen. This means you can use other software to do a screen recording that will capture the desktop and mobile device simultaneously in one video file.
-Allows you to use frames for the device’s feed e.g. you can make an iPad video stream look like an actual iPad device.
-Changeable video quality settings, as well as different frame rate recording options to help decrease video file size.
-Reflector teacher allows use with reflector director, reflector student and is preconfigured for classrooms.

Disadvantages:
-Due to the connection to the mobile device being wireless, there is potential for lag in the recording if the network is weak.
-The trial version of the app has a significant watermark on recordings.
-Can’t screen record desktop and mobile device at same time on its own.
-Difficult to change the scale of the image on the screen.
-If mobile device recording is separate from other components of lecture recording, the 2 videos would need to be synced up after recording.

Alternative – How to record the iPad using QuickTime Player (wired connection):

  1. Plug your iPad into your Mac and launch QuickTime Player, built into macOS.
  2. On the app menu bar, click File>New Movie Recording.
  3. On the video control panel, click the downward arrow beside the record button and select your iPad as the video and audio source.
  4. Click the record button. When you are done recording click the stop button.


Kaltura Capture Video Tutorial – Allowing End User To Control View Of Multiple Video Streams

  1. Open the KalturaCapture App.
  2. Check the screen feed, camera feed and audio feeds are on.
  3. Hit Record.
  4. When you want to finish recording, you can pause or stop the recording.
  5. Give the video a title, description and tags (optional) and click upload.
  6. When the video is uploaded, a link to the video on media.ed.ac.uk will appear. Click this link to check your video.\
  7. On Media Hopper Create, if your video had a screen and camera stream, both will be automatically controllable by the end user allowing for full screen of either of the videos and multiple split screen views.