Any views expressed within media held on this service are those of the contributors, should not be taken as approved or endorsed by the University, and do not necessarily reflect the views of the University in respect of any particular issue.
During our official exhibition, I took on the role of documenting the event through photography and videography. My goal was to preserve the atmosphere, interactions, and intricate details of our breathing installation while highlighting the audience’s immersive experience.
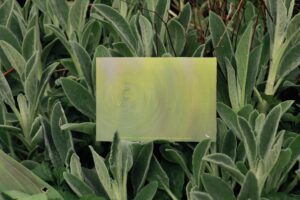
After the last class, I focused on improving the background visuals for our 5-5 breathing guide, addressing feedback from earlier critiques. The previous version had two main issues:
1. After its recent adjustments, the visuals didn’t fully align with the dynamic sphere animation.
2. The repetitive patterns felt monotonous over time.
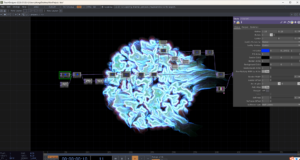
To solve this, I revisited the original particle effect style but expanded its variety. I created eight distinct 5-second animations, each with unique motion paths—some resembling slow upward drifts, others mimicking gentle pulses or radial expansions. By stitching these clips into a seamless loop, the background now feels dynamic and non-repetitive, subtly shifting to keep viewers engaged without distracting from the central breathing guide. I also fine-tuned the color palette and blending modes to better harmonize with the main dynamic sphere.
The updated background not only complements the breathing rhythm but also adds depth to the installation’s atmosphere. Next, I’ll test the visuals with real-time breathing data to ensure the transitions feel intuitive and calming.
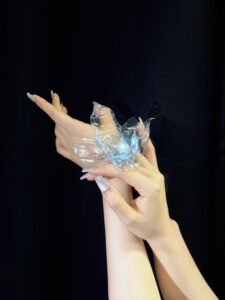
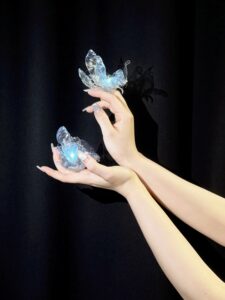
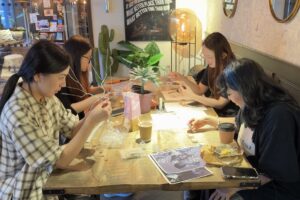
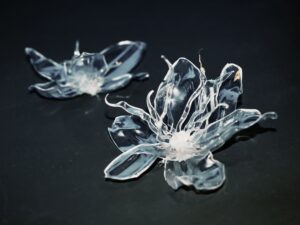
We held another workshop this Friday to push our installation closer to completion. Building on last week’s progress, we focused on refining the plastic flowers, solving resin challenges, and assembling the final structure.
We started by creating nearly 10 plastic flowers, cutting and melting bottles into petals with practiced efficiency, and then gluing them together. Everyone works well together to form an assembly line of plastic flowers.
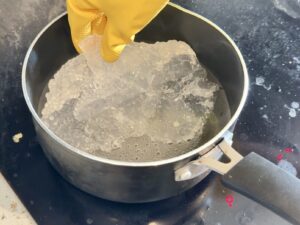
The real breakthrough came with the resin lungs. After struggling with the heat gun last week, we tried a simpler method: boiling resin in a pot of water. The resin softened quickly in the bubbling water, making it easier to shape—though handling the hot material required careful gloves and teamwork!
We molded four lung-like forms and attached them to the wire branches Xinyi had made earlier. To blend the industrial look of the iron wire, we coated the branches with a thin layer of resin, hiding the metal beneath a smooth, organic texture.
Finally, we glued the plastic flowers to the resin-coated branches, weaving the elements together into a cohesive shape. Petals, translucent lungs, and wire branches hint at the interplay of breath and form.
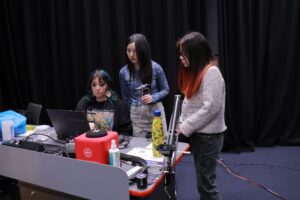
On 21/3/2025, last Friday, our team held a workshop to begin constructing the interactive breathing installation. Here’s our progress and creative problem-solving.
1. Plastic Flowers
Can, Ruolin and Ashley heated manipulation transformed rigid plastic into surprisingly lifelike flora. They cut bottles into large sheets, then into petal-sized pieces. Then they carefully melted the plastic with heat to curl the edges into organic petal and stamen shapes. Finally the pieces into delicate, sculptural flowers.
I filmed the process in a short stop-motion video.
2. Resin Lungs
Li tried to make lung shapes out of resin. She softened the resin with hot water and a heat gun to mold its organic shape. But it was tricky because the resin hardened too fast, making detailed sculpting difficult, and our heat gun stopped working. We ended up with some interesting resin pieces we might still use.
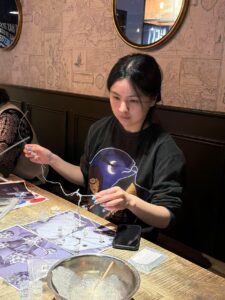
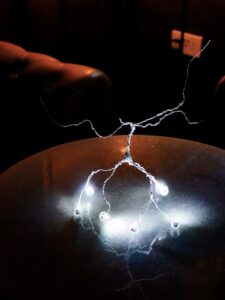
3. Wire Branches
Xinyi Bent and twisted iron wire into branching stems based on 3D model references. She added small lights at the bottom that will glow in the final installation, suggesting the vital energy of breath moving through a system.
4. Documentation & Support
My role included photographing, and videoing the process while assisting wherever needed – whether helping adjust a stubborn petal shape, preparing materials, or troubleshooting our equipment challenges. The photographs I took capture not just our progress but the collaborative spirit of the day, where every challenge was met with inventive problem-solving.
We haven’t finished everything yet, but we made good progress. Next week we’ll complete the lungs, put all the parts together, and connect them to our digital system. I’m excited to see how it will all come together!
Following my previous exploration of visual designs for the 5-5 breathing guide, I’ve continued experimenting with new ideas to create an animation that complements the central dynamic sphere without causing visual conflict.
This time, I tried creating an animation in After Effects using blue particle lines that grow upward, then fall and dissipate. The idea was to simulate a natural, flowing motion that aligns with the rhythm of breathing:
Inhale (5 seconds): The particles grow upward, symbolizing the intake of breath. Exhale (5 seconds): The particles fall and dissipate, representing the release of breath.
After sharing the animation with the team, we identified a issue:
Problem: The falling motion of the particles wasn’t prominent enough, making it difficult to distinguish between the inhale and exhale phases.
Solution: I’m currently working on enhancing the falling effect by: Increasing the speed and visibility of the particles as they fall. Adjusting the timing to ensure the transition between growth and fall is smooth yet noticeable.
On March 8th, I interviewed Yilin, a medical student visiting Edinburgh, as part of our project exploring the visualization of breathing through interactive art. Her responses provided valuable insights into how breathing is perceived and experienced. Here’s a summary of the key points from our conversation:
Key Insights
Awareness of Breathing: Yilin mentioned that her awareness of breathing increased after the pandemic, especially as a medical student focused on lung health.
Noticing Breathing: She notices her breathing most during moments of anxiety or tension, when her breath becomes faster.
Emotional and Physical Differences:
Steady breathing makes her feel calm, while rapid breathing increases anxiety. Deep breathing slows her heartbeat, while shallow breathing makes it faster.
Visualizing Breathing: Yilin imagines her breathing as similar to a cardiogram—sometimes stable, sometimes fluctuating.
Colors and Relaxation: She finds natural colors like sky blue and grass green relaxing, while black and white evoke tension, symbolizing death.
Sound and Breathing: Yilin feels that nature sounds (e.g., birds, leaves) help stabilize her breathing and make her feel calm. She compared her breath to the sound of wind through leaves.
Key Takeaways for Our Project
Visuals: Incorporate cardiogram-like patterns to represent breathing, with smooth transitions for calm states and fluctuations for tension.
Colors: Use natural, calming colors like blue and green to evoke relaxation.
Sound: Integrate nature-inspired sounds to enhance the immersive experience.
In our previous research, we discovered that the 5-5 breathing technique—inhaling for 5 seconds and exhaling for 5 seconds—can help people achieve a state of calm and relaxation. To enhance this experience, we decided to incorporate a visual guide into our interactive installation. The visual design is divided into two parts:
1. A fixed animation that guides the 5-5 breathing rhythm.
2. A dynamic graphic that responds to the user’s actual breathing patterns.
My role is to design the fixed animation, which serves as a clear and intuitive guide for users to follow the 5-5 breathing rhythm. However, this task has proven to be more challenging than expected.
Initial Attempts and Challenges
1. Rotating and Expanding Dots:
I started by experimenting with rotating and expanding dots, hoping to create a sense of rhythm and flow. However, this design conflicted with the dynamic sphere in the second part of the visual, creating visual clutter and confusion.
2. Expanding and Contracting Circles with Halos
Next, I tried using a circular design that expanded outward during inhalation and contracted inward during exhalation, accompanied by a glowing halo effect. While this was visually appealing, it still overlapped and competed with the central dynamic sphere, making it difficult for users to focus on either element.
Key Insight: These attempts revealed that centralized and circular designs are not suitable, as they conflict with the dynamic sphere that occupies the center of the screen.
3. Background Color Transitions
To avoid overlapping with the dynamic sphere, I shifted my focus to the background, using color transitions to indicate the breathing phases. For example:
Inhale: Transition from a cool color (e.g., blue) to a warm color (e.g., orange).
Exhale: Transition back to the cool color.
However, this approach introduced two new challenges:
Color Interpretation: Users might not intuitively associate specific colors with inhaling or exhaling, leading to confusion.
Transition Smoothness: A sharp transition between colors felt abrupt and unnatural, while a slow, gradual transition made it difficult for users to distinguish the exact moments to inhale or exhale.
Current Direction and Next Steps
Based on these challenges, I’ve realized that the fixed animation needs to:
Avoid Centralized and Circular Designs: To prevent visual conflict with the dynamic sphere.
Provide Clear Timing Cues: Ensure users can easily identify when to inhale and exhale.
Maintain Visual Harmony: Complement the dynamic sphere without overwhelming it.
Moving forward, I plan to explore the following solutions:
Edge-Based Animations: Create animations that occur at the edges of the screen, such as a progress bar or waveform, to guide breathing without interfering with the central sphere.
Text or Symbol Indicators: Use simple text (e.g., “Inhale” and “Exhale”) or symbols (e.g., arrows) to provide clear instructions.
Subtle Motion Cues: Incorporate gentle, non-intrusive motion (e.g., flowing lines or particles) that aligns with the breathing rhythm.
Conclusion
Designing a visual guide for the 5-5 breathing technique has been a process of trial and error. While my initial attempts faced challenges, they provided valuable insights into what works and what doesn’t. By focusing on edge-based designs and clear timing cues, I’m confident that the final fixed animation will effectively guide users toward a calm and balanced breathing experience.
Since the last blog posting, my work has been mostly troubleshooting, experimenting, and making some interesting outcomes. Here are the details of my work:
Solving the Image Display Issue
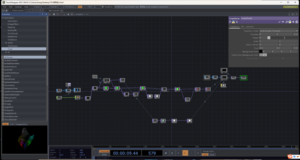
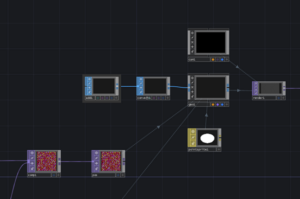
As I mentioned in my last post, my initial attempt to create a visual effect using the Geometry COMP failed because no image was appearing. To address this, I first updated Touch Designer to the latest version, thinking that the issue might be related to software compatibility. After the update, I carefully reviewed my setup and discovered that some buttons in the Add SOP operator weren’t activated. Once I fixed this, the image finally appeared!
However, the shape of the image wasn’t what I had envisioned. Instead of a smooth, circular form, it appeared as a hyperbola-like shape. This was a bit unexpected, and I realized I need to adjust the parameters further to achieve the desired circular effect. I’ll continue tweaking the settings to align the visuals with our project’s theme.
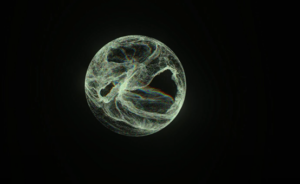
Outcome: Dynamic Circle Effect
While troubleshooting the hyperbola issue, I decided to explore other approaches. I successfully created a dynamic circle effect that responds to parameter adjustments. By manipulating the Noise parameters, I was able to generate various transformations, such as pulsating and morphing shapes, which could beautifully represent the concept of breathing. Additionally, I experimented with the Ramp tool to introduce color transitions, adding another layer of visual interest to the effect.
This dynamic circle effect feels like a significant step forward, and I’m excited about its potential. It’s versatile and can be adapted to different datas or stages of our project, depending on the adjustments we make.
Next Steps
1. Discuss Visual Aesthetics with the Group: During our next class, I’ll share my experiments with the team and gather feedback on which visual effects best align with our project’s vision. It’s important that my work complements the overall design and narrative.
2. Coordinate with Hefan: I’ll have a detailed discussion with Hefan to clarify our roles and responsibilities moving forward. We’ll need to decide how to divide tasks effectively to ensure a cohesive final product.
3. Collaborate with the Arduino Team: I’ll also connect with the team members working on the Arduino sensors to explore how we can integrate their data into Touch Designer. This could involve using sensor inputs to drive visual changes, creating a more interactive and immersive experience.
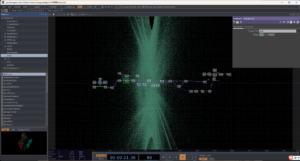
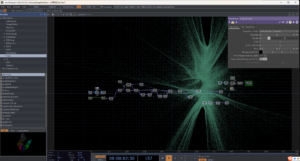
To kick things off, I spent time researching references and case studies on YouTube and Pinterest. These platforms provided a wealth of inspiration, showcasing how others have used Touch Designer to create dynamic and fancy visuals. I found some fascinating examples of fluid simulations, organic animations, and particle systems that resonated with the concept of breathing. These references helped me conceptualize how we might translate the theme into a visual experience.
First Unsuccessful Attempt
My first attempts were based on a YouTube tutorial on creating dynamic visual effects with Touch Designer. However, I ran into an issue where the Geometry COMP wasn’t rendering any visuals, despite following the steps correctly. I’m still troubleshooting this problem, which might be related to the setup of the operators or the version of Touch Designer. I’ll continue to debug this and consult tutorials or forums to resolve the issue. While this was a setback, it was a valuable learning experience that highlighted the importance of understanding the intricacies of Touch Designer’s workflow.
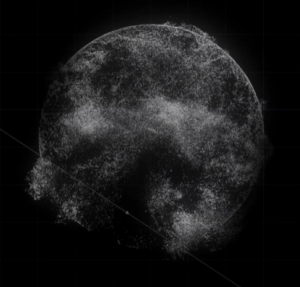
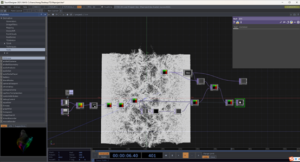
Success: Particle Effect (life.tox)
Despite the initial hiccup, I managed to create a particle effect, which involves particles that continuously generate and disappear, creating a sense of movement. I named this file life. tox, as it felt like a fitting representation of the cyclical nature of breath and existence. This effect could be an addition or chop to our final project, perhaps as a background element or a transitional animation. I’ll refine it further to better align with our overall aesthetic.
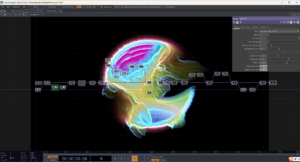
Experimenting with Visual Distortion
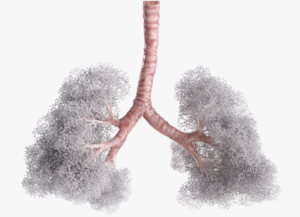
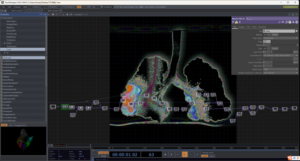
In addition to the particle effect, I experimented with applying Touch Designer’s distortion and color manipulation tools to an image of a lung. I created a series of effects where the lung image shifts in color and warps in shape. But I haven’t figured out how to make it mimic the rhythmic expansion and contraction of breathing. While these experiments are still in their early stages, they’ve given me a clearer idea of how we can visually represent the theme. I’m particularly excited about the potential of combining these effects with audio or sensor data to create a more immersive experience.
Next Step
Resolve the issue with the Geometry COMP to achieve the desired visual effect.
Refine the life. tox particle effect and explore how it can integrate with other elements of the project.
Expand on the lung image experiments and fine how it can mimic the rhythm of breathing expansion and contraction
Collaborate with the team to ensure my visuals align with the overall direction of the project.