Any views expressed within media held on this service are those of the contributors, should not be taken as approved or endorsed by the University, and do not necessarily reflect the views of the University in respect of any particular issue.
This Thursday, because max still has some minor problems, we made an appointment with Jules to solve the cross-fade problem between playlist layers.
At the same time, the meeting with Leo solved our idea of using sensor to control the change of audio frequency.
However, because sensor has not been very sensitive in controlling patterns, we made an appointment with Joe, and this problem will be solved in the afternoon of our performance.
After attending the dmsp class on Thursday, the teacher suggested that we pack our sensors to make them look orderly and in line with the theme, so our group made an appointment to make a control box for our sensors with some cardboard and wrapping paper on Friday.
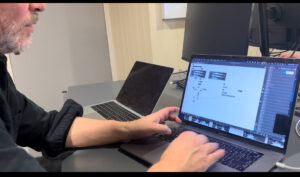
On Saturday, we borrowed Atrium, the venue for the official performance, for our last formal rehearsal, to ensure that our wiring was long enough and the speakers were properly placed.
In this week’s DMSP lecture, we received suggestions from teachers that we need to simply decorate hardware devices such as sensors and MIDI controllers, and hide the numerous cables to ensure aesthetics. So this week I also worked with Ruojing and Yuan to make handcrafted cases for these devices (see Video 1 and Video 2).
Video 1: A Video Showing the Sensor Decoration Production.
Video 2: A Video Showing the MIDI controller Decoration Production.
In order to comply with our theme of thalassophobia, we specially made the color of all decorations dark blue, so that users can also experience the emotion of thalassophobia from the details. During the last rehearsal we agreed that the dark blue worked well, so that was settled on as the final decoration for the hardware devices.
In addition to this, I also created instructions for sensors and MIDI controller (see Figure 1). At that time, it will be displayed on two iPad screens for users to see.
Figure 1: Instructions for Using Sensors and MIDI Controller.
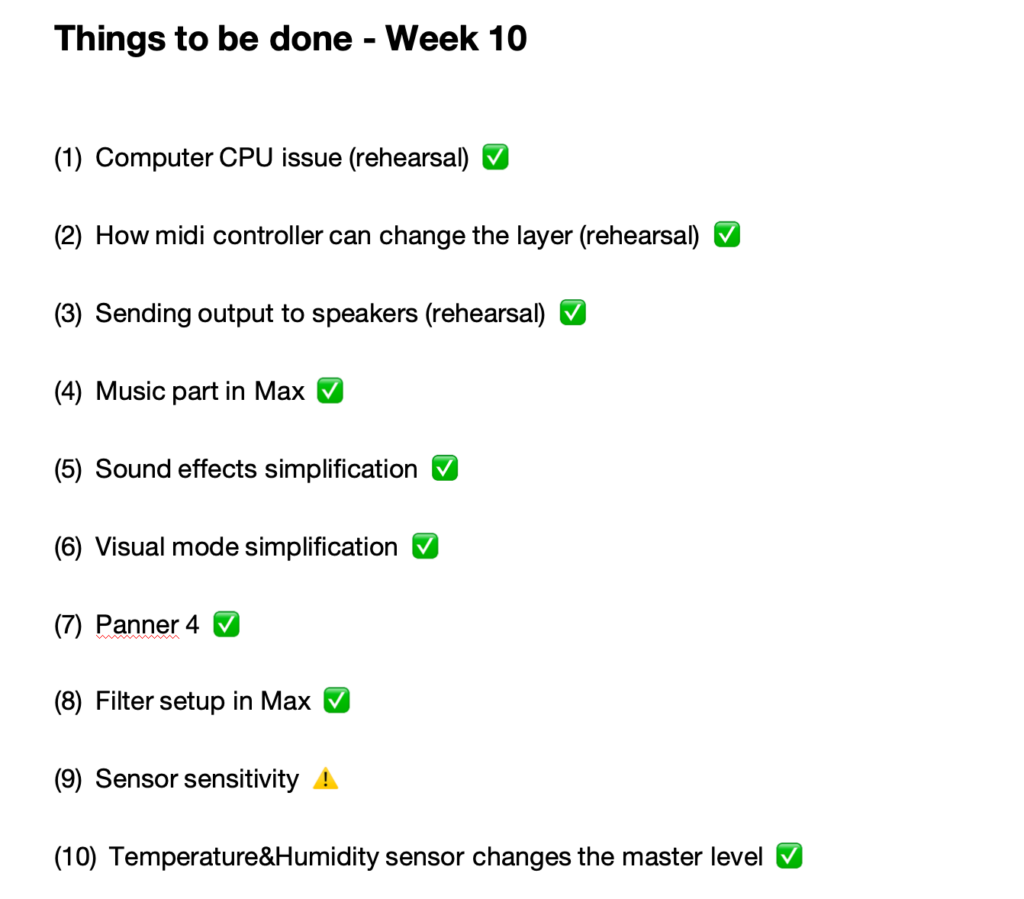
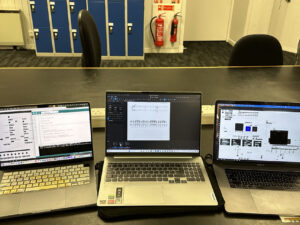
This week I mainly improve the project based on the “Things to be done” in Week 10 summarized last week. On Thursday, Leo and I had an in-depth discussion on the contents of all the software and ended up solving three problems: determining the number of panners, setting the filter in the Max patch, and using the temperature sensor to control master level.
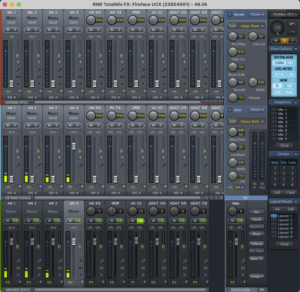
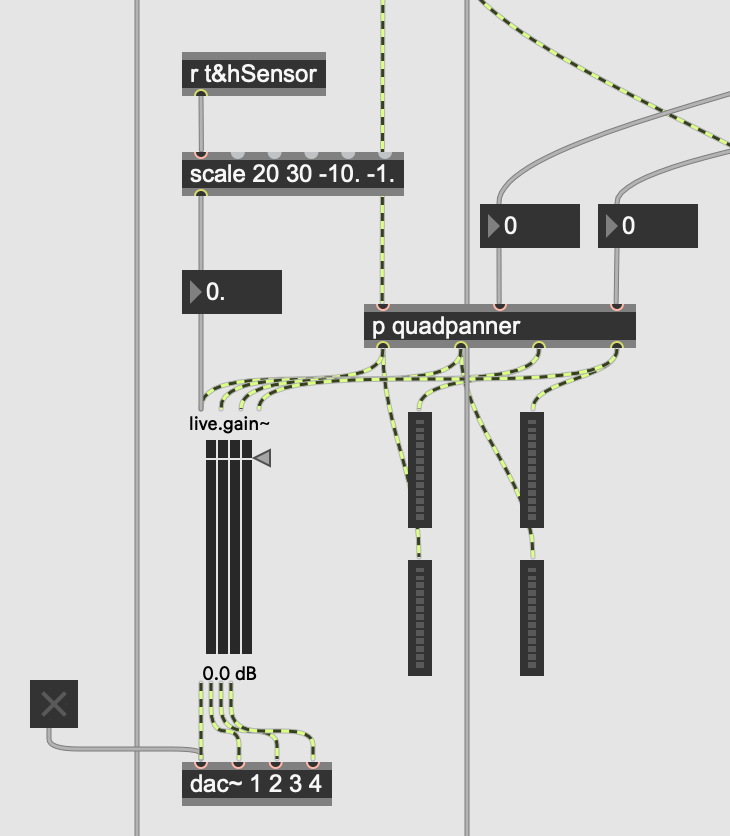
The first is the panner aspect. Given the portability and duration of our on-site setup, we found 4 speakers to be the most suitable. It can not only make the entire installation feel immersive, but also avoid problems such as errors or insufficient equipment due to over complexity to a certain extent. Correspondingly, the positions of the four speakers in the Max patch are determined as the four points A, B, C, and D of the pictslider (see Figure 1). At the same time, the settings in the Totalmix software bundled with the FireFace UCX sound card are to output the four channels to the corresponding four speakers (see Figure 2).
Figure 1: Pictslider in Max Patch.
Figure 2: Totalmix setup.
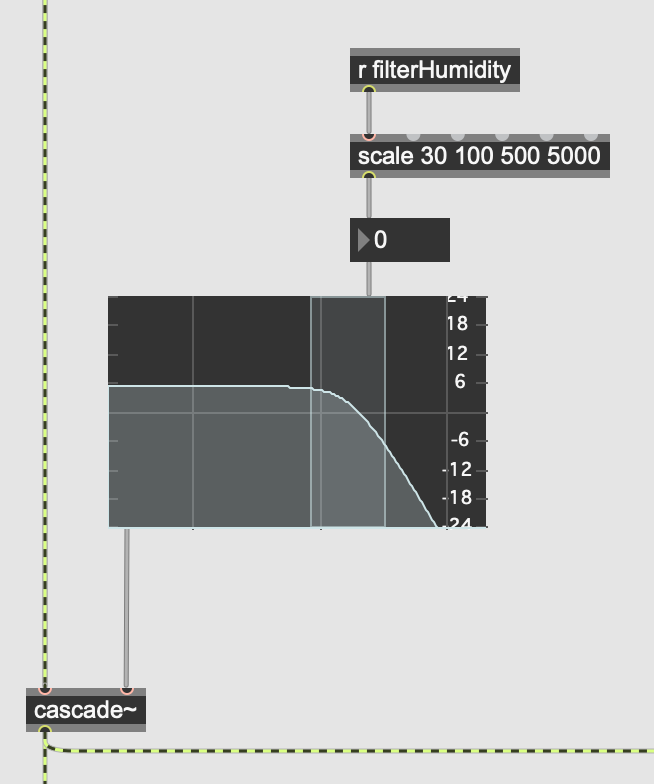
The second is the filter setting in Max. The purpose of this filter is to allow users to experience changes in sound frequency by interacting with the humidity sensor. After Leo’s guidance, I discovered that the cascade~ object can implement audio filter changes. With the filtergraph~ object, the cutoff frequency can be changed by the value received by the sensor (see Figure 3).
Figure 3: Filter Part in Max Patch.
Finally is the master level part. This extra step is taken into account that when there are more people in the environment, the sound level will correspondingly increase, which may cause some people to be unable to hear the sounds in the installation. At this time, we need to increase the overall volume to improve this. However, manual adjustments on site will greatly affect the user’s sense of immersion and personal experience. I later thought that the number of people in the environment is closely related to the temperature in the environment, so the less obvious temperature value in the temperature&humidity sensor can be used to control the master level, thus realizing the operation of adjusting the total volume invisibly according to the on-site environmental conditions. That is, the more people there are, the higher the temperature, and the greater the master level of the installation.
I had never thought of how to output four channels of sound before. Leo helped me solve this problem: dac~ object can directly output the desired number of tracks. I thought that I could use the live.gain~ object set to four channels to connect it to the panner and dac~ object to achieve master level control (see Figure 4).
Figure 4: Master Level Part in Max Patch.
This Saturday, we negotiated with other groups and successfully borrowed the right to use Atrium for two hours. So we had our last rehearsal in the Atrium (see Video 1).
Video 1: A Video Showing the Installation Setup for the Final Rehearsal.
There were no problems with hardware device connections and most software settings during the rehearsal process. However, the problem of sensor sensitivity was not successfully solved this week (see Video 2).
Video 2: A Video Showing the Sensor’s Lack of Sensitivity.
So I made an appointment with Joe to meet before the official demonstration next Wednesday to focus on the sensor sensitivity issue. Hopefully this last question before the final presentation will be ironed out next week!
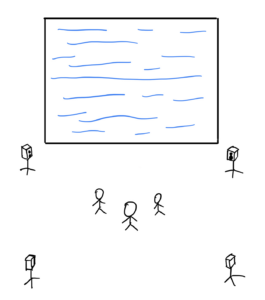
This week, our group had a rehearsal to test the audio-visual installation. Because the music store does not have 8 speakers, we made a decision to change the setting from 8 speakers to 4 speakers, building up a surround sound environment. The equipment list was as follows:
– 1 Temprecture&Humidity sensor
– 2 Light Sensors
– 2 Ultrasonic Sensors
– 1 Portable Projection Screen
– 1 HD NEC V302H Projector
– 1 Fireface Audio Interface
– 4 Genelec 8030/8040
– 1 MIDI Controller
– 2 Patch Boards
– 2 Adaptors
Our project will happen in Atrium, and the lights need to be turned off, providing a dark environment for immersion. The sensors will be put on a table at the front. Instructions on interacting with the sensors will be put next to the sensors.
This rehearsal was valuable to us. Because through this testing, we discovered some new problems that we need to fix. For example,
1. The transition between sound effects was not smooth. If participants interacted with the sensor while the sound effect had not finished, the sound effect would directly jump to another one. There was no crossfade, and the previous sound effects did not play to the end.
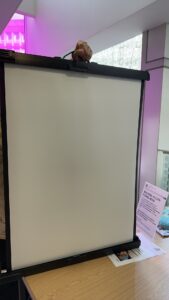
2. The portable projection screen was too small, so we might consider using a bigger screen or a whiteboard to replace it.
3. We also noticed that if we had four buttons on the MIDI keyboard for participants to enter the four levels, our project would have a non-linear storyline. To make our story linear, we must create one main button for the level control.
4. We also had a problem: the two back speakers did not output sound effects and chords. They only output ambient tracks.
5. The sound effects for the calm level were not output from the speakers for some reason. Only chords happened at this level.
6. The interaction with the ultrasonic sensor is not smooth.
7. The panner has not been used yet. Do we still need the panner?
8. The filter and the master level controller have not been created in Max yet.
We will arrange rehearsals this Thursday, Friday, and next week. Before that, we must fix these issues and ensure a smooth and successful installation process.
Together with the team members, I applied to the school to borrow four speakers, sensors, sound cards, projectors and white screens for testing.
The day before the first test, I just finished creating the music part, and imported chorus into our patch. We canceled the use of nodes object, and linked the music with the sound part. The X and Y axes are controlled by sensors, and each level is accompanied by the sound effect of that level. At the same time, the midi controller button is used to trigger the switch of different levels.
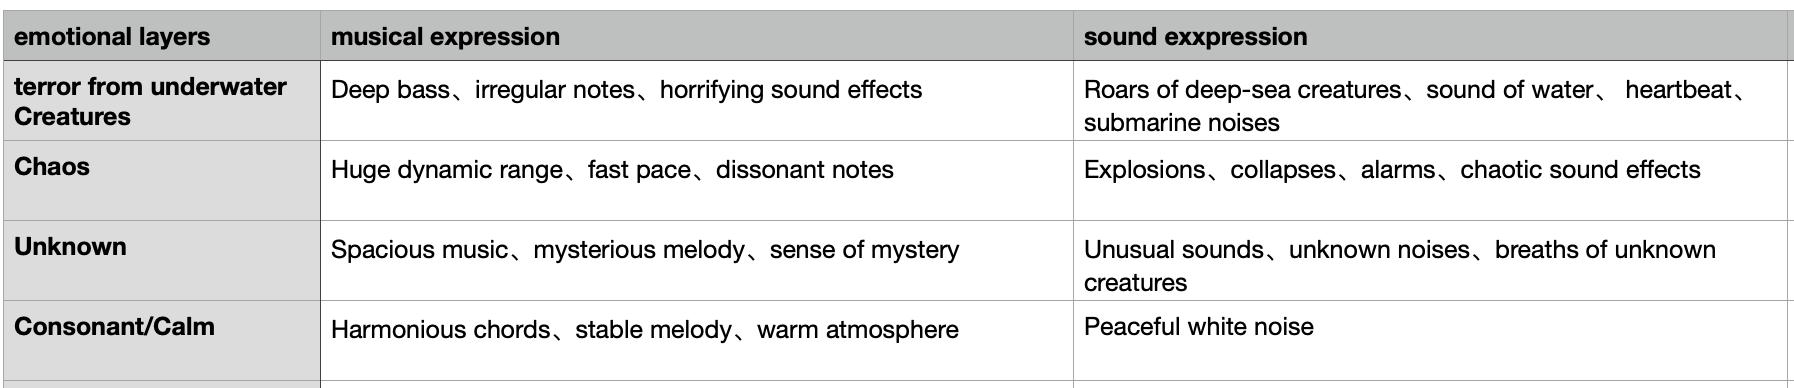
The following is the design of our different emotional levels in music and sound effects.
The following is Live rehearsal in the music store.
The following is a sound effect demonstration shot in the music store.
The following is a visual display shot in the music store.
The problems that need to be solved now are:
1. crossfade is not done when switching between different levels, and variable control is needed.
2. Now the control variables are monotonous, and more control needs to be done, such as filter.
3. The current four-level switching is controlled by four buttons instead of one button, which means that the linear development of these scenes has not been realised.
4. There were some problems in the output of our speakers when building the site. Only two levels were effective in totalmix, and three level meters appeared after changing dac~1234 in max. On this basis, I added ezdac object. Although it was successfully output to four speakers, the sound effects I heard were not available in some speakers.
5.Metro needs to be set to ensure the integrity of the entire audio playback.
This week we borrowed all the equipment needed and rehearsed together the construction and implementation of the final installation (see Video 1 and Video 2).
Video 1: A Video Showing the first rehearsal of installation.
Video 2: A Video Showing the first rehearsal of installation.
Before the rehearsal, we discussed it with Leo in the tutorial and came up with a “Things to be done” list in Week 9. This greatly helped our rehearsal process.
During the rehearsal, I discovered two problems with the sensor. The first one is that the value sent by one of the ultrasonic sensors to the Max patch changes very laggy, and sometimes even stops changing. As shown in the video, the message in the console is normally changing , but the LineDistance value in the float object which shows 38 stops did not change accordingly. In the rehearsal, I tried many methods and looked for possible faults in the equipment connection, the Arduino project and the Max patch, but it still stuck after modifications or restarts (see Video 3).
Video 3: A Video Showing the LineDistance Value Stop Changing in the Max Patch.
The second is that in the sound part of the Max patch, the x-axis and y-axis of the pictslider, which are controlled by the light sensor and ultrasonic sensor respectively, cannot change particularly smoothly, either too slowly or too jumpy. This may have an impact on the user’s experience in the moment when interacting with the installation. I tried changing the delay value in the Arduino project and the metro value in the Max patch, and temporarily found a few more moderate values, but the effect was still not the best. So for the control conditions of the x-axis and y-axis, I still need to try multiple methods to choose the best one.
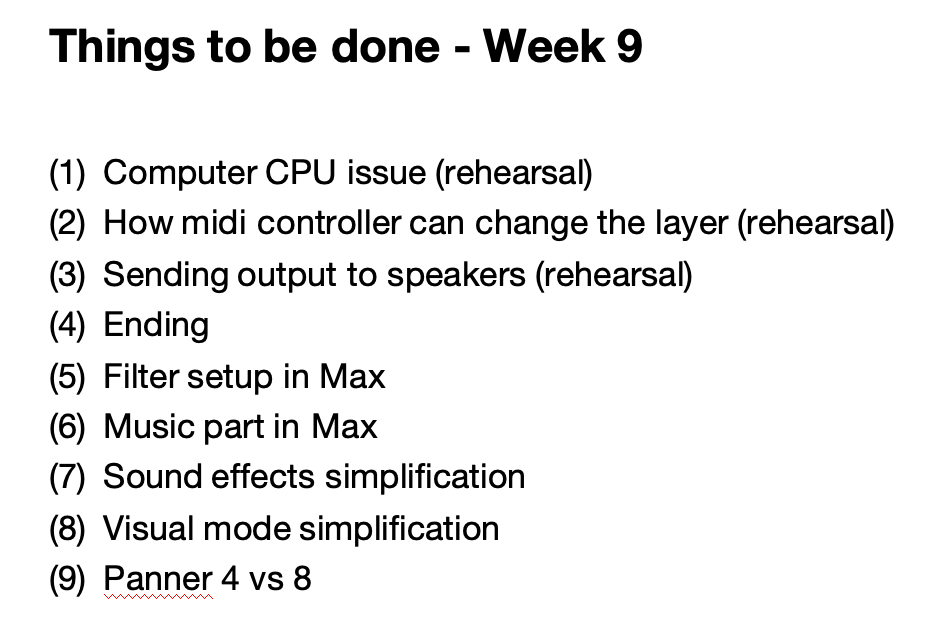
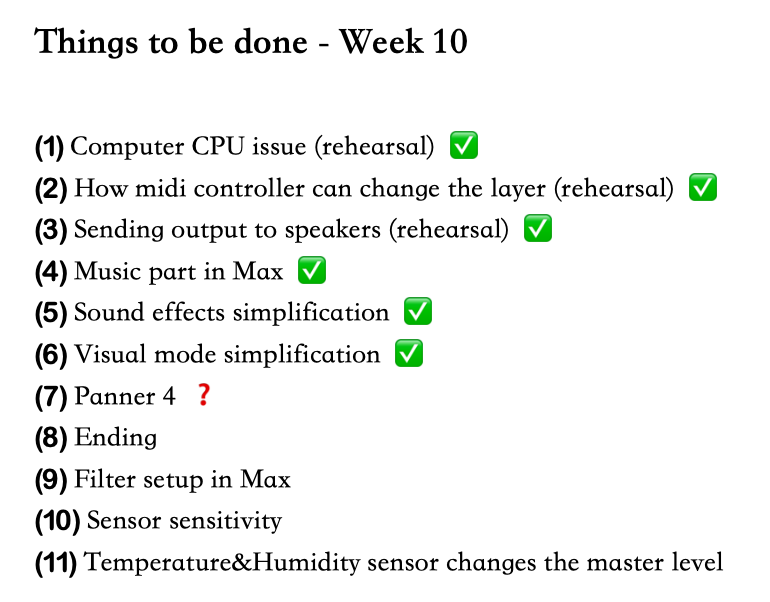
These two issues are what I need to focus on next week. At the end of the rehearsal, we summarized the things in the Week 9 list that we completed today, and based on this, we listed the new “Things to be done” in Week 10. The check marks are the parts that have been completed this week, the question mark are the part that is doubtful and need to be discussed again, and the rest are the things to focus on in Week 10.
When expanding on the different sections, the group felt it important for the ‘musical’ content, to each be distinct in their representation of the different sections. For the creation of the ‘chaos’ layer, representing the panic caused by fear, I felt it was best to take a free improvisation approach to the section. Free improvisation is a musical style that instead of relying on any formally recognized framework to improvise on (scales, harmony, tonal centers, etc.) improvisation is completely free, left totally up to the impulse of the player (Caconne, 2018).
For my improvisation I used a tool called the repeater orchestra, a piece of software which repeats what the performer plays at different times. Here is a demonstration of the tools use, in performing the Terry Riley work in C.
When using the website, there is a warning, saying that if you don’t use headphones it can “create some gnarly feedback” (Smith, 2o16). However, this kind of gnarly feedback that is created with the repeater orchestra is very useful as part of creating a chaotic aesthetic.
The improvisation itself involved the use of voice, percussion, and the repeater orchestra, in a mostly empty echoy room. Thankfully, my old room in Glasgow was currently empty, and was therefore able to use for recording in a reverberant space.
I then took the improvisation, added some further effects, and created this track.
Sources
Canonne, C. (2018). Rehearsing Free Improvisation? An Ethnographic Study of Free Improvisers at Work. Music Theory Online, 24(4).
Smith, B. (2016). Repeater Orchestra. Available at: https://codepen.io/barefootfunk/pen/ZWoLm.
vimeo.com. (n.d.). Bryant Smith: Repeater Orchestra Performance at CodePen Chicago, June 29 2016. [online] Available at: https://vimeo.com/172845834
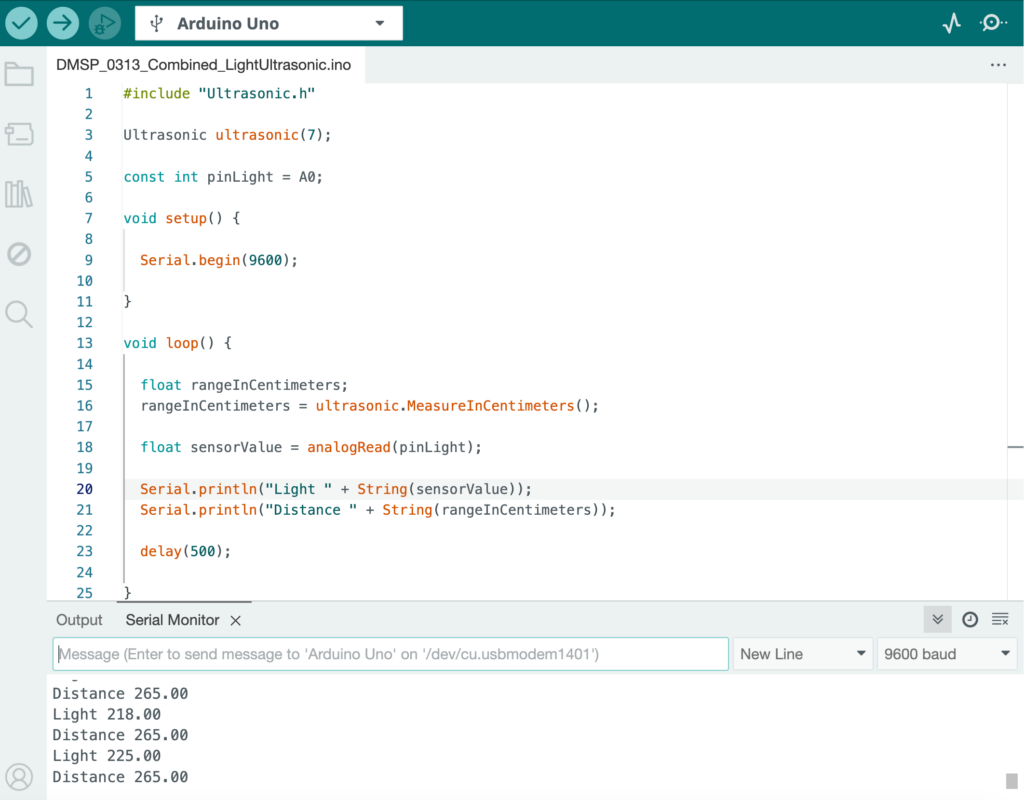
In Week 8, I mainly integrated the project files from last week, so that two sensors can be connected to the same breadboard, and the values of the two sensors are concentrated in the same Arduino project and the same part of the Max patch (see Figure 1 and Figure 2).
Figure 1: Arduino Project Combining Light Sensor and Ultrasonic Sensor.
Figure 2: Max Patch that Combines Data Sent by Light Sensor and Ultrasonic Sensor.
In this way, during the testing phase and the final installation operation phase, the values of different sensors can be more clearly assigned to different parameters that need to be controlled. At the same time, it can ensure whether the sensors are working properly and errors can be eliminated relatively quickly (see Video 1).
Video 1: A Video Showing the Light Sensor and Ultrasonic Sensor Connected on the Same Breadboard and Sending Data to the Max Together.
However, another problem discovered this week is that the pattern in the visual part in the Max patch cannot be displayed normally in the Mesh. Patterns that should keep beating will get stuck. This is the main tougher issue that needs to be addressed before next week.
On Tuesday, we asked joe to help us solve the problems encountered in the code when max connected to the sensor. We need to adjust some codes to ensure the rationality of max’s operation.
On Wednesday and Thursday, we had a meeting with Leo to solve some problems about max.
The technical problems we mainly solve are as follows:
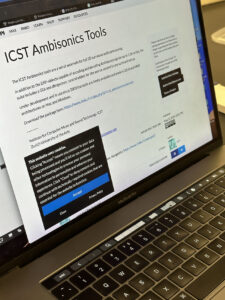
On Wednesday, my patch only did the sound effect part. Our sound effects have four levels. I classified them well, but I didn’t know how to transition from the first level to the second level. I thought of using preset object, but I encountered some problems. Leo suggested that I use buffer to store all the sound effects and change the levels at any time, but the final solution was to use pattrstorage object to control the appearance and changes of each level through the storage of the level meter data. Another technical problem is that max involves the on-site display. Because we use multiple speakers, we need to create an effect in max that can output different sound effects to multiple speakers. But we haven’t decided whether we want surround sound effect or multi-channel effect. Leo suggested that I use ICST ambisonics tools to output surround sound.
On Thursday,We took class so we asked Jules a lot and he showed us the use of panner.
I have to think about how to make the panner function into our patch.
This week, I focused more on creating sound effects for the final peaceful level. I created some relaxing sound effects, including sounds like wind, chimes, water, ice, etc.. The ice cube, page-turning, and rice-dropping sounds are recorded in the studio using Neumann km 184 and the XY stereo recording technique. The necklace sound is recorded in my home studio using Rode NT1 and Focusrite audio interface in mono. The twinkling, water-dropping, and windchime sounds are manipulated using Mconvolution, integrating sounds together to create a new sound effect. All these sounds focus on the high frequency, whereas the sounds for the previous level focus on the low-mid frequency. These soft, high-frequency sounds help build a sense of chill, relaxation and comfort.