Any views expressed within media held on this service are those of the contributors, should not be taken as approved or endorsed by the University, and do not necessarily reflect the views of the University in respect of any particular issue.
As part of our exhibition, we decided to include a video compilation of small clips, images and sounds that we had gathered during our overall process as part of our exhibition. This video was then displayed on one of the lateral screens, providing the audience with a unique look behind the scenes of our creative process.
By showcasing this compilation, we were able to pique the interest of the audience and provide them with an interactive and immersive experience. They were able to gain a better understanding of our project and the creative process behind it, and as a result, we received numerous inquiries and questions about how we developed the project. The inclusion of the video compilation proved to be a valuable addition to our exhibition, adding depth and dimension to the overall experience for our audience.
For me (although we had some mishaps) the exhibition was a success, I would love to be able to redo it again, with more time in our hands to fix all those things we initially wanted to do, but had to cut out because of our limited timeline. If we could, developing the first-person views of the audience going thru the whole stairs from top to bottom, and interacting with the movement with the sensors, making it travel time and space, would be ideal.
Dreaming big, in the future, it would be amazing if we can find a sponsor for the exhibition, and show it in a cultural space around Edinburgh, or even during the Fringe Festival.
Before this project, I had no prior experience with LiDAR technology and was unfamiliar with its applications. However, I became intrigued by its potential uses and decided to explore it further. Throughout the project, I have gained valuable knowledge on how to gather and manage cloud points using LiDAR, and have experimented with creating 2D and 3D variations of the cloud points.
I learned a great deal working with a multidisciplinary team, as it was my first time creating such a complete project with other disciplines. While my knowledge about sound was inexistent before the project, I have now learned useful information that could help me in future projects.
I think one of the best decisions I took this year was choosing this course. At first, I was not really sure, as I thought that working with such a big team was probably gonna be a problem, as it can be difficult for all to be on the same page. But after our initial first meeting, those fears went out the window. Truly I have never worked with such a great team, where everyone involved is so willing and excited to learn new things and give their best for the development of the project.
I want to thank each of my team members for all the hard work, and dedication put into this project. The sound task force, David, Chenyu, Xiaoqing, and YG, that created the most amazing immersive sound experience. The Touch Designer Team, Allison, Yijun, and Yuxuan for the amazing development they had of learning TD from scratch, as well as all their testing with Audruino. Molly for her leadership and with whom I made a great team working in the project management, and development of the final exhibition. I feel extremely proud of all that we achieved during this semester.
I also want to thank our tutor, Asad, for all his incredible mentorship, who helped us give structure to the crazy ideas we all had in our heads. And our course organizer Jules, for the support given to us to make the exhibition possible in the way we imagined it from the beginning.
1. Went to uCreate to check on the second part of the 3D printing, to find out that the print had failed during the day, so I calibrated the machine again and started the printing process once more. (This was around midnight, the print took 9 hours[I spent 8 of those 9 hours in the library]).
2. Went to Evolution House to print posters and postcards
3. When picking up the second 3d print, I took the postcards to uCreate, and hand-cut them with a ruler and Xacto knife as they were 8 on each page.
5. Edited the secondary blender videos on iMovie.
6. Set up of the space: projectors, screens, tables, 3D models, videos on screens, and lighting.
7. Talked with the audience about the exhibition, our main concept, and about our design process.
7. Pack away all the equipment, and return tables, and boxes to their places.
8. Celebrate the end of a successful exhibition by going with some of my teammates for a pint (ok, a couple of pints).
Challenges Encountered
The day of the exhibition was a hectic one, between running around the city picking up the posters, and 3d models, back to Alison’s house to finish up the last videos we needed. A couple of hours before we started to set up, things were not working correctly, we realized that the Kinect was not gonna work in conjunction with the sound, so we decided to not use it. The computer we had planned to use TouchDesigner in, decided to not work at the last minute, so we switched to one of our computers. Also, we realized that because of a small miscommunication, the projectors we had planned to work with were not available. And once we were set up, there were problems connecting the HDMI cables from our computers to the projects, this was merely minutes before the star, so the panic was quite high. Thanks to the help of Jules we were able to fix the side screens (tip: check that your adapters work, beforehand). Some of the light fixtures that we wanted to use, were not set up properly, but with a bit of creativity, we changed the setup slightly to make it work.
In any project, unexpected challenges and setbacks can arise, and our exhibition was no exception. However, we had taken proactive measures to prepare for such eventualities, starting from the early stages of project development. We had discussed and identified potential issues and developed contingency plans, so when issues did arise, we were able to quickly adapt and implement alternative solutions. Ultimately, this allowed us to navigate the challenges and deliver a successful exhibition. (Also a quick wit and rapid thinking, saved us from mishaps)
Lessons Learned and Team Collaboration
Our collaboration was essential in the success of the exhibition, as we created a great multidisciplinary and multicultural group that came together to work on our main objective, to design and develop an engaging and emotional experience for the audience. Without this collaborative effort, we would not have been able to achieve the level of cohesion and depth that our project ultimately achieved.
One of the most important lessons I learned during the course was the significance of prioritization and organization in project management. From discussing and identifying all the necessary tasks and assigning specific roles to each team member. This approach enabled us to have a clear understanding of what needed to be done and when. Additionally, our cohesive team allowed for mutual support in problem-solving, ensuring that no one was left struggling alone.
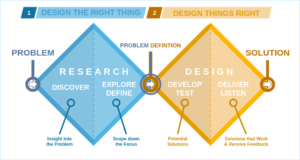
Our design methodology was inspired by the double-diamond approach, which consists of the following states:
Discovery: gathering data
One of our first tasks was to start researching the concept of place, as well as the technology LiDAR. We had a brief, and pretty much the ability to follow it in any way we wanted to. So we identified our opportunity and started to ideate what kind of project we wanted to work on. We did several sessions talking about where we wanted the project to go forward and decided that each team member would pitch their final idea, and we would go on from there.
Definition: Filtering our ideas
In this stage we had our ideas all together, so we decided to have a meeting where we all explained our ideas, and from there we decided to follow the one we thought had more character, using bits and pieces from the other concepts to tie it together. At this stage, we decided we wanted to do work with The New Steps and create an immersive, interactive exhibition.
Development: Building our concept
This stage is where we started the main of our design work, we planned what scenes we need to to, and what kind of sound recording we were gonna work with. As with any project some things changed during our process, so we keep iterating it, also taking into account the feedback given to us by our tutors.
Delivery: Exhibition
For the delivery of the project, we had to make several tests, to make sure everything worked together and in an easy and well manner. We did one full sound test, where we also saw how we were gonna set up the screens. In the following tests, we decided the best layout for the exhibition, and what kind of objects we needed to complete the space. On the day of the exhibition, problems showed up, as is a normal thing that can happen with this kind of project, but we worked fast and solved them in time for the audience to enjoy of the experience.
Daniela M
References
www.designcouncil.org.uk. (n.d.). The Double Diamond – Design Council. [online] Available at: https://www.designcouncil.org.uk/our-work/skills-learning/the-double-diamond/.
Digi-ark (2020). English: Double Diamond Design Process phases. [online] Wikimedia Commons. Available at: https://commons.wikimedia.org/wiki/File:Double_diamond.png.
Echoes and Absences was inspired by our collective experiences and fascination with the idea of place. After conducting thorough research and considering several potential locations, we ultimately chose to focus on The New Steps in Edinburgh’s old town. The complexity of this transitional space, where hundreds of people pass through each day, intrigued us. Although it may seem like a non-place, as we spent more time there, we realized that the definition of the space varies based on individual experiences. While some people may see it as just a passageway, others may have developed a deep emotional connection with it, seeing it as a place full of history and memories that is a part of their daily routine. This insight led us to explore the idea of how people’s personal experiences can shape their perceptions of a place and influence the emotional connection they have with it.
Our team’s primary goal was to design a unique and immersive experience that would enable users to feel a sense of presence. To achieve this, we focused on exploring the connections and transitions between a liminal place and the audience, aiming to create an engaging and thought-provoking experience that would leave a lasting impression.
We carefully considered how users would move through the space, designing the exhibition to guide them through a series of visual and auditory stimuli that would create a sense of immersion and transport them into this digital place. Through the use of LiDAR technology, we were able to capture and manipulate spatial data in innovative ways, creating a truly captivating environment that stimulated the senses and captured the imagination. Throughout the design process, we remained committed to creating an enjoyable, interesting, and intriguing experience for the audience. We were mindful of balancing the emotional and intellectual aspects of the exhibition, using sound and visual elements to convey complex ideas in an accessible way.
Overall, our goal was to create an experience that would not only be engaging and thought-provoking, but also leave a lasting impression on the user. By utilizing LiDAR in innovative ways, we were able to achieve this goal and create a truly unique and captivating experience for our audience.
The desired outcome for this project was to create an immersive and thought-provoking experience for the user. We aim to transport the user to a different world and encourage them to explore the connections and transitions between a liminal place and their own experiences. Through this, we hope to evoke a sense of presence and emotional engagement that will stay with the user long after they leave the exhibition. In terms of public discourses or conversations, we aim to contribute to the ongoing discussion around the ways in which technology can be used to create new forms of art and cultural experiences. We want to challenge traditional notions of exhibition design and explore the possibilities that emerge when different creative disciplines collaborate and utilize cutting-edge technology. We also hope to engage in conversations around the concept of place and how it shapes our experiences and emotions, particularly in the context of a rapidly changing and increasingly globalized world. Overall, we see Echoes & Absences as a contribution to the broader cultural conversation and a means of exploring and challenging the boundaries of what is possible in the realm of immersive art and design.
Each individual has a different relationship with place, and they tend to be both complex and dynamic and involve an entire series of dimensions that continue to shape and reshape how different situations present themselves to us. (Janz, 2017)
With this, we can say that our relationship with place is not just a matter of physical proximity or geographical location, but instead is a subjective and experiential phenomenon. “We all see the place differently, this varies depending on different factors, such as our individual memories, cultural context, historical background, and sensory perception. With this, our relationship with place is constantly evolving, and its reshaped every day by our day to day experiences.
Marc Augé (Augé, 1995) defines a “place” as a space that possesses a distinct identity and significance. They are enriched by social, cultural, and historical meaning and foster a sense of community and belonging among individuals. Augé identifies three main characteristics of a place: identity, which pertains to the unique character and significance of a location; relation, which refers to the social and cultural interactions that occur within the place; and history, which encompasses the collective experiences and memories that shape the identity of the place over time.
On the other hand, Augé defines “non-places” as a space that lacks a distinctive identity or meaning, and is instead defined by their function or purpose. These spaces are typically designed to be easily accessible and efficient, but they do not foster a sense of community or belonging due to their temporary nature. There are three primary characteristics of non-places: transience, which reflects their fleeting and temporary nature, designed for quick movement; anonymity, which refers to the lack of social interaction and connection among individuals in non-places, as people tend to be focused on their own goals rather than engaging with others; and uniformity, which describes the standardized and repetitive design of non-places, characterized by homogeneous features.
Our relationship with place is shaped by a multitude of factors, including our individual experiences, cultural background, and sensory perception. As technology continues to shape the way we interact with the world around us, the concept of place is also evolving to encompass digital spaces. These digital places offer unique opportunities for connection and community but also present new challenges and complexities. As we continue to navigate the changing landscape of place in the digital age, it is important to consider how these spaces shape our experiences and interactions and to explore new ways of fostering a sense of belonging and connection in both physical and digital places.
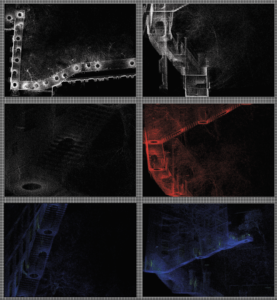
When creating promotional materials for the exhibition, our goal was to convey the essence of the project in a way that was engaging and accessible for potential visitors, we opted to use the rawest form of visual data available, in our case it was the images generated through cloud compare when we first started working with the cloud points.
Our goal was to visually convey the key ideas of Echoes and Absences to potential visitors, using imagery that was both captivating and informative. To achieve this, the team chose to create posters showcasing some of the images generated during the process. In addition to the posters, we also designed postcards for visitors to take home with them. These postcards feature some of the images generated during the development of the project, as well as additional information about the project and a QR code to the blog that shares our work. The postcards are intended to serve as a reminder of the exhibition, as well as a way for visitors to further learn about the project after their visit.
Overall, the team’s approach to designing promotional materials was to focus on the visual representation of the project’s core concepts, using captivating imagery to engage potential visitors and encourage them to learn more about the exhibition, the materials created were intended to serve as effective tools for promoting the exhibition and generating interest among the public.
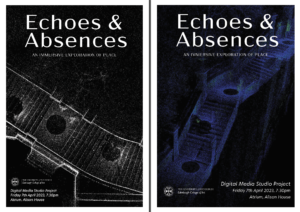
Final Poster Design
For the posters we printed both of them in A1, and once we saw the printed results, we decided to use the black and white one for the exhibition as it looks with more quality. While the blue one we used as a supporting poster at the entrance of the room, and decided that this should be used for the digital posters, as the quality digitally is amazing.
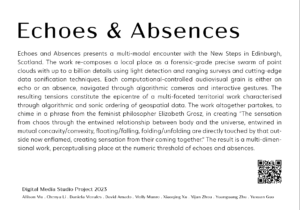
Final Postcard Designs
The postcards will have a selection of images on one side, our manifesto on the back, along with the team’s members’ names, and a QR code to the home page of our blog. On the exhibition day, the postcards received great feedback from the audience, as it allowed them to take a bit of the exhibition with them, and gave them the opportunity to learn more in-depth about the project.
We have deiced to create something more than just an immersive digital experience. We want to showcase our whole design process and share it with the public, the entire workflow process, the ups and downs we had, and the exciting bits we realized while doing this project.
We decided to turn our project into an exhibition, where we included the process we went thru while working. We can show the representation of each person in the team of what our database is, a way to show a bit of essence from each one of us as individuals before we merged our ideas together.
As far as what we are looking to exhibit, so far we have the following list:
Immersive digital experience (main event)
Lidar thru our mind (shows a version of the cloud points from the eyes of each of the team members)
Fieldwork records (showing our process while gathering data in the field, video/pictures…)
3D visualization of the steps (3d printing pieces of the stairs, one or two variations of them)
Sound that was developed from our material but not used for the immersive experience.
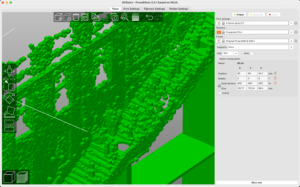
Once we saw the 3d model of the stairs in Blender, with our predetermined shape in each point, making it look like something out of a pixel world dream, we asked ourselves how it would look if we created a physical model of this digitalized version of a physical place? A bit weird for sure, but what better than to try it ourselves.
Why do we want to do this?
The main reason behind 3d printing our scans is to show the representation and distortion of a place after it goes thru such a process.
From collecting our cloud points from the real physical place we are talking about to working the data in Cloud Compare to subdivide the amount of data we got, importing it to Blender, giving it a shape and a digital physical form again, finding a way to express this transformation the data has gone thru by printing it and showing it to the public.
Of course, we have our limitations with 3D printing as with any technology, but I find it extremely interesting the aesthetically pleasing way the 3D models came to be, as it is a physical representation of the process we put the data thru. One way to further show this is if we can print with a white filament (or we can spray paint the model) and place it on a black background. So it’s a representation of how we are working with our data digitally, white data on a black background, just like we worked most of the time in CloudCompare and TouchDesigner.
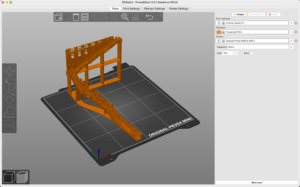
Choosing a cube as the form to use for this, using Blender I deleted most of the points that were floating in space and not really part of the primary stairs model. After delimitating the data that was gonna be part of the model, I created a simple structure to hold the model together “the bones of the earth the stairs are on.” Once the model was finished on Blender, I exported a .stl so I could import the model to PrusaSlicer, to slice the model and give it the determined setup needed for 3D printing.
PursaSlicer software
We purposely choose to leave some holes in the structure, as it’s an essential part that shows where our scanner was placed. For this version of the 3D model, we believe it will show up with many imperfections, but for us, that is part of its beauty of it.
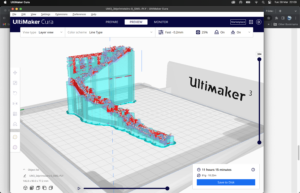
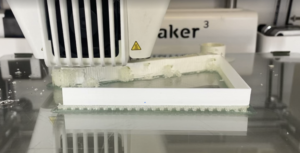
We will try to create a second 3D model using one of the Ultimaker 3 printers, which will allow us to print with two different filaments. Using a water-based filament for the parts that support the structure while printing, and those will be dissolved with water, creating a more detailed 3D model. For this print, we are using Ultimaker Cura software for the development of the printed model.
The Printing will be made on Thursday the 29 in the uCreate maker studios.
After getting all the files ready, I decided to go to uCreate before printing to ask them about my files and if they were viable for printing. In there the head of the 3D printing department looked at my model and told me that it was very likely to fail due to the complex geometry, another thing was that I was printing the model in one piece, and this created great waste of material.
After their feedback, I decided to change the model, creating a mesh and subdividing it to create a softer surface. After this, I decided to split the model into two pieces, this way I was able to print them horizontally and save material.
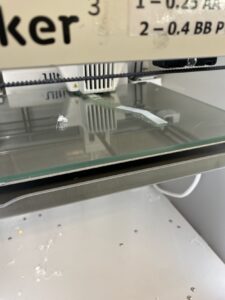
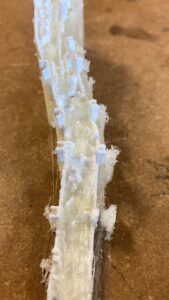
I printed the first part of the stairs without a problem, and it came out looking really interesting because you could also see all the supporting filament that gave it more character, so we decided to keep it. Printing the second part was a bit more difficult, I sent the files the first time, and while it did print, there was a corner of the stairs that was deformed. So I decided to print it again, only this time I stayed checking on the print, and after around an hour, it failed again. Feeling desperate as to why I was having trouble printing it, I asked for help and then learned that the reason it was not printing was that the machine was not calibrated correctly, once I learned how to do it, I started printing again. This print was supposed to be finished around midnight one day before the exhibition. So I went to pick it up and then found a Post-it not from someone in uCreate telling me that the print moved, and filed. I was not gonna give up, so I calibrated once again and sent the print once again, it was supposed to take around 8 hours to print. I had another submission the next day that I had to work on, so I stayed up all night working on that, and when 8am came, I went to check on the 3d printed model, and there it was, perfectly done.
Once back in Aslion house I simply joined both pieces together using superglue. And we exhibited the final model, as well as the previous failed attempts (and the post-it note) in a stand with a spotlight. During the exhibition, the audience took a great interest in the 3d model, as it was the physical representation of what they were seeing on the main screens.
If you’re reading this in order, please proceed to the next post: ‘Behind the Scenes’.
I have started doing a little digging into the history of The New Steps which are located in Old Town, Edinburgh. So far the search has been quite disappointing, as I can’t seem to find any relevant information online, the most I have gotten is a tourism blog talking about them as one more spot to visit during their travels to the city.
So I decided to start looking elsewhere, in this case, the National Library of Scotland. My first step was to start looking at old city maps to try and find the exact spot the stairs are, and the library website has a really handy tool of begin able to look at maps side to side. With this, I was able to locate the stairs on several maps going from 1892 forward, as older maps have the general streets, but the stairs are not shown anywhere.
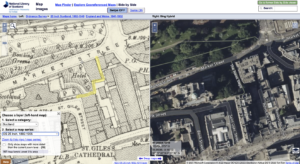
In one of the older maps that I found from 1892-1905, there is displayed a staircase similar to what The New Staris are today, with just part of them not matching the actual route, so it could be said they have been there, but slightly altered through the years. I can say they are The New Steps, as the entry point both on the top and the bottom are the same, it’s just the path they take is slightly different.
In the screenshot below we can see how the stairs are represented in the map of Edinburgh.
Map Name: OS 25 Inch, 1892-1905
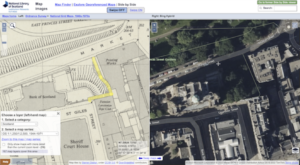
Map Name: OS 1:1, 250/1:2,500, 1944-1971
I did however find a comment in a tourism blog about them, but at the moment I don’t have any references to confirm if this information is viable.
The New Steps were built in 1869 when St. Guiles Street was laid out in the present form. And they were called The New Steps because The Evening News had an office in the building to the left of number 19. You would walk through a vennel, an open-air passageway, where number 19 now stands, and climb three sections with eight flights of stairs to St. Guiles Street. In 1928, hence the date of the building The Evening News building was extended and took over the area the steps started in. The steps were realigned and if you move Google Maps with one right click you can see the present start of the steps with the light above the entrance. I don’t have any way to reference this information, nor do I know if it’s true, yet.
Looking at the dates of the maps, and the dates the Evening News building was extended, it makes sense the change in the path found in the maps.
I’m looking to find some reliable sources to confirm the history of the steps, for this, I have asked for help from one of the librarians, and they kindly told me they were gonna do some digging and come back to me with any information relevant.
The Library reached out to me after a weekend and confirmed my suspicions about the history of the steps. The librarian did some research in different books, but same as me there was not much information about the place.
If you’re reading this in order, please proceed to the next post: ‘Meeting’.