Any views expressed within media held on this service are those of the contributors, should not be taken as approved or endorsed by the University, and do not necessarily reflect the views of the University in respect of any particular issue.
1. arrive early before the start of the show to assist in checking and organising the sound equipment required for the show
2. Assist in setting up the surround sound system on site, installing and checking the sound system equipment
3. assist in testing the sound and volume components of the sound system
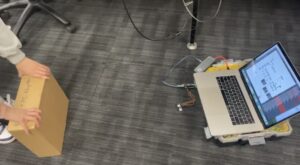
4. assist in measuring and accurately adjusting the actual step distance between the observer and the Arduino sensor
5. participate in external demonstration videos of connected equipment
6. Present the sound system structure to the audience during the demonstration and record answers to relevant questions
7. Prepare relevant professional questions and interview backstage observers in real time
8. Check and store the equipment after the performance and restore the scene
Challenges
In our installation, after testing and comparing, we chose to use a smooth iron plate as a prop in the observer’s hand to interact with the sensors. However, based on our observations, the transient response of this method was not as agile and fast as we would have liked during our testing. The reason for this could be due to the fact that the sensor response speed was delayed and accumulated throughout the display, thus causing our system settings to interfere with each other.
Secondly, some of the interactive trigger sounds were not immediately perceived by the observer throughout the presentation due to the grainy background sounds, which told me that I should have tested all the live sounds beforehand and adjusted their loudness and dynamics accurately so that all the sounds would blend into the installation sound system as much as possible, but still give the observer a sense of the trigger dynamics.
When doing the live space architecture, even after replacing multiple HDMI cables and connection inputs, the display would not play the display video until we replaced the computer.
Lessons
Despite the time we had anticipated, the number of problems that arose on site was a major factor that forced us to delay the preparation process. But when faced with these unexpected problems, calmly resolving them and having a back-up plan was the only way to help us get out of the situation. Behind the presentation of the project on this night was the entire design, refinement, debate and action of our team and the advice and help I received from my team members was the greatest asset I took away from the project.
The implementation of the Place project has been a novel and rewarding experience for me. Overall, the significance of the project is its ability to combine cutting edge technology with cultural significance to create an immersive and engaging experience that allows for a new interpretation and appreciation of the culture of the place. The staircase, as a physical element of the installation, is able to connect with the contextual culture contained within the site of our project, adding depth and resonance to the overall experience for audiences. The integration of sound and vision, along with the use of Arduino, Max, Kinect and 3D scanning technology, creates an innovative dynamic and responsive installation. The interactive and immersive nature of the installation allows for a new interpretation and appreciation of the cultural significance of the site, creating an innovative and engaging experience for visitors.
From a sound perspective, the use of a 7.1 surround sound system in the installation and the audibility of the sound creates a dynamic and immersive experience for the audience. The integration of distance sensors with the sound triggering system allows for real-time interaction with the sound, making the audience an active participant in the overall experience. And the use of Max as the primary control interface for the sound system enables flexibility and precision in sound design, thus enhancing the overall sensory experience for the observer.
From a visual perspective, the use of the Kinect sensor and 3D scanning creates a visual element that is both dynamic and responsive to the viewer’s movements. The integration of the distance sensor with the visuals allows for real-time interaction, which makes the viewer an active participant in the overall experience. the use of TouchDesigner allows for flexibility and precision in visual design, which enhances the overall sensory experience.
My tasks:
For Place, a project involving an interactive immersive installation, my main responsibility was mainly to architect a sound triggering system about Arduino and based on Max.
The following links provide a detailed description of the various parts of my workflow:
Initially all the MAX and Arduino parts of building the interactive triggered sound system were like new territory for me, I had a lot of misdirection and misjudgement in the process of figuring it out, but I learned step by step with David’s help about the Arduino connections, about the creative control functions of MAX in the sound system architecture, and I I learnt that musicality is sometimes not the only option in a performance, I learnt that the granularity of sound makes for a unique and infectious presentation, and I overcame many new problems in this learning process with the help of the team.
As far as the whole sound creation process is concerned, I learnt to be inspired by interactive triggering of sound creation during the preliminary field recording. In the sonification section, I learnt about the possibilities and techniques of data sonification, and I realised that every part of the sound system is important, detailed and essential. David’s extensive experience with MAX has helped to guide and inspire me in every part of the project. Allison was always on hand to answer questions about both the arduino connection and its working code, and Chenyu was always on hand to provide her unique and helpful advice on the whole structure of my work. Thanks to Molly, Daniela, Yijun, YG and Yuxuan, we were able to work on the architecture and details as we tried to improve the performance of the whole device step by step to achieve the final presentation.
22/03/2023 ECA Xiaoqing Xu, Chenyu Li , Allison Mu
Initial Connection with Arduino under MAX Threshold Function Structure
23/03/2023 Allison House Xiaoqing Xu, Chenyu Li, Allison Mu
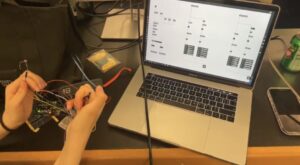
Connection to distance sensing under Arduino architecture with trigger test by observer
Comparing the advantages and disadvantages of distance sensor and photosensitive sensor
24/03/2023 Teams David, Xiaoqing Xu
Attempt to connect the modified Max patch with the full Arduino architecture
28/03/2023 Allison House David, Xiaoqing Xu, Chenyu Li, Allison Mu
Observer step test and trigger threshold adjustment
Tuning modification of interactive trigger sound
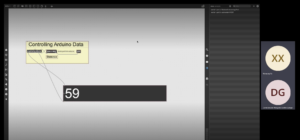
Initially, the threshold values were set in units of 10, but during testing, it was observed that the change in distance values was not sufficient to trigger all the auditory information of the sound, including the instantaneous audio content. Therefore, the threshold values were simplified based on the step distances of multiple people to achieve the most ideal trigger effect. This involves adjusting the threshold values to accurately detect when someone is stepping onto or off the stairs, and ensuring that the corresponding sound is triggered in a timely and accurate manner.
During the initial design phase, our team considered three types of sensors: pressure, distance, and photosensitive sensors. However, we found that the pressure sensor did not provide accurate data that reflected the simulated climbing state. The photosensitive sensor was also problematic due to its sensitivity fluctuations, which were influenced by the surrounding environment and made it difficult to isolate variables. After conducting tests and comparisons, we determined that the distance sensor was the most sensitive and best suited for detecting the observer’s movement in the test state. However, during our actual tests, we discovered that the clothing material worn by the observer could absorb reflections and cause errors in the data readings. To overcome this issue, we identified that a smooth plane with a certain area could more quickly and sensitively respond to real-time sensing data from the distance sensor.
All the sound samples Playlist was initially classified according to the sound body, but in the process of actual testing all the triggered sounds were slightly mixed in the hearing, and it was difficult to distinguish their triggering time points, so our sound team divided them further, that is, the four action states were actually simulated from the perspective of trasient and sustain, and all the sound Playlists were classified and divided again, and all the sound Playlists were set up with transition processing between two and two to make the triggering more natural and realistic.
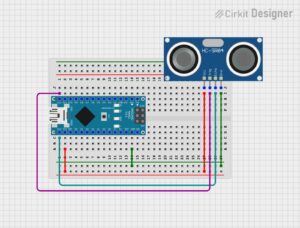
In this case, the Arduino plays a crucial role in the overall interactive device and sound triggering system, acting as a bridge between the distance sensor and the Max patch, enabling the interactive device to respond to the user’s actions and trigger the appropriate sound.
Its main function is to act as the primary interface between the distance sensor and the Max patch receiving the distance sensor data, processing it and sending it to the Max patch via serial communication. The Arduino code reads the sensor values from the distance sensor pins and sends them to the Max patch via serial communication. The Max patch then processes the sensor data and triggers the appropriate sound based on the received sensor value, sending a signal when the distance sensor value exceeds a specified threshold.The Arduino code is able to detect when the distance sensor value exceeds the threshold and sends a trigger signal to the Max patch via serial communication.
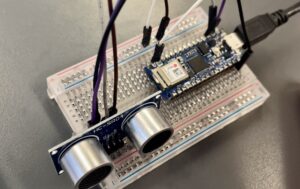
Arduino connection diagram
Arduino Operation
The code is used to measure the distance using the ultrasonic sensor. It uses the ultrasonic library to handle the sensor functions and provides the ability to interact with the ultrasonic sensor. The code calls the integer variable “distance” to store the measured distance. It initializes serial communication at a baud rate of 9600, which is used to send data from the Arduino to the computer via a USB connection. During the main loop run, this code sends the measured distance value to the serial monitor. Our project code introduces a 100 ms delay between distance measurements, which provides some time for the serial monitor to display the data and for the sensor to settle down between measurements. Finally this code uses the ultrasonic sensor connected to pins D12 and D13 to measure the distance and send the measured distance value to the serial monitor.
The interactive sound component of the device is designed to receive data from the sensors and to map the sensed data generated by the tester in real time to the intended sound sample in Max. Therefore, in this part of the concept, the state of simulated human climbing a step is transformed into a trigger and a random event for the tester for a certain threshold range.
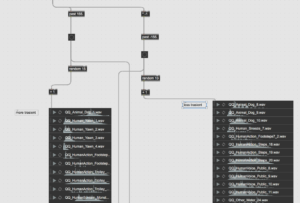
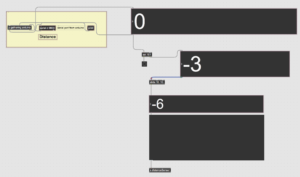
Firstly, the Max patch needs to receive distance sensor values from the Arduino. These values represent the proximity, or distance, of a person to the stairs and it changes as the person goes up or down the stairs. Max patch receives distance sensor values from the Arduino, representing the proximity or distance from the person to the stairs. It compares the received distance sensor values with the threshold values 55 and 155 to determine the different states of climbing the stairs.
When a certain threshold range is reached, the sensed data is automatically detected and a different result is triggered. For example, with 55 and 155 as the two thresholds for ResultA/B, ResultA’s Playlist is triggered when the data is less than 55, ResultB’s Playlist is triggered when the data is greater than 155, and the Playlist for intermediate state sound files is triggered when the data is between 55 and 155.
In the final Max patch, the device is triggered by two thresholds that determine the distance value in real time. the “Past” object in the Max patch simulates the state of a person climbing a staircase using the distance sensor value received via the Arduino, and the “Past” object has four states during the determination process. The thresholds 55 and 155 are used to detect when the person has climbed the stairs and returned to the middle state from the previous step, respectively. A negative threshold of opposite polarity multiplied by -1 is used to indicate the return state.
When the first threshold is triggered (going up a step), the distance sensor value crosses the threshold 55 from low to high, triggering the first threshold in the patch indicating that the person is going up the stairs. This may result in a positive value being stored in the “past” object indicating the current state of the stairs. When the second threshold is triggered (returning to the intermediate state from Step up), the distance sensor value crosses the threshold 55 from a high value to a low value, triggering a second threshold indicating that the person is returning to the intermediate state from Step up. This results in a negative value being stored in the “past” object, indicating the current state from Step back to the intermediate state. When the third threshold (going down the stairs) is triggered, the distance sensor value crosses the threshold 155 from a low value to a high value, triggering the third threshold, indicating that the person is going down the stairs, storing a positive value in the “past” object, indicating the current state of going down the stairs. When the fourth threshold is triggered (returning to the middle state from the bottom of the stairs), the distance sensor value crosses the threshold 55 from the high value to the low value, triggering the fourth threshold, indicating that the person is returning to the middle state which is the middle state at the bottom of the steps, resulting in a negative value being stored in the Past object.
It is worth noting that the negative value triggered in the above step is multiplied by -1 using the multiplication object in the Max patch. this changes the sign of the value in a mathematical sense and in this case effectively indicates the opposite direction of the return to the intermediate state from the top or bottom of the step, enabling the simulation of the change of state of the person going up and down the stairs in the Max patch.
sound containers ( Random ) :
Vertically, a Playlist is created that randomly plays different fetch sound objects, i.e. containers of sound objects corresponding to the two extreme sound states of ResultA/B. Horizontally, it is necessary to create the corresponding sound containers for a range based on the actual measurement of different value intervals containing multiple transformations of the same sound file from ResultA to ResultB.
Within the framework of the above thresholds, I set up four sound playlist objects so that each time a threshold is triggered, the destination sound sample playlist can be played at random. According to the original design of the interaction-triggered sounds, the target sound playlist was broadly divided in the auditory category into realistically inclined sounds in the range of action-return states with a threshold of 55 and non-realistically inclined sounds in the range of action-return states with a threshold of 155. However, based on the results of the subsequent tests, the four sound playlists were further divided into Transient and Sustain in terms of their nature. The aim was to simulate a more realistic human speed state when walking up and down stairs.
Transients and continuations of sound:
When the observer is going up the stairs, all sounds within the random sound playlist are sustained, whereas when the person is returning to the intermediate state from a step, their simulated counterpart is the opposing state of going up the steps, so the target sample sound playlist is more transient, so the sound response triggered when returning to the intermediate state value is more rapid and more curved. The same purpose applies to the triggering of Threshold 155, but we wanted the sound triggered when descending the stairs to be more transient and Transient, and the sound response when returning from the step down to the intermediate state value to be more continuous and granular.
Transitions and connections of sound:
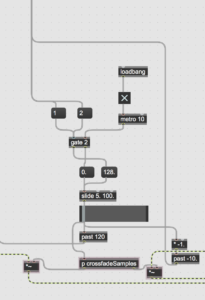
Since the observer is in constant motion during the action, this places certain demands on the transition between the different sound sample playlists. In the max patch we use the “gate” and “slide” objects to smooth this out. The go and return states of the threshold are sent to the left entry of gate via messages 1 and 2. The gate object receives the threshold and determines whether the input value is above or below the threshold. The output of the gate object is then sent to the slide object which controls the duration of the transition. The output of the slide object is then connected to the input of the scale object, which maps the duration value to the appropriate range for the playlist transition. The duration of the slide depends on the findings of our team’s listening experience in subsequent tests, and is the amount of time it takes to cross-fade between tracks. Loadbang and metro objects are used to trigger the transition at the appropriate time. This part of the Max patch can therefore be used to ensure that the sound playlist transitions smoothly and seamlessly according to the changing sensor input values.
Intuitive and Flexible Sound Transition Control:
In Max patches, the number 101 is used as a default or fallback value when sensor data is out of its range or not received correctly. This is a design choice used in the Max patch to handle unexpected or invalid inputs. For example, if the sensor is not sensitive enough or does not detect any input, it send an incorrect or invalid value to the Max patch. In this case, the Max patch is designed to replace the value with the default value of 101 to avoid unexpected behavior in the rest of the patch. Due to this phenomenon, our Max patch uses a “sel 101” object connected to a button object and has two outlets. The number “101” is used as an argument to the “sel” object, which means that when it receives the number 101 as input, it will output a “bang” message from the first outlet and the second exit will output whatever input is received. When the button object is pressed, it sends a “bang” message to the “sel 101” object. If the input number is 101, the first exit of the “sel 101” object will output a “bang” message, triggering some action in the Max patch. If the input number is not 101, the second exit of the “sel 101” object will output the input message unchanged. The number 101 is used as a trigger in Max patches to control a specific action or behavior. We connect its output “sel101” to a bang object that will trigger a specific function or event in the device when it receives the value 101. This is useful for handling unexpected input from distance sensors or implementing specific behaviors in your device based on this input.
The user’s decision-making interactions in the device can be broadly divided into four states:
Going up the steps from the preset position;
Returning from the upper position to the preset state position;
descending from the preset position to the next level;
Returning to the preset position from a lower level position.
In the final implementation of the device, we actually represent the user’s decision position during the above process by setting a distance threshold. On this basis, we can divide the results presented under the data extremes into realistic conceptual sound groups (ResultA) and surreal conceptual sound groups (ResultB).
ResultA: Based on a single layer of sound material prototypes, this conceptual sound set is based on the sound of all possible events in the decision making process in the installation, from which the auditory dimension of the connection between the person and the real event is evoked and the resonant similarity between the person and the installation is established. In terms of production, the single-layer sounds are edited within a reasonable range of the concept of reality in terms of the values of the time domain parameters (IR coefficients), at the basic sound distortion stage.
ResultB: An extreme surreal composite sound layer based on ResultA, the control sound group as opposed to ResultA. The material of the sound itself is identical to ResultA, but the aural effect is distinctly different in perception from the former; the sound processing technique no longer sets a reasonable range in terms of parameters, and the aural effect is presented as a completely conceptualised non-real-world sound. The aural purpose of this result is to construct an immersive narrative within the concept of this installation, which is completely different from the previous one, but essentially part of the same sound evolution.
The design concept of the installation aims to explore the different states and possibilities of people and systems, so in the production of this sound library I have focused on ‘people’, selecting samples of sound material from the diversity of human interactive behaviour. For example, different age groups – primary school students, university students, workers, etc., different actors – roadside beggars, tourists, etc., different amounts of human voice – two-person conversations, multiple people, etc. . In addition to the speech sound information described above, the human-centred sound body also includes non-semantic sounds, as well as the sounds of actions made by pedestrians recorded in the field, such as the sound made by a wheel when a person is walking. The sound of dragging a suitcase, the sound of a chain when carrying a bicycle, etc., are the focus of this sound bank. These are the main focal points of the sound library.
Classification of sounds:
Based on the above concepts, the objects sampled for this sample sound sampling can be broadly divided into the following categories:
1. footsteps
2. human
Speech: conversational and non-verbal sound symbols such as breathing, laughing, coughing, etc.
During the sound editing process, I processed multiple versions of each individual sample sound, adjusting them to each other to varying degrees in multiple dimensions such as the time and frequency domains, varying from low to high frequencies to each other, as well as overlaying multiple layers of sound dimensions from single to composite. These different versions of sound in the scene represent the intermediate process of the user’s decision from ResultA to ResultB, a combination of multiple sound states (multiple small processes) and triggered transitions according to the data range.
During the pre-production field recording, I purposefully recorded many human-based sound samples using Sennheiser 416 microphones, including but not limited to human voices, group noise and footsteps, moreover, people unintentionally sneezing, coughing, bicycle chains and bells on backpacks, busy cell phones, etc. These sound samples provided me with a lot of creative inspiration for the post-production sound.
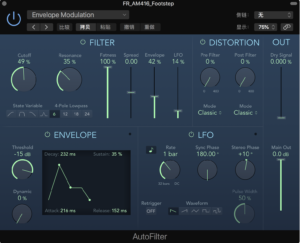
Throughout the post-production process, my goal was to be able to use the same realistic sound samples to create multiple, contrasting versions of the sounds. For example, a bent, grainy techno sound effect with an ethereal echo sound effect, or a sharp, transient, prominent tone effect with a thick, layered sound effect, etc. The main DAWs I use are Logic pro and Reaper, and the sound production process techniques are as follows:
Time stretching and pitch shifting:
changing the pitch and playback speed of audio can produce unusual and surreal sounds. Logic Pro has built-in time stretching and pitch shifting tools.
Distortion and Saturation:
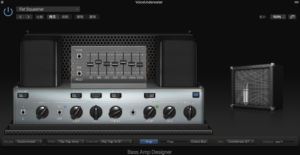
Adding distortion or saturation to audio can produce a raspy, aggressive sound. I try to experiment with different types of distortion and saturation plug-ins to find the right amount of texture for each sound. (Overdrive/ Distortion/ Amp Designer)
Layering
Combine multiple layers of sounds with different textures and timbres to create a complex, transcendent atmosphere. It includes layered synthesized sounds, recordings of natural environments, and processed samples.
Reverb and Delay:
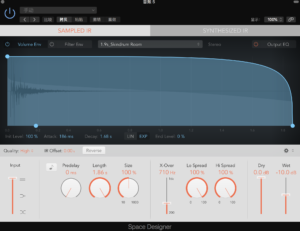
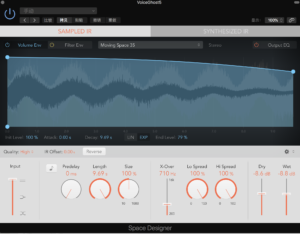
Use reverb and delay plug-ins to create a sense of space and depth in the sound. I try to make extreme settings, such as long decay times or high feedback levels, to produce weird, dreamlike atmospheres (Space Designer/ ChromaVerb/ Delay Designer).
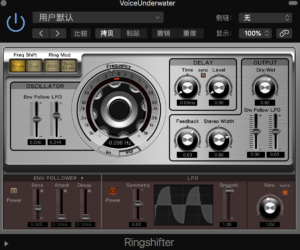
Frequency shifting:
Frequency shifting can produce metallic, dissonant sounds and can be used to add an element of unreality to your audio (Frequency Shifter in Logic Pro).
Resample:
Merge audio to a new track and further process it using any combination of the above techniques. This can lead to some unique and unexpected results (EXS24 in Logic Pro).
Automate Effects:
Automate effect parameters such as filter cutoff frequencies or reverb mix levels to create dynamic, ever-changing soundscapes.
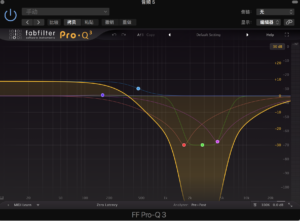
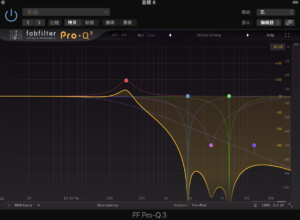
Experimental processing:
Use a spectrum processing plug-in like FabFilter Pro-Q3 to manipulate individual frequencies of the audio, removing, retaining or adding the parts of the frequencies I want to achieve some special spooky sounding effects.
Grain Synthesis:
Grain synthesis is a technique that involves manipulating small fragments of sound to create unique textures, such as Logic Pro’s Mangle.
Reverse:
Inverting sounds can create interesting textures and timbres that are not possible in traditional ways. Upside down vocals can often give a grotesque, ghostly feel. It can also be layered with its original, non-reversed counterpart to add depth and complexity to the mix. Often, the combination of forward and reverse sounds can create a sense of movement and space. For example, inverting certain elements of a mix may produce unexpected and interesting effects. For example, reversing the reverb tail can create a unique sucking sound that draws the listener in, while reversing the delay can create a disorienting bouncing effect.
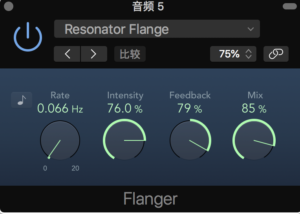
Flanger:
Creates a unique, wide, spacious sound by combining the original audio signal with a slightly delayed and modulated version of itself. It creates a comb filter effect that produces a series of notches in the spectrum that move over time, resulting in the characteristic hiss associated with flanging. It creates a lot of space and dimensionality for me in my mixes. But too much flanger can make a mix sound unnatural, so I experiment with different settings to find the most appropriate amount of flanger for the target sound.
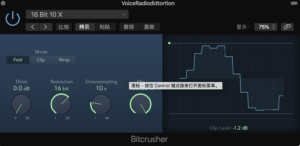
Bitcrusher:
This technique is mainly used for bit reduction and downsampling, but can also be used to add digital distortion and saturation to my sound. I control saturation mainly by adjusting the “drive” parameter.
Arduino: a microcontroller board that can be used to build a wide variety of electronics projects, including those that involve sensors.
Pressure Sensor: detect changes in pressure, such as altitude or water level changes. BMP180 and BMP280 sensors are commonly used.
The project would likely involve placing the footstep pressure sensor on the ground, and connecting it to an Arduino board using jumper wires. The Arduino board would then be connected to a computer or power source using a USB cable or battery pack. The pressure sensor would detect when a footstep is made, and the Arduino board would use its analog input pins to measure the pressure values. The code running on the Arduino would then analyze the pressure values and determine if a footstep has been made. The output of the project might be displayed on an LCD screen or other display module connected to the Arduino, or it could be transmitted wirelessly to a remote device (smartphone or computer).
Making an Arduino-based footstep pressure sensor project:
Gather Components: The first step is to gather all the necessary components. An Arduino board (such as the Uno or Nano),a pressure sensor module (such as the Force Sensitive Resistor or Flex Sensor), a breadboard, and some jumper wires.
Connect the Pressure Sensor to Arduino: Connect the pressure sensor to the analog input pin on the Arduino board. Depending on the type of pressure sensor used,it may have two or three pins. Connect the positive and negative pins of the sensor to 5V and GND pins on the Arduino,
Write the Code: Open a new sketch in the Arduino IDE and write the code to read the pressure sensor values.
Upload the Code: Connect the Arduino board to your computer using a USB cable,select the correct board and port in the Arduino IDE, and upload the code to the Arduino.
Use interactive devices supported by 3D printing technology to display the cultural heritage of a special place with Scottish cultural background, and use immersive display experience to explore the possibility of the interactive relationship between individuals and spaces.
Form:
The multi-dimensional scanning scene is displayed through projection, and the audience can feel the scanning changes of image data caused by individual behavior and movement from the first perspective in the exhibition space. The time development of the entire installation is guided by the well-established story line, so that the immersive experience of the space environment and the cultural significance and aesthetics behind it can be experienced.
Place:
Mary King Close
Mary King Street is an underground street in the Old Town of Edinburgh, Scotland. It dates back to the 17th century and is one of the oldest areas of the city. It is named after Mary King, a prominent figure in Edinburgh’s history who lived there in the 1630s. The close was once a bustling center of activity, with merchants selling their wares, artisans working and families living there. However, when the plague hit Edinburgh in 1645, it was sealed off for decades until it reopened as a tourist attraction in 2003, complete with mythical tales of its haunted ghost.
project extension:
Non-realistic space: realize the transformation of real space and non-realistic space through the user’s specific trigger form, and make corresponding display form of picture and sound;
Use programming technology to generate sound through visual movement
Sound Plan:
Large ambient sound that matches the environment (simultaneous recording or screen generation)
Scene music: Multiple music motives in different areas of the location that can enhance the immersive experience of the first-person perspective, triggered by individual triggers/sensing (Experimental Electronics/Scotland/medieval)
3 Voiceover: Narrative, quickly explain the background and meaning of the project
My project story proposal:
The protagonist accidentally meets the ghost in the mirror after straying into the alley (performance artist). In the story it tells, he personally experienced the artist’s relationship between life and art when the plague hit Edinburgh in 1645 struggling and thinking. The character experience space develops with the sound narrative, perhaps adding our members’ individual thoughts in different spaces.
First practice
Time:31/01/2023
Place:ECA West Court
Equipment:Leica BLK360
Purpose:
To understand how LIDAR technology and its devices work in space, including how it is presented, to extend the scanning range. Method: Change the scanning angle of the equipment in an indoor closed space to detect the 3D printing results of the device in response to human motion by changing the motion trajectory of the human body
Summary:
Lidar scanning technology can quickly acquire a large number of data in a short time, and can provide a large number of objective databases for our final mapping space, so as to accurately represent the terrain or structure. Compared with traditional scanning methods, 3D modeling can provide more detailed scanning results However, according to this practice, we found that the equipment has certain requirements on the spatial topography to be scanned, so for areas with a large number of trees or other vegetation, the collected data may not be so detailed or accurate, and according to the data, the accuracy of the results may be affected when the data is collected under wet conditions such as rain and snow.