Any views expressed within media held on this service are those of the contributors, should not be taken as approved or endorsed by the University, and do not necessarily reflect the views of the University in respect of any particular issue.
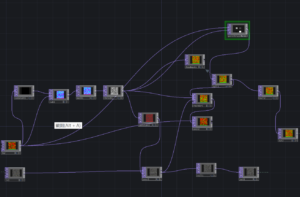
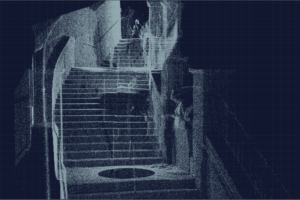
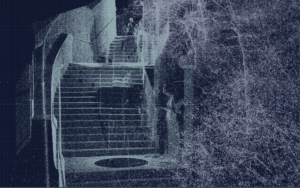
Based on B2BK (20223) tutorial video, I learned about the knowledge of the thresh node. Through the thresh node, we can process a portion of the particles. I connected it to a constant node and adjusted the green and blue values in the constant node’s RGB to 0. This allows us to manipulate the particles that belong to the red portion. As shown in Figures 1 and 2 and 3, I attempted to cut this staircase into two parts.
Figure 1 Figure 2
Figure 3
However, when I tried to manipulate parts of the image other than the red section, such as the green or blue sections, the changes were not noticeable. Therefore, we abandoned the use of this node.
1. Debugging interactive devices and adjusting the range of detection values for the devices.
2. Connect Max to TouchDesigner and adjust the corresponding value ranges (the value range of sound and the parameter value range of TD are not consistent).
3. Adjust the visual artwork and ensure it is properly projected onto the screen.
4. Introduce the exhibition to the visitors who come and encourage them to try our installations.
5. Interviewing the audience and asking them about their feedback and suggestions regarding the exhibition.
6. Record interview videos
Asking the audience for their feedback and suggestions helps us better understand their needs and reactions, and based on this feedback, we can improve and optimize the direction of the exhibition. It also promotes communication and interaction between us and the audience, allowing them to have a better exhibition experience. This can also make the audience feel that their opinions and suggestions are valued and respected, and they are more willing to understand the concept and purpose of the project.
Challenges Encountered
There were some miscommunications in our previous discussions, which resulted in slight differences in the triggering settings between the sound and visual components. This caused the sound and image to be out of sync. When we attempted to fix the settings, we encountered some bugs in our code, but fortunately, we were able to resolve them in the end. Additionally, the computer we were using had a low configuration, which led to frequent malfunctions in our visual files, such as unstable and delayed detection results for the Kinect and sensors in TouchDesigner. The detection range of the Kinect and ultrasonic sensors also conflicted, and as most of our sound effects relied on the triggering of the ultrasonic sensors, we had no choice but to abandon the Kinect component.
Lessons Learned and Team Collaboration
The most profound lesson learned from this exhibition is that it is essential to conduct a comprehensive exhibition test before the final presentation, just like a rehearsal before a concert. There were too many unforeseen accidents, and advance testing can give us a rough mental expectation of the final presentation effect and prepare a plan B to deal with unexpected situations. Full communication within the team is also crucial. It is necessary to ensure that everyone receives consistent information to prevent a disastrous situation caused by information gap.
I think the ‘place’ team is an amazing group!! It has given me confidence in teamwork projects, and the overall presentation of the project is impressive. It is definitely not a project that one person could complete in just two months. However, nothing is perfect, and there are still many areas that need improvement.
The biggest issue was the detection problem with the Kinect and Arduino sensors. As we mentioned in our blog, we ultimately did not use the Kinect part of the project because its detection range conflicted with that of the ultrasonic sensors. However, this made our interactive part somewhat monotonous because we only had the options of moving forward and backward, and triggering scene transitions. This weakened the immersive atmosphere. Additionally, we spent a lot of effort exploring different effects with the Kinect part, and not being able to present them was a great pity. Moreover, the ultrasonic sensor detection was not sensitive, and it was affected by clothing materials and lighting. We had to ask the audience to hold a heavy blackboard in front of their chests to trigger the effect, and it wasn’t always effective. One possible solution is that we could give up ultrasonic sensors and switch to coordinate-detecting sensors. Without considering technical and equipment limitations, if we could set up the entire exhibition site as a three-dimensional coordinate system, where the audience can trigger different scene effects and sounds in different areas, I think that would be very cool. Additionally, if the Kinect could be modified to capture the silhouette of a person and interact with the point cloud image, I think it could enhance the immersive experience.
Another issue is related to the venue and equipment. The size of the screens on both sides is not consistent, which affects the overall visual appeal of the exhibition. If we could use large LED electronic displays, the exhibition would be more refined. Additionally, our sensors were exposed, and perhaps we could create a prop that fits the concept to wrap it up and create a more immersive environment.
In this team project, I deeply realize the importance of teamwork and the role of sound design in interactive media projects. Everyone is like a part of a machine, efficiently completing their own work. The presentation of this exhibition cannot be achieved without the efforts of Molly and Danni. They rented the venue, printed the models, created animations, posters, and postcards. They made this project finally presented to the audience in the form of a real exhibition. In addition, they actively communicated with the teacher, allowing us to receive feedback in a timely manner and improve the project. Also, this is the first time I have collaborated with classmates in sound design to complete a project. They demonstrated outstanding ideas and professional skills, allowing me to truly experience how sound enhances visual effects, creates atmosphere and emotions, and allows the audience to experience and feel the work more deeply. David’s professionalism and maturity have always effectively guided the team, and Xiaoqing and Chengyu have always actively followed up on the project and patiently solved the problem of how to combine the visual and sound parts. Yuanguang has also been communicating with David about the sound part. Allison and Yuxuan, as partners who completed the visual part together, have always patiently helped me solve the problems I encountered. Without them, I might have collapsed.
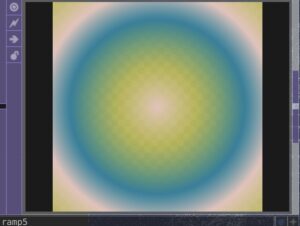
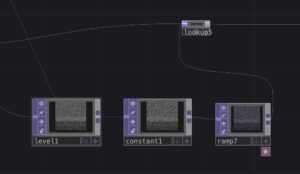
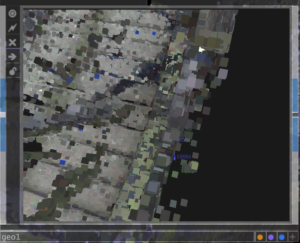
In order to present a good image, we changed the color of the point cloud and adjusted the composition. We used a ramp node to change the color of the point cloud, extracting elements such as morning, night, trees, and blue sky to design the colors. The final colors we selected are shown in Figure 1. Although we chose many colors, they don’t make the image look too colorful, as shown in Figure 2, and these colors are changing small particles one by one.
Figure 1: ramp node Figure 2: particles
The final result is as shown in Figures 3, 4, and 5.
Figure 3 Figure 4
Figure 5
Dynamic effect of tree
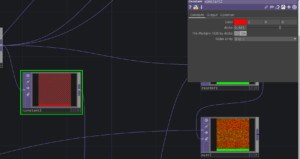
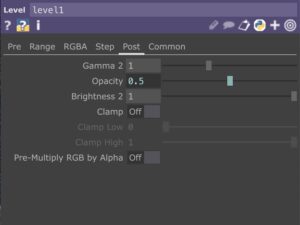
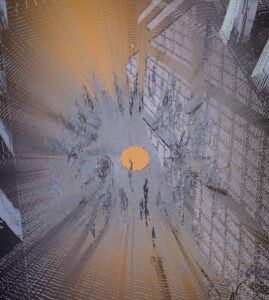
We also tried to make the trees ‘fade in and out.’ We attempted to change the transparency of the trees, so that they would disappear and reappear, as shown in Video 1. However, we found that we couldn’t dynamically change the transparency parameter within the ramp node. So we added a level node and changed the transparency parameter there, as shown in Figure 6&7.
After importing the point cloud, we attempted to add some visual effects to it. This can be seen as our attempt to use technology to reshape this location, in order to reflect our understanding and knowledge of this place.
Visual effect by using noise node
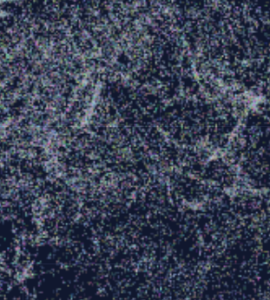
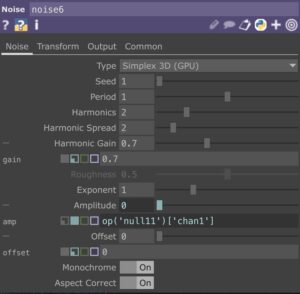
In order to add some visual effects to the point cloud, I used the noise node. As shown in Figure 1, different parameters in this node correspond to different effects, and we tried many different combinations. Among them, changing the values of some parameters did not result in significant visual changes in the point cloud, while others were very noticeable.
And some changes in parameter values bring very noticeable effects, as shown in video 1, adding atmosphere to this location.
Figure 1: different parameters in noise node.
Video 1: visual effect by changing value of offset
Dynamic visual effect by linking with sound data
But changing the values gives a definite visual effect (such as different visual effects for values 2 and 5). We want to preserve the process of this change, as shown in video 1, where the visual effect is dynamic (the effect in video 1 is obtained by controlling the mouse to change the values). So, we need a set of dynamically changing data that can be linked to the parameters.
After discussion, we decided that we could use sound data as a reference to link to the parameters, as sound is a part of shaping the environment. By linking the sound data, we visualized how sound influences the environment.
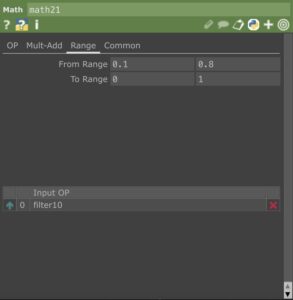
However, the range of the sound data does not match the range of the parameter values, which is 0-1/1-10. We used a math node to solve this problem, as shown in Figure 2, where we changed the range of the sound values to correspond to the parameter range, so that we could use the sound data.
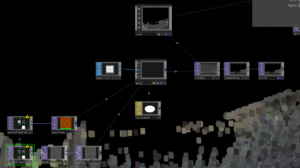
After receiving the scanned files from the LiDAR, we attempted to import them into TouchDesigner for processing. Initially, we followed video tutorial from Heckmann (2019), which used a CSV file. As mentioned by Yuxuan, this method was not suitable for us because the numbers in our CSV file were very messy. Therefore, we decided to follow the B2BK (2023) tutorial and import PLY files into TouchDesigner instead (the specific import process can be found in the blog https://blogs.ed.ac.uk/dmsp-place23/2023/04/26/designing-interactions-with-touchdesigner-1-importing-point-cloud-files/ ).
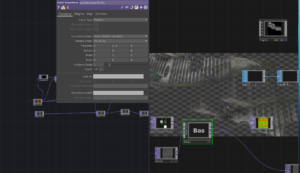
Rendering Material – Volumetric Point Cloud
As shown in Figure 1, we added materials to the point cloud to make it visible in the geometry node. However, as shown in Figure 2, the particles displayed in this way are flat. We found a way to solidify the particles in another video by Heckmann (2019), as shown in Figure 3, adding a box SOP node to turn each particle into a cube, and then adding materials to these cubes to obtain the effect shown in Figure 4.
Heckmann, M. (2019). Point Clouds in TouchDesigner099 Part2 – Using a Point Cloud File (Star Database). [online] www.youtube.com. Available at: https://www.youtube.com/watch?v=TAmflEv0LJA&t=1221s [Accessed 26 Apr. 2023].
Heckmann, M. (2019). Point Clouds in TouchDesigner099 Part1 – Instancing. [online] www.youtube.com. Available at: https://www.youtube.com/watch?v=WbnaW3gMmMs&t=7s [Accessed 26 Apr. 2023].
Based on the first phase, we have successfully linked Kinect with TouchDesigner. Next, our focus is on linking the audience and point cloud through Kinect, using specific methods.
Measuring the distance between both hands using Kinect
Considering that we will be using Arduino to implement our physical interactions, we are exploring how to interact with point clouds through hand gestures. I attempted to measure the distance between both hands by capturing their coordinates. Using a formula, we can know distance^2 = (x1 – x2)^2 + (y1 – y2)^2. So, as shown in the video below, when I spread my hands apart, the distance increases, and when I bring them closer together, the distance decreases. As shown in the Figure 2, we can use this value to change the visual effect of the point cloud (the specific content is in the blog of the point cloud visualization section in TouchDesigner).
Figure 1: Kinect measures the distance between both hands by capturing the hand coordinates.
Figure 2: Use distance value detected by Kinect to interact with point clouds.
Unfortunately, we didn’t get a chance to use the Kinect part in the last presentation because we didn’t have enough time to complete the testing. The detection range we set for the Kinect conflicted with the detection range of the distance sensor. However, if we have the opportunity to show this project to the public again, we’ll fix this issue and make sure everything works smoothly!
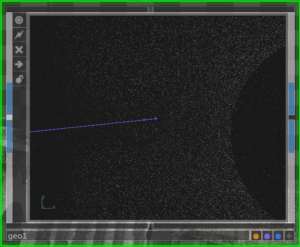
The first time we used the radar we tried walking in a circle around the location to be scanned and the results scanned out particular shapes based on our movement. This inspired me to think that we can do some design exploration and expression based on our behaviors and actions in space.
The trajectory of our movements on our first scan
Idea
As shown in the diagram, we can correspond the scanned shape to the score to get the exact track.
Through transforming the shape of our actions, distance depth, and positional coordinates into unique sound effects to express our relationship with space and emotional connection.
At the same time, it can combine the sounds of other people in this space, such as the sound of conversation and footsteps.
Combined with Allison’s ideas, we can translate body language into music, expressing how the environment affects us unconsciously, as well as our emotions and perceptions of space. It is possible that the physical space outside the mirror corresponds to one kind of music and the space inside the mirror to another. Through this project, we can reflect on how the environment shapes people, and how people reshape the environment.
Some attemps
I tried providing Chat gpt with a few simple numbers to generate a basic melody, and I found that it worked.


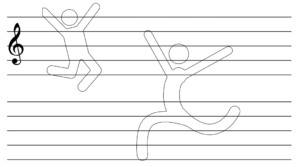 As shown in the diagram, we can correspond the scanned shape to the score to get the exact track.
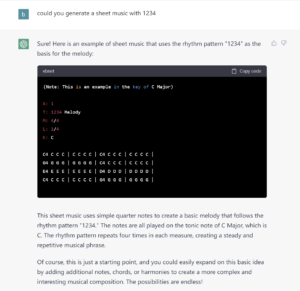 I tried providing Chat gpt with a few simple numbers to generate a basic melody, and I found that it worked.