Any views expressed within media held on this service are those of the contributors, should not be taken as approved or endorsed by the University, and do not necessarily reflect the views of the University in respect of any particular issue.

Personal Reflection – Allison

The “Place” group has been a remarkable learning experience, characterized by effective collaboration and communication among team members throughout the project’s development. While the exhibition received positive feedback, there are aspects that could be improved in future iterations from a designer team perspective.

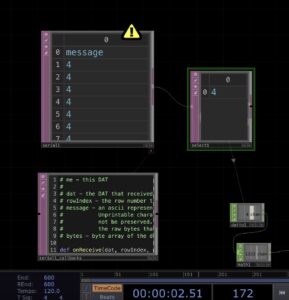
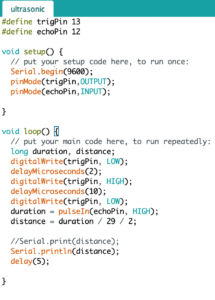
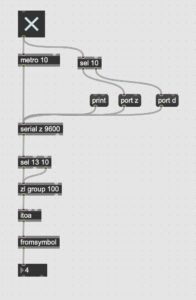
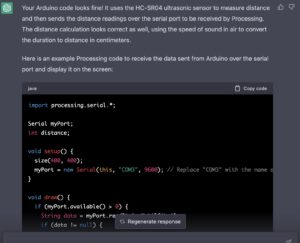
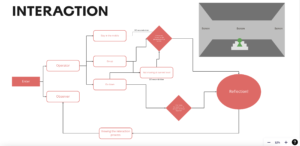
One challenge we faced was the accuracy of the ultrasonic sensor, which was influenced by the materials of clothing, such as cotton. Consequently, audience members wearing cotton were unable to trigger the sensor effectively. To address this issue during the exhibition, we provided an iron board as a prop for the audience to hold in front of their chests, enabling them to trigger the sensor. With more time and resources, an alternative solution could involve creating wheel-shaped props using laser cutting, incorporating the concept of “driving through time and space.” Adding a scenario or narrative to the project would help justify the use of such props.

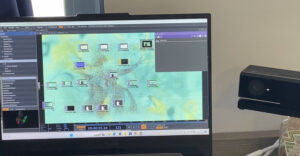
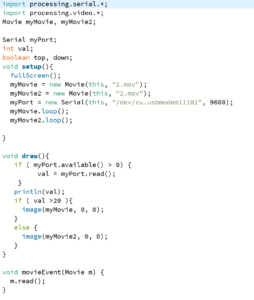
Another area of concern was the Kinect. As mentioned in a previous blog post, we disabled the Kinect function during the exhibition, as it interfered with the ultrasonic sensor, our primary interaction method. It would be beneficial to reintegrate the Kinect, given the time and effort spent on developing its engaging interaction features. One potential solution could involve changing the Kinect’s properties, such as using the y-axis data from movement capture instead of the distance between the user’s hands (x-axis data). This approach could offer similar visual effects without disturbing the ultrasonic sensor’s data collection while also providing more possibilities for visual elements and greater freedom for audience interaction.

Working within a large group, I learned the importance of time management and task organization, skills that are deceptively difficult to implement. I am grateful for the efforts of Molly and Dani, who effectively set up the exhibition, including designing the equipment displays, posters, postcards, guidebooks, 3D printing, and slideshows, providing a solid foundation for a successful exhibition. David’s exceptional leadership allowed each team member to find their tasks, make decisions, and ensure we were on the right track. Xiaoqing, Chenyu, and YG were consistently receptive to suggestions and supportive of others. Finally, I appreciate the assistance of Yijun and Yuxuan, with whom I collaborated on TouchDesigner, and who patiently addressed my questions.

Thanks for all the teammates!


Allison Mu

Exhibition Day – Allison

What I did

1.  Completed the remaining animations.

2. Set up TouchDesigner on the school’s PC.

3. Installed Kinect and configured the ultrasonic sensor.

4. Conducted final testing of interactions by connecting both MAX and TouchDesigner (previously tested separately).

5. Interviewed audience members for feedback.

6. Filming

Collecting feedback from the audience and our professors proved valuable, as it offered an alternative perspective on our project. As designers, we may overlook certain aspects during development, and third-party viewpoints can provide more objective opinions, contributing to future iterations.

Challenges Encountered

Despite our best efforts, we faced several last-minute challenges with this project, including unexpected technical issues. Although we shifted to a PC for increased power to run TouchDesigner, the performance did not meet our expectations, with glitches appearing frequently. Additionally, using Kinect interfered with the ultrasonic sensor triggering and disrupted the audio. When users manipulated the point cloud with gestures, the ultrasonic sensor below the Kinect was affected, sending incorrect data to MAX. Ultimately, we decided to disable all Kinect effects to prioritize overall performance.

Lessons Learned and Team Collaboration

The key takeaway from this experience is the importance of thoroughly testing equipment before implementing it in the final project and having a backup plan for unforeseen situations. Our team members’ collaborative efforts, active communication, and problem-solving skills were instrumental in overcoming challenges and achieving project success. By maintaining open lines of communication, we were able to address and resolve the aforementioned difficulties more effectively.


Allison Mu


TouchDesigner Point Cloud Camera Animation#2

With the assistance of Yijun and Yuxuan, I have learned how to make camera animations in TouchDesigner more efficient. As Yuxuan may have mentioned in his post, TouchDesigner Point Cloud Camera Animation #1, operating the camera in TouchDesigner entails a significant workload. Six parameters need to be adjusted for each frame, and alterations to one property can impact the others, resulting in a more time-consuming process than anticipated.

A New Approach to Visual Representation

We have decided to slightly modify the visual representation of the New Steps project from our original plan. Rather than creating one animation moving up to the top while another presents one step down, we aim to develop two animations from distinct perspectives: first-person and third-person views. This fresh approach offers various possibilities for point cloud scanning, allowing the audience to experience the visuals from multiple angles.

Developing the Animation

The animation I created showcases an overall view of the New Steps, with the camera slowly moving up and then descending to focus on people. This perspective provides a sense of daily life and what the scene might look like in reality. The combination of familiar and surreal visual experiences could potentially evoke reflection on the concepts of place and non-place.

A Multifaceted Visual Experience

By implementing different camera perspectives and enhancing the efficiency of our TouchDesigner animations, we aim to create a more immersive and multifaceted visual experience for our audience. The unique combination of familiar and surreal elements will encourage viewers to reflect on their understanding of place and non-place in a fresh and engaging way.

If you’re reading this in order, please proceed to the next post: ‘Kinect Phase 1’.

Allison Mu


Kinect Phase 1

In our recent exploration of TouchDesigner, we identified Kinect as a promising tool to offer audiences increased freedom and opportunities for interaction with on-screen visual elements.

Kinect’s Versatility in Various Domains

As noted by Jamaluddin (2021), Kinect was initially designed for gaming purposes, but its application has expanded into other fields. The release of Microsoft’s SDK has enabled its use in medical, robotics, and other sectors through academic research projects, showcasing its adaptability and potential for innovation.

Integrating Kinect with TouchDesigner

By incorporating Kinect into our TouchDesigner workflow, our design team can utilize the motion data captured by Kinect to generate interactive and responsive visuals. Kinect’s real-time data can be seamlessly processed and manipulated in TouchDesigner, enabling the creation of more captivating point cloud effects based on audience movement.

Acquiring Kinect and Initial Testing

To our surprise, we were able to acquire a Kinect device from Ucreate in the library, prompting us to begin developing with this tool alongside Arduino. I followed an online tutorial by The Interactive & Immersive HQ (2020) to complete the initial Kinect connection test (see Figure 1). This straightforward tutorial provided essential information about both Kinect and TouchDesigner. Key takeaways included installing the Kinect SDK first, using CHOP objects to import data from Kinect into TouchDesigner, and understanding the various applications of this data, such as triggering color changes, deformation, and more.

Figure 1: Interacting with particles in TouchDesigner using Kinect, with the Kinect device placed on a ketchup bottle.


Next Steps and Collaboration

Moving forward, the Kinect device will be handed over to Yijun Zhou for further development of gesture-reactive effects. Please refer to the subsequent post for more information on our progress.

If you’re reading this in order, please proceed to the next post: ‘Kinect Phase 2’.

Allison Mu


Reference

Jamaluddin, A. (2021) 10 creative and Innovative Uses of Microsoft Kinect, Hongkiat. Available at: https://www.hongkiat.com/blog/innovative-uses-kinect/

The Interactive & Immersive HQ (2020). Generative visuals with particles & kinect in touchdesigner with Crystal Jow. YouTube. Available at: https://www.youtube.com/watch?v=mY7DavB0z2c


Arduino 3rd stage – Connecting to Touchdesigner!

After several practice sessions with Arduino, our team is ready to progress to the next stage of our project, as previously outlined in our blog posts. The goal is to detect the movement of audience members in order to trigger the playforward or playback of an interactive animation. Ideally, we would directly connect all the sensors with the software used for creating visual elements, such as TouchDesigner or Unity. Although we initially devised a backup plan to trigger recorded video through Processing, the results were not optimal, warranting further exploration of our primary option.

Experimenting with Arduino and Unity

During a weekly meeting, Molly and I attempted to connect an Arduino joystick with Unity. However, we discovered that compatibility was limited to specific versions of Unity that allowed for Arduino integration. As a result, we decided to shift our focus to TouchDesigner, which offered more online tutorial videos and implementation support.

Learning from Online Tutorials

I followed two instructional videos on YouTube: one demonstrating how to link Arduino with TouchDesigner by P.G. Lucio (2021), and another explaining how to control video playback with audio input by Bileam Tschepe (2022). These tutorials guided me through obtaining the correct data from the Arduino board, displaying messages with a serial port object in TouchDesigner, and processing the average data as input (see Figure 1). Additionally, I experimented with connecting distance data to video length to approximate the final project outcome (Figure 2).

Figure.1. Screenshot of serial port information in TouchDesigner.

Figure.2. The distance sensor is operating the video play.

Preliminary Results and Next Steps

Our initial tests have yielded promising results. We can now jump to different points in the video based on input from distance sensors, although the exact ratio between time (minutes) and distance (centimeters) requires further refinement. We have also successfully utilized audio beats to trigger video playback at this stage.

As our Arduino testing phase nears completion, I am eager to collaborate with Yijun and Yuxuan on the TouchDesigner aspect of the project. Acquiring TouchDesigner knowledge will be crucial in case we encounter issues with the software or if ultrasonic sensors prove unsuitable for influencing point cloud properties. Additionally, the integration of Kinect technology should also be considered in our ongoing development process.

If you’re reading this in order, please proceed to the next post: ‘From Raw Data to Unity’.

Allison Mu.


Reference
Bileam Tschepe. (2020, February 16). Controlling Video With Audio – TouchDesigner Tutorial 14 (see description) [Video file]. Retrieved from https://www.youtube.com/watch?v=oviwpILXo5A

P. G. Lucio. (2021, September 7). How To Use TOUCHDESIGNER & ARDUINO Together – Beginner Tutorial [Video file]. Retrieved from https://www.youtube.com/watch?v=V_Q_fDukTI0


Arduino 2nd Stage

Building on our previous work with Arduino sensors, we’ve decided to switch to an ultrasonic sensor based on the feedback from our recent lecture. For safety reasons, we won’t be creating physical steps for our exhibition. Instead, we’ll utilize a distance sensor to detect audience movement and trigger video swapping.


Figure.1. Screenshots of code


Expanding Our Horizons

Figure.2. Screenshots of  the max patch

To collaborate effectively with our sound designer team, we’ve also explored connecting Arduino sensors with MAX/MSP. It’s been exciting to learn something new and understand how serial ports can be displayed in various forms. The key takeaway is that the central concepts remain the same: using the same port and converting data into a format MAX can understand.

Challenge & ChatGPT

During our development process, we encountered a few hiccups. The data we received from the Arduino monitor differed from what appeared in the Processing console. After double-checking the circuit, Arduino code, and port, we turned to ChatGPT for help.

As it turned out, we hadn’t converted the string data to an integer or removed any leading/trailing whitespace. ChatGPT provided a solution that fixed our issue perfectly!

Figure.3. My lovely online tutor

What’s Next?

Our next step is to experiment with the speed() and jump() functions in Processing to explore the possibilities of controlling a single video’s playback speed or direction. Ideally, the video would play faster and faster as the audience approaches the sensor.

Stay tuned for more updates as we continue refining our interactive experience!

If you’re reading this in order, please proceed to the next post: ‘Arduino 3rd stage – Connecting to Touchdesigner!’.


Allison Mu

03/16/2023

Arduino 1st Stage

We’re excited to dive into the world of Arduino sensor testing! Our goal is to create an interactive experience where different videos play when our audience steps on a physical model of new steps. To accomplish this, we’ve chosen a particular sensor that’s both easy to attach and discreetly hidden beneath the steps.

Selecting the Ideal Sensor

After some consideration, we decided on using a photoresistor due to its ease of attachment and perfect size for hiding below the steps. Check out our ideal sensor implementation in Figure 1 below:

Figure.1. Ideal sensor implementation for the steps


Devices

  • Arduino Uno R3
  • Photoresistor
  • 220-ohm resistor
  • Jump wires
  • breadboard

Software

  • Arduino IDE
  • Processing


Figure.2&3. Screenshots of the code


Integrating Video Playback

Since Arduino doesn’t have its own video library, we need to link it with another coding program, such as Python, MAX/MSP, or Processing, to achieve the desired result. The logic behind this is using a serial port to transfer data from Arduino to Processing, and setting up two thresholds to switch between the recorded videos.

While these codes aren’t overly complex, they provide valuable insight into sharing Arduino data with other software. As a team, our long-term plan is to connect sensors with Unity or Touch Designer to directly manipulate the movement of the camera. However, it’s always smart to have a backup plan (e.g., video swapping) for the exhibition.

Stay tuned for more updates on our Arduino sensor testing journey!


Lets see how it works!

https://www.youtube.com/shorts/SvZ2pgWlxWo


If you’re reading this in order, please proceed to the next post: ‘Arduino 2nd Stage’.


Allison Mu

02/16/2023

Interaction Process

The interaction process is shown in the figure above, there are observers and operators in this exhibition. The operator can interact with scenes and narrative sounds will come with the scene moving forward or backwards. The observer could view the whole interaction process and be inspired as well in the end.

View the narrative part here: https://blogs.ed.ac.uk/dmsp-place23/2023/02/13/narrative/


Additionally, the colour and size of the point cloud will change based on time changes. The default scene will get some deformation and morph with the actions of the operator, eventually, the “non-place” turns to a “place” by providing the audience with a sense of place through expression in different dimensions of human life: emotions, biographies, imagination, and stories.

View software support here: https://blogs.ed.ac.uk/dmsp-place23/2023/02/13/workflow/

Allison & Yijun

Narrative

The lidar scanner will record new steps within 24 hours. The time will move forward while the audience climbs up the steps, and vice versa.

Some narratives phrase cooperate with audio could enhance the immersive experience of the audience, the audience would be able to imagine their own story in their mind:

Early morning 

“The fresh air and quietness of the morning are just what I needed.”

“Is there any coffee shop open?”

 Morning 

“Do you know which classroom are we going to today?”

“Nooo, I am late”

“I will be there in 5 mins”

I’m a bit winded, but the peace and solitude of this place is worth it.”

Afternoon

“Be careful with your steps”

“The steps kill me”

“I guess the dungeon is over there”

Night

“It is a long day”

“What’s the next place we are going?”

“See, the street lights are on”

“Just arriving! Would you please leave a door for me?”

Midnight

Singing of the drunkard

couple quarreling


Ambient Sound/Sound List

In the morning, you can hear the sound of cyclists carrying bicycles up and down the stairs (such as the sound of bicycles hitting the railings).

At night, fireflies gather on the street lamps. When you accidentally disturb them, they will fly away.

If you stay on a step for a long time, a wired noise will be generated by the steps

Future Plan

As a group, we are thinking to ask random people in new steps to share their story with this place, or their final destination to rich our content and indicate the relationship between people and place.


13th Feb 2023

Allison, Chenyu, Yijun, Xiaoqing

Allison – Draft Idea

Background
The project will explore what would be the factors to consequences of different reactions toward a certain place? Whenever we enter a space, we first look around and then unconsciously decide what kind of behaviour and demeanour we will adopt. For instance, upon entering a historical museum, we unconsciously start to pay great attention to our behaviour and become polite, speaking softly and producing a solemn state of mind. When entering a leisure space, we become much more active and relaxed, laughing and playing without any worries, and producing a very relaxed psychological state.

Introduction

The audience will enter a space with 4 white walls, each of which will project the scene we scanned(since the scan is 360 degrees). One mirror with an infrared sensor will be placed at one side, and once the audience gets close to it, the scene will be changed (it could be an animation created in Cloudcompare) showing how people are using this place, for example, seeing the actions within an hour. Overall, it allows the audience to jump through several places to observe one’s life.

Possible place

Private Space – Livingroom/bedroom
A place relates to one’s social identity – A teaching room
Public space

Backup idea?

We could make something more conflict. For example, taking some
actions which not related to certain spaces, in the other words,
break free from society’s expectations

Inspiration

Pelle Cass

Compress the action of one hour into one moment.

Technology

Arduino + Lidar

css.php

Report this page

To report inappropriate content on this page, please use the form below. Upon receiving your report, we will be in touch as per the Take Down Policy of the service.

Please note that personal data collected through this form is used and stored for the purposes of processing this report and communication with you.

If you are unable to report a concern about content via this form please contact the Service Owner.

Please enter an email address you wish to be contacted on. Please describe the unacceptable content in sufficient detail to allow us to locate it, and why you consider it to be unacceptable.
By submitting this report, you accept that it is accurate and that fraudulent or nuisance complaints may result in action by the University.

  Cancel