Any views expressed within media held on this service are those of the contributors, should not be taken as approved or endorsed by the University, and do not necessarily reflect the views of the University in respect of any particular issue.
Arrive early to check out the equipment we book, and make sure all the things we need are here.
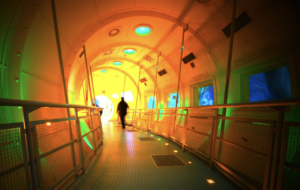
Helping set up the 7.1 channel sound system
Help to test out the sound system and the data transport from Max to Touch designer
Help to show the concept video through my laptop
After the start, introduce our installations to the audience and answer their questions
Interviewing some of the audience
After the exhibition, return the equipment and restore the display inside the classroom
Challenges Encountered
This time we still meet the situation that although we have already booked the equipment on the bookit, since part of them have not returned to the store, we have to change part of them to build our system. Fortunately, we have a planB and are flexible enough to achieve the results we want. Another problem was I always failed to connect the screen with my computer, and finally found out it was because the hdmi port of the adapter was broken. I was very anxious and stressed at that time but finally we found the question out and solved it. The final one was the ultrasonic sensor didn’t worked very smooth with out the iron plate, and did not expect the possible impact of Kinect and ultrasonic sensor on each other .
What I learned from these challenges
To have plan B is very important and useful, and at the same time, I should think out of the box, to solve the problems more flexible.
The more urgent the situation is, the more calm I should be, carefully investigate the fundamental of the problem and find the way to solve it.
It is not wise to disassemble each part completely independently, and we should also pay more attention to the possible influence between the different part. At the same time, more complete and simultaneous tests are very necessary.
For me, “Place” DMSP was an irreplaceable and memorable experience of great significance. It was the first time I worked with so many people, but luckily everyone worked well together and communicated well, which made it a great experience for me. Here I would like to record my feelings, gains and the place I think could be better, the problems I encountered and how I overcame them, and express my gratitude to the group members and tutors.
I am primarily responsible for field recording, which I feel very honored to do, not only because it is an important attribute of the location, but also because it is the initial part of the sound work, and all subsequent sound creation is based on it. This made me feel obligated to do my best, so I did a lot of planning and preparation for the official recording, and the final result was satisfactory. Please check the details in the blog linked below.
The most valuable gain of this practice is that I realized how to be flexible and adaptable to solve problems – if I don’t have a windshield, we can find a similar material for an emergency, and if it doesn’t “fit” well enough, making it rub against the diaphragm, we can use tape to fix it, there is always a way to solve the problems. I also learned some live audio tips from David, which are very useful.
Another advantage of taking on this job is that because this part will be done up front, I have full energy and time to get involved in the subsequent parts and add to the other parts of the sound design as well (Although 4 of us are responsible for a part in sound work respectively , everyone would like to help each other out through the whole work. I really enjoy the atmosphere and way of cooperation in our group! ). In the process, I was deeply impressed by the great work my teammates have done——the super elaborate max patch from David and the beautiful creatively sound design from Xiaoqing. I was also greatly deepened my understanding of max/msp and Arduino, which is also very beneficial to my learning in other courses.
In addition, I even have the opportunity to develop more possibilities and realize it. Once again, I would like to thank our group members for their active communication with each other. It was because of a chat with Allison that I was able to make a new attempt and breakthrough my limit.
She told me that the ddm students are trying to use Kinect to capture the movement of audience to trigger the visual effect, and ask me if we sound people would also like use it as another sensor to tigger some sound. It sound fascinating and I was very interest in it, although I don’t know any related knowledge.
This was an attempt to learn that required me to explore completely on my own, whereas before, when I encountered problems that I did not know how to solve, I could by and large find help from others, ask teachers or students who were proficient in this area. But this time I can only search the information on the internet, and I did encounter a lot of difficulties in the process. Thankfully, I eventually found a way to do it and even expanded the functionality it could achieve, which was an unprecedented breakthrough for me. In this way, we only have to use one sensor to control both Touch designer and max, and at the same time, use the sound data triggered in max to control the effect in Touch Designer, smartly deepens the visual and auditory connection. Since want to achieve this I have a lot more chance to communicate with the group mates who works on Touch Designer, I leaned a lot on the visual system of our project from them and also becoming friends with them. For more details on my search, please check the blog linked below.
There are also some thing I want to but have not done or some little disappointment in the project. Since the time was not very enough and there are already quite a lot things happened in the sound field of the project, the original field recording was not directly been put into the sound field, and we also didn’t use the Kinect to trigger interactive sound. In fact the Kinect was hardly used in the exhibition, because the ultrasonic sensor was not enough stable and accuracy, most of our audience have to hold an iron plate . We had a brief discussion on it after the exhibition, maybe instead letting audience holding a heavy plate, there will be better way to make it more reasonable like the “wheel idea” from Allison. As for the Kinect, it might can capture some other data like the height of audience hand, or the distance between two feet of the audience. There is another problem happened on the exhibition. Maybe because the performance of the computer running Touch Designer was not good enough, or the network was not that good, when the sound triggered the visual effect, it did not look as smooth as in the usual test.
In a word, through this valuable experience, I not only gained knowledge, but also broke through and gained friendship. Thanks to this course for providing me with such a great opportunity, and thanks to Asad and Jules for their rich guidance, sincere advice and full support!
Recently, I was trying to find ways to use the Kinect as a sensor to trigger the interactive sounds in max. It would be interesting to let the audience trigger some sound when doing the action, and I heard from the DDM group-mates that they are also trying to use Kinect to trigger some changes in the visual, and it would be better if the changes in the visual are accompanied by the sound trigger. So I looked up a lot of information and videos, but I found that most of the cases of directly connecting Kinect data to Max are very old, and many of them use software called SYNAPSE for Kinect (link to SYNAPSE webpage below), but it doesn’t support Kinect for Windows. Some later cases also have different problems for me, they do not support Max8 or Mac, making it difficult for me to proceed.
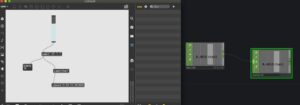
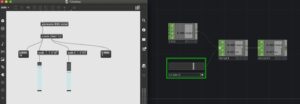
At this point, I changed my way of thinking, because I heard that Kinect can access touch designer smoothly, so I can try to make touch designer as a relay station to transfer data from Kinect to Max to achieve interactive sound triggering, and in this way, the relationship between visual and sound is also closer. After some research, I found a related tutorial (link below) that makes transferring data from Touch Designer to Max very easy.
At the same time, I’m also curious about if I can change the direction of the data transport, which is from max to touch designer, since visual part also need the data from ultrasonic and we don’t have to use 2 sensors if we can send the data from max to touch designer. Meanwhile,I heard my teammates found a way to control the video speed by the amplitude of the audio wave, and my opinion was why not combine it with the interactive sound of going up and down stairs, using it as the file to control the visual, then it will be a great linkage of the sound and the visual.
In odder to achieve that, I learned the OSC in protocol and after some research and practice, it succeeded and worked very smooth.
So far, we can achieve at least two things:
Kinect -Touch Designer-Max: to achieve the sound triggered by the audience’s movements.But since our sound was already rich enough, we didn’t end up triggering the sound by this method.
Max -Touch Designer: We have used Max and ultrasonic sensors to precisely implement the interactive sound is triggered whenever the audience goes up and down the steps, so we can use these triggered sound effects(use a snapshot to get the level between ±1) to control the speed of the video in Touch Designer.
Chenyu Li, 3.29
Test records and logs:
3.28 find out the method and test on one computer(TD and Max in same IP address)
3.29 communicate with group mates on touch designer, confirmation of feasibility and preparation of experiments
3.31 Test out with touch designer group mates with different computer, after succeed, communicate with David and put it in to the whole max patch, and test out again
4.3 scale the number of output with touch designer group mates for a better visual effect
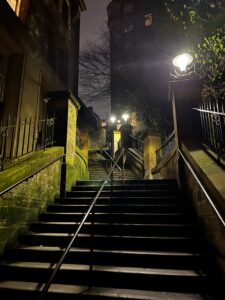
Ambient sound, as one of the most intuitive feelings when people are in a “place”, is a very important attribute of the “place” itself. In order to present this property in our installation, we decided to go to the selected location “The News Steps” for field recording to record the ambient sound, edit and process it as one of the elements of the installation sound design, and deliver it to David for sonification in max/msp and to Xiaoqing for interactive sound design.
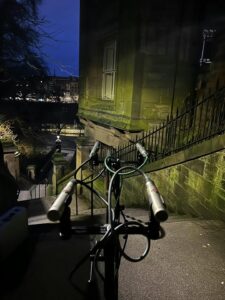
Because our installation is time-related, we wanted to be able to record the entire day from morning to night, and the duration of the recording would be very long. At the same time, “The News Steps” is a public outdoor space, which poses additional challenges for field recording and requires thorough preparation.
Before making the equipment list, I went to “The News Step” for a site survey. It is a steep and very narrow staircase, but fortunately, there are some small platforms in the middle of the large section of stairs for us to set up the equipment. The pedestrians here are dense and of all ages, so during the recording process, one is to protect the equipment from harm, and the other is to observe the pedestrians’ reactions to the equipment before the formal recording. If they can ignore them and present the most natural way is the best, if they have surprised, curious and funny reactions is also acceptable. The most worrying situation is that people will shut up because they notice the microphones, making the walkers feel disturbed or even offended, which would completely defeat the purpose of recording the daily sound of the place and is something we definitely don’t want to see. If this happens during the test recording, we will reduce the use of microphones that are more familiar to passersby (e.g., shotgun mics). We were initially concerned that such recordings would violate some rights such as the privacy of pedestrians, but since we will do some processing so that the final presentation does not show the original voice or content, so there should be no such risk.
The list of equipment that I have drawn up, taking into account various considerations, can be found in the blog linked below.
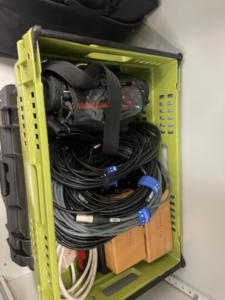
After discussing this with the group, we decided to simplify the list to two pairs of condenser mics and a shotgun mic, which was more than enough to represent the ambient sound of the location. In addition to the recording equipment itself, I included batteries, tape, and a large-capacity SD card in the list to prepare for long recording times and various other issues that might arise. Here is the link to the first sound meeting.
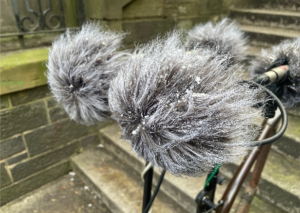
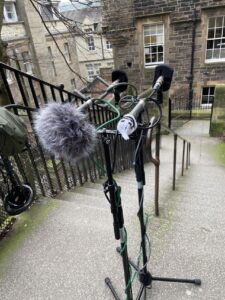
We took the equipment to “The News Steps” for a test recording before the formal recording, found the appropriate platform to set up the system, created the work area, smoothly adjusted the equipment and started recording. Two pairs of microphones(Neumann KM184 pair and Shcoeps MK6 pairs) were recorded at fixed locations using the mixpre6II, while the shotgun mic(Sennheiser MKH 416) was recorded using h6 to flexibly roaming around the stairs. The test recording proved to be very necessary. Although we prepared a large number of batteries, the weather was so cold, especially for the mixpre6II, that four brand-new AA batteries would not even last 15 minutes. In addition, since the recording scene was outdoors, the low-frequency noise brought by the wind would be very serious and affect the overall effect if there were no windproof measures. Unfortunately, we had to record the next day and it was too late to use the bookit to borrow some windshields. So we found everything we could use in an emergency to put over the microphone, including a little plush hat that came with the purchase of a drink. Because these things are not so tight for the microphone, I found in the monitoring when the wind is relatively strong, there was the sound of friction between them and the mics. So we used tape to fix them a bit and finally solved the problem. It was a very moving and fun experience for me to see everyone working together to solve a problem. The good news is that the recorded sound was very good and the passersby hardly reacted to the microphone, which made me determined to continue using the shotgun mic.
After the test recording, I tested it again at home and exported the recording from the SD card to check. Because the mixpre6II’s advance working mode is used, the sound is recorded as poly-wave. Because two pairs of microphones are used, the file has six tracks, the first two tracks are a stereo mix of all microphones, and the last four tracks are separate signals from each of the four microphones. In this way, as long as I recorded the input channel number for each microphone, I could easily tell which microphone was recording the current signal in post-editing. After checking, since our two pairs of microphones were placed back-to-back, the recorded signal did not have phase problems and the mixed signal from the first two tracks could be used directly (provided that the balance of each track was adjusted during recording). There was another unexpected gain in the process: if the recorder was powered through the computer, it would last much longer than four AA batteries. But I couldn’t rule out at the time that it was because the room was warmer, so I still brought an extra H6 recorder as plan b when I was formal recording.
On the first formal recording day, the group woke up at 5 am and met at “The News Steps” at 6 am to set up the system. (It was really cold!) Because of the experience of the trial recording, the process went very smoothly. The computer was connected to power the recorder and the input channels for each microphone were recorded. Because of problems with the time code inside the recorder, I specifically recorded the duration, start time and end time of each recording. I expected the length of each strip to be ten minutes after editing, so I kept each recording at about 15 minutes. After David’s reminder, I would say the exact time to the microphone at the beginning of each recording, so it would be easier to edit. It was very touching that all the sound design students participated in this field recording with such an early start time and a long duration. The team worked very well together. After setting up the system, some students stayed here to record and monitor, while others helped to buy breakfast. After that, the recording also alternated in turns, with me mainly controlling the mixpre6II and monitoring the two pairs of main microphones, while the other three alternated using the shotgun mic for more flexible recording. In addition to recording the sounds made by pedestrians, they also recorded their own footsteps, the sounds of the environment around the steps, their own chats with passersby, the barking of dogs on the roadside, and other very interesting sounds in preparation for the production of interactive sounds later, all in an orderly manner. As time went on, we also changed the position of the main microphone pairs once, placing them on a higher platform to accommodate the “the higher you go, the later it gets” concept of our installation. Fortunately, the computer’s battery held up until the recording was successfully completed. More photos and details can be found in the blog at the link below.
After that, I started to edit the recorded sound. Since there was still a problem with wind noise in the low end, I did a slight dynamic EQ on it, which solved the problem very effectively. At the same time, I went through the edit from the beginning, cutting out any excessive low-end wind noise and other unwanted sounds, and keeping each strip to exactly 10 minutes (for David’s sonification later). Because the final installation will have a large number of channels, in addition to all mixed together in stereo, I also rendered two pairs of microphones each in stereo and four microphones each in mono, naming them fixedly in the time_microphone_L/R/stereo format for easy handover.
The second recording was for the afternoon to evening period. I borrowed four windshields of the same type to try to avoid the problem of low-frequency wind noise, and thanks to them, they helped us to protect these very delicate microphones from the sudden heavy snowfall. Luckily the snow only lasted for a short while and the rest of the recording was not much different from the first time, as we had previous experience and overall it went very well.
Currently, I have finished editing the field recording and delivered the data to the students in the follow-up session. I have learned a lot and the group has become more familiar and united with each other, which is a very new and wonderful experience for me. Afterwards, I will be working with the sound design team to do follow-up work and working with Allison to see if we can combine Max and Kinect to trigger some sounds through audience movement.
Here are the Google drive link of the edited audio files:
Things need to be done on the day of the recording
Ambient sound of the whole day in space
Conversations and the sound of the movement of pedestrians
IR data of space(If adding some sound effects later, I can apply the reverb there)
Vibrations on the steps(Trying to combine with ambient sound to enrich the audience’s listening experience)
The dialogue and the sound of movement in our narrative
Preparation 2: Selecting the equipment
Equipment selection gives priority to flat frequency response, portability and availability.
Equipment list
Sennheiser MKH 416
A short shotgun microphone with a super-cardioid polar pattern.
Use a shotgun microphone to:
Record the sound effect of pedestrians’ movements without disturbing them;
Record the dialogue and the movement in the narrative acting by our teammates.
Sanken Cub-01 (MC31)&contact mic from ac workshop
Sanken Cub-01 (MC31): A boundary microphone for location recording.
Use a contact mic to:
Recording the vibrations on the railings;
Use a boundary mic to:
Get a cleaner, flatter and more natural sound for post-processing. Stick it up a little higher, it might be a good way to record the conversation from pedestrians.
On my first day in Edinburgh, I was struck by the depth of its history and culture. The historic buildings and interesting or macabre legends were fascinating. So I was very interested in the subject of ‘place’ and strongly wanted the concept of our work to be relevant to the local history and cultural attributes of Edinburgh.
I communicated with ChatGPT about the places which have unique historical stories or tales, and how to combine the historical element with modern technology. It presents me with a lot of places, like Edinburgh Castle, Princes Street graveyard, and The Mary King’s Close. As for the second question, it gave me an example called dynamic earth, which is an interactive science center. The center offers an immersive experience called “The Time Traveler” where visitors can travel through time in a virtual time machine and explore the Earth’s history in an interactive way.
I was inspired by it and would like to use lidar technology to record several historical places, use Cloud Compare to stitch them together like a museum, then make them into interactive installations so that the audience can learn about the history and tales of the place as they interact with it.
place(s):
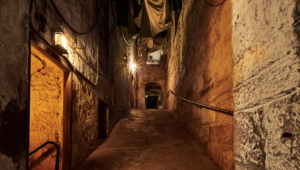
The original idea was to show some of Edinburgh’s historic locations(like The real Mary King Close, Prince’s street graveyard, and castle, etc. ), combine them with the tale of this city, and add some simple narrative, using visual and sound effects to demonstrate it.
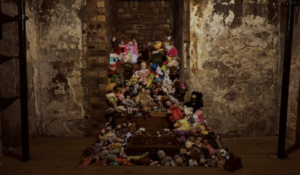
This hidden warren of 17th-century streets and houses was buried beneath the Royal Exchange in the 18th century. It said that it was buried because of the black death and haunting. People saw eerie lights and heard terrible crying there, some even felt something was dragging their legs or arms.
narrative:pointing at the dolls to trigger
visual : the point turn to blue or grey, get larger to express a sence of Infectious diseases,the shadow of people appear ( to imitate the ghost of patient ), then turn some point into very vibrant colours to imitate eerie lights.
sound : the sound of patients’ moaning、 baby crying or a little girl’s creepy laughing appear.
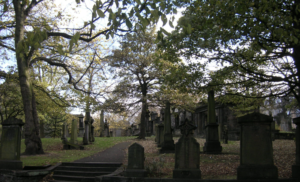
A large ancient graveyard in Edinburgh. It is said that soldiers who died in the war were buried here and that passers-by heard their roar on the battlefield.
narrative: pointing at the biggest tree
visual: the points turn black and background turn red ,also use the shadow of people to imitate they are in a war
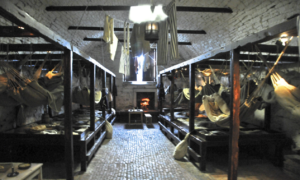
A large number of prisoners of war from different cultures at different times were held here, including some skilled craftsmen. The prisoners made their own recreational tools and crafts, which are still in good condition today.
narrative: pointing at a recreational equipment made by inmates
visual: ghost shadow seating on every where, crowded
sound: the sound of chatting,dripping water on the ground,throwing the dice
Follow up and additions
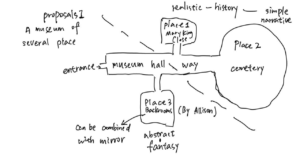
After several meetings, I heard some other really good concepts like inputting a timeline narrative in Mary King Close’s (from Yuxuan), the mirror world (from David), and the backroom kitchen —- a confusing and repetitive fictional space(from Allison), so I‘m thinking about if we can combine them together(as the picture shown), then there will be the places not only have realism historical story but also abstract fictional story. If there is too much work to do to represent so many places, I’m also down for focusing on fewer or even one place(s).
visual and interactive:
It will be A space stitched together from different places, connected by a museum corridor. There will be a big screen showing the whole museum at the beginning. The movement sensor will assist audiences to choose the room they want to see in detail by pointing at the specific room. They can also change direction and different angles of the room through movement. If they point at some particular object(eg. The dolls in Mary King’s Close), the narrative will be triggered and there will be some change in visual and sound, like the change of color of the points and the appearance of some sound effect.
sound elements:
Ambient sound, since the environment sound is an important part/element of the place itself
Sound effects lead or assist the narrative, for example, the sound of patients’ moaning、 baby crying or a little girl’s creepy laughing in Mary King’s close. (those sound effects can be processed by the IR data of places)
Interactive sound effects (if necessary)
Some ambient/drone music pad (I think the idea of generating music by movement or visual from David is very cool, and Yijun said ChatGPT can achieve that).
 After the test recording, I tested it again at home and exported the recording from the SD card to check. Because the mixpre6II’s advance working mode is used, the sound is recorded as poly-wave. Because two pairs of microphones are used, the file has six tracks, the first two tracks are a stereo mix of all microphones, and the last four tracks are separate signals from each of the four microphones. In this way, as long as I recorded the input channel number for each microphone, I could easily tell which microphone was recording the current signal in post-editing. After checking, since our two pairs of microphones were placed back-to-back, the recorded signal did not have phase problems and the mixed signal from the first two tracks could be used directly (provided that the balance of each track was adjusted during recording). There was another unexpected gain in the process: if the recorder was powered through the computer, it would last much longer than four AA batteries. But I couldn’t rule out at the time that it was because the room was warmer, so I still brought an extra H6 recorder as plan b when I was formal recording.