Any views expressed within media held on this service are those of the contributors, should not be taken as approved or endorsed by the University, and do not necessarily reflect the views of the University in respect of any particular issue.
As part of our exhibition, we decided to include a video compilation of small clips, images and sounds that we had gathered during our overall process as part of our exhibition. This video was then displayed on one of the lateral screens, providing the audience with a unique look behind the scenes of our creative process.
By showcasing this compilation, we were able to pique the interest of the audience and provide them with an interactive and immersive experience. They were able to gain a better understanding of our project and the creative process behind it, and as a result, we received numerous inquiries and questions about how we developed the project. The inclusion of the video compilation proved to be a valuable addition to our exhibition, adding depth and dimension to the overall experience for our audience.
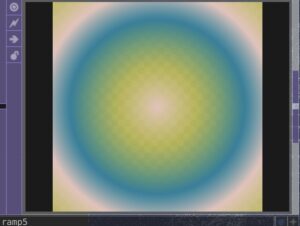
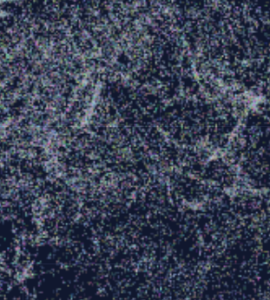
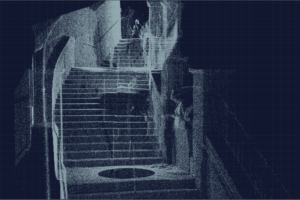
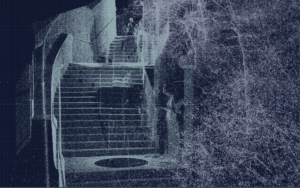
In order to present a good image, we changed the color of the point cloud and adjusted the composition. We used a ramp node to change the color of the point cloud, extracting elements such as morning, night, trees, and blue sky to design the colors. The final colors we selected are shown in Figure 1. Although we chose many colors, they don’t make the image look too colorful, as shown in Figure 2, and these colors are changing small particles one by one.
Figure 1: ramp node Figure 2: particles
The final result is as shown in Figures 3, 4, and 5.
Figure 3 Figure 4
Figure 5
Dynamic effect of tree
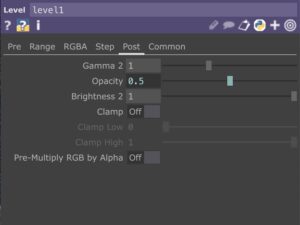
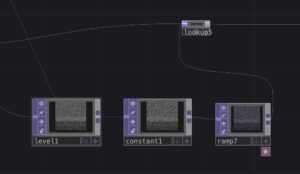
We also tried to make the trees ‘fade in and out.’ We attempted to change the transparency of the trees, so that they would disappear and reappear, as shown in Video 1. However, we found that we couldn’t dynamically change the transparency parameter within the ramp node. So we added a level node and changed the transparency parameter there, as shown in Figure 6&7.
In this post, you can find a Link to the GitHub repository that contains all project files, including Max/MSP patch and point-cloud txt. data set, all audio files, and instructions on how to use them.
After importing the point cloud, we attempted to add some visual effects to it. This can be seen as our attempt to use technology to reshape this location, in order to reflect our understanding and knowledge of this place.
Visual effect by using noise node
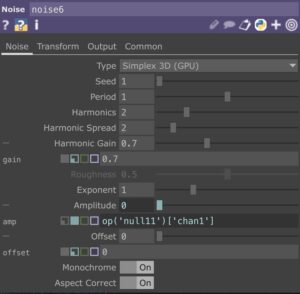
In order to add some visual effects to the point cloud, I used the noise node. As shown in Figure 1, different parameters in this node correspond to different effects, and we tried many different combinations. Among them, changing the values of some parameters did not result in significant visual changes in the point cloud, while others were very noticeable.
And some changes in parameter values bring very noticeable effects, as shown in video 1, adding atmosphere to this location.
Figure 1: different parameters in noise node.
Video 1: visual effect by changing value of offset
Dynamic visual effect by linking with sound data
But changing the values gives a definite visual effect (such as different visual effects for values 2 and 5). We want to preserve the process of this change, as shown in video 1, where the visual effect is dynamic (the effect in video 1 is obtained by controlling the mouse to change the values). So, we need a set of dynamically changing data that can be linked to the parameters.
After discussion, we decided that we could use sound data as a reference to link to the parameters, as sound is a part of shaping the environment. By linking the sound data, we visualized how sound influences the environment.
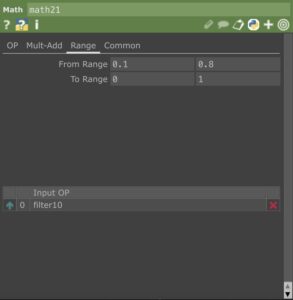
However, the range of the sound data does not match the range of the parameter values, which is 0-1/1-10. We used a math node to solve this problem, as shown in Figure 2, where we changed the range of the sound values to correspond to the parameter range, so that we could use the sound data.
Ever since I saw the brief for the group of Place, I was so excited and had so many ideas about where this project could go. An opportunity to get my hands on and learn new technology too? Sign me up!
LiDAR is a technology that I’ve been aware of, but not something that I’d personally looked into. After seeing the examples from our tutor Asad and his PhD… let’s just say I started reading more on it.
Given an unlimited amount of time, money and equipment, I would develop this project into larger room exhibition. I very much envision something in my head similar to that of RYOICHI KUROKAWA project s.asmbli [ wall ] . With multiple screens in a large dark room where the sound can echo throughout. I talk about this in my post about Digital Exhibitions
https://www.ryoichikurokawa.com/project/saw.html
I’ve learned a lot from a lot of my teammates. David has shown me how MaxMSP works as I am interested in using it for my dissertation; Allison has refreshed and updated some of my Arduino knowledge. I’ve been introduced to new sensors and the capabilities of TouchDesigner. Frankly I’m in awe of those who worked on the TouchDesigner and MaxMSP side of the project as they knew nothing of it in the beginning, and were self taught. Dani taught me about 3D printing and I witnessed her trails and errors if failed prints and rejoiced when they worked.
How has this impacted the way I work? I like to say that I always aim high in anything I apply myself to. This project has only heightened that as we were able to achieve an amazing result that I am so incredibly proud of. I would happily present this project again with all the new updates and fixes that are possible to make it even more impactful.
Finally I would like to say a massive thank you to my team, upon first meeting them, I knew that we had a good group. There was such a good array of skills and expertise that the possibilities were vast. We all listened to each other, talked issues through, experimented on ideas and were fair and just in our work distribution. David spent so much time developing the Max Patch and working with his fellow sound task force (Chenyu, Xiaoqing and YG); Allison has created amazing videos for our final submission and worked her Arduino magic with TouchDesigner alongside Yijun and Yuxuan. Daniela, who I worked closest with kept me sane and helped me work through stubborn Cyclone, CloudCompare and Blender projects and stayed with me during late nights spent in the Atrium.
Thank you to Asad Khan for his creative and passionate guidance, Jules Rawlinson for solving so many issues; Dave Taylor for his patience with moving computers and downloading software for us.
I can’t forget, thank you to our most important teammate: Liam the LiDAR Scanner.
2. Started the rendering for the Blender animations on multiple computers for faster rendering.
3. Set up of the space: projectors, screens, tables, 3D models, videos on screens and lighting.
4. Making sure that everyone had what they needed, knew where things would go etc.
5. Get feedback from lecturers about our project.
6. Pack away all the equipment, return tables and boxes to their places.
7. Celebrate the end of the project with homemade cookies from my friend and a drink!
Challenges Encountered
One of the HDMI to USB-C adapters that I had loaned was faulty and was not allowing me to connect my computer to the projector. Thankfully Jules had a spare and got it to work with his. Also, due to a slight miscommunication between groups, the specific projectors that we wanted to use had been returned and booked out by someone else. The solution was to get in touch with them and collect the correct projector right after they had finished and we were about to begin. It wasn’t the exact brand that we wanted, but we solved the problem the day and made it work!
Lessons Learned and Team Collaboration
Having backup plans on backups on backups is one of, if not THE most important thing to have in any project, no matter the content of topic. If not for all of the contingencies that we had in place, we would not have been able to complete this project to what we had. Continuous communication between teammates as well as lecturers allowed us to be realistic about what we could achieve. Even up to the day of exhibition, being able to think on our feet and problem-solve was a much needed. I’ve learned so much from this project about working with and guiding a large group of people to deliver a successful event.
The implementation of the Place project has been a novel and rewarding experience for me. Overall, the significance of the project is its ability to combine cutting edge technology with cultural significance to create an immersive and engaging experience that allows for a new interpretation and appreciation of the culture of the place. The staircase, as a physical element of the installation, is able to connect with the contextual culture contained within the site of our project, adding depth and resonance to the overall experience for audiences. The integration of sound and vision, along with the use of Arduino, Max, Kinect and 3D scanning technology, creates an innovative dynamic and responsive installation. The interactive and immersive nature of the installation allows for a new interpretation and appreciation of the cultural significance of the site, creating an innovative and engaging experience for visitors.
From a sound perspective, the use of a 7.1 surround sound system in the installation and the audibility of the sound creates a dynamic and immersive experience for the audience. The integration of distance sensors with the sound triggering system allows for real-time interaction with the sound, making the audience an active participant in the overall experience. And the use of Max as the primary control interface for the sound system enables flexibility and precision in sound design, thus enhancing the overall sensory experience for the observer.
From a visual perspective, the use of the Kinect sensor and 3D scanning creates a visual element that is both dynamic and responsive to the viewer’s movements. The integration of the distance sensor with the visuals allows for real-time interaction, which makes the viewer an active participant in the overall experience. the use of TouchDesigner allows for flexibility and precision in visual design, which enhances the overall sensory experience.
My tasks:
For Place, a project involving an interactive immersive installation, my main responsibility was mainly to architect a sound triggering system about Arduino and based on Max.
The following links provide a detailed description of the various parts of my workflow:
Initially all the MAX and Arduino parts of building the interactive triggered sound system were like new territory for me, I had a lot of misdirection and misjudgement in the process of figuring it out, but I learned step by step with David’s help about the Arduino connections, about the creative control functions of MAX in the sound system architecture, and I I learnt that musicality is sometimes not the only option in a performance, I learnt that the granularity of sound makes for a unique and infectious presentation, and I overcame many new problems in this learning process with the help of the team.
As far as the whole sound creation process is concerned, I learnt to be inspired by interactive triggering of sound creation during the preliminary field recording. In the sonification section, I learnt about the possibilities and techniques of data sonification, and I realised that every part of the sound system is important, detailed and essential. David’s extensive experience with MAX has helped to guide and inspire me in every part of the project. Allison was always on hand to answer questions about both the arduino connection and its working code, and Chenyu was always on hand to provide her unique and helpful advice on the whole structure of my work. Thanks to Molly, Daniela, Yijun, YG and Yuxuan, we were able to work on the architecture and details as we tried to improve the performance of the whole device step by step to achieve the final presentation.
After receiving the scanned files from the LiDAR, we attempted to import them into TouchDesigner for processing. Initially, we followed video tutorial from Heckmann (2019), which used a CSV file. As mentioned by Yuxuan, this method was not suitable for us because the numbers in our CSV file were very messy. Therefore, we decided to follow the B2BK (2023) tutorial and import PLY files into TouchDesigner instead (the specific import process can be found in the blog https://blogs.ed.ac.uk/dmsp-place23/2023/04/26/designing-interactions-with-touchdesigner-1-importing-point-cloud-files/ ).
Rendering Material – Volumetric Point Cloud
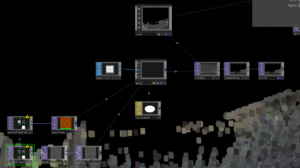
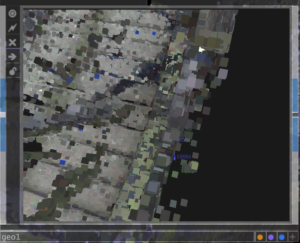
As shown in Figure 1, we added materials to the point cloud to make it visible in the geometry node. However, as shown in Figure 2, the particles displayed in this way are flat. We found a way to solidify the particles in another video by Heckmann (2019), as shown in Figure 3, adding a box SOP node to turn each particle into a cube, and then adding materials to these cubes to obtain the effect shown in Figure 4.
Heckmann, M. (2019). Point Clouds in TouchDesigner099 Part2 – Using a Point Cloud File (Star Database). [online] www.youtube.com. Available at: https://www.youtube.com/watch?v=TAmflEv0LJA&t=1221s [Accessed 26 Apr. 2023].
Heckmann, M. (2019). Point Clouds in TouchDesigner099 Part1 – Instancing. [online] www.youtube.com. Available at: https://www.youtube.com/watch?v=WbnaW3gMmMs&t=7s [Accessed 26 Apr. 2023].
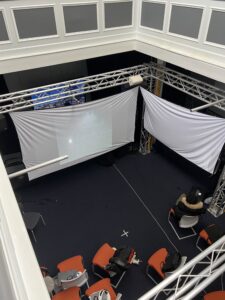
Time to develop the setup for this project! As stated previously, we will be presenting in the Atrium of Alison house. We had scoped this place out early on due to its adaptability and layout. One of the main concerns that we had was the light in the space coming from the overhead skylights. These skylights do have blinds on them, however no one knew how to close them.
One day, Molly went searching, following the wires on the ceiling and down the walls. And Molly found the switch for the blinds! This was very exciting as multiple groups needed this space to be darker for their projections to be visible.
You can see how bright it is – this is at 4pm
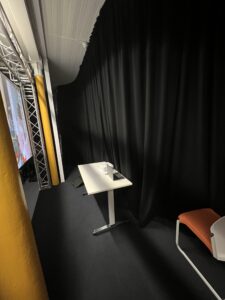
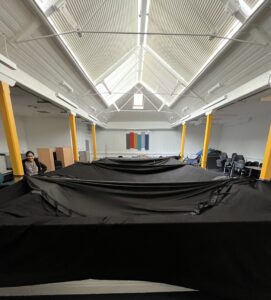
So the plan was to present late in the evening for optimum darkness. However, as multiple other groups also need this space to be dark all day, Jules Rawlinson came up with the solution – draping blackout curtains to fill in the hole:
Large change: no more physical staircase for the interaction zone! As you will have read in previous posts – we decided that a distance sensor with select boxes to step into to represent forward, neutral and backwards, would be better for the interaction as well as for health and safety.
Group test day 29th March:
As we were unable to find the supposed projector screens that used to be in the loan store, we initially experimented with a shower curtain and were thinking of other solutions.
– Side note and a note to future groups!- on the day of testing the shower curtain, we were also up at 5am scanning the steps. In the afternoon Molly ran to ECA before the meeting in Alison house to pick up our first projector. Unbeknownst to her, it was very heavy and she had to walk from Lauriston loan store all the way to Alison house. From there on, we took taxis.
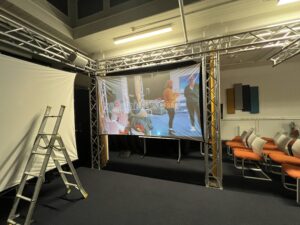
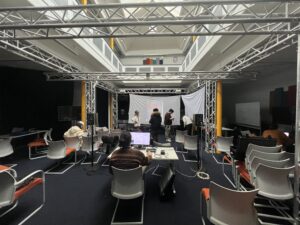
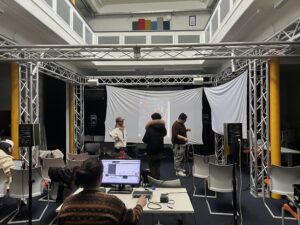
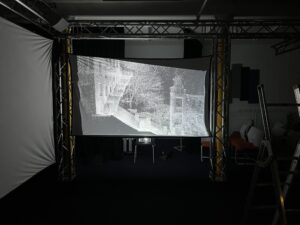
This was not feasible so we spoke to Jules and he bought some purpose projector screens for us that we were able to hang up on the truss in the space. The images below show when we first hung them up to test out the positioning and how the projectors would look on them when projecting from the back. On this day we were also able to test the positioning of the speakers in order to see how the surround 7.1 sound would feel and work.
All in all this was a very successful meeting where all areas of the project were able to be tested and feedback given by Asad to further develop and modify our ideas.
4th April: Finalising the Layout.
Since submission 1, and upon feedback and suggestions from tutors, we decided to add more elements to our project so that it felt like more of an exhibition that you might find in a museum. The exhibition can be decided into three areas:
Middle: Main interaction and visual zone
Right side: 3D model and behind the scenes video
Left side: Sound project visualisation and promotional material.
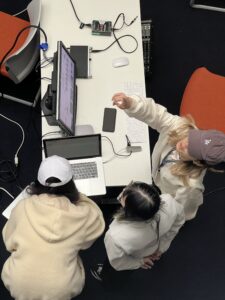
When designing the layout of the exhibition it was important to consider the flow of the audience. Myself and Daniela took the time to set up the projector screens, experimenting with their placement and method of securing them. We also walked around the room to see how we could use the space layout to our advantage. It was very much an iterative process throughout the weeks.
The space had to work and be aligned with the “interaction zone” as it was only one person at a time. We also had to be aware of how the speakers would be placed with the projectors as it was all situated behind the screens and we didn’t want to block the back projection with any shadows.
Integrating the other various multimedia elements, outside of the main interaction zone were placed to be mirrored in the space to keep a balance to the exhibition. This meant that the audience would not feel confined into one area that was empty, but instead invited to move about the room and explore the different items, centred around the main interaction.
Creating a video walk-though of the space and narrating where exactly everything is going really helped on the day of exhibition to make the setup more efficient. Also visualising where the boxes for interactions would be in order to design the distance of tables and how we can block users from interfering with the sensors.
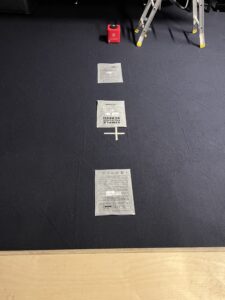
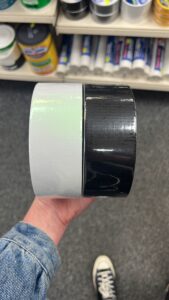
Trying to be resourceful and using what we could find in the atrium to our advantage. Finding tables, boxes, TV’s etc that are already in the room (or upstairs). Otherwise buying duck-tape for cables and drawing the interaction zone using our budget.
Tape from Ali’s CaveBoxes we found at the back of the atrium – perfect for the 3D model and to box in the interaction zoneStretching the screens to remove wrinkles was challengingTables for the projectors, empty space behind blocked by curtains
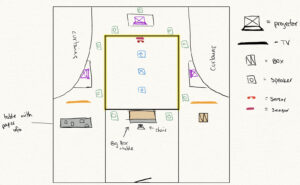
Altogether, this is our diagram for the day of exhibition:
Let’s break this down.
Speakers. // Boxes of interaction. // can be read about in the sound and interaction posts.
Projector screens: Hung on three sides of the truss.
Projectors: Three situated on tables at the right height and distance behind the screens.
Sensors: Distance and Kinect
TV screens
Right = BTS video
Left = Sound visualisation of MaxMSP
Not seen: TV screen in front of the door – this was a last minute decision to add based on previous group setup. Worked to our advantage.
Tables
Left: for the promotional material
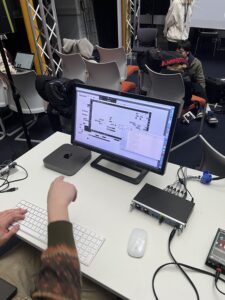
Middle: For sound equipment computer
Boxes
Middle: Blocking and dividing the space of interaction
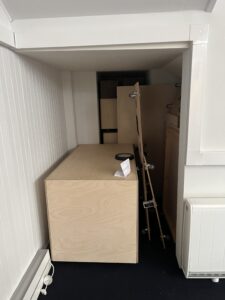
Right: smaller and taller box for the 3D model.
Not shown: Lighting.
Lighting
We knew that we needed lighting to show the 3D model and the promotional posters and postcards. Staying resourceful, we asked around our group to see who had a desk lamp that they could bring to the day of exhibition. Molly and David both had clamp-on desk lamps that worked perfectly for both. They were also a warm light, rather than cold as to not overpower the projections.
Equipment
Here is a list of the equipment used in the space (not including sound equipment).
Projectors
1 Optima Short throw projector and 2 Sony short throw
For me (although we had some mishaps) the exhibition was a success, I would love to be able to redo it again, with more time in our hands to fix all those things we initially wanted to do, but had to cut out because of our limited timeline. If we could, developing the first-person views of the audience going thru the whole stairs from top to bottom, and interacting with the movement with the sensors, making it travel time and space, would be ideal.
Dreaming big, in the future, it would be amazing if we can find a sponsor for the exhibition, and show it in a cultural space around Edinburgh, or even during the Fringe Festival.
Before this project, I had no prior experience with LiDAR technology and was unfamiliar with its applications. However, I became intrigued by its potential uses and decided to explore it further. Throughout the project, I have gained valuable knowledge on how to gather and manage cloud points using LiDAR, and have experimented with creating 2D and 3D variations of the cloud points.
I learned a great deal working with a multidisciplinary team, as it was my first time creating such a complete project with other disciplines. While my knowledge about sound was inexistent before the project, I have now learned useful information that could help me in future projects.
I think one of the best decisions I took this year was choosing this course. At first, I was not really sure, as I thought that working with such a big team was probably gonna be a problem, as it can be difficult for all to be on the same page. But after our initial first meeting, those fears went out the window. Truly I have never worked with such a great team, where everyone involved is so willing and excited to learn new things and give their best for the development of the project.
I want to thank each of my team members for all the hard work, and dedication put into this project. The sound task force, David, Chenyu, Xiaoqing, and YG, that created the most amazing immersive sound experience. The Touch Designer Team, Allison, Yijun, and Yuxuan for the amazing development they had of learning TD from scratch, as well as all their testing with Audruino. Molly for her leadership and with whom I made a great team working in the project management, and development of the final exhibition. I feel extremely proud of all that we achieved during this semester.
I also want to thank our tutor, Asad, for all his incredible mentorship, who helped us give structure to the crazy ideas we all had in our heads. And our course organizer Jules, for the support given to us to make the exhibition possible in the way we imagined it from the beginning.


 Creating a video walk-though of the space and narrating where exactly everything is going really helped on the day of exhibition to make the setup more efficient. Also visualising where the boxes for interactions would be in order to design the distance of tables and how we can block users from interfering with the sensors.